Snippets
Working with code snippets in an Ionic application
Introduction to Snippets
Some of the predefined events that are available for the App Builder come with the out-of-the-box snippets that can be used for:
- UI components (under the DESIGN panel): https://docs.appery.io/docs/snippets#defining-snippets-for-ui-components;
- Datasources (under the DATA panel): https://docs.appery.io/docs/snippets#defining-snippets-for-datasources;
- Functions (under the CODE panel): https://docs.appery.io/docs/snippets#defining-snippets-for-code-functions.
To get access to Appery.io code snippets, expand the EVENTS tab from the bottom.
The code snippets are blocks of JavaScript code implementing different useful functionality. Using snippets makes writing custom code easier.
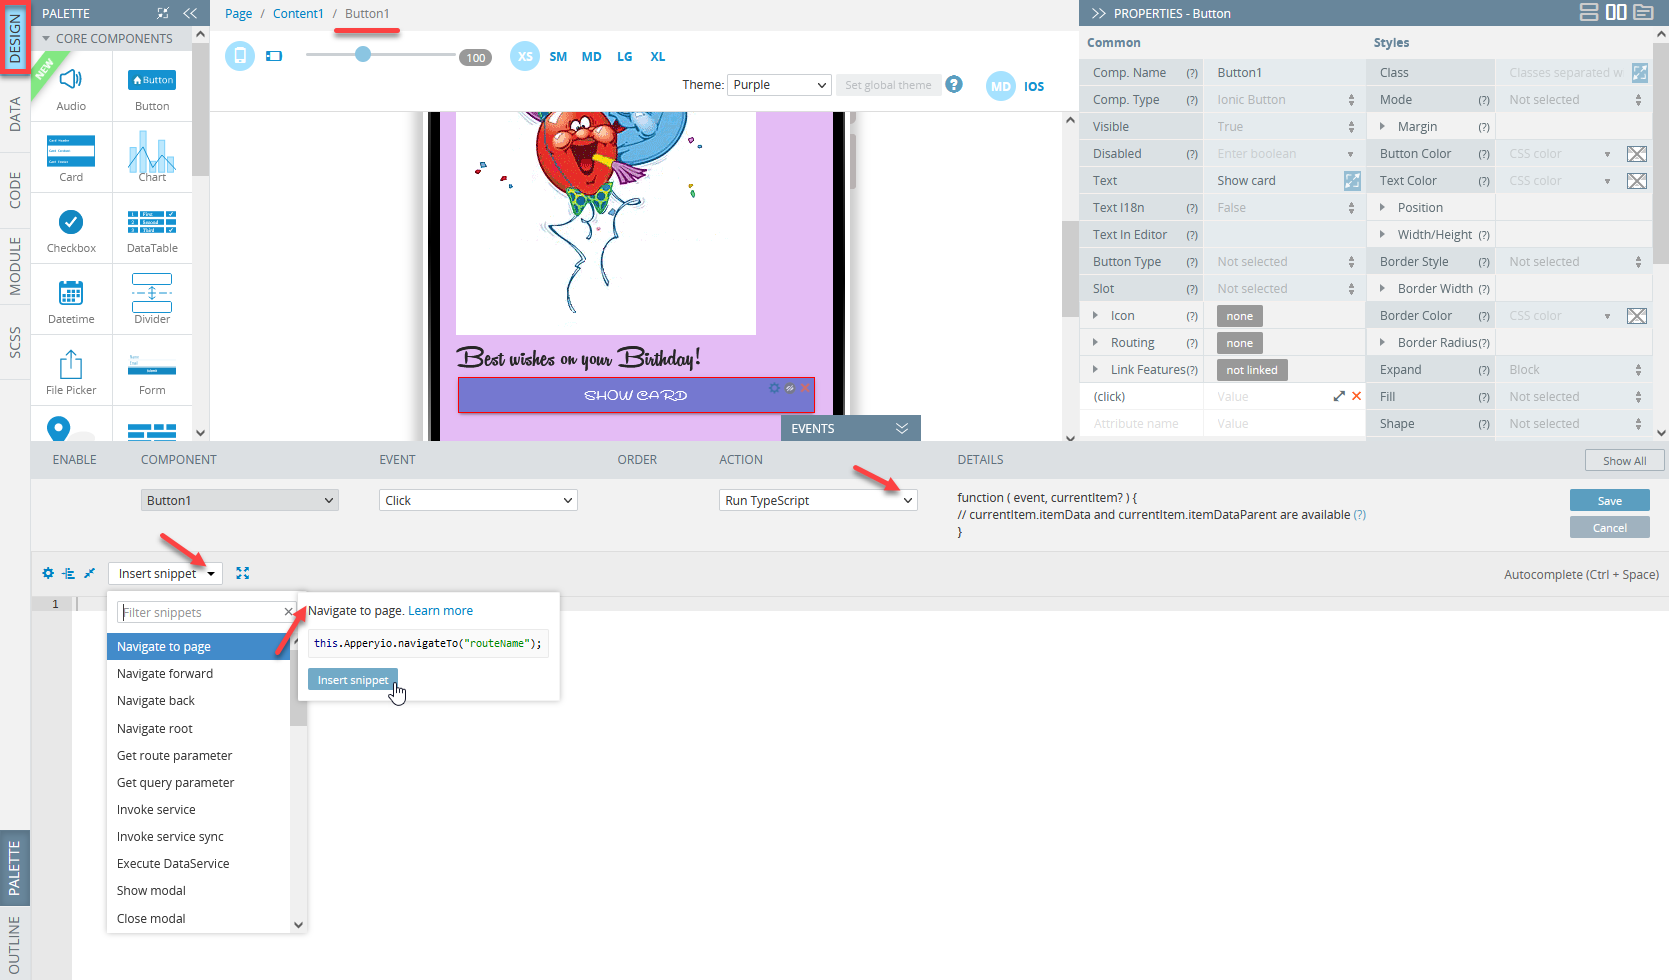
Defining Snippets for UI Components
Open the DESIGN panel and select the UI component to be defined.
For example, for the Button1 component Click event, select the Run TypeScript action.
Now, in the editor window, click Insert snippet and select the needed snippet from the list:
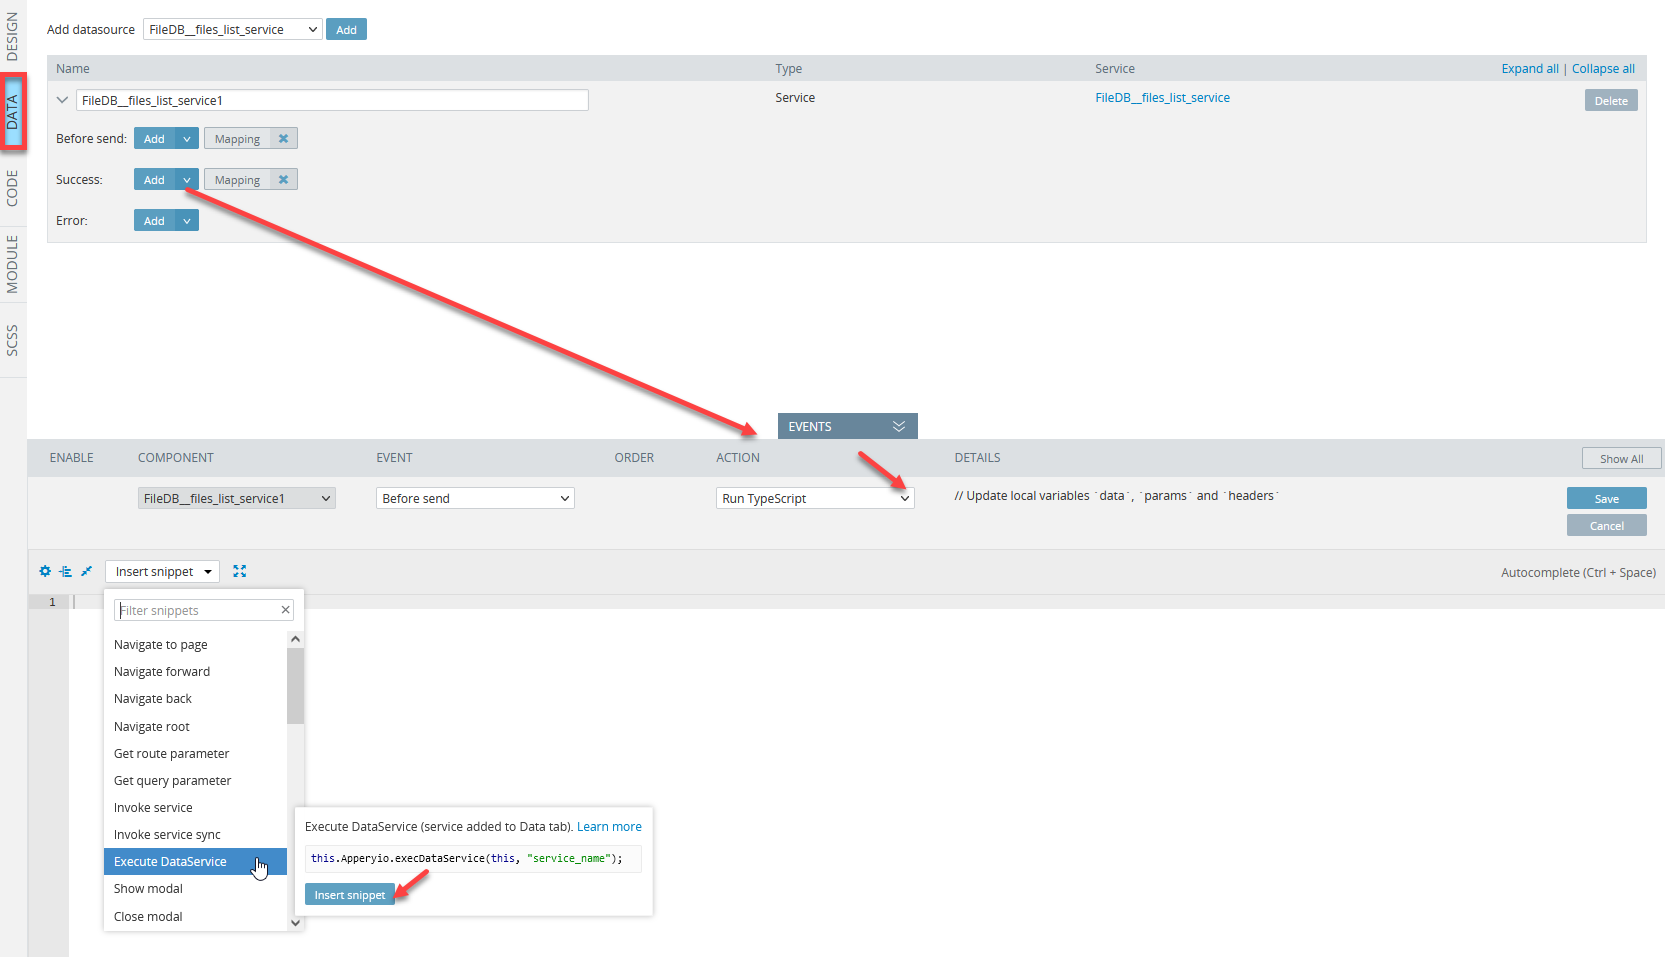
Defining Snippets for Datasources
Open the DATA panel, then select the datasource to be defined.
For example, for the loadGoods component Before send event, select the Run TypeScript action.
Now, in the editor window, click Insert snippet and select the needed snippet from the list:
Note
The list of snippets is the same for DESIGN and DATA events as well as for the CODE functions.
Defining Snippets for Code Functions
Open the CODE panel, create a Method, and add its argument, if needed.
From the list of snippets, select the needed one:
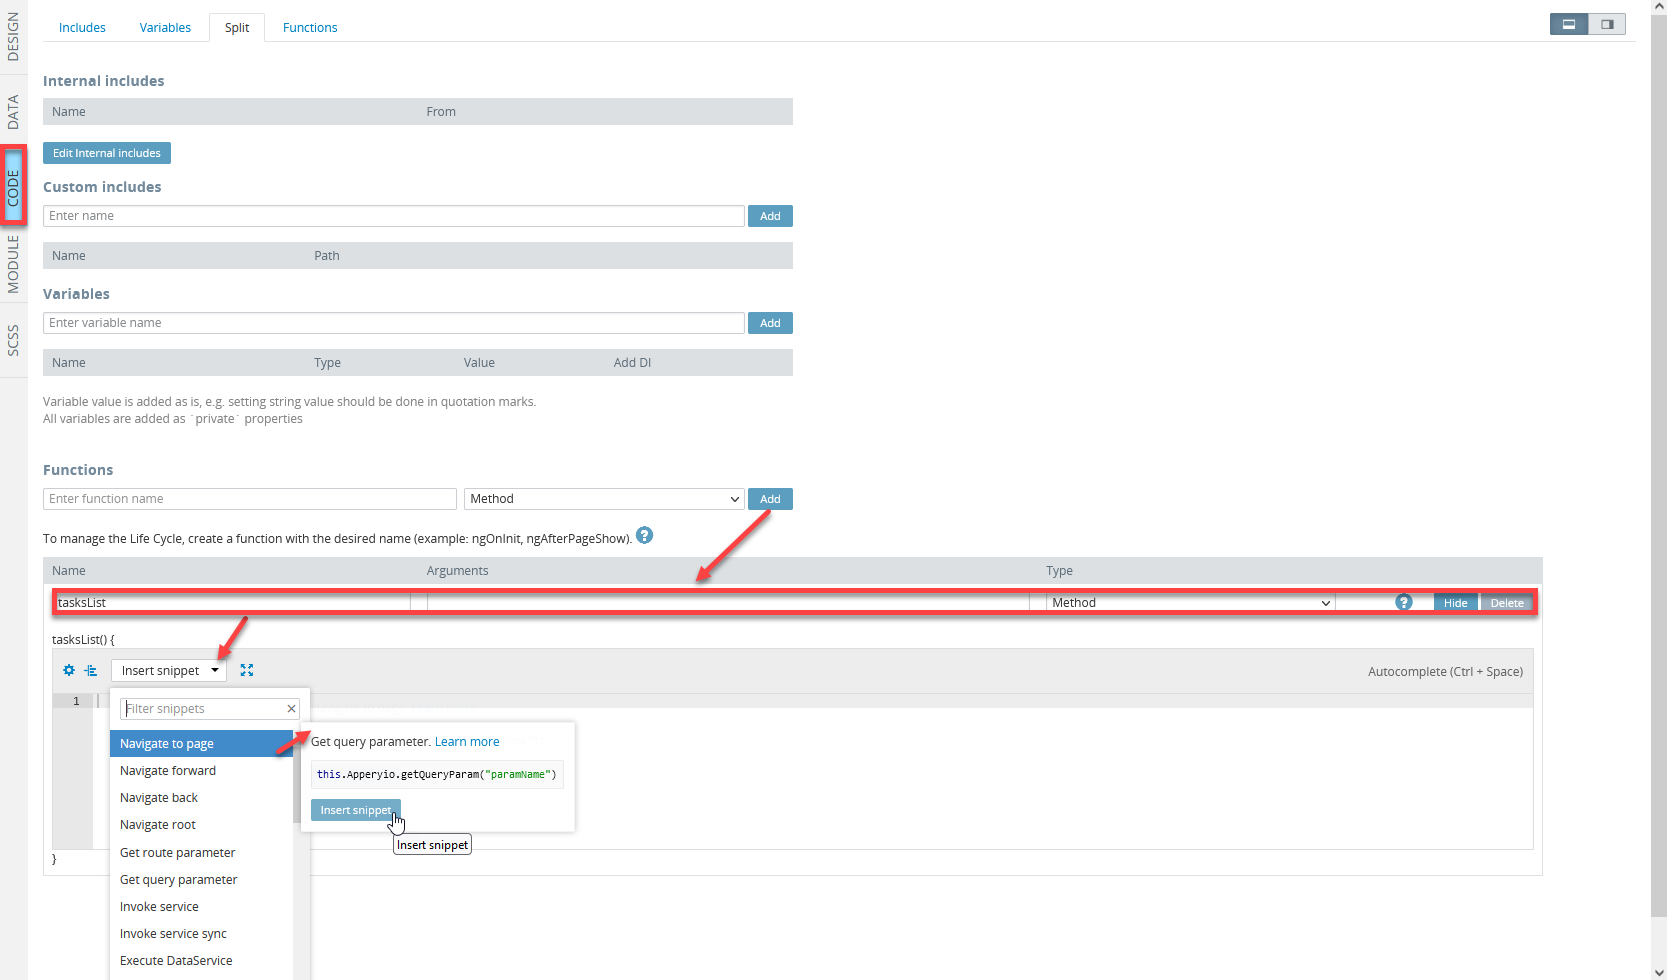
After a snippet is added, edits can be made to the code.
Tip!
You are free to use the helper that will assist in adding needed functions:
Angular Life Cycle Events
You can also check this guide covering how the page life cycle works in an app built with Ionic and Angular: https://ionicframework.com/docs/angular/lifecycle.
Also, you can insert more snippets into the function or replace strings of code.
Adding Services into the Code Function by Drag-and-Drop
One more way to implement functionality to your app is to add the needed services into the scope function via drag-and-drop.
Here is how it works:
Open the CODE panel and from the list of services on the left, drag the needed service and drop it into the function code window. This will automatically add the code of the service invocation.
Code Snippets
Below is the list of available snippets:
- Navigate to page
- Navigate forward
- Navigate back
- Navigate root
- Get route parameter
- Get query parameter
- Invoke service
- Invoke service sync
- Execute DataService
- Show modal
- Close modal
- Get controller
- Loading present
- Loading dismiss
- Toast present
- Toast dismiss
- i18n set language
- i18n get translation
- i18n get browser lang
- Get variable
- Set variable
- Get from storage
- Set to storage
- Remove from storage
- Preload ionic icons
- Preload ionic components
- Set theme
- Get current theme
- Reorder compete
- Get autoupdate version
- Get autoupdate server version
- Download latest autoupdate version
- Install latest autoupdate version
- Alert present
Navigate to page
This snippet is used for navigation between the application pages. The routeName argument is the route name specified on the Routing tab of the Project settings.
this.Apperyio.navigateTo("routeName"/*, optional, params, here */);
Every route is bound to its own page. Several routes can be bound to one page. The number of routes can be used when navigation is defined with parameters or without them depending on different conditions.
Parameters Sending
Parameters are used when simple data should be passed to the page at navigation through the URL.
Note that for sending complicated data (e.g. Objects) it is better to use alternative ways, for example, variables using the Set variable snippet before navigation and the Get variable snippet after navigation.
Data as parameters are passed as arguments following up the routeName argument.
The values of each parameter should be comma-separated.
Every parameter is set as a JavaScript expression with special syntax depending on the variable type:
| Parameter name | Data type | Value syntax |
|---|---|---|
id | Number | 123 |
name | String | 'john' |
active | Boolean | true |
The order of parameters should be the same as the order specified in the route Path.
For example, sending the parameters for the route with the profileId name and the path profile/:id/:name/:active:
this.Apperyio.navigateTo('profileId', 123, 'john', true);
If the passed parameter is an object, it should be converted to a string.
For example, sending the parameters for a route with the profileUser name and the path profile/:user:
const params = JSON.stringify({id: 123, name: 'john'}) // "{"id":123,"name":"john"}"
this.Apperyio.navigateTo('profileUser', params);
Parameters Receiving
Every parameter can be received by its name after navigation to a page.
If the parameter should be written in a variable specified on the CODE panel, you can use the Set variable action.
In other cases, you can use the Get route parameter snippet.
Navigate forward
Navigate to page with forward direction. You can set Route params, AnimationOptions and NavigationExtras, if needed:
this.Apperyio.navigation.forward("routeName"/*,[route, params, here], {NavigationExtras and AnimationOptions} */);
Navigate back
Navigate to page with back direction. You can set Route params, AnimationOptions and NavigationExtras, if needed:
this.Apperyio.navigation.back("routeName"/*,[route, params, here], {NavigationExtras and AnimationOptions} */);
Navigate root
Navigate to page with root direction and set the target page as a root page. You can set Route params, AnimationOptions and NavigationExtras, if needed:
this.Apperyio.navigation.root("routeName"/*,[route, params, here], {NavigationExtras and AnimationOptions} */);
Get route parameter
This code snippet is used for receiving parameters sent through the URL at navigation:
let paramName = this.Apperyio.getRouteParam("paramName");
In this case, the paramName argument should be replaced with the actual name of the route parameter specified in route Path. For example, receiving parameters for a route with the path profile/:id/:name/:active:
let id = this.Apperyio.getRouteParam("id");         // "123"
let name = this.Apperyio.getRouteParam("name");     // "john"
let active = this.Apperyio.getRouteParam("active"); // "true"
Note
Every parameter is converted to a string after it is received.
Convert parameters to the initial data type:
let paramId = this.Apperyio.getRouteParam("id");         // "123"
let paramActive = this.Apperyio.getRouteParam("active"); // "true"
let paramUser = this.Apperyio.getRouteParam("user");     // "{"id":123,"name":"john"}"

JSON.parse(paramId)     // 123
JSON.parse(paramActive) // true
JSON.parse(paramUser)   // {id: 123, name: "john"}
Get query parameter
This code snippet is similar to the Get route parameter snippet but can be used for receiving parameter values from queries. Use this code:
let param = this.Apperyio.getQueryParam("paramName");
Invoke service
This snippet allows users to write their own code for receiving data from a server:
this.Apperyio.getService("service_name").then(
    service => {
        if (!service) {
            console.log("Error. Service was not found.");
            return;
        }
        service.execute({
            data: {},
            params: {},
            headers: {}
        }).subscribe(
            (res: any) => {
                /* success */
                console.log(res);
            },
            (err: any) => {
                /* error */
                console.log(err)
            }
        )
    }
)
In the code above, the service_name is not the datasource name but the actual service name (e.g. app_login_service).
After the service is run and completed it returns the success or error result.
The result of the service is stored in the variable res or err.
The received result can be processed by some custom code added to the particular part of the snippet.
The sent request data can be passed by the data, params, or headers option of the snippet.
For example, add a code for navigation to a profile page after a user is logged in:
this.Apperyio.getService("app_login_service").then(
    service => {
        if (!service) {
            console.log("Error. Service was not found.");
            return;
        }
        service.execute({
            data: {
                username: "user",
                password: "pass"
            },
            params: {},
            headers: {}
        }).subscribe(
            (res: any) => {
                /* success */

                // get user id from server response
                const userId = res["_id"];

                // navigate to the profile page of the logged in user
                this.Apperyio.navigateTo("profile", userId);
            },
            (err: any) => {
                /* error */

                // navigate to the error page if something went wrong
                this.Apperyio.navigateTo("errorPage");
                console.log(err);
            }
        )
    }
)
Invoke service sync
This snippet allows users to write their own code for receiving data from a server.
The working of the snippet is similar to that of the Invoke service snippet. The difference is that the following code allows writing more sequential and readable code:
var service = await this.Apperyio.getService("service_name");
if (service) {
     try {
        var result = await service.execute({
            data: {},
            params: {},
            headers: {}
        }).toPromise();
    } catch (e) {
        /* error */
        console.log('error', e)
    }
} else {
    console.log("Error. Service was not found.");
}
/* success */
console.log(result);

/* following code */
In the code above, the service_name is not a datasource name but the actual service name (e.g. users_login_service).
After the service is run and completed it returns the success or error result. The result of the service is stored in a variable result or e.
The received result can be processed by some custom code written in a particular part of the snippet.
The sent request data can be passed by the data, params, or headers option of the snippet.
For example, write a code for navigation to a profile page after a user is logged in:
var service = await this.Apperyio.getService("app_login_service");
if (service) {
     try {
        var result = await service.execute({
            data: {
                username: "user",
                password: "pass"
            },
            params: {},
            headers: {}
        }).toPromise();
    } catch (e) {
        /* error */

        // navigate to the error page if something went wrong
        this.Apperyio.navigateTo("errorPage");
        console.log('error', e)
    }
} else {
    console.log("Error. Service was not found.");
}
/* success */

// check if the result exists
if (result) {
  // get user id from server response
  const userId = result["_id"];

  // navigate to the profile page of the logged in user
  this.Apperyio.navigateTo("profile", userId);
}

/* following code */
Execute DataService
This snippet executes a datasource service added in the DATA panel:
this.Apperyio.execDataService(this, "service_name");
In the code above, the service_name argument should be replaced with the actual datasource name:
this.Apperyio.execDataService(this, "service1");
Show modal
This snippet opens a modal page:
this.Apperyio.showModal("screenName", {
    componentProps: {},
    showBackdrop: true,
    backdropDismiss: true,
    cssClass: "",
    animated: true,
    keyboardClose: true
})
.then(modal => {
    modal.present();
    modal.onDidDismiss().then((dataReturned) => {
        // console.log(dataReturned.data);
    });
});
In the code above, the screenName argument should be replaced with the actual modal page name.
To set the page as a modal, define its Modal Screen property as True.
Info
Modal pages are based on the Ionic Modal component.
Options
The following options allow customizing the shown modal:
animated- if set to true, the modal will animate;backdropDismiss- if set to true, the modal will be dismissed when the backdrop is clicked;componentProps- data to pass to the modal component;cssClass- additional classes to apply for custom CSS. If multiple classes are provided they should be separated by spaces;keyboardClose- if set to true, the keyboard will be automatically dismissed when the overlay is presented;showBackdrop- if set to true, a backdrop will be displayed behind the modal.

Two more options can be added manually:
mode- determines which platform styles to use (ios or md);swipeToClose- if set to true, the modal can be swiped to dismiss. This only applies in the iOS mode.
Note that if the modal page has been added by using the Open modal page action, these options become available for editing by default:

Sending Data to a Modal Page
The componentProps is used for sending data to a modal page.
The option receives an object of data:
{
  componentProps: {
    name: 'john',
    age: 21
  }
}
To make data available on the modal page, it should be specified as variables on the CODE panel of the opened modal page.
The names of the created variables, in this case, should fully correspond with the actual names in the sent data object (e.g. name or age).
After the definition, the variables are available as:
this.name // 'john'
this.age  // 21
Receiving Data from a Modal Page
The data received from a modal page after its closing is available as a variable inside the onDidDismiss handler function specified at showing the modal page.
In the code above, such a variable has the name of dataReturned.
The variable contains an object with the data property that includes the data received from the modal page.
To close modal pages and send data from them, use the Close modal snippet.
To have the possibility of controlling the modal, use the ModalController controller received with the Get controller snippet.
Close modal
This snippet closes the opened modal page.
this.Apperyio.getController("ModalController").dismiss(/* data */);
To send data from a closed modal, pass data as an argument of the dismiss method of the snippet:
this.Apperyio.getController("ModalController").dismiss({
    name: 'john',
    age: 21
});
The sent data will be received in the onDidDismiss handler function specified at showing the modal page.
Receiving data from a modal page is described in the section Show modal.
Want to know more?
You can check this document to learn how to pass properties from a screen to a modal screen and back by using the corresponding snippets.
Get controller
This snippet gets a controller that allows applying special functionality to different components:
let controller = this.Apperyio.getController("ControllerName");
In the code above, the ControllerName argument should be replaced with one of the controller's names.
Available controllers are:
ActionSheetController;AlertController;PickerController;MenuController;ModalController;PopoverController;LoadingController;ToastController.
Note
Note that all controller methods return a Promise.
Wait until the method is completed:
await controller.dismiss();
Get the data returned by the method:
let result = await controller.dismiss();
ActionSheetController
Available methods are as follows:
dismiss()- dismisses the action sheet overlay after it has been presented;onDidDismiss()- returns a promise that resolves when the action sheet did dismiss;onWillDismiss()- returns a promise that resolves when the action sheet will dismiss;present()- presents the action sheet overlay after it has been created.
You can read more about ActionSheetController methods here.
AlertController
Available methods are as follows:
dismiss()- dismisses the alert overlay after it has been presented;onDidDismiss()- returns a promise that resolves when the alert did dismiss;onWillDismiss()- returns a promise that resolves when the alert will dismiss;present()- presents the alert overlay after it has been created.
You can read more about AlertController methods here.
PickerController
Available methods are as follows:
dismiss()- dismisses the picker overlay after it has been presented;getColumn()- gets the column that matches the specified name;onDidDismiss()- returns a promise that resolves when the picker did dismiss;onWillDismiss()- returns a promise that resolves when the picker will dismiss;present()- presents the picker overlay after it has been created.
You can read more about PickerController methods here.
MenuController
close()- closes the menu. If the menu is already closed or can't be closed, it returns false;isActive()- returns true if the menu is active;isOpen()- returns true if the menu is open;open()- opens the menu. If the menu is already open or it can't be opened, it returns false;setOpen()- opens or closes the button. If the operation can't be completed successfully, it returnsfalse;toggle()- toggles the menu. If the menu is already open, it will try to close. Otherwise, it will try to open it. If the operation can't be completed successfully, it returns false.
You can read more about MenuController methods here.
ModalController
dismiss()- dismisses the modal overlay after it has been presented;onDidDismiss()- returns a promise that resolves when the modal did dismiss;onWillDismiss()- returns a promise that resolves when the modal will dismiss;present()- presents the modal overlay after it has been created.
You can read more about ModalController methods here.
PopoverController
dismiss()- dismisses the popover overlay after it has been presented;onDidDismiss()- returns a promise that resolves when the popover did dismiss;onWillDismiss()- returns a promise that resolves when the popover will dismiss;present()- presents the popover overlay after it has been created.
You can read more about PopoverController methods here.
LoadingController
dismiss(options)- dismisses the loading overlay after it has been presented;onDidDismiss()- returns a promise that resolves when the loading did dismiss;onWillDismiss()- returns a promise that resolves when the loading will dismiss;present()- presents the loading overlay after it has been created.
You can read more about LoadingController methods here.
ToastController
dismiss(options)- dismisses the toast overlay after it has been presented;onDidDismiss()- returns a promise that resolves when the toast did dismiss;onWillDismiss()- returns a promise that resolves when the toast will dismiss;present()- presents the toast overlay after it has been created.
You can read more about ToastController methods here.
Loading present
This snippet shows loading on the page.
info
Loading is based on the Ionic Loading component.
this.Apperyio.getController("LoadingController").create({
    message: 'Please wait...',
    spinner: 'crescent',
    duration: 2000
}).then(loading => loading.present());
Options
Options that allow customizing the showed loading:
animated- if set to true, the loading indicator will animate;backdropDismiss- if set to true, the loading indicator will be dismissed when the backdrop is clicked;cssClass- additional classes to apply for custom CSS. If multiple classes are provided they should be separated by spaces;duration- number of milliseconds to wait before dismissing the loading indicator;keyboardClose- if set to true, the keyboard will be automatically dismissed when the overlay is presented;message- optional text content to display in the loading indicator;mode- determines which platform styles to use (ios or md);showBackdrop- if set to true, a backdrop will be displayed behind the loading indicatorspinner- the name of the spinner to display;translucent- if set to true, the loading indicator will be translucent. Only applies when the mode is set to ios and the device supports backdrop-filter.
Available spinner names are circles, circular, crescent, dots, lines, lines-small, null or undefined.
To hide loading, use the Loading dismiss snippet.
To have the possibility of controlling the loading, use the LoadingController controller received with the Get controller snippet.
Loading dismiss
This snippet hides loading on the page:
this.Apperyio.getController("LoadingController").dismiss();
Toast present
This snippet shows a toast on the page:
info
Toast is based on the Ionic Toast component.
this.Apperyio.getController("ToastController").create({
    header: 'Toast header',
    message: 'Click to Close',
    position: 'top',
    buttons: [{
        side: 'start',
        icon: 'star',
        text: 'Favorite',
        handler: () => {
            console.log('Favorite clicked');
        }
    }, {
        text: 'Done',
        role: 'cancel',
        handler: () => {
            console.log('Cancel clicked');
        }
    }]
}).then(toast => toast.present());
Options
Options that allow customizing the showed toast:
animated- if set to true, the toast indicator will animate;buttons- an array of buttons for the toast;color- the color to use from your application's color palette;cssClass- additional classes to apply for custom CSS. If multiple classes are provided they should be separated by spaces;duration- how many milliseconds to wait before hiding the toast. By default, it will show untildismiss()is called;header- header to be shown in the toast;keyboardClose- if set to true, the keyboard will be automatically dismissed when the overlay is presented;message- message to be shown in the toast;mode- determines which platform styles to use (ios or md);position- the position of the toast on the screen;translucent- if set to true, the toast will be translucent. This only applies when the mode is ios and the device supports backdrop-filter.
Default color options are: primary, secondary, tertiary, success, warning, danger, light, medium, and dark.
The default position options are: bottom, middleor top.
To hide the toast use the Toast dismiss snippet.
To have the possibility of controlling the toast, use the ToastController controller received by the Get controller snippet.
Buttons options:
text- text of the button;icon- Ionic icon name to display in the close button;side- position (start or end) inside the toast where the close button will be shown;role- role of the element that is dismissing the toast. This can be useful in a button handler for determining which button was clicked to dismiss the toast (e.g. cancel or ok);cssClass- additional classes to apply for custom CSS. If multiple classes are provided they should be separated by spaces;handler- function invoking after clicking on the button.
Toast dismiss
This snippet hides a toast on the page
this.Apperyio.getController("ToastController").dismiss();
i18n set language
This snippet changes the language currently used:
this.Apperyio.translate.use("lang_name");
In the code above, the lang_name argument should be replaced with the actual language with the created dictionary for it (e.g. en).
You can read more here.
Want to know more?
You can check thistutorial that demonstrates how to use the i18n set language snippet and the ngx-translate third-party internationalization (
i18n) library for building a multilingual Ionic app.
i18n get translation
This snippet gets the instantly translated value of a key (or an array of keys):
this.Apperyio.translate.instant("key"/*, interpolateParams*/);
The interpolateParams argument is an object of data that replaces variables of dictionaries.
You can read more here.
i18n get browser lang
This snippet gets the current browser language if available or throws undefined otherwise:
this.Apperyio.translate.getBrowserLang();
You can read more here.
Get variable
This snippet gets a global variable:
let val = this.Apperyio.data.getVariable("varName");
In the code above, the varName argument should be replaced with the actual variable name
Note that the snippet returns undefined unless the value of the variable with the same name is defined with the Set variable snippet.
For example, you can create a global variable and use it where needed using this helper:
Apperyio.data.getVariable("myBoolVar1")
Check the screenshots below for how to do it:


To add this variable, use the Set variable snippet.
Set variable

This snippet sets a global variable:
this.Apperyio.data.setVariable("varName", "some value");
In the code above, the varName argument should be replaced with the actual variable name, and some value should be replaced with the data used as the variable value.
The value of the variable can be read with the Get variable snippet.
Get from storage
This snippet gets data from the storage specified in the Project > Model and Storage > Storage section.
info
Storage is based on Data Storage.
let val = await this.Apperyio.data.getStorage("storName");
In the code above, the storName argument should be replaced with the actual storage name.
If no specified storage value is set, the snippet returns null.
Set to storage
This snippet sets data to the storage specified in the Project > Model and Storage > Storage section.
info
Storage is based on Data Storage.
await this.Apperyio.data.setStorage("storName", "some value");
In the code above, the storName argument should be replaced with the storage name and some value should be replaced with the data used as the storage value.
Remove from storage
This snippet removes the storage specified in the Project > Model and Storage > Storage section.
info
Storage is based on Data Storage.
await this.Apperyio.data.removeStorage("storName");
In the code above, the storName argument should be replaced with the actual storage name.
Preload ionic components
This snippet preloads some Ionic components (for example alert, select, etc., or the components that are initially hidden on the page (with *ngIf)) to get rid of delays when a component/overlay is shown for the first time.
It can be selected for the Run TypeScript action.
this.Apperyio.preload.components([/*"ion-modal"*/]);
Preload ionic icons
This snippet preloads some Ionic Icons to get rid of delays when a component/overlay is shown for the first time.
It can be selected for the Run TypeScript action.
this.Apperyio.preload.icons([/*"alarm"*/]);
Set theme
This snippet allows setting the needed color theme. The theme name needs to be provided:
this.Apperyio.theme.set("themeName");
Get current theme
This snippet applies the currently selected color theme.
let themeName = this.Apperyio.theme.getCurrent();
Reorder complete
This snippet completes the ReorderGroup component data and can be selected for the Run TypeScript action:
// console.log('Dragged from index', event.detail.from, 'to', event.detail.to);
// change the 'list' to the name of created variable with array of reorder items
// this.list = event.detail.complete(this.list);
event.detail.complete();
Appery.io has the Automatic app update feature, which means you can update apps that your end-users have already installed on the device and this can be done without going through an app store.
But in some cases, you may want to control the update flow from the JavaScript side. For this, we offer the following options:
- Get autoupdate version
- Get autoupdate server version
- Download latest autoupdate version
- Install latest autoupdate version.
Get autoupdate version
On every launch, this snippet will check the client autoupdate version:
// return an object with properties:
// status - indicates whether the getAutoupdateVersion call was successful,
//          available value: "Success" or "Error"
// data - shows the autoupdate version, if the 'status' is set to "Success"
// message - shows the error message if the 'status' is set to "Error"
const data = await this.Apperyio.hotPush.getAutoupdateVersion();
if (data.status === "Error") {
    console.log(data.message)
} else {
    console.log(data.data)
};
Get autoupdate server version
This plug-in connects to your server on startup and checks the server autoupdate version:
// return an object with properties:
// status - indicates whether the getAutoupdateServerVersionSync call was successful,
//          available value: "Success" or "Error"
// data - shows the autoupdate server version, if the 'status' is set to "Success"
// message - shows the error message if the 'status' is set to "Error
const data = await this.Apperyio.hotPush.getAutoupdateServerVersionSync();
if (data.status === "Error") {
    console.log(data.message)
} else {
    console.log(data.data)
};
Download latest autoupdate version
To automatically download the update to the device, use the following method:
// return an object with properties:
// status - indicates whether the autoupdateDownloadLatestVersion call was successful,
//          available value: "Success" or "Error"
// data - shows the latest autoupdate version, if the 'status' is set to "Success"
// message - shows the error message if the 'status' is set to "Error
const data = await this.Apperyio.hotPush.autoupdateDownloadLatestVersion();
if (data.status === "Error") {
    console.log(data.message)
} else {
    console.log(data.data)
};
Install latest autoupdate version
Use this method to install the latest autoupdate version on the device:
// return an object with properties:
// status - indicates whether the autoupdateInstallLatestVersion call was successful,
//          available value: "Success" or "Error"
// message - shows the error message if the 'status' is set to "Error
const data = await this.Apperyio.hotPush.autoupdateInstallLatestVersion();
if (data.status === "Error") {
    console.log(data.message)
} else {
    console.log(data.status)
};
Alert present
This snippet creates and shows an Alert component based on the Ionic Alert component:
await (async () => {
    let options = {
        // additional classes to apply for custom CSS
        // if multiple classes are provided they should be separated by spaces
        'cssClass': '',
        // the main title in the heading of the alert
        'header': 'Alert header',
        // the main message to be displayed in the alert.
        // message can accept either plaintext or HTML as a string.
        // to display characters normally reserved for HTML, they must be escaped
        'message': 'message',
        // the subtitle in the heading of the alert. Displayed under the title
        'subHeader': 'Alert sub header',
        // array of buttons to be added to the alert (string | AlertButton)
        'buttons': ['OK']
    }
    let controller = this.Apperyio.getController('AlertController');
    const alert = await controller.create(options);
    return await alert.present();
})();
You are free to customize the alert properties like header, subheader, and/or message.
Updated 12 months ago