Building a pizza app with Ionic & AngularJS
Important Note!Note that the option of creating new apps with the Ionic framework was removed but we still support the projects that were created with it earlier.
Introduction
In this tutorial, you’ll learn how to build a mobile app using the Appery.io Ionic/AngularJS version. If you are not familiar with these frameworks, we recommend that you read the following documentation about AngularJS and Ionic. In this application, a user can view a pizza menu and suggest a new pizza recipe. This app uses the Appery.io databases and shows you an example of using AngularJS.
Try It Yourself
Attachments
- Exported database collections as
.jsonfiles (download .zip archive).
You have to create the database manually as described in the section below. If you’ve already created the database, find the X-Appery-Database-Id and paste it into the PizzaDatabase_settings > database_id.
Creating a New App
Important Note!Note that the option of creating new apps with the Ionic framework was removed but we still support the projects that were created with it earlier.
In this step you will create a new Ionic app.
- To create a new app, from the Apps page, click Create new app, the Ionic tab should be opened and the Blank template selected.
- For app name enter Ionic Pizza and click Create.
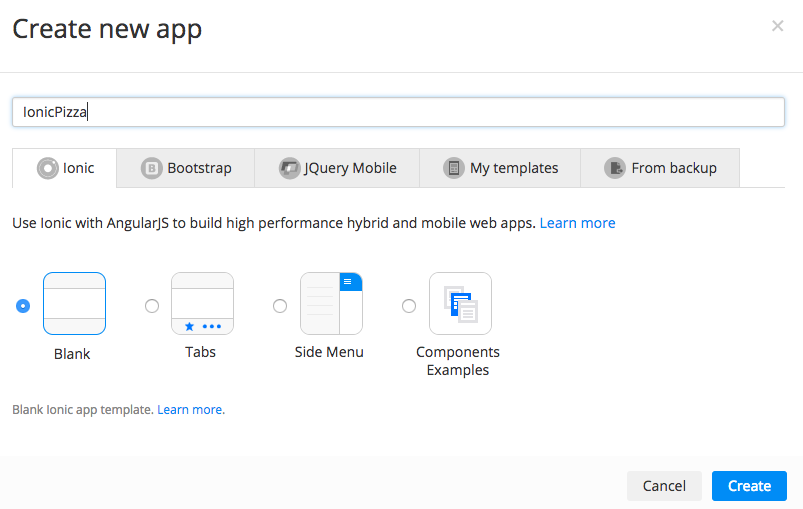
New Ionic app.
The App Builder will open and load the newly created Ionic app.
Creating App Pages
The app already has an index and Screen1 pages by default. You are going to rename the default page and add one more pages.
- Rename Screen1 to PizzaMenu by clicking the gear icon when you hover over the page name and selecting Rename.
- Go to Create new > Page and create a PizzaCreator page. Blank Ionic page template should be selected.
Creating a Modal Window
One more page you are going to create is a Modal window.
- Select Create new > Modal.
- For name enter Info and click Create Modal*.
- Select its Header and set the property Text to the following value:
Save info. - Drag a Text component to Modal, set its property Text to the following value:
{{result}}.
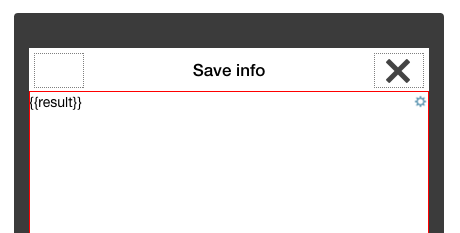
Modal panel.
Setting App Navigation (Routing
Routing (navigation) is needed to allow the page content to be displayed in the ng-view component of index page.
- Go to Project > Routing.
- Set Route name to menu for PizzaMenu page.
- Set Route name to creator for PizzaCreator page.
Your routing should look like this:
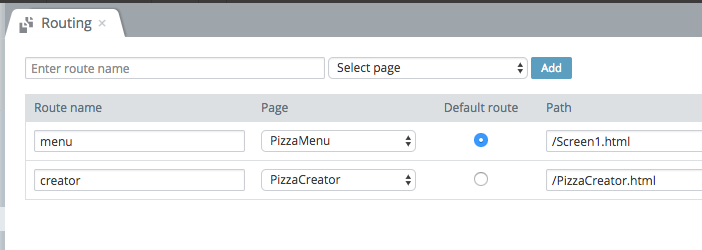
Routing.
Creating App Model
An Ionic page is usually bound (connected) to a model. In this step you are going to create a model that you will use a little bit later.
- Go to Project > Model.
- Add the following model items:
- Array – type Array.
- Object – type Object.
- List – type Array (with the item type Object).
- Wrapper – type Object (with the item type Object).
The model should look like this:

That's all for the model part.
You are done with the app UI for now. Now you are going to work on the app backend.
Creating a Database
To start creating the app database, click on Database in the App Builder (upper right corner), or simply go to https://appery.io/database.
- Create a new database and name it PizzaDatabase.
- Once the database has loaded, create a new collection called Menu.
Import the DatabaseInstead of creating collections manually, you can download the .zip archive and unzip it. There are exported Menu and Ingredients collections as .json files. Just click Import a collection, type its name, and click Choose file to select the previously unzipped files.
- Add new columns to the Menu collection called:
- name (string).
- price (number).
- consist (array).
- Click +Row to add a new pizza to the menu.
- Create a new collection called Ingredients.
- Add new columns to the Ingredients collection called:
- name (string),
- price (number).
- vol (number).
- Click +Row to add a new ingredient to the collection.
- Create a collection called CustomPizza
- price (number).
- consist (array).
Importing Database Services into the App
Now that you are done with the database, the next step is to import database services into the app.
- Inside the App Builder, go to Create new > Database Services.
- Expand the Menu collection and check the List service.
- Expand the Ingredients collection and check the List service.
- Expand the CustomPizza collection and check the Create service.
- Click Import selected services and the services will be added under in Services folder.
Now that you have imported the services into the app, the next step is to design the pages.
Building the index Page
The index page is the main app page that contains the common components for all of the pages. The other pages’ content will be displayed in the ng-view component, this can be set via Routing.
Page Design
To design the index page:
- Select the Header and set its Text property to Pizza Delivery, set Color to balanced.
- Select the Footer and set its Text property to Pizza Delivery, set Color to balanced.
- Select an index page (via the breadcrumbs) and set Controls Top > Tabs to True.
- Select Tabs and set Color to dark.
- Select the first TabsItem, set Text to Menu, and set ng-click to the following value:
goTo('menu'). - Select the second TabsItem, set Text to Pizza Creator and set ng-click to the
goTo('creator').
That's it for index page design.
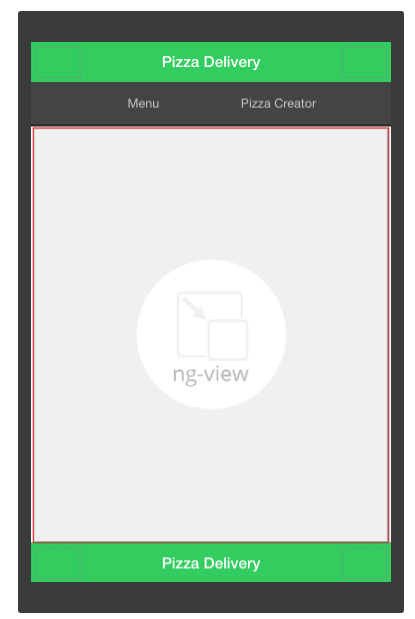
index page design.
Creating a Scope Function for Navigation
Now you are going to setup a scope function to help with navigation.
- Switch to the Scope tab on the index page.
- Add the function goTo(page) with the following code:
Apperyio.navigateTo(page);Building the Menu Page
The PizzaMenu page contains a list of pizzas and allows users to view their prices and ingredients.
Page Design
To design the page:
- Drag the List component to the page from the Palette. It contains three items, remove two of them (hover the mouse over an item and click on the red x).
- Select the remaining List Item and set its Type property to Linked. Add the ng-repeat property and set it to item in list.
- Set List Item property Text to the following value:
{{item.price | currency}} - Set List Item property Title to the following value:
{{item.consist.toString()}} - Set List Item property Heading > Text to the following value:
{{item.name}}.
The page should look like this:
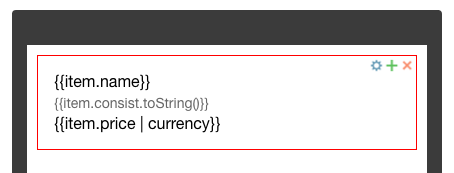
PizzaMenu page.
Setting Up Page Scope
Switch to the Scope tab on the Menu page.
- Add a variable list of type List.
- Open the init() function.
- Select the Pizza_Menu_list_service (from the left) and drag inside the editor.
- Inside of function(success) {} click on *CLICK TO EDIT MAPPING**.
- Create the following mapping:

Mapping.
- Click Save & Replace.
- The code for init() function should look like this:
//On load screen logic
var requestData = {};
    /*CLICK TO EDIT MAPPING*/

// read more about using rest services: https://links.appery.io/ve-snippet-rest
Apperyio.get("Pizza_Menu_list_service")(requestData).then(
function(success){ // success callback
    (function mapping7581(success, $scope){
        var list_scope = $scope.list;
        list_scope = success.data;
        $scope.list = list_scope;
        /*CLICK TO EDIT MAPPING*/
    })(success, $scope);

},
function(error){ // callback to handle request error

},
function(notify){ // notify callback, can fire few times

});
Good job. You are done with the PizzaMenu page. Next you are going to work on the PizzaCreator page.
Building the PizzaCreator Page
The PizzaCreator page allows users to create a custom pizza recipe and submits it to an administrator review.
Design
- Add Form and Grid below the Form to a page.
- Set Form property Style = Card.
- Add Select to Form and set its property Text = Ingredients. Double click Options and remove two of them.
- Select Options and set its property ng-model = selected.item and set ng-options to the following value:
item.name for item in listPlease read more about ng-model here and ng-options here.
- Add a Button under the Select, and set its properties to Text = Add, Width = Full, ng-click = addItem(), Color = Positive, Icon > Style = ion-plus-circled.
- Add the second row to the Grid. Add the third cells to both rows, set the proprties of the two first cells to Width = 67%.
- Add Text component to each Grid Cell.
- The first row is a Grid header. Set the Text properties to Name, Price and Vol.
- For the second row set the following Text property values:
{{item.name}}
{{item.price | currency}}
{{item.vol}} gm- Select the second row and set its property to ng-repeat in the following value:
item in customList track by $index- Add a Text component under the Grid and set its property Text to the following value:
{{customPizza.price | currency}}- Add a Button component and set its properties Text = Save, Width = Full, Color = Positive, Icon > Style = ion-upload.
- Set the ng-click property to the following value:
savePizza()Scope
Switch to the SCOPE tab on the PizzaCreator page.
- Add a variable customPizza of type Object.
- Add a variable customList of type Array.
- Add a variable list of type List.
- Add a variable selected of type Wrapper.
- Open the init() function.
- Initialize variables:
$scope.customPizza.price = 0;
$scope.customPizza.consist = [];- In the editor click the arrow to filter snippets, select Invoke service, and click Insert snippet.
- Now, click Backspace, then CTRL + Space and select pizzaDatabase_Ingredients_list_service (you can also enter it manually).
- Click the second Mapping button and create the following mapping:

- The first arrow saves an ingredients list to the variable list. The second one writes the null array item to selected.item.
- Click Save & Replace.
- Here is the generated code of the function init():
$scope.customPizza.price = 0;
$scope.customPizza.consist = [];

var requestData = {};

Apperyio.get("pizzaDatabase_Ingredients_list_service")(requestData).then(

    function(success) {

        var selected_scope = $scope["selected"];
        var list_scope = $scope["list"];
        selected_scope.item = success.data[0];
        list_scope = success.data;
        $scope["selected"] = selected_scope;
        $scope["list"] = list_scope;

    },
    function(error) {

});- Add the function addItem() with the following code:
$scope.customList.push($scope.selected.item);
$scope.customPizza.price += $scope.selected.item.price;
$scope.customPizza.consist.push($scope.selected.item.name);- Add a function savePizza() and open it.
- Specify the default values:
$scope.customPizza.about = "Custom pizza";
$scope.customPizza.name = "Custom pizza name";- In the editor click the arrow to filter snippets, select Invoke service, and click Insert snippet.
- Click Backspace, then CTRL + Space and select pizzaDatabase_CustomPizza_create_service (you can also enter it manually).
- Click the request Mapping button right after the variable requestData, and create the following mapping:

- Click Save & Replace.
- Set cursor to the function(success) {...} after the Mapping button and click the arrow to filter snippets then click Open Modal Page.
- Click Backspace, then CTRL + Space, and the name of the only Modal that is pasted automatically.
- Before calling modal.show() write a text message:
modal.scope.result = "Thank you! Your pizza recipe was successfully sent to us.";- Set the cursor to the function(error) {...} and click the arrow to filter snippets then click Open Modal Page.
- Click Backspace, then CTRL + Space, and the name of the only Modal that is pasted automatically.
- Before calling modal.show() write the message text:
modal.scope.result = "error";- Here is the generated code of the function savePizza():
$scope.customPizza.about = "Custom pizza";
$scope.customPizza.name = "Custom pizza name";

var requestData = {};

requestData.data = Apperyio.EntityAPI('pizzaDatabase_CustomPizza_create_service.request.body', undefined, true);

var customPizza_scope = $scope["customPizza"];
requestData.data = customPizza_scope;

Apperyio.get("pizzaDatabase_CustomPizza_create_service")(requestData).then(

    function(success) {

        var modalOptions = {
            animation: 'slide-in-up',
            focusFirstInput: false,
            backdropClickToClose: true,
            hardwareBackButtonClose: true
        };

        Apperyio.get('Modals').loadModal("Modal").then(
            function(modalInstance) {
                modalInstance.open(modalOptions).then(function(modal) {
                    modal.scope.modal = modal;
                    modal.scope.result = "Thank you! Your pizza recipe was successfully sent to us.";
                    modal.show();
                });
            },
            function(error) {
                console.log(error);
            });
    },
    function(error) {
        var modalOptions = {
            animation: 'slide-in-up',
            focusFirstInput: false,
            backdropClickToClose: true,
            hardwareBackButtonClose: true
        };

        Apperyio.get('Modals').loadModal("Modal").then(
            function(modalInstance) {
                modalInstance.open(modalOptions).then(function(modal) {
                    modal.scope.modal = modal;
                    modal.scope.result = "error";
                    modal.show();
                });
            },
            function(error) {
                console.log(error);
            });


    });
Binding
Open BINDING to view the links between the variables and properties:
Testing The App
It’s time to test the app. Click TEST and the Menu should open.
Navigate to PizzaCreator to create your own pizza. Add the ingredients you like.
After your recipe is ready click the button to send it to the database. Your pizza app is ready and looks tasty!
