In this guide, we will demonstrate how you can create a development environment to use it for debugging the changes you have made for your app's next release without endangering the app version in production.
Important Note!Note that the option of creating new apps with the Ionic 4 framework was removed and we no longer support the projects that were created with it earlier.
Moreover, you are free to effortlessly migrate your Ionic 4 project(s) to their Ionic version with keeping both apps active.
Please check this page to learn how to do it.
Introduction
After you have successfully released the first stable version of your app into App Store or Google Play, you will inevitably face the "What next?" question.
Most developers still have loads of features on the waiting list to be added to the app in production and wonder how that can be done without breaking working REST services and introducing a lot of problems for the existing app users. Therefore, another question "How to introduce new app features without breaking the working app?" arises.
The answer is simple: by adding a development environment. You can clone the existing database and server code so that they become development database and development server code and experiment with your app safely adding new features there. An only after they have been properly tested and are ready to be rolled out, you can safely propagate those changes into the production versions.
Important noticeNote that you should carefully track which collections you added into the new database instance and which server codes were changed.
Also, you should avoid breaking changes in your REST API in one moment since you cannot assume that all your users will update their version of the app from the stores immediately so that there be a time frame when some users will use app version 1 while others will still be using app version 2.
None of them will welcome any problems with your app.
Before You Start
- Tutorial level: expert.
- Prerequisites: an Appery.io account.
Creating Development Environment for Ionic ProjectsWe strongly recommend that you check our upgraded document Creating Development Environment for Ionic Projects created with Ionic here!
Production Settings
Suppose we have an Appery.io project named ProdEnvironment with the integrated login service.
Also, on the server side, we have the database named prodDB and the server code login_v1 that is set up with Settings_v1 library and connected to our app.
Our aim is to update the server-side data and logic without breaking the lifecycle of the app in production. To achieve this, we can use the approach of multiple environments.
The current prodDB database has a user User_prod in its Users collection:

prodDB Users collection
And the current login implementation of the login_v1 server code is:
var DB_ID = '<APPERY-IO-prodDB-ID>';
try {
    var requestBody = JSON.parse(request.requestBody);
    var username = requestBody.username;
    var password = requestBody.password;

    var result = DatabaseUser.login(DB_ID, username, password);

    response.success(result, "application/json");
} catch(e) {
    response.error({ status: 'error', message: e.message }, 401);
}
In this code,<APPERY-IO-prodDB-ID>is your production database id. It can be found in the App Builder editor URL or under Databases > Settings > API Keys.
Cloning App Data
- The first step is cloning the existing prodDB database. Under its Settings tab, click the Clone button and rename the new DB to devDB. This is the DB that will get new updates.
- In the cloned database Users collection, add a new user User_dev (with setting password) that doesn’t exist in ProdDB. Also, delete the cloned User_prod user:

devDB Users collection
- We also need to clone the login_v1 server code. Go to the login_v1 Settings tab and click Clone. In the new window, provide a new name for this new server code, for example, login_v2 and confirm the operation. This server code will have the updated logic and be related to the devDB database.
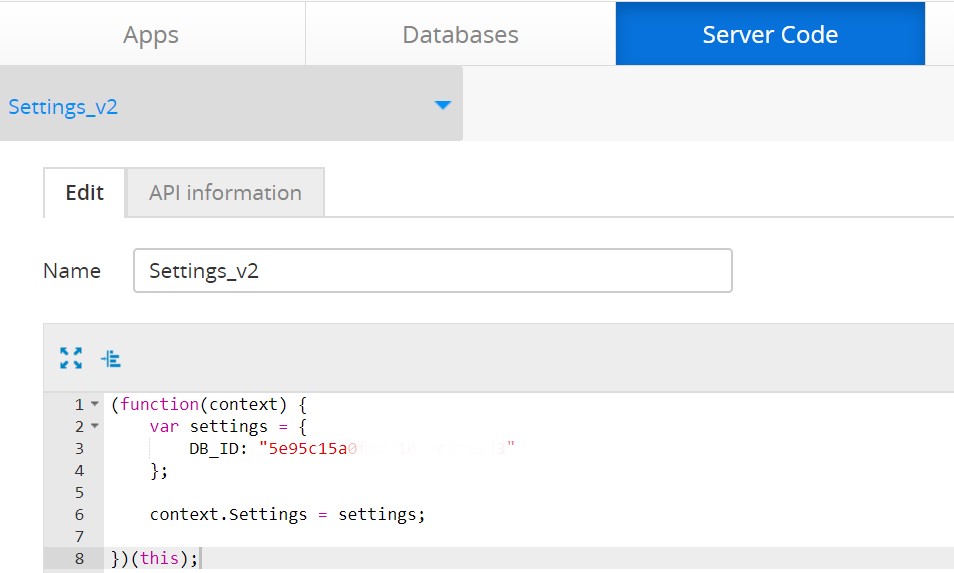
- Create a new server code library named Settings_v2. This common server code will contain an identifier to connect the new server code with the new devDB database.
(function(context) {
    var settings = {
        DB_ID: "<APPERY-IO-devDB-ID>"
    };

    context.Settings = settings;

})(this);
In this code,<APPERY-IO-devDB-ID>is your development database id. It can be found in the App Builder editor URL or under Databases > Settings > API Keys.
5, Open the new login_v2 server code. Go to its Dependencies tab and select Settings_v2 library. Go back to the Script tab and put the new code as shown on the screenshot below, then save:
try {
    var requestBody = JSON.parse(request.requestBody);
    var username = requestBody.username;
    var password = requestBody.password;

    var result = DatabaseUser.login(Settings.DB_ID, username, password);

    response.success(result, "application/json");
} catch(e) {
    response.error({ status: 'error', message: e.message }, 401);
}
As you can see from this code, we will now use Settings.DB_ID for login. It’s the DB_ID from the Settings_v2 dependency. If using the same approach of connecting with the DB for other scripts, we can easily switch between databases in all server code scripts in the development stage. To switch a DB, setting other DB_ID in the Settings_v2 script is required.
Modifying App Logic
- Let’s update the Appery.io project ProdEnvironment so that it could support multiple environments. Open Services > Settings in the Project view. Add a new parameter: environment with v1 as its default value:

By using the environment variable, we will be able to control which server code and DB will be in use in our app.
2. Next, we have to create an environment control manager. To do it, click CREATE NEW > TypeScript under the Project view of the Appery.io editor. Enter environmentControlManager for the name and confirm:

TypeScript environmentControlManager
- Add the following code to the script:
import { HttpClient, HttpParams } from '@angular/common/http';
import { Injectable } from '@angular/core';
import { ApperyioHelperService } from '../apperyio/apperyio_helper';
@Injectable()
class EnvironmentControlManager {
private environments = {
"v1":{
"loginAlias": "login_v1"
},
"v2":{
"loginAlias": "login_v2"
}
}
constructor(private Apperyio: ApperyioHelperService) {
this.Apperyio.config.constants.EnvironmentManager = this.environments[this.Apperyio.config.constants.Settings.environment];
}
}
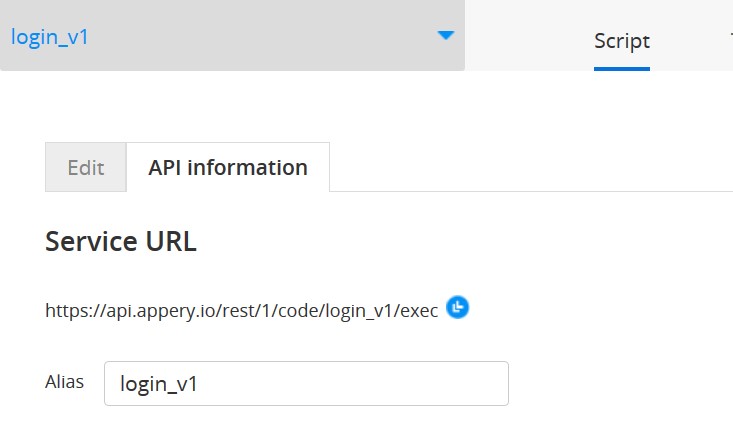
export { EnvironmentControlManager as ExportedClass };Note that our server codes have custom aliases:
Correspondingly, we have the following environments settings in the code:
private environments = {
        "v1":{
            "loginAlias": "login_v1"
        },
        "v2":{
            "loginAlias": "login_v2"
        }
    }
We have already set the v1 value for the environment variable under the Settings tab.
So, take a look at the following part of the code from the environmentControlManager TypeScript:
constructor(private Apperyio: ApperyioHelperService) {
        this.Apperyio.config.constants.EnvironmentManager = this.environments[this.Apperyio.config.constants.Settings.environment];
    }
Here, we define the settings from environments to the new Appery.io EnvironmentManager constant based on the environment variable Settings.
4. Next, we have to inject our environmentControlManager into the app. Open the Pages > app page under the Project view. Open its CODE tab, then click Edit internal includes, select environmentControlManager from the list and save:

- Also, create a new local variable environmentControlManager and select environmentControlManager for its type. Make sure that the Add DI check box is enabled:

The existing login service is targeted directly at the server code with login_v1 alias:

- Let’s update the setup of the service to control which server code will be in use. To do this,
the EnvironmentManager constant created in the environmentControlManager type script will be used:

Testing
Now it's time we start with a test based on v1 of the environment variable in the service Settings that equals the production environment.
Click the TEST button in the App Builder to launch the app in the browser, then enter the User_prod credentials. This means that we use login_v1 server code and prodDB for login.
The expected result is that the user User_prod can log in successfully and the user User-dev does not exist:

User_prod successful login

User_dev does not exist
Now, let’s change the environment to v2. Go back to Services > Settings and set the value of the environment variable to v2. Save:

Enter the User_dev credentials to check that now we use the login_v2 server code and devDB for login.
This time, the expected result is that the user User_dev logs in successfully and the user User_dev does not exist:

User_dev successful login

User_prod does not exist
Congratulations!
Now, equipped with the option of operating with several environments, you have lots of place for safe experimenting.