Sample app demonstrating Date and Time Input in Ionic 4
Introduction
In this sample app, we will demonstrate several ways of entering date and time values in an Appery.io app.
First, you will learn how to implement single date and time input, then we will move on to more complicated cases: multiple dates and date ranges input types.
Downloads and Resources
You can also try our demo app by creating it from the backup.
To restore the app from a backup, follow these steps:
- Download the app backup file.
- Click Create new app.
- Click From backup and select the project backup file on your drive.
- Type in the app name and click Create.
But if you are interested in the detailed tutorials, please follow the steps below.
Creating New App
- Navigate to the Appery.io dashboard. Here, from the Apps tab, click Create new app.
- Select the Ionic 4 application for its type and Blank as a template. Name it, for example DateTimeApp and confirm by clicking Create.
Using Datetime Component
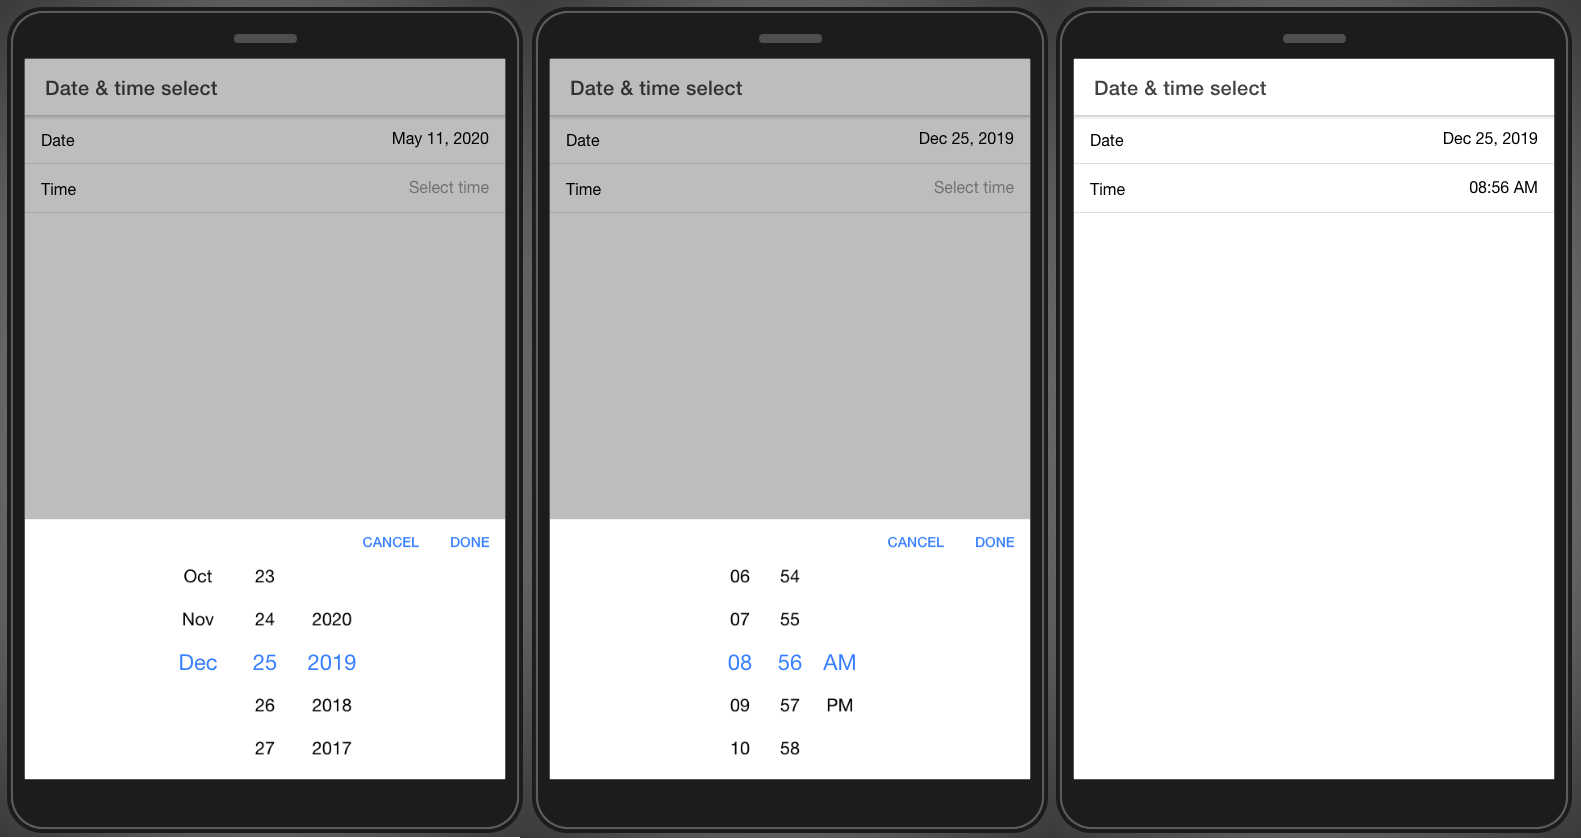
The simplest way is to use the Datetime component. It displays values in two places: in the component itself and in the picker interface that is presented at the bottom of the screen. This picker interface looks the same on both platforms and in the browser.
- In a new Ionic 4 app, rename the Screen1 to Datetime, for example, and under the page PROPERTIES tab, set the Page Footer property to False.
- Then, select the ToolbarTitle1 component and change it's Text property to Date & time select.
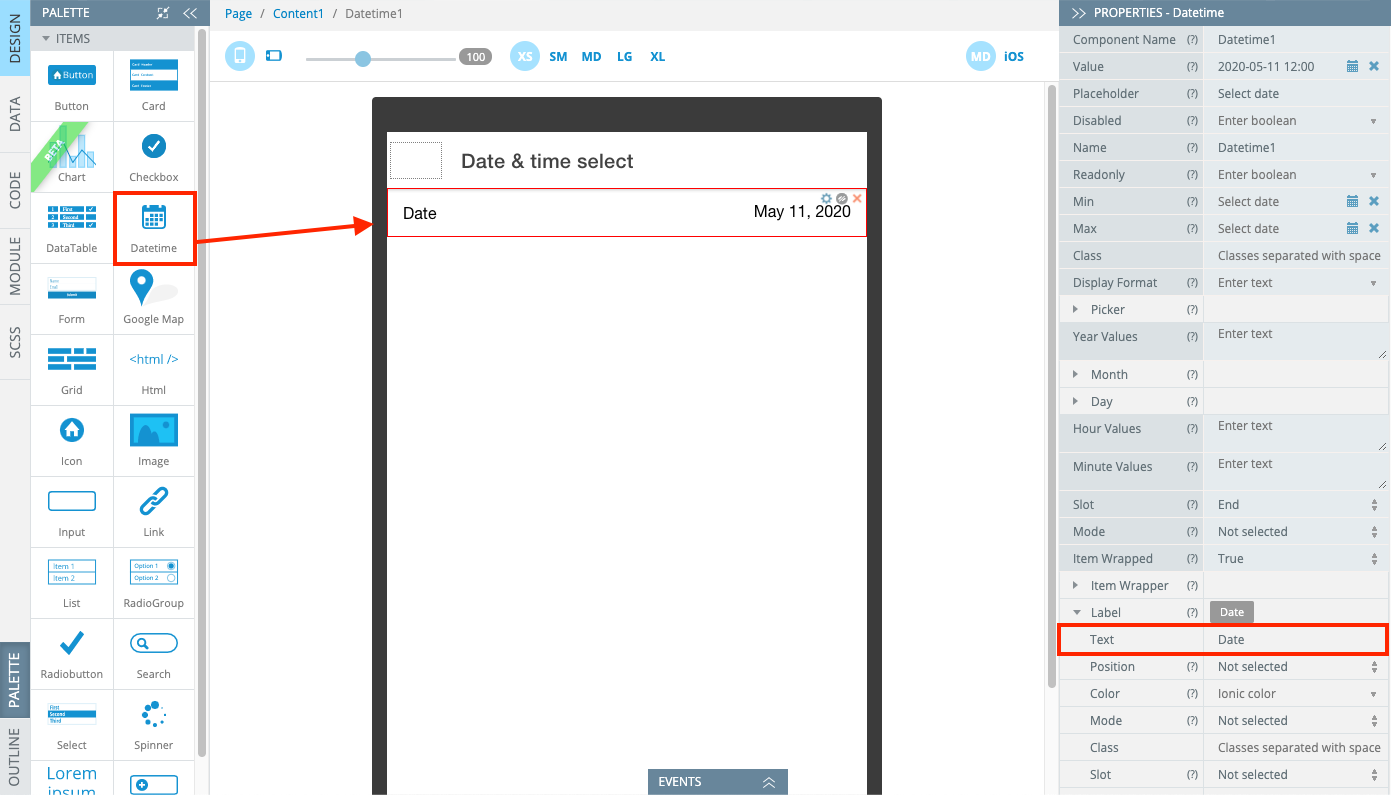
- Now, drag & drop the Datetime component from the PALETTE panel to the screen. Set its Label > Text to Date:
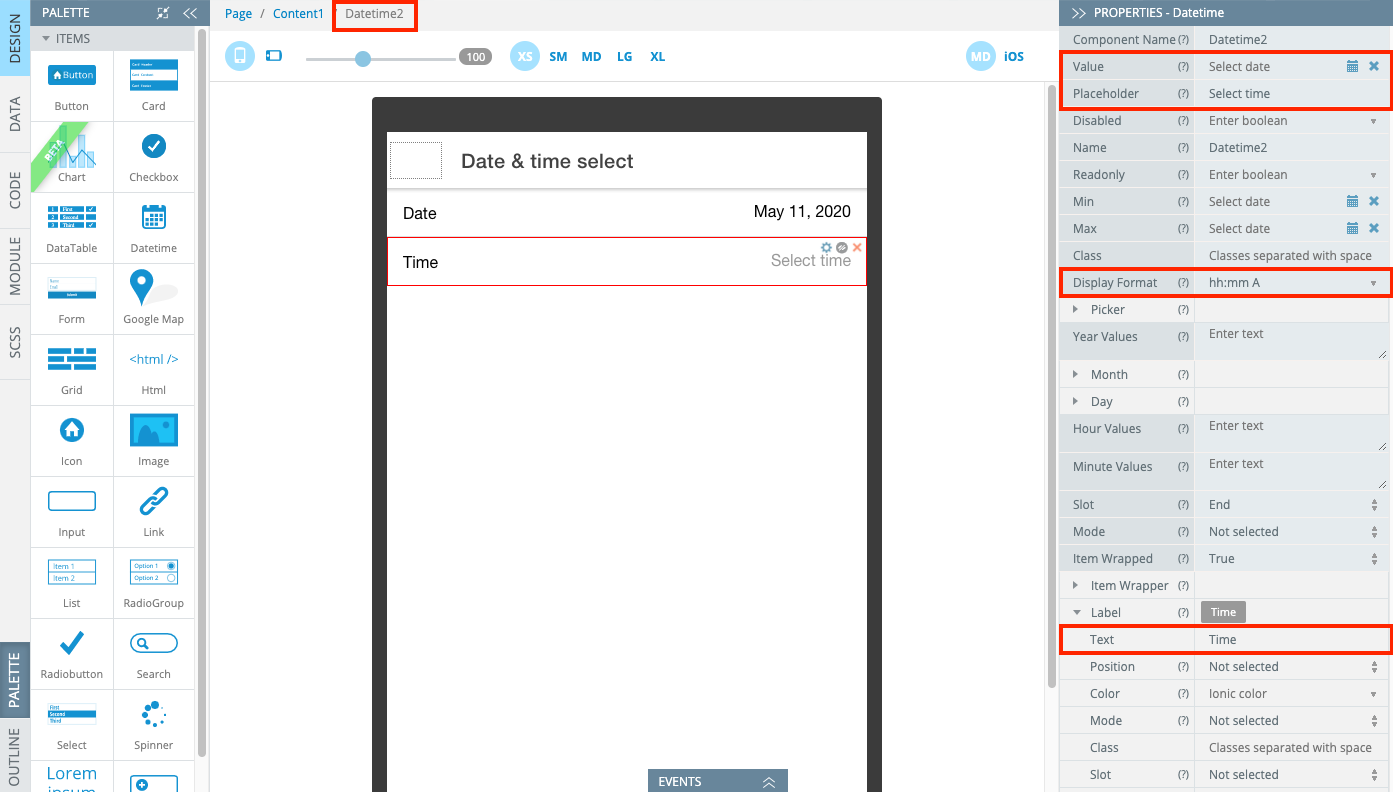
- Drag & drop one more Datetime component from the PALETTE panel to the screen. Clear its Value property and change the Placeholder text to Select time. For the Display Format property, type h:mm A. Also, change its Label > Text to Time:
- Test the app. It should look like this:
Using Input Component
For some reason, you may also need the ability to enter dates from the keyboard on the desktop. This can be implemented using the Input component with its Type attribute set to Date or Time. It creates an input field that lets the user enter a date or a time value, either with a text box that validates the input or a special date picker interface. The date value will be formatted as yyyy-mm-dd.
- In a brand new Ionic 4 application, rename the Screen1 to Input, for example.
- Under the PROPERTIES tab, set the Page Footer property to False.
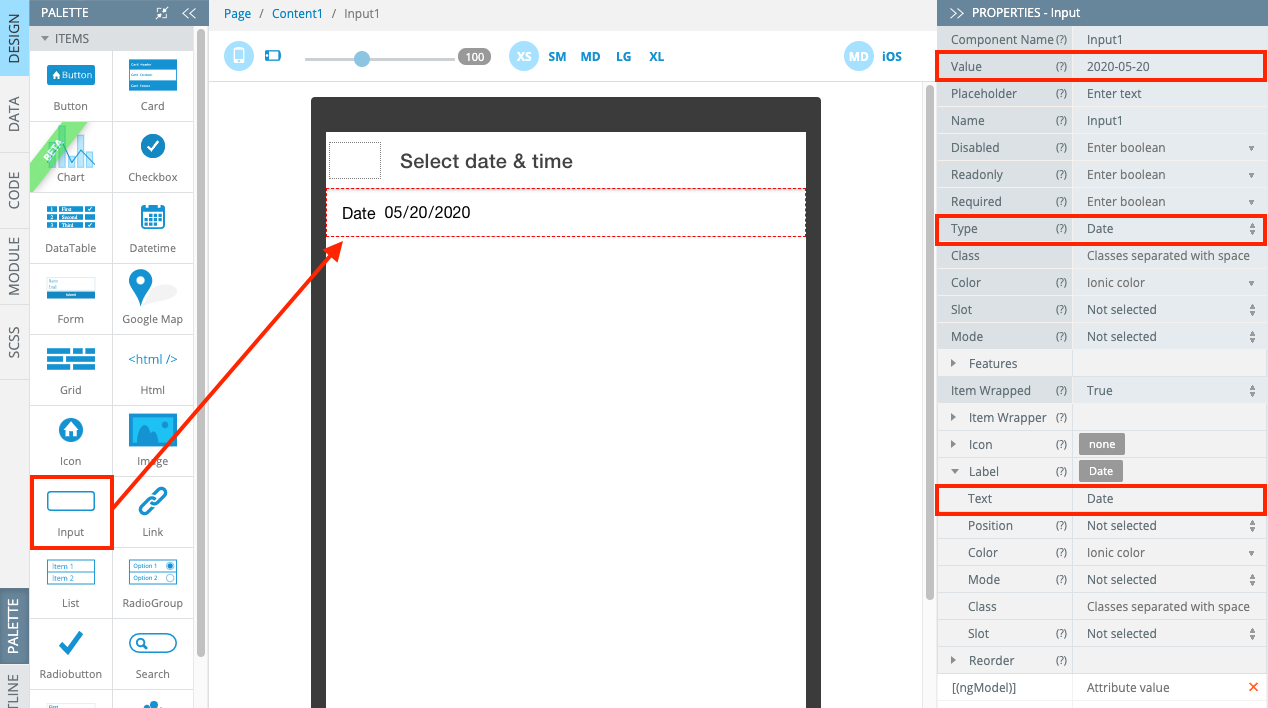
- Drag & drop an Input component to the screen. Set its Type to Date and Label > Text to Date. You can also set a default Value, for example 2020-05-20:
- Place one more Input to the screen. Set its Type to Time and Label > Text to Time. You can also set a default Value, for example 10:30:
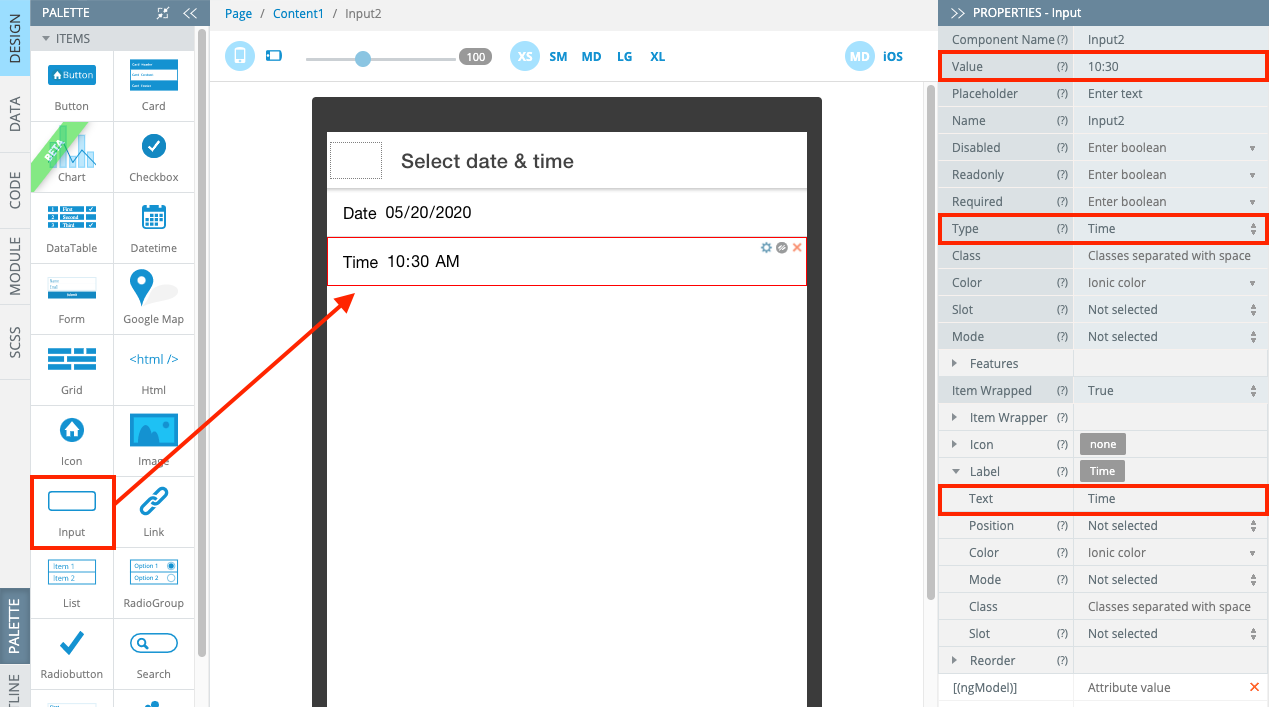
Placeholder attributeNote that the Placeholder attribute doesn't work with Inputs of Date and Time type. You can set the default input Value instead.
If you still need a placeholder in your control, please try the Datetime component.
That’s it, you can test the pickers. When you click the date input field, the native date picker dialog will appear. Also, on the desktop, you can type the date manually. The appearance of the picker may vary depending on the browser and OS:
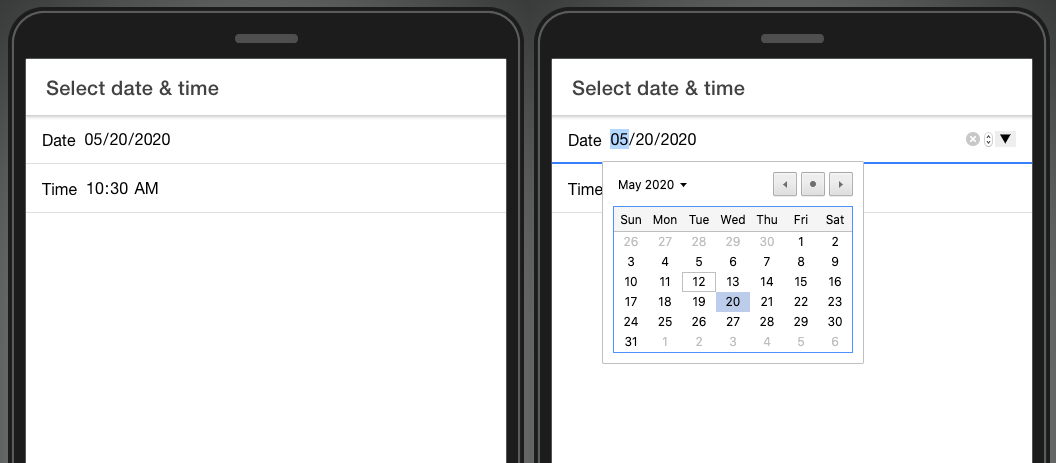
App work in Chrome desktop browser, macOS
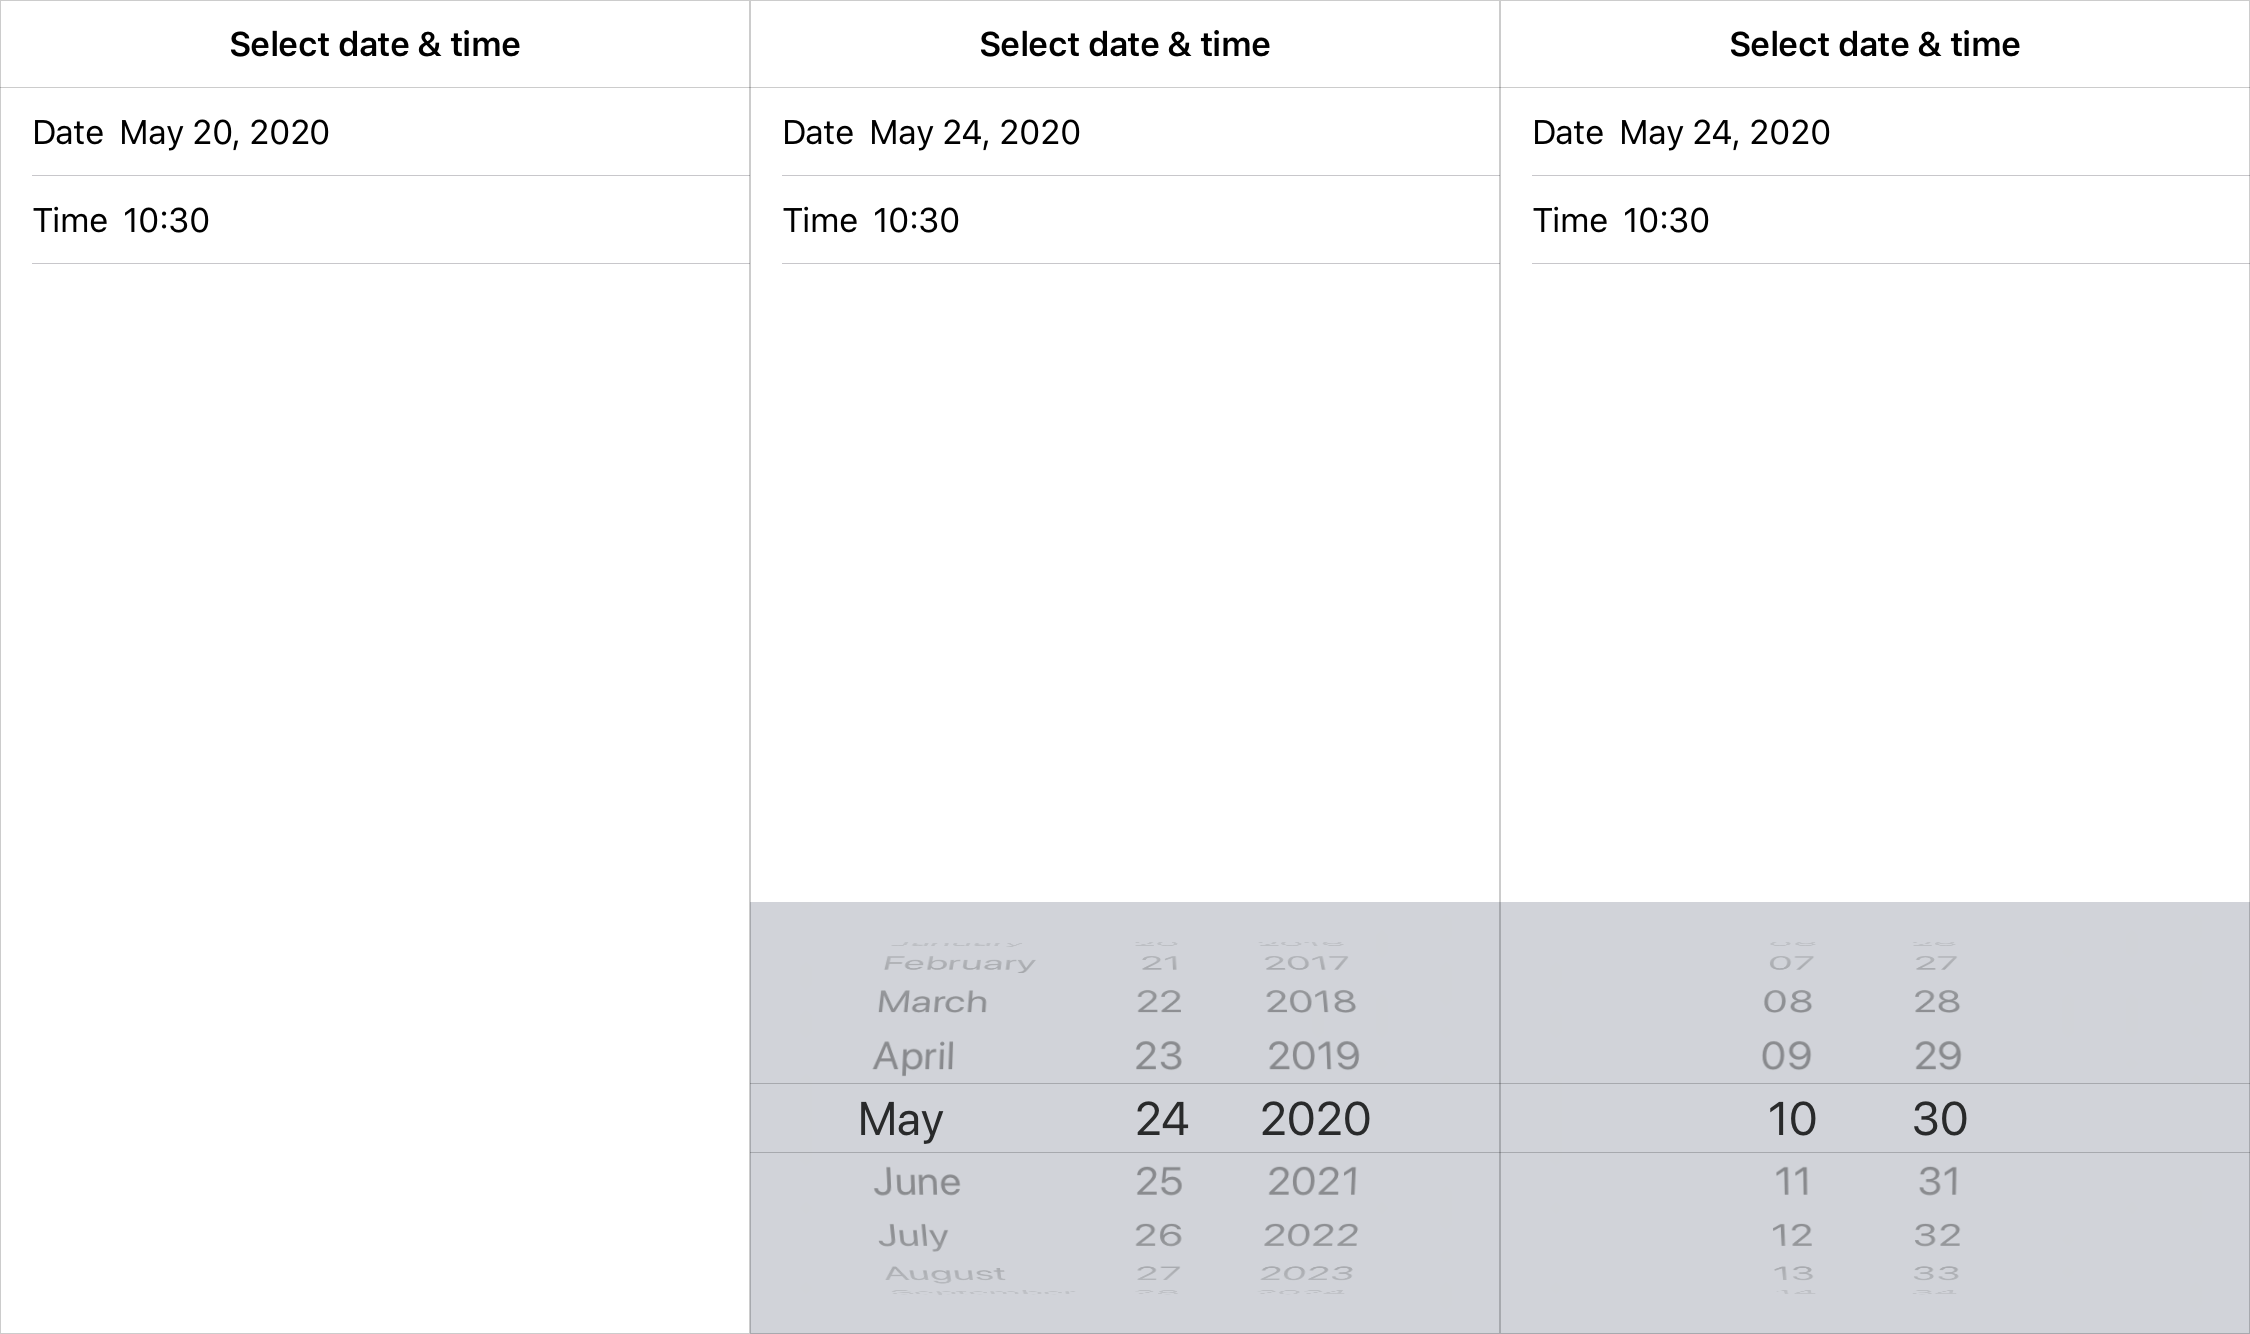
App work on iOS
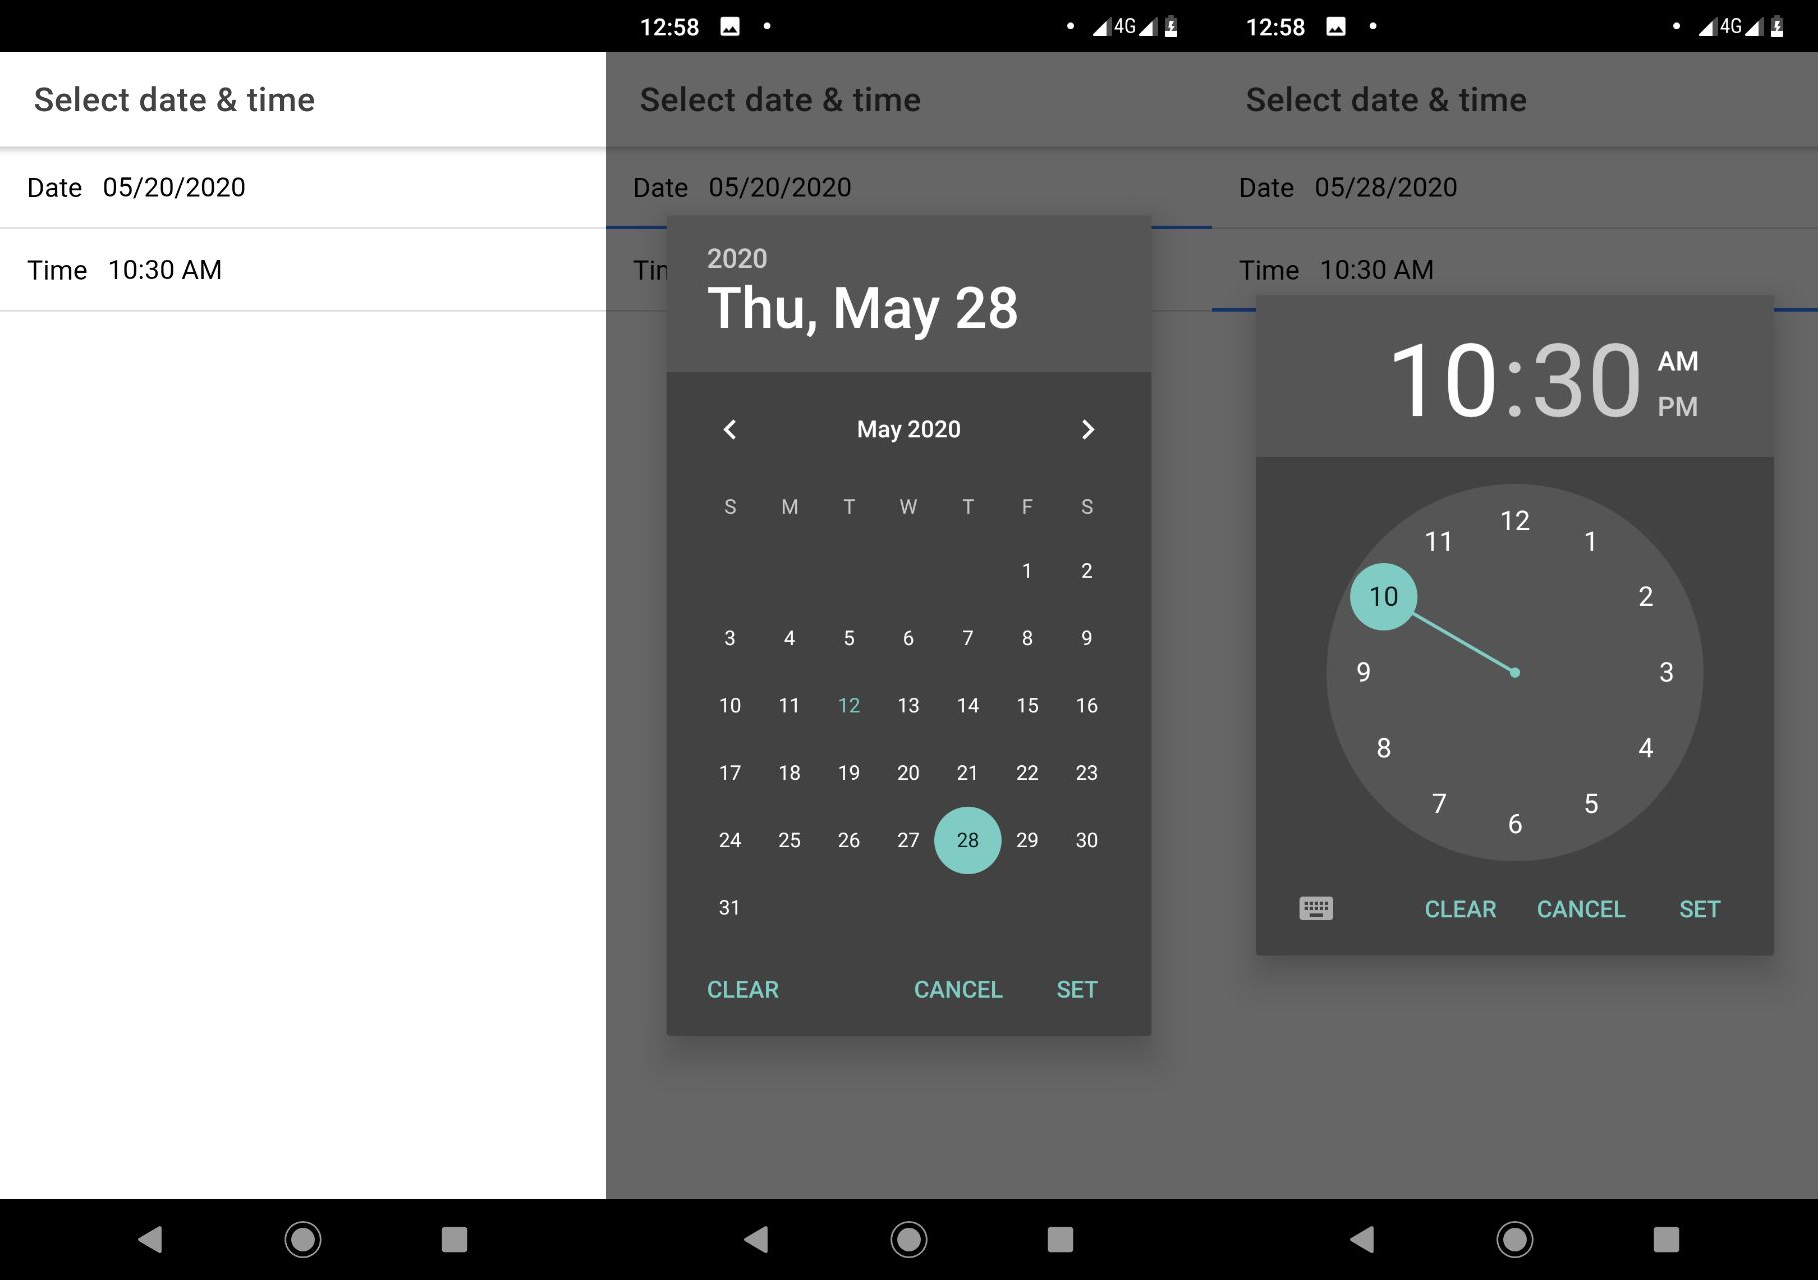
App work on Android
Desktop Safari SupportAlso note that Safari desktop browser does not include a native datepicker (although it does for iOS). Instead, a regular text input will be shown.
Useful link for tracking browser support: http://caniuse.com/#feat=input-datetime
Using Custom Datepicker
The Datetime and Input components are a good solution if we need to enter only one value. But what if we need to select multiple date values or a date range? In this case, we can use a separate modal screen or the ion2-calendar Modal Mode.
Setting Up Datepicker App with Modal Screen
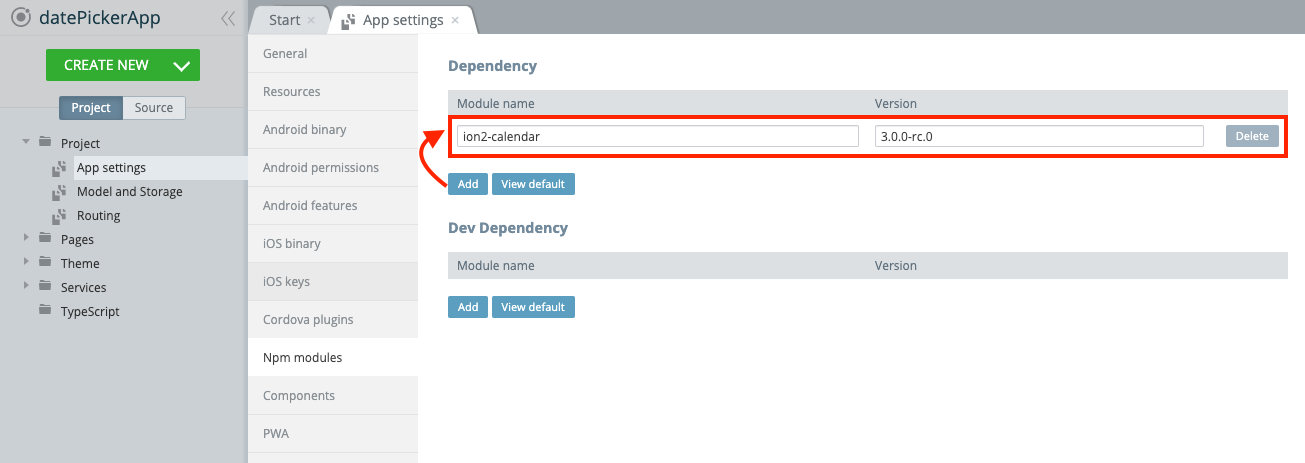
- In a new Ionic 4 app, go to Project > App settings > Npm modules.
- Add a new Dependency with ion2-calendar for its name and 3.0.0-rc.0 for its version:
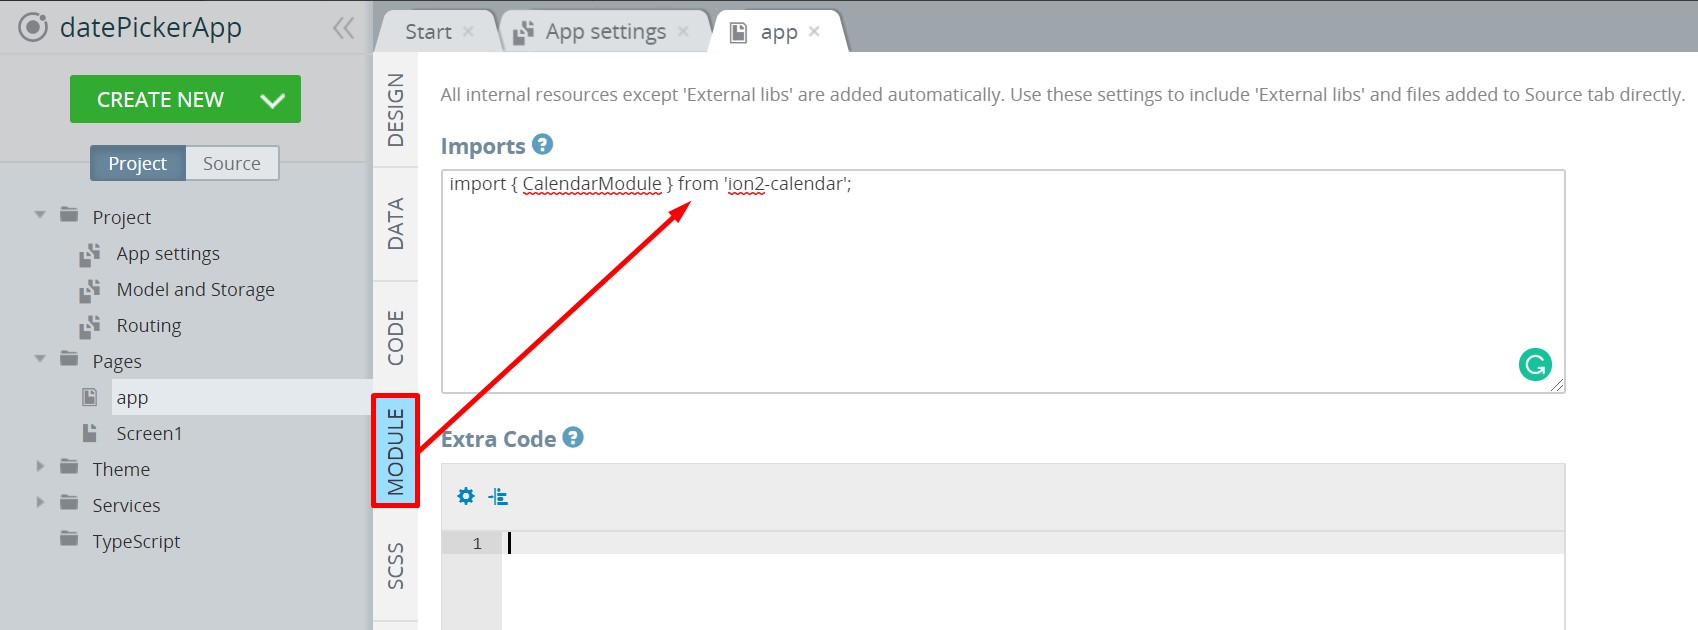
- Then navigate to Pages > app > MODULE. In the Imports section, add:
import { CalendarModule } from 'ion2-calendar';
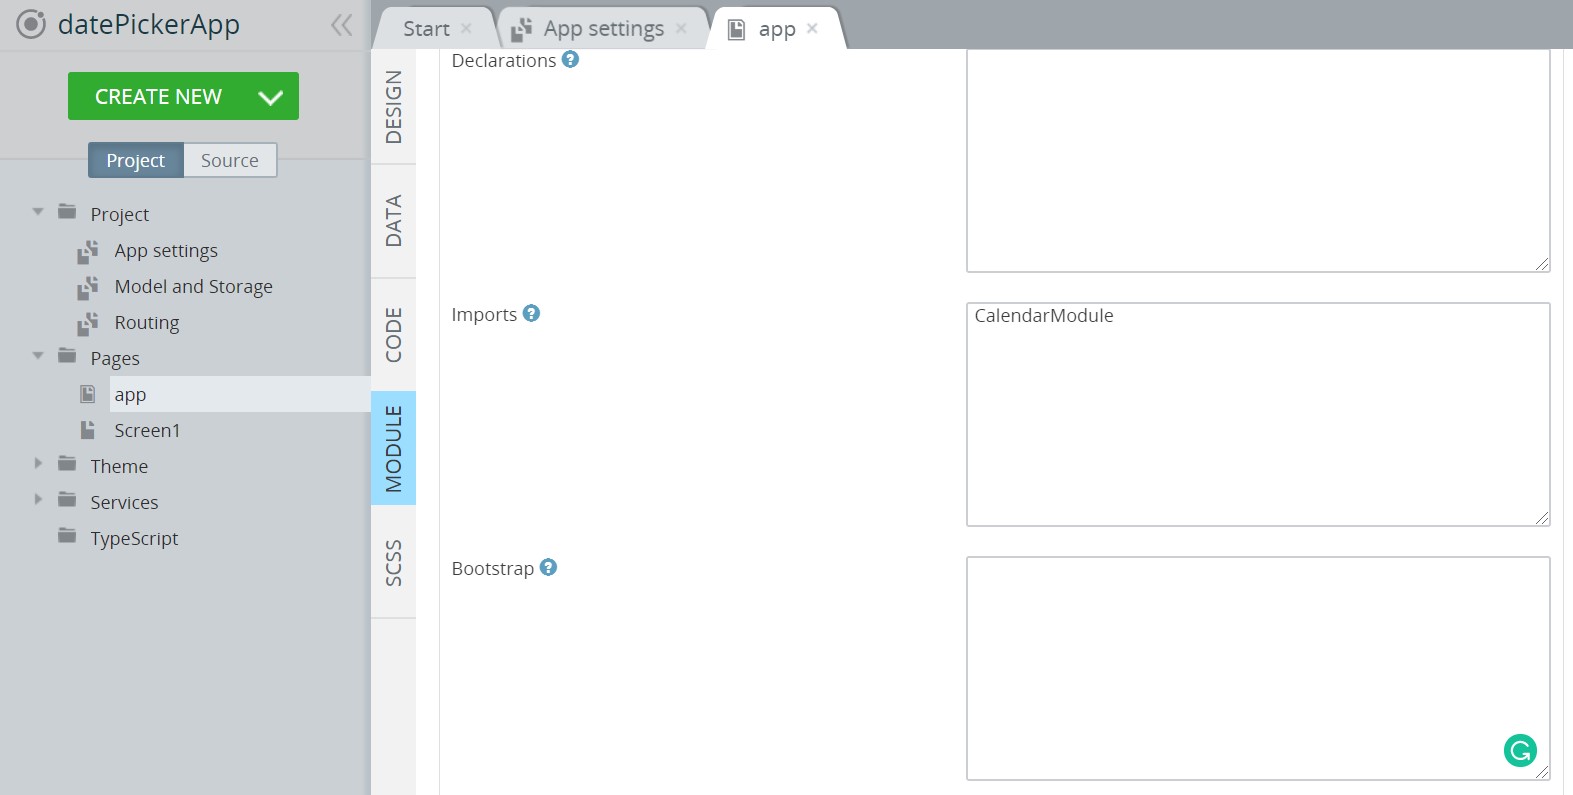
- Scroll down and in the NgModule Settings > Imports section, type
CalendarModule. Save the changes:
Multiple Date Selection
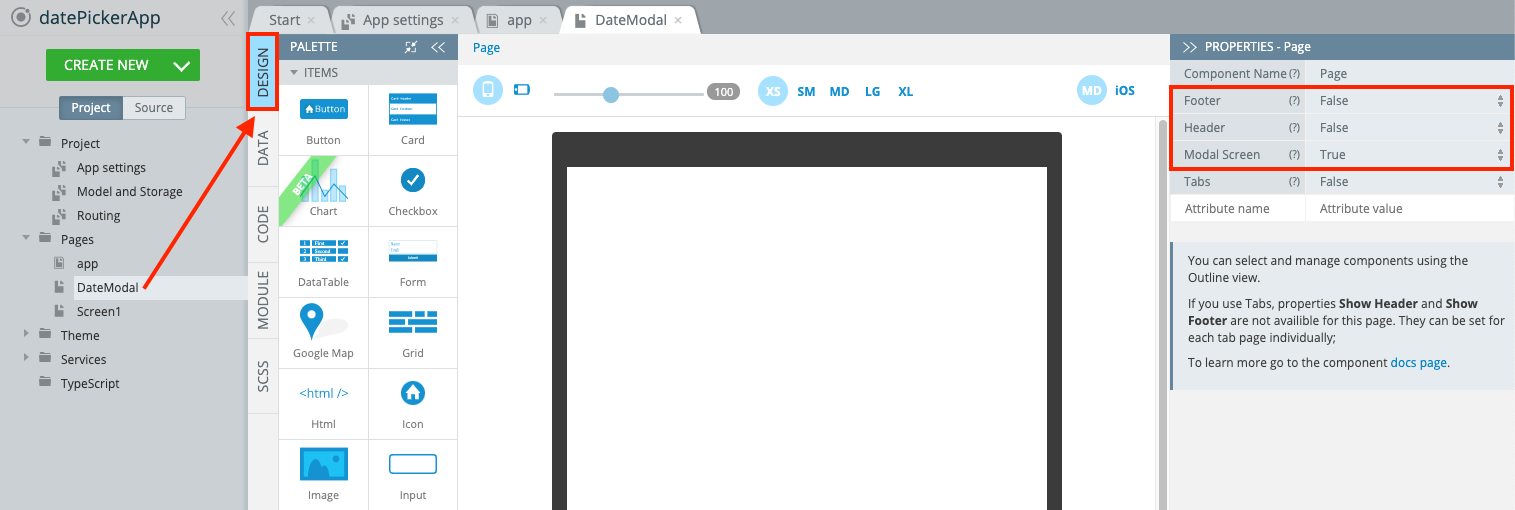
- Create a new page with DateModal for its name.
- For the created page, under the PROPERTIES tab, change its Header and Footer properties to False, and set Modal Screen to True:
- Drag & drop an Html component to the screen. Click the Edit button next to its HTML property in the PROPERTIES panel on the right. Type the following code in a popup and click Save:
<ion-calendar
	[(ngModel)]="selectedDates"
	[options]="options"
	[type]="type"
	[format]="'YYYY-MM-DD'"
	>
</ion-calendar>
- Drag & drop a Button component under the Html component. Change its Text to Confirm.
- Unfold the EVENTS panel from the bottom, select the Button1 component, for the Event, select Click, for the Action, select Run Typescript. In the list of snippets, select the Close modal snippet. Then, type
this.selectedDatesas the dismiss method parameter. As a result, the code should be like this:
this.Apperyio.getController("ModalController").dismiss(this.selectedDates);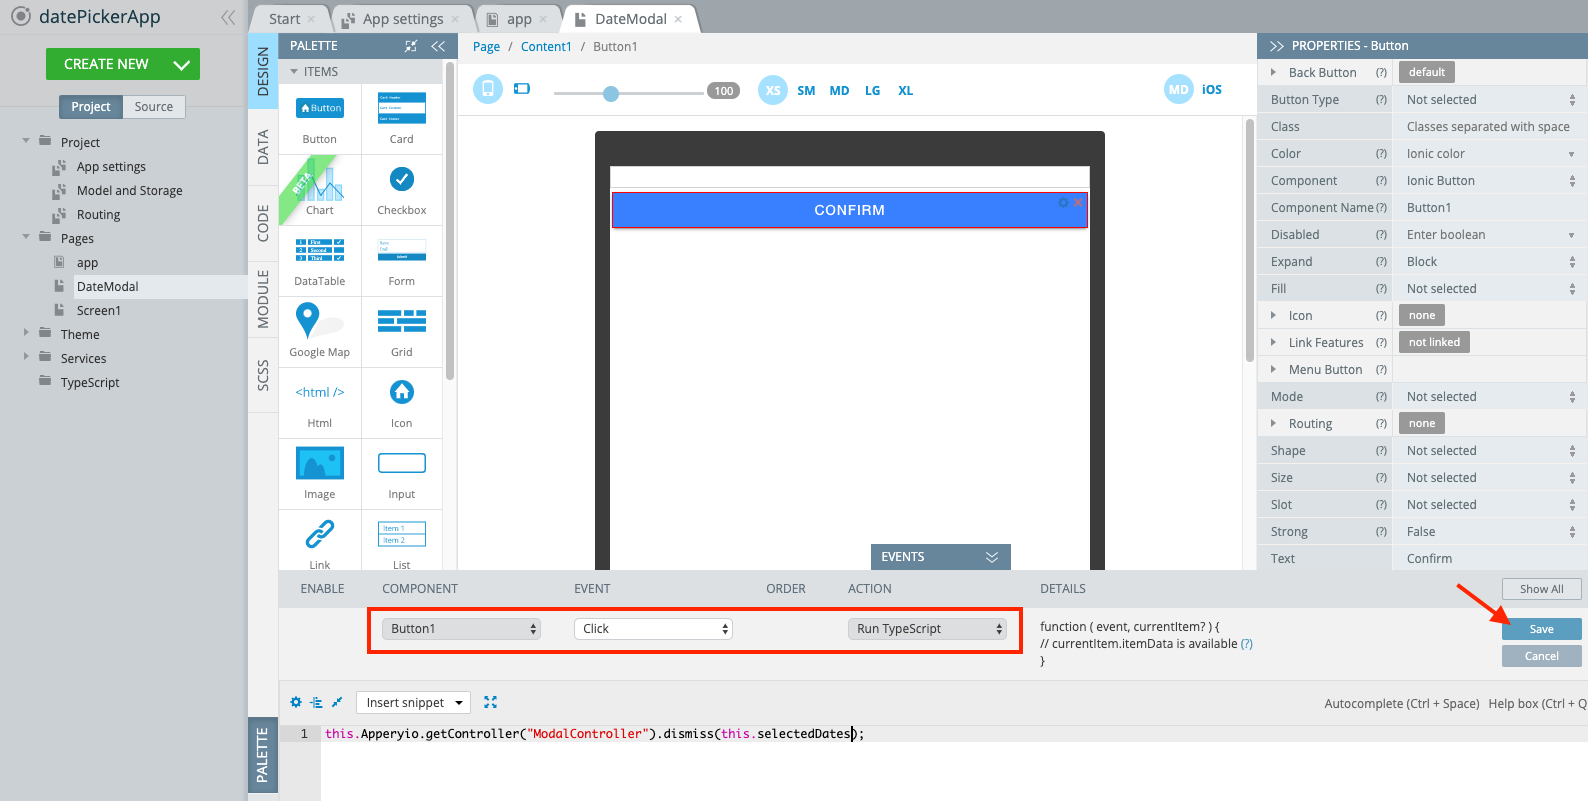
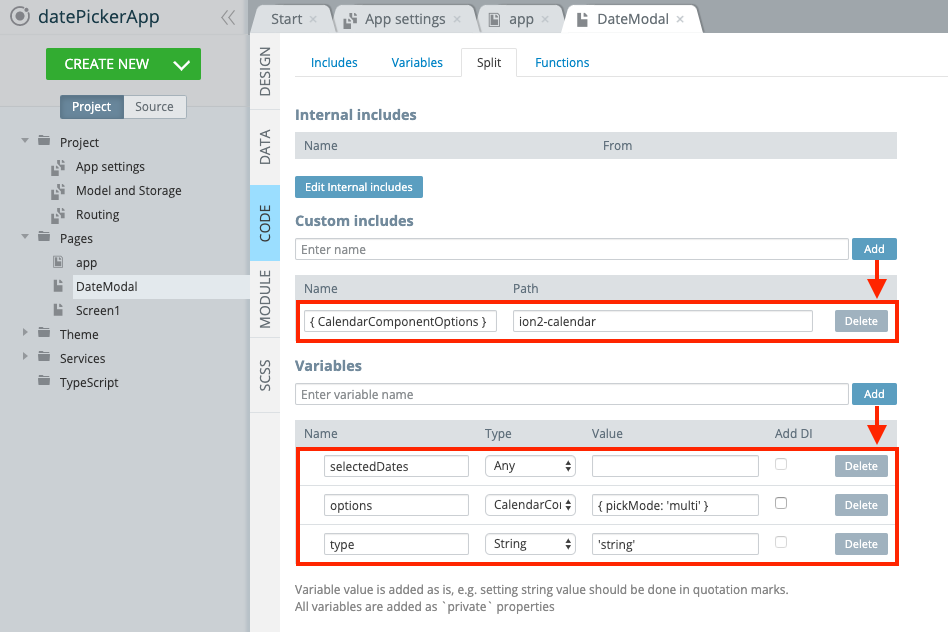
- Save the changes and switch to the CODE tab. Here, in the Custom Includes section, add an include with
{ CalendarComponentOptions }for its name. Setion2-calendaras its path. - In the Variables section, create 3 variables:
selectedDatesvariable of Any type,optionsvariable of CalendarComponentOptions type with{ pickMode: 'multi' }default value,typevariable of String type with'string'as its default value:
Component optionsThe
typevariable defines the type of the date values, returned from the picker. You can set the following types:'string','js-date','moment','time'and'object'.The
pickModeoption sets the picker mode:'single','multi'or'range'.For more information, check the module documentation.
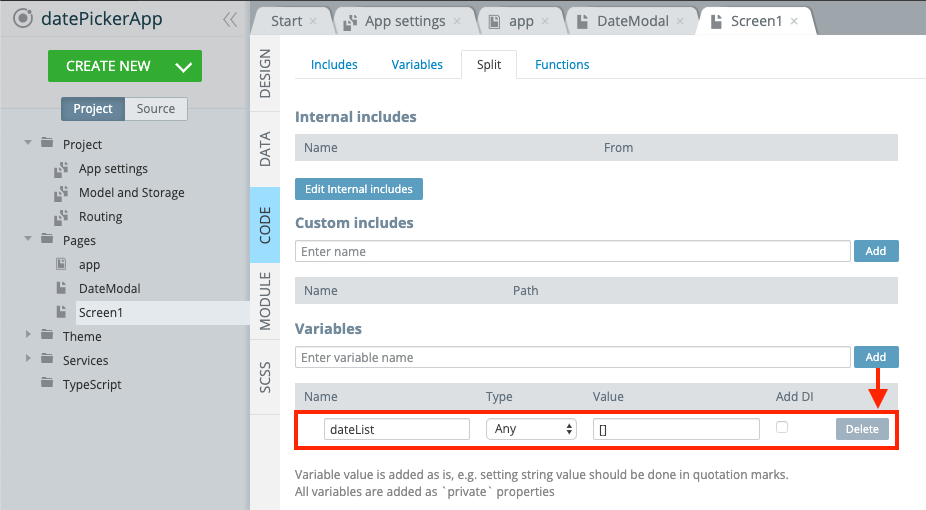
- Switch to the Screen1 page and select its CODE tab. Create a new dateList variable of Any type with [] default value:
- Then, go to the DESIGN tab. In the header, change the Text of ToolbarTitle1 to datePickerApp. Also, you can remove the page's Footer.
- Drag & drop a List component to the screen. Inside a list, delete the 2nd List Item component. For the ListItem1 component, set the following property: *ngFor = let dateValue of dateList:

- Inside the list item, set the ItemLabel1 component’s Text property to {{dateValue | date}}:

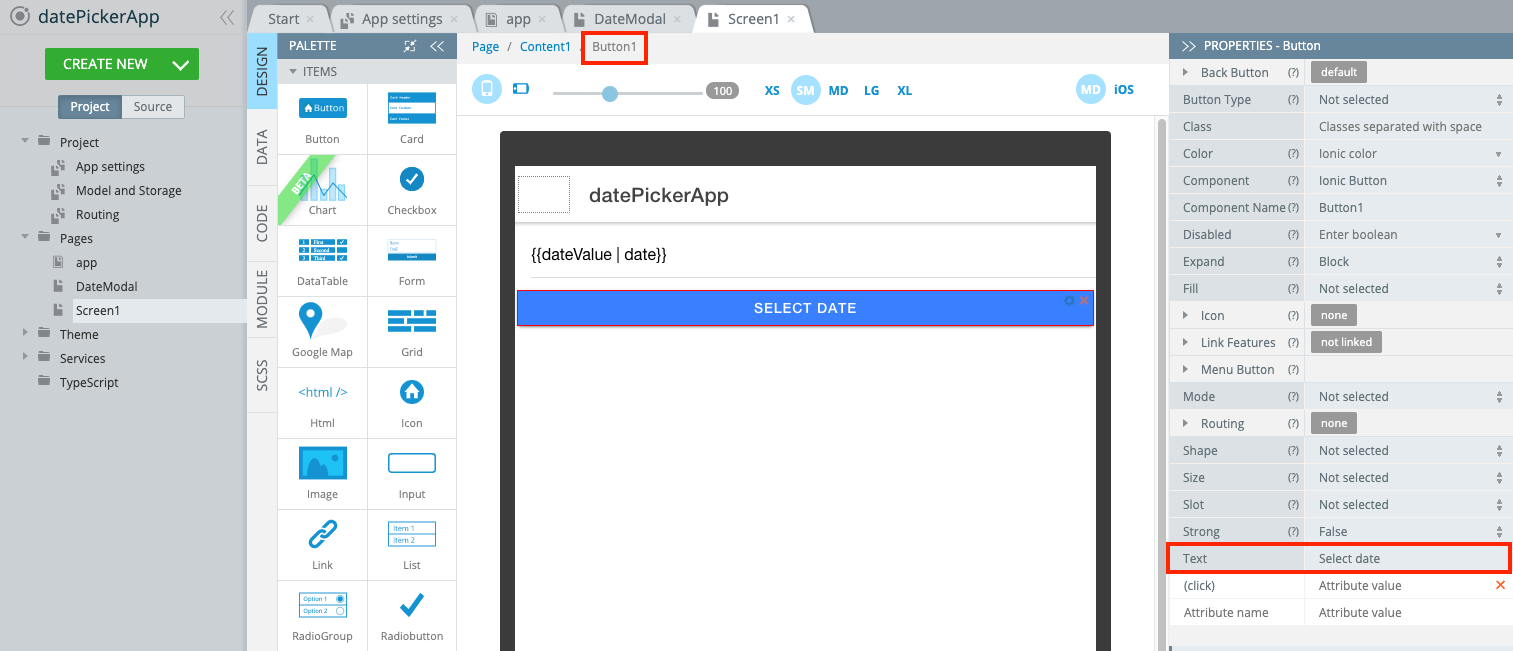
- Place a Button component under the List. Change button’s Text property to Select date:
-
Expand the EVENTS panel from the bottom. For the Button1 component, create a Click event. For Action, select Run Typescript. In the code editor, insert the Show modal snippet and replace the modal name to DateModal.
-
In the code that appears, replace
// console.log(dataReturned.data);line with the following code:this.dateList = dataReturned.data;. The result should look like this:
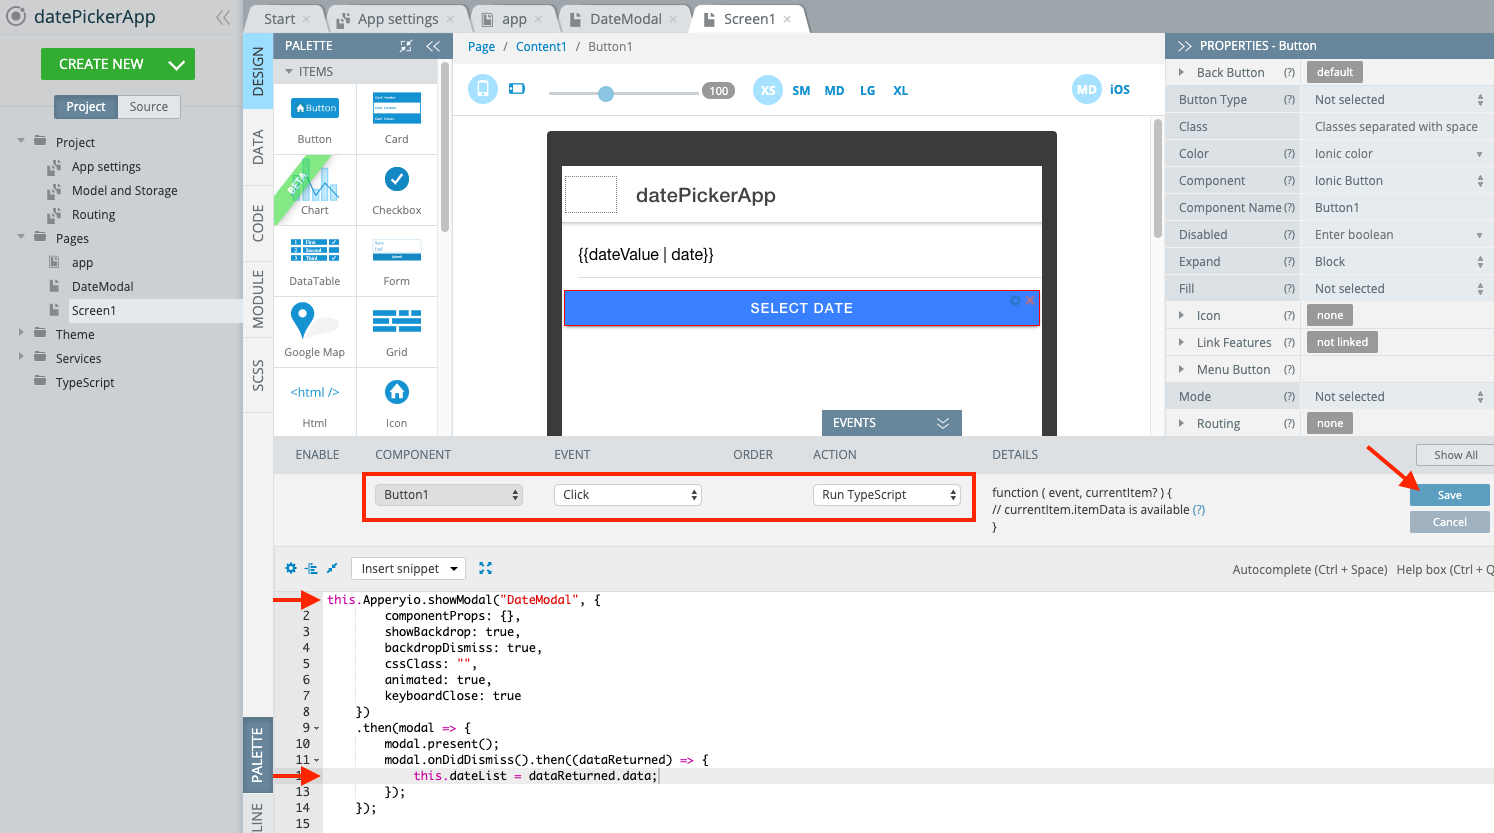
Save all the changes and test the app:

Date Range Selection
If we want to select a range of dates, we need to modify our app a bit.
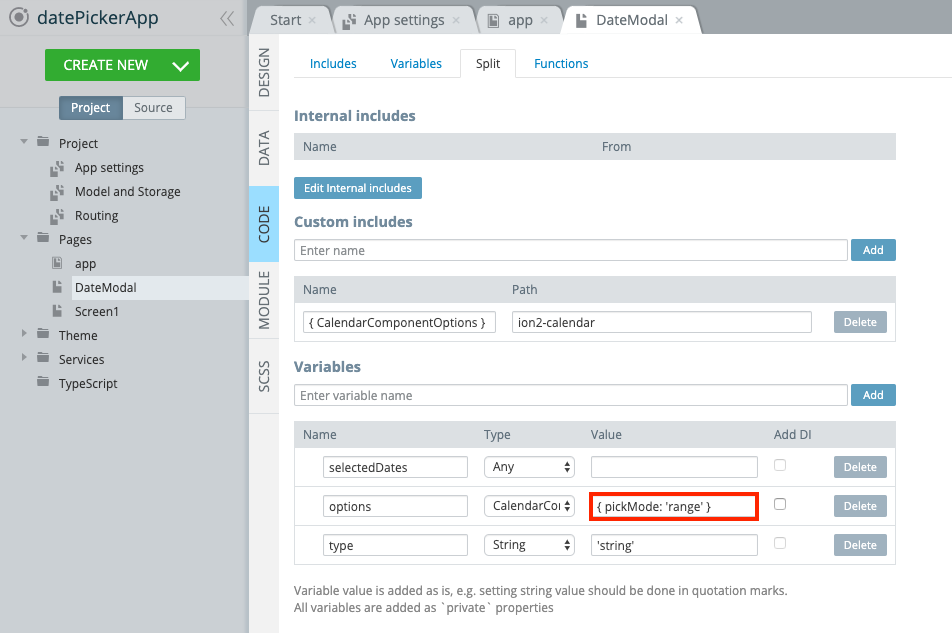
- In the DateModal page's CODE tab, change the value of the options variable to { pickMode: 'range' }:
- Switch to the DatePicker page. In the DESIGN tab, delete the List1 component. Drag & drop a new List component to the screen:
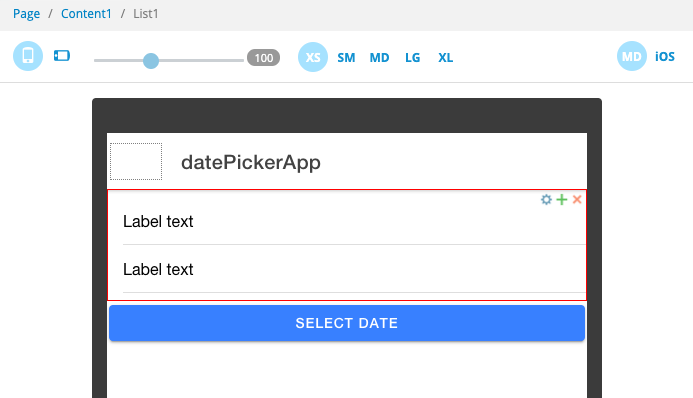
- Inside the list, for the first List Item, set its label's Text property to From: {{dateList.from | date}}. For the second one — to To: {{dateList.to | date}}:

Save the changes and test the app. Now you can select a range of dates by clicking the start and the end dates:

Single Date Selection
It's also possible to select a single date using the ion2-calendar module. Let's modify our app again.
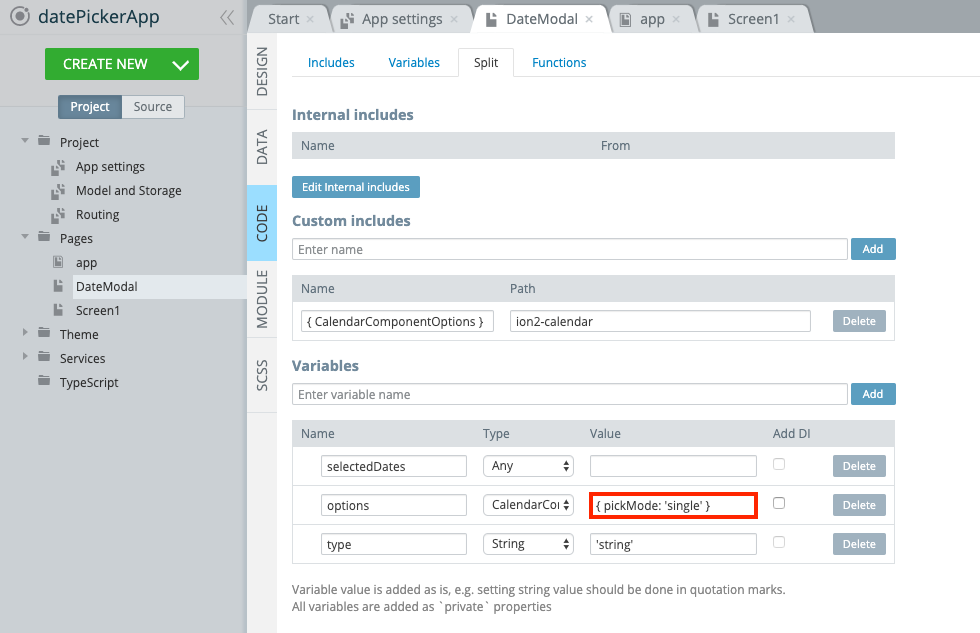
- Go to the DateModal page's CODE tab. Change the value of the options variable to { pickMode: 'single' }:
- Switch to the Screen1 page, select the DESIGN tab. Inside the list, delete the 2nd List Item element.
- For the remaining list Item, change the label's Text property to Date: {{dateList | date}}:

Save the changes and test the app. Now only a single date selection is available:

Using ion2-calendar Modal Mode
In the previous steps, we created a separate modal screen to display the date picker. Another option is to use ion2-calendar's Modal Mode.
- Let's start from scratch. Create a new Ionic 4 app of Ionic 4 Blank type, name it to ModalModeApp.
- Go to Project > App settings > Npm modules. Add a new dependency with ion2-calendar for its name and of 3.0.0-rc.0 version:
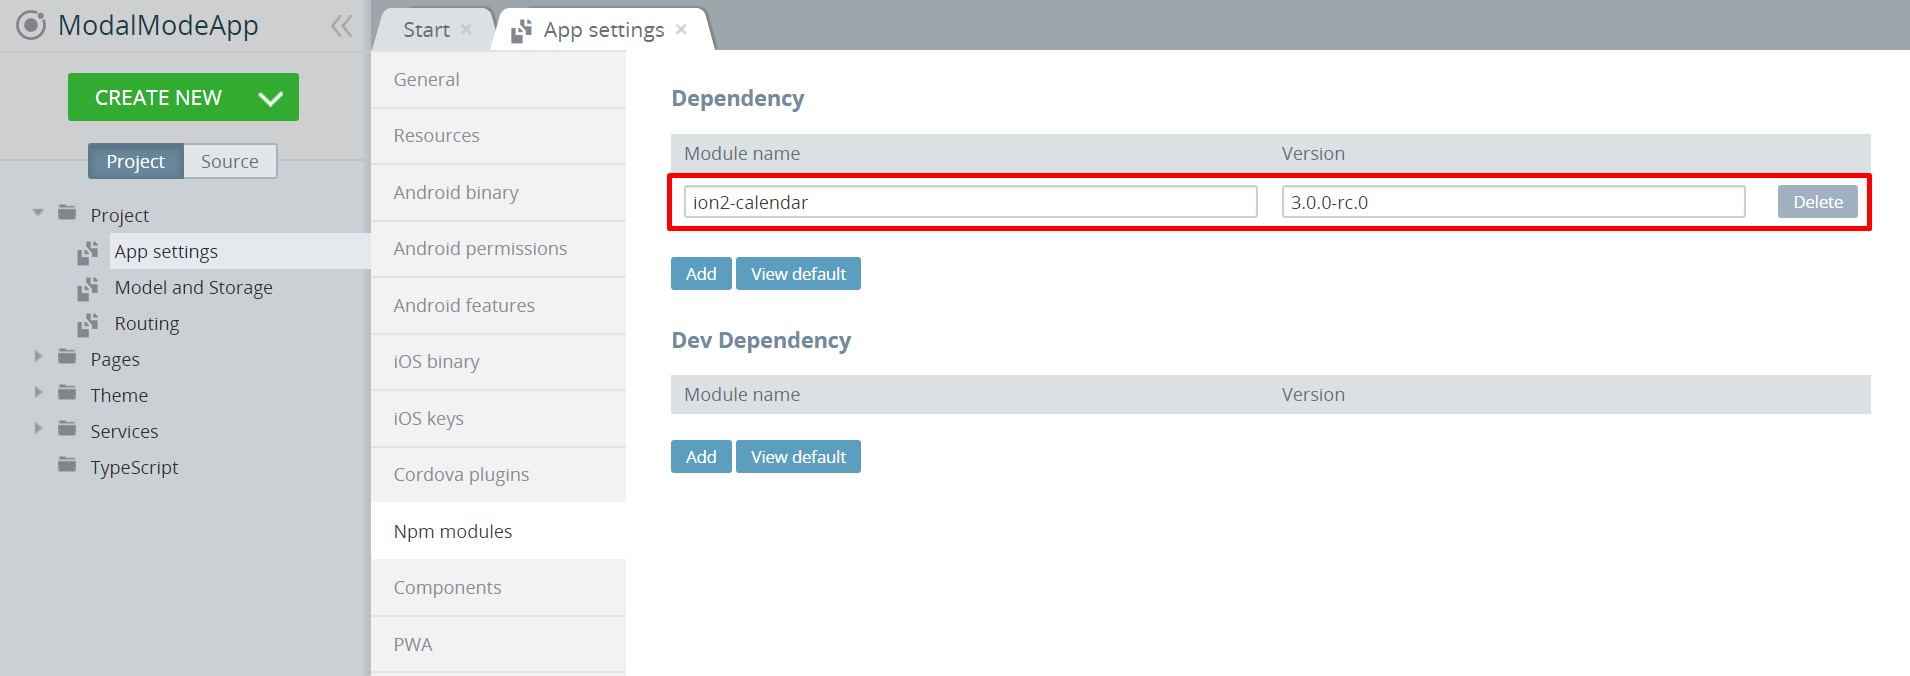
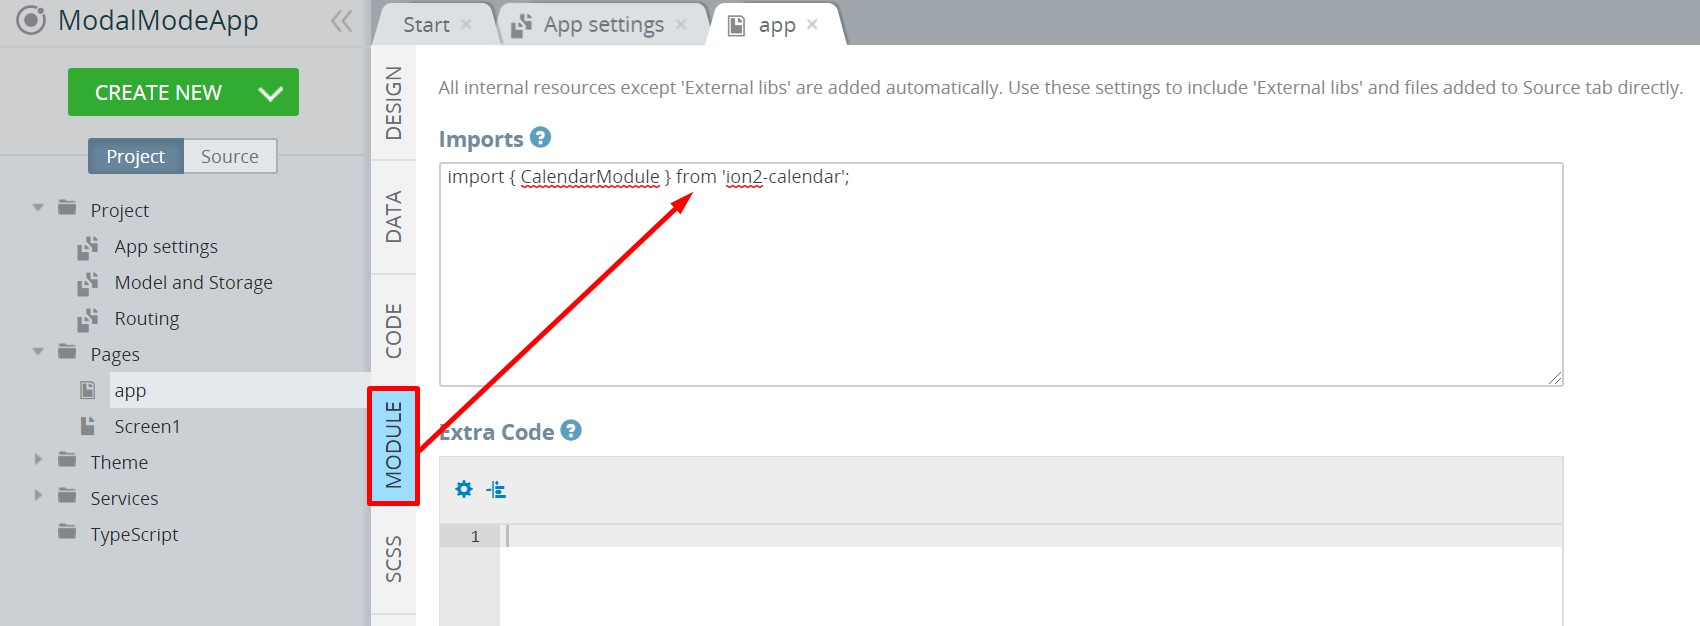
- Navigate to Pages > app > MODULE. In the Imports section, add the
import { CalendarModule } from 'ion2-calendar';line of code:
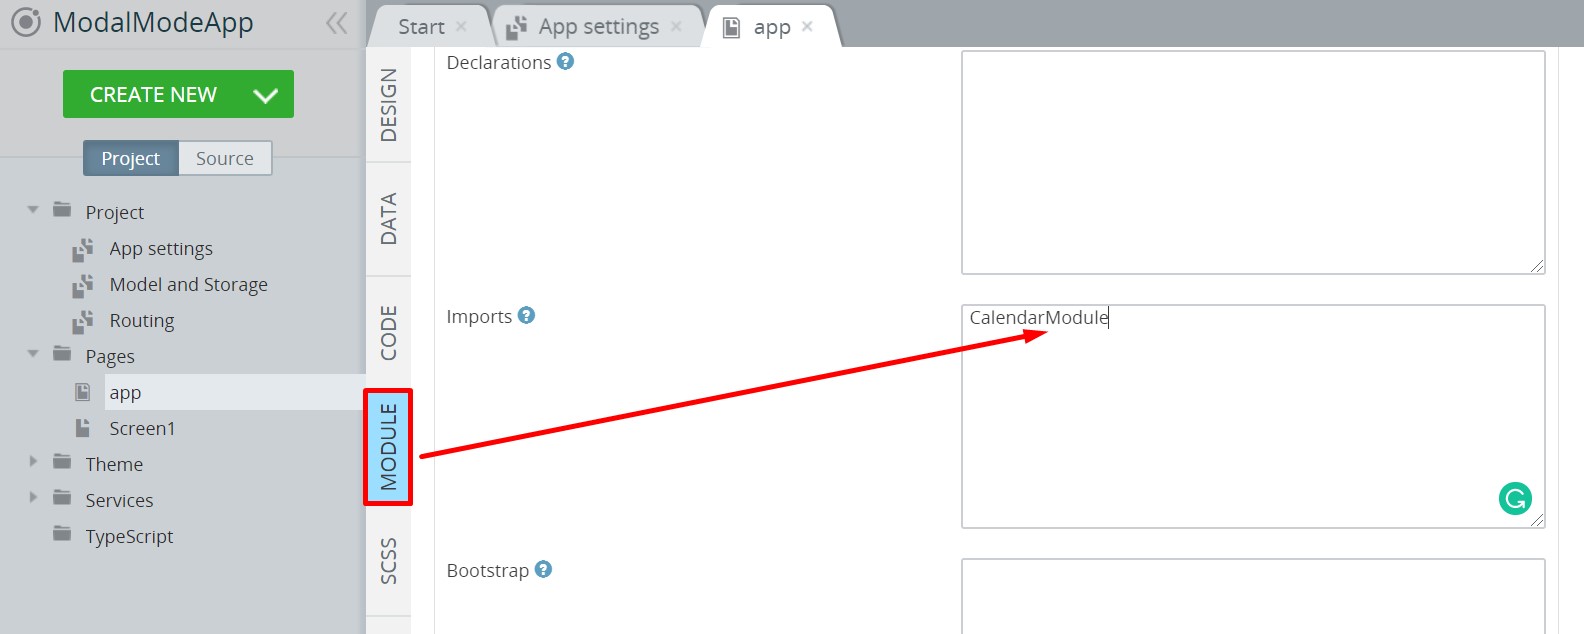
- Scroll down and in the NgModule Settings > Imports section, type CalendarModule. Save the changes:
- Rename Screen1 to CustomDatepicker, open its DESIGN tab, change the Header ToolbarTitle Text to Custom datepicker.
- Then drag & drop a List component and a Button component to the screen.
- Inside the List, for the first List Item, set the Label Text to From: {{selectedDates.from | date}}. For the second one — to To: {{selectedDates.to | date}}.
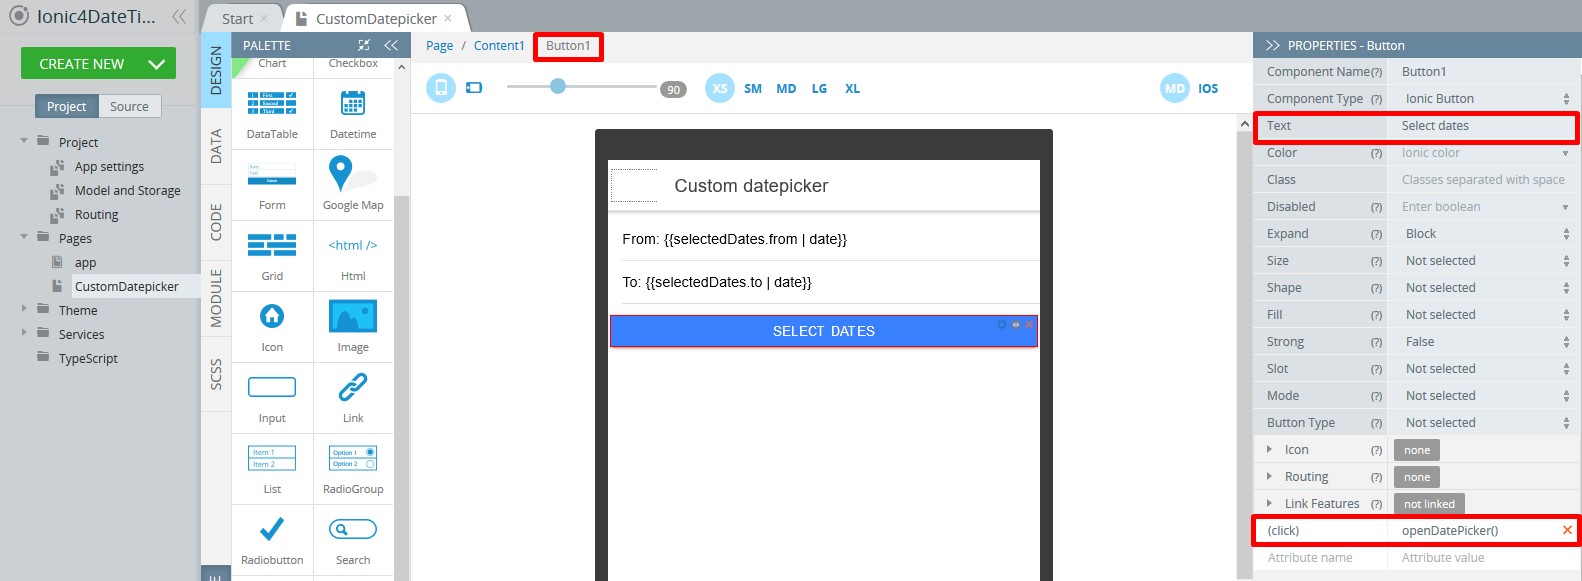
- For the button, set Text to Select dates and define its (click) property as openDatePicker():
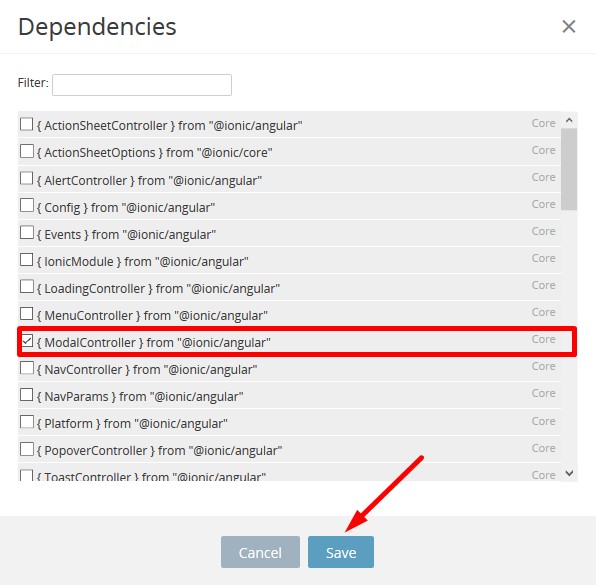
- Navigate to the CODE tab. In the Internal Includes section, click the Edit internal includes button. In the popup, select the { ModalController } from "@ionic/angular" include and save:
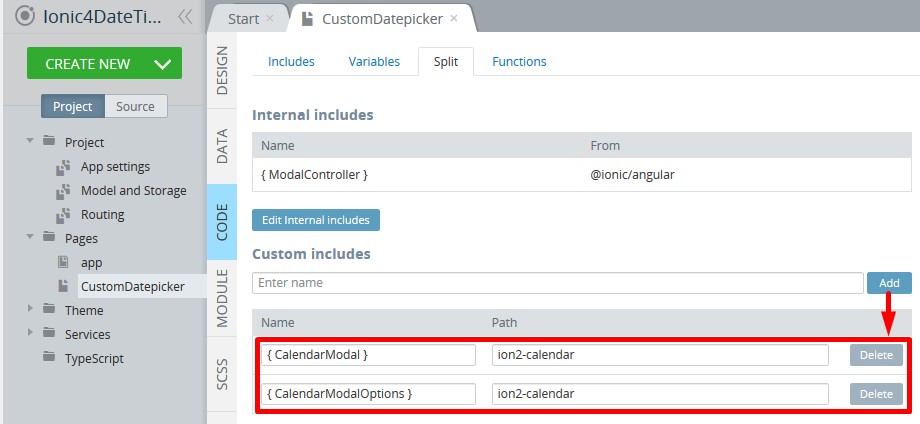
- Also, add the following Custom Includes:
- with
{ CalendarModal }for name andion2-calendarpath, - with
{ CalendarModalOptions }for name andion2-calendarpath:
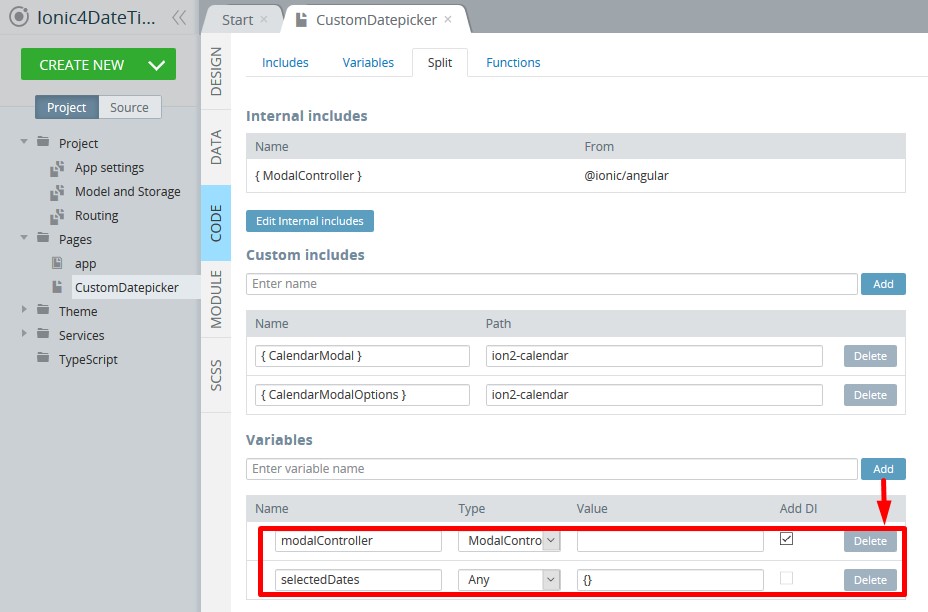
- In the Variables section, create 2 variables:
- variable modalController of ModalController type. Mark the Add DI box as checked.
- variable selectedDates of Any type with {} default value:
- In the Functions section, create a new openDatePicker Async method. In the code editor, type the following code:
const options = {
  pickMode: 'range',
  title: 'Select date range'
};

const calendarModal = await this.modalController.create({
    component: CalendarModal,
    componentProps: { options }
});

calendarModal.onDidDismiss().then(({ data }) => {
    if (data) {
        this.selectedDates.from = data.from.dateObj;
        this.selectedDates.to = data.to.dateObj;
    }
})

return await calendarModal.present();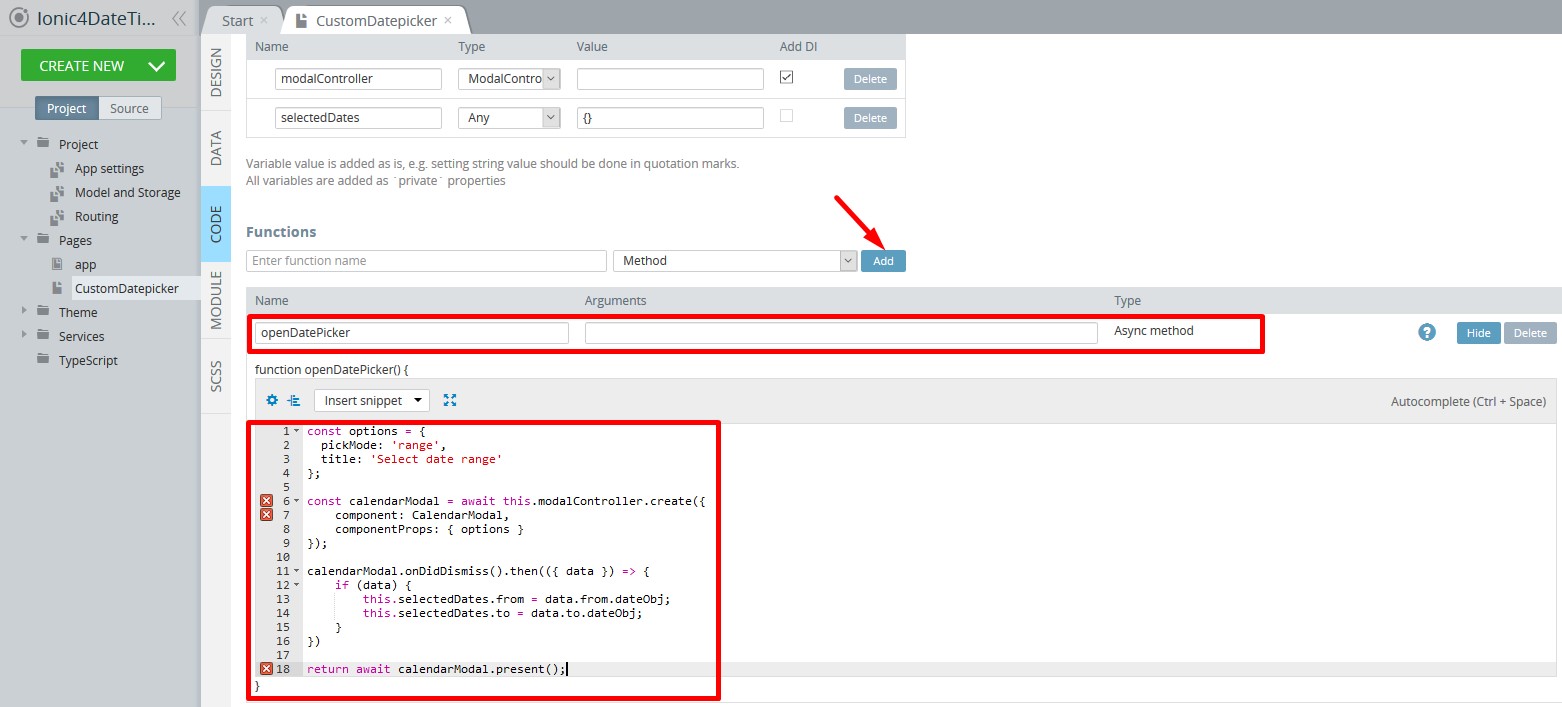
Save the changes and test the app. You will see that the modal looks a bit different now:
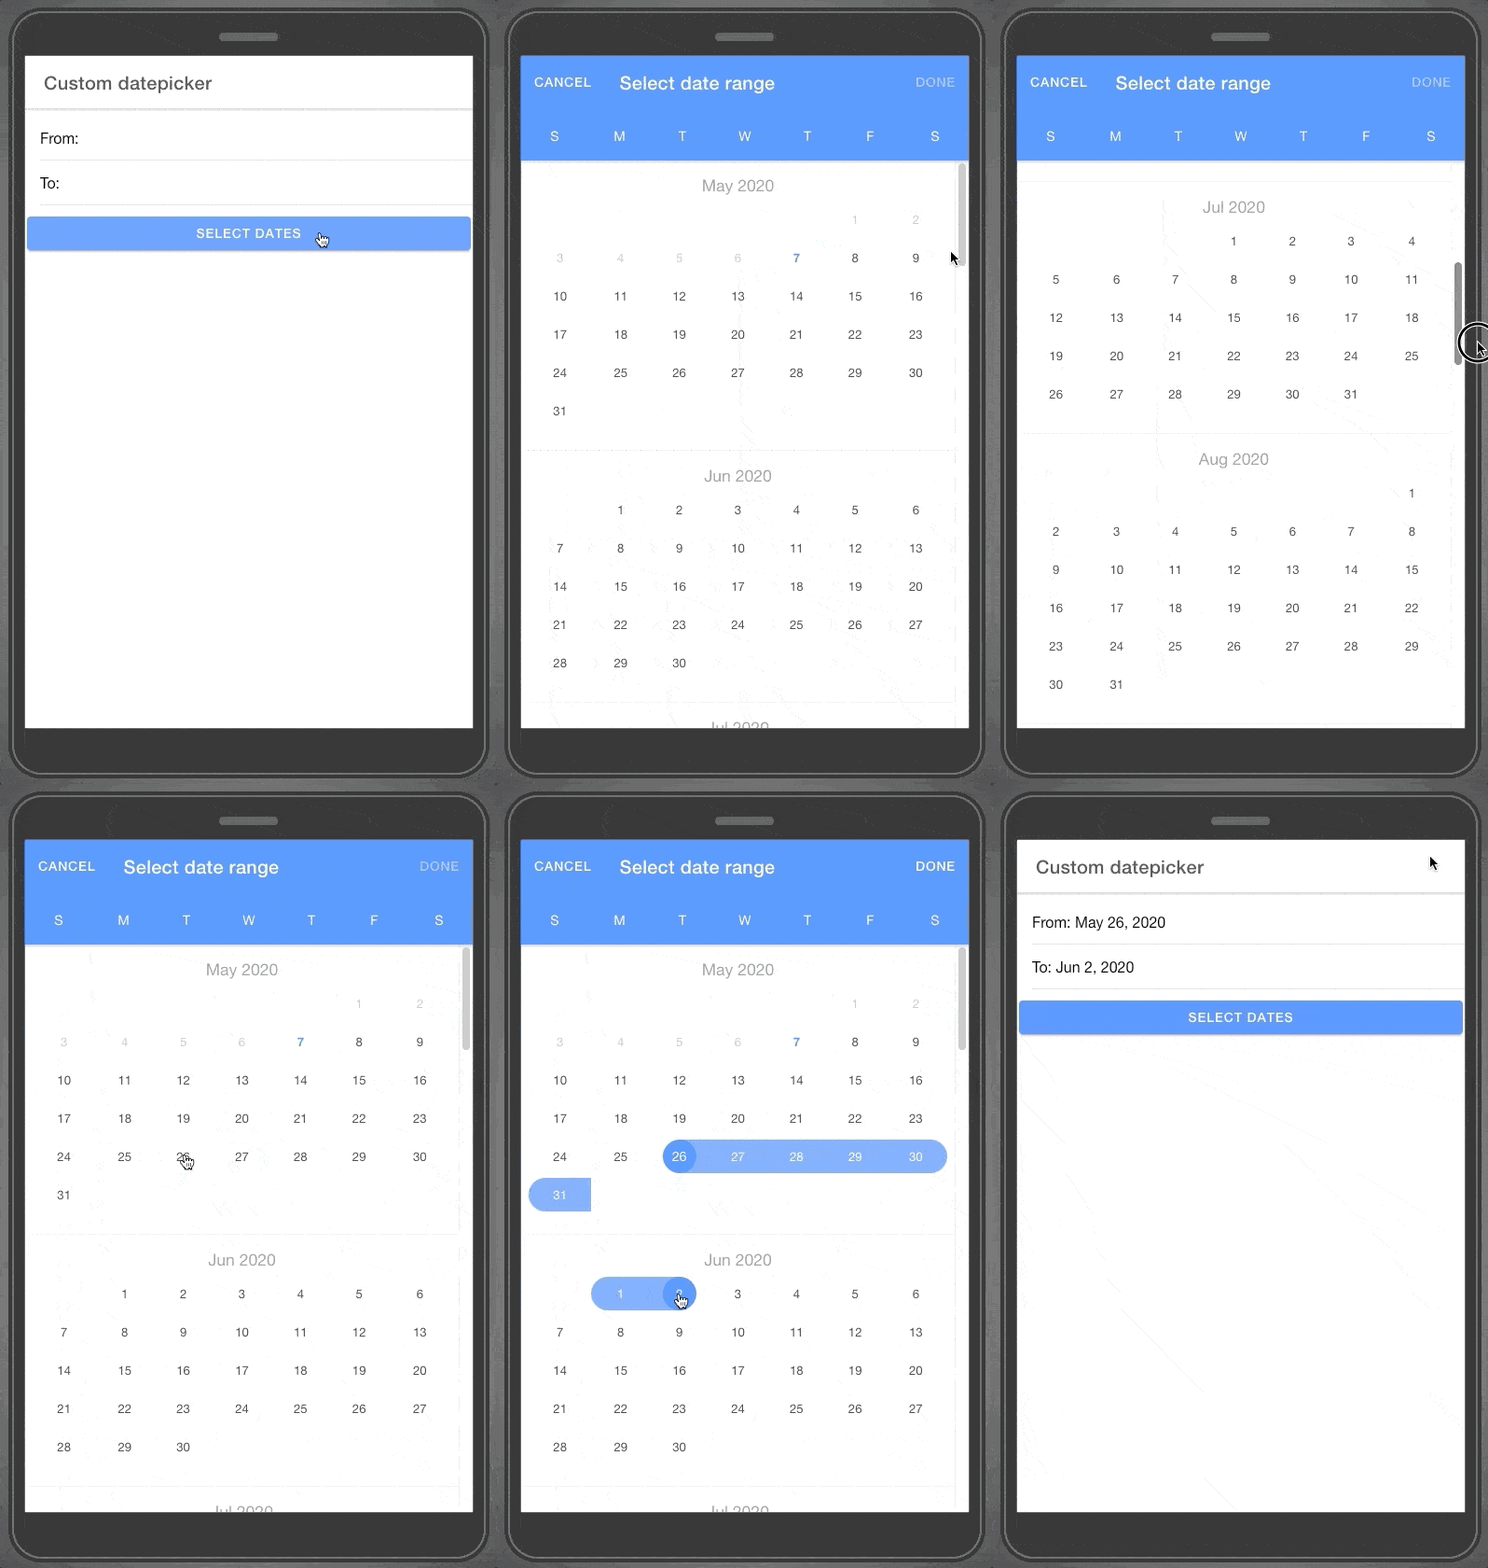
Customizing ion2-calendar datepickerYou can customize the component more flexibly. It supports:
- selecting single date, date range and multi date.
- HTML components.
- disabling weekdays or weekends.
- setting days event.
- setting localization and calendar appearance.
Information on available properties and methods can be found in documentation.
Note that ion2-calendar can be used precisely for the selection of date values. If you need to create integration with the native calendar app, please check Ionic 4 Calendar plug-in tutorial.
