This tutorial demonstrates how to set up the login functionality using forms for handling user input and link it to the Appery.io database.
Introduction
In this sample app tutorial, we will demonstrate how you can create an Ionic 4 login app using forms and where the related services are linked to the Appery.io database.
Important pre-conditionFirst of all, create an Appery.io database and name it myDB.
Downloads and Resources
You can also try it yourself by creating from the backup:
- Download the app backup file.
- Click Create new app.
- Click From backup and select the project backup file on your drive.
- Type in the app name: Ionic 4 Form DB Login App.
- Click Create:
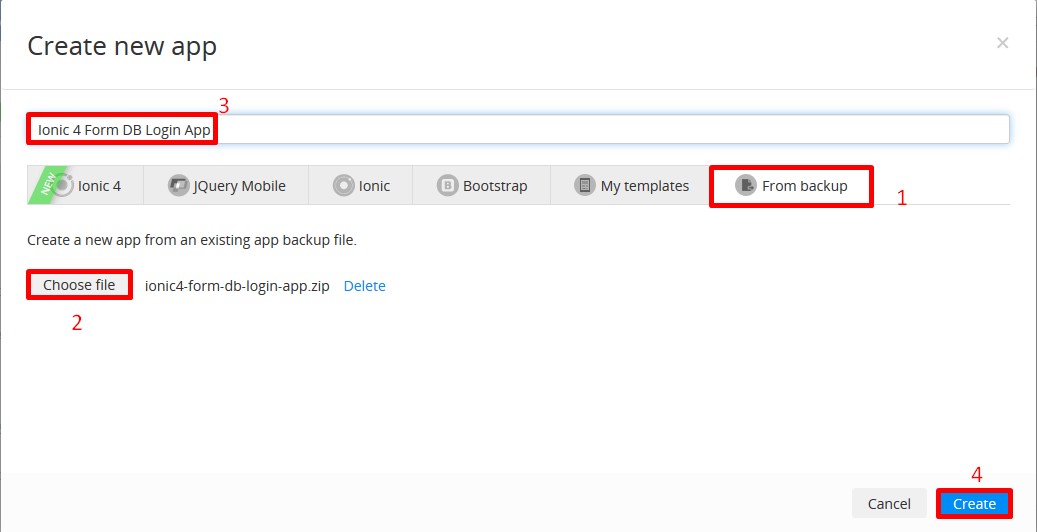
Creating from backup
Defining DB credentialsNote, that if you decide to create from backup but would like to use your database, you will need to modify the default myDB service in your app.
To do it, in the Project view, unfold the Services > myDB > myDB_settings folder and replace the default database_id value with your database ID (can be found in the browser search field or in YOUR DB > Settings > API keys.
Also, if you are interested in the detailed tutorial, please follow the steps below.
Preparing DB
Create a new Appery.io database called myDB and define its Users collection like the following:
- Add three columns of String type: firstName, lastName, and gender.
- Add a column optIn of Boolean type (this option indicates whether the user agrees to receive emails).
- Then, add a row filling in the columns with some data, for example:
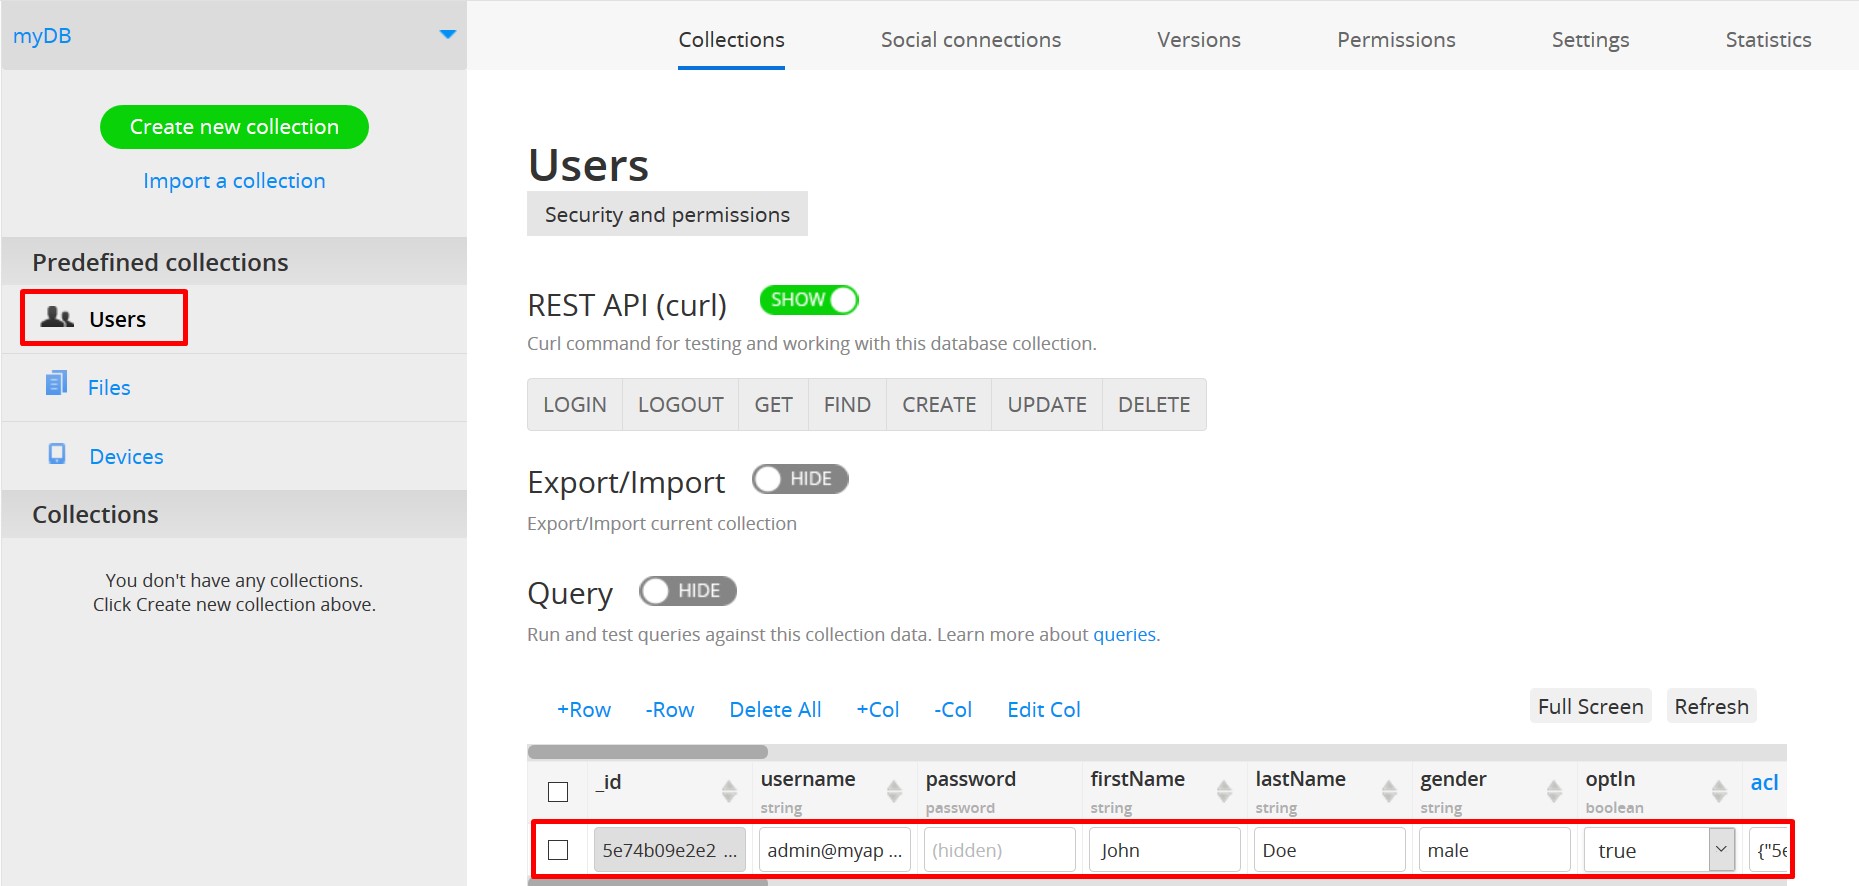
myDB Users collection
Creating App
- Go to the Apps tab and create a new Ionic 4 blank application Ionic 4 Form DB Login App.
- In the Project view, unfold the Pages folder and rename the default Screen1 to LogInPage by using the context menu.
- Click Create New > Page to add another page: ProfilePage. This is the page to be redirected to after logging in.
- Then, from the Project tree, open Project > Routing, make sure that the pages have routes and edit them like the following:
- update the Screen1 route name to LogInPage.
- update the paths, renaming screen1 to login and removing the word
pagefrom both paths, so that you end up with the login and profile paths:

Routing tab
- For this app, we will also need some database user services, so in the Project view, click Create New > Database Service, select myDb database, check Login, Logout, Signup, and Me services and import them into the project:
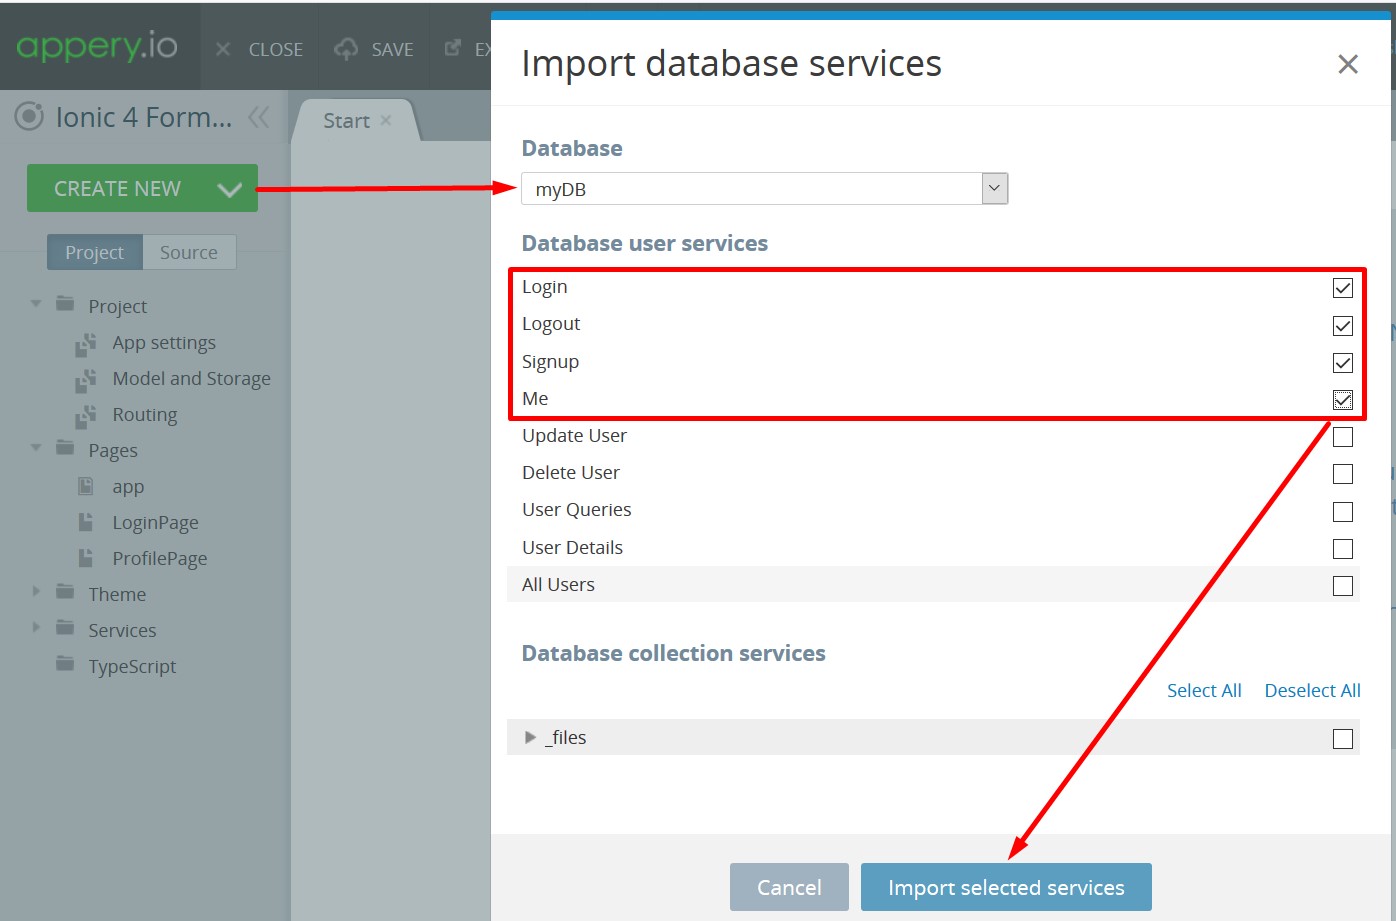
Importing DB Services
The services will be instantly added to the Services folder inside the App Builder.
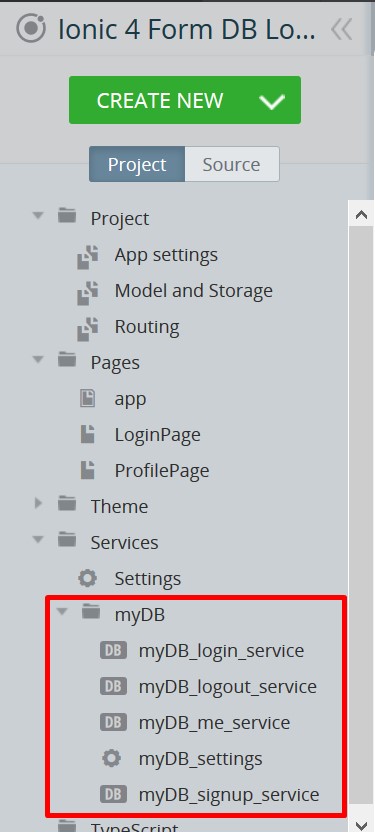
myDB services added
NoteDefining myDb_signup_service created in this step is described in the related Ionic 4 Form DB Signup Sample App tutorial which explains how to extend this tutorial and describes how to add the signup page to the app.
- Also, we will need storage to save the authorization token after logging in or signing up. Open the Model and Storage > Storage asset and add a new storage variable of String type and named token:

Adding storage
Defining LogInPage
LogInPage UI
- Open the DESIGN panel of LogInPage and, under the PROPERTIES panel, set the Footer and Header properties to False to disable the default header and footer:

- The first element to be defined for this page is the company logo, so, drag & drop an Image component to the page, click the Change button for the Image attribute to open the Media Manager window where you can upload the logo image from your drive (should be prepared beforehand) and apply it for the app:
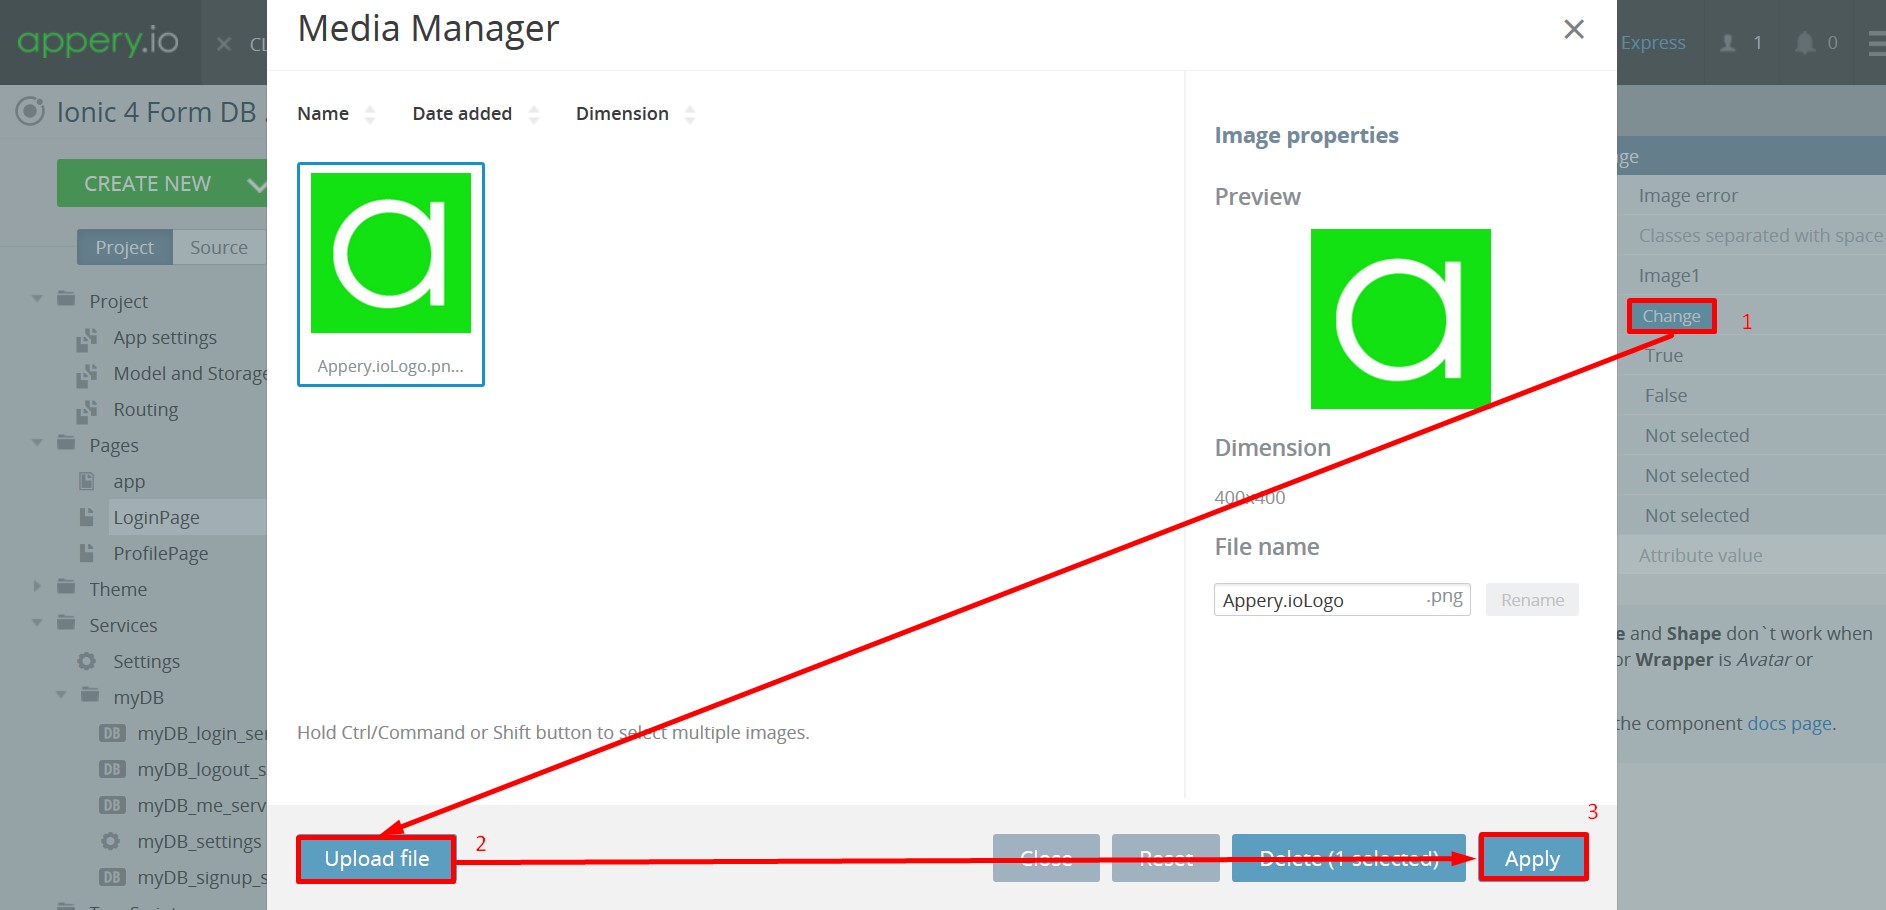
Working with Media Manager
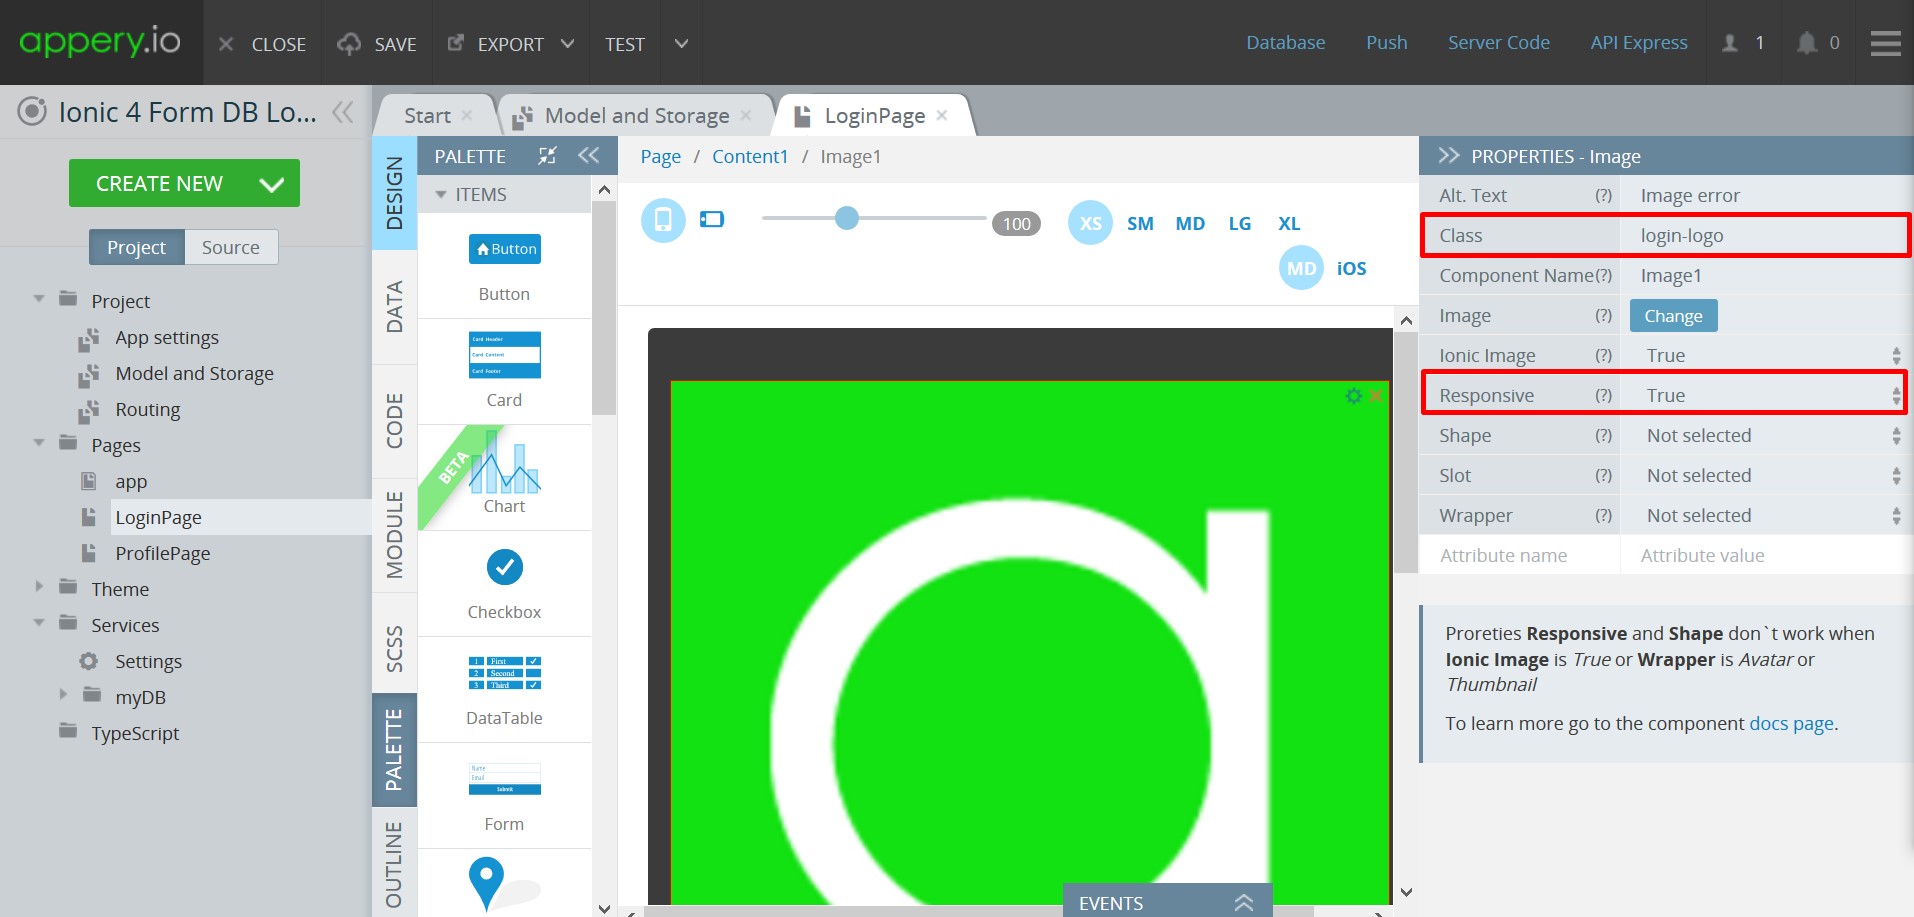
- Set the image Responsive property to True so that it can be automatically adapted to different screen sizes.
- Now, set the image Class to login-logo:
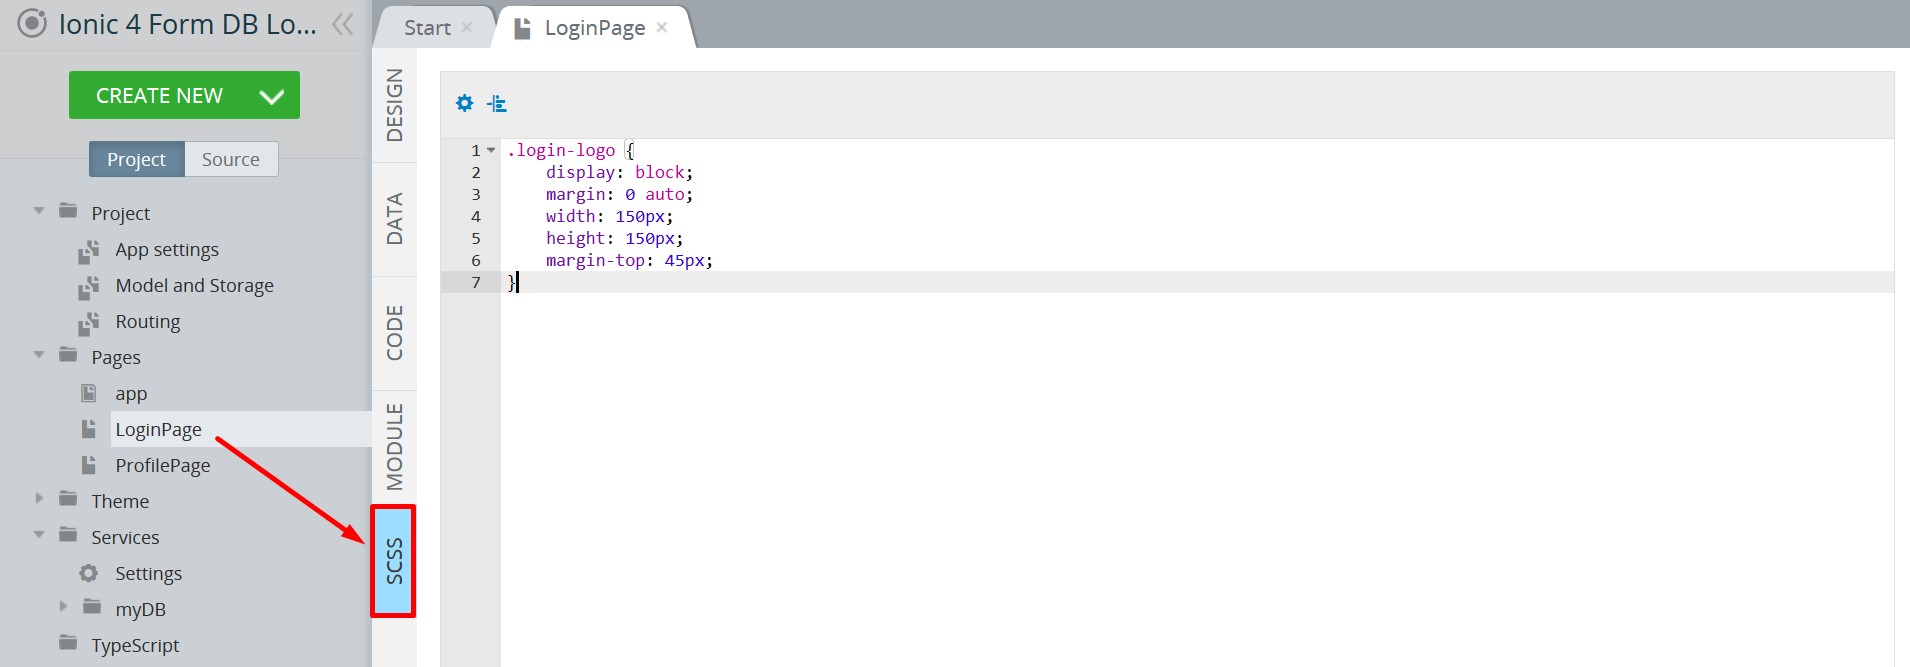
- To see the effect, let's add the below code to the SCSS tab of LogInPage to define this class attribute:
.login-logo {
    display: block;
    margin: 0 auto;
    width: 150px;
    height: 150px;
    margin-top: 45px;
}
Here is how the SCSS panel should look like:
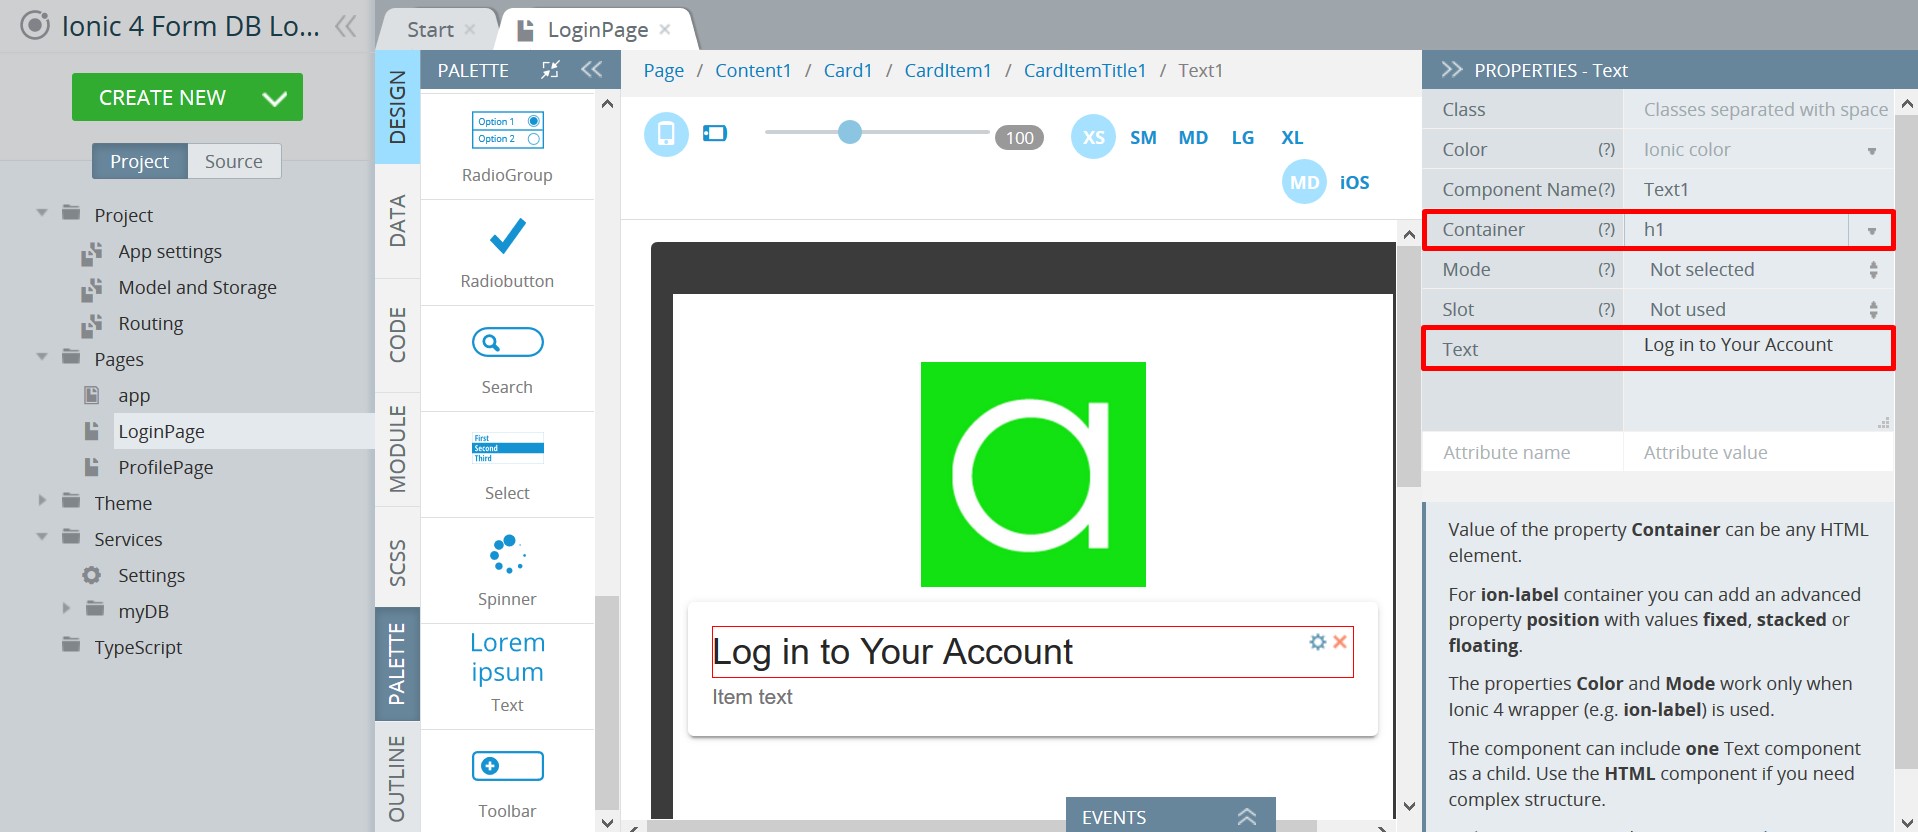
- Now, drag & drop a Card component from PALETTE to the screen content; then, add a Text component to the Card Item Title area and define its properties:
- Container = h1
- Text = Log in to Your Account:
NoteYou can also skip the steps 1-6 and start with adding the Form component as it is the element that provides all the main app logic.
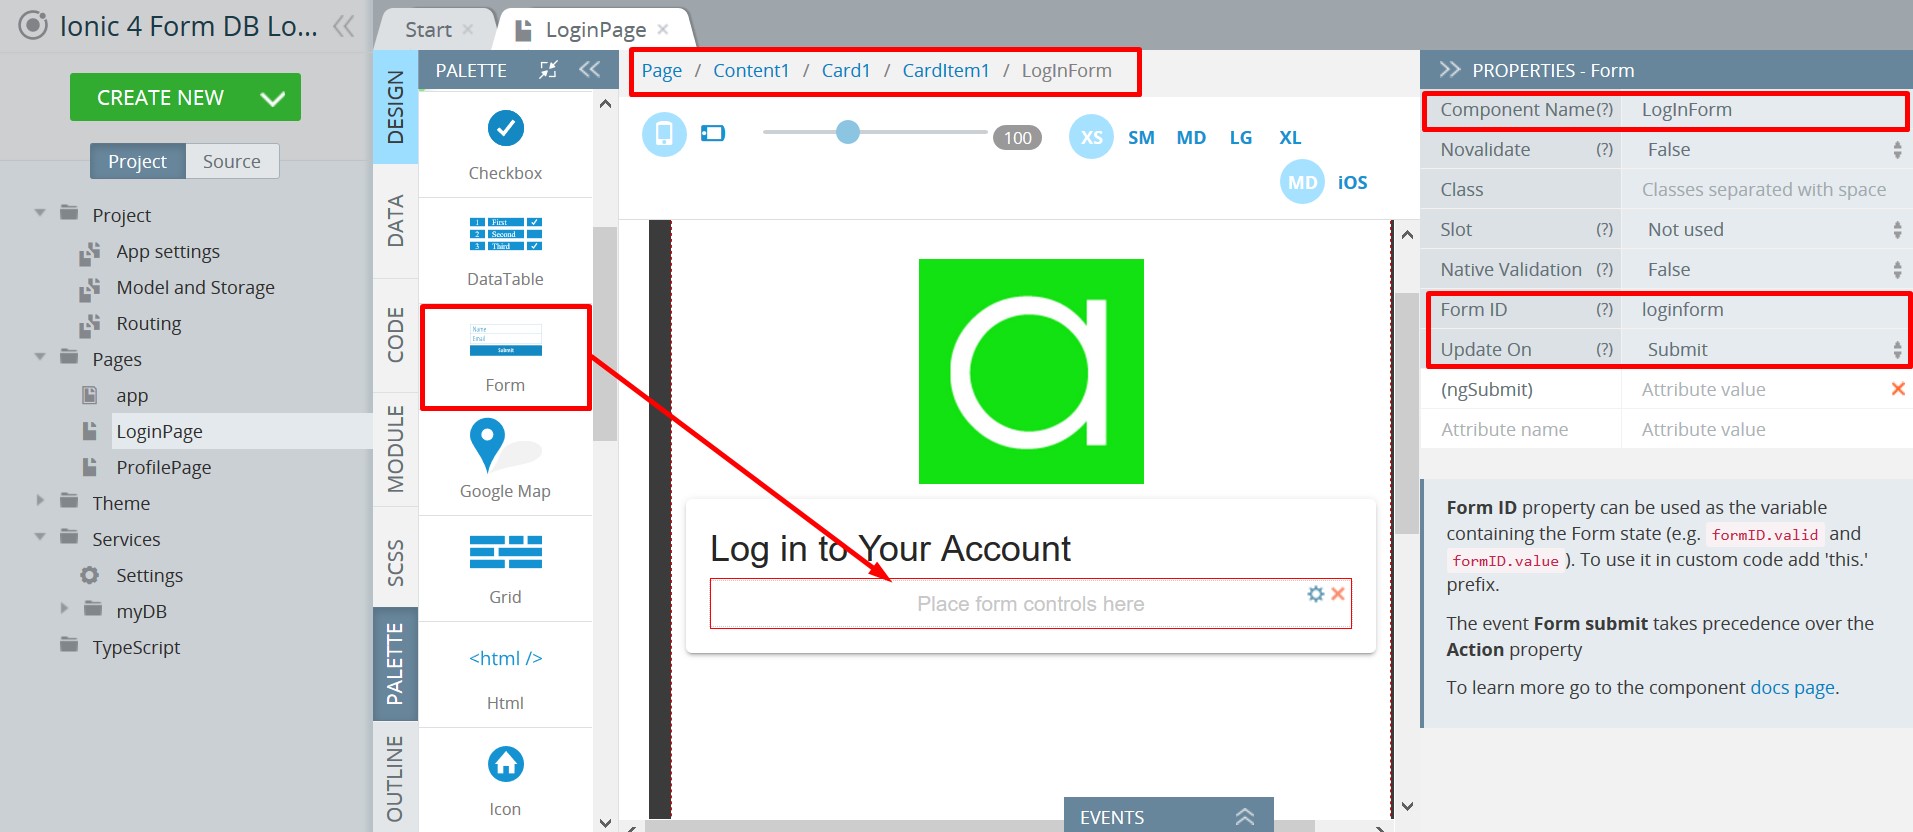
- It's now time to drag & drop a Form component from PALETTE to the Card Item and define the form properties:
- Component Name = LogInForm
- FormID = loginform
- Update On = Submit:
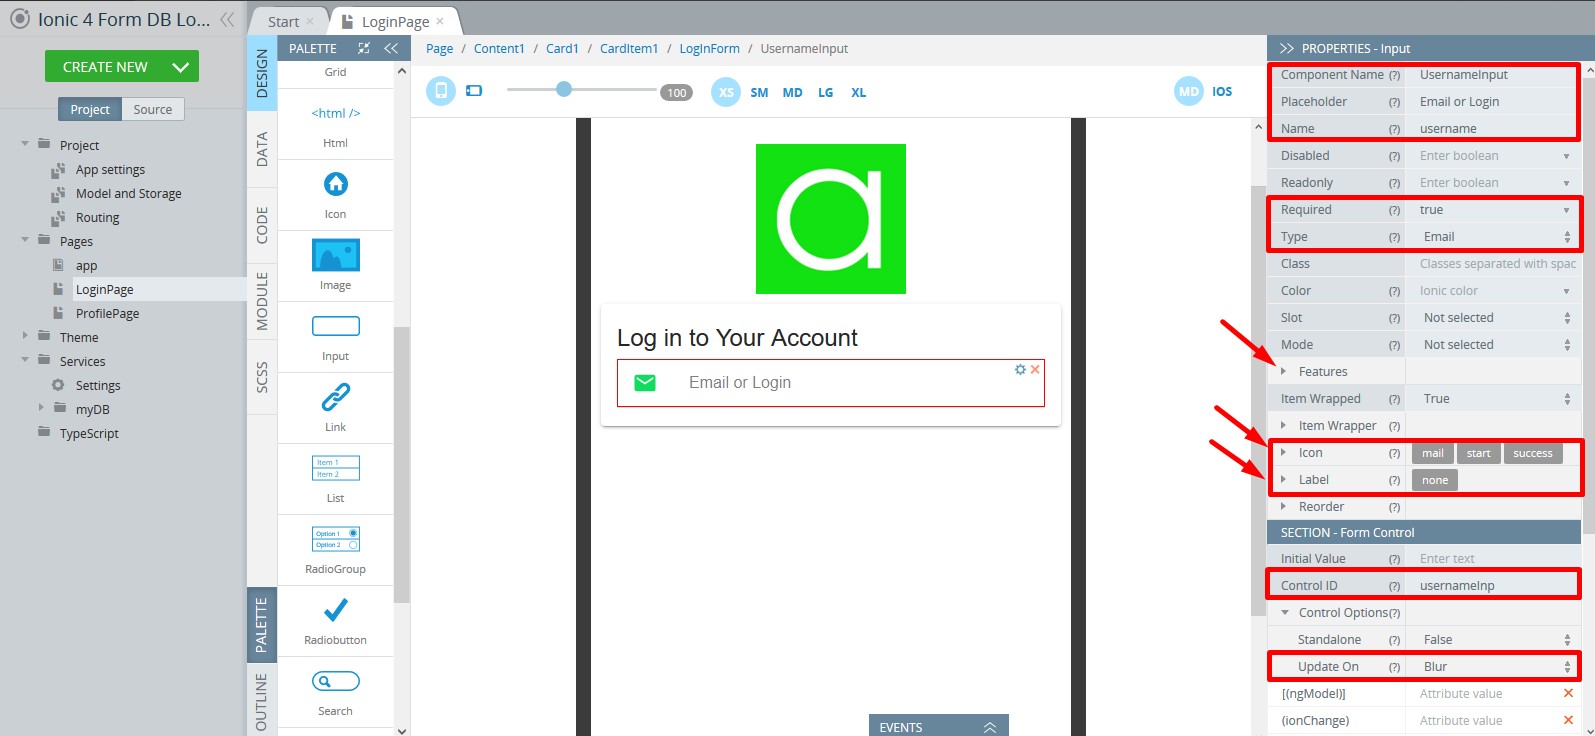
- Drag & drop an Input from PALETTE inside the LogInForm component. It will be the input for username so let's update it with the following properties:
- Component Name = UsernameInput
- Placeholder = Email or Login
- Name = username (note that this property is the name of the parameter submitted with the form data)
- Required = true
- Type = Email
- Features > Pattern = ^[a-zA-Z0-9.!#$%&’+/=?^_`{|}~-]+@[a-zA-Z0-9-]+(?:.[a-zA-Z0-9-]+)$ (the HTML pattern for input validation, in our app we will allow only email as username, but you may add any validation if you need it).
- Icon > Color = success
- Icon > Slot = Start
- Icon > Style = mail
- Label > Text = clear the text field
- Control ID = usernameInp
- Control Options > Update On = Blur:
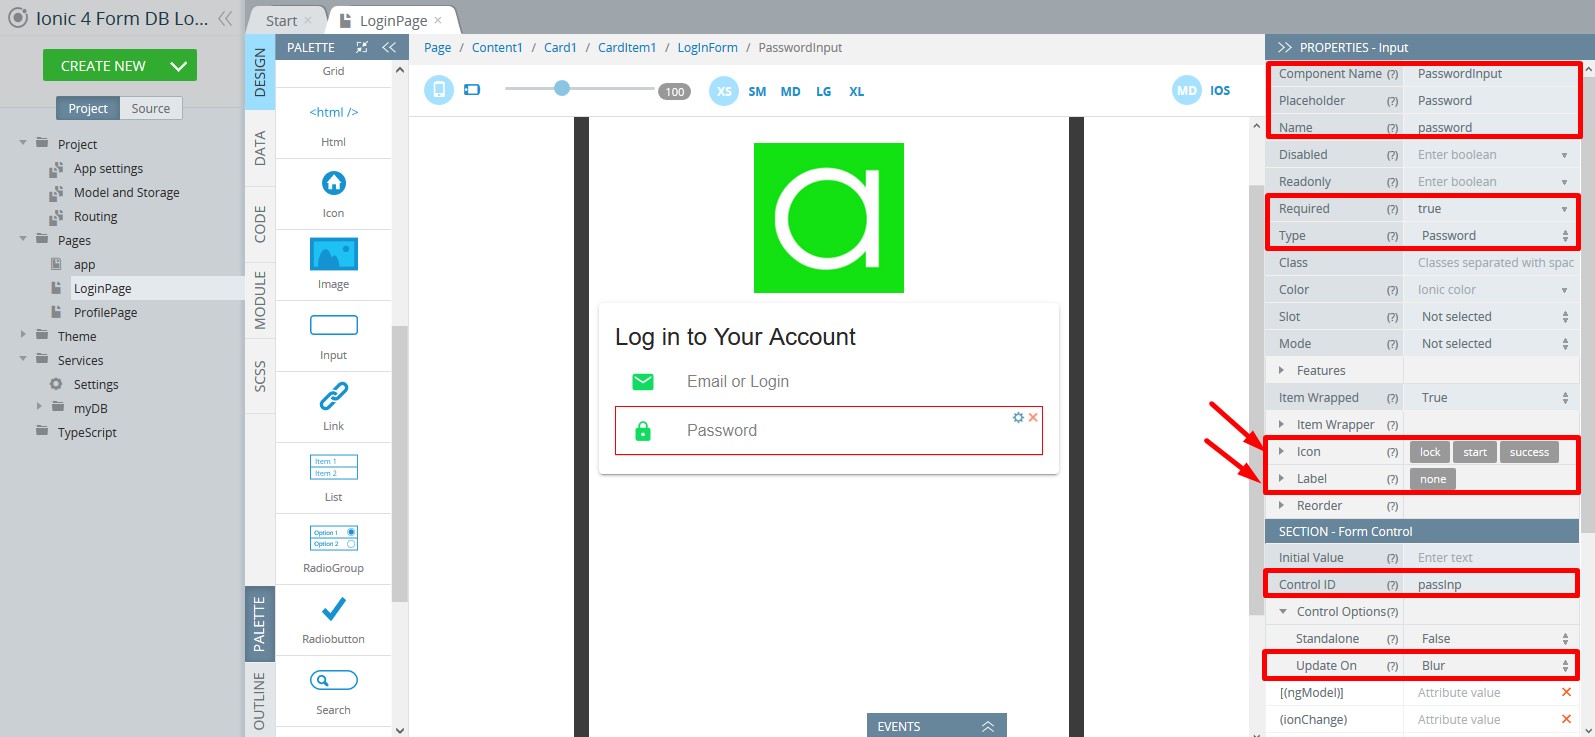
- Drag & drop another Input into LogInForm. It should be defined as the input for password, so let's set up the following properties:
- Component Name = PasswordInput
- Placeholder = Password
- Name = password
- Required = true
- Type = Password
- Icon > Color = success
- Icon > Slot = Start
- Icon > Style = lock
- Label >Text = clear the text field
- Control ID = passInp
- Control Options > Update On = Blur:
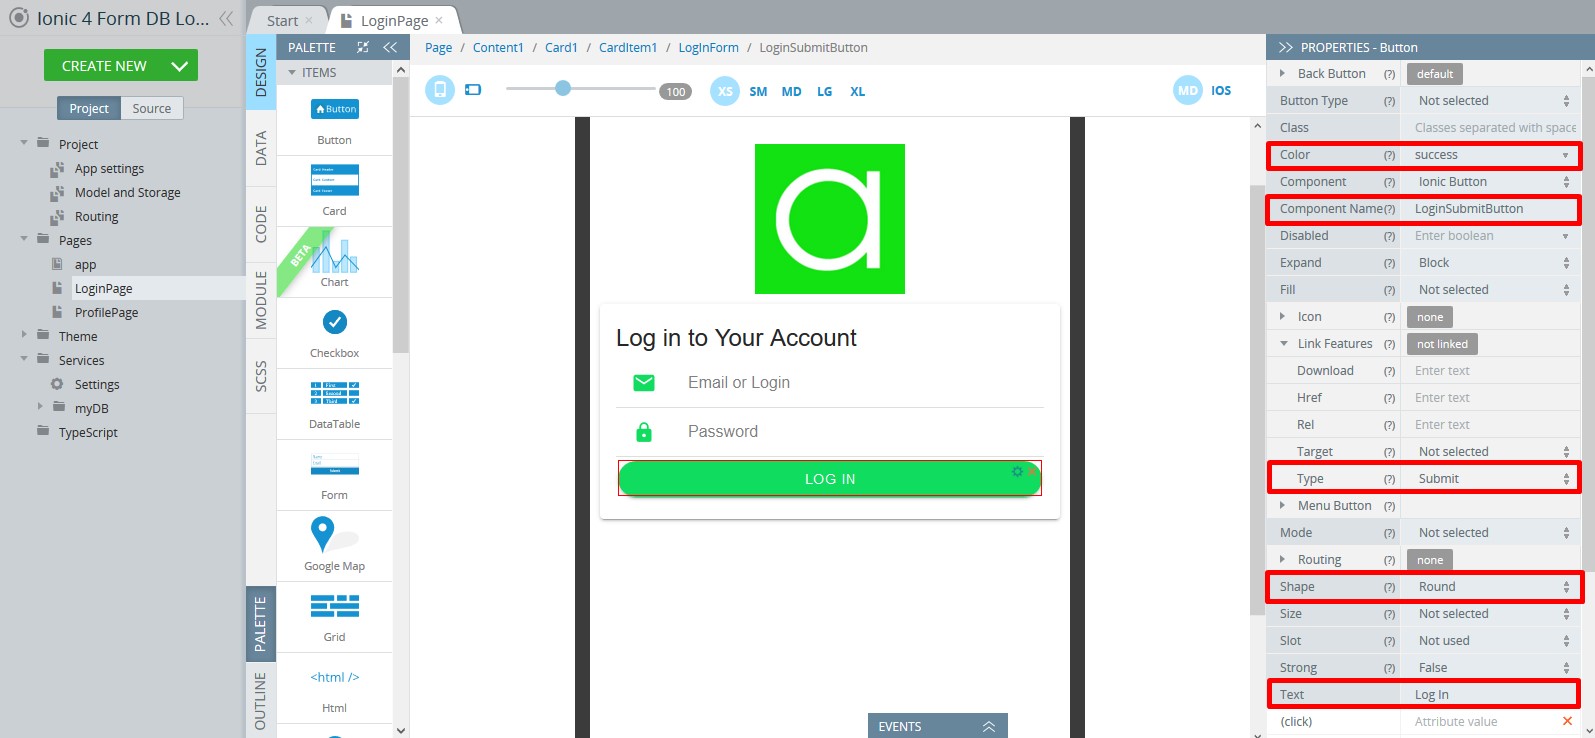
- Drag & drop a Button from PALETTE into LogInForm. Let's update it with the following properties to define a submit buton:
- Color = success
- Component Name = LoginSubmitButton
- Link Features > Type = Submit
- Shape = Round
- Text = Log In:
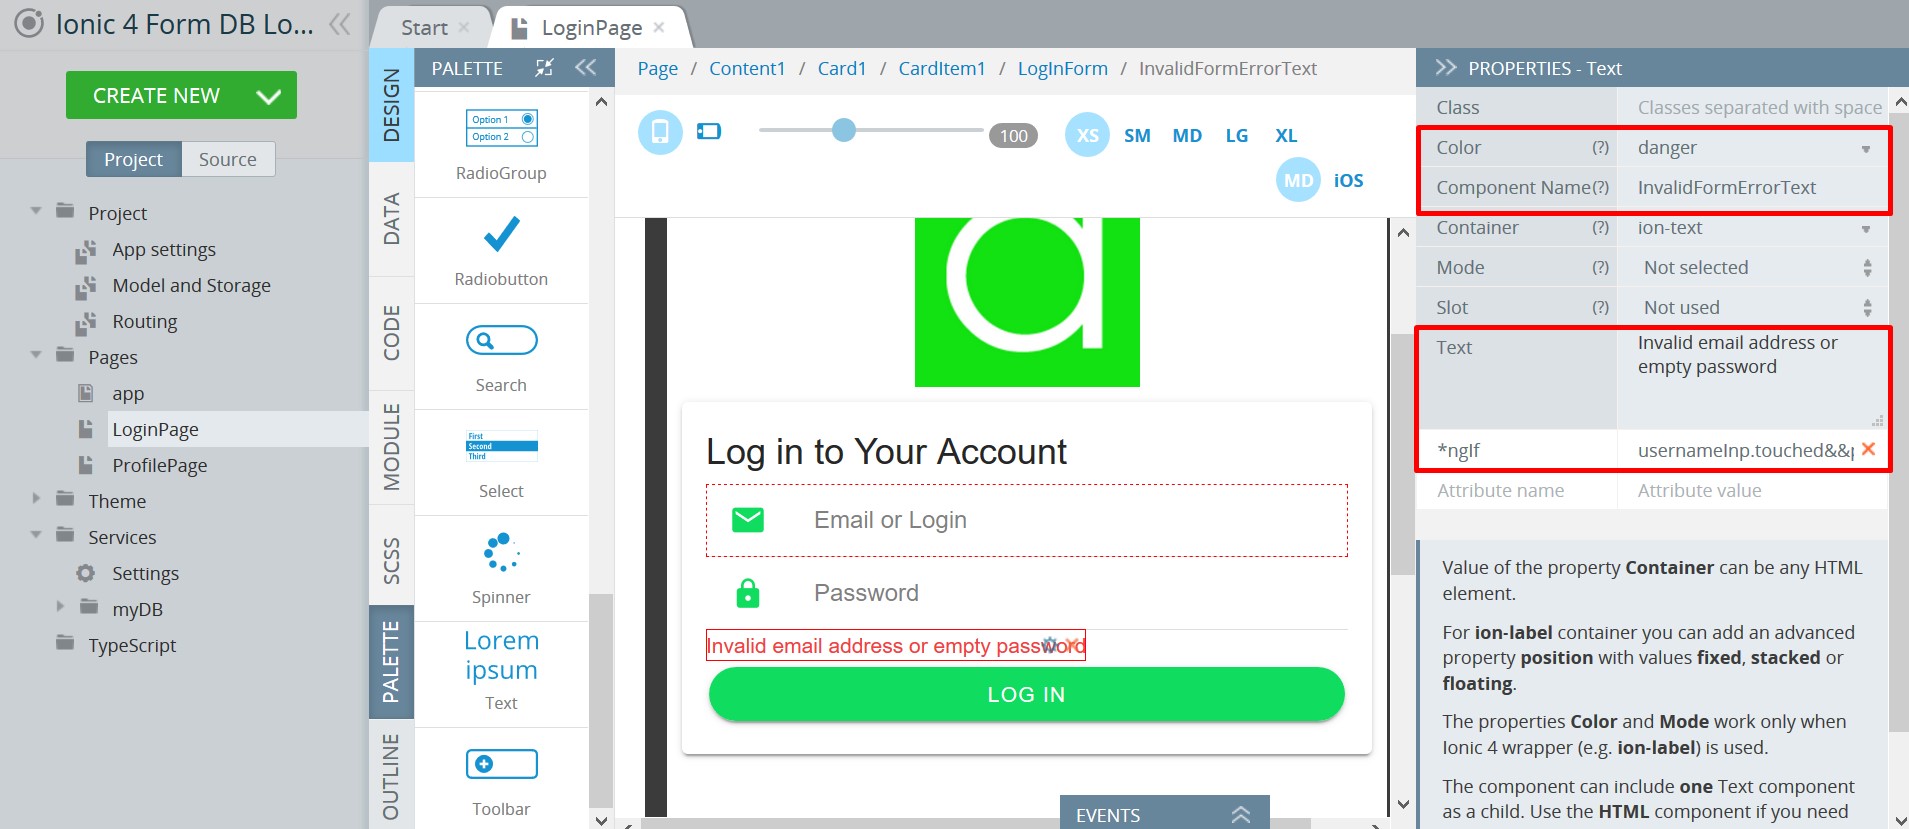
- Drag & drop a Text component from PALETTE to LogInForm below the PasswordInput, we will use it as the validation error message, so let's set up its properties:
- Color = danger
- Component Name = InvalidFormErrorText
- Text = Invalid email address or empty password
- add a new attribute: *ngIf = usernameInp.touched&&passInp.touched&&loginform.invalid (if both inputs are provided but one of them is invalid, the error message will appear and the form will not be submitted):
LogInPage Logic
Now, when the UI is done, let's add the service invocation on form submitting.
- Open the DATA panel and, by clicking the Add button, add myDb_login_service for datasource, then rename it to logIn.
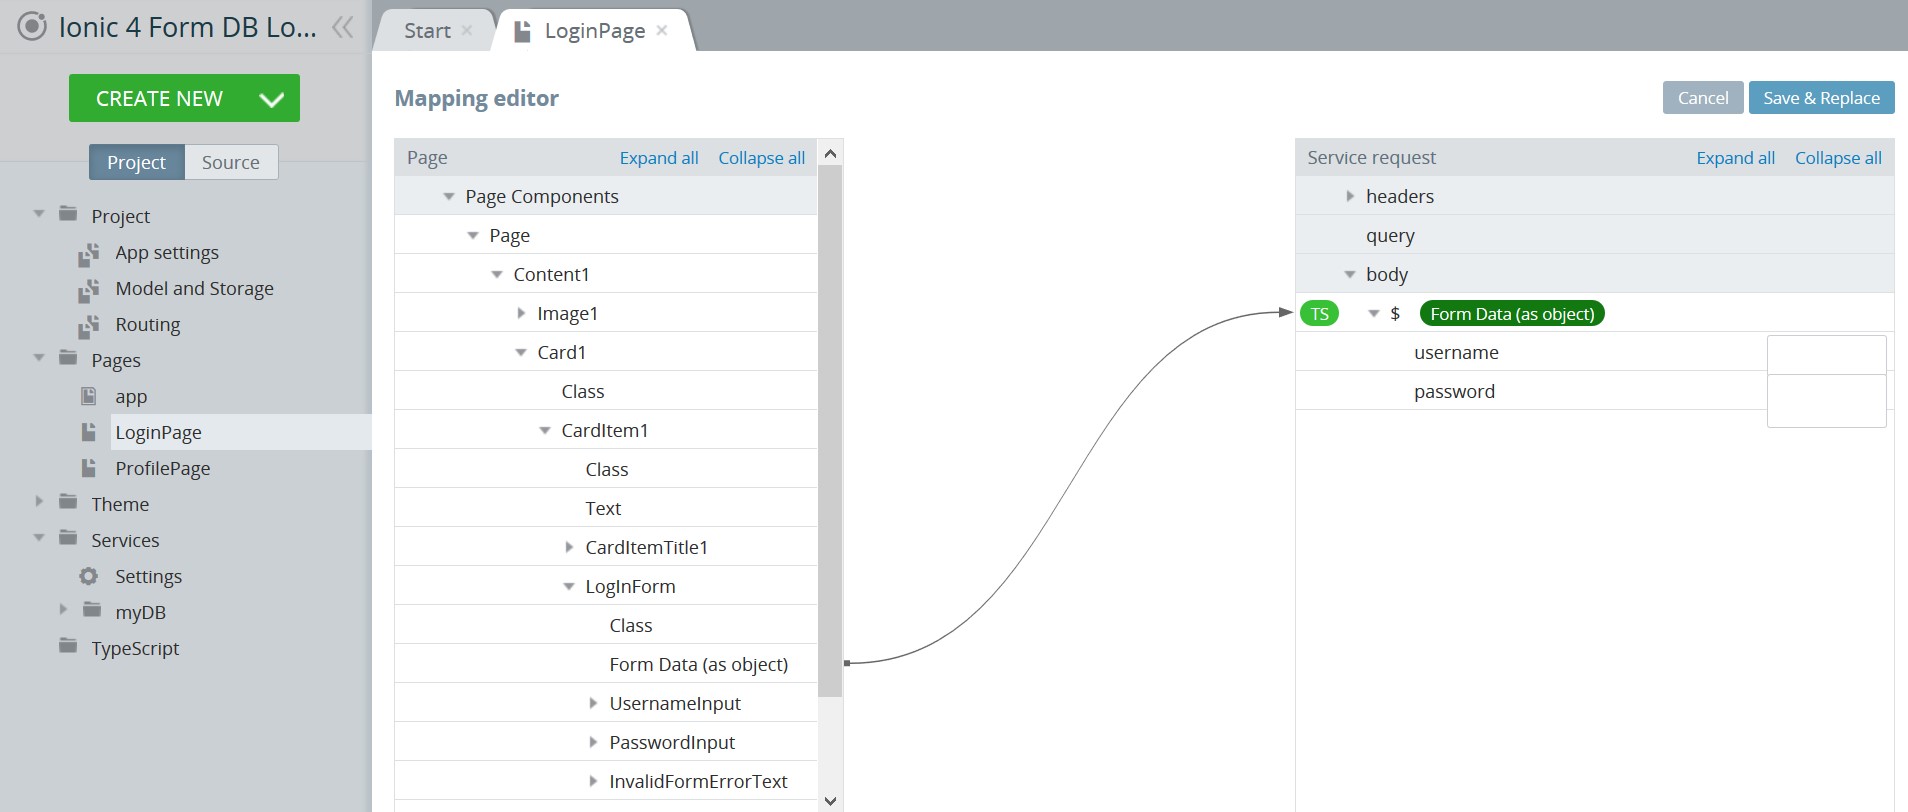
- Edit the Before send mapping of logIn service mapping the Form Data (as object) property to the $ body service request, and save:
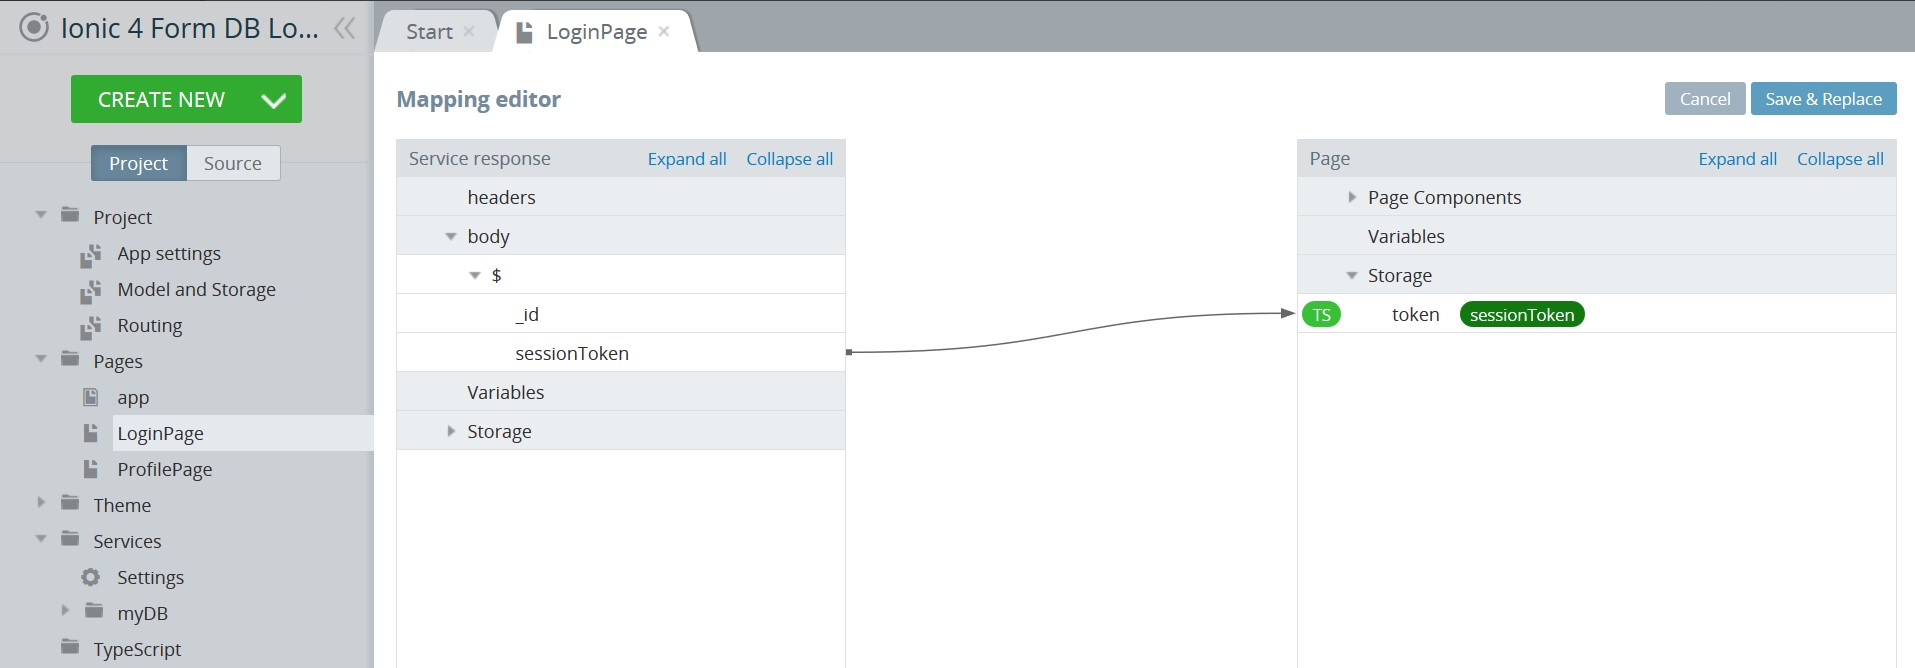
- Now, edit Success mapping, map the sesionToken response to the token storage, then click Save & Replace to save the work:
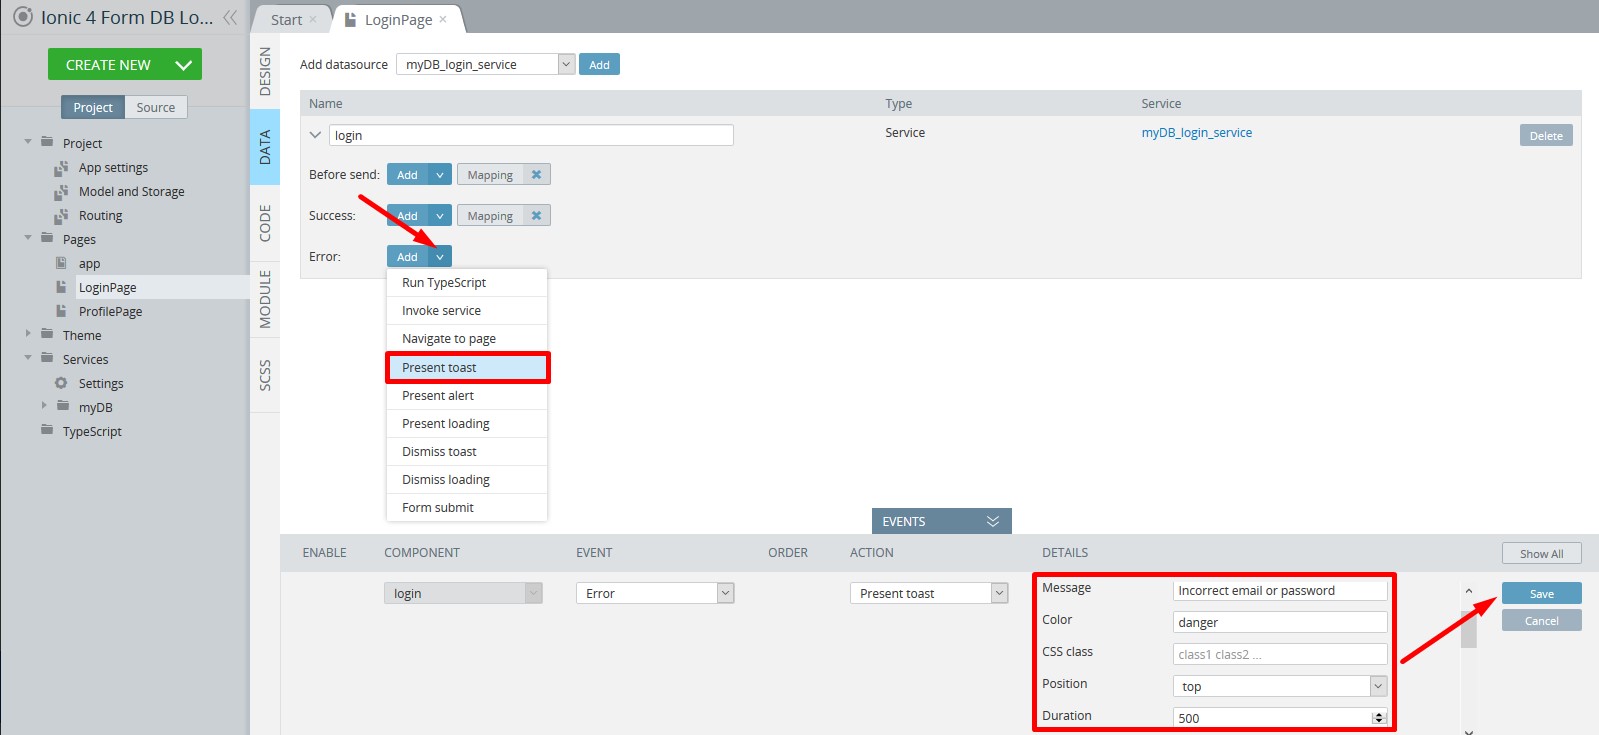
- Add the Present toast action to Error event to show an error message about unsuccessful logging in and set its:
- Message = Incorrect email or password
- Color = danger
- Position = top
- Duration = 500:
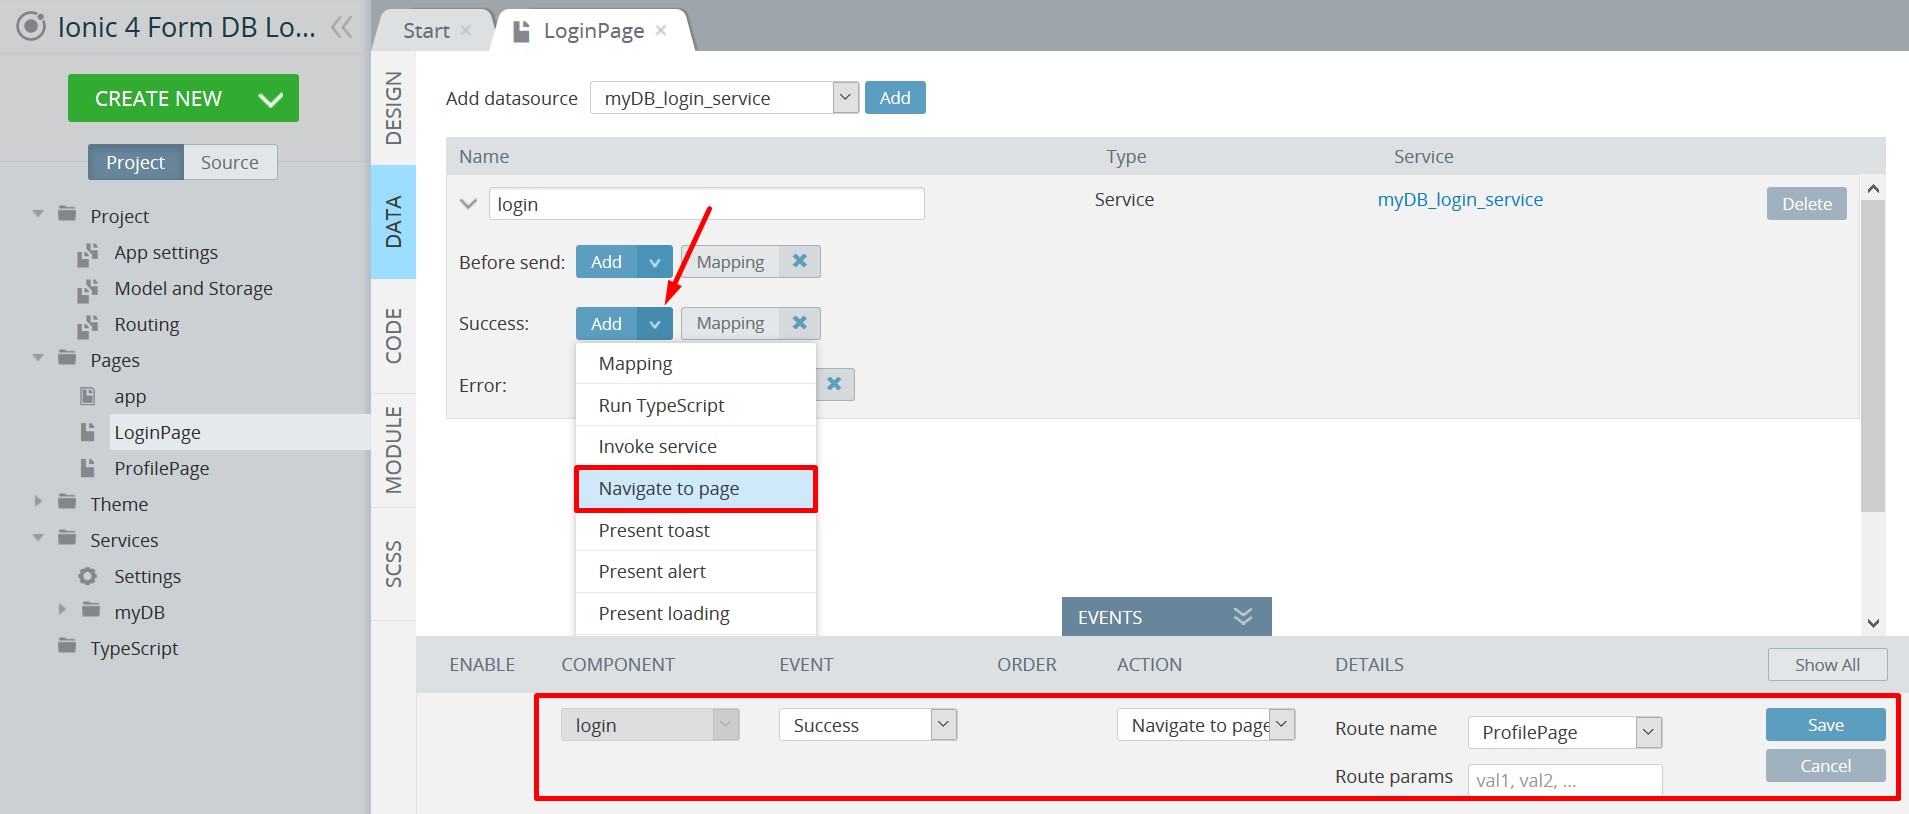
- Add Navigate to page action to Success event. After successful login, we should be navigated to the Profile page, so select it in the action parameters and save:
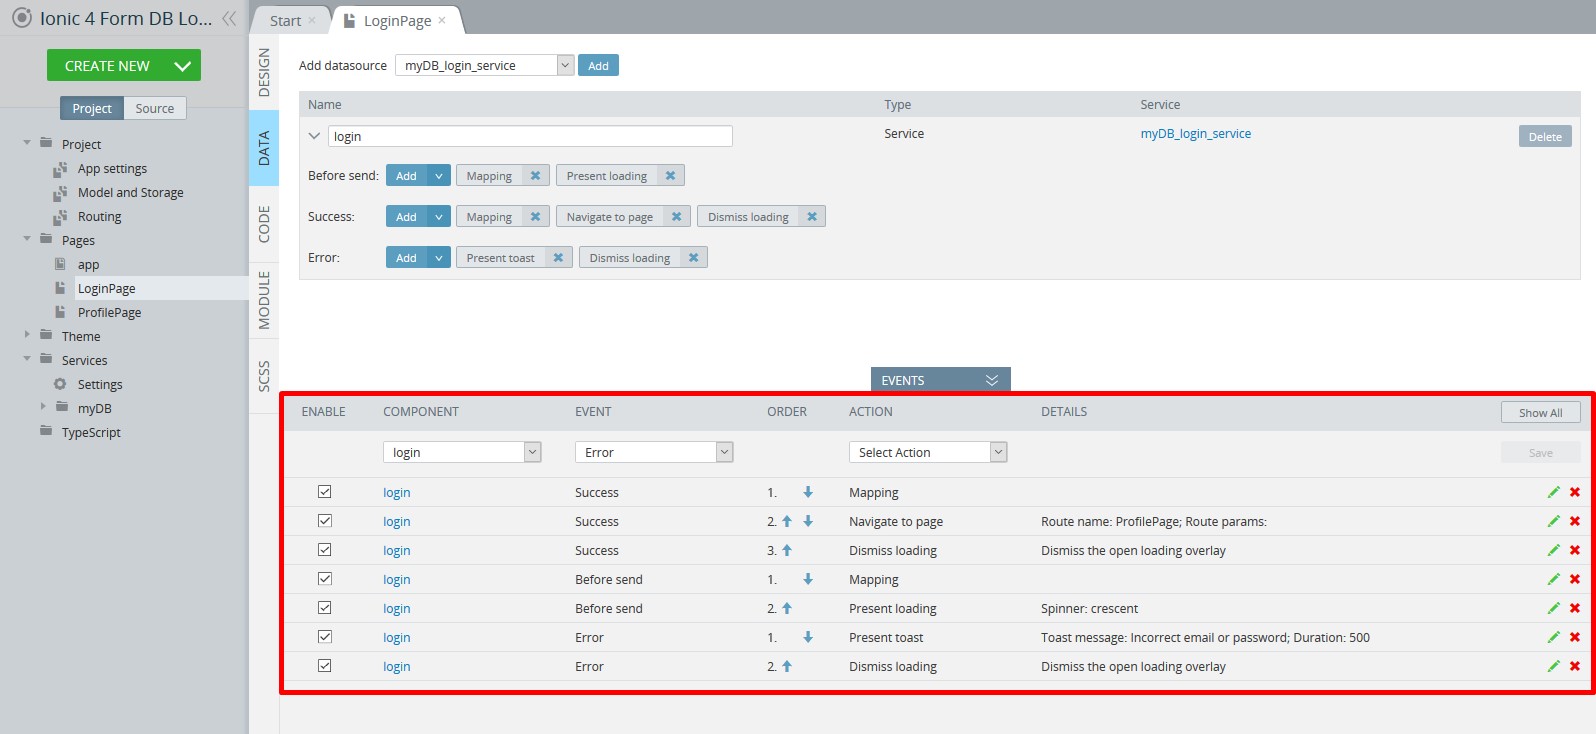
- Also, as a good practice, let's add the Present loading action (with crescent for its Spinner property) to Before send and the Dismiss loading action to Success and Error events.
Here is how the DATA panel of LoginPage with all the events defined should look like:
Now, to the last step for the login procedure.
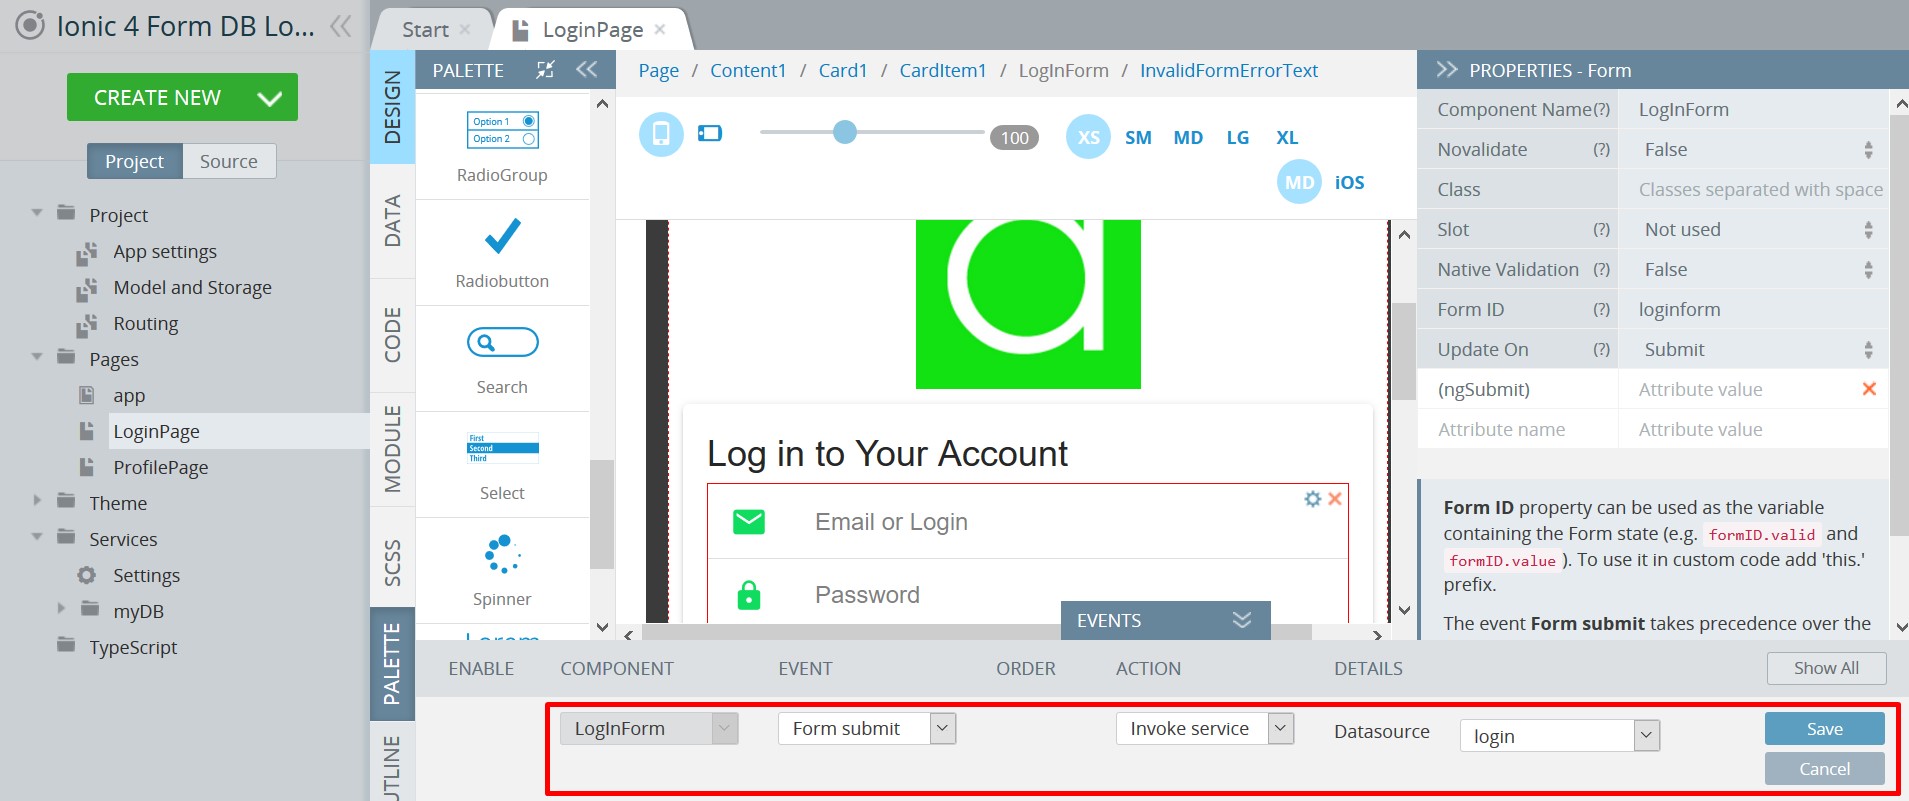
7. Go back to the DESIGN panel, select LogInForm, unfold the EVENTS tab, and add the action Invoke service with the login datasource to Form submit event:
Defining ProfilePage
ProfilePage UI
Now, let's define the ProfilePage asset.
- Select the ToolbarTitle component and change its Text property to Welcome {{firstName}} {{lastName}}.
- Drag & drop a Button to the ToolbarButtons area and set its attributes as the following:
- Component Name = LogOutButton
- Icon > Color = medium
- Icon > Slot = Icon Only
- Icon > Style = log-out
- Text = clear the text field
- Drag & drop a Card component to the screen and add 4 more items into it by click the green + button on the Card element.
- Select CardItemTitle and set its Title Text to Profile.
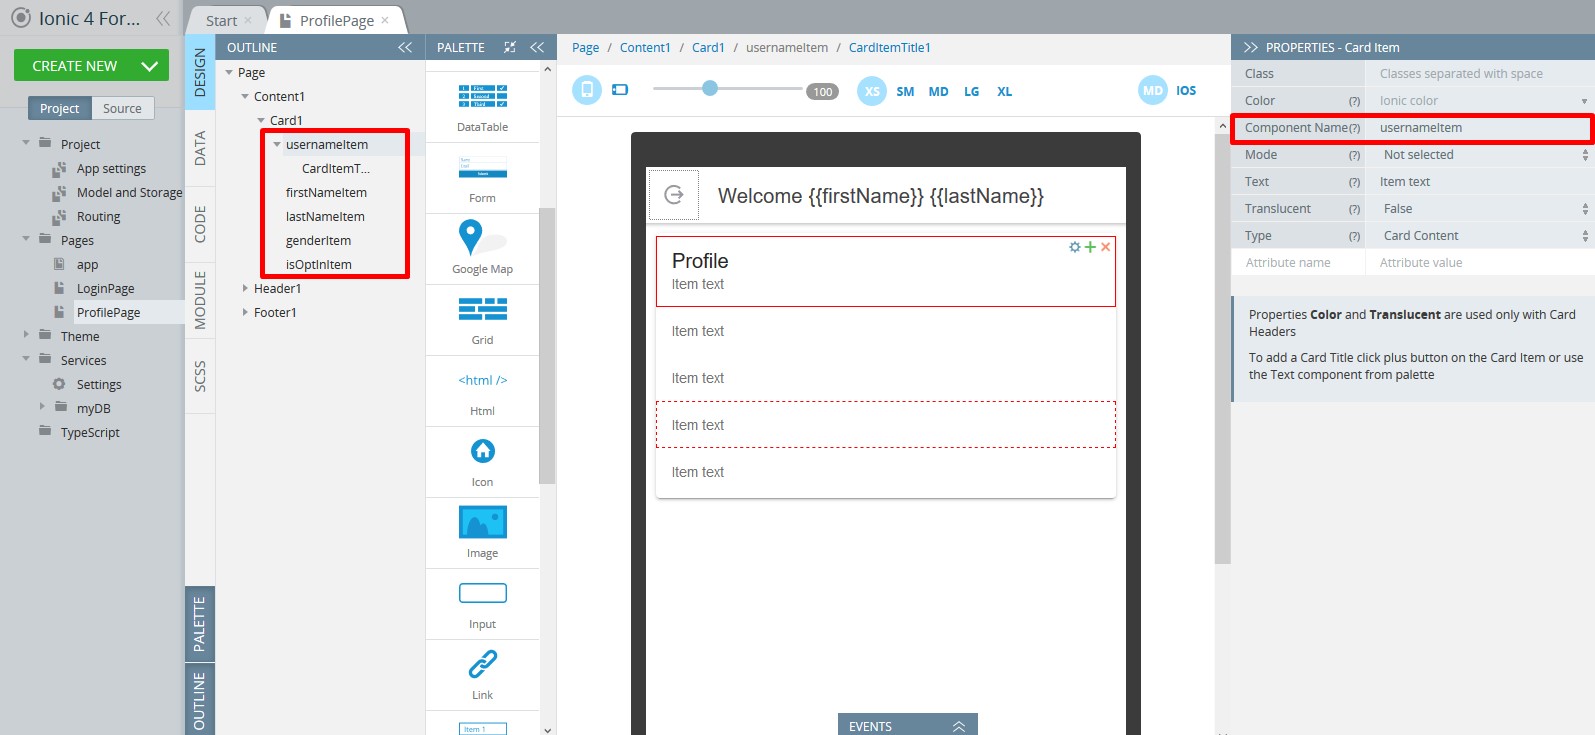
- Then, one by one, select CardItems' Component names attributes and give them human readable Component Name: usernameItem, firstNameItem, lastNameItem, genderItem, isOptInItem.
ProfilePage Logic
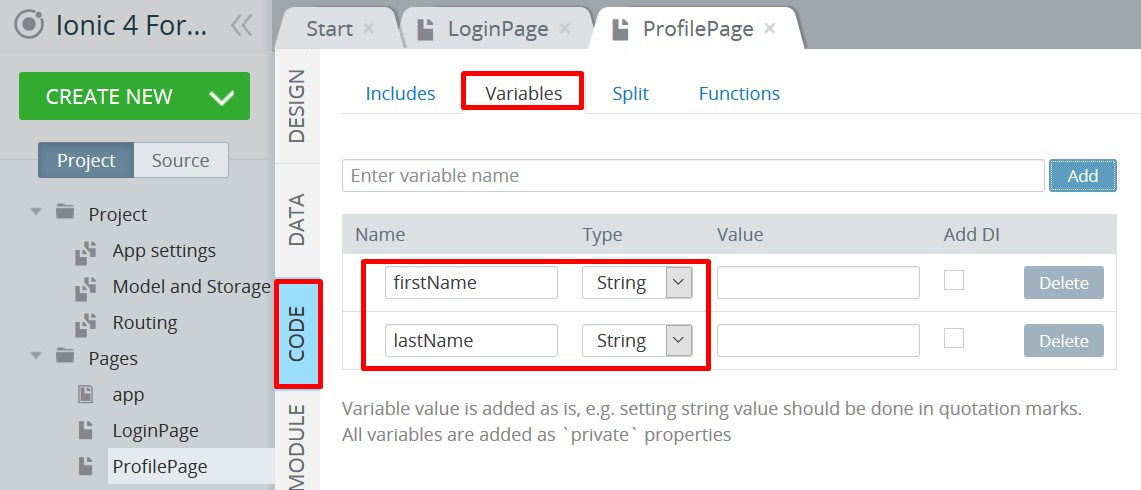
- Now, when the page UI is ready, we can continue to add services but first, open the CODE tab and add 2 new variables of String type: firstName and lastName (for the welcoming message in the ProfilePage header):
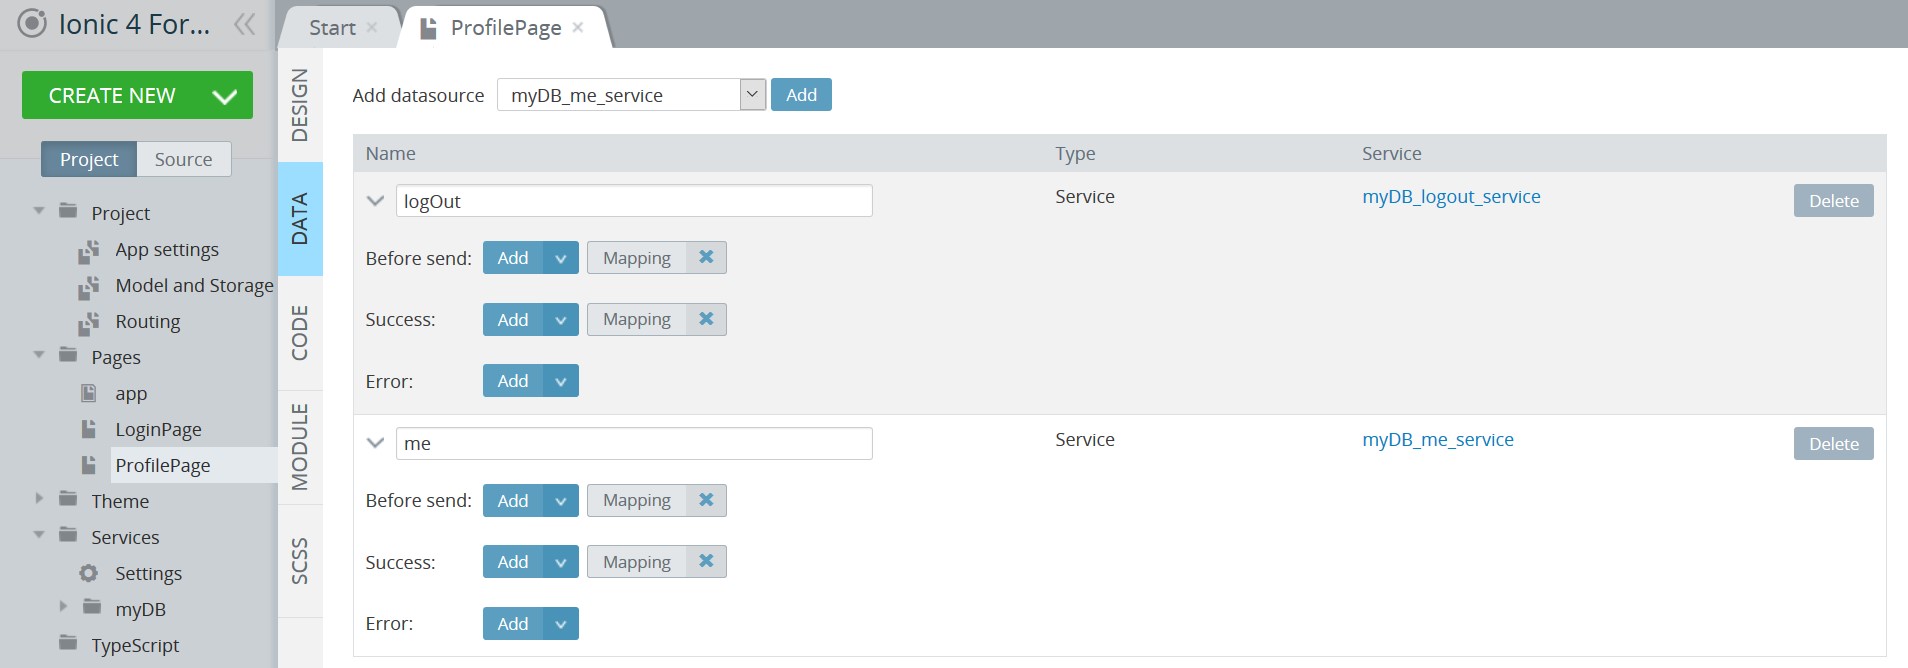
- Open the DATA tab and add myDb_logout_service as datasource, rename it to logOut, then add myDb_me_service as datasource and rename it to me:
- Edit the Before send mapping of logOut service and map the token storage property to X-Appery-Session-Token service header request:

- Add Navigate to page action to Success event of logout. After successful logout, we should navigate to the LogInPage, so select it in the action parameters.
- After that, switch to me service and edit its Before send mapping to map the token storage property to X-Appery-Session-Token service header request:

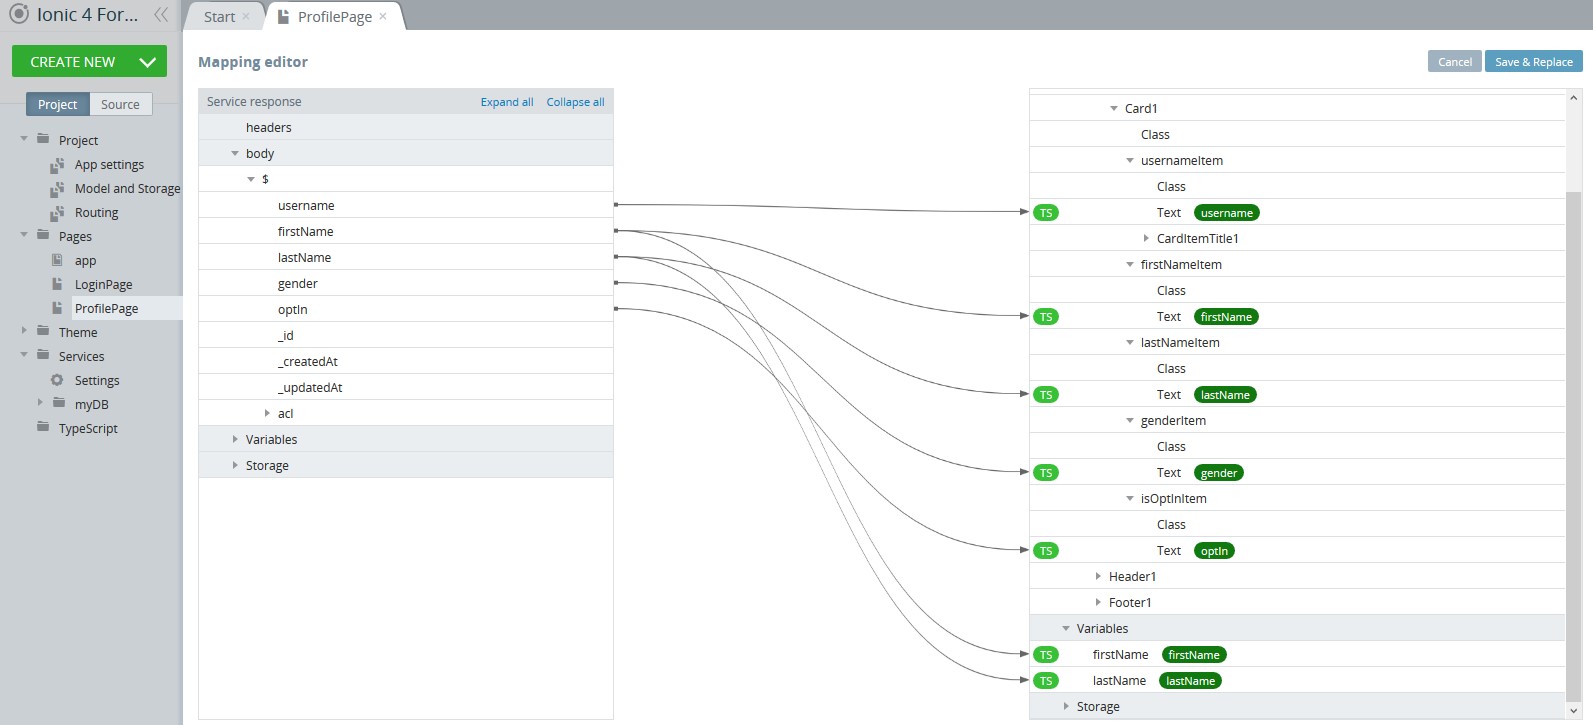
- Also, edit the Success mapping of me service and map username, firstName, lastName, gender, and optIn response parameters to the corresponding CardItem > Text properties. Also, map the firstName and lastName response parameters to the firstName and lastName variables:
- As a good practice, let's also add Present loading action (with Loading... for its Message) to Before send event and Dismiss loading action to the Success and Error events of both datasources:
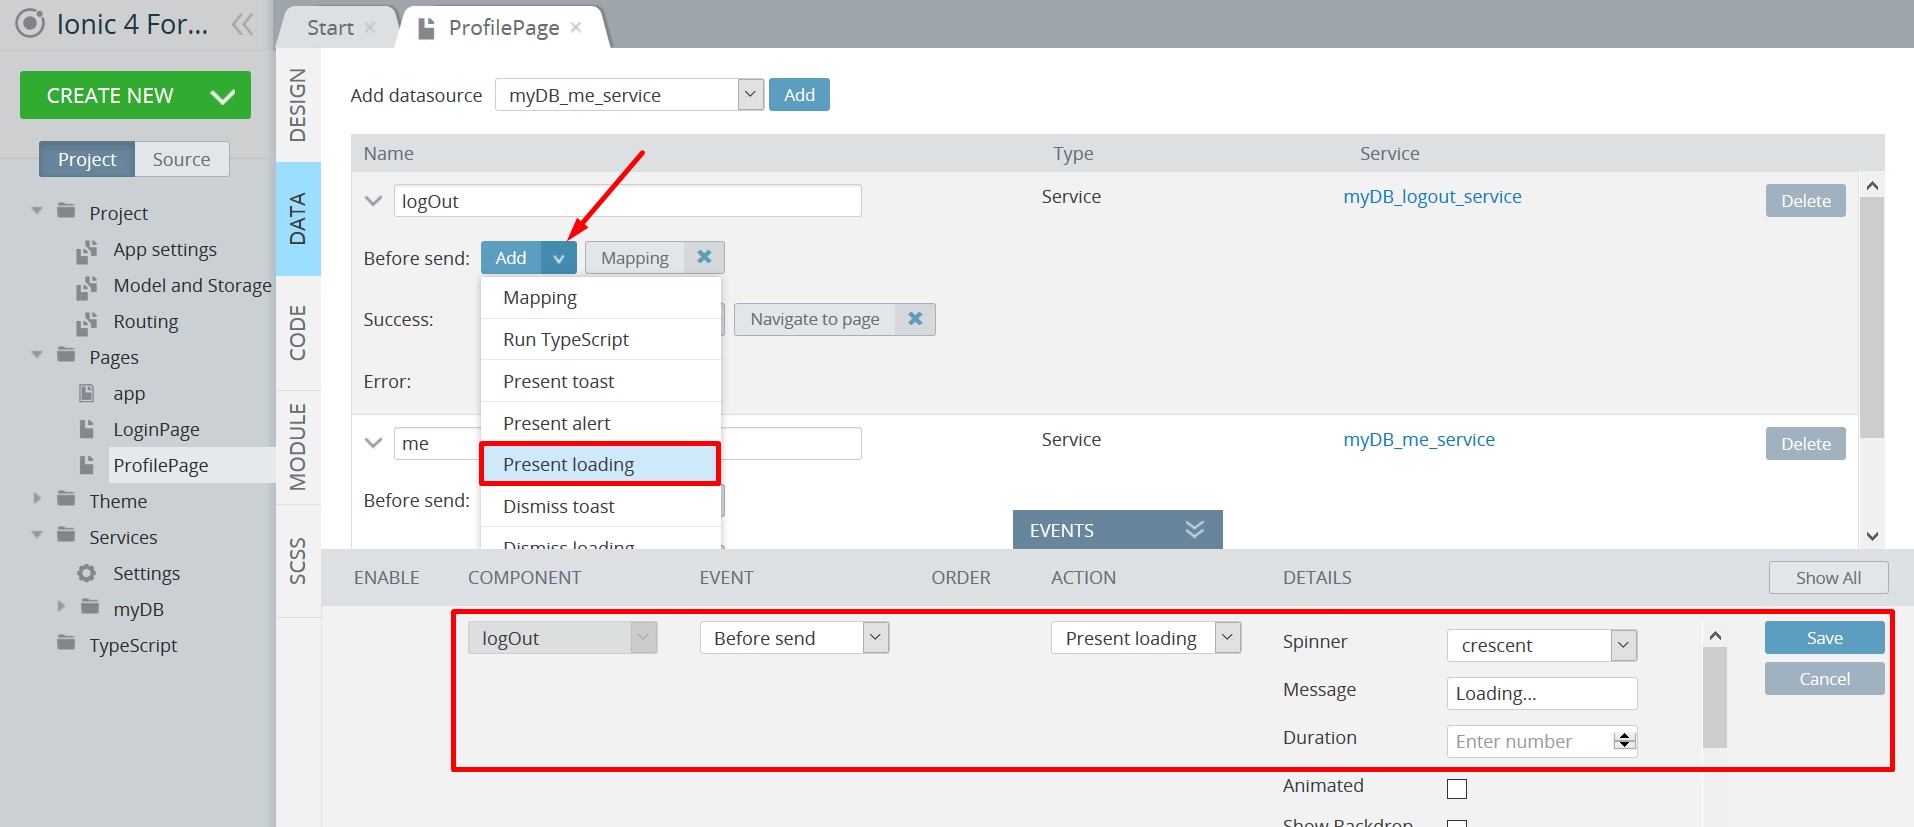
Adding Present loading action to Before send event of logOut service
Here is how the DATA panel of ProfilePage with all the events defined should look like:
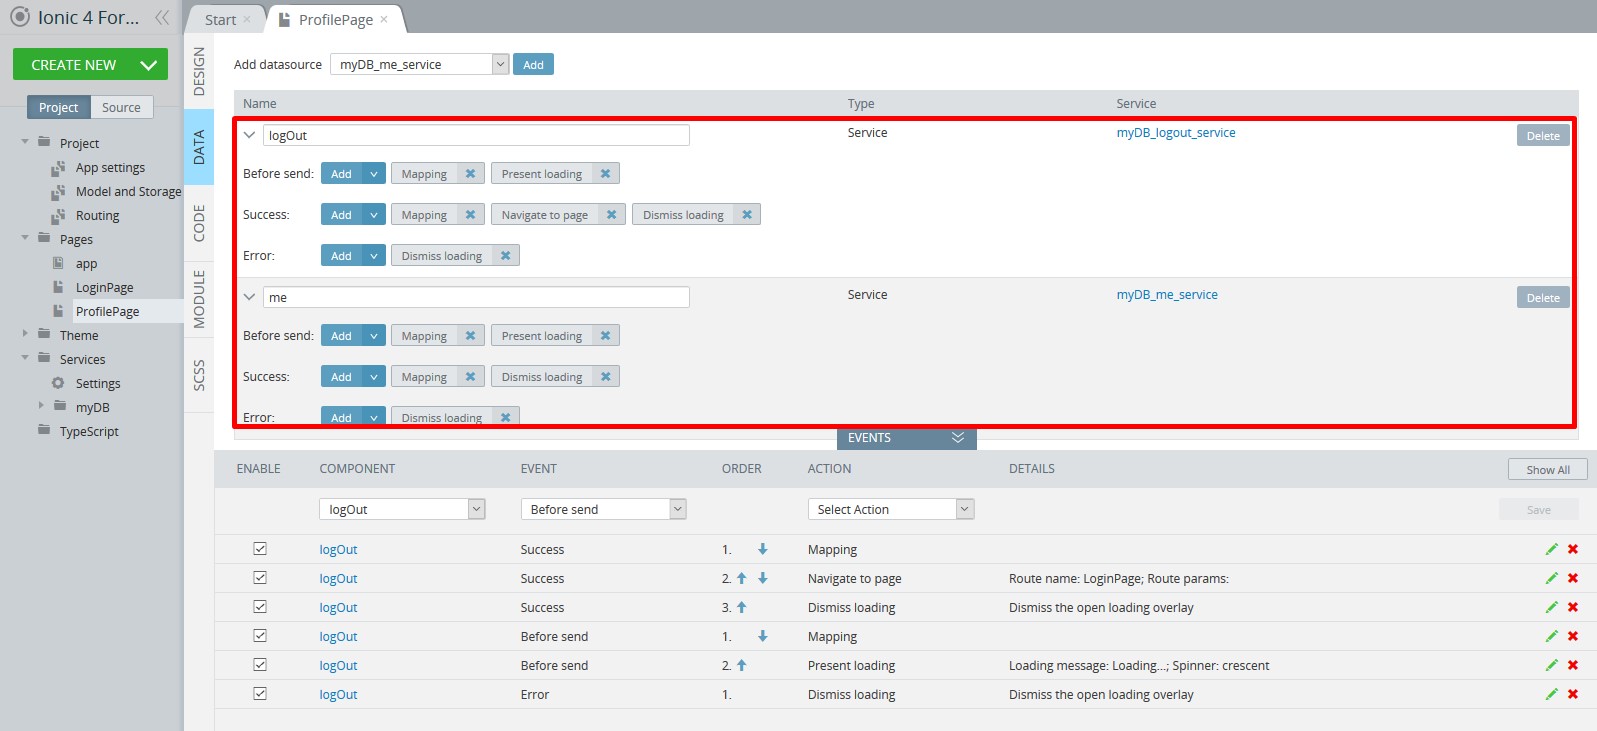
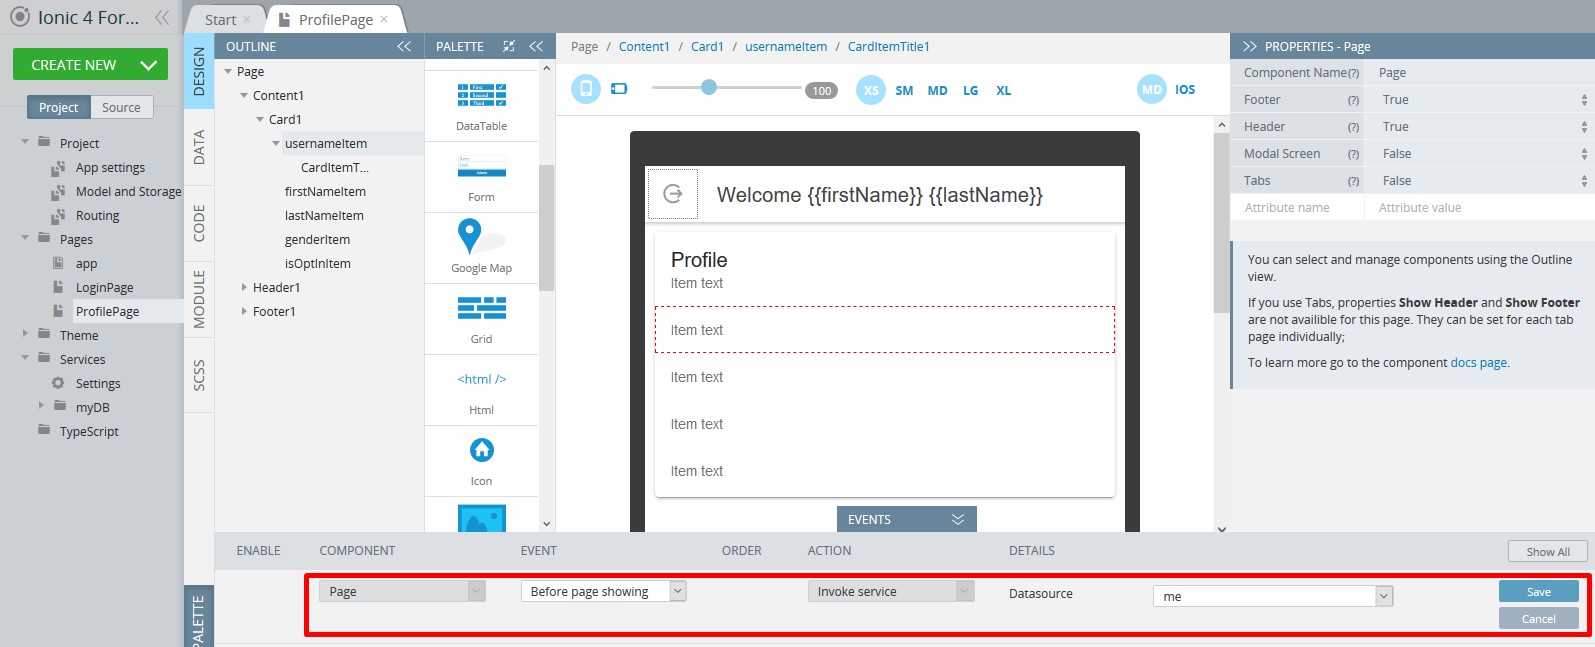
- Go back to the DESIGN panel, open the EVENTS tab, select the Page component, add Invoke service action with me as datasource to Before page showing event and save:
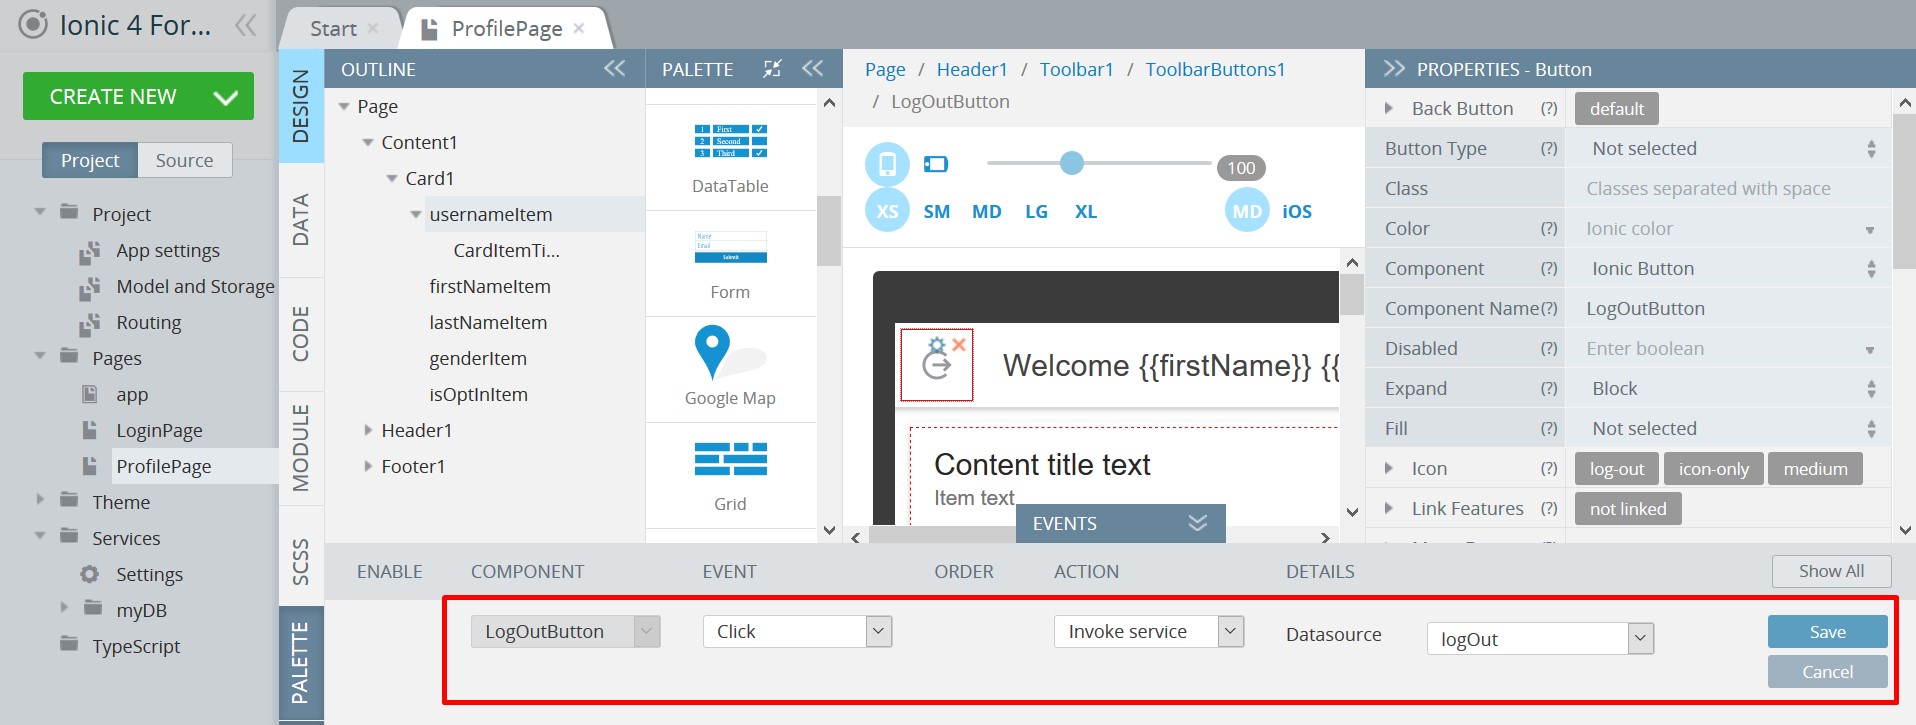
Finally, select LogOutButton and add Invoke service action for its Click event with logOut defined as datasource:
App testing
Now, you can test your login form behavior on the preview. Click the TEST button and wait until the app loads, don't worry if it takes some time.
Experiment entering invalid data, making mistakes in username or password, and finally, using valid user credentials to log in:

App in work
Please, note the different error messages firing when testing different cases with entering wrong credentials.
You can also check this alternative Appery.io video that shows how the Form component can be defined for handling user input in an Ionic 4 app:
