Ionic 4 Todo List application for adding, editing, deleting, and updating items in a connected Appery.io database.
Introduction
In this tutorial, you’ll learn how to build a mobile app that displays a list of data from a cloud database. The app communicates with the database via a REST API.
Before You Start
- Tutorial level: beginner; your first mobile app.
- Prerequisites: an Appery.io account.
Want to know more?You can also check our Appery.io Community video that shows how to create a List Details application with database integration using the Appery.io List Details plug-in here:
Downloads and Resources
You can also try it yourself by creating from the backup:
- Download the app backup file.
- Click Create new app.
- Click From backup and select the project backup file on your drive.
- Type in the app name.
- Click Create:

Defining DB credentialsNote, that if you decide to create from backup but would like to use your database, you will need to modify the default todoDB service in your app.
To do it, in the Project view, unfold the Services > todoDB > todoDB_settings folder and replace the default database_id value with your database ID (can be found in the browser search field or in YOUR DATABASE > Settings > API keys.
But if you are interested in the detailed tutorial, please follow the steps below.
Database Setup
Creating New Database
- Create a new database from the Databases tab, click Create new database:

Create new database
- Name your database todoDB and click Create:

Create todoDB database
Adding New Collection to Database
After creating a new database you will see a list of its predefined collections. Also, you can create custom collections.
- Click Create new collection to create a new custom database collection.
- Enter tasks as the collection name and click Add:

Create tasks collection
Adding New Column to Collection
Then, we need to fill the created collection with data.
- First, select the tasks collection from the list. Click + Col. Name the column taskName, select the String type and click Create column:

Create taskName collection
- New taskName column appears in the table:

Create taskName column
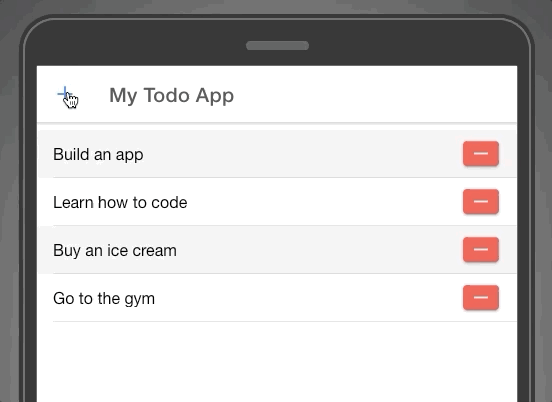
- Now, using +Row, enter a few records. For example, add the following tasks:
- Build an app
- Learn how to code
- Buy an ice cream
- Go to the gym
That's how it looks now:

Now the database for our app is ready. Let's move on to creating the app itself.
Mobile App
Creating New App
- From the Apps tab, click Create new app:

Create a new app
- Select Ionic 4 > Ionic 4 Blank as the application type, enter todoList for the app name, and click Create:

Ionic 4 App create dialog
Building UI
- Every new app comes with a default Screen1 page. Let's open it: Pages > Screen1. We won't need the bottom app toolbar, so let's set the Footer property of the Page component to false:

- Click the Toolbar title in the app screen and change it to My Todo App by changing the Text property on the right menu:

Toolbar properties
- In our app, we would need a List component for showing the records that we have in the database. From the components PALETTE, drag & drop a List component to the screen:

List component
- Click the second List item - ListItem2 and click on the red cross to delete it. We won't need the second list item since we are going to use a dynamic service for displaying lists in our app.
You can use the OUTLINE menu and the Breadcrumbs for navigating between the App UI components.

- Select ListItem1 component. In the PROPERTIES panel, set its Class property to todoListItem. Also, add the *ngFor attribute with the let task of tasksList value:

List properties
- Let's now add some flavor to our list element and customize its color. Open the SCSS tab and add the following code:
.todoListItem:nth-child(odd) {
    --background: #f2f2f2;
}- Click Save and see if the SCSS file was applied correctly and the styles (the item color changes to grey) were applied on the app DESIGN panel:

Adding Buttons
Okay, it looks good! Now let's add some elements to manage our task list.
- Under our app DESIGN panel, drag & drop a Button into the ListItem1 element, placing it to the right:

- Now, select the created Button and set the following properties:
- Color = danger
- Icon.Style =
removeicon - Icon.Slot = Icon Only
- Text = empty
- (click) = deleteTask(task._id):

- Inside the list item, select ItemLabel1 and set its Text property to {{task.taskName}}:

- Finally, add another Button component to the ToolbarButtons area, and set its properties to:
- Color = primary
- Icon.Style =
addicon - Icon.Slot = Icon Only
- Text = empty:

Buttons layout overview
Creating Task Page
We will need a separate page for adding a new task to the list, so let's create it.
- Click Create New > Page and name the created page AddTaskPage:

Create new page
Note that the Create navigation route for this page checkbox is marked. You can find and edit all routes in the Project menu > Routing asset.
- On the new page, disable the Page footer by setting its Footer property to false. Also, change the Toolbar Title Text to Add new task.
- Drag & drop a Button element into the Toolbar Buttons area. We will use this button for back navigation. To do this, change the Component value to Ionic Back Button in the PROPERTIES panel.
- Next, unfold the Back Button group and set the Text property to Back:

Back button properties
- To enter the names of new tasks, we will need an Input component. Let's drag & drop it to the page from PALETTE and set the following properties:
- Placeholder = Enter task
- Label.Text = empty
- [(ngModel)] = newTaskName

- Then, under the input component, add a Button that will be used to save the entered tasks. Set its Text property to Add Task:

That's it, the app UI is ready and we can move on to implementing the app logic.
Application Logic
Getting Tasks List
The first thing we need to do is to get the full list of tasks from the database.
- Go to Screen1 > CODE. In the Variables section, enter tasksList as a variable name, click Add and change the Type of the created variable to Any:

- Click Create New > Database Service and select the todoDB database from the dropdown. Expand the list of the tasks collection services and mark the Create, List and Delete services as checked. Click Import selected services:

Import database services
- After importing the database services, they should appear in the Project tree in the Services > todoDB folder:

- Now we need to use these services in our app. Under the Pages folder, navigate to the Screen1 DATA panel. Here, add the todoDB_task_list_service as a datasource and change the service's generated local name to getTasksList:

- Then, we need to save the data that is returned from the service to the variable. Click the Mapping button next to the service's Success event:

- Map the service response to the tasksList variable. Don't forget to click Save & Replace after that:

- As we need to load the list of tasks on the page load, let's add the required event. Go back to the DESIGN panel. In the EVENTS tab for the Page component, add the Before page showing event. Select Invoke service as the Action and getTasksList service as the Datasource. Click Save:

The service will be invoked each time you enter the Screen1 page, and the list of tasks will be loaded from our database.
- Also, let's set up some routing. We need to navigate to the AddTaskPage when the user clicks the
+button in the toolbar. To do that, select the Button2 component inside the Toolbar Buttons area and create a new Click event in the EVENTS tab. Select Navigate to page as the Action and AddTaskPage as the Route name. Click Save:

At this point, we can test our app in the browser. Click the TEST button in the App Builder to launch the app. Check that tasks will appear on the app screen, and you can navigate to the AddTasksPage by clicking on the + button in the toolbar. Also, make sure that the back navigation works too:
Deleting Tasks
Let's proceed with the app. The next thing we need to do is to implement the functionality to remove tasks from the list.
- Go to the Screen1 CODE panel. Here, create a Method named deleteTask with taskId as its argument.
- From the list of services on the left, drag and drop the todoDB_task_delete_service into the function code window. This will automatically add the code of the service invocation:

- Add some edits to the code. Insert the Execute DataService snippet instead of
console.log(res);(on line 13). Replace "service_name" with "getTasksList" that is the name of the previously imported service. This will reload the list of tasks from the database right after one of them is removed:

- Then, add
"_id": taskIdto the params block. Save the changes. As a result, the function code will look like this:

deleteTask code
Adding Tasks
Now we can remove tasks from the list, but we also need the ability to create new ones.
- On the CODE panel of the AddTaskPage, add a new variable to store the name of a new task. Enter newTaskName as its name and select the String type:

- Go to the DATA panel and add the todoDB_tasks_create_service as the new Datasource. Change its local name to createTask:

- Then, click the Mapping button next to the Before send event and map the newTaskName variable to the taskName service request parameter. After editing, click Save & replace:

- Also, we need to clear the input field if the task was successfully added. Click Add next to the Success event and select Run TypeScript in the list. In the code editor, type in
this.newTaskName = "";and click Save:

- And the last thing we need to do when the task is successfully added is to return to the main page. Сlick the Add button next to the Success event again. Select Navigate to page as the Action and Screen1 as the Route name. Don't forget to save the changes:

- And finally, we need to invoke the createTask service when the user clicks the Add task button. So, go to the DESIGN panel, unfold the EVENTS tab from the bottom and for the Button2 component create a new Click event. Select Invoke service as the Action and createTask as the Datasource:

Editing Tasks
Let's also add the ability to edit the existing items on the todo list.
- In the App Builder, click Create New > Database Service. Here, select the todoDB database from the dropdown. Expand the list of the tasks collection services and mark the Update service as checked. Click Import selected services:

-
Go to Screen1 page's DESIGN panel. Here, drag & drop one more Button into the ListItem1 element, placing it next to the existing button.
-
Now, select the created Button and set the following properties:
- Icon.Style =
createicon - Icon.Slot = Icon Only
- Text = empty
- (click) = editTask(task._id, task.taskName):

- Then, switch to the CODE panel and in the Functions section create a new Async method named editTask with taskId and taskName as its arguments and the following code:
const alert = await this.Apperyio.getController("AlertController").create({
    header: 'Edit task',
    inputs: [{
        name: 'task',
        type: 'text',
        value: taskName
    }],
    buttons: [{
        text: 'Cancel',
        role: 'cancel',
        cssClass: 'secondary',
    }, {
        text: 'Edit',
        handler: (res) => {
            if (res.task.length) {
                this.Apperyio.getService("todoDB_tasks_update_service").then(
                    service => {
                        if (!service) {
                            console.log("Error. Service was not found.");
                            return;
                        }
                        service.execute({
                            data: {
                                taskName: res.task
                            },
                            params: {
                                _id: taskId
                            },
                        }).subscribe(
                            (res: any) => {
                                this.Apperyio.execDataService(this, "getTasksList");
                            },
                            (err: any) => {
                                console.log(err)
                            }
                        )
                    }
                )
            }
        }
    }]
});

await alert.present();
Save all the app changes, and we are ready to test the app!
Testing App
Click the TEST button in the App Builder to launch the app in the browser.
Try removing tasks from the list, creating new and editing existing ones. Everything should work as follows:

Want to know more?You might also like to check our advanced ToDo List tutorial that uses an external PostgreSQL database with creating a secured API Express project.