Building Ionic Login Sample App. Part 2
Introduction
In this sample app, we will demonstrate how to define the Login form in an Ionic project so that it can validate user credentials stored in the Appery.io database.
In this part, we will connect our app with the database and implement login and logout app logic. The steps for the first part of the tutorial can be found here: Building Ionic Login App Tutorial. Part 1.
Downloads and Resources
You can also try it yourself by creating from the backup:
- Download the app backup file.
- Click Create new app.
- Click From backup and select the project backup file on your drive.
- Type in the app name.
- Click Create:

Creating from backup
Defining DB credentialsNote, that if you decide to create from backup but would like to use your database, you will need to modify the default usersDB service in your app.
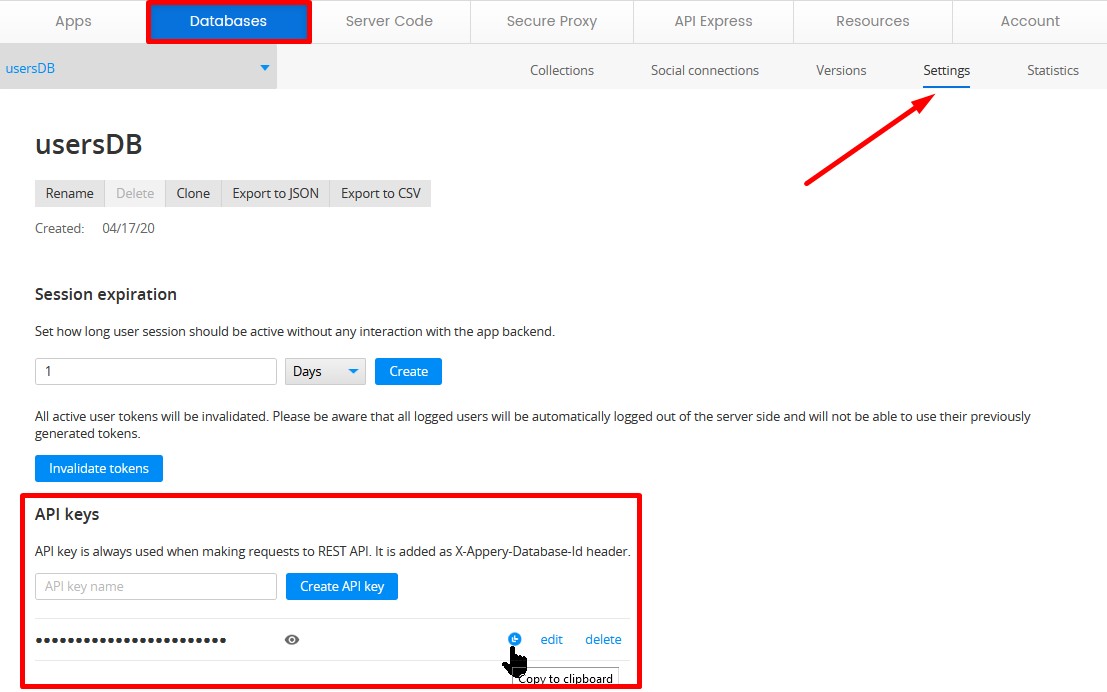
To do it, in the Project view, unfold the Services > usersDB > usersDB_settings folder and replace the default database_id value with your database ID (can be found in the browser search field or under the YOUR DB > Settings > API keys tab:
But if you are interested in the detailed tutorial, please follow the tutorial steps below.
Creating Database
In the first part of the tutorial, we've created the app named Ionic Login App. And now let's proceed with creating a database to store the user's data.
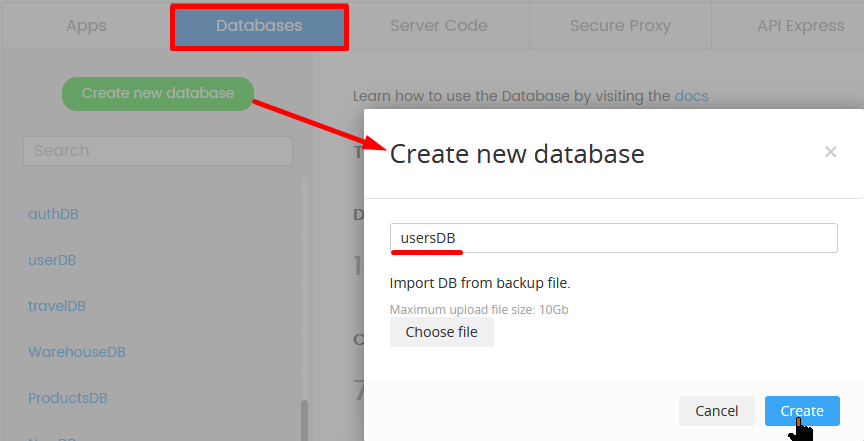
- From the Appery.io dashboard, go to the Databases tab and click Create new database. Enter a name for the database, for example, usersDB, and confirm the database creation:
As you can see here, Appery.io database has a predefined Users collection.
- Let's add a couple of users to this collection by clicking the +Row button. The _id , acl , _createdAt and _updatedAt fields are auto-generated, so please fill in only the values in the username and password columns:

Now we have a database that contains user data. Let's go back to our app and import the database services so that we can interact with the database.
Importing Database Services
- From the app dashboard, click CREATE NEW > Database Service:

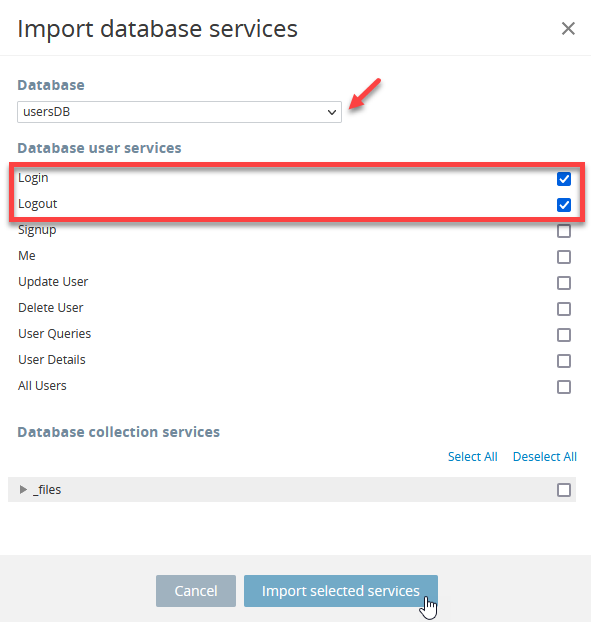
- In the Database drop-down, select the name of the created database (usersDB). We will need the Login and Logout database services in our app, so mark them as checked. Click Import selected services:
The needed database services should appear on the list of app services:

Now, we need to use the imported services in our app.
- So, unfold the Pages folder and navigate to loginPage. Then click its DATA panel. Here, add the usersDB_login_service as a datasource. Change the service's generated local name to loginService:
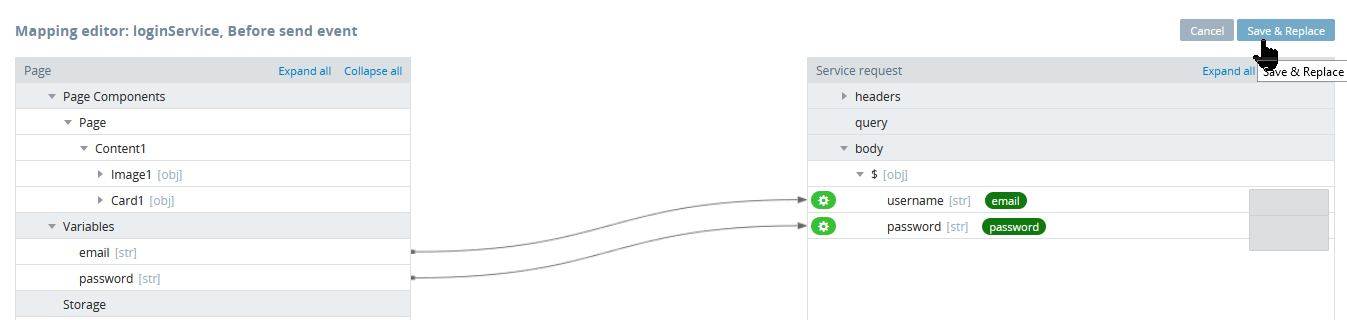
- Then, we need to modify the service's mappings. Click the Mapping button next to Before send and create the following mapping:
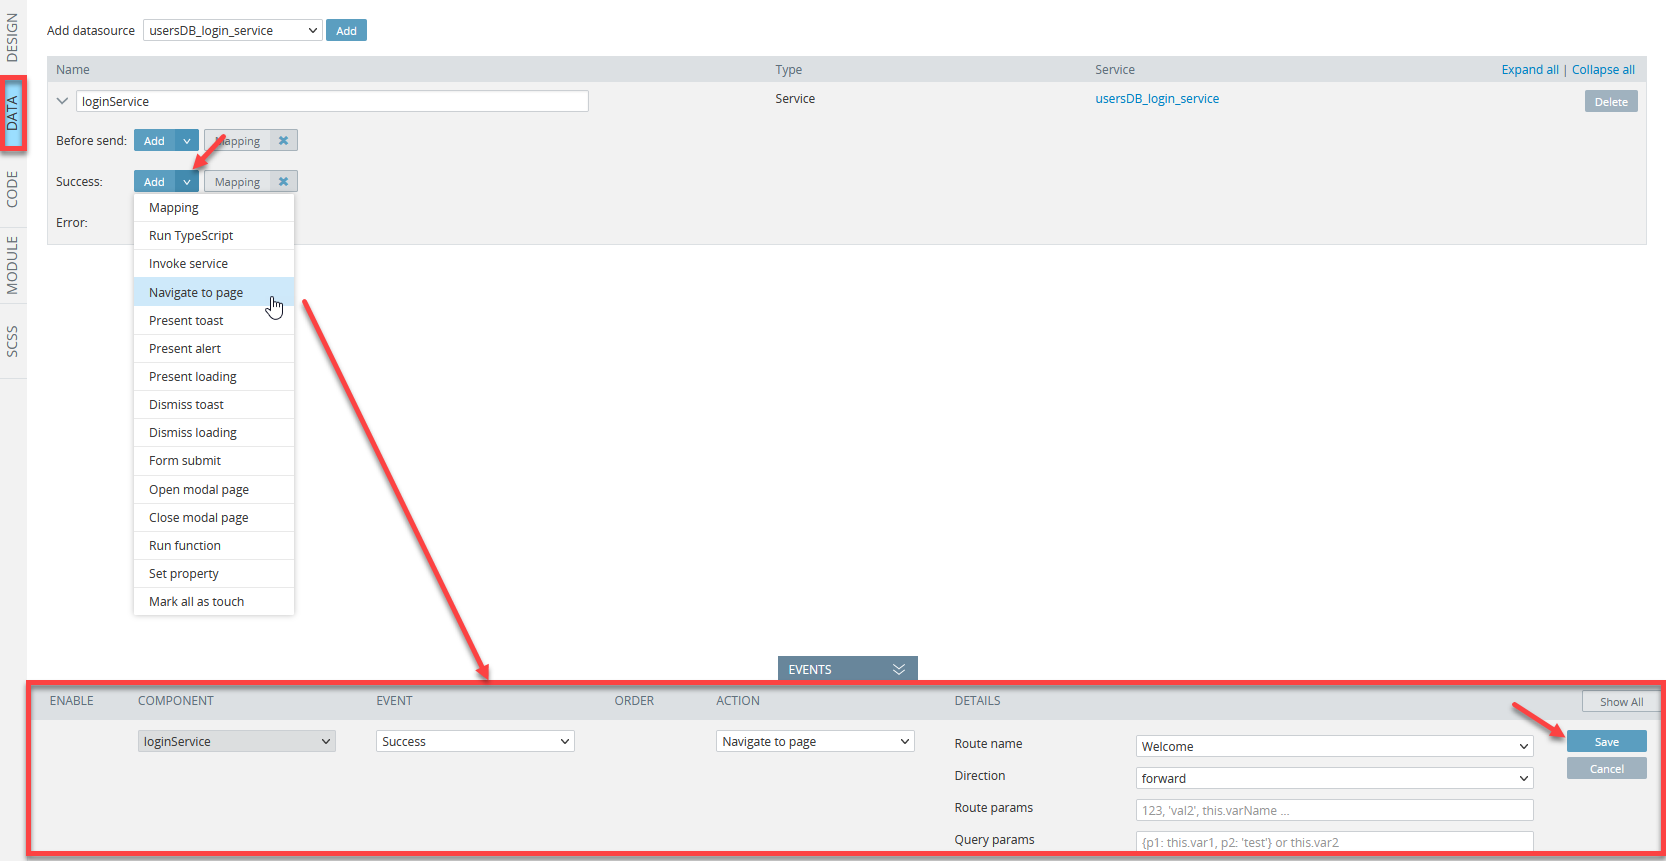
Then, we need to process the result of the service call. In case of successful login, we want to navigate to the Welcome page.
- Click the Add button next to Success, and select Navigate to page from the list that appears.
- At the bottom, in the EVENTS tab, select Welcome for the Route name and click Save:
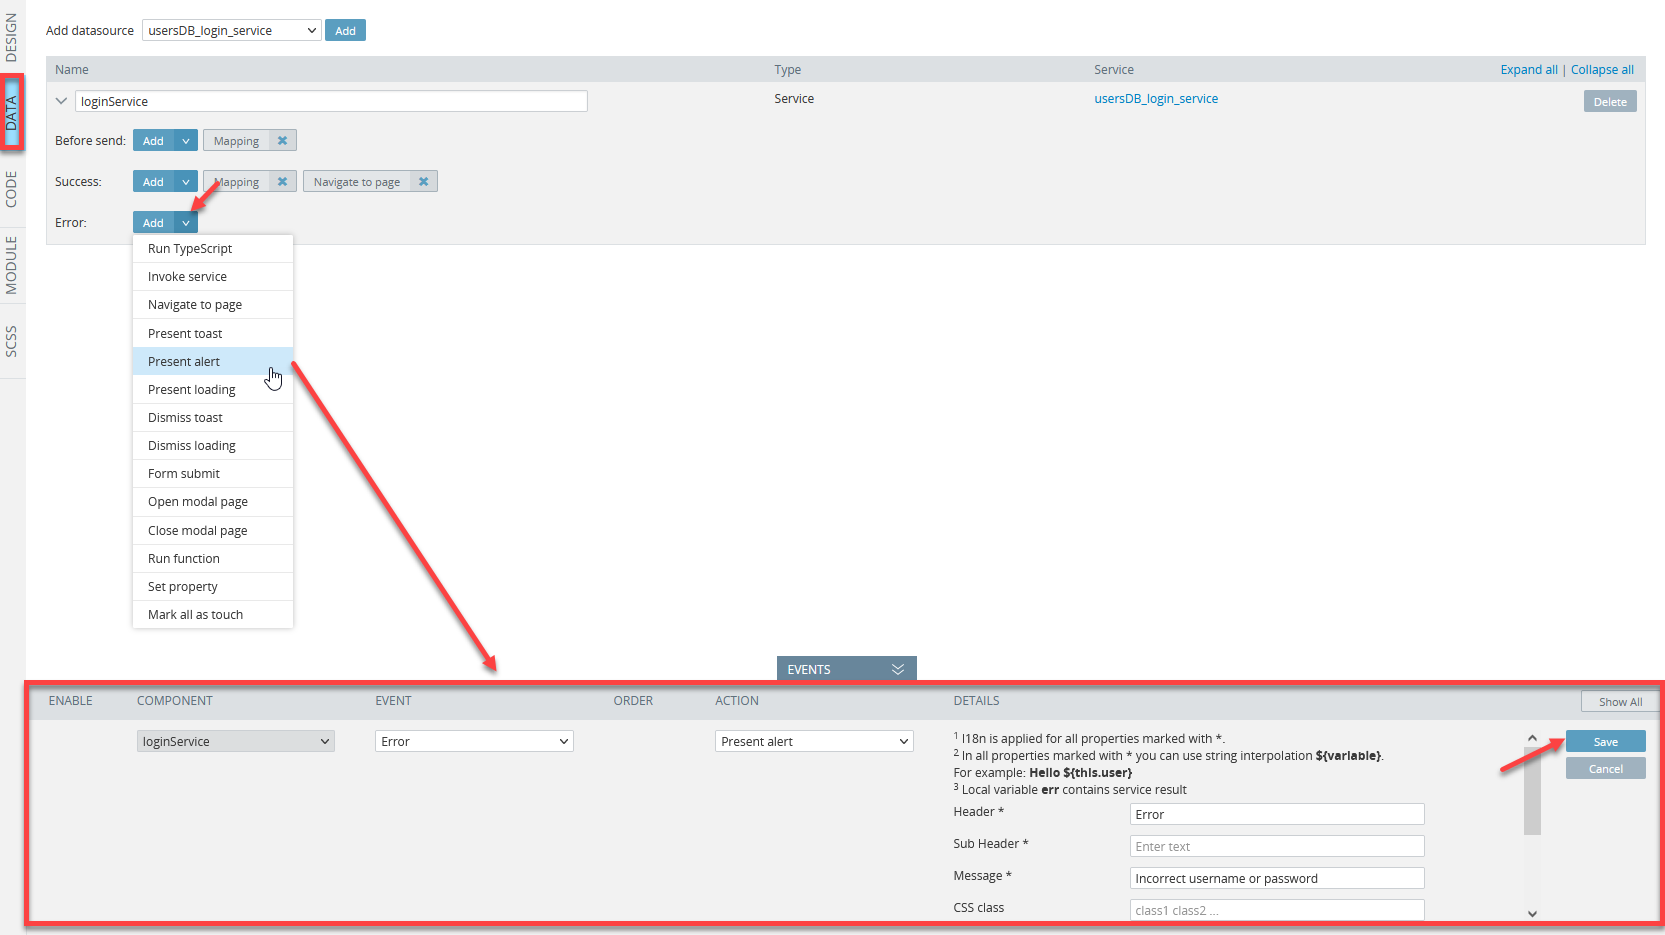
- One more thing we need to do is to handle possible errors. Click the Add button next to Error and select Present alert for the action.
- You can now modify some alert settings in the EVENTS tab. Set its Header to Error and its Message to Incorrect username or password. Then, save the changes:
also
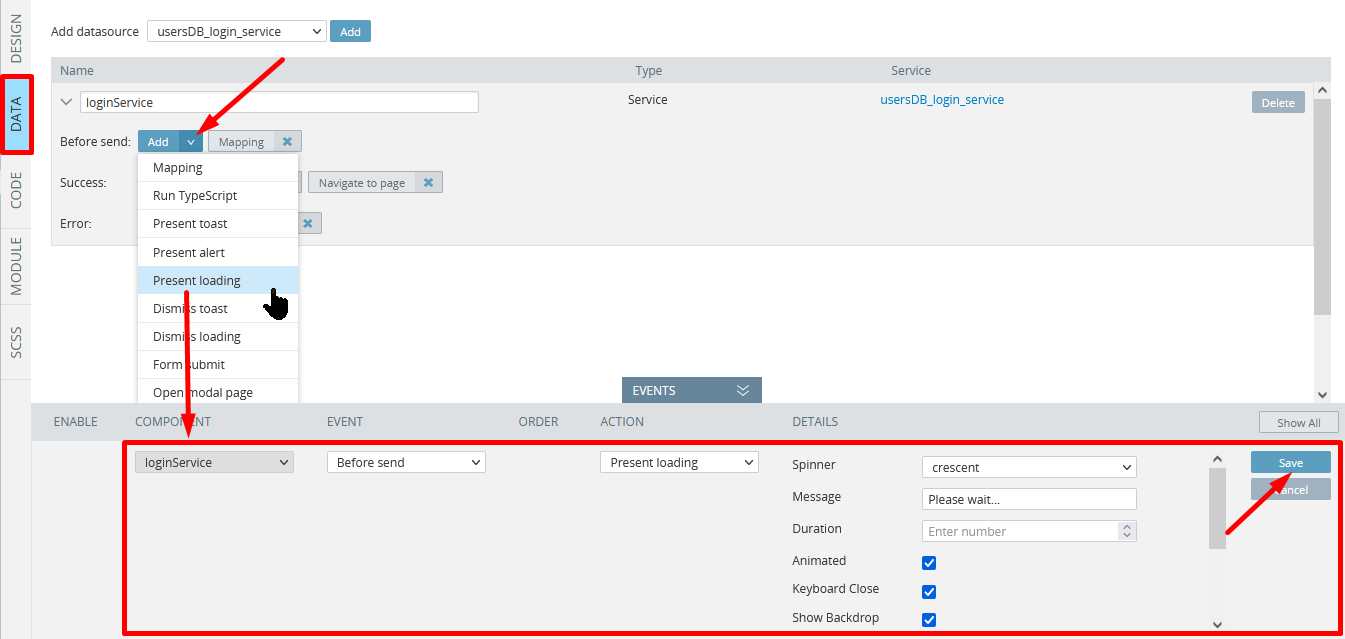
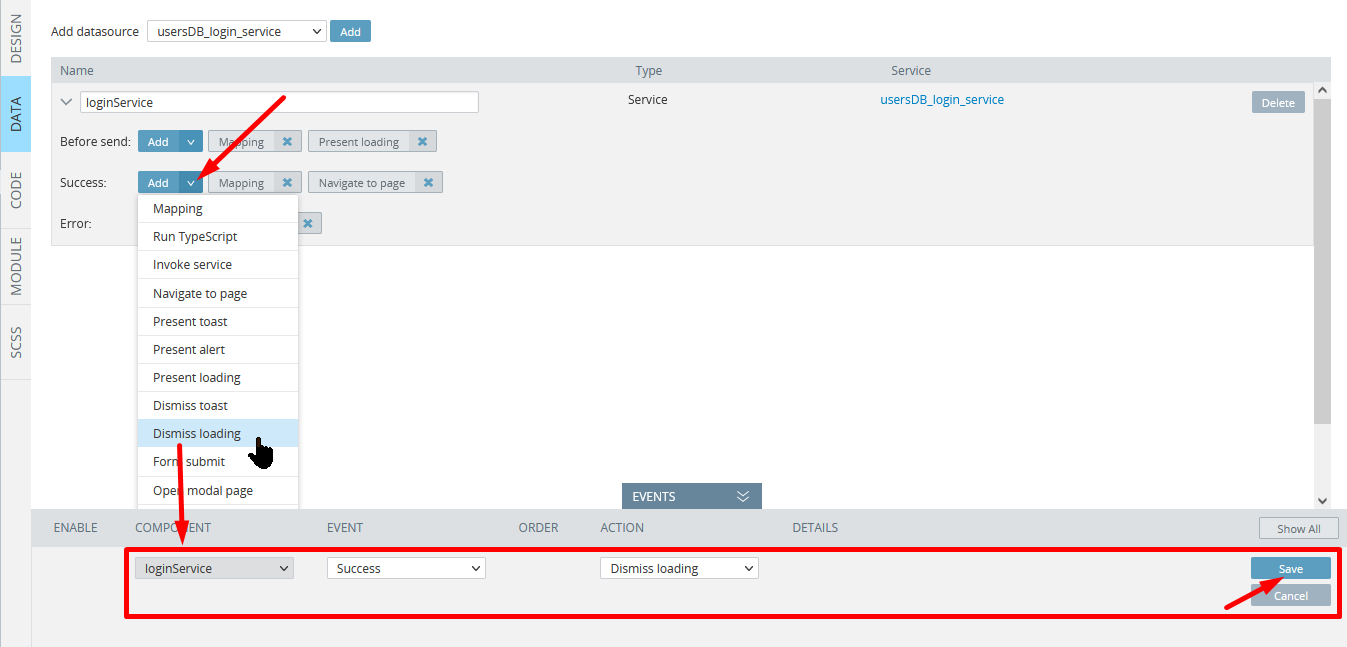
- Accessing the database can take some time, so let's also add a loader to show that the loading is in progress. Click the Add button next to the Before send event and select Present loading for the action.
- Again, review the EVENTS tab: there are some settings for the loader that we can change. For the Spinner select crescent and for the Message type Please wait.... Also, enable Show Backdrop. Don't forget to save your work:
- Then, we need to define when to hide the loader. Click the Add button next to the Success event and select Dismiss loading. Save the changes:
- Reorder events so that the Dismiss loading event invokes immediately after the service successfully returns a response:

- Also, add the similarly positioned Dismiss loading event for Error. As a result, the datasource should look like this:

- The next step is to process the login service request. Click the Mapping for the Success event. As you can see here, in case of success the service returns the user _id and sessionToken:
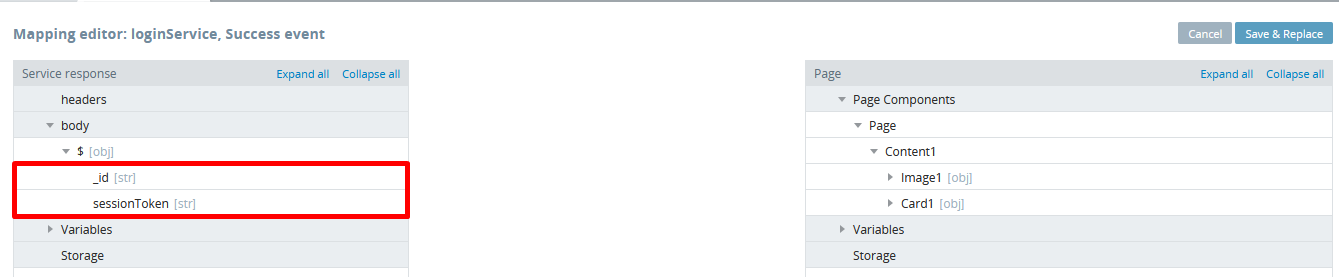
Let's cancel editing the mapping for now. We will need the session token later, to get the access to the secured database collections and invoke secured services. So, we need to keep this session token somewhere to be able to use it later.
- Unfold the Project tab folder from the left and go to the Model and Storage tab. Here, select the Storage tab. Create a new Storage variable with sessionToken for its name and of String type:

- Then, return to the login service's Success mapping (you can simply click the tab to open loginPage) and put the session token into the storage. To do that, edit the mapping as shown below and save the changes:

Updating loginPage
The login service configured, we need to update the loginPage.
- Navigate to its DESIGN panel and unfold its EVENTS tab from the bottom.
- Create a new Form submit event for the Form1 component. Select Invoke service for the ACTION and loginService for the Datasource. Save the changes:

Now, the login service will be invoked on form submit and the user will be navigated to the Welcome page only if the login is successful.
Updating Welcome page
Let's modify the second app page, Welcome.
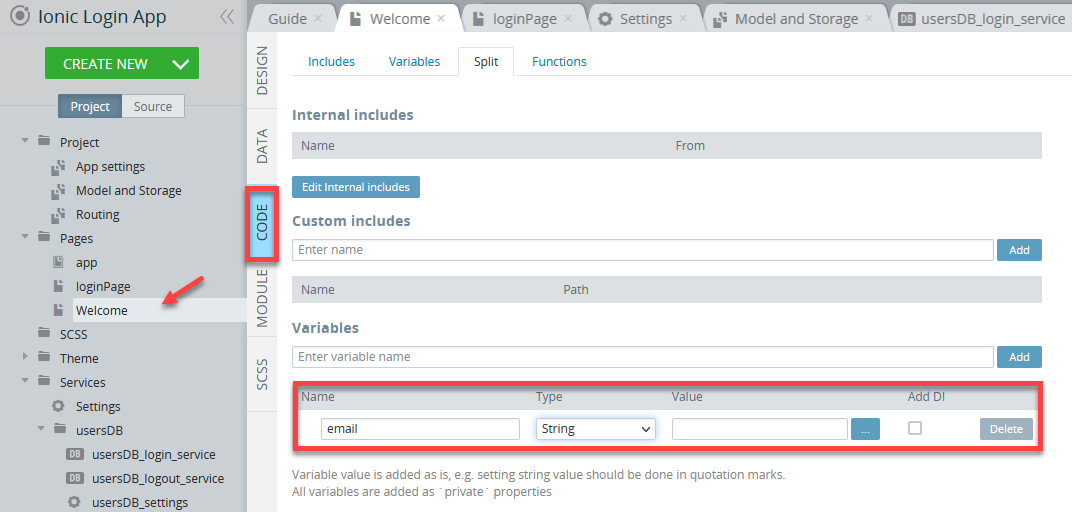
- Open its CODE panel and create a new variable for storing user information. It should have
emailfor its name and be of String type:
We can get the user email from the storage, but let's try another approach. We will use routing to pass the user email from one page to another.
- Go to Project > Routing.
- Here, apply the following changes:
- for the loginPage rename the Route name and the Path to loginPage,
- and for the Welcome page, add a routing parameter to pass the username. Just change its Path to welcome/:id:

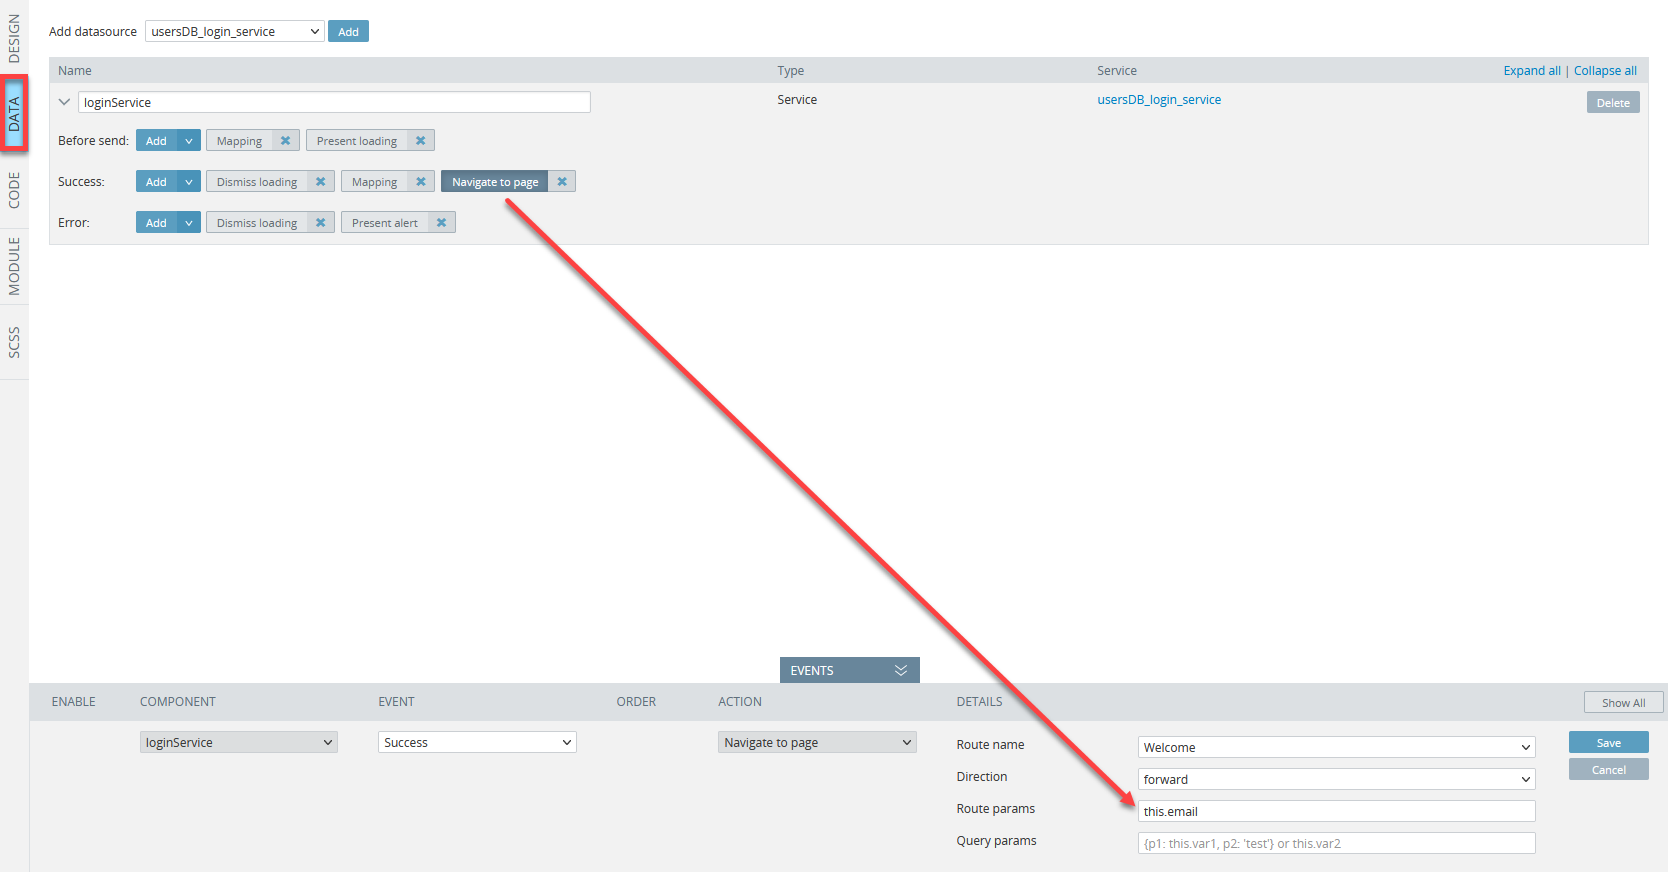
- Save the changes and go to the DATA panel of loginPage. Here, we will need to modify the Success events of the loginService. Click Navigate to page and add some route parameters in the EVENTS tab: type this.email in the Route params field and click Save:
- Then, switch to the DESIGN panel of the Welcome page and unfold the EVENTS tab from the bottom.
- For the Page component, add the Before page showing event, and for the ACTION, select Set variable. Then, let's provide some details. Select email for the Variable name, check the Read from routing parameter check box and type id as the value of the Parameter name. Then save the changes:
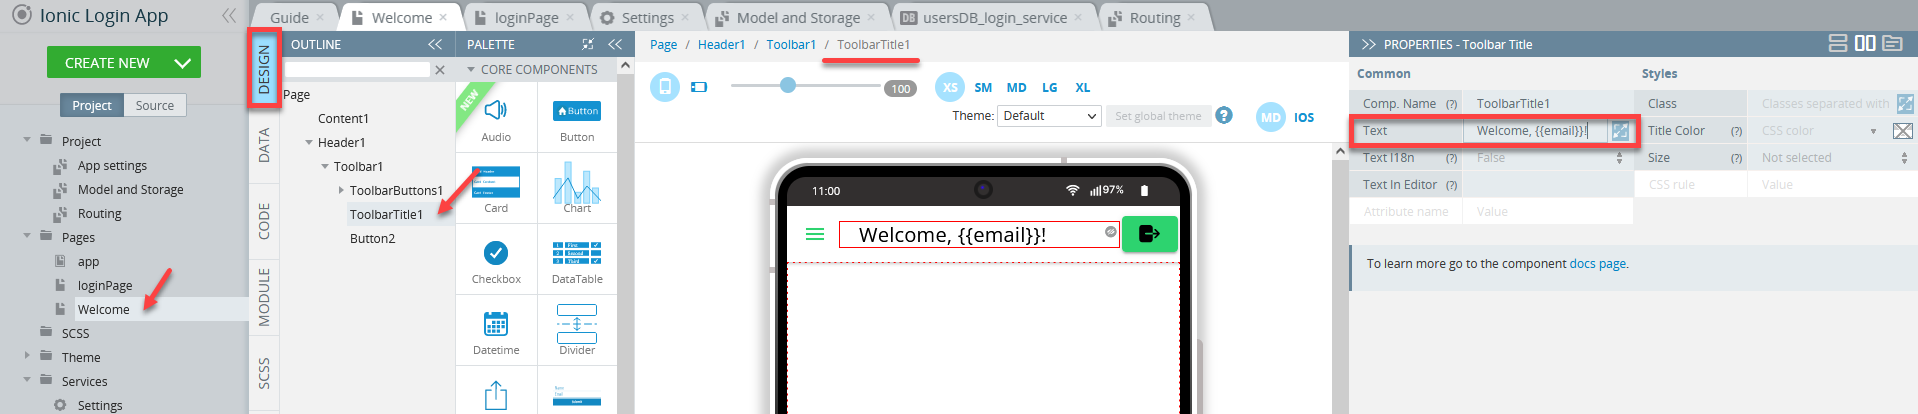
- Now, we can display the email address of the logged user in the toolbar. For the ToolbarTitle1 component, change the Text property value to Welcome, {{email}}!:

And one more thing we need to do in our app is to implement the logout functionality.
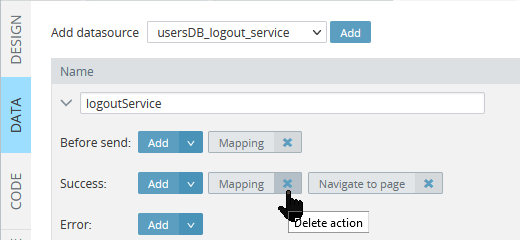
- Let's navigate to the DATA panel of the Welcome page and add a new datasource, the usersDB_logout_service. Then, change its local name to logoutService:
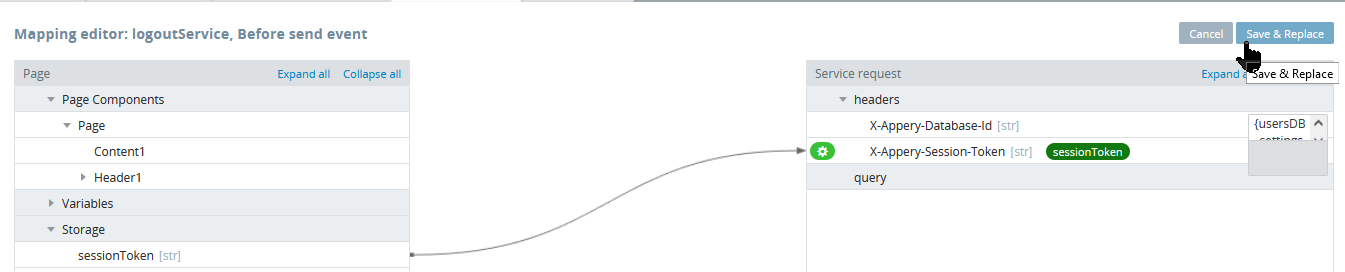
- We need to pass the session token to invoke the logout service, to let it know, which user should be logged out. So let's edit the Before send mapping a bit, passing the session token from the storage to the service request header. Don't forget to click the Save & Replace button after editing:
- In case of successful logout, we need to return the user to the login page. Click Add next to the Success event and select Navigate to page. Select loginPage as the Route name and save the changes:

- Also, we can delete the Success mapping, because it is not used for anything. Here is how it should look like:
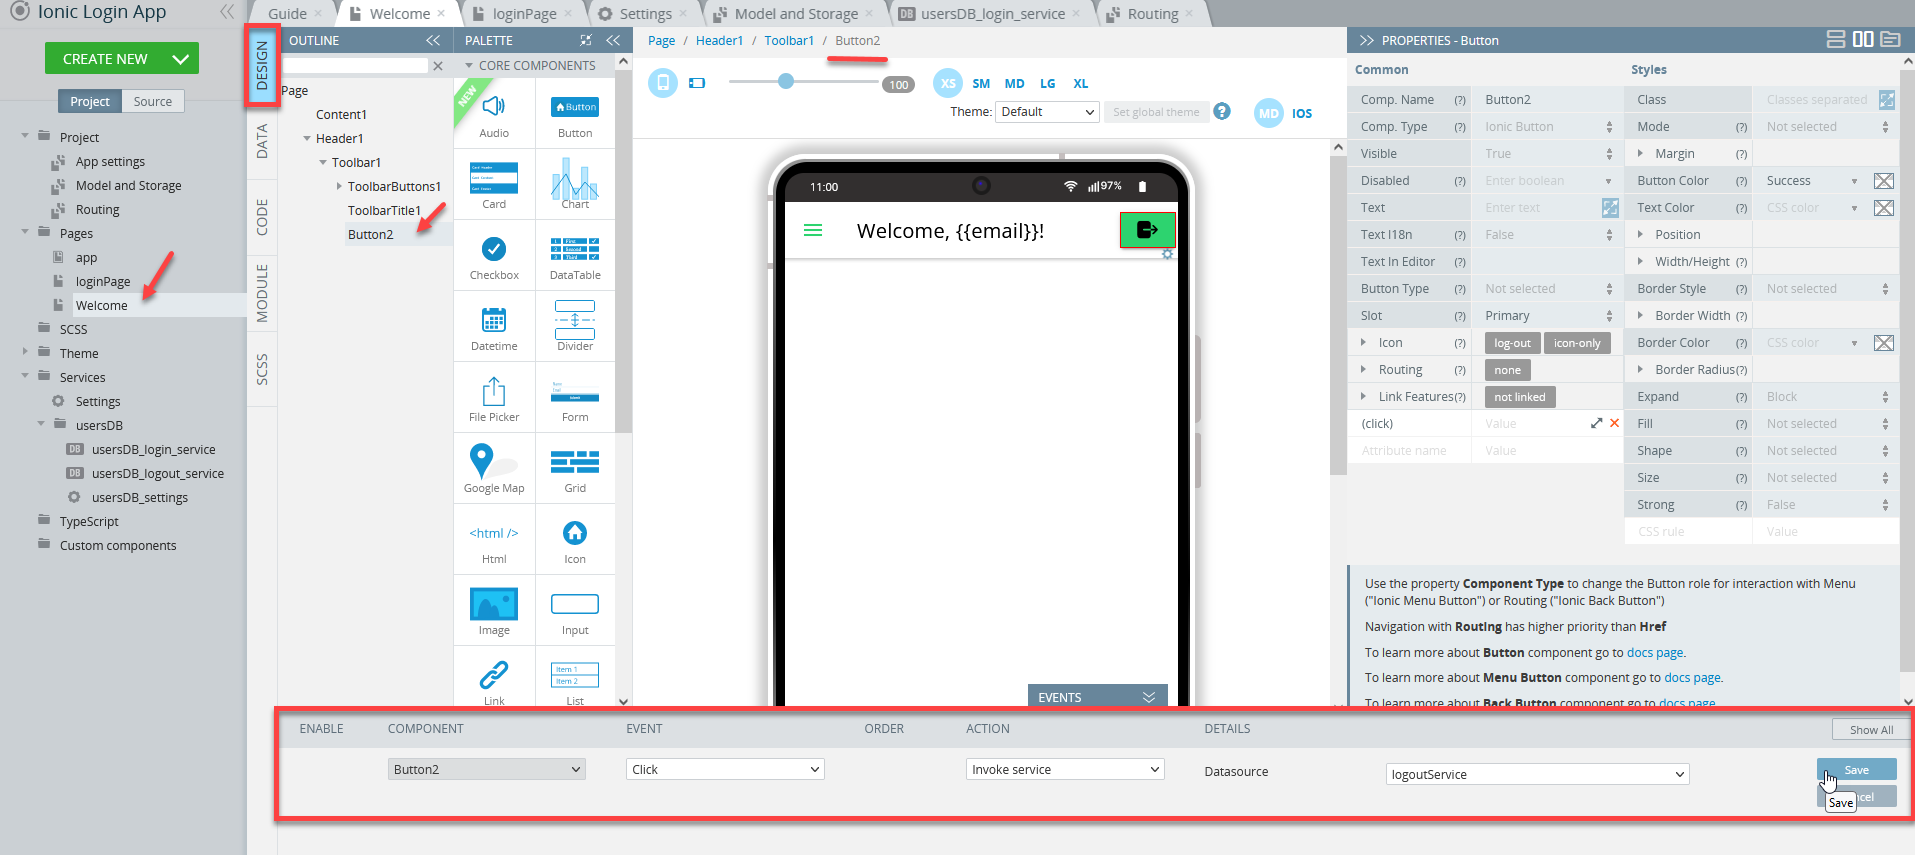
- And finally, we need to handle logout button clicks. Go to the DESIGN panel of the Welcome page and unfold the EVENTS tab from the bottom. Here, for the Button2 component, create a Click event. Select Invoke service for the action and logoutService as ts Datasource:
Save all the app changes. And that's it, we are ready to test the app.
App Testing
Now, click the TEST button in the App BuilderToolbar to launch your app in the browser and test how your app works using the credentials from the usersDB database: enter [email protected] or [email protected] for the user email, and 123456 for the password for both users:
If you provide an incorrect email address or/and password (not existing in the connected database), you will see a warning:
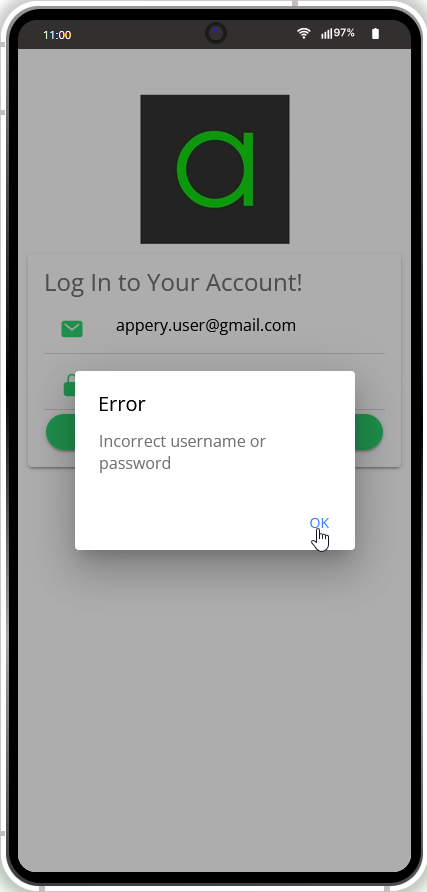
App testing
Testing on Device
Now, when your app version is ready, you might also like to test it on the device.
Appery.io Tester AppA great option to quickly test the app on the device is to use our Appery.io Tester app.
The app is free and available for both iOS and Android.
You can check out this page to learn more about using the Appery.io Tester app.
Updated about 1 year ago