Social Login
Using Facebook, Twitter and Google for app login.
When building an app with Appery.io, you can use social networks to authenticate users, this can be handy if your app requires registration. Instead of providing new credentials, they can use their social network login. We currently have the following OAuth supported providers:
- Twitter;
- Facebook;
- Google.
When a user logs in via a social network, a new user will be created in Users collection of the Appery.io database. Appery.io X-Appery-Session-Token will be returned for further API calls.
Invoking Social Network APIReturned token doesn’t allow triggering social network providers API. It’s only valid for Appery.io API calls, for example, the Database REST API. In other words, you won't be able to invoke a Facebook API to get a list of your friends. In order to do this, you will need to setup the standard Facebook login functionality.
You can find instructions on how to do it here
Creating Your App on the OAuth Provider Side
Before You BeginBefore you can complete the following steps you must make sure you have an account with the social media platform you wish your app to connect to.
Video instructionsSome of these steps are described in our video tutorials about social login. The only difference is that the video shows how to set up social integration, not social login.
Facebook
- Go to https://developers.facebook.com/ and log in.
- Click My Apps > Create App.
- Choose Build Connected Experiences and click Continue.
- Enter your App Display Name and App Contact Email and click Create App.
- In the section Add Products to Your App find Facebook Login and click Set Up.
- At left find and click Facebook login -> Settings.
- In Valid OAuth Redirect URIs paste URL according to your project type:
https://appery.io/app/view/<YOUR APPERY.IO APP ID>/assets/static/social_login.htmlhttps://appery.io/app/view/<YOUR APPERY.IO APP ID>/https://appery.io/app/view/<YOUR APPERY.IO APP ID>/SomePage.html- At the left, click Settings -> Basic.
- Add appery.io to App Domains.
- Scroll down and click Add Platform. Choose Web. Use the following Site URL as a template, but use your own Appery.io App ID:
https://appery.io/app/view/<YOUR APPERY.IO APP ID>/- Click Add Platform and choose Android. In Google Play Package Name fill your package name. Use this template to fill Class Name input, but use your own android package name:
<YOUR ANDROID PACKAGE NAME>.MainActivity- Go to https://appery.io/app/res page.
- Find your Android certificate and click the Export to zip button.
- Save the archive to your computer and extract its files.
- Copy the contents of
<cert_name>.sha1file and convert it to base64. Paste base64 value into the Key Hashes input on the Facebook page.
Debug buildsFor the debug builds, Key Hashes will be the same for all projects:
Ojrok9wK7TfjqFwcUQyl9NugzmM=
For the release builds, Key Hashes will depend on the certificate you used to sign the application.
- Enable Single Sign On toggle.
- Click Add Platform and choose iOS. Fill Bundle ID and Enable Single Sign On toggle.
- Click Save Changes
- Scroll up. Copy App ID. Go to your Appery project -> App Settings -> Cordova Plugins. Enable Facebook Connect plugin. Click Options, add "APP_ID" as key and paste App ID as value. Add "APP_NAME" as key and your Facebook app Display Name as value. Click Save Options.
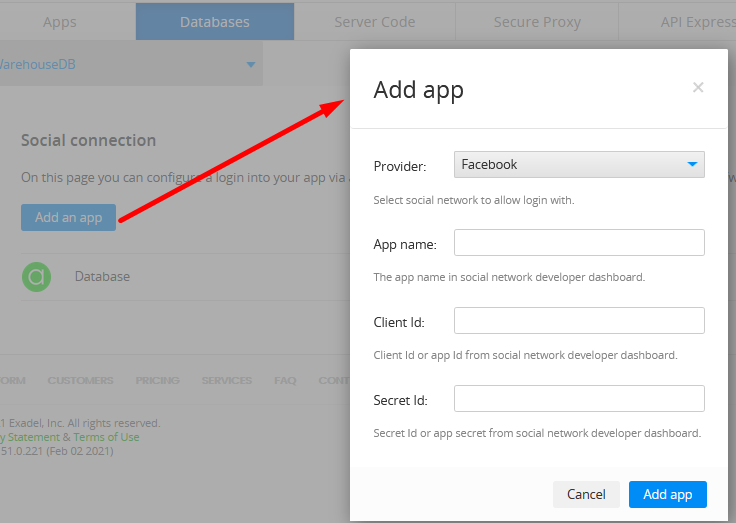
- Return to the Facebook page. On the opened page there will be App ID and App Secret values. Use them as Client Id and Secret Id for setting up database social connection as described here
Twitter
- To create a new Twitter app, go to https://apps.twitter.com/. Click Create New App, enter the required information. Enable Sign in with Twitter option during app creation. As Callback URL paste URL according to your project type:
https://appery.io/app/view/<YOUR APPERY.IO APP ID>/assets/static/social_login.htmlhttps://appery.io/app/view/<YOUR APPERY.IO APP ID>/https://appery.io/app/view/<YOUR APPERY.IO APP ID>/SomePage.html- Click Create your Twitter application.
- Then, open the Keys and Access Tokens tab to locate the API Key and API Secret. Use them as Client Id and Secret Id for setting up database social connection as described here
Google
Google Sign-In differenceUnlike other sign-in options, for Google social sign in you will need to create three client Id for a web application, Android and iOS builds.
To create projects with Google, you need to register with https://console.developers.google.com first.
- Select a project or create a new one, naming it (here: ApperyioGoogle) and accepting the terms of usage.
- On the main page, paste Api & Services into the search input. Click on Api & Services found product.
- Click on OAuth consent screen option on the left. Follow instructions to set up the consent screen. During set up, add ./auth/userinfo.profile scope.
- After set up, click Credentials options on the left. Click Create credentials and choose OAuth client ID option.
- Now, on the opened screen, choose the Web application option as the Application type. Set application name (ex: ApperyAppWeb). In Authorized JavaScript origins section, click Add URI and paste https://appery.io. In Authorized redirect URIs section click Add URI and paste URL according to your project type:
https://appery.io/app/view/<YOUR APPERY.IO APP ID>/assets/static/social_login.htmlhttps://appery.io/app/view/<YOUR APPERY.IO APP ID>/https://appery.io/app/view/<YOUR APPERY.IO APP ID>/SomePage.html- Click Create. Click again Create credentials and choose OAuth client ID option.
- Now, on the opened screen, choose the Android option as the Application type. Set application name (ex: ApperyAppAndroid). Fill in the Package name input.
- Go to https://appery.io/app/res page.
- Find your Android certificate and click the Export to zip button.
- Save the archive to your computer and extract its files.
- Copy the contents of
<cert_name>.sha1file and paste them to the Signing-certificate fingerprint input.
Signing-certificate fingerprintFor the debug builds, Signing-certificate fingerprint will be the same for all projects:
3A:3A:E8:93:DC:0A:ED:37:E3:A8:5C:1C:51:0C:A5:F4:DB:A0:CE:63
For the release builds, Signing-certificate fingerprint will depend on the certificate you used to sign the application.
- Click Create. In the opened popup copy to the clipboard
Client Id. - Open your project.
- Go to Project -> App settings -> Cordova plugins.
- Locate Google SignIn, click the corresponding checkbox to activate it. Open Options.
- Add the
WEB_APPLICATION_CLIENT_IDas parameter name and paste the copied value from the clipboard. - Return to Google Developers Console. Click again Create credentials and choose OAuth client ID option.
- Now, on the opened screen, choose the iOS option as the Application type. Set application name (ex: ApperyAppiOS). Fill in the Bundle ID input. Click Create
- Find the list of created OAuth 2.0 Client IDs, find created iOS line, and click on the download icon on the right. You will download .plist file. Open it with text editor and find REVERSED_CLIENT_ID string. Copy it to the clipboard.
- Open your project.
- Go to Project -> App settings -> Cordova plugins.
- Locate Google SignIn. Open Options.
- Add the
REVERSED_CLIENT_IDas parameter name and paste the copied value from the clipboard. - Find the list of created OAuth 2.0 Client IDs, find created Web Application line, and click on the edit icon on the right. On the opened page there will be Client ID and Client secret values. Use them for setting up database social connection as described here
Using Your Credentials
Google and Facebook providersFor Google and Facebook providers, this step is required only if you need to test social login on preview.
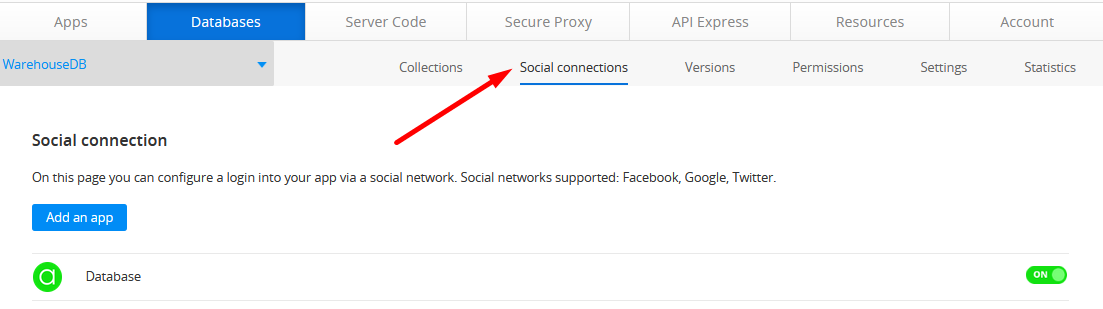
After your app has been created, use the provided credentials to configure the connection under the database settings: go to Database > Your database > Social connections, click the Add an app button, select the needed social network, and specify the needed credentials:
Social Login API
Please go to the Social Login JavaScript API page.
Authentication Events and Statuses
There are some events and statuses that are generated during the authentication process. You can use these events or status to properly track an authentication phase or hook any custom logic. Status can be retrieved by using the getStatus method.
Initially, authentication status equals to unauthorized. Before starting the authentication procedure, the dbloginstart event fires and the authentication status changes from unauthorized to inProgress.
After getting the response from an Appery.io database or a social network, the dbloginend event fires. Also, the status changes to authorized if successful or to error in case of a failure.
Normally, when launching an app on a mobile device, the token will be received automatically a few seconds after a user has logged in. The token will be returned as a parameter to the defined callback.
Updated about 1 year ago