OAuth Login with Google jQM Sample App
A sample jQuery Mobile application
Important Note!The option of creating new apps with thejQuery Mobile framework was removed but we still support the projects that were created with it earlier.
This app demonstrates how to set up an OAuth login with Google. This sample app will log in the user into his/her Google account and then display a list of files in the user's Google Drive.
This app uses and demonstrates:
- jQuery Mobile.
- Server Code.
- OAuth for Google.
The app consists of the app UI (client) and the app backend. You also need to set up a project in Google Developer Console and enable the Google Drive API for this project.
OAuthThis sample app uses Google but it can be adapted to use any other provider that supports OAuth such as Facebook.
OAuth Login with Google App in Android/iOS AppsSince April 20, 2017, all OAuth requests through InAppBrowser are blocked (see http://blog.ionic.io/google-oauth-changes/ for details). Now, it’s mandatory that the Google Sign-In Cordova/PhoneGap plugin be used. To comply, please follow the steps described here.
The steps for implementing it with iOS and Android are also described in our blog.
Want to know more?Please check our instructional video that shows how to add the Google login feature to Android and iOS applications built with Ionic 4 from Appery.io:
Want to know more?You might also like this Community video instruction to learn how you can easily build an Appery.io Ionic 4 app that allows login by using your Apple ID:
Google Project
You need to create a Google project, which will provide you with a client ID and client secret values that you will use. If you already have a Google project, then you can skip this step.
- Go to https://console.developers.google.com/ and sign in.
- Create a new project.
- When the new project is created, go to API Manager (in the left menu) > Library. This is where you will enable any Google APIs you want to use in the app. For this example, you are going to enable the Google Drive API.
- Enter drive to search for Google Drive API.
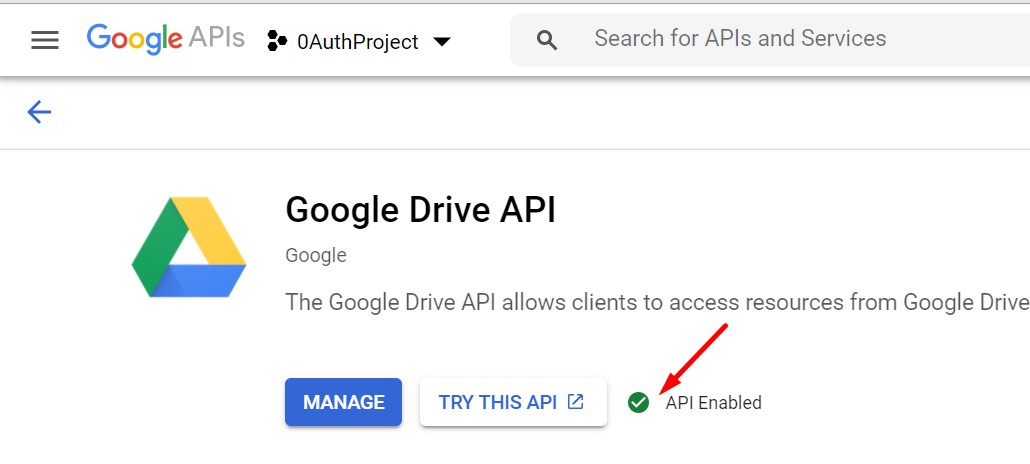
- Click on Google Drive API and on the next page click Enable:
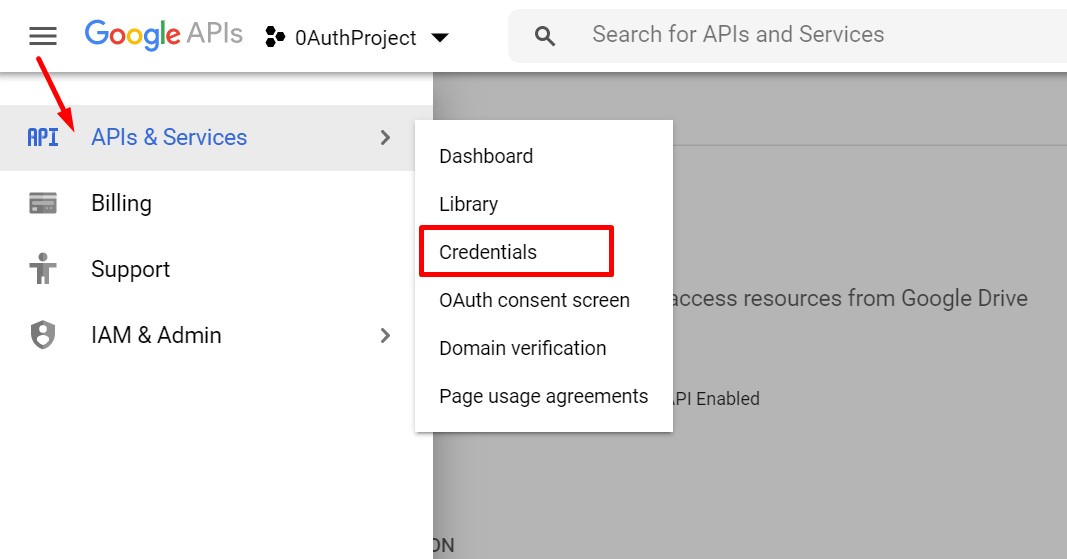
- Click the left menu button and select APIs & Services > Credentials:
- To add a new credential, select the + CREATE CREDENTIALS tab and click Help me choose. Then, for Where will you be calling the API from? select the Web server option.
- For What data will you be accessing? select the User data option.
- Click What credentials do I need? button:
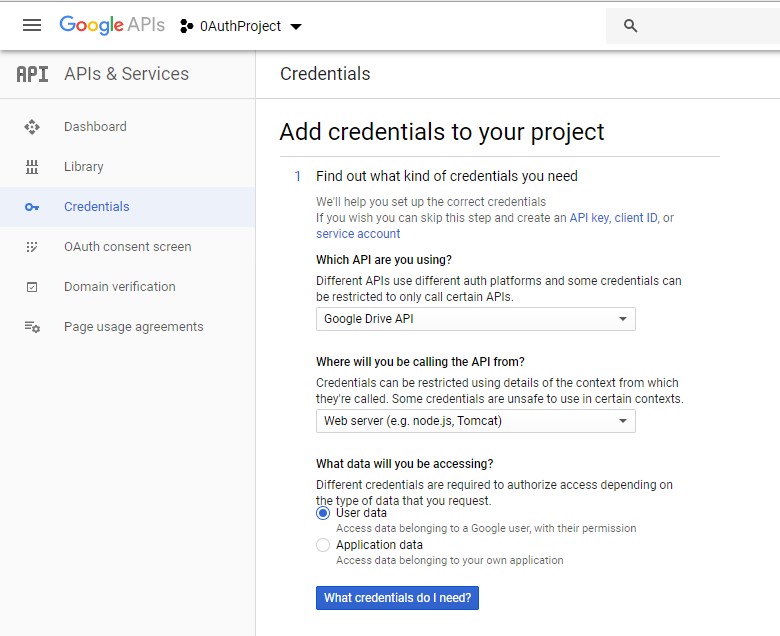
Adding Credential
- On the next screen, you can give the client a different name or keep the default name. Click the CreateOAuth client ID button.
- Enter a product name that will be shown when the user is signing in, then click Continue.
- Click Done to finish.
Your page should look like this:
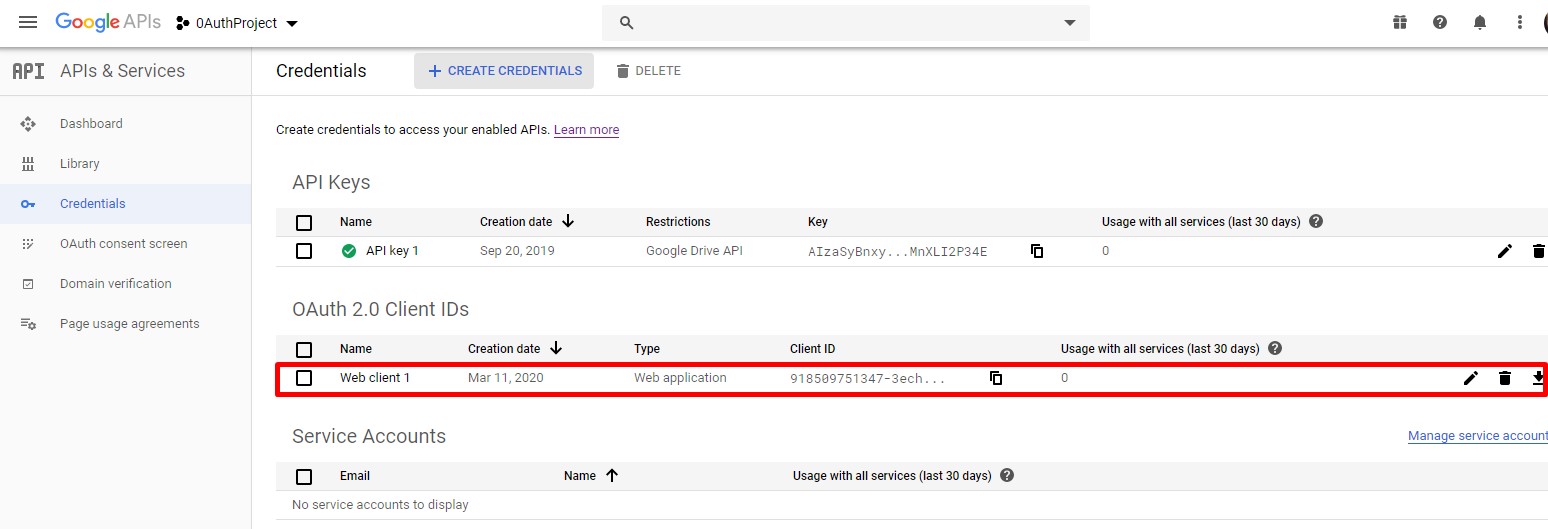
Google OAuth client
When you click on Web client 1, you will see the client details. You will need to use the Client ID and Client secret later.
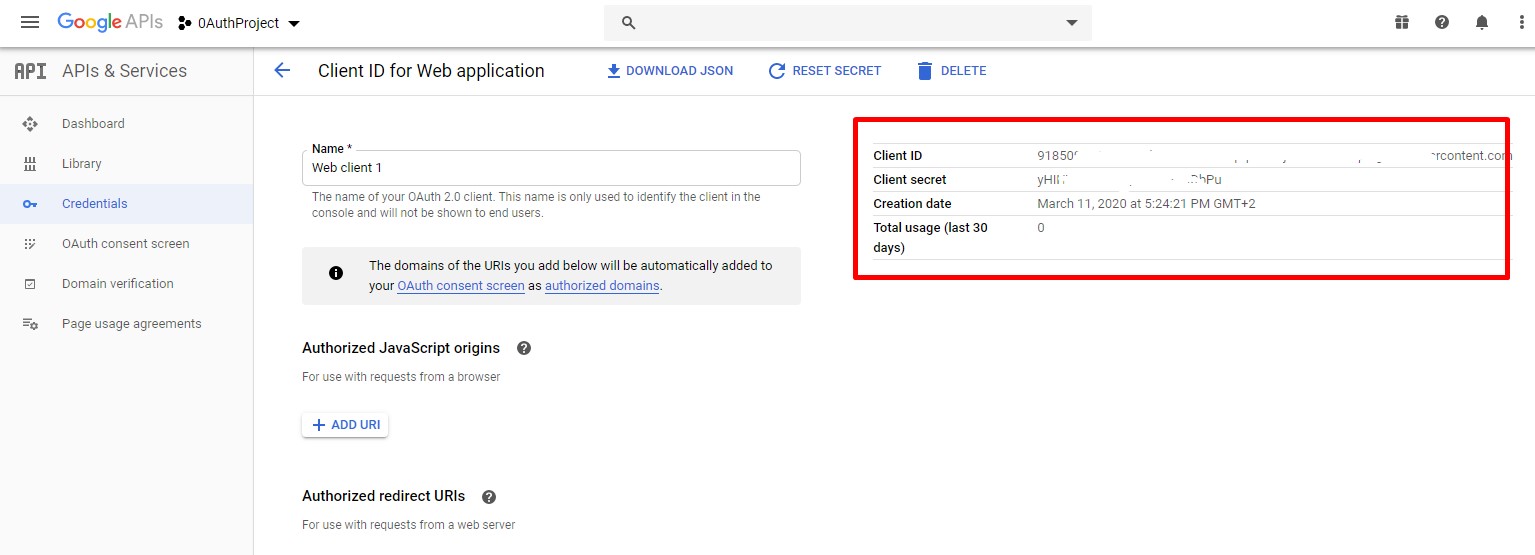
Client ID and Client secret.
You will need to come back to this page at the end to set the redirect URLs.
App (UI)
To get the app UI:
- Create a new jQuery Mobile app based on the Blank template.
- Inside the App Builder, select CREATE NEW > From plugin . Under API Provider, select OAuth Login with Google App.
- Click the Import selected plugin button.
- Select LoginWithGoogle as the starter page and click Apply settings.
App Backend
The app backend consists of two Server Code scripts. The first script will help with authentication and the second script will invoke Google Drive API to get a list of files.
Google Login Script
The first script helps with the login flow.
- Under the Server Code tab, create a new Server Code script.
- Name the script: googleOAuthLogin.
- Copy the code below and paste it over the new script you just created and save.
// Get code from Google
var code = request.get("code");

// Appery.io app ID. Get it from the App Builder URL:
// http://appery.io/app/project/ID/editor
var app_id = "";

// Appery.io Server Code script ID.
// Get it from API information tab
// https://api.appery.io/rest/1/code/ScriptID/exec
var script_id = "";

// Google client ID.
var client_id = "";

// Google client secret.
var client_secret = "";

var redirect_page = "https://appery.io/app/view/"+app_id+"/app/Welcome.html";
var redirect_uri  = "https://api.appery.io/rest/1/code/"+script_id+"/exec";

var XHRResponse = XHR2.send("POST", "https://www.googleapis.com/oauth2/v4/token", {
  "body": "code=" + code + "&client_id=" + client_id + "&client_secret=" + client_secret + "&redirect_uri=" + redirect_uri + "&grant_type=authorization_code"
});

var responseObject = JSON.parse(XHRResponse.body);
response.redirect(redirect_page + "?" + responseObject.access_token);
Now, you need to fill out various IDs for this script.
- Set the app_id (line 6 of the code). You can find the ID in the App Builder editor URL.
- Set the script_id (line 11). It is the ID of this script. You can find it under its API information tab (or in the script editor URL).
- Select your client for Android to access the following details.
- Go back to your Web client 1 to copy the client_id from Google Developer Console and paste it into line 14.
- Copy the client_secret from Google Developer Console into the code (line 17) .
- Save the script.
Google Drive File Script
This script will invoke a Google Drive API and return a list of files.
- Create a new Server Code script and name it listGoogleDriveFiles.
- Copy and paste the following code, save it:
// Google Drive API
var url   = "https://www.googleapis.com/drive/v3/files";
var token = request.get("token");

var XHRResponse = XHR2.send("GET", url, {
  "headers": {
    "Authorization": "Bearer " + token
  }
});
Apperyio.response.success(XHRResponse.body, "application/json");
Next, you need to connect the app with the backend.
Connecting the App with the Backend
The next step is to connect the app with the backend.
- Inside the App Builder, open Services > Settings. This file has a number of properties you need to set.
- Set the ScriptID value - that's the googleOAuthLogin script which helps with login.
- The scope is already set. The scope includes resources to which the app is requesting access. If you add additional resources once the app is running, Google will prompt you to permit the app to access these resources.
- The clientID is the value from the Google Developer Console.
The last step is to set up the listGoogleDriveFiles_service service which invokes the Google Drive API.
- Open Services > listGoogleDriveFiles_service > Settings.
- In the URL, replace {servercode_googledrivefiles} with the Server Code ID of the second listGoogleDriveFiles script.
Setting the Callback URL
The last step is to set the callback (redirect) URL in the Google project. Go back to the page with the details on Web client 1 and, for Authorized redirect URLs, enter the full URL of googleOAuthLogin script (the script URL can be found in API information tab in Server Code tab):
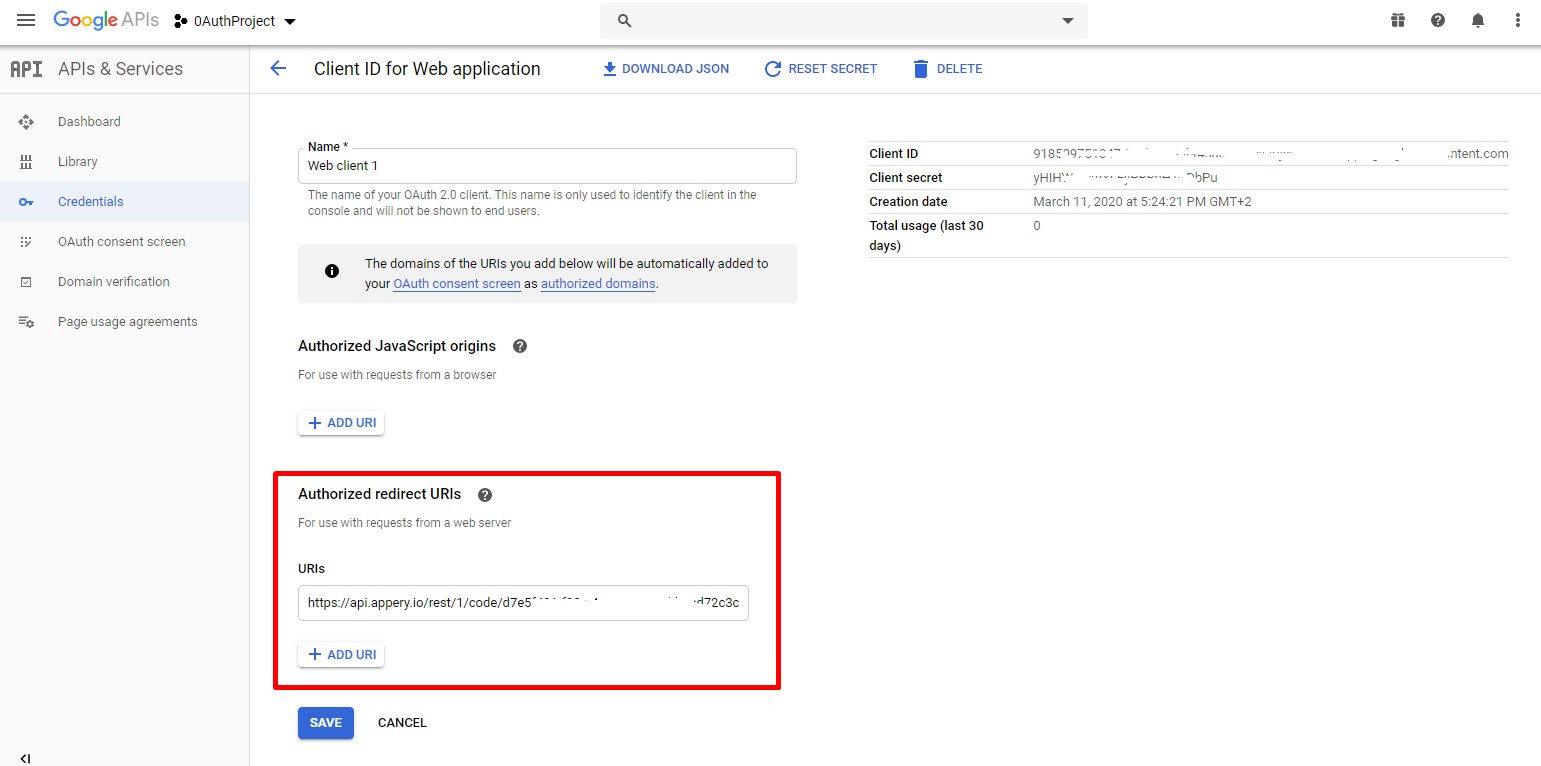
Setting redirect URL.
Using Google Sign-In Cordova/PhoneGap plugin
We also need to add the Google Sign-In Cordova/PhoneGap plugin; otherwise, all OAuth requests through InAppBrowser will be blocked (see http://blog.ionic.io/google-oauth-changes/ for details).
So, first of all, download the plugin and import it to the project under Resources > Cordova plugins (more details on this). When ready, you can proceed with specifying the settings for iOS or Android apps. We'll describe both ways and then show you how to set up your app at the end.
Google setting for iOS projects
- On the Google project page, go to the Credentials tab and select Create credentials > OAuth client ID:
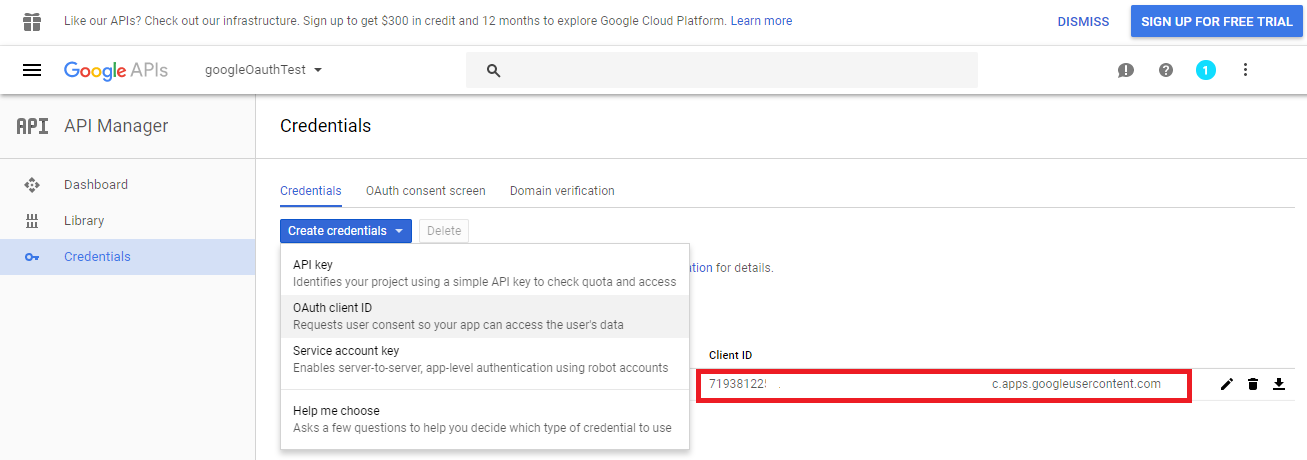
OAuth client ID (iOS)
- In a new window, select iOS.
- Define the Bundle ID (you can get it from App settings > iOS binary > Bundle ID).
- Click Create.
- Now, copy the iOS URL scheme from the created Сlient ID:
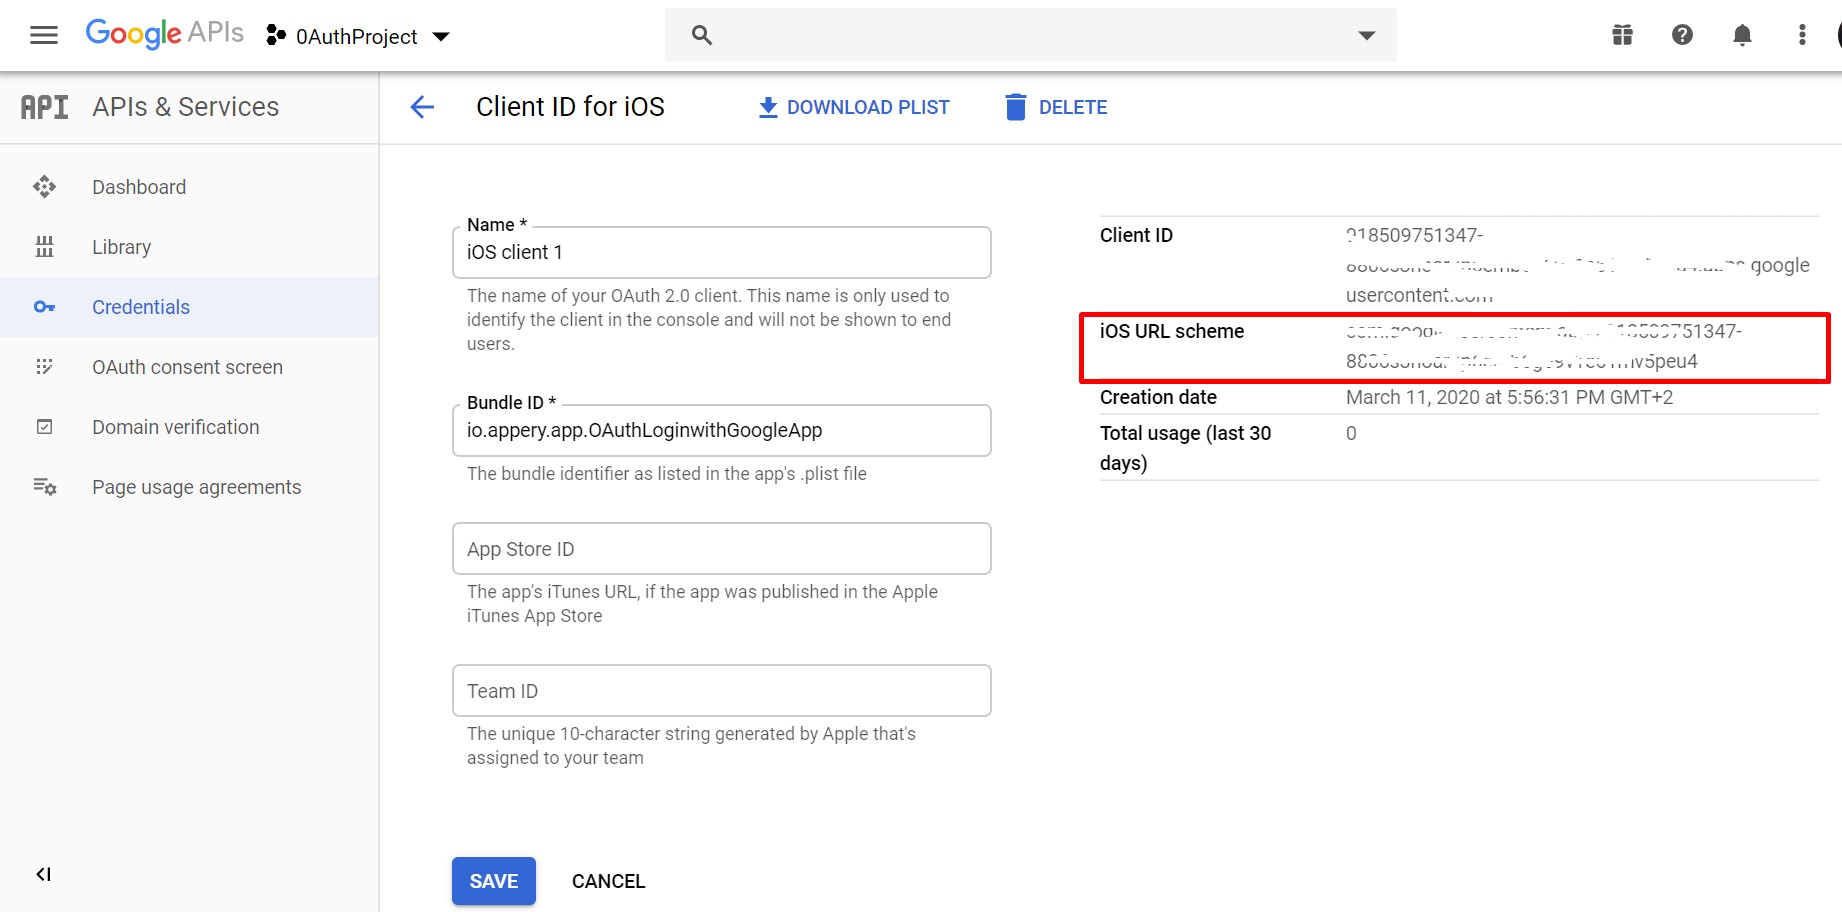
Client ID for iOS
- Add the iOS URL scheme as the REVERSED_CLIENT_ID parameter of the Google Sign-In plugin and save:
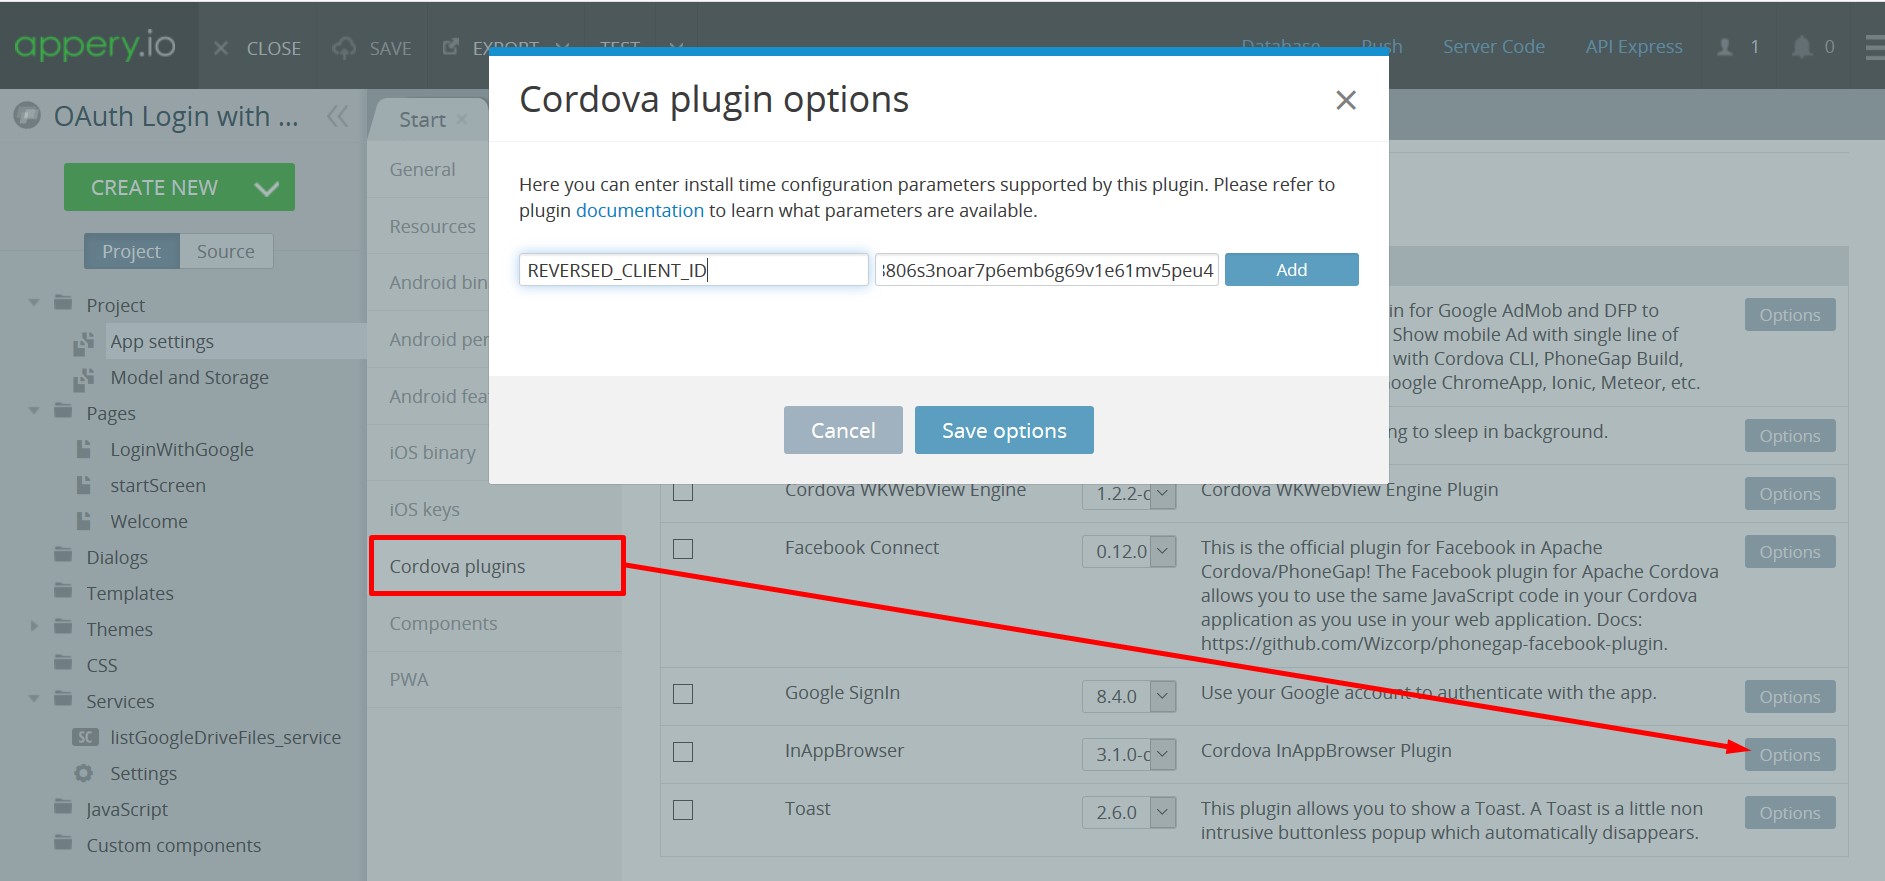
Google SignIn plugin
Ready!
Google setting for Android projects
- On the Google project page, go to Credentials and select Create credentials > OAuth client ID:
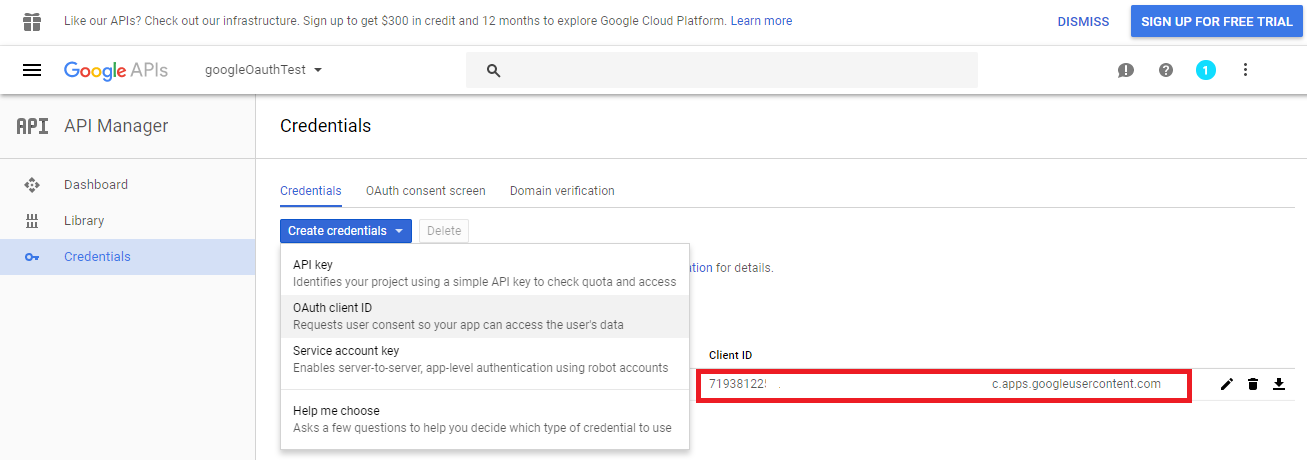
OAuth client ID (Android)
- In a new window, select Android.
- You will need the SHA-1 fingerprint of the certificate that you are using for signing up your app to link the client ID to the app. To get it, export your certificate (Resources > Certificates):
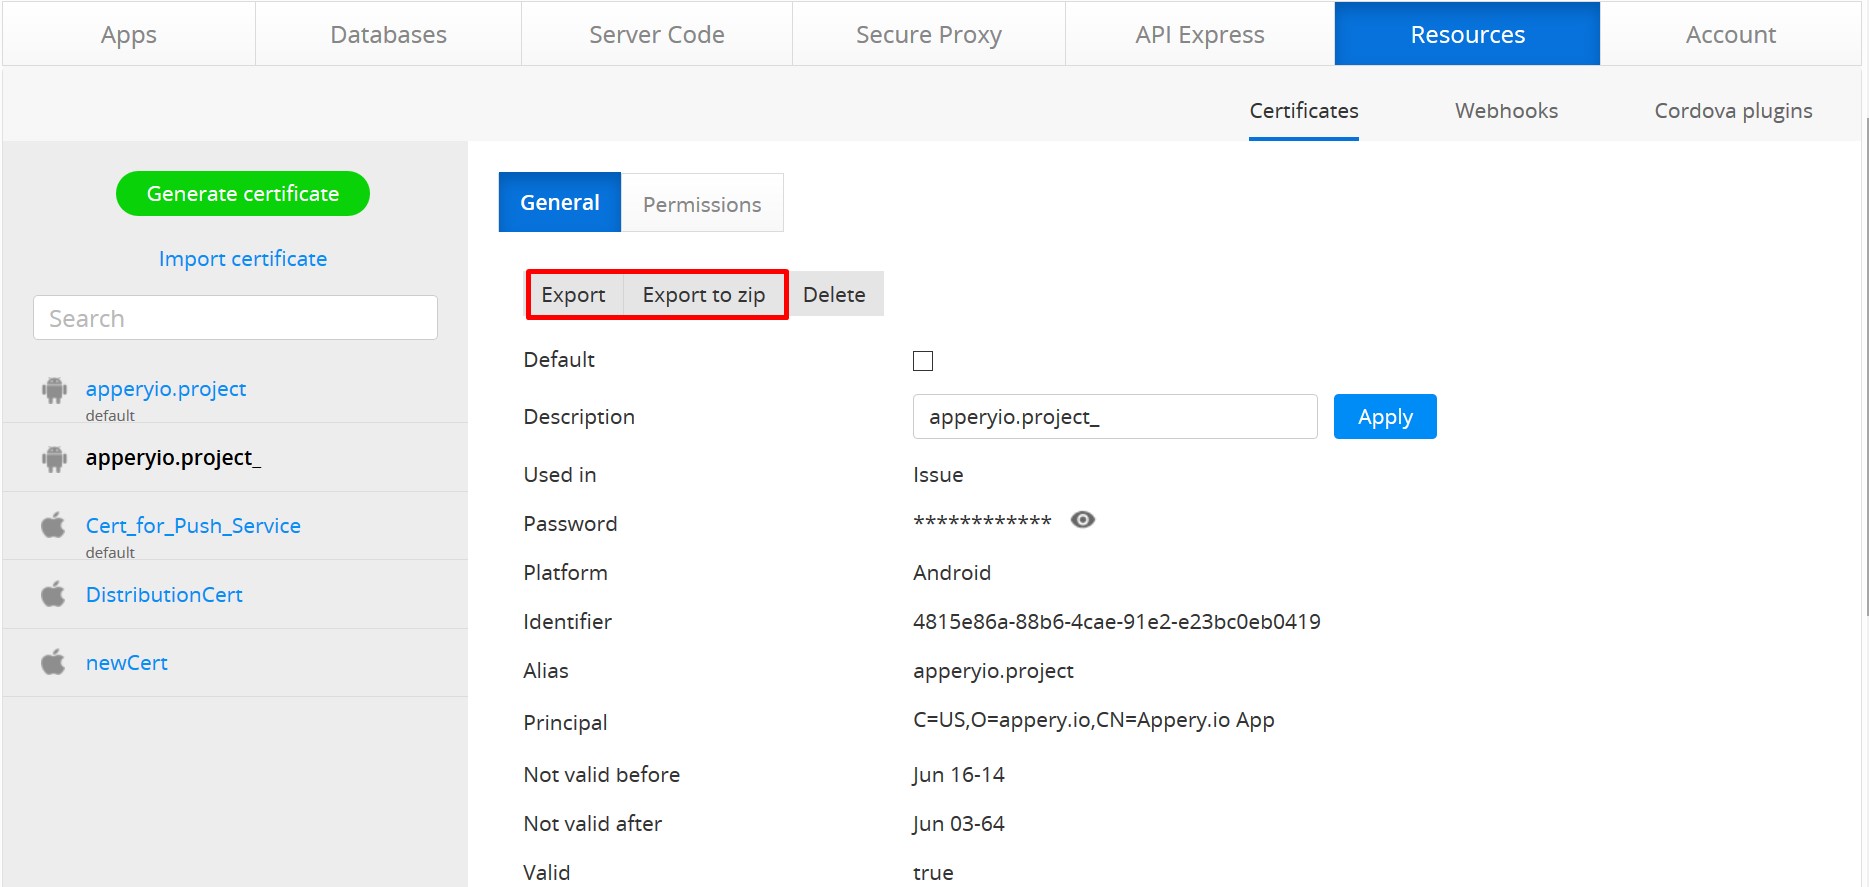
Exporting cerificate
- Now, unzip it and open the SHA-1 file in a notepad, for example. Copy it.
You can also run the following command in the console:
keytool -exportcert -keystore path-to-debug-or-production-keystore -list -v.keytool is a key and certificate management utility. It is included in the JDK, you can install either JDK or download the keytool utility.
- The obtained SHA1 code should be added to the Signing certificate fingerprint.
- Insert the Package name (can be found in the App Builder: App settings > Android binary > Package name).
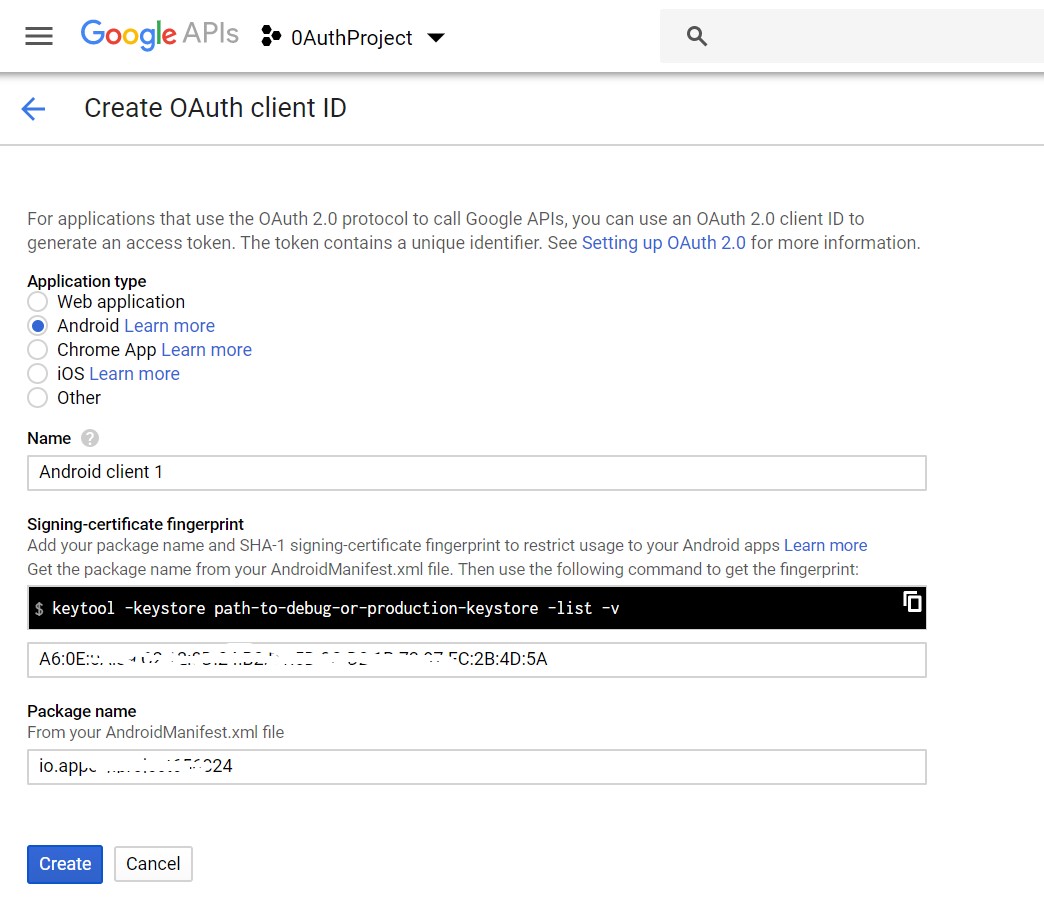
Creating OAuth client ID
- Click Create.
Check that it is added under Credentials:
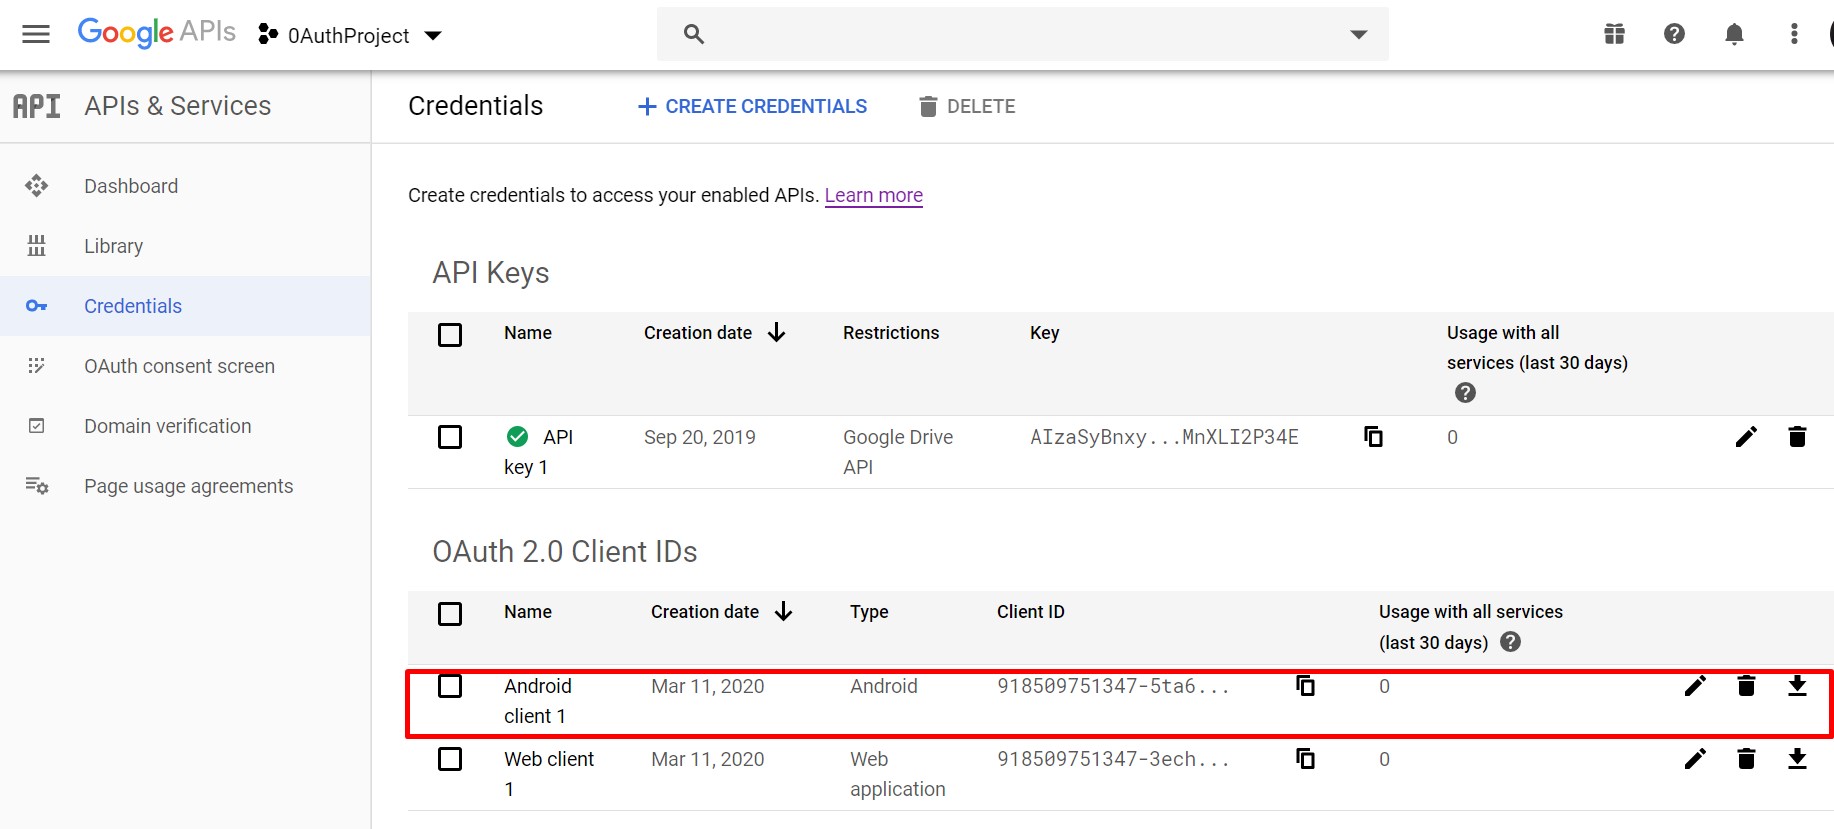
Android Client added
Please note that the selected Android certificate will only work with the release option enabled so, select the Release check box under App settings > Android binary.
Also, make sure that the valid certificate is selected in the App settings > Android binary > Certificate section.
Testing App
Important NoteWhen testing the app in the browser it's important that you remove the mobile frame. You need to run the app directly in the browser.
Click Login with Google, in a new window, you will see a familiar Google login screen:
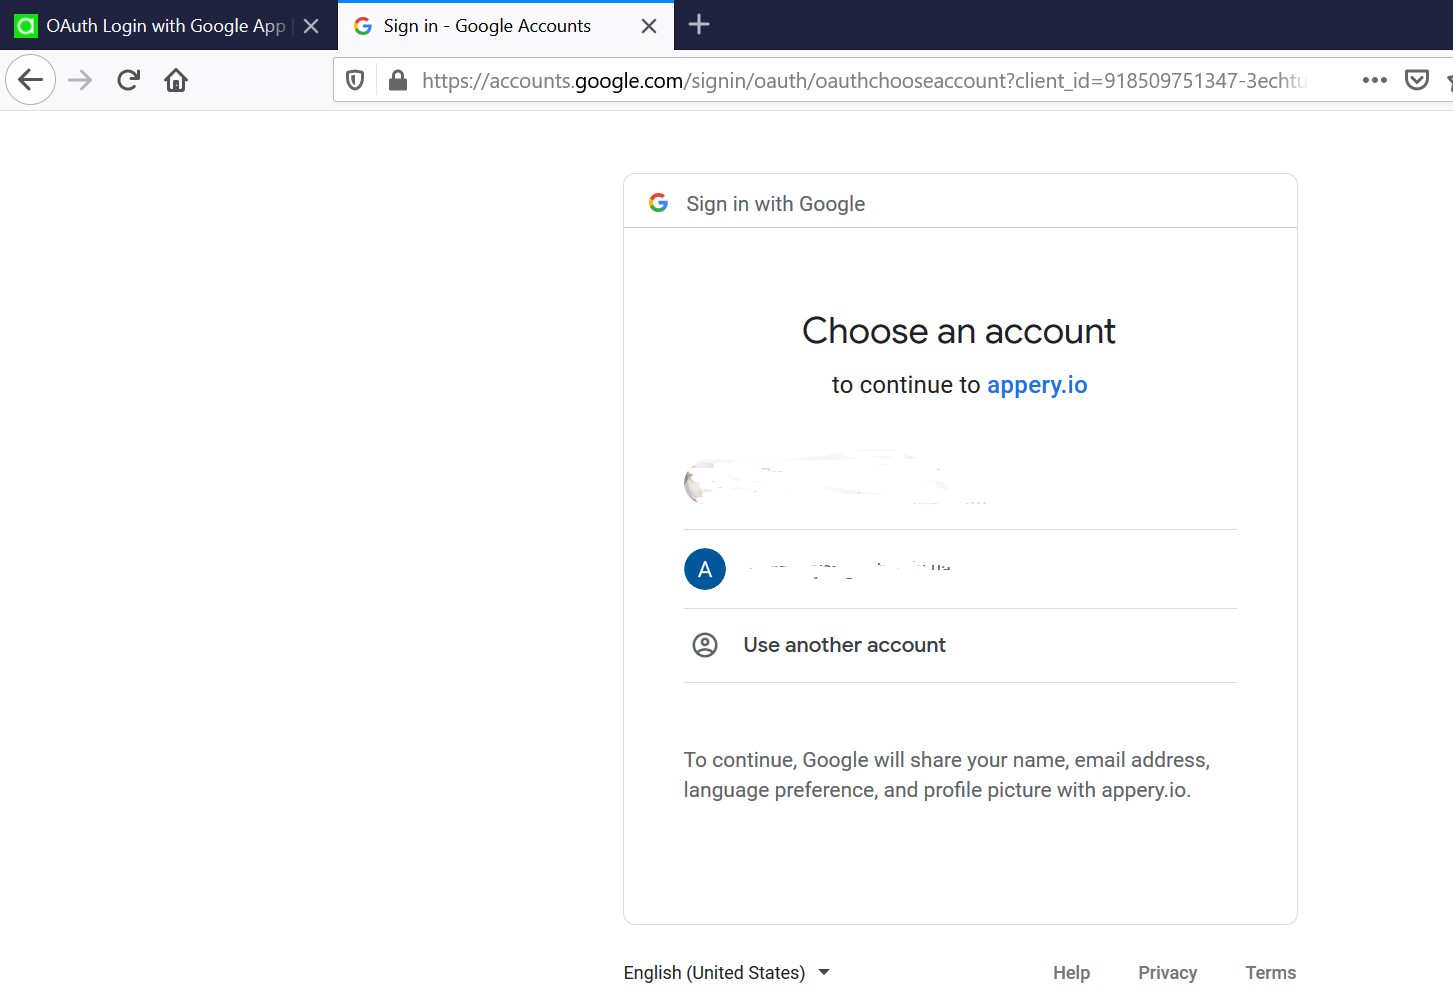
Window to choose an account
When you log in, Google will ask you if you give this app permissions to access the listed resources.
Testing Without the Mobile FrameOnce again: it's important you test the app without the mobile frame; otherwise, it will not work.
Updated 7 months ago
