jQM InAppBrowser App
Using the InAppBrowser API in a jQuery Mobile app
Important Note!The option of creating new apps with thejQuery Mobile framework was removed but we still support the projects that were created with it earlier.
What are we going to build?
In this tutorial, you’ll learn how to build an app that navigates to a web page via various methods of the Apache Cordova InAppBrowser plug-in. The InAppBrowser plug-in provides the ability to spawn a browser instance from the application.
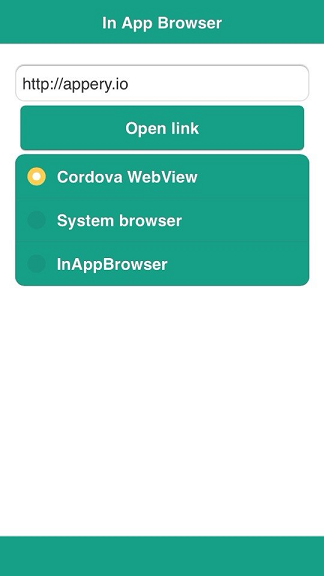
The app will look like this:

Ionic InAppBrowser App TutorialPlease check out our Ionic InAppBrowser App tutorial where we demonstrate how you can you will learn how to use the InAppBrowser API in an Ionic app.
Apache Cordova (PhoneGap)
Apache Cordova (PhoneGap) is automatically included when you create a new project in Appery.io.
Creating a new app
Create a new app in the App Builder. From the Apps page, enter an app name and click Create. You’ll see a start page.
Creating the UI
First, place an Input component on the page and rename it to link_source. Type a link (which will be used by default), into the Text field. Place a Button component on the page, and rename it to open_browser_button. Next, place a Radio component and rename it to browser_type_group.
Set _self as value for the first Radio button. Type Cordova WebView for the Text property, and rename the button to cordova_web_view. Check the Selected box.
Similarly, create two more Radio buttons.
For the second button, set:
Value – _system, Text – System browser, Name – system_browser.
And for the third one:
Value – _blank, Text – InAppBrowser, Name – in_app_browser.
Invoking from JavaScript
InAppBrowser can be invoked via JavaScript:
- Open the DESIGN tab.
- Select the open_browser_button, open the EVENTS tab, and add the following event: open_browser_button> Click > Run JavaScript.
- Add the following JavaScript:
var radioGroup = $('input[name=browser_type_group]:checked');
window.open(Apperyio('link_source').val(), radioGroup.val());- Click Save.
Wrapping into Service
InAppBrowser can be also invoked via a service.
NoteDon’t use both methods (Invoking from JavaScript and this one) at the same time.
Appery.io doesn’t have a predefined InAppBrowser component; instead, this example uses a Generic Service.
- From the Projects view: CREAYE NEW > Service > Generic (custom JavaScript implementation), enter name InAppBrowserService and click Create Service. The service will be listed under the Services folder.
- Open the service and go to the Request tab. Specify two parameters – link and browser_type.
- Go to the Settings tab and click Add custom implementation. Type InAppBrowser as name and click Create.
- You’ll see the default implementation. You’ll need to make some changes and add some code. Your custom implementation should look like:
Appery.InAppBrowser = Appery.createClass(null, {
    init : function(requestOptions) {
        this.__requestOptions = $.extend({}, requestOptions);
    },
    process : function(settings) {
        settings.beforeSend(settings);
        if (this.__requestOptions.echo) {
            settings.success(this.__requestOptions.echo);
        } else {
            window.open(settings.data.link, settings.data.browser_type);
            settings.success({});
        }
        settings.complete('success');
    }
});
Binding Service
- Open the DATA tab.
- For datasource, select Service > InAppBrowserService > Add. The InAppBrowser service will be added to the page. Name it in_app_browser_service.
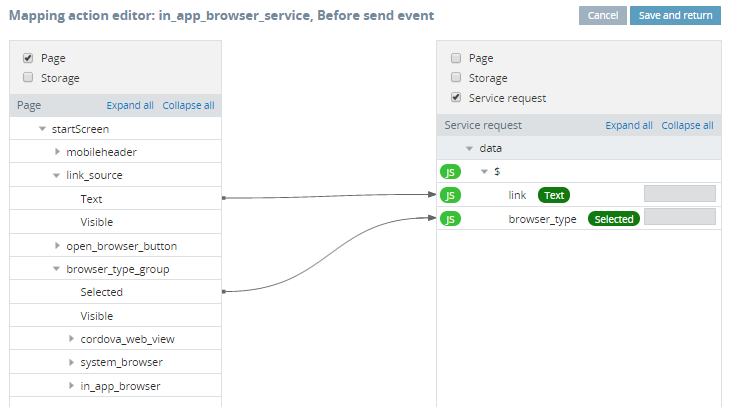
- Create the following mapping for Before send event:

- Save.
Launching InAppBrowser
- Open the DESIGN tab.
- Select the button, open the EVENTS tab, and add the following event: open_browser_button> Click > Invoke service > in_app_browser_service, and click Save.
Issue with Viewing PDF InAppBrowserNote that the issue with viewing PDF InAppBrowser can be observed. For the workaround, check this link.
Testing App
Since we’re invoking a native component, this app needs to be tested as a hybrid app, or installed on the device.
Android
Testing on Android is relatively simple, since you can quickly install any app on your device.
To do it, build the Android binary and install it on your device. When the build is completed, you’ll see a QR code. Scanning the QR code will download the app to your phone. You can also email the app to your device.
iOS
Build the app and install it on your device.
Important NotePlease, note that to export the app for iOS, you will need to upload your distribution certificate and provisioning profile obtained from Apple under the App settings > iOS binary tab.
You can check this document in case you need help with exporting your application for iOS. Here, you will find the document that explains how to manage certificates in Appery.io.
Updated 7 months ago
