Collections
Using collections to organize app data.
A database is organized into a number of collections. The Appery.io database has two types of collections:
- Predefined collections - automatically created with every new database;
- Custom collections - any custom collections you create to hold app data.
Collection vs. TableThe term collection in the Appery.io database corresponds to the term table in SQL databases.
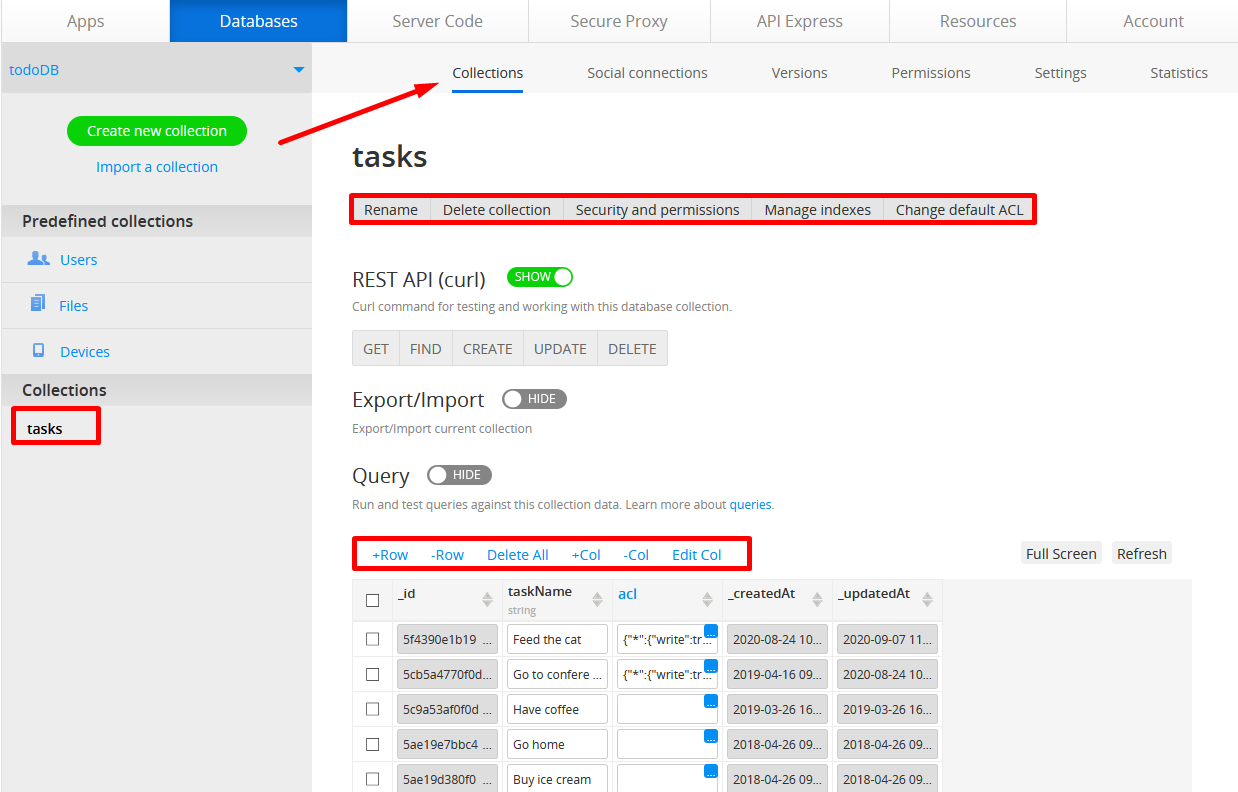
Select the Collections tab to open the corresponding view where you can:
- Create and import collections.
- Edit collections (add and delete columns and rows), change permissions and rename or delete collections.
- Manage indexes and change default ACLs.
- See REST APIs for every collection, including the predefined collections.
- Add users and set passwords in the Users collection.
- Upload and download files in the Files collection.
- Add devices with installed apps in the Devices collection.
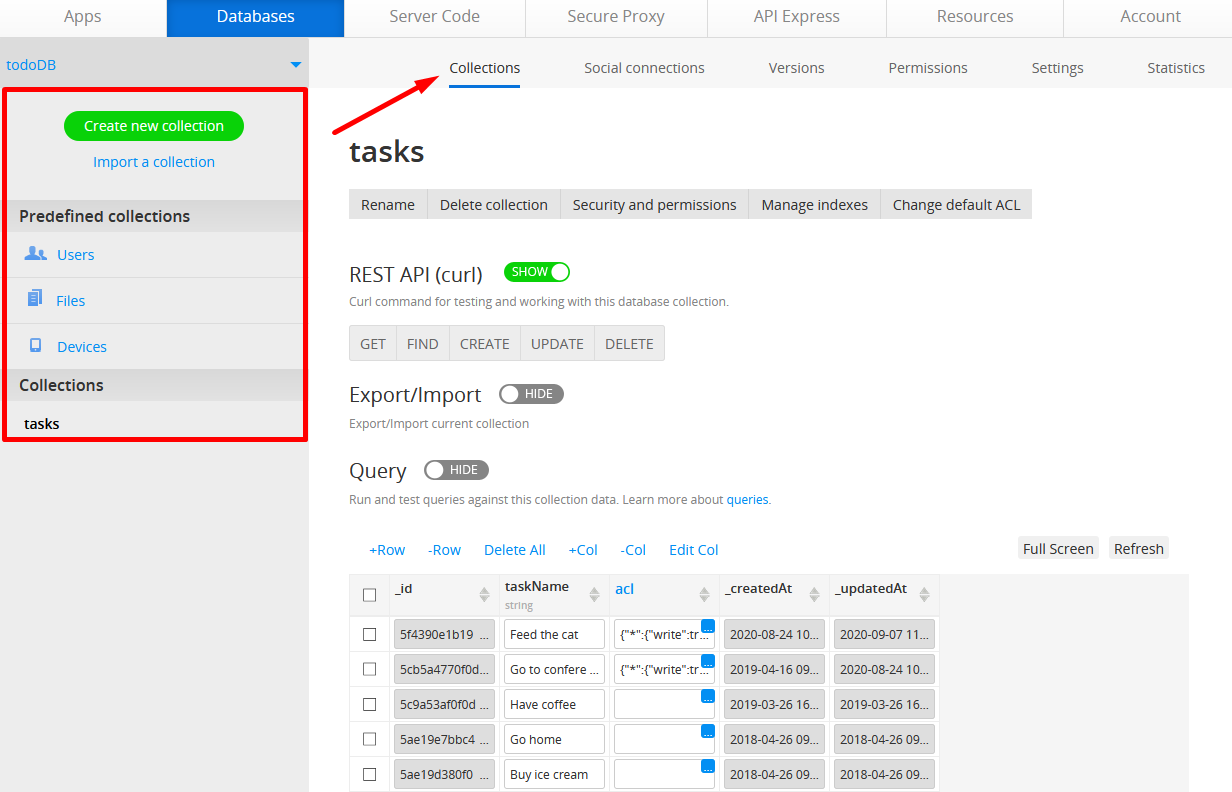
Predefined collections
Predefined collections are automatically created with every new database. The predefined collections are:
- Users;
- Files;
- Devices.
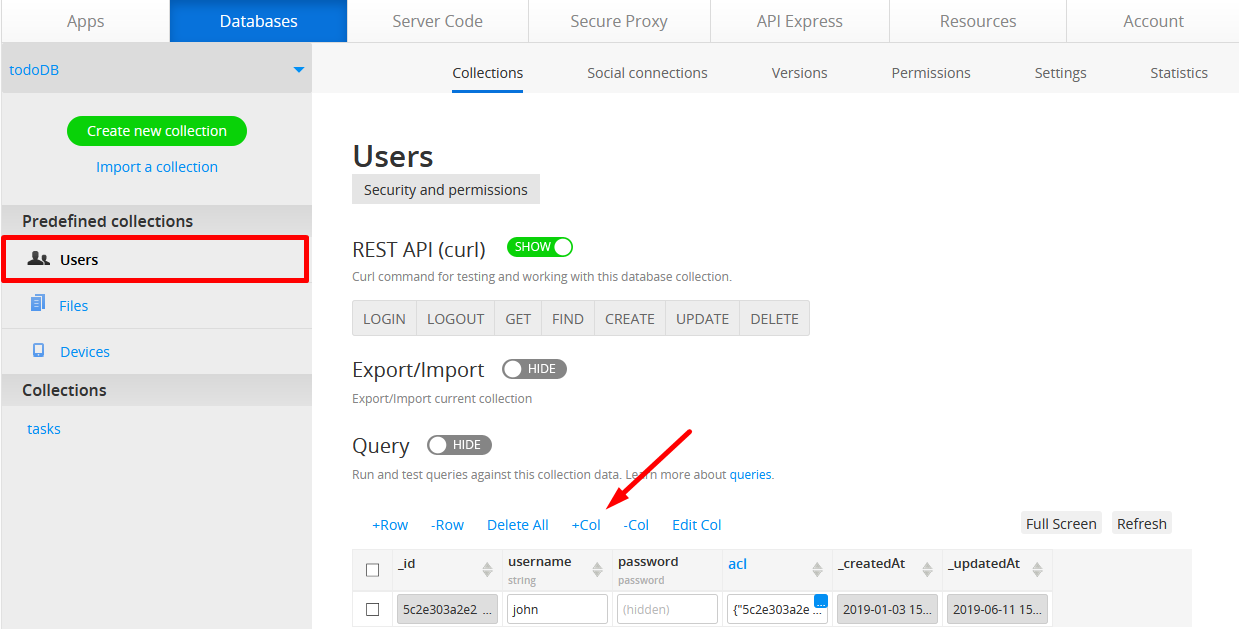
Users
The Users collection is for storing and managing users in your app. For example, you can provide user registration, user login services in your app.
The collection has the following default columns:
| Column name | Description |
|---|---|
| _id | The id of the user; consists of letters and numbers; cannot be changed. |
| username | The username of the user who has access to the database. |
| password | The password of the user (is hidden). |
| acl | Access Control List. Permissions for this object (user) to access the database. |
| _createdAt | Date and time this user was created. |
| _updatedAt | Date and time the user’s data was last updated. |
You can add custom columns to the Users collection:
Files
The Files collection is for storing files such as images, PDFs, or text files:
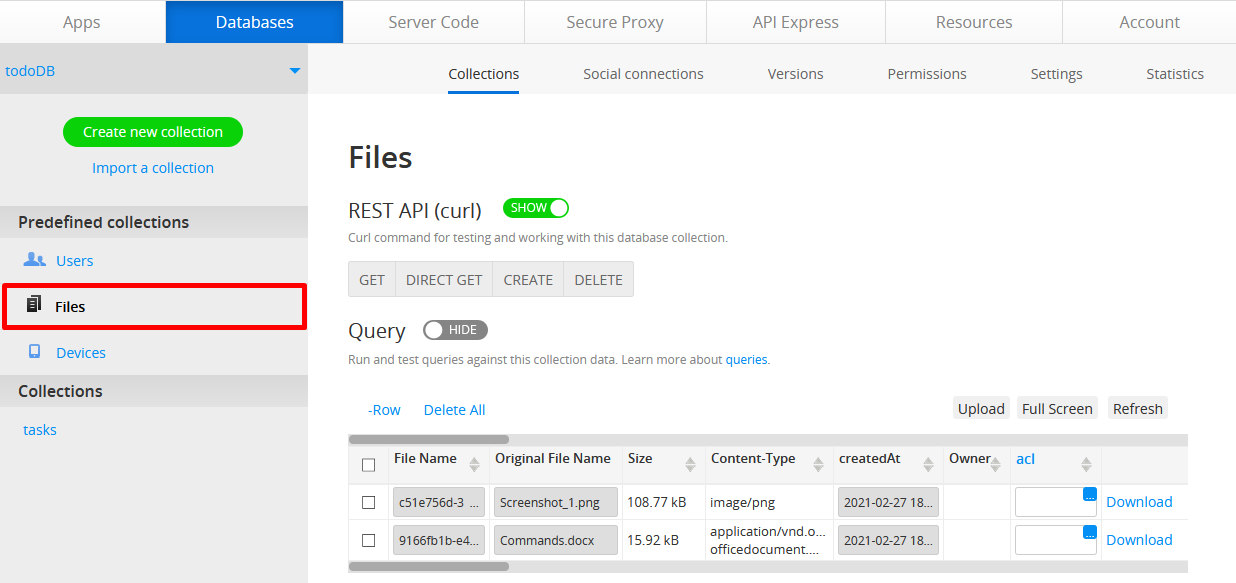
The Files collection has the following columns:
| Column name | Description |
|---|---|
| File Name | File name under which the file is stored in the database. The format is: id.originafilename.ext. |
| Original File name | The original file name uploaded to the database. |
| Size | File size. |
| Content-Type | The file content type. This information is based on the file format. |
| _createdAt | Date and time this file was uploaded. |
| Owner | Displayed only when the file was created directly from a POST request. This field has also an Info icon. Upon clicking the icon, a popup appears with information about the file owner. |
| acl | Access Control List. Permissions for this object to access the database. |
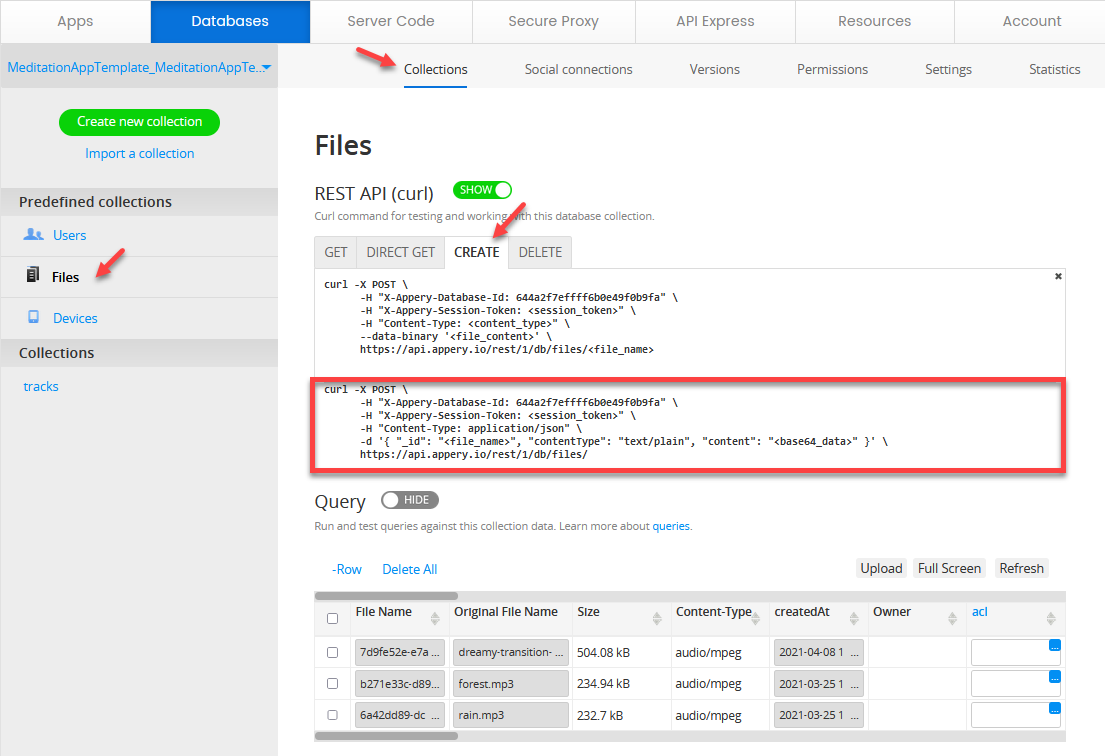
There is a helper under the CREATE tab that can be useful if you need to create binary files and send them as Base64:
Devices
The Devices collection holds registrations from push-enabled apps. The information in this collection allows sending targeted Push Notification messages. The collection has the following columns:
| Column name | Description |
|---|---|
| _id | The id of this registration object. Auto-generated during device registration in the collection. |
| deviceID | Unique id of this device. Auto-inserted during device registration. |
| token | Unique token from the Push Notifications service. Auto-inserted during device registration. |
| type | Device type. A for Android. I for iOS. |
| channels | One or more channels for which this device has subscribed. Channels are used to send targeted Push Notification messages. |
| timeZone | The time zone in which this device registered. |
| acl | Access Control List. Permissions for this object . |
| _createdAt | Date and time when device registered. |
| _updatedAt | Date and time when device registered was updated. |
You can add custom columns to the Devices collection.
Custom collections
If needed, custom database collections can be created.
To do it, under the database Collections tab, click Create new collection, provide a name, and confirm the operation.
You are free to define the collection structure (add/delete/edit rows and/or columns).
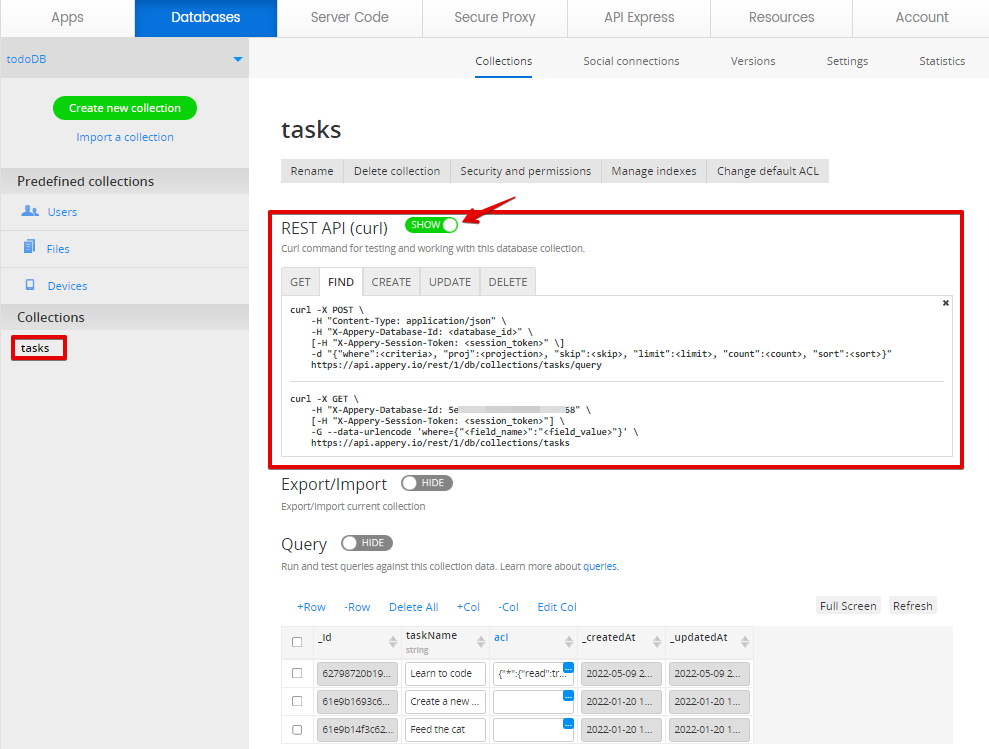
You can also use the REST API (curl) toggle to show the collection REST API section with more information on its curl commands (for example, X-Appery-Database-Id or how to compile the search request):
Security and Permissions
To access a collection you need to provide the database API key (id). You can also add additional security and permissions.
Requiring User Login
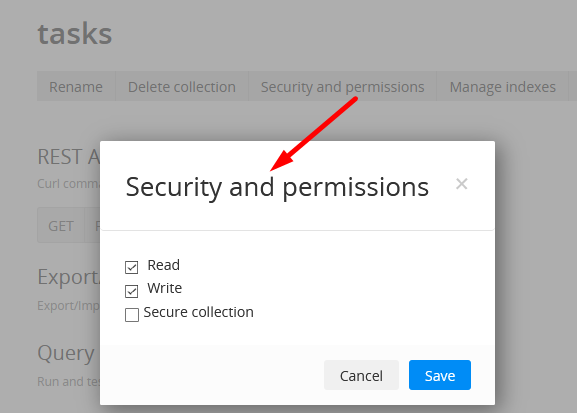
By default, the Secure collection option is disabled. The data in this collection can be retrieved via REST services, without the need to provide a session token. By turning on the Secure collection option, any action with the collection via REST API services should be done with the provided session token parameter. This means that only logged-in users can access the collection. The session token is added as header parameter: X-Appery-Session-Token.
Login API
Read/write Permission
In addition to making a collection secure, you can also set whether a collection has read and/or write access.
- Read access - allows reading data in the collection;
- Write access - allows data to be inserted or updated in the collection.
For example, to make a collection read-only, turn off the Write permission.
Indexes
If you have a large number of columns in the database and perform a search on certain columns, an index on those columns can make the search operation a lot faster.
To manage the collection indexes, click the corresponding tab from under your collection:
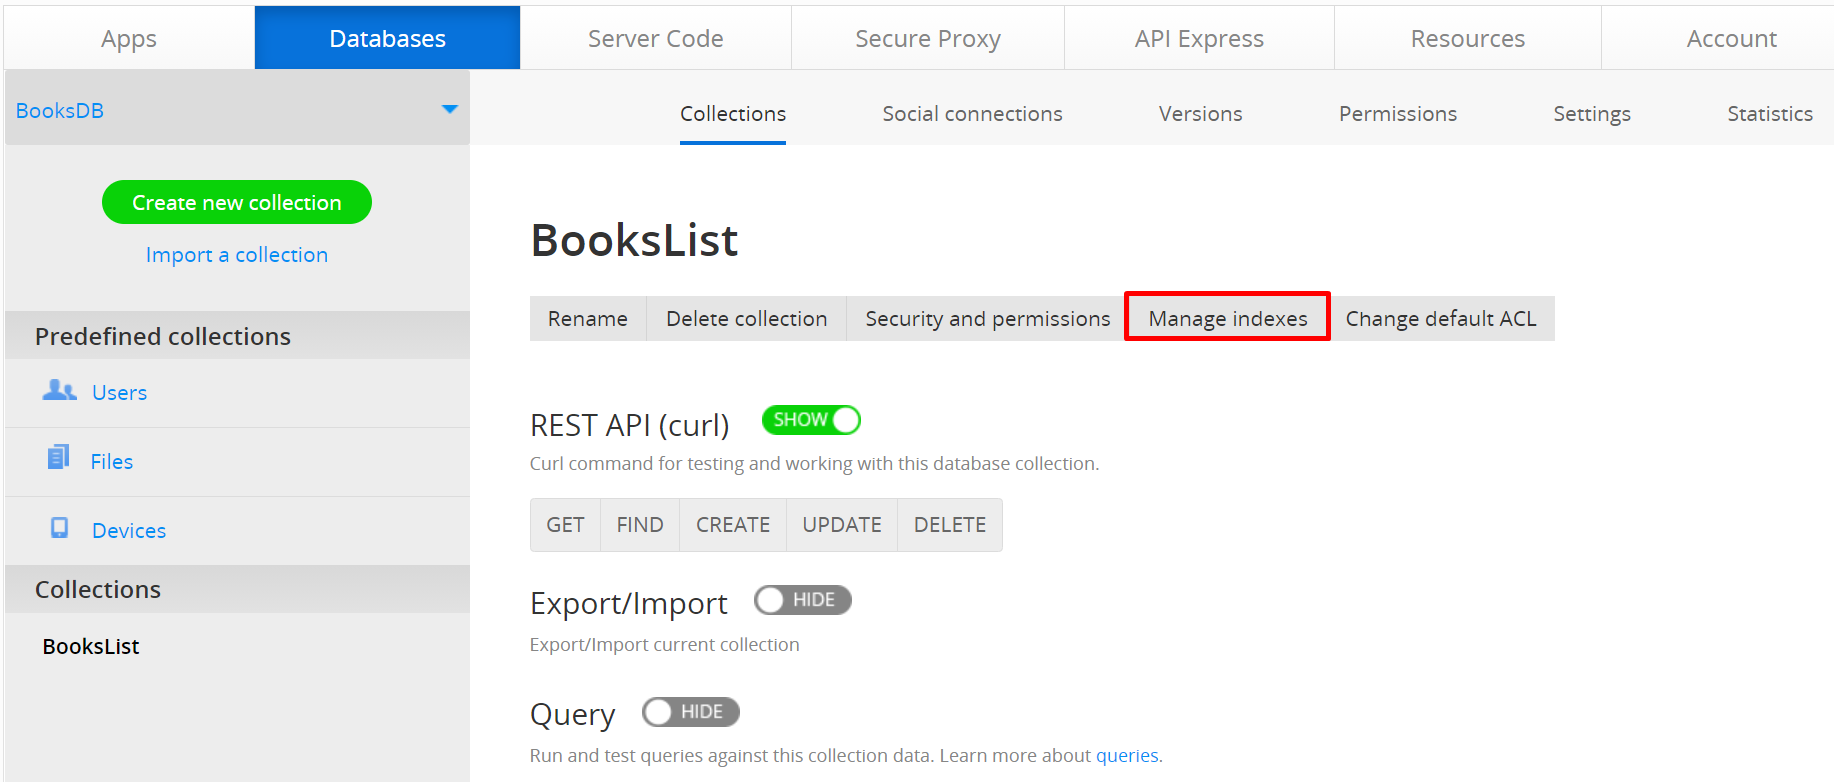
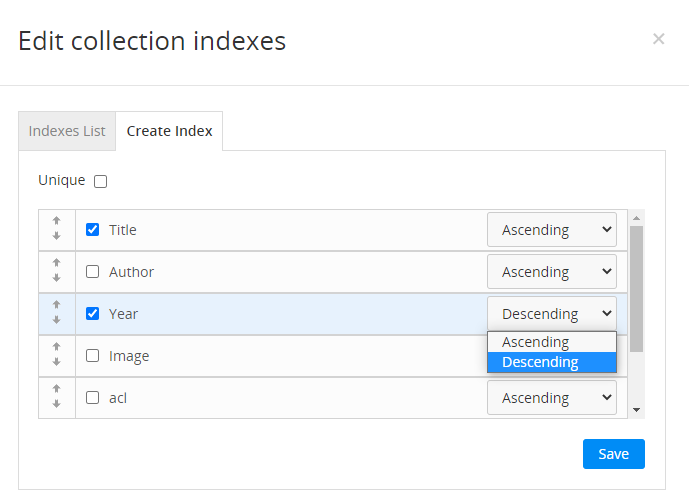
In the new window, you will be able to manage the indexes for all columns created under this collection:
ACL (Access Control List)
ACL (Access Control List) allows defining access (permission) for a particular object in a collection.
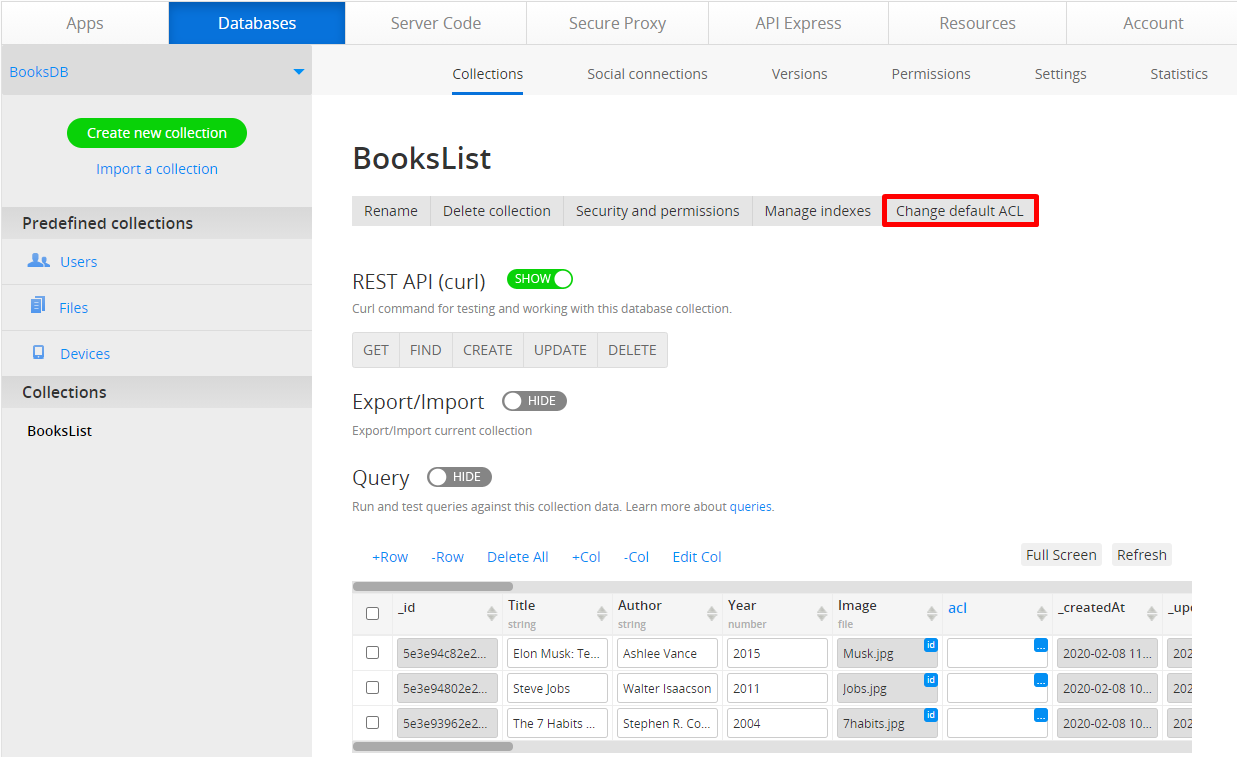
To access the ACL Editor, click the Change Default ACL tab:
Now, to manage the Access Control List, click on the Username placeholder, and you’ll see the drop-down list with all existing users:
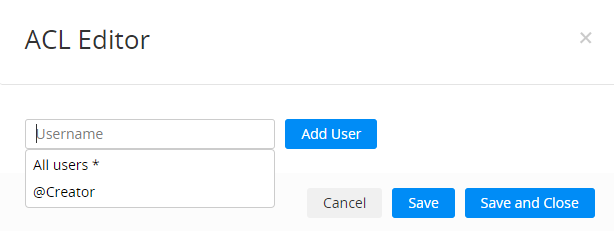
Select the needed user, and click Add User to manage the user’s access rights.
Select All users * to manage access rights for all users or select @Creator to manage access rights for the user that created the current object. The most common use case for @Creator is when @Creator has rights to read and write and All users * only has read rights. So, only the object creator can modify it.
The most basic ACL is the following:
{"573e3bf0975a12724790effc":{"read":true,"write":true}}This example means that user with id = 573e3bf0975a12724790effc has read and write access to a particular object. No other user will be able to read or write to this object. Only a user who signed in with the Master key will be able to overwrite the ACL.
The most common case is when the user who is currently logged in creates an object and has read/write permission to this object.
It is also possible to give permission to additional users. For example, this example shows two users have read/write access to an object:
{"573e3bf0975a12724790effc":{"read":true,"write":true},"573e3bf6975a12724790effe":{"read":true,"write":true}}If a user has only read access, then the ACL would look like this:
{"573e3bf0975a12724790effc":{"read":true}}The ACL can be set in two ways:
- Default (when the object is created);
- In runtime.
Default
Default ACL means that every time a new object is created the default ACL will be applied to that object. We recommend using this approach unless you have a special case where you need to determine ACL in runtime.
To set the default ACL, click the Change default ACL button. A visual ACL editor will open. When you start typing in the input field, you will see the following options:
- All users * - all users will have access to this object;
- @Creator - the object creator (currently signed-in user) will have access to this object;
- username - if you have any users currently in the Users collection, they will be listed here.
After you set a default ACL, every new object created will have the default ACL set.
To view or edit an ACL for an object, click on the blue icon in the ACL field. There you can view and edit the current ACL for this object.
In runtime
You can also set the ACL in runtime. This is a more advanced usage. Check the database API to learn how to set ACL in runtime.
Importing Collections
Importing New Collection
You can import a collection if you have a .json or .csv file. To import a collection, click Import a collection, enter the collection name, and select the file to be imported:
Please see the sample files format below.
{
	"data": [{
		"_id": "561ffc09e4b0335a64ab4486",
		"Author": "George Orwell",
		"Title": "1984",
		"Year": "1949"
	}, {
		"_id": "561ffc2ee4b0335a64ab4488",
		"Author": "Stephen King",
		"Title": "The Shining",
		"Year": "1977"
	}, {
		"_id": "561ffc53e4b0335a64ab4489",
		"Author": "Antoine de Saint-Exupéry",
		"Title": "The Little Prince",
		"Year": "1943"
	}, {
		"_id": "561ffc84e4b0335a64ab448d",
		"Author": "Mikhail Bulgakov",
		"Title": "The Master and Margarita",
		"Year": "1966"
	}, {
		"_id": "561ffcece4b0335a64ab448e",
		"Author": "Ray Bradbury",
		"Title": "Dandelion Wine",
		"Year": "1957"
	}, {
		"_id": "561ffd11e4b0335a64ab448f",
		"Author": "Jane Austen",
		"Title": "Pride and Prejudice",
		"Year": "1813"
	}]
}
"_id:string","acl:object","Author:string","Title:string","Year:string","Owner:pointer|Owners"
"561ffc09e4b0335a64ab4486","","George Orwell","1984","1949","56fbb69ee4b0f82184d4d3b9"
"561ffc2ee4b0335a64ab4488","","Stephen King","The Shining","1977","56fbb69ee4b0f82184d4d3b9"
"561ffc53e4b0335a64ab4489","","Antoine de Saint-Exupéry","The Little Prince","1943","56fbb69ee4b0f82184d4d3b9"
"561ffc84e4b0335a64ab448d","","Mikhail Bulgakov","The Master and Margarita","1966","56fbb69ee4b0f82184d4d3b9"
"561ffcece4b0335a64ab448e","","Ray Bradbury","Dandelion Wine","1957","56fbb69ee4b0f82184d4d3b9"
"561ffd11e4b0335a64ab448f","","Jane Austen","Pride and Prejudice","1813","56fbb69ee4b0f82184d4d3b9"
Import file formatIf you are not sure about the file format, create a sample collection with the data types that you need. Export the collection and use this file as a starting point.
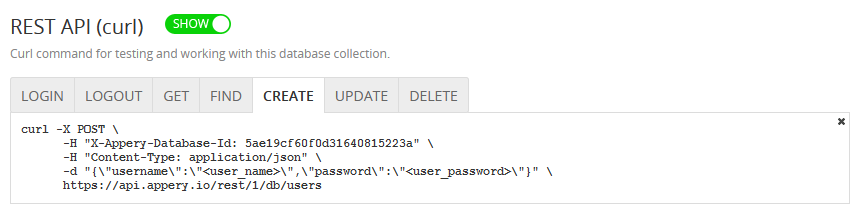
REST API (curl)
The REST API (curl) section displays the curl command to connect to the Appery.io Database. A curl command is invoked from a command line and can be a good way to test the API. A curl is the most basic way to test an API. If you are not familiar with curl, here is a good resource to learn more.
Select a different tab to see the curl command for a different operation:
Export/Import
Importing Data Into Existing Collection
You can also import data into an existing collection. Importing data into the existing collection is supported only for:
- Users collection;
- Custom collection.
Importing Data Into Users Collection
To import data into the Users collection, click the Export/Import toggle to Show and click Import Data. Then select from one of the following options:
- Add (rows will be added to the end);
- Replace (old data will be cleared).
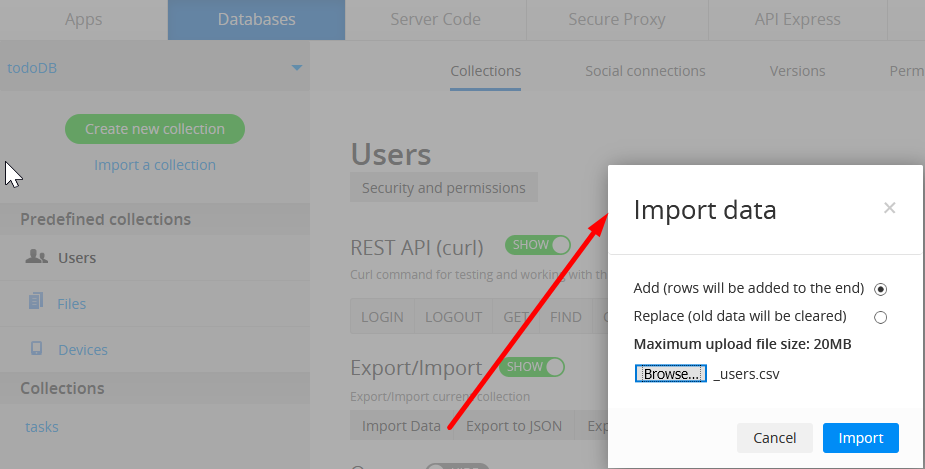
Note!Please be aware that when you import data into the Users collection, all existing data (users) will be removed.
Importing Data Into Custom Collection
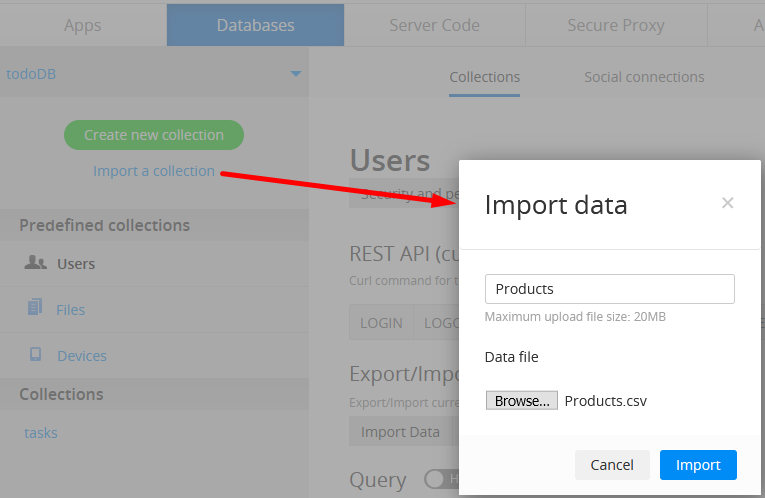
To import data into a custom collection, click the Export/Import toggle to Show and click Import Data. Then select from one of the following options:
- Add (rows will be added to the end);
- Replace (old data will be cleared).
Note that the maximum upload file size is 20MB.
Import scv fileBy defaulf all column types during the import are string but if you collection has different type (for example Number) this type should be specified in csv header file like this
test.csv
name,count:number
test,10The full example with all types
"_id:string","acl:object","_createdAt:date","_updatedAt:date","name:string","count:number","flag:boolean","dateofbirth:date","myarr:array","userRef:pointer|_users","obj:object","location:geopoint","myfile:file"
"67cfd2bd1afb8f711a9e41d3","","2025-03-11 06:05:49.653","2025-03-11 06:07:30.275","test","10.0","true","2025-03-04 00:00:00.000","[ 1.0 , 2.0 , 3.0]","67cfd2b81afb8f711a9e41d1","{ ""value"" : ""bob""}","[ 16.373 , 48.208]","{ ""fileName"" : ""410d2ec5-7d29-4c43-854a-93ed518e9b2e.test.png"" , ""originalFileName"" : ""test.png"" , ""fileurl"" : ""https://api.appery.io/rest/1.1/db/files/66c8a8073548532c70e04b1d/410d2ec5-7d29-4c43-854a-93ed518e9b2e.test.png\""}"
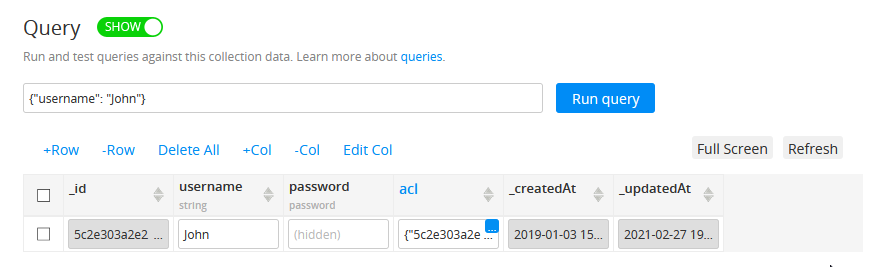
Query
Here, you can also run where-queries for a quick test. To do this, click the toggle right to the Query label, and you’ll see an input field and the Run query button. Clicking the Run query button will execute the GET service to the selected collection (which is opened right now). For testing purposes only, the first 10 records will be displayed. The entered text will be added to a where clause. In other words, you don't need to enter where, just the actual query.
For example, if you have a collection with a name, you can run this query to return all users whose name is John: {"username": "John"}:
Updated about 1 year ago