Appery.io Database and Server Code
Working with Appery.io Database and Server Code
Introduction
The Appery.io platform provides a NoSQL cloud database to store any data your app requires. In this tutorial, we will show you how to work with the Database using Server Code scripts. Server Code allows creating server-side app logic using JavaScript.
With the Server Code Collection API you can access the database and perform all the basic operations with the data stored in a database: reading, creating, editing, and deleting.
Ionic Sample App Using Appery.io BackendWe highly recommend that you review this tutorial that shows how to build a mobile Ionic app displaying a list of data from the database and explains the basics of working with the Appery.io Database and Server Code.
Appery.io Database Setup
First, we need to create a new database. In this tutorial, we will work with the simple library database, that stores information about books and their authors.
- From the Appery.io dashboard go the Databases tab. Here, click Create new database. Enter libraryDB as a name of a new database and click Create:
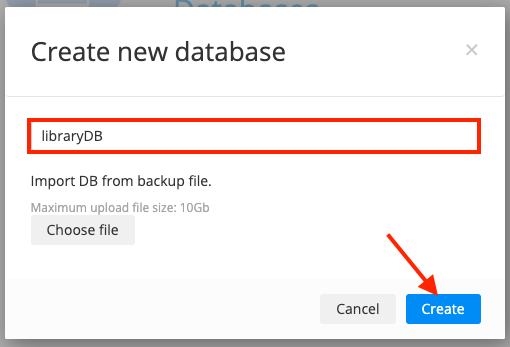
As you can see, here we have 3 predefined collections: Users, Files and Devices. We can also create custom collections. Let’s create a new custom collection named Books to store a list of books in our library.
- Click Create collection, type Books as a name of a new collection and click Add:
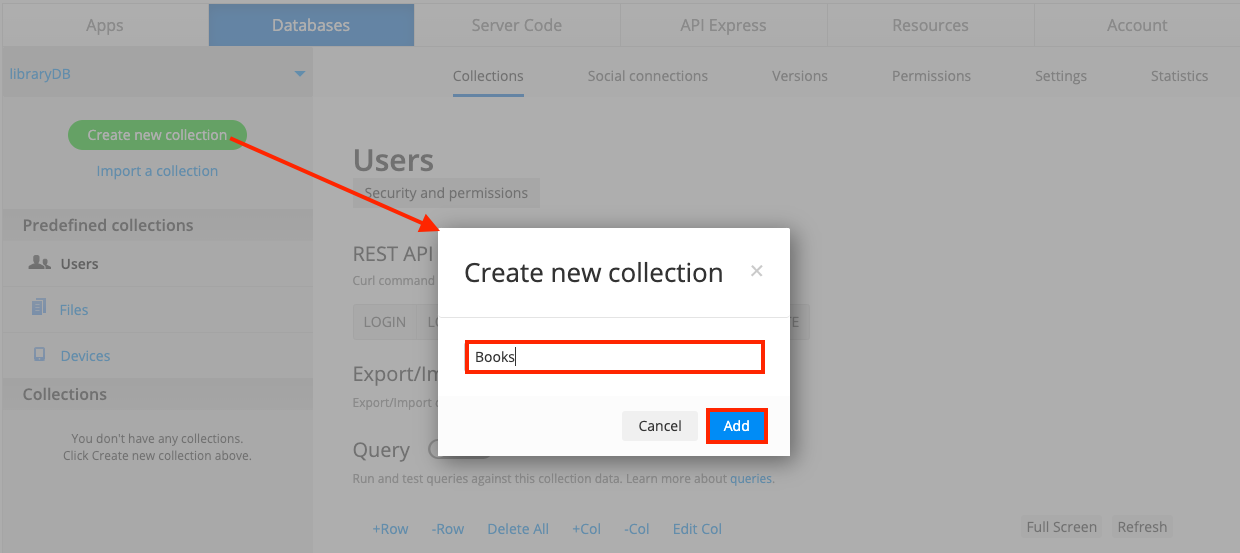
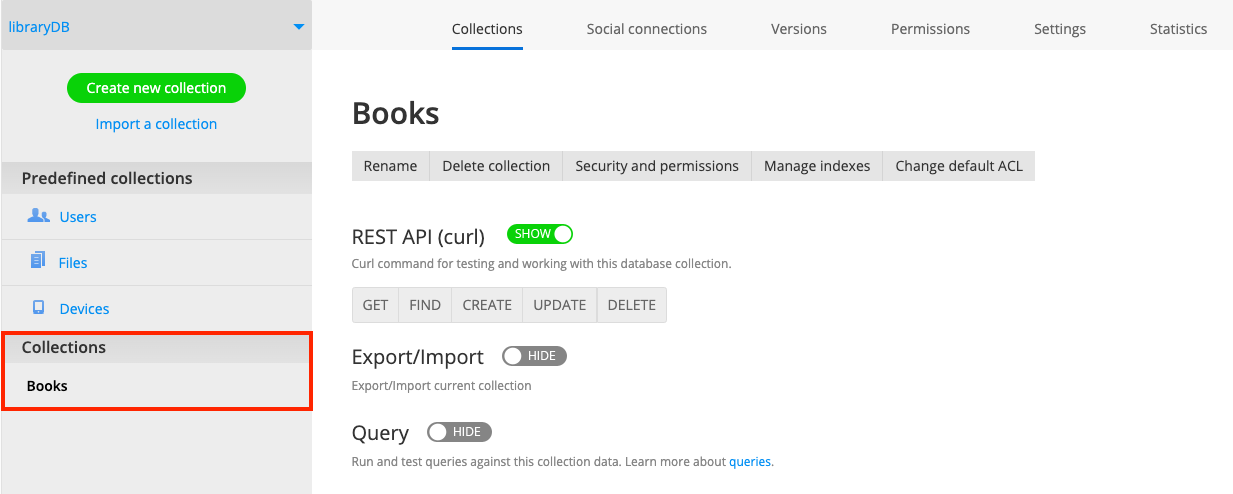
You will see that a new collection appeared on a list of Collections:
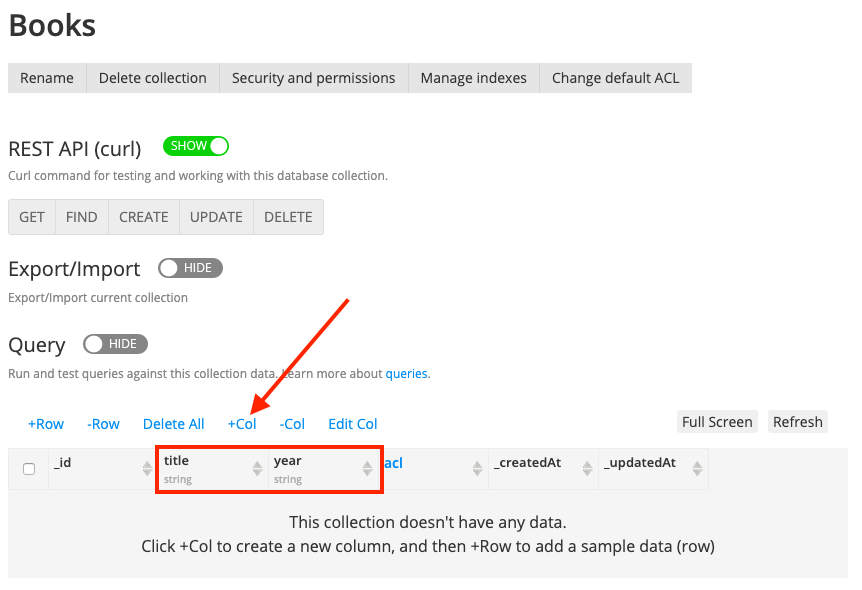
- Add two columns to this collection: title and year, both of string type:
As any book has an author, and the author could write several books, we need to store information about the authors somewhere.
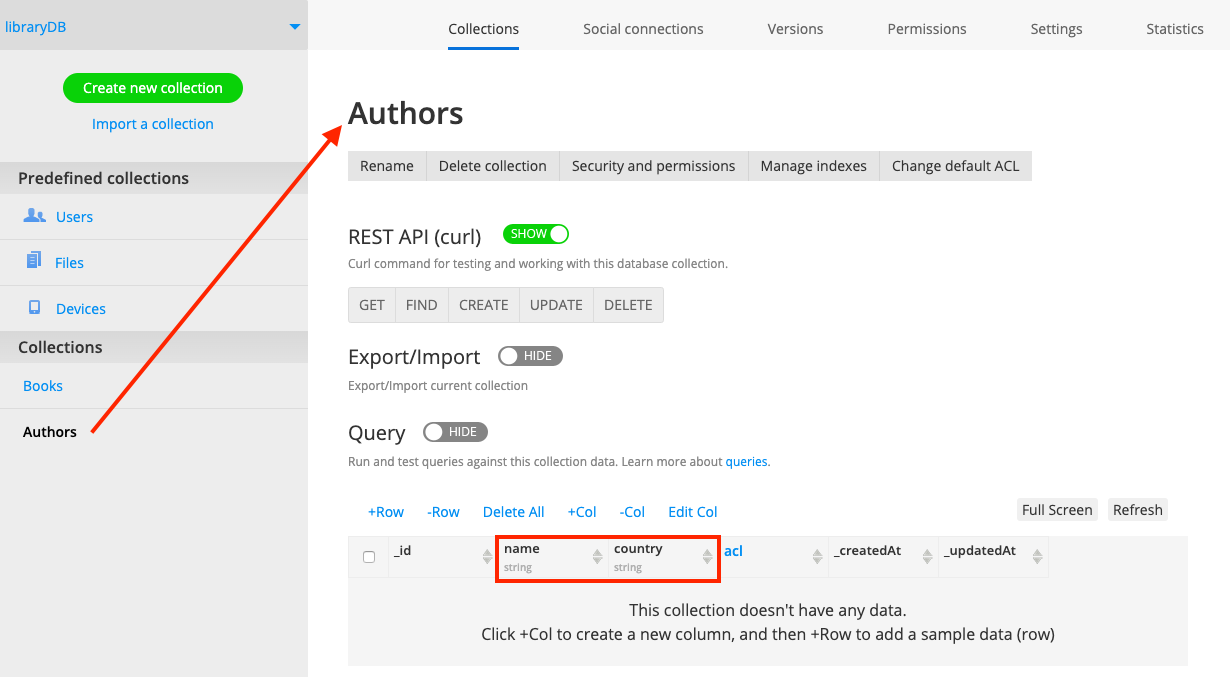
- Let's create another collection named Authors with 2 columns, name and country, both of string type:
Using Pointers
Next, we need to connect these two collections and link the books to their authors. To link collections together, we can use Pointers.
PointersAppery.io Database is based on MongoDB. As MongoDB is not a relational database, it can’t perform SQL join operations. Instead, there are pointer types that are used as references to another object. It contains the collection name and _id of the referred-to value.
Let’s say that the Books collection contains the author column. That column contains the author ID from the Authors collection.
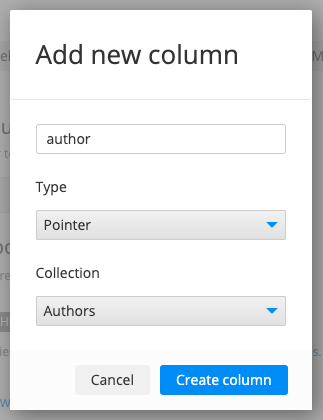
So let's go back to the Books collection and create one more column named author of Pointer type:

Securing Database
By default, the Secure collection option is disabled in all custom collections. So, you can access it by providing only the database ID.
If you need additional security, you can configure it in a couple of minutes. Go to the the Security and permissions tab and enable the Secure collection check box:
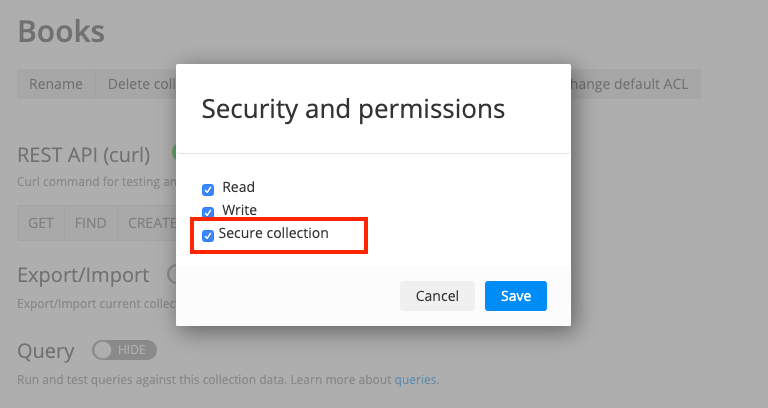
That's it, the collection is secured, and now a sessionToken has to be included in each request. It can be retrieved after the user has successfully logged in. Without the token, the database collections cannot be accessed.
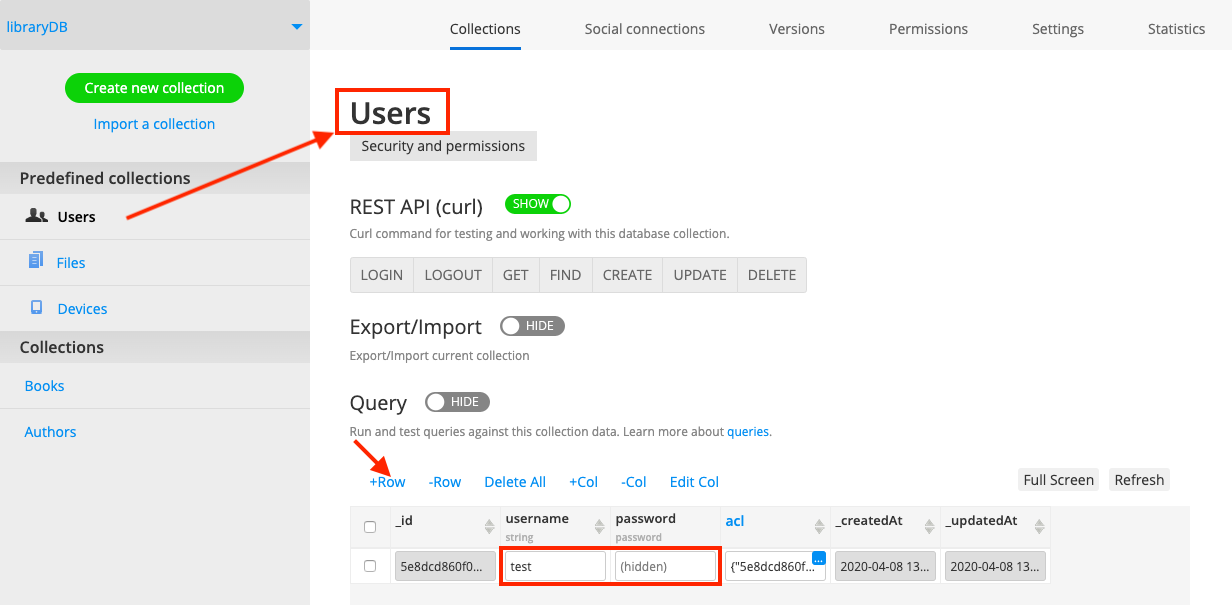
So, we need to create a test user in the predefined Users collection to get access to our secured databases. Let’s add a new row for a new user with test as a username and test as a password, for testing purposes. We will use these credentials later to get the sessionToken value and access the data stored in secured collections.
Want to know more?Please check out this link to learn more about adding security to your Appery.io Database.
Filling Database with Data
Let's fill both collections with sample data. You can add rows by clicking the +Row button.
The _id field is auto-generated, so all you need to fill in is:
- name and year columns for the Authors collection,
- title, year and author columns for the Books collection.
As a result, the Authors collection can look like this:
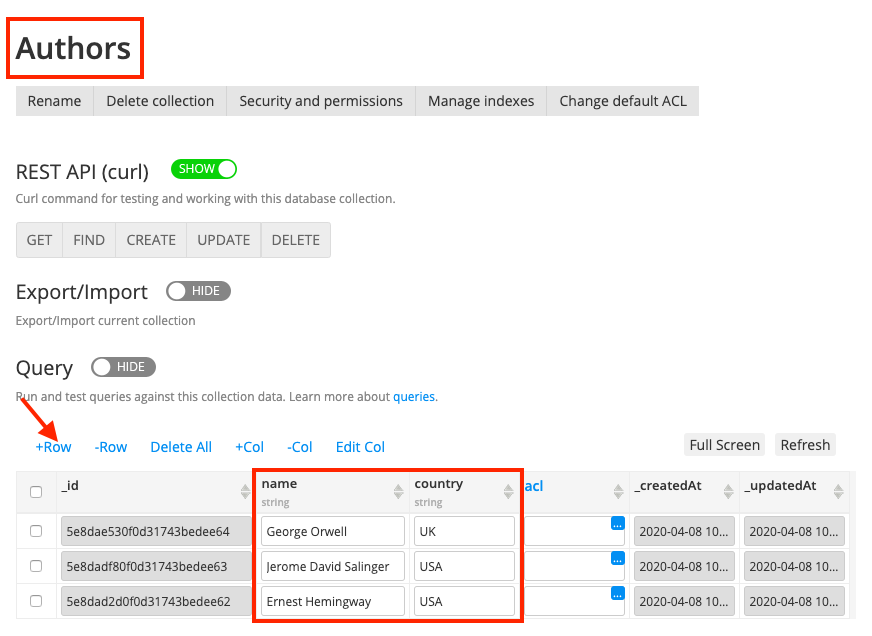
And the Books collection can look like this:
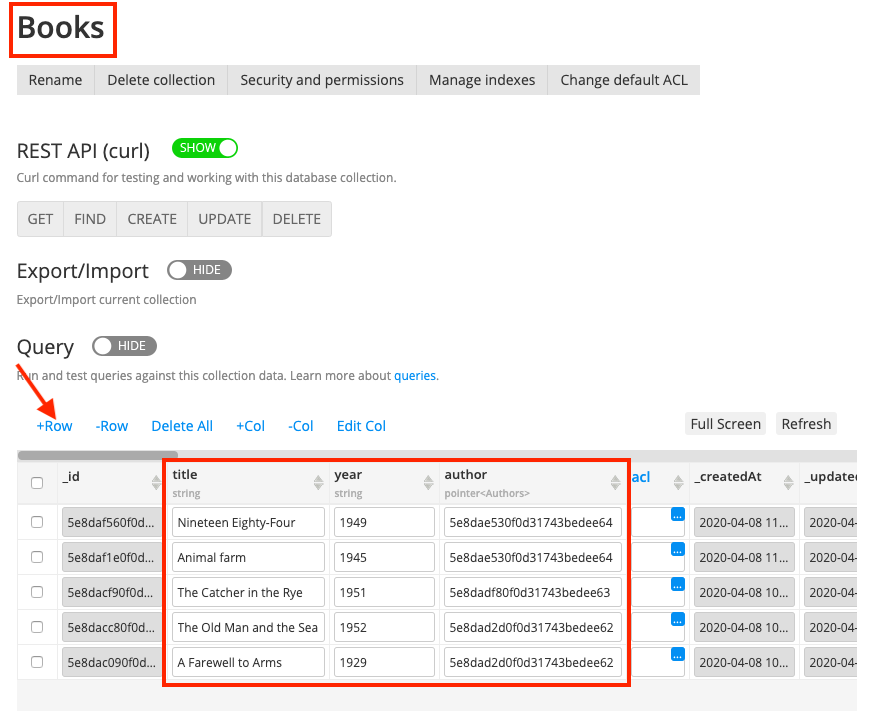
Filling in the pointer columnNote that the author column in the Books collection should contain the corresponding author ID's.
Later, we will use scripts to create objects in both databases. But for now, just copy author's _id value manually from the Authors collection:

Author ID, Authors collection
And then, in the Books collection, paste it as the value of the author pointer field for the linked book objects:

So, our test database is ready, let's move on and learn how to to perform various operations with the stored data.
Server Code Scripts
You can connect to the database directly from the app, using the Database services. But we recommend accessing the database from the Server Code instead.
This approach has the following benefits:
- The database results can be sorted and filtered.
- The database can be queried more than once.
- Any custom logic can be run before or after querying the database.
Server Code Libraries
If you want to share some data between various scripts, you can create a Server Code Library. A Library is a reusable component for storing utility functions, constants, database credentials — anything that should be shared by server code scripts.
To create a new library, go to the Server code tab and click the Create library button:
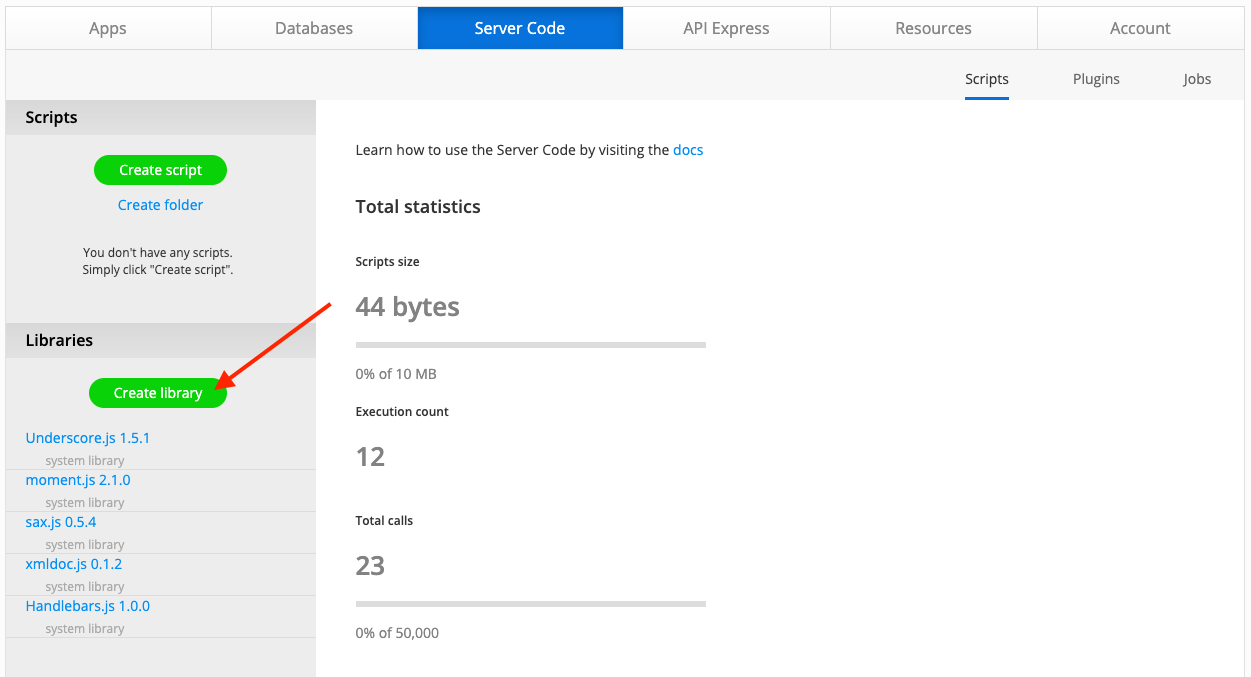
You'll be navigated to a new page. Here, enter the library name, for example, libraryDBSettings. In the code editor, type in the code below, replacing the string value with your database API key:
var DB_API_KEY = "5e8c7a01..........4656b9";
Database API KeyThe database API key can be found under your database Settings tab, in the API keys section. To copy the key to your clipboard, click the button next to it.
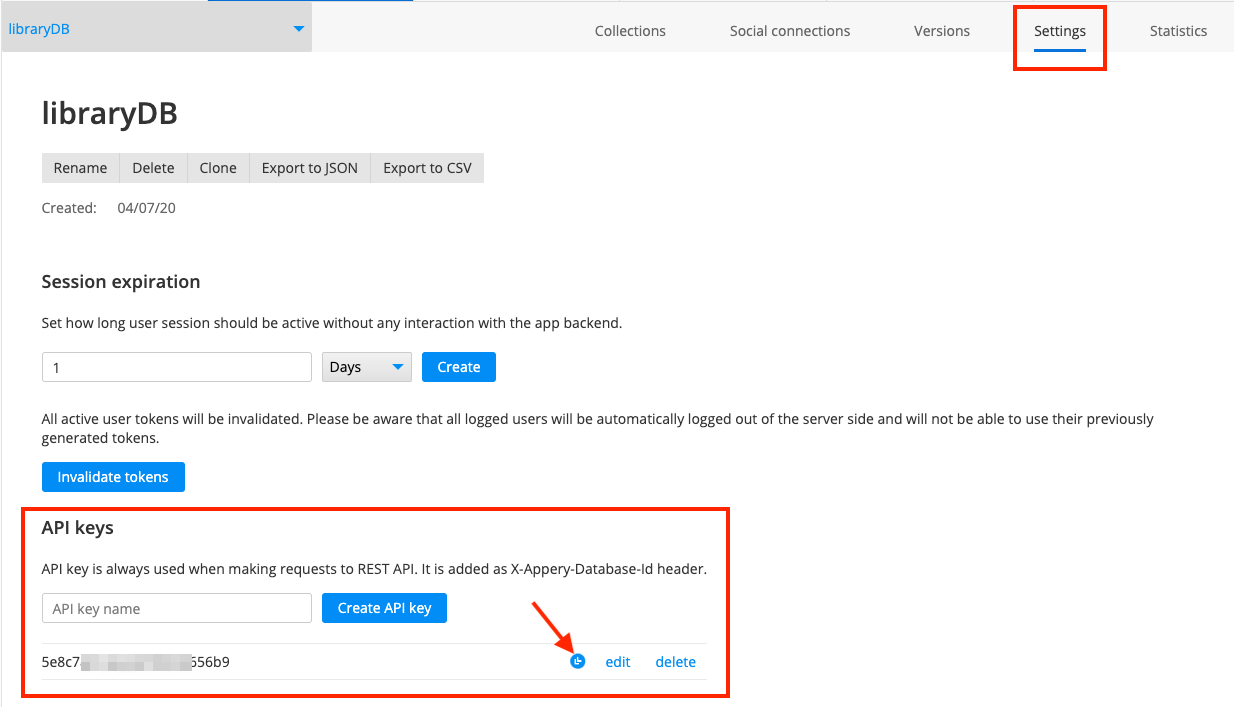
Getting the database API key
Once your API key has been inserted into the code, click Save. Our library stores only the database API key, but you can use it for storing any reusable data that should be shared by the scripts:

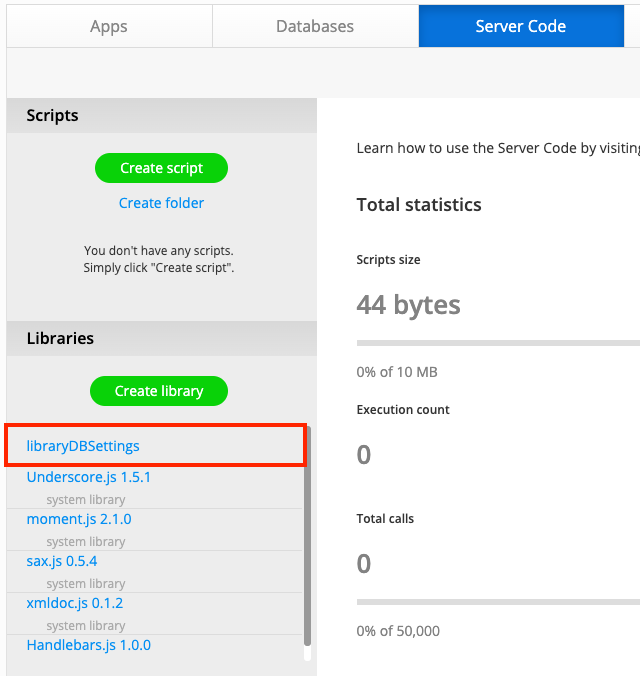
Now, you will see the libraryDBSettings library on the Libraries list under the Server Code tab:
Creating Server Code Scripts
New server code scripts can be created from the Server Code tab. Just click the Create script button on the left panel:

Then, enter a Name for the script and click Save:
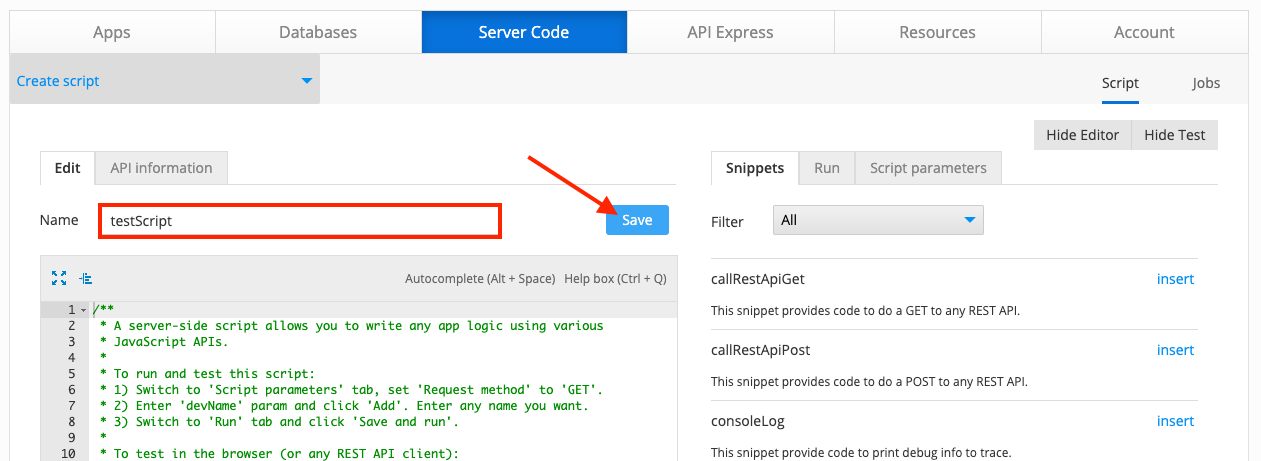
In the code editor, you can type in any code you need, or use the Snippets panel to insert some predefined methods.
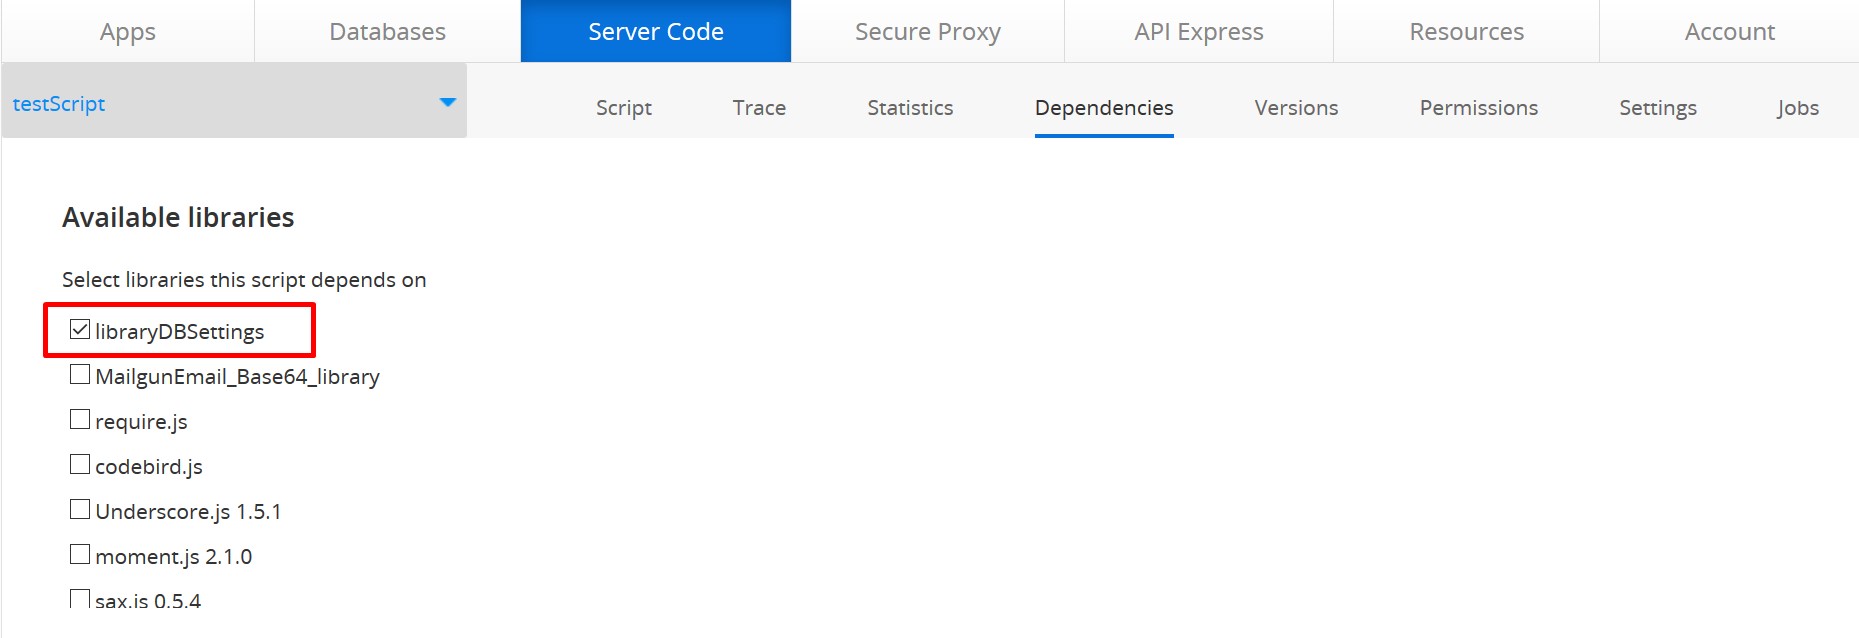
You will need to add the library libraryDBSettings as a dependency for any new script that we are going to create. So, after creating a new script, go to the Dependencies tab of that script and enable the check box next to libraryDBSettings:
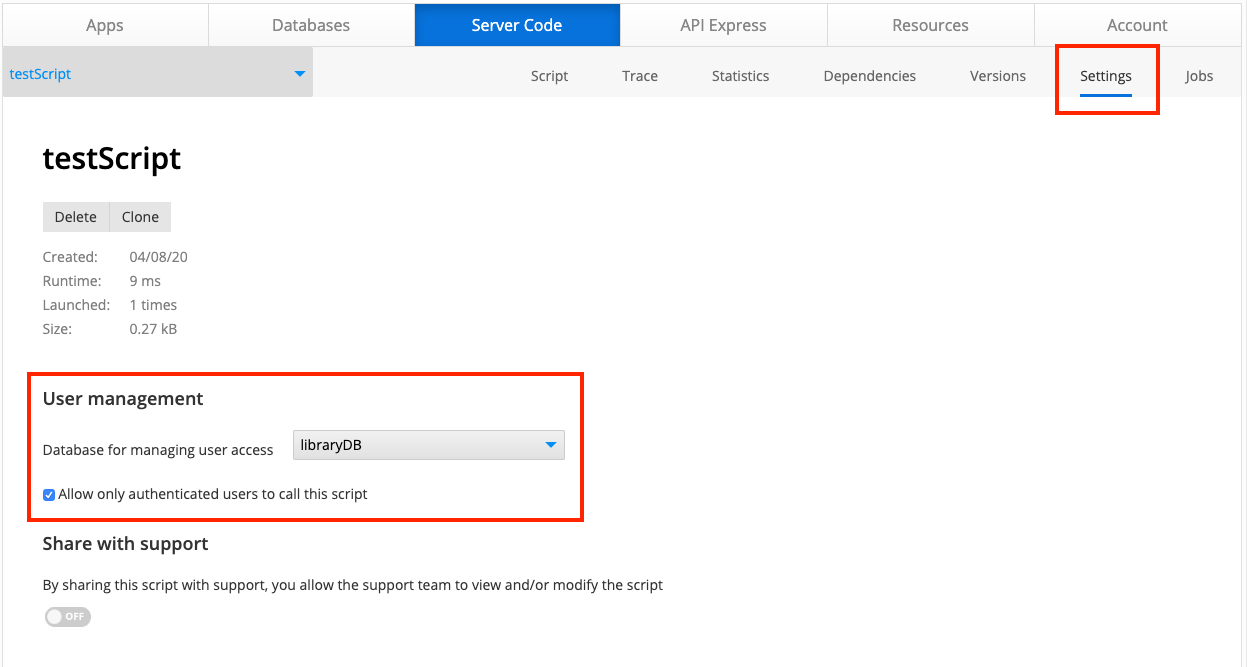
As our database collections are secured, we need to manage user access. Go to the created script's Settings tab and take a look at the User management section.
Here, select your database name (libraryDB) in the Database for managing user access drop-down. Then mark Allow only authenticated users to call this script check box as checked:
Obtaining X-Appery-Session-Token
Now, you should obtain and provide sessionToken to get access to the database. Go to the Script > Script parameters tab, and check a new Session token field. Click the Obtain button:
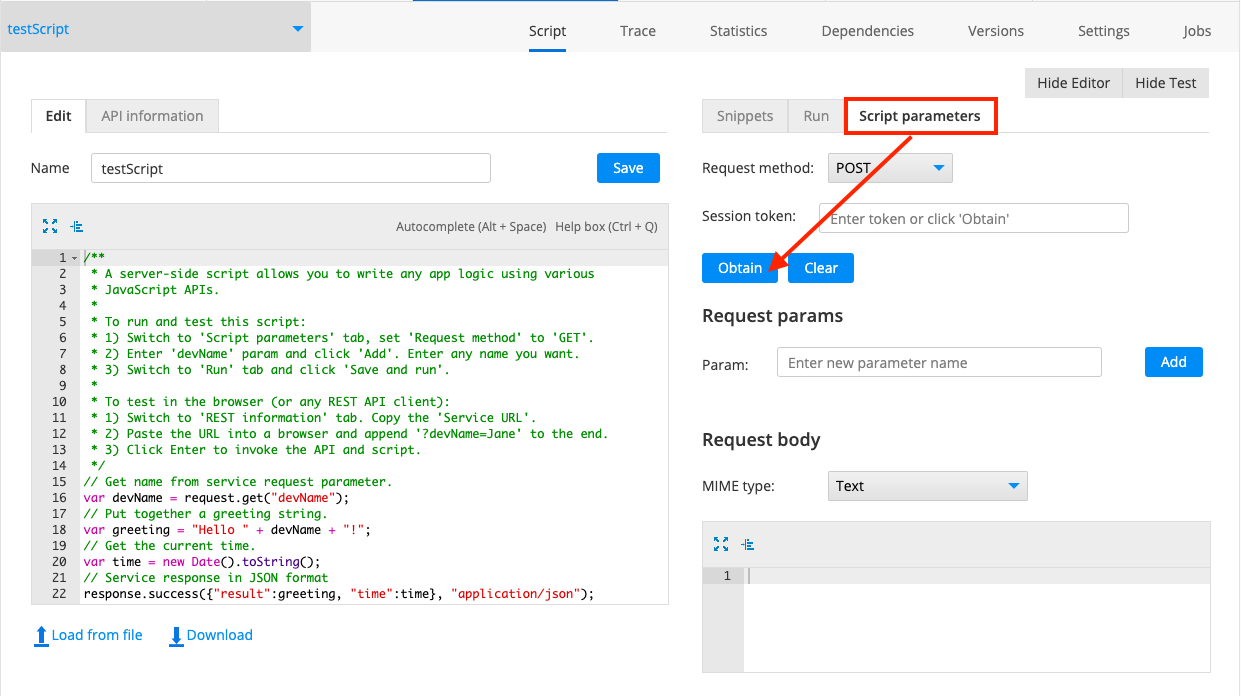
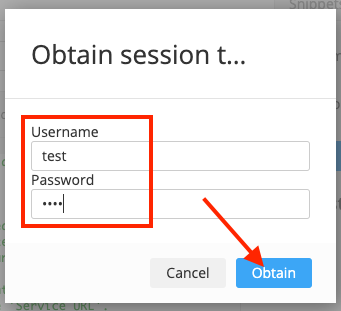
Enter test user credentials (test for both the username and the password) and click Obtain:
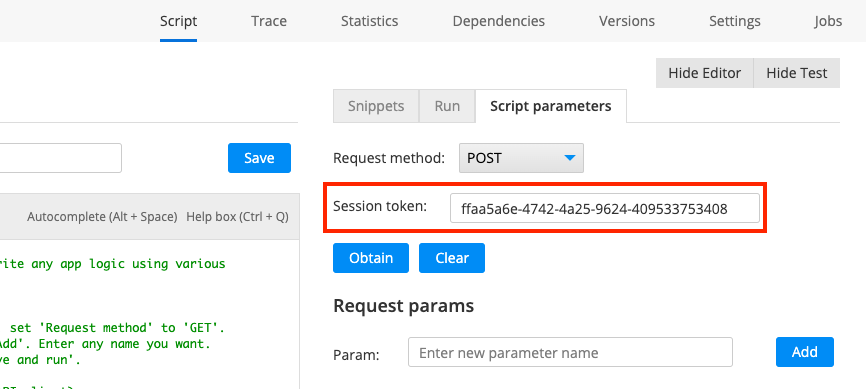
You will see the generated session token in the Session token field:
Obtaining X-Appery-Session-Token from DatabaseThe sessionToken can also be obtained from under the Appery.io Database services. You can check this link to learn how to do it.
User accessDon't forget to manage user access for all scripts that we are about to create in this tutorial.
Reading Data
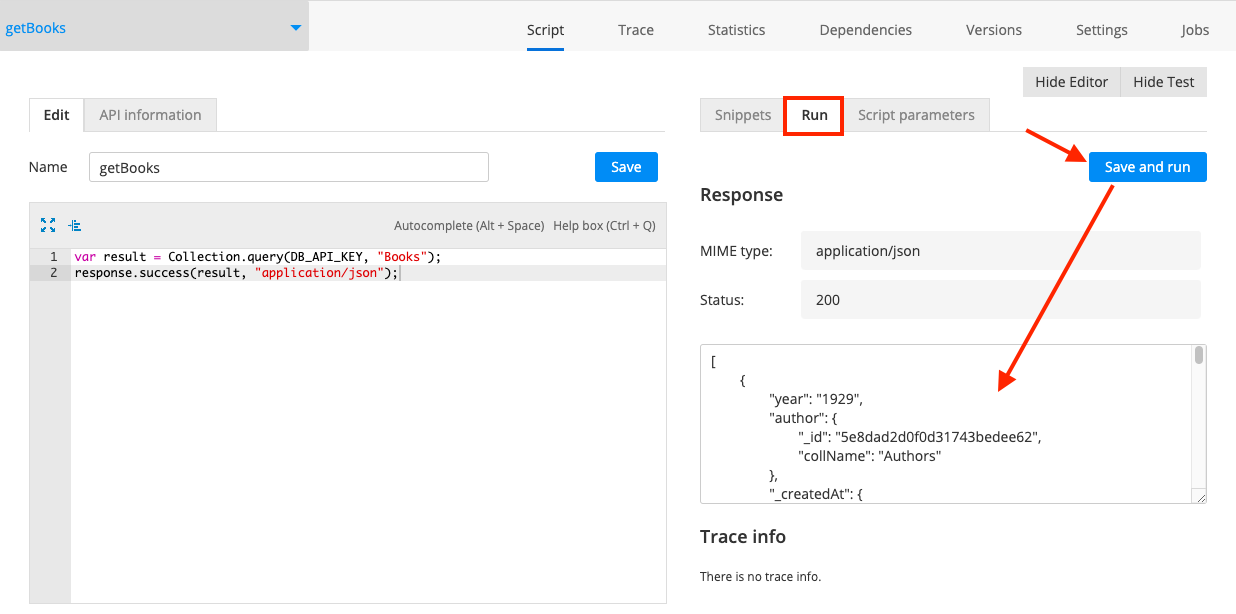
The following script reads all objects from the Books collection. Since we indicated libraryDBSettings as a dependency of our script, the variable DB_API_KEY comes from there.
On the first code line, the script retrieves all the data from the Books collection. On the second line, the service response is defined:
var result = Collection.query(DB_API_KEY, "Books");
response.success(result, "application/json");
A script can be quickly tested from the Run tab where you can see the JSON data, all the book objects from our database:
To get information about a single book, you need to know this book ID. Note that we are also passing "author" as the fourth parameter of the Collection.retrieveObject() method. So the author information from the Authors collection will be included in the response:
var bookId = request.get("bookId");
var result = Collection.retrieveObject(DB_API_KEY, "Books", bookId, "author");
response.success(result, "application/json");
The book ID is passed as a service request parameter. So, to test the script, you need to provide this parameter under the Script parameters tab.
Enter bookId as a new parameter name, click Add and paste the book ID as a parameter value. Also, change request method to GET, as we are reading information from the database:
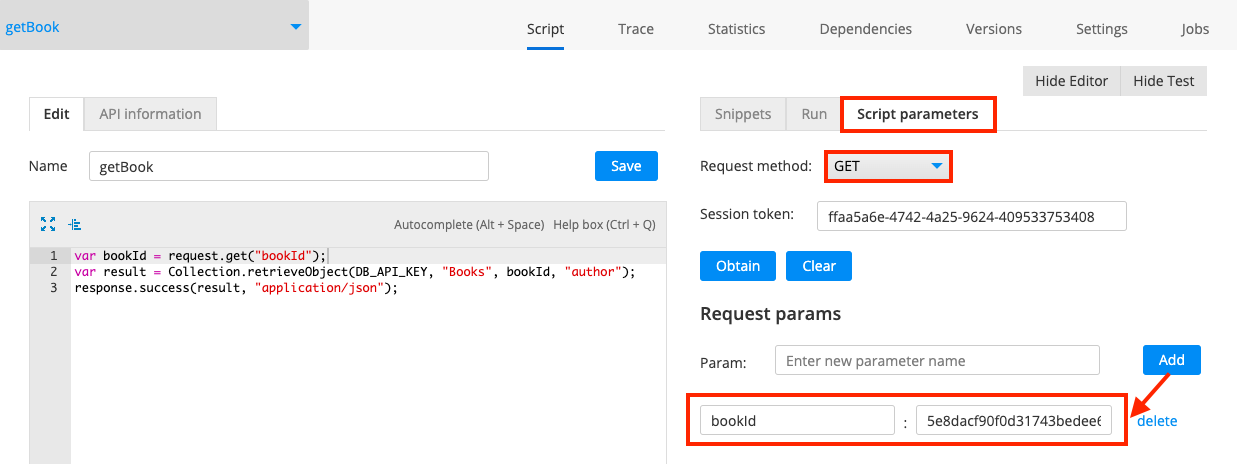
When you run the script, you will see the following response (the JSON data):
{
	"year": "1951",
	"author": {
		"country": "USA",
		"_createdAt": {
			"$date": "2020-04-08T10:56:56.586Z"
		},
		"name": "Jerome David Salinger",
		"_id": "5e8dadf80f0d31743bedee63",
		"_updatedAt": {
			"$date": "2020-04-08T10:57:09.779Z"
		}
	},
	"_createdAt": {
		"$date": "2020-04-08T10:52:41.383Z"
	},
	"_id": "5e8dacf90f0d31743bedee61",
	"title": "The Catcher in the Rye ",
	"_updatedAt": {
		"$date": "2020-04-08T11:00:55.012Z"
	}
}
In case you want to find all the books of a single author, use the following script. Don't forget to pass the author ID as a request parameter:
var authorId = request.get("authorId");

var params = {
    "criteria": {
        "author._id": {
          "$eq": authorId
        }
    }
};

var result = Collection.query(DB_API_KEY, "Books", params);
response.success(result, "application/json");
If you want to include the author information into the previous response, use the "include" parameter with the "author" column name as a value:
var authorId = request.get("authorId");

var params = {
    "criteria": {
        "author._id": authorId
    },
    "include": "author"
};

var result = Collection.query(DB_API_KEY, "Books", params);
response.success(result, "application/json");
Creating Data
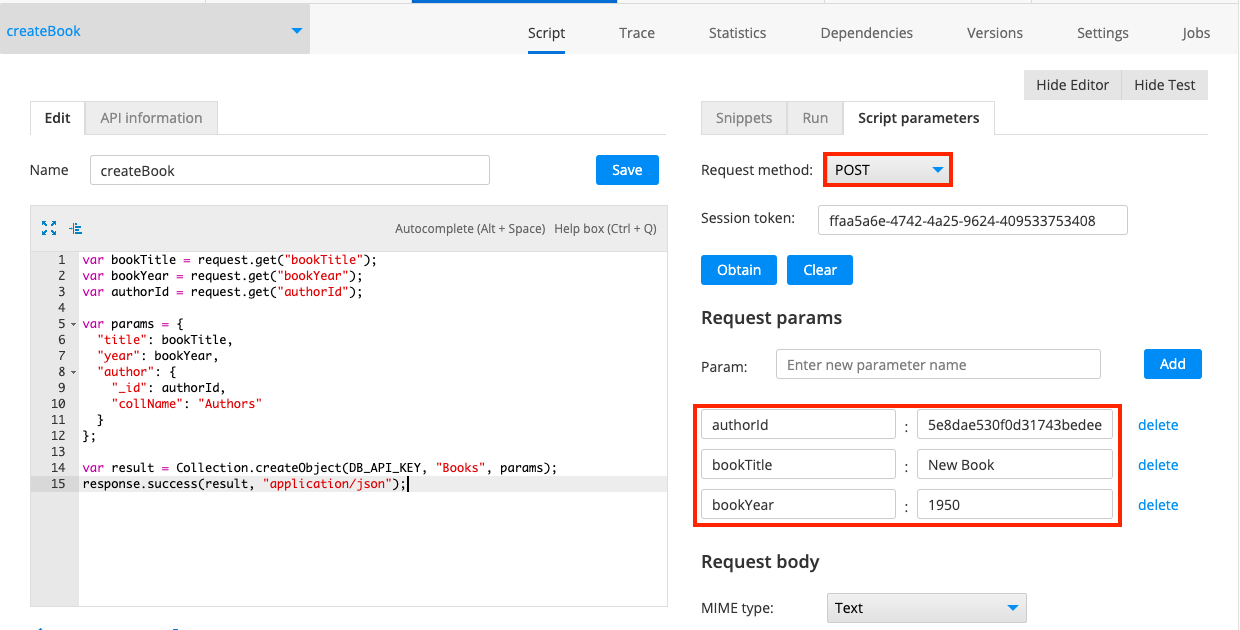
Reading from the database is rather easy. Let's try to save some data into the database. The following script saves a new book of the provided author into the database collection:
var bookTitle = request.get("bookTitle");
var bookYear = request.get("bookYear");
var authorId = request.get("authorId");

var params = {
  "title": bookTitle,
  "year": bookYear,
  "author": {
    "_id": authorId,
    "collName": "Authors"
  }
};

var result = Collection.createObject(DB_API_KEY, "Books", params);
response.success(result, "application/json");
Before running the script, change the Request method to POST, as we are writing some data into the database:
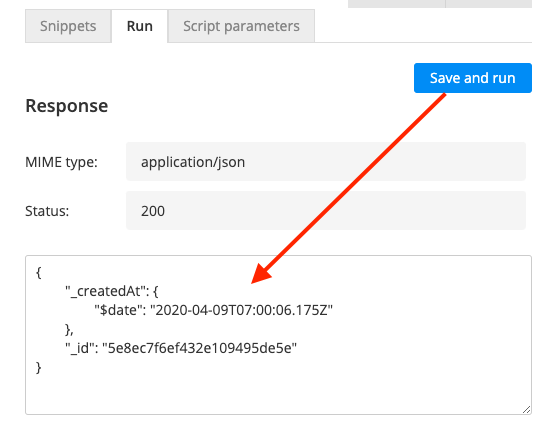
A response of create operation contains the object ID and the object creation time:
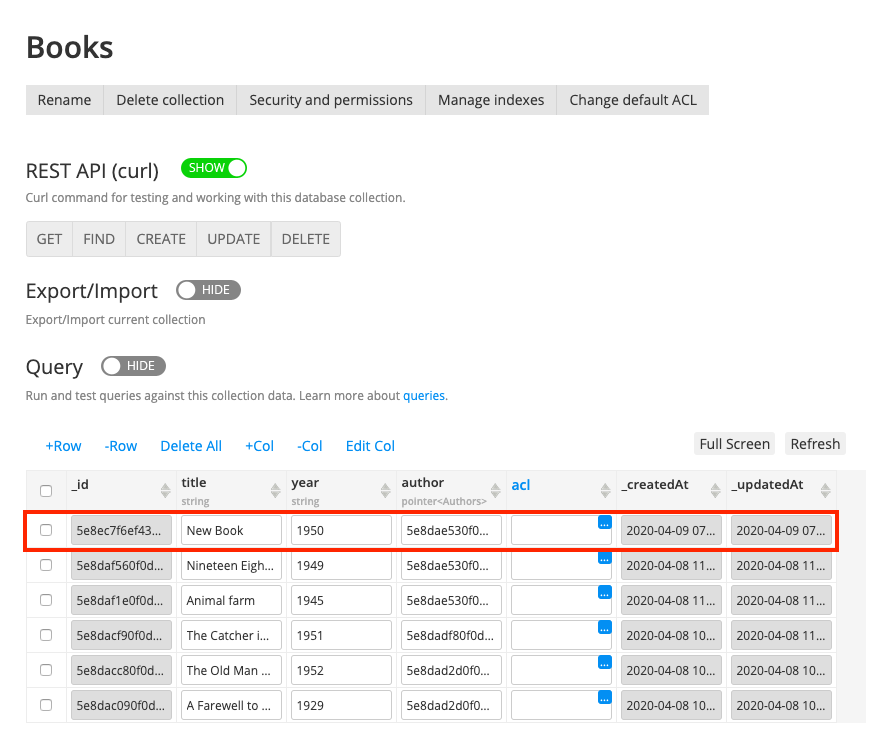
You can check the database, a new record is here:
Let's proceed with a more complex case: two sequential database queries. First, we create a new author and then we create a new book of this author.
Author ID can be extracted out of the first query response. And don't forget to provide all the needed query parameters (bookTitle, bookYear, authorName, authorCountry):
var bookTitle = request.get("bookTitle");
var bookYear = request.get("bookYear");
var authorName = request.get("authorName");
var authorCountry = request.get("authorCountry");

var author = Collection.createObject(DB_API_KEY, "Authors", {
  "name": authorName,
  "country": authorCountry
});

var result = Collection.createObject(DB_API_KEY, "Books", {
  "title": bookTitle,
  "year": bookYear,
  "author": {
    "_id": author._id,
    "collName": "Authors"
  }
});

response.success(result, "application/json");
Updating Data
Let's assume we've made a mistake in book data entering a wrong year value. To update a book you need to know the book ID. You can specify only the fields that need updating. For example, the following script updates only the year field:
var bookId = request.get("bookId");

var params  = {
    "year": "1970"
};

var result = Collection.updateObject(DB_API_KEY, "Books", bookId, params);
response.success(result, "application/json");
If you want to update both title and year, just add one more field:
var bookId = request.get("bookId");

var params  = {
    "year": "1970",
    "title": "New Title"
};

var result = Collection.updateObject(DB_API_KEY, "Books", bookId, params);
response.success(result, "application/json");
Removing Data
To delete an object from the collection, we need to know the object ID by using the POST method. The following script will delete a book with provided ID from the database collection:
var bookId = request.get("bookId");
Collection.deleteObject(DB_API_KEY, "Books", bookId);
If you want to remove the author with the provided ID and also all the books of this author from our library database, use the following script. First, we remove all books of this author, and then we delete the author:
var authorId = request.get("authorId");

Collection.multiDeleteObject(DB_API_KEY, "Books", {
  "author._id": authorId
});

Collection.deleteObject(DB_API_KEY, "Authors", authorId);
Indexes Management
If the number of items in your database is increasing, it makes sense to use Indexes to speed up the frequently used database queries. Without indexes, MongoDB scans every document of a collection to select the documents that match the query. Such scanning is not efficient and requires processing lots of data.
Indexes are special data structures, that store a small portion of the data set in an easy-to-traverse form. The index stores the value of a specific field or set of fields, ordered by the value of the field as specified in the index.
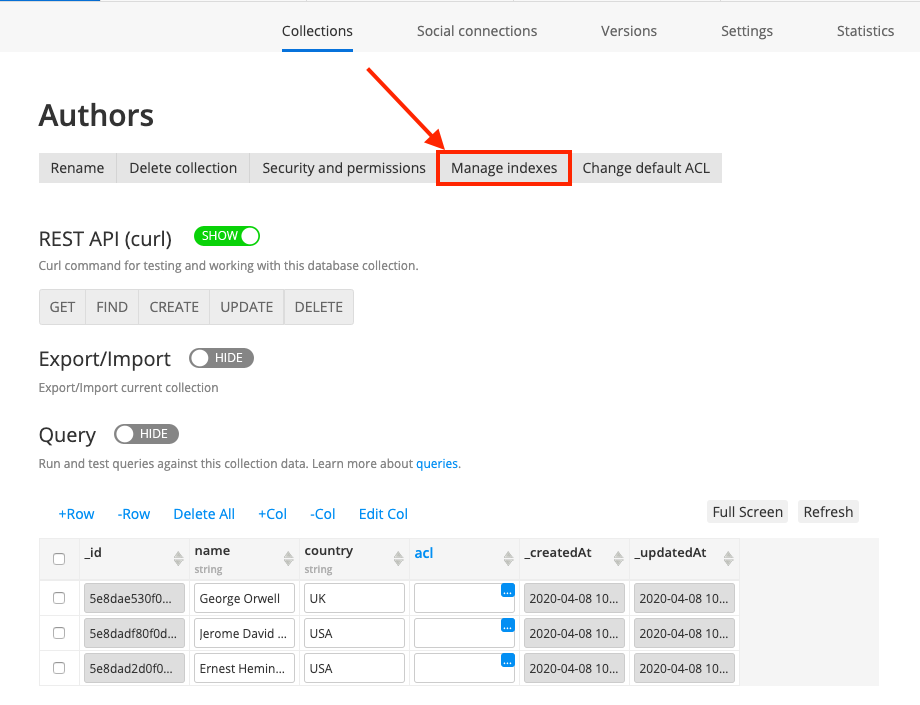
For example, in our database, we often search for authors by their name. So we can add an index for the Authors collection. Click Manage indexes:
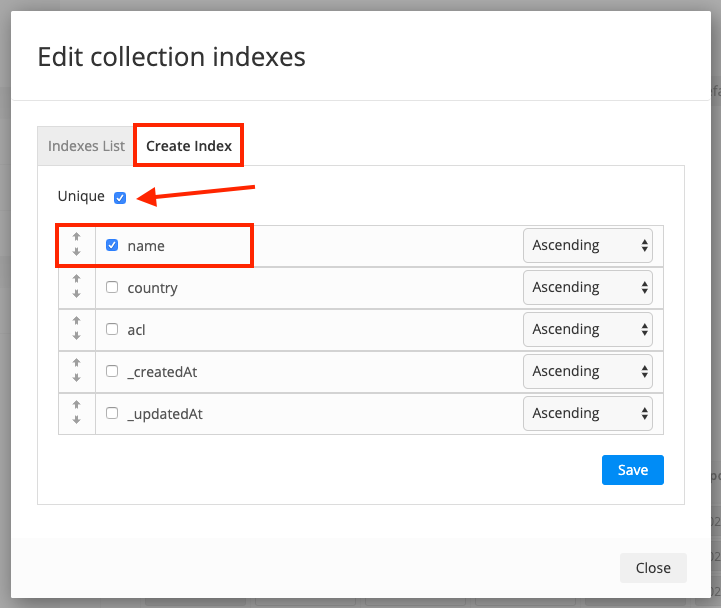
In the modal, select the name field and mark the index as unique:
You can read more about MongoDB indexes to properly understand the idea.
Importing Server Code Services in App
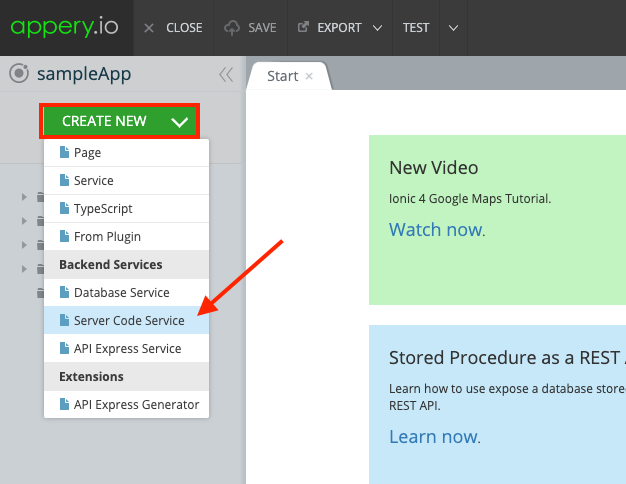
You can easily import and use the Server Code services in your app. From the app dashboard, click Create new > Server Code Service:
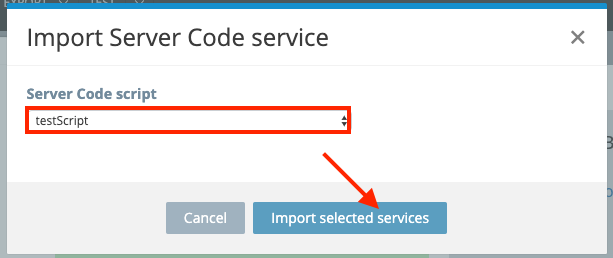
Select the required service and confirm importing:
You will see the imported Server Code service on the services list:
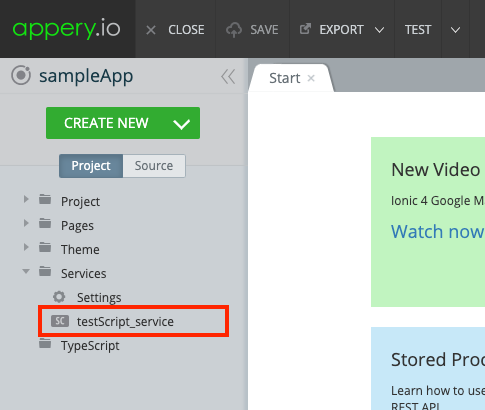
More information about it can be found here: Importing server code services
Using Secure Proxy
To provide additional security, you can use the Appery.io Secure Proxy. It allows keeping your secret keys, credentials, or other data safe from being accessed by app users. Additionally, it can be used for testing in desktop browsers to avoid cross-domain security problems.
More information about creating and configuring Secure Proxy can be found here: Appery.io Secure Proxy.
Want to know more?You can also check out our quick start tutorials explaining how to work with Appery.io backend:
- Database:
and- Server Code.
Updated 7 months ago
