Ionic Leaflet Plugins (OpenStreetMap) App
Using Appery.io Leaflet Map and Leaflet Route plug-ins for creating an application with OpenStreetMap
Introduction
If you're looking for a free alternative to the Google Maps service, take a look at OpenStreetMap, a free editable world map.
In this sample app, we will use Leaflet, an open-source JavaScript library for embedding maps, and the OpenStreetMap service to integrate a map in the Appery.io Ionic app:
Appery.io Leaflet PluginsAlso, you can easily integrate the map into your app with the use of Appery.io Leaflet plug-ins.
Downloads and Resources
You can also try it yourself by creating from the backup:
- Download the app backup file.
- Click From backup and select the project backup file on your drive.
- Type in the app name.
- Click Create.
Defining DB credentialsNote, that if you decide to create from backup but would like to use your database like described in the Displaying List of Markers section, you will need to modify the default travelDB service in your app.
To do it, in the Project view, unfold the Services > travelDB > travelDB_settings folder and replace the default database_id value with your database ID (can be found in the browser search field or in YOUR DATABASE >Settings > API keys:

But if you are interested in the detailed tutorial, please follow the step-by-step instructions below.
Creating New App
- From the Apps tab, click Create new app:
- Select Ionic Blank as the application type, enter Ionic OpenstreetMap App for the app name, and click Create.
Adding Dependencies
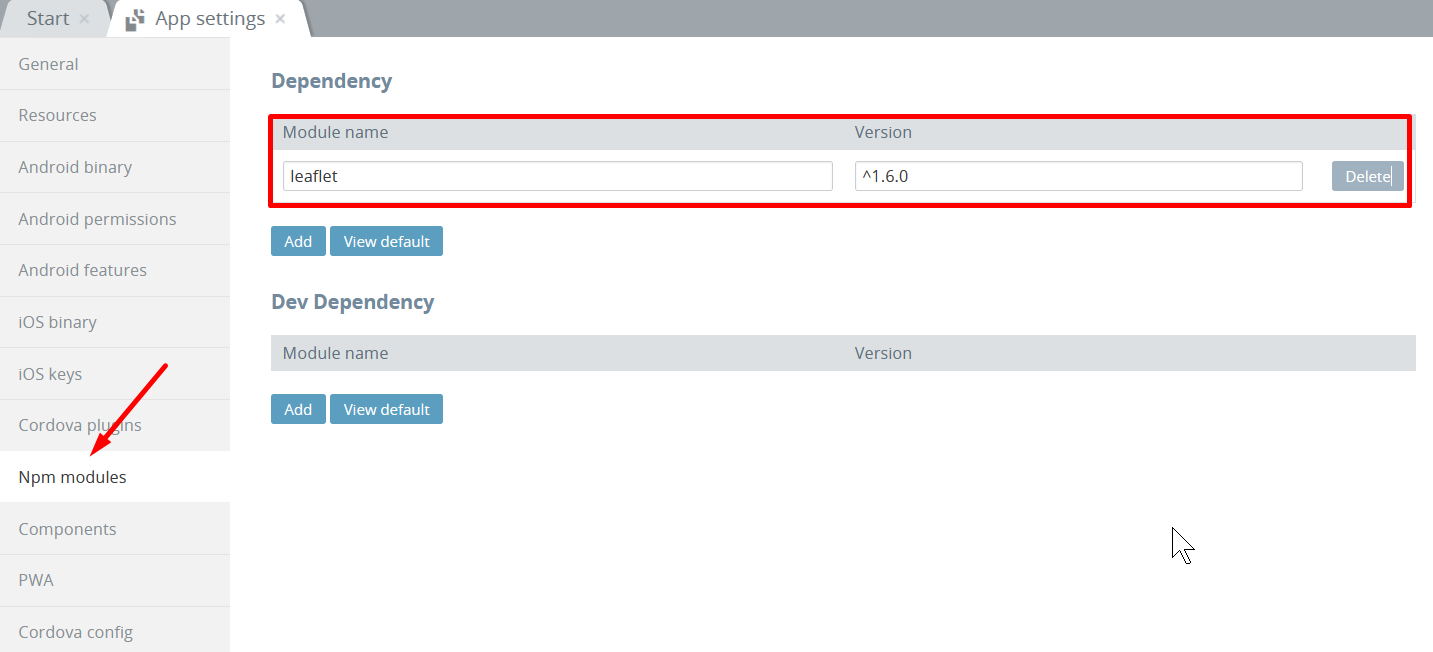
- On the left side, unfold the Project Tab folder and go to App Settings >Npm modules.
- Add
leafletas an app Dependency and set^1.6.0for its version:
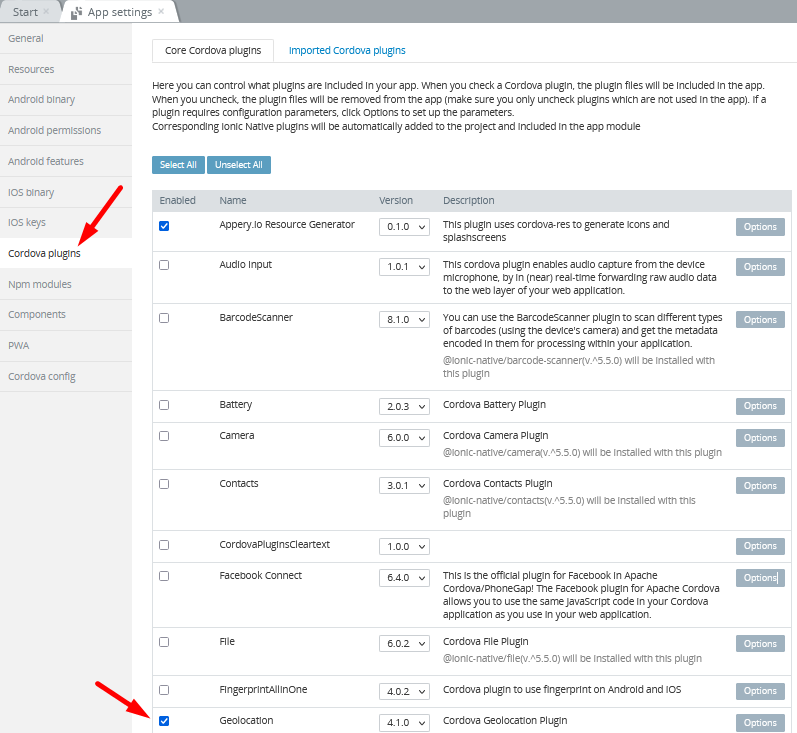
- Then, switch to the Cordova plugins tab and enable the Geolocation plug-in:
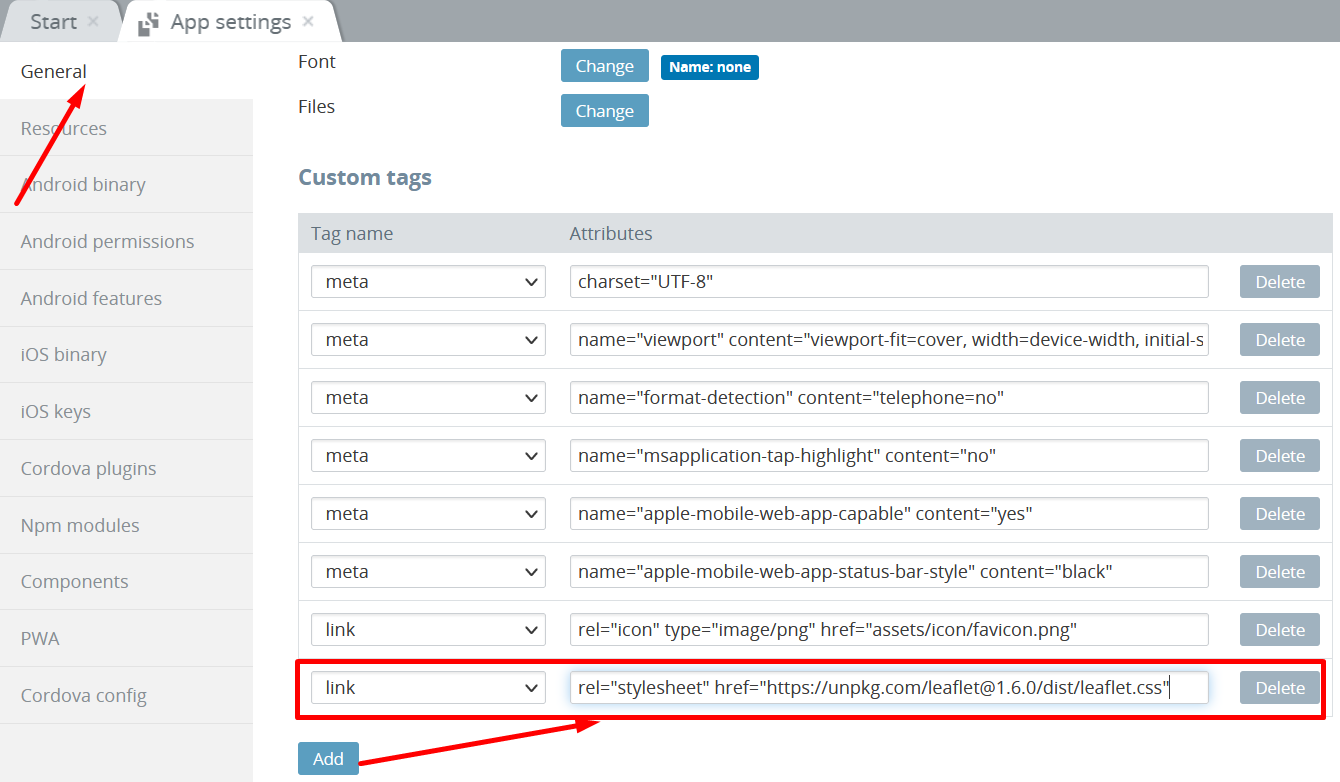
- Now, switch to the General tab and in the Custom tags section, add a new link tag with the following Attributes value:
rel="stylesheet" href="https://unpkg.com/[email protected]/dist/leaflet.css":
Displaying Map
Then, let's start building the app UI. First, we will simply display a map on the screen.
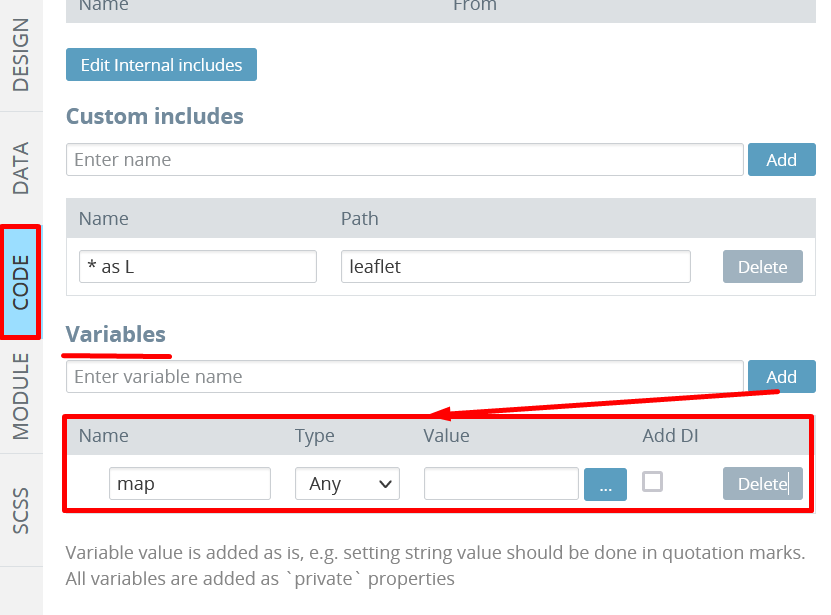
- Go to Pages > Screen1 >CODE panel. Here, in the Custom includes section, add a new include,
* as Lwithleafletpath:

- Scroll down to the Variables section. Here, create a new
mapvariable of Any type:
- Switch to the DESIGN panel. Set the page's Footer property to False. In the header, set the Common > Text property of Toolbar title to OpenStreetMap:

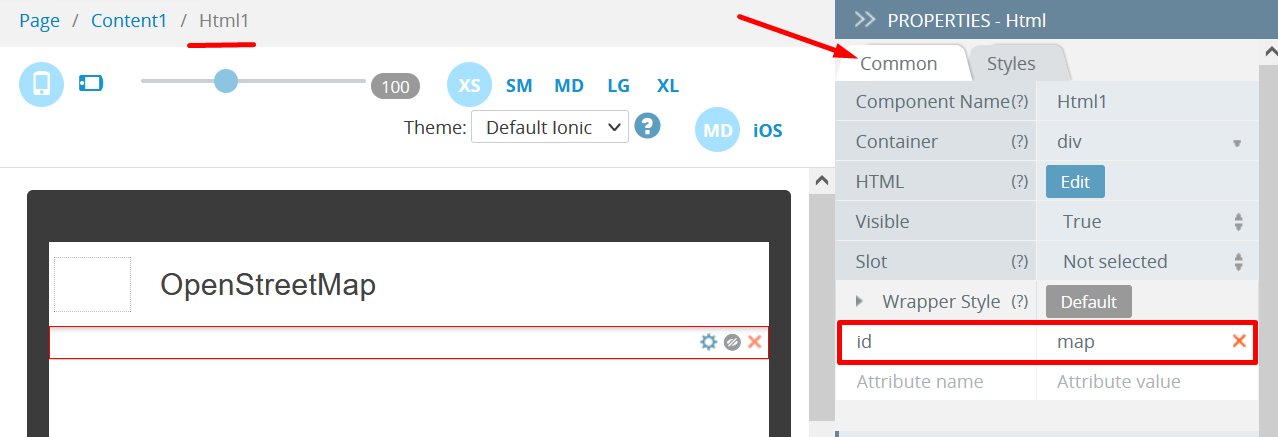
- To create a container for a map, drag & drop the Html component to the screen. In the PROPERTIES panel, select the Styles tab and set the component's Class property to map-container:

- Also, add a new attribute with id name and map value under the Common tab. Save the changes:
- Let's apply some simple styles for the map. Switch to the SCSS panel panel tab, add the following styles and save the changes:
.map-container {
    height: 100%;
}- Go back to the DESIGN panel and expand the EVENTS tab from the bottom. Here, select Page as the Component and After page showing as the Event. For the Action, select Run Typescript and type in the code below. It creates a new map in the
divelement withid="map"and adds OpenStreetMap tiles — square bitmap images displayed in a grid arrangement to show a map:
this.map = new L.Map('map').setView([40.647491, -73.787827], 15);
L.tileLayer('https://{s}.tile.openstreetmap.org/{z}/{x}/{y}.png', {
attribution: '© <a href="https://www.openstreetmap.org/copyright">OpenStreetMap</a>'
}).addTo(this.map);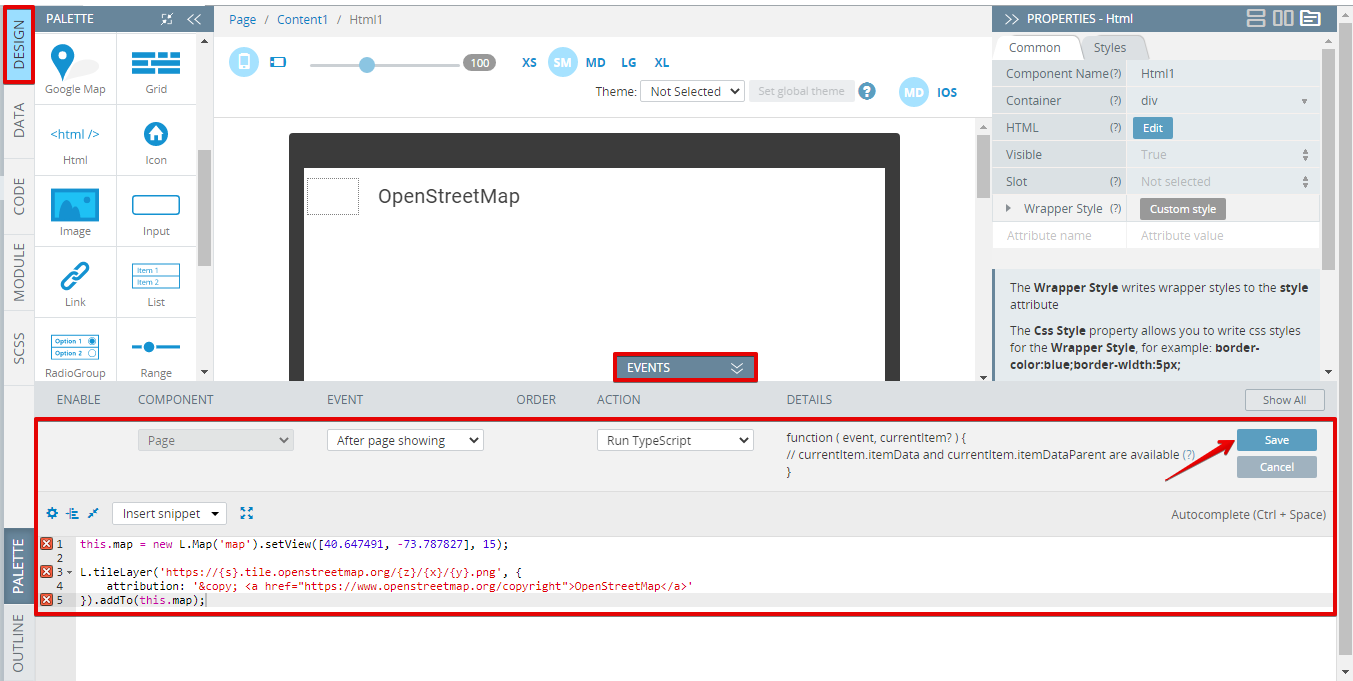
Setting Map ViewLet's take a look at this line of code:
this.map = new L.Map('map').setView([40.647491, -73.787827], 15);Here, we create a new map and set its view. You can set any initial map center coordinates (first function parameter) and zoom level (second function parameter). More information can be found in Leaflet documentation
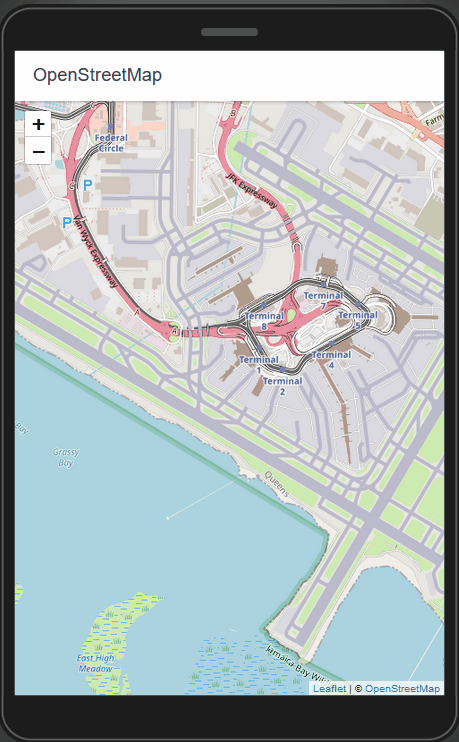
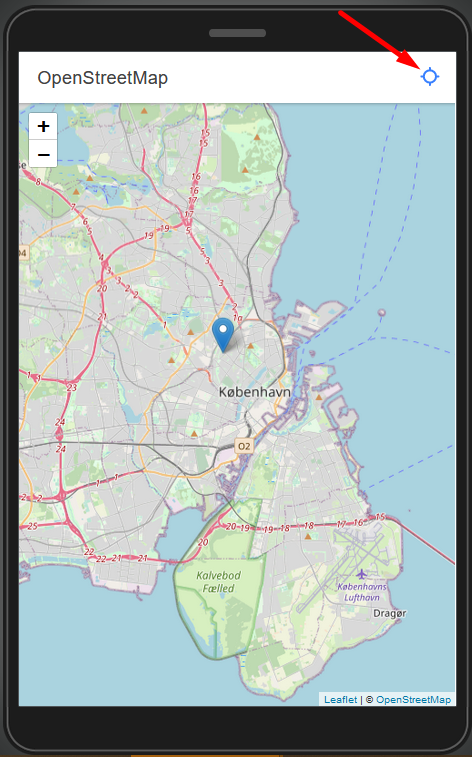
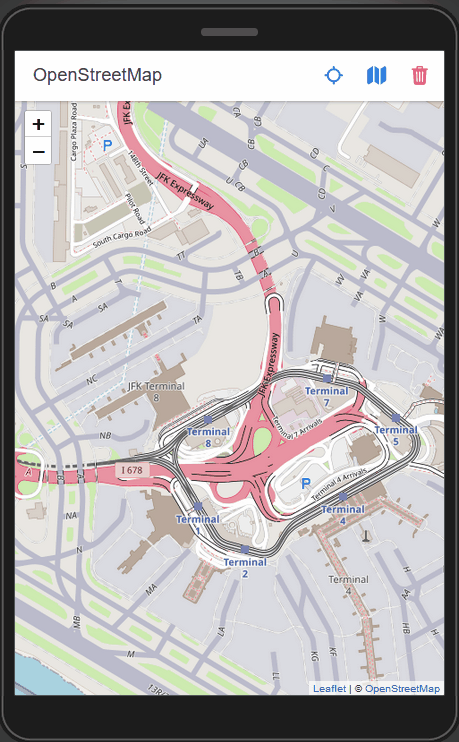
Save all the changes. You can click the TEST button in the App BuilderToolbar to launch your app in the browser. You will see a full screen map that can be dragged around and zoomed in and out:
Getting Current Location
Then let's get our current location and display a marker on the map.
- Then, drag & drop the Button component to Screen1 page Header. Under the Common tab, clear the button's Text property. To modify the button appearance, unfold the Icon section, click the default No icon button next to the Style property and select the locate icon in the popup menu. Set the icon's Color property to primary and Slot property to Icon Only:
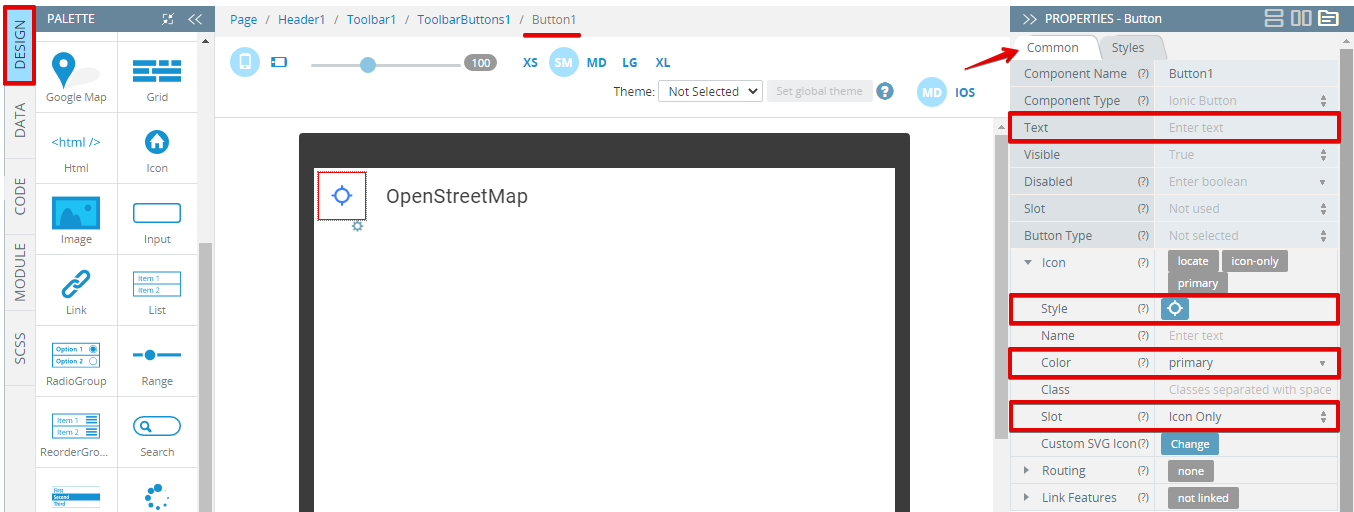
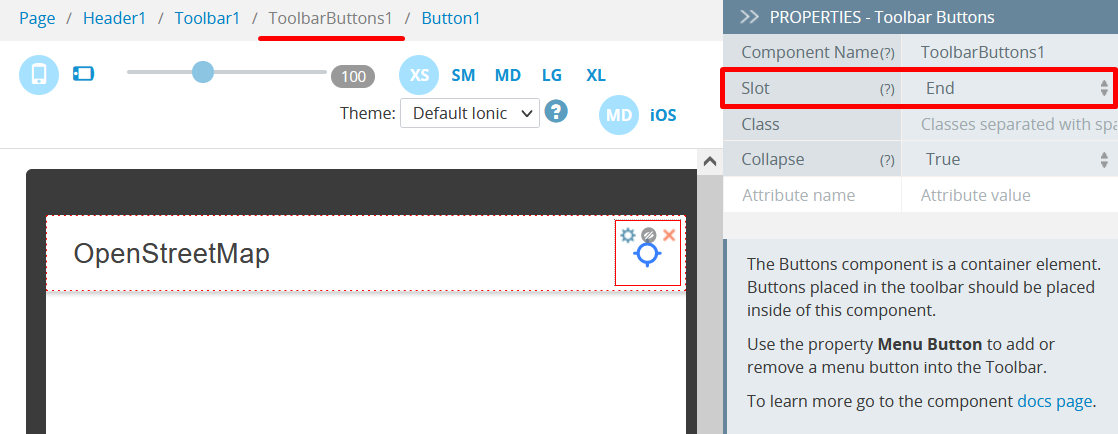
- Select the Toolbar buttons component and change its Slot property to End:
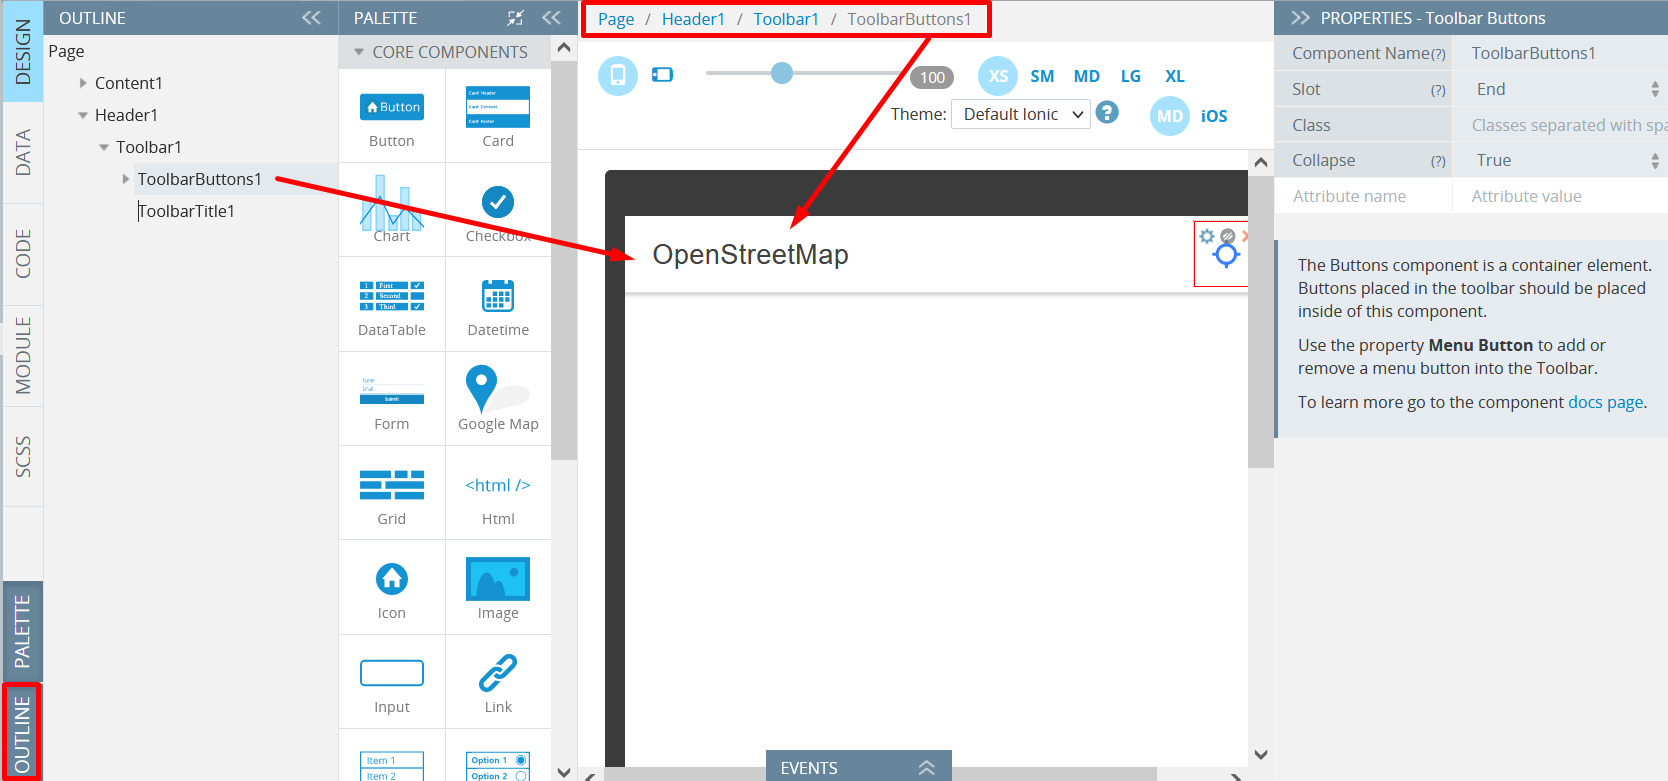
You can either use the OUTLINE view menu or the Breadcrumbs for navigating between the app UI components:
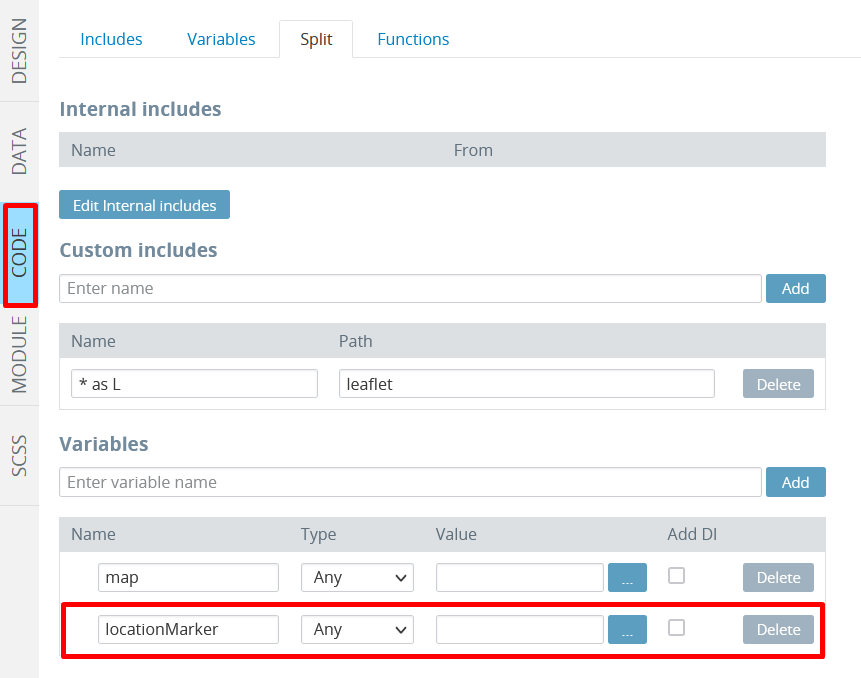
- Go to the page CODE panel. Here, in the Variables section, create a new
locationMarkervariable of Any type:
- Then, let's create an auxiliary method for clearing the map. In the Functions section, create a new function,
clearMap, with adding the following code. It removes all layers that are not tile layers:
this.map.eachLayer((layer) => {
    if (!(layer instanceof L.TileLayer)) {
        this.map.removeLayer(layer);
    }
});
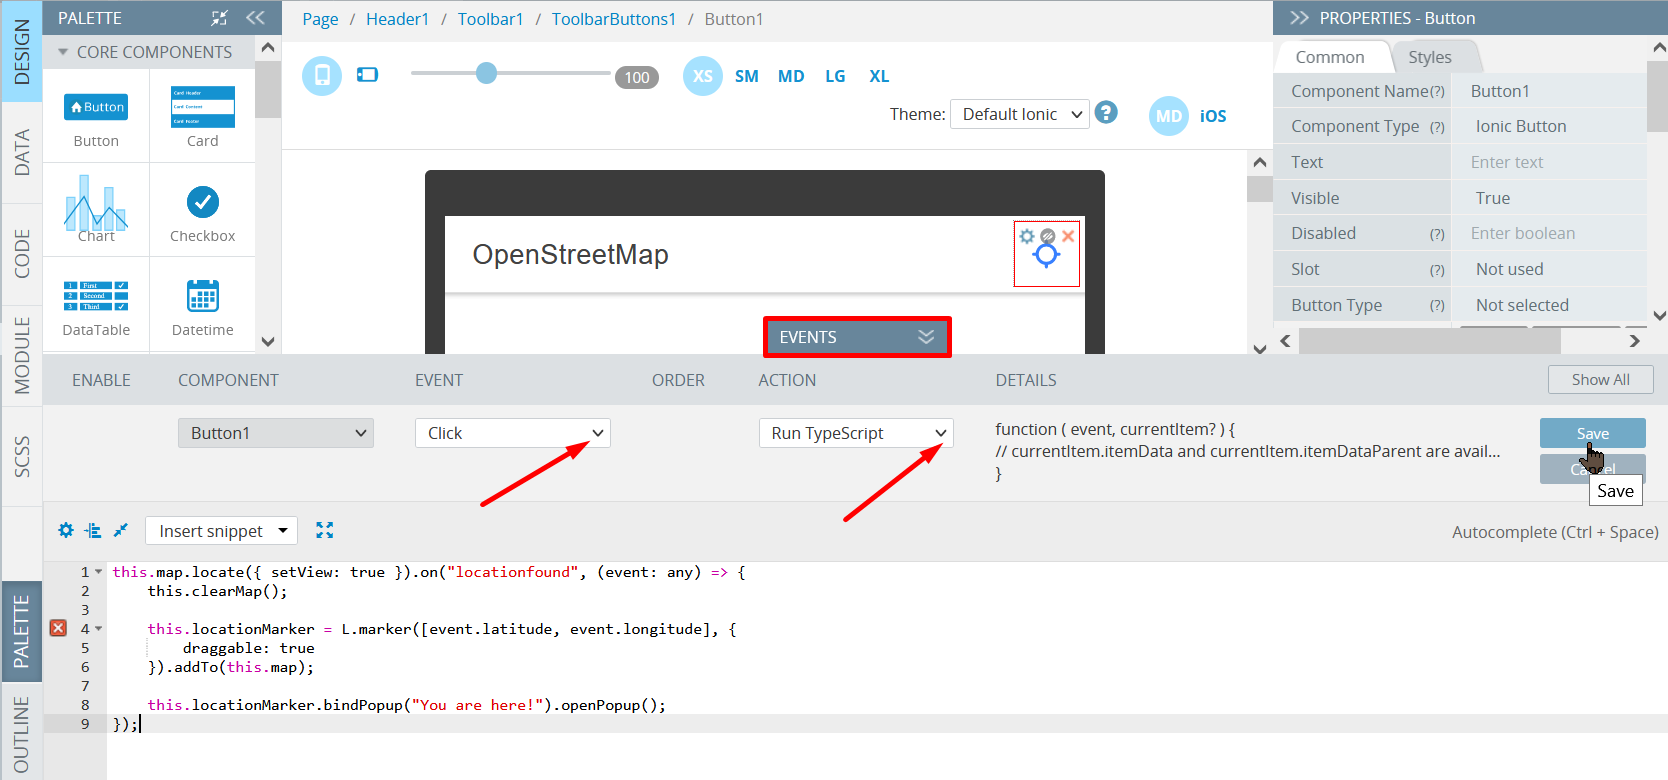
- Then, go back to the DESIGN panel to add a button click event handler. In the EVENTS tab, select the Button1 component Click event with the Action as Run Typescript . In the code editor, type in the code below. Click on the button will detect your current location and place a marker with a popup on the map. We made a marker draggable, so you can change its position:
this.map.locate({ setView: true }).on("locationfound", (event: any) => {
  	this.clearMap();

  	this.locationMarker = L.marker([event.latitude, event.longitude], {
        draggable: true
    }).addTo(this.map);

    this.locationMarker.bindPopup("You are here!").openPopup();
});
Now you can test the app. After the page is loaded, the map should be shown. Click the button in the header and the view will move to your current location. Note that you should allow the app to use your location:
TroubleshootingIf nothing happens when you click the button, please make sure geolocation is enabled on your device.
Displaying List of Markers
Let's modify our app a bit to display a list of locations stored in the Appery.io database.
- First, we need to create a new database. Go to the Databases tab and click Create new database. Enter travelDB as a new database name and confirm creating.
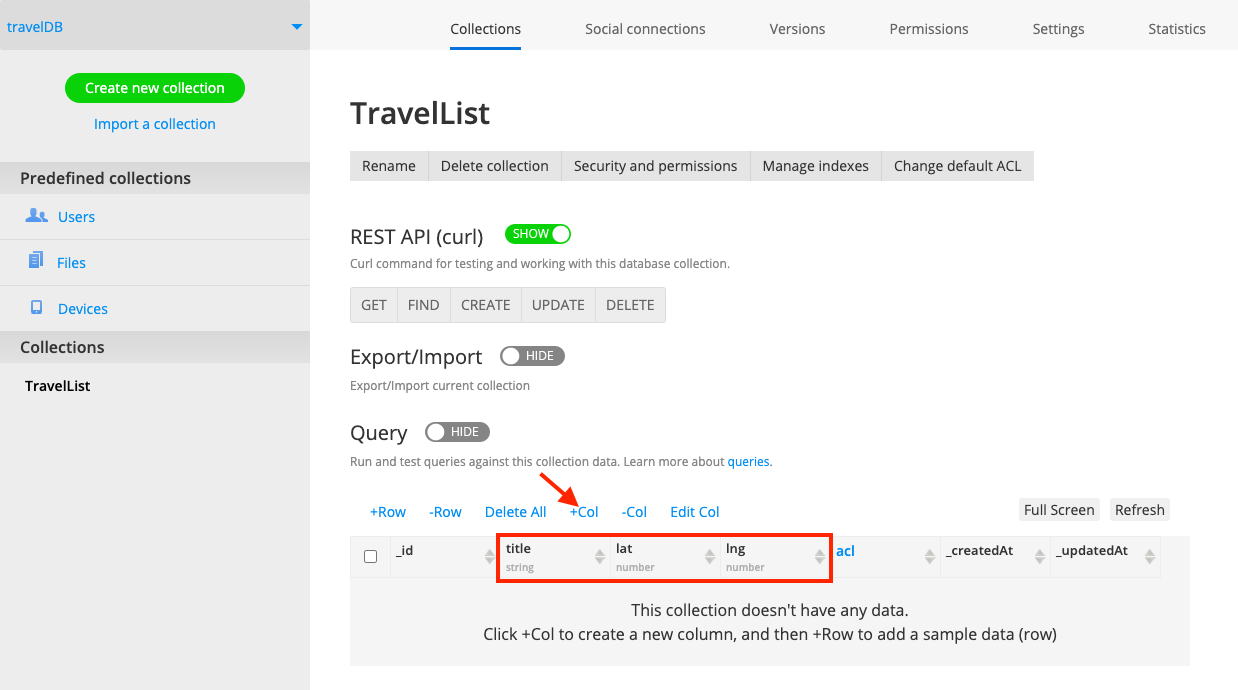
- In the new database, create a new custom collection. Click Create new collection, enter TravelList as its name and click Add.
- In the new collection, add 3 columns by clicking + Col:
- title column of String type,
- lat column of Number type,
- lng column of Number type:
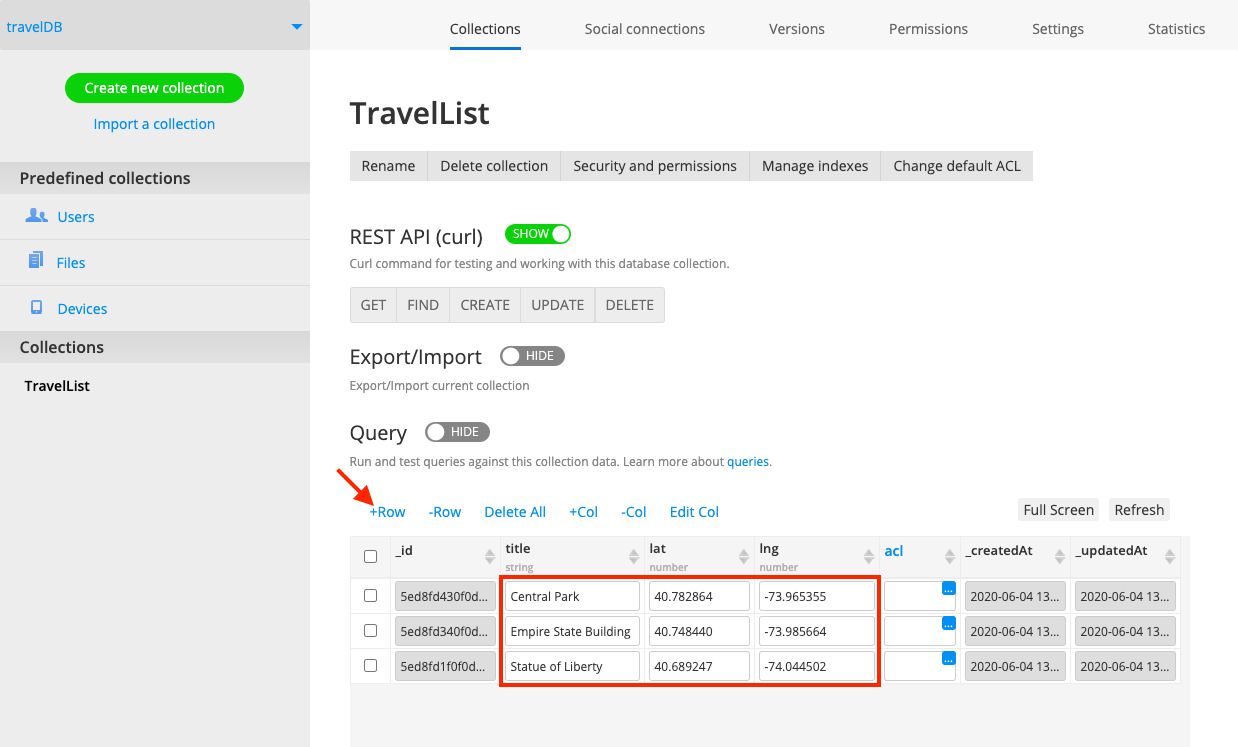
- Fill the collection with some sample data by adding rows (click +Row). For example, you can add a couple of places to visit in New York with geographical coordinates:
| title | lat | lng |
|---|---|---|
| Statue of Liberty | 40.689247 | -74.044502 |
| Empire State Building | 40.748440 | -73.985664 |
| Central Park | 40.782864 | -73.965355 |
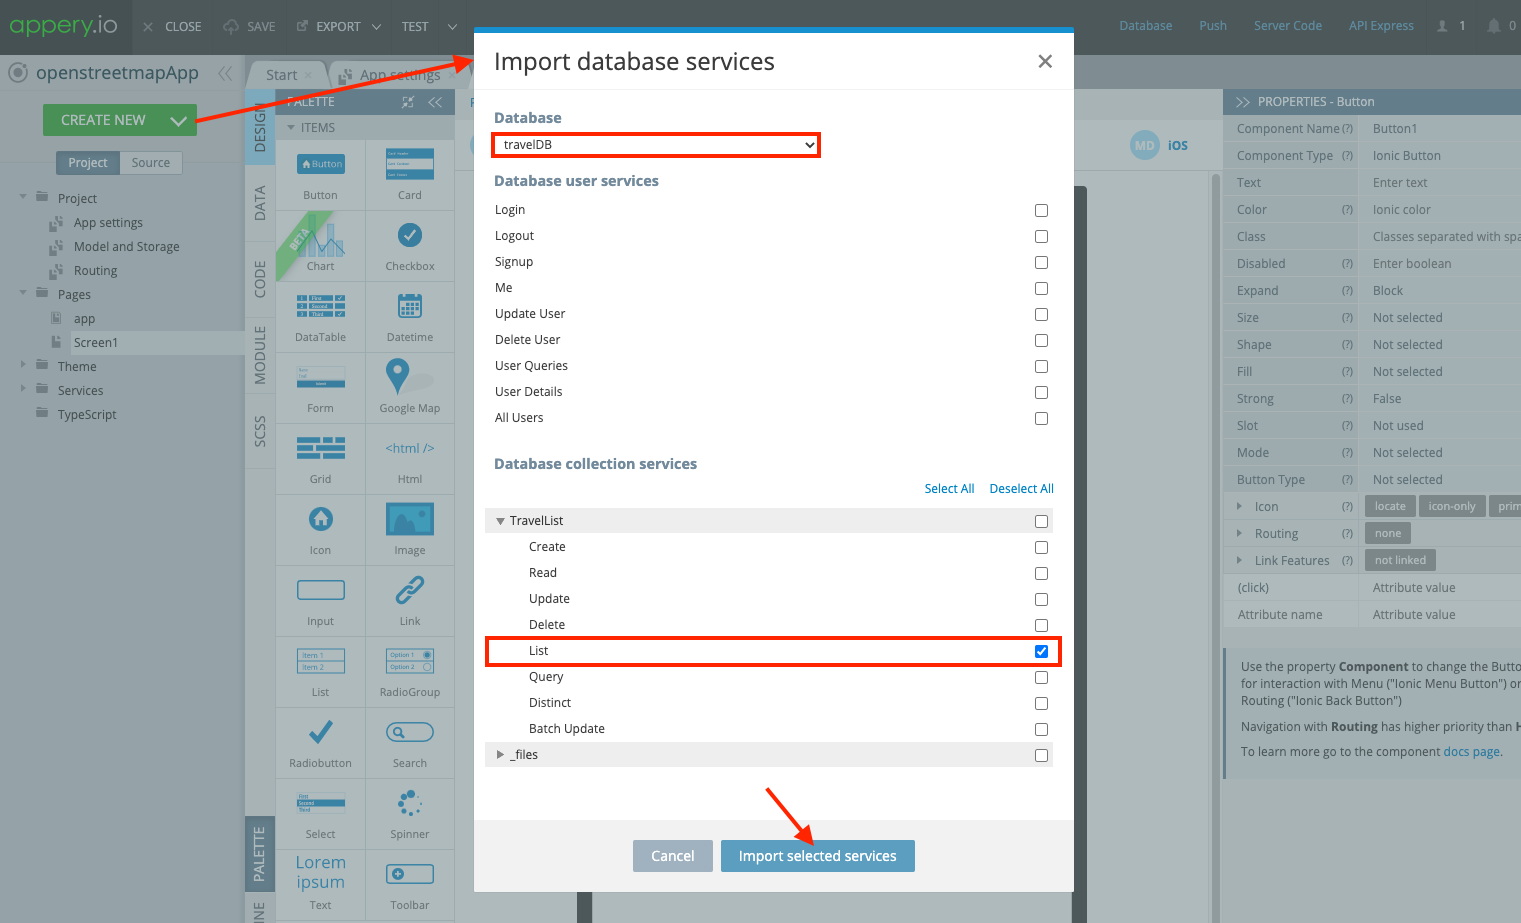
- The database is ready, let's return to our app. Click CREATE NEW > Database service, select the created travelDB database, unfold the TravelList collection's services list, mark the List service as checked, and confirm importing:
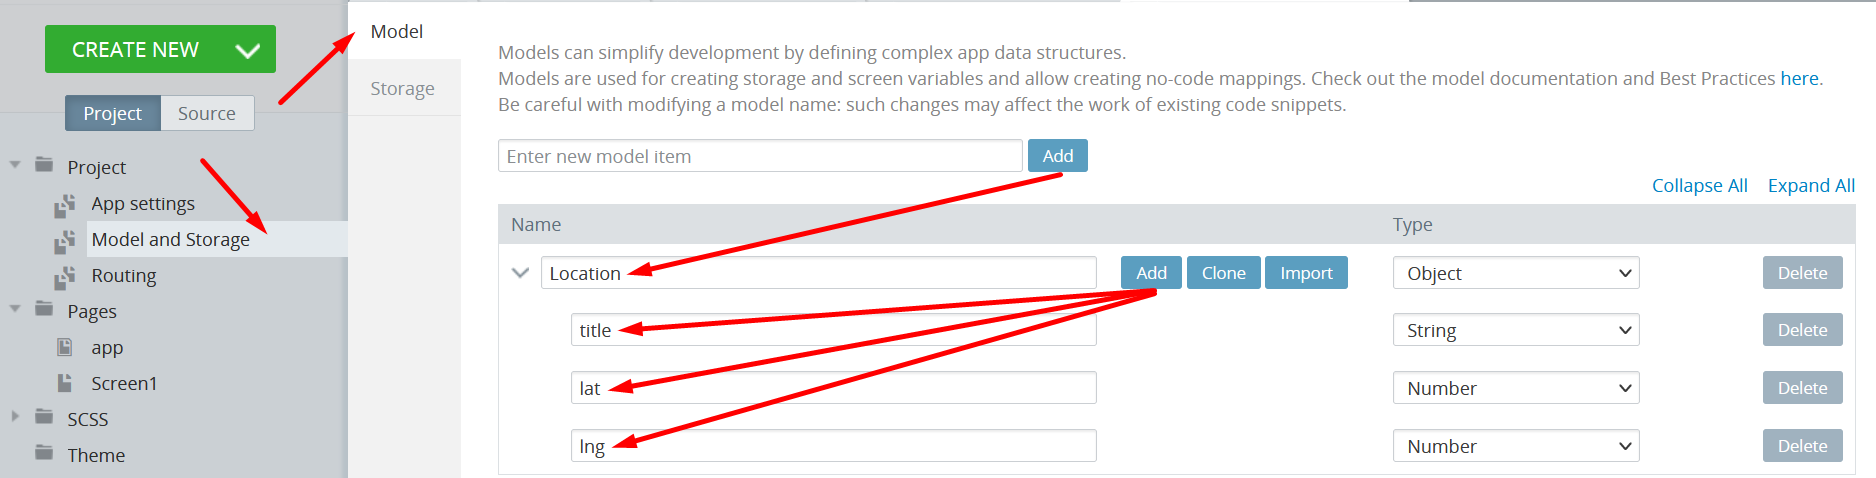
- Then, let's create a model to hold the locations. Go to Project > Model and Storage >Model tab. Add a new Location model. Then, for the Location model, add 3 parameters:
- title of String type,
- lat of Number type,
- lng of Number type:
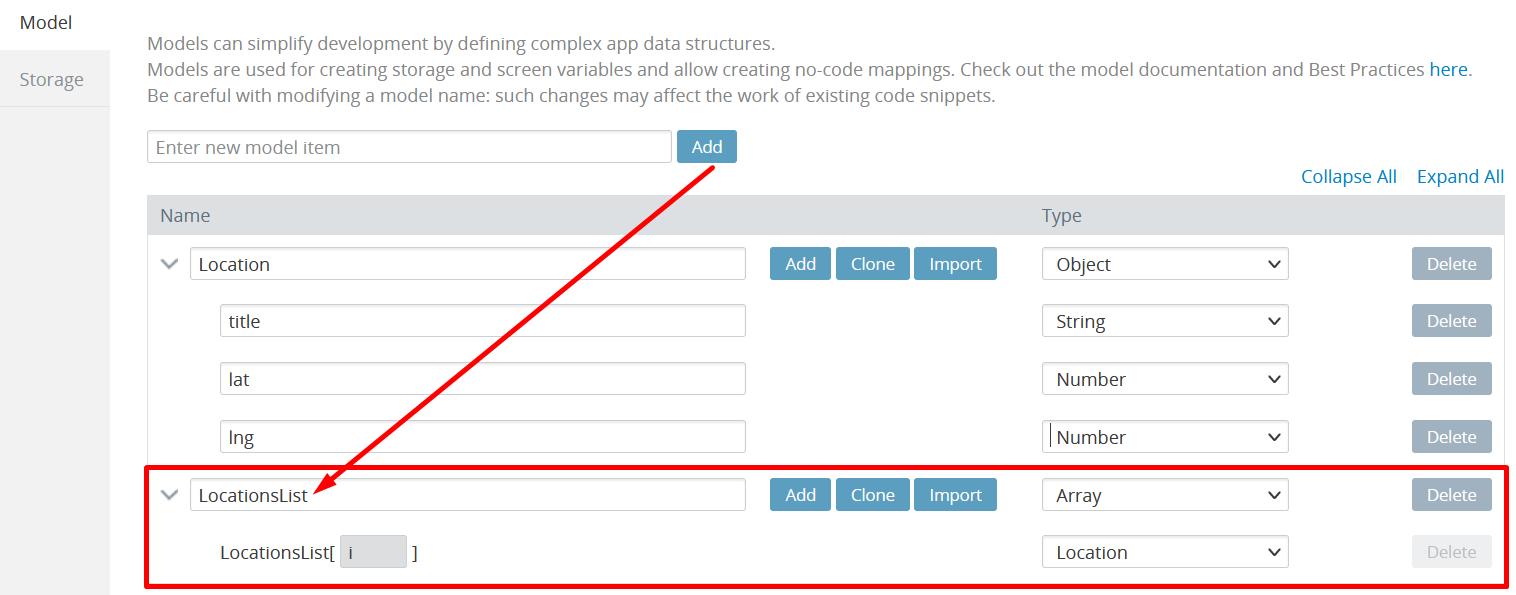
- Create one more model for the list of locations, LocationsList of Array type. Then, change the type of LocationList[i] to Location:
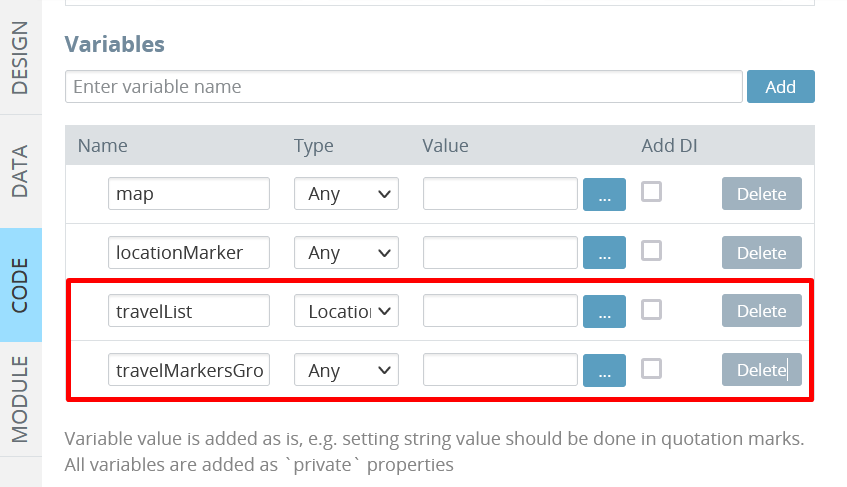
- Then, go to the Screen1 CODE panel. Here, create two variables:
travelListvariable of LocationsList type. It will be used to store the list of locations.travelMarkersGroupvariable of Any type. It will be used for grouping an array of markers:
- Go to Screen1 DATA panel and add the travelDB_TravelList_list_service as a new datasource. Click Add and rename the datasource to getTravelList:

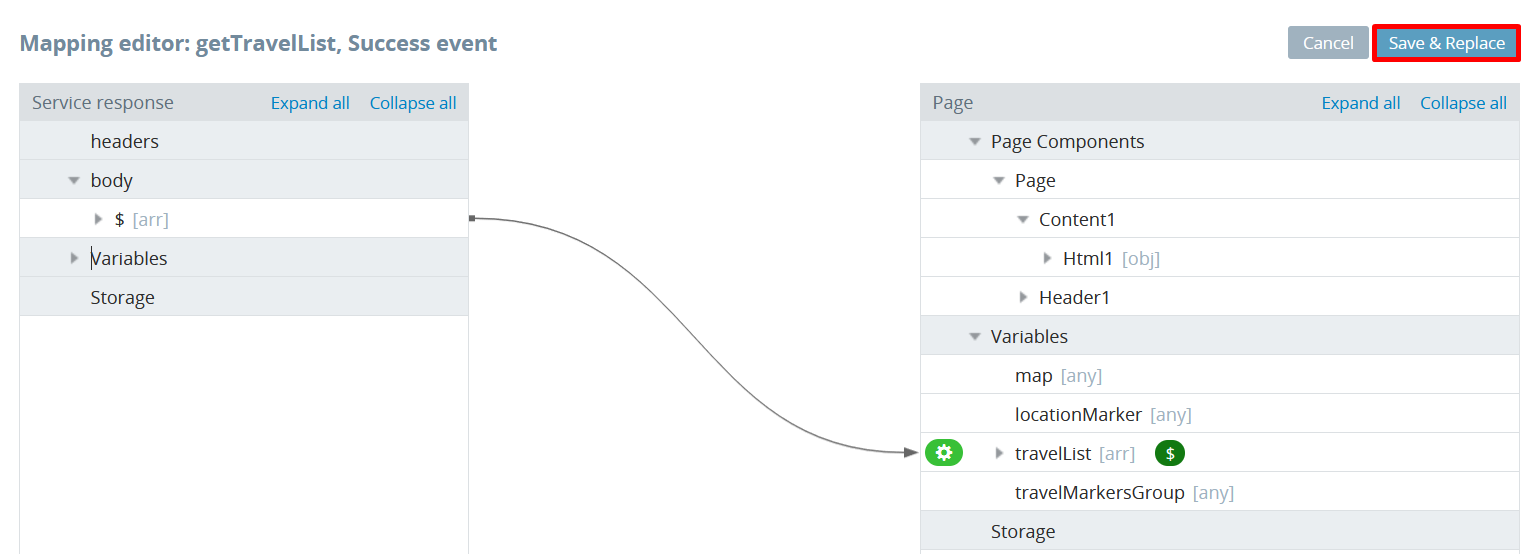
- Edit the service's Success mapping. Map the service response to locationsList variable and click Save & Replace:
- Then, click the Add button next to the datasource's Success event. Select the Run TypeScript action and type in the following code. After that, save the changes:
this.clearMap();
this.travelMarkersGroup = L.featureGroup();

this.travelList.forEach(item => {
    const newMarker = L.marker([item.lat, item.lng]);
    newMarker.bindPopup(item.title);

    this.travelMarkersGroup.addLayer(newMarker);
    this.map.addLayer(this.travelMarkersGroup);
});

this.map.fitBounds(this.travelMarkersGroup.getBounds());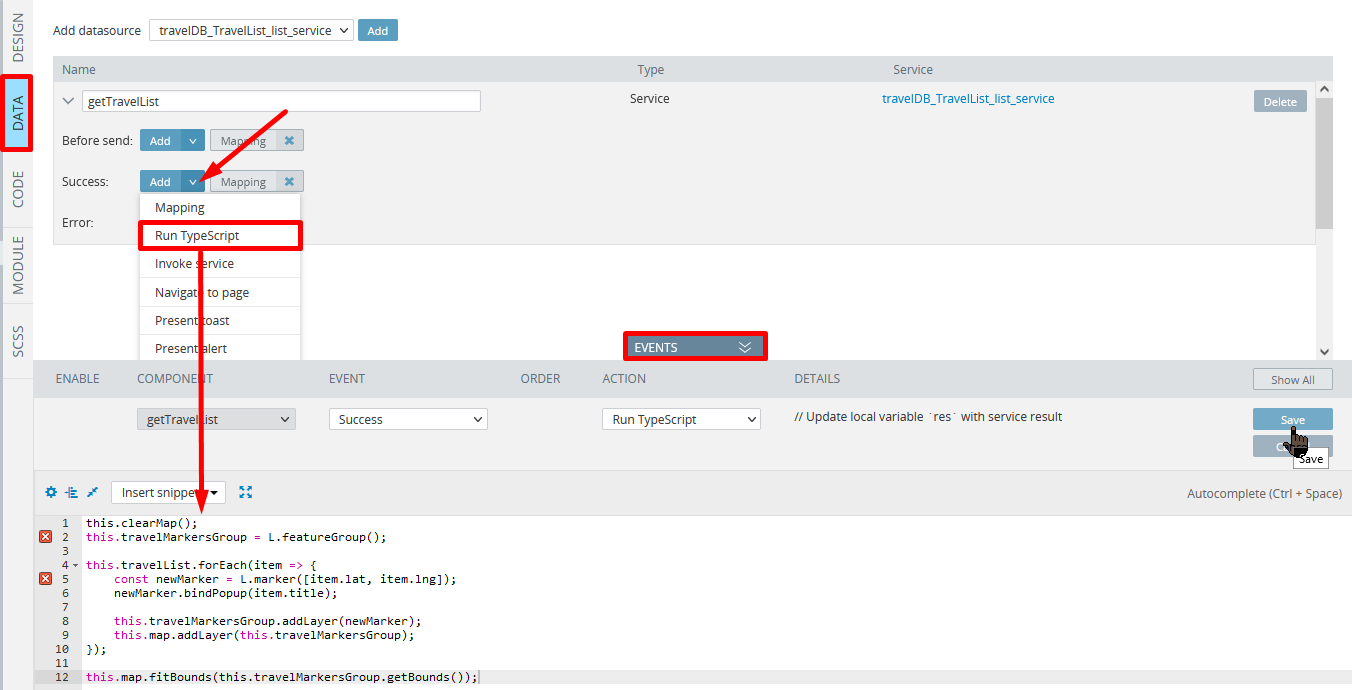
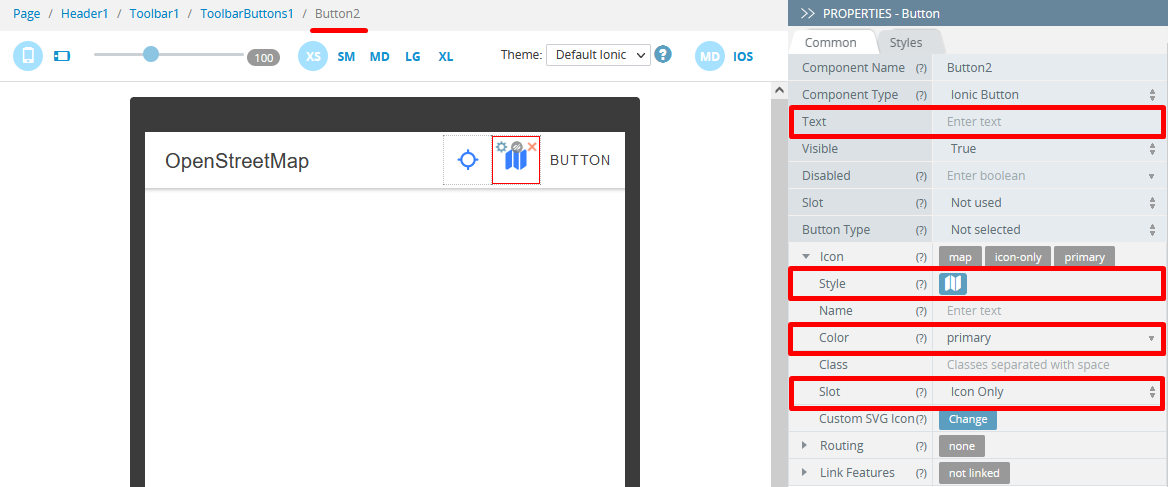
- Go back to the DESIGN panel and place two more Button components in the app header, inside ToolbarButtons1. For the first created button, clear its Text, change Icon > Style to map, set Icon > Color to primary and Icon > Slot to Icon Only:
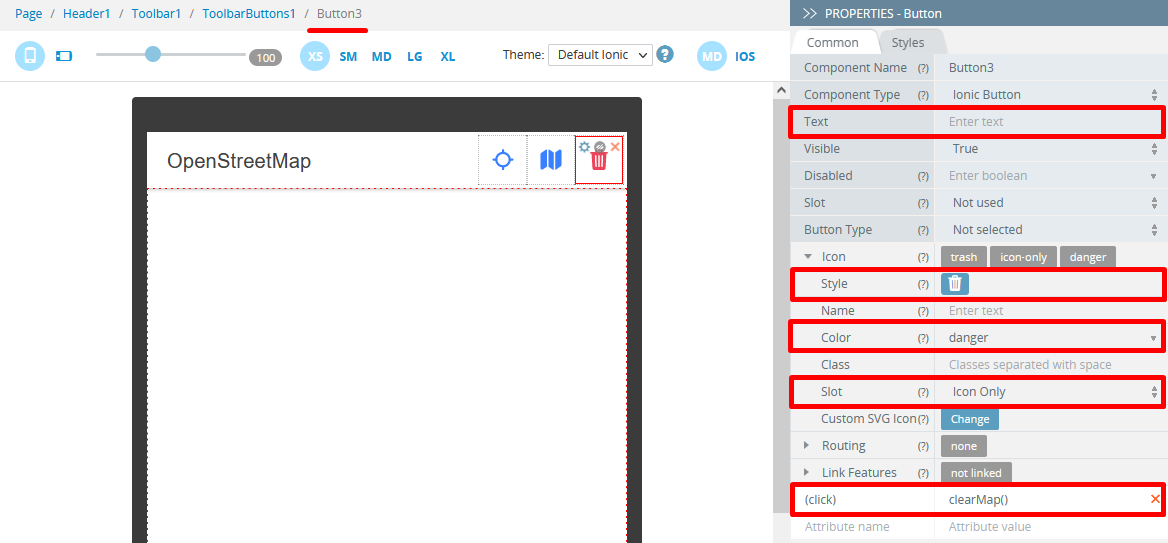
- For the second created button, clear its Text, change Icon > Style to trash, set Icon > Color to danger and Icon > Slot to Icon Only. Also, set its (click) property to clearMap():
- Unfold the EVENTS tab from the bottom, select the Button2 component. For the event, select Click, and for the action, select Invoke service. Set getTravelList service as the datasource and click Save:
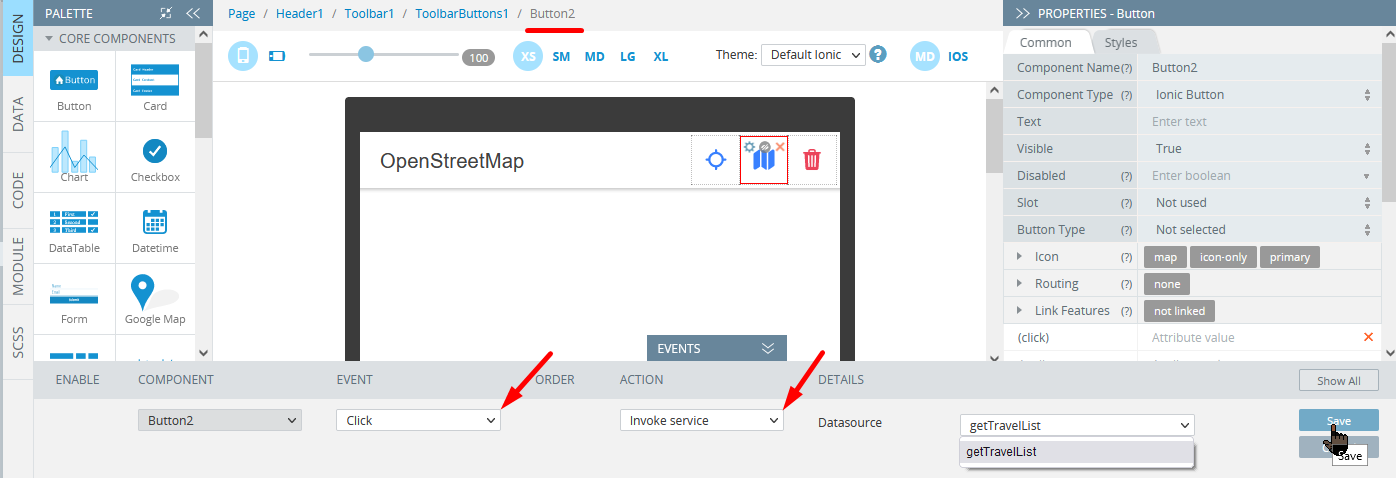
Save all the changes and test the app. Click on the second button will add markers from the database to the map. You can click the markers to see a popup. Clicking the last button will clear the map:
Adding Markers
Let's also add the possibility to place new markers by clicking on the map.
-
On the Screen1 CODE panel, add a new
userMarkersvariable to store a list of markers. Set its type to LocationsList. -
Go to the DESIGN panel and modify the code of page's After page showing event by adding the
this.map.on('click', (event) => this.addMarker(event));line so that the code looks like the following:
this.map = new L.Map('map').setView([40.647491, -73.787827], 15);
L.tileLayer('https://{s}.tile.openstreetmap.org/{z}/{x}/{y}.png', {
attribution: '© <a href="https://www.openstreetmap.org/copyright">OpenStreetMap</a>'
}).addTo(this.map);
this.map.on('click', (event) => this.addMarker(event));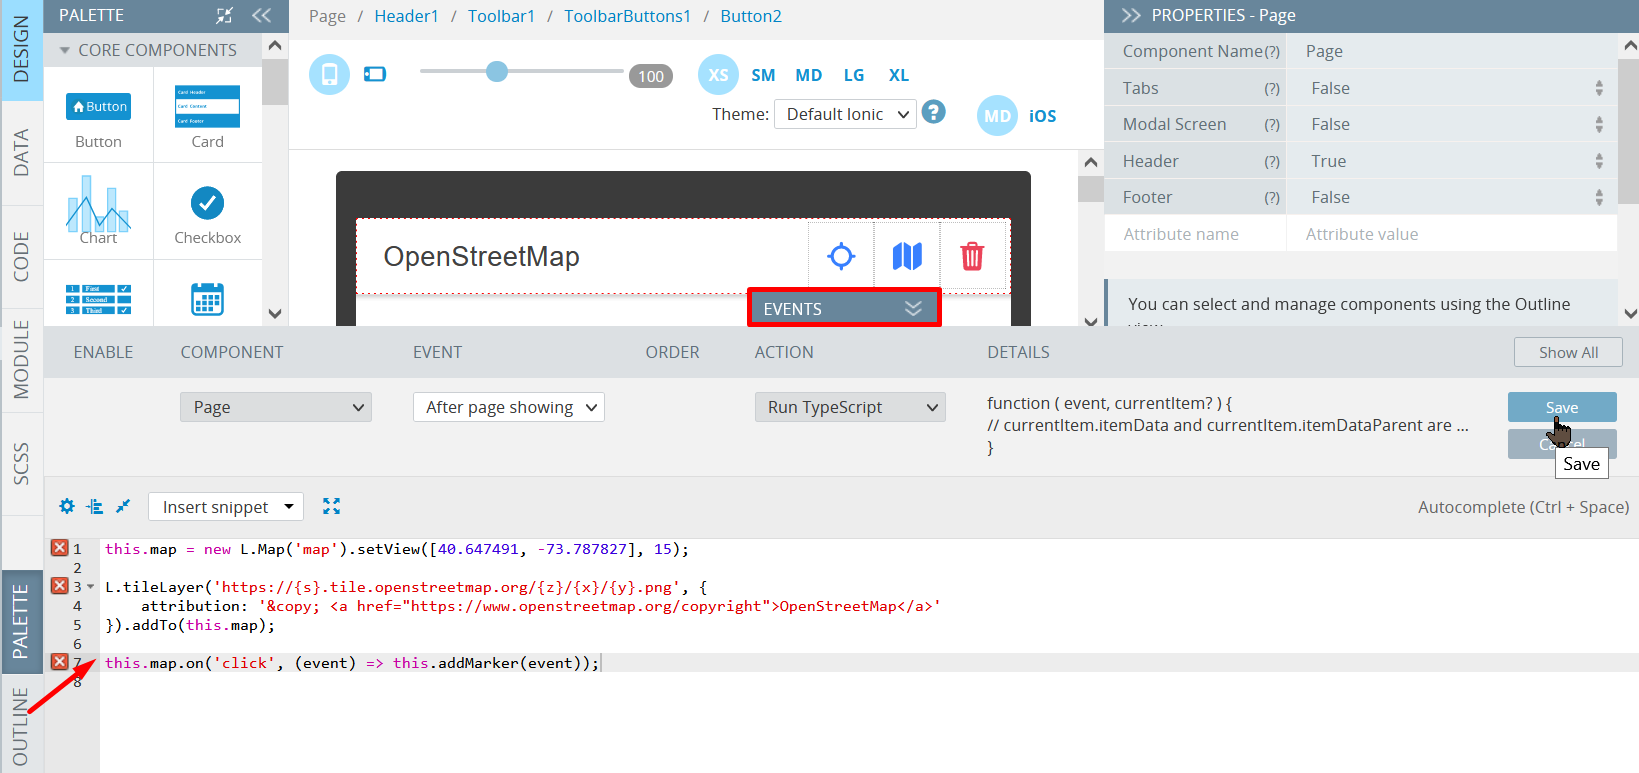
Map ProvidersYou can use any map provider instead of OpenStreetMap. Some of them can be found in this demo.
Note that some of them require API key and may charge a fee for additional requests.
- Now, in the CODE panel, create a new Async method, name it
addMarker, add theeventargument, and provide the below code. It shows a popup that lets users enter a marker title, then a marker is placed on the map as a separate layer:
const { lat, lng } = event.latlng;

const alert = await this.Apperyio.getController("AlertController").create({
    header: 'Add Location',
    inputs: [{
        name: 'name',
        type: 'text',
        placeholder: 'Location title'
    }],
    buttons: [{
        text: 'Cancel',
        role: 'cancel',
        cssClass: 'secondary',
        handler: () => {
            console.log('Creation cancelled');
        }
    }, {
        text: 'Add',
        handler: (res) => {
          const title = res.name;
          const newMarker = new L.marker({ lat, lng })
          	.bindPopup(title)
          	.addTo(this.map);

          this.userMarkers.push({ title, lat, lng });
        }
    }]
});

await alert.present();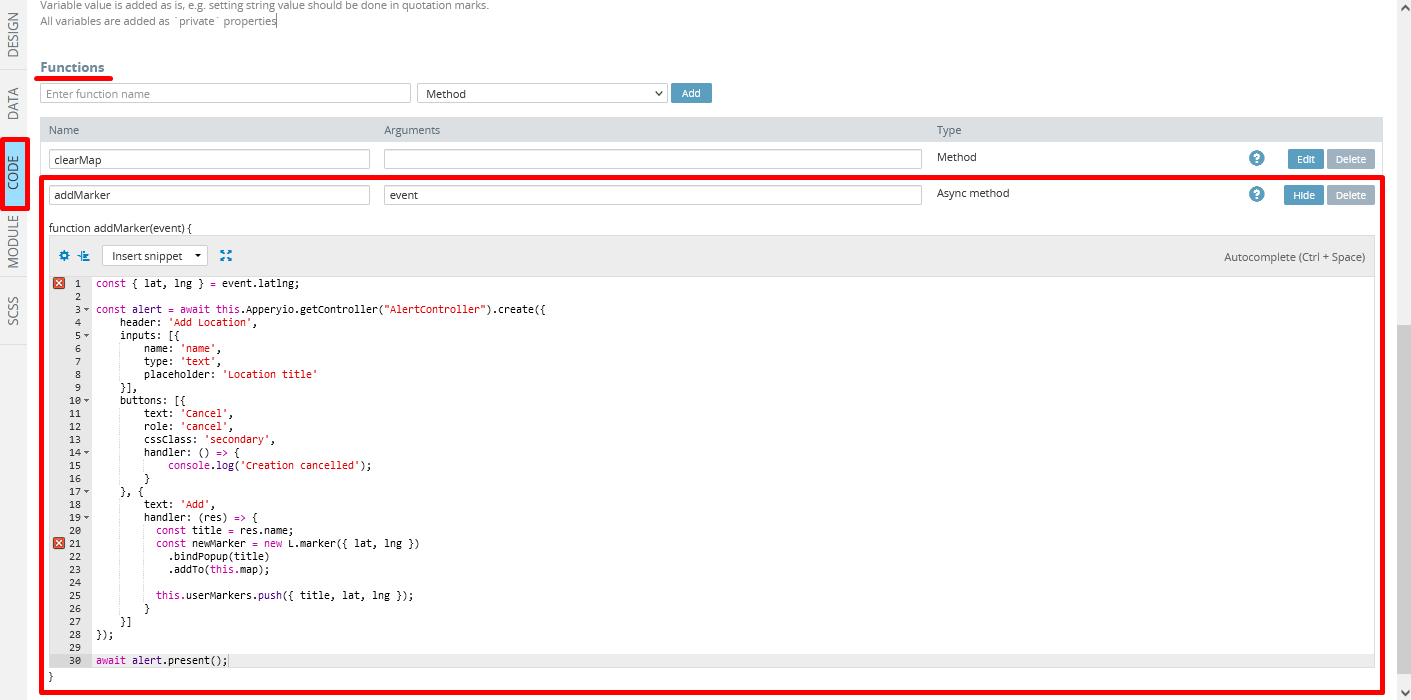
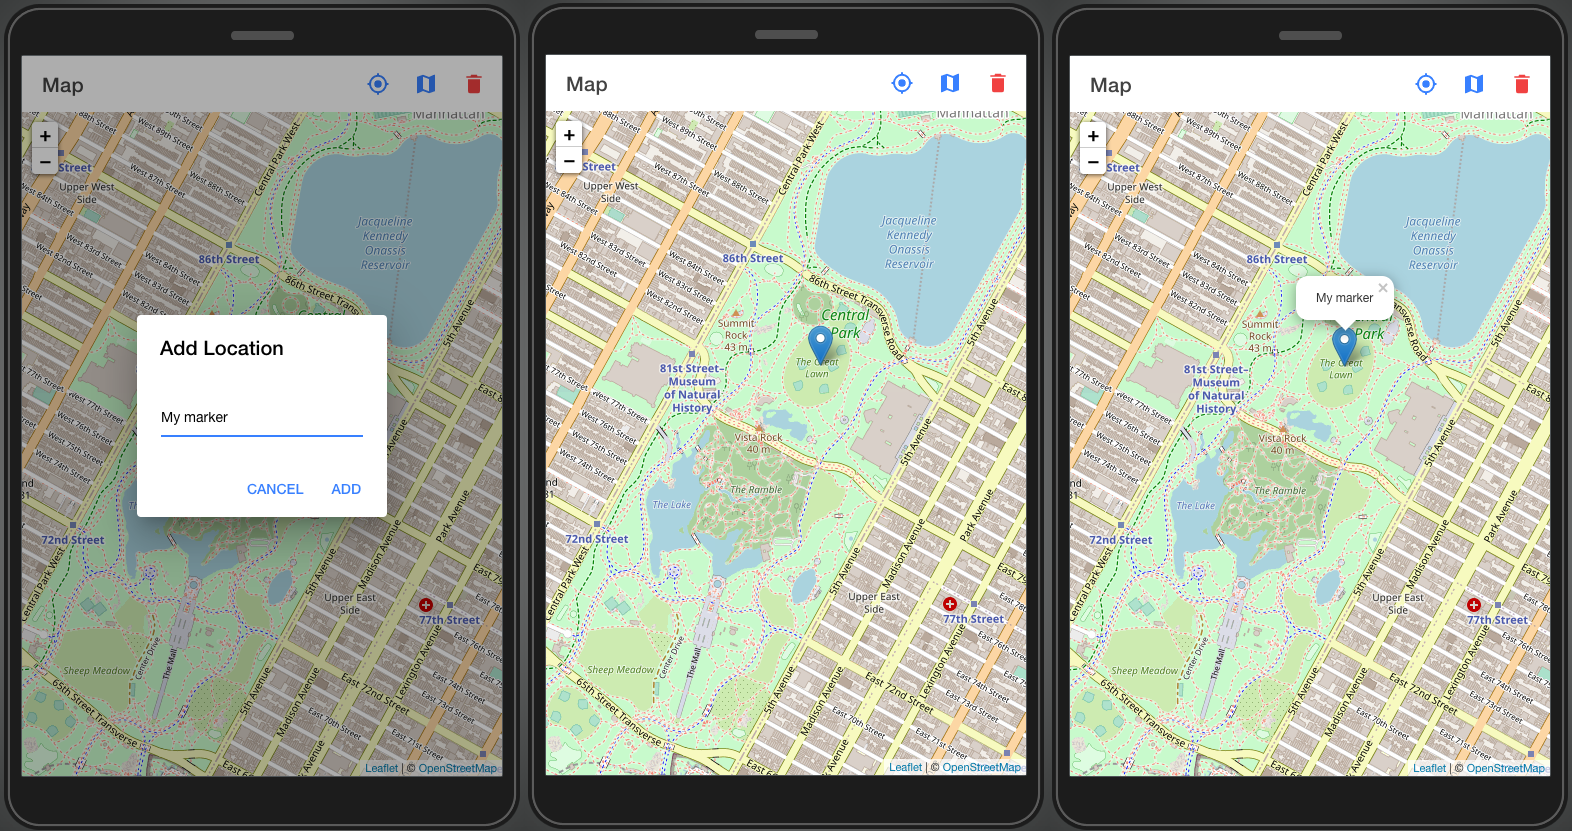
Save the changes and test the app. Click on the random place on the map, enter a title for a marker and confirm creating. You will see that a marker has appeared on the map:
Using Appery.io Leaflet Plug-ins
You can also easily import the map into your app, using one of the Appery.io Leaflet plug-ins. Let's take a closer look at them.
Leaflet Map Plug-in
This plug-in integrates Leaflet map into your app, adds OpenStreetMap layer on it. Clicking the buttons in the app toolbar can locate you on the map, add a new OpenRailwayMap overlay layer or clear all the markers.
To add the plug-in into your app, do the following:
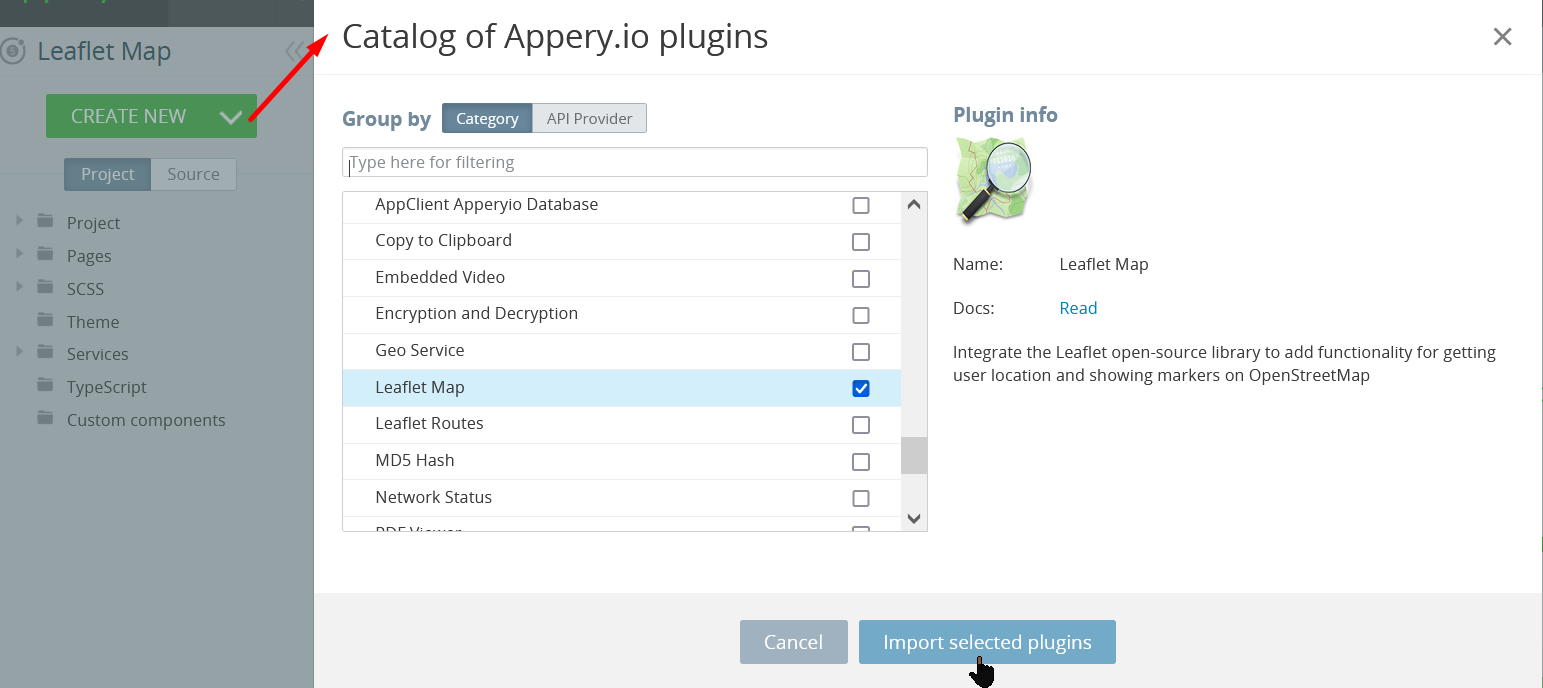
- In the visual App Builder, click CREATE NEW > From Plugin. Here, in the Utilities section, select the Leaflet Map plug-in and click Import selected plugins:
- Go to Project >Routing and change the default route to
LeafletMap:
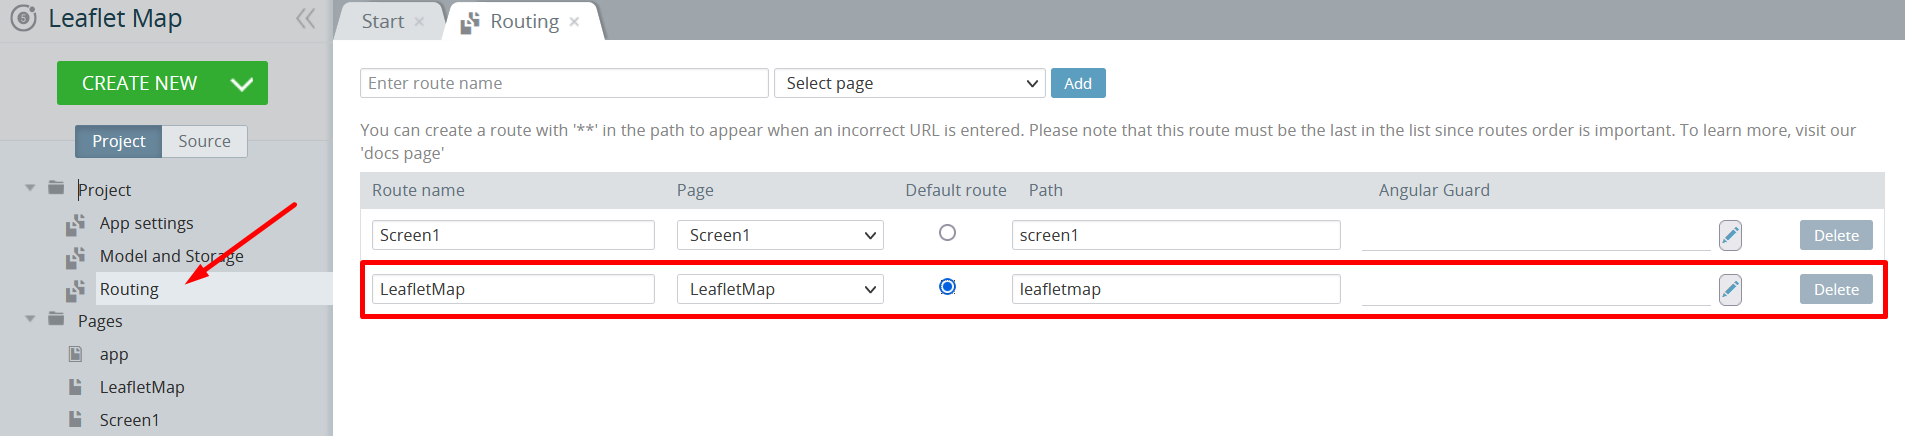
Important!If you skip the above step, the starting page of the app will be the default Screen1 page and not LeafletMap so, you will not be able to test the map functionality!
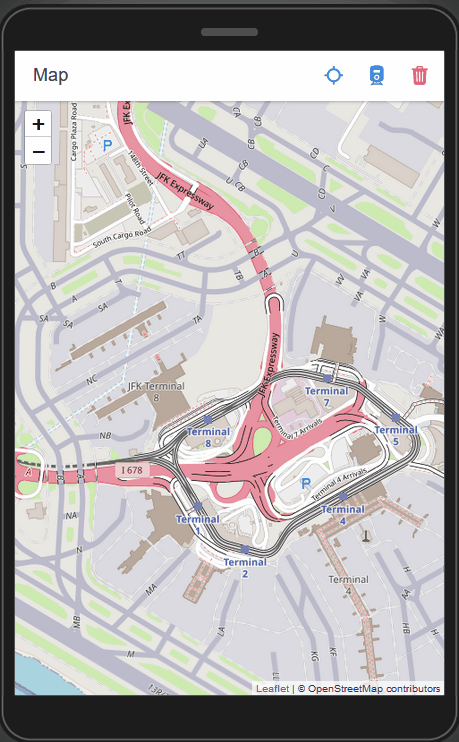
After that, the app can be tested again. You can find your location, place markers on the map, and clear the map.
Also, an additional overlay layer showing the railway routes can be switched on and off:
Enabling GeolocationPlease make sure the geolocation is enabled on your device before testing the app. If you're testing the app in the browser, please allow the app to access the location.
Leaflet Routes Plugin
This plugin uses openrouteservice to build routes on the Leaflet map. To use it in your app, please follow the steps:
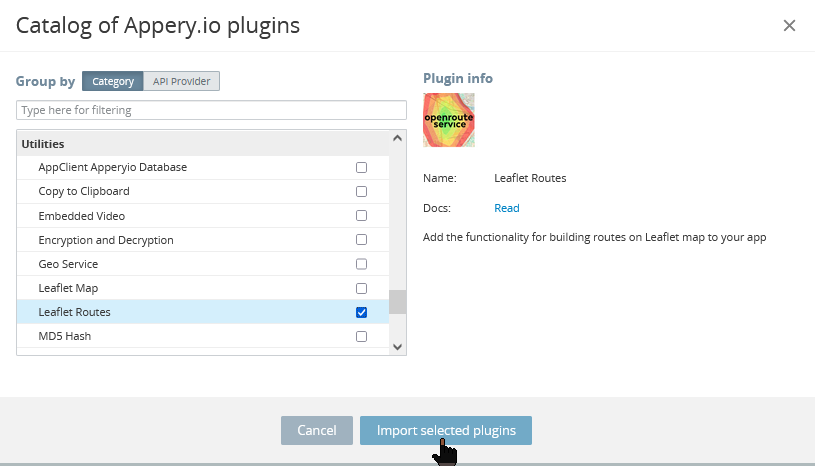
- In the App Builder, click CREATE NEW > From Plugin. Here, in the Utilities section, select the Leaflet Routes plugin and click Import selected plugins:
- Go to Project >Routing and change the default route to
LeafletRoutes:

Important!If you skip the above step, the starting page of the app will be the default Screen1 page and not LeafletRoutes so, you will not be able to test the map routes functionality!
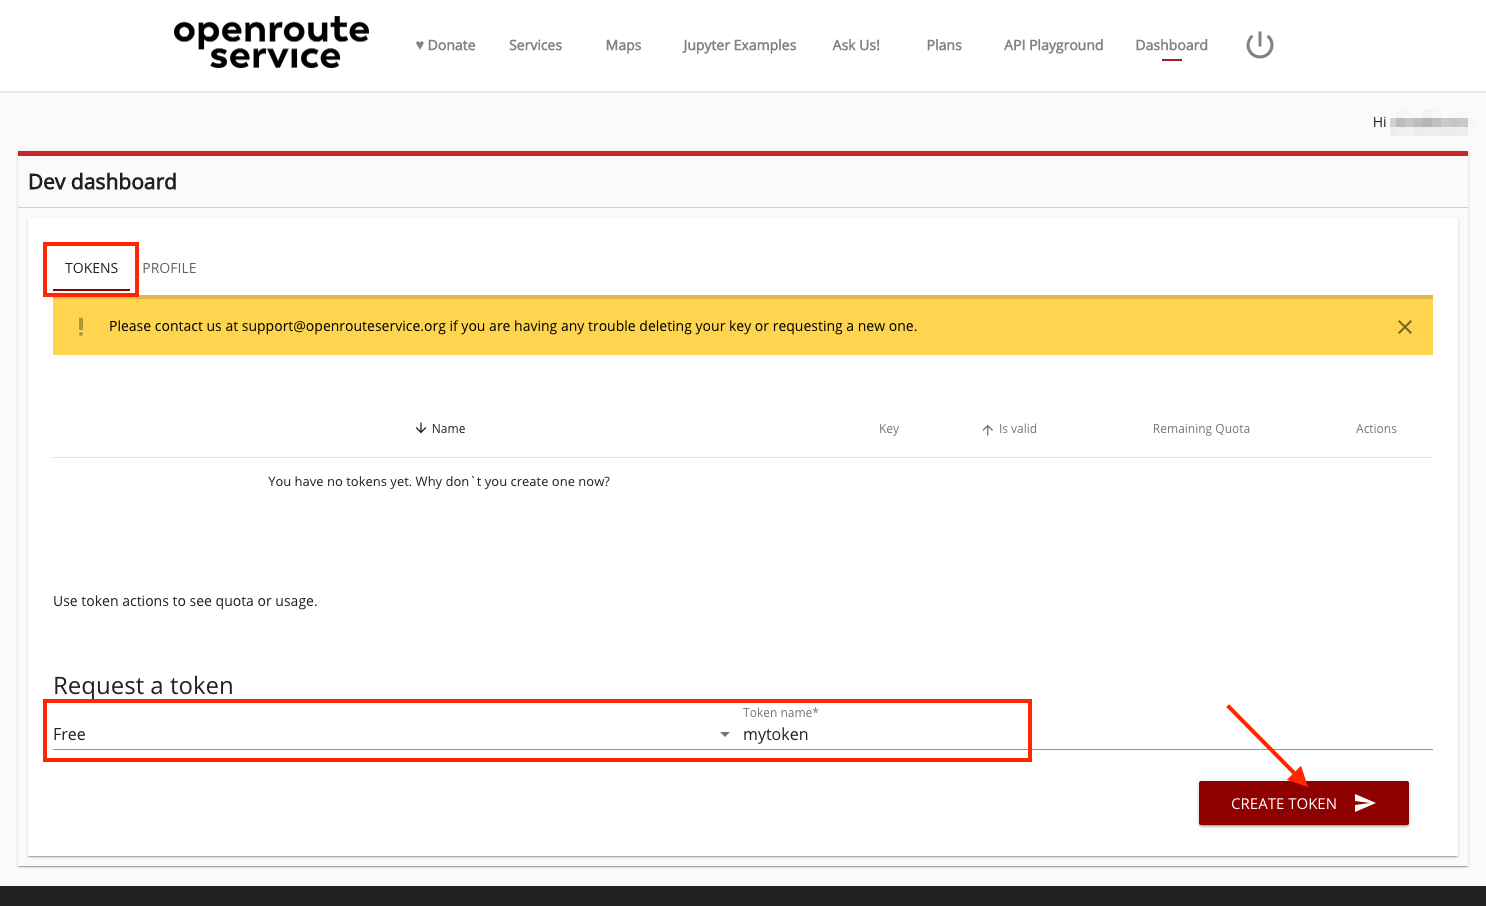
- Sign up to openrouteservice. In the Dev dashboard navigate to the TOKENS tab. Select Free for the token type, enter some token name and click CREATE TOKEN:
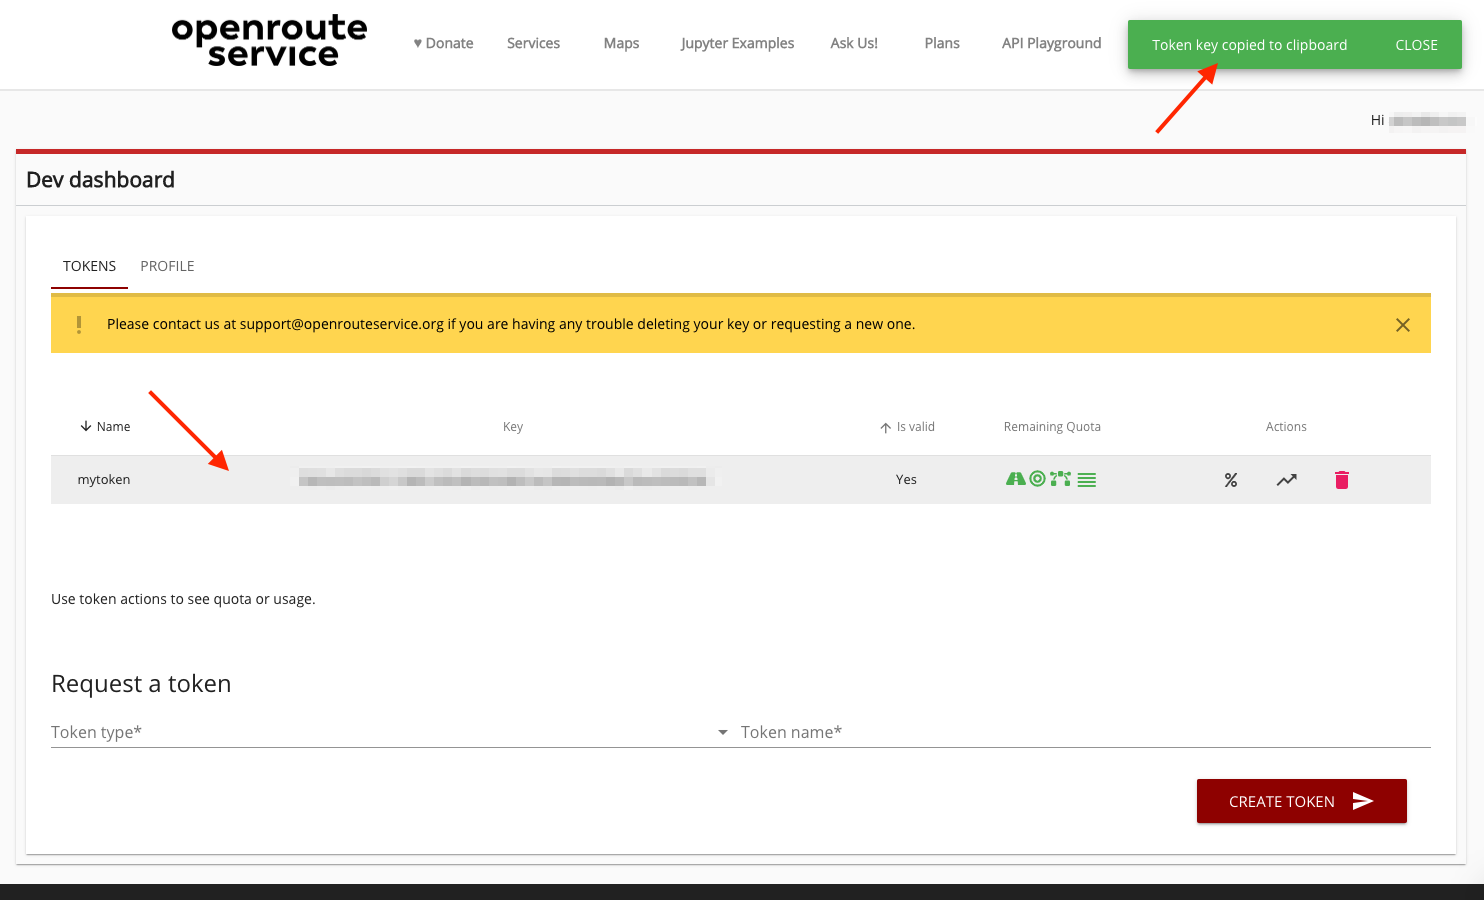
- You will see the generated token. Double-click it and the key will be copied to the clipboard:
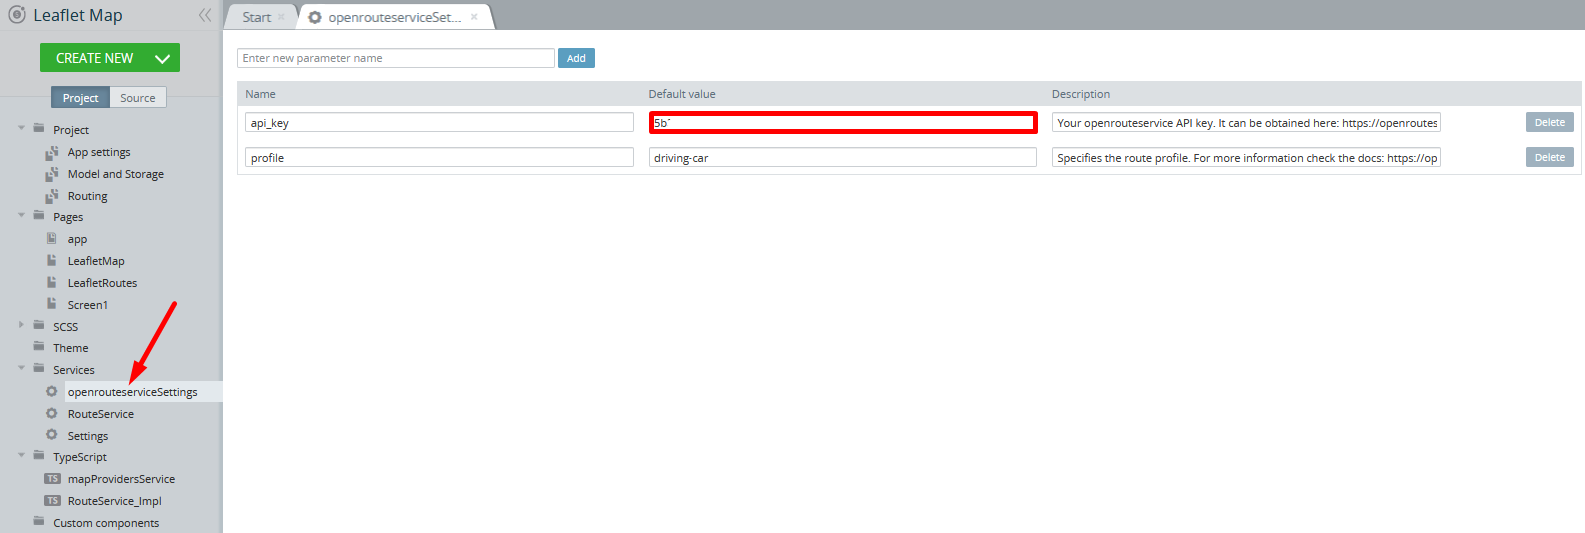
- In the Appery.io app builder, go to Services > openrouteserviceSettings and paste the copied key as the api_key parameter's value:
Testing App
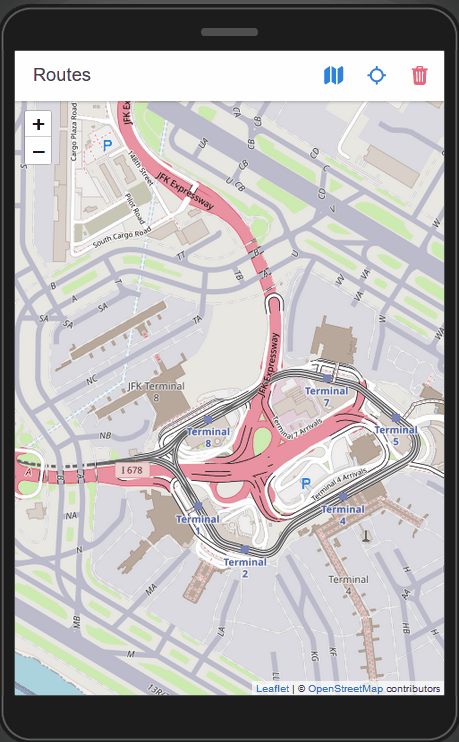
That's it, you're ready to test the app. Add several markers (at least 2) by clicking on the map. The app will build the route between the markers automatically. Also, you can see the approximate route distance, duration and instructions about your maneuvers at the bottom of the screen:
Testing on Device
When your app version is ready, you might also like to test it on the device.
Appery.io Tester AppA great option to quickly test the app on the device is to use our Appery.io Tester app.
The app is free and available for both iOS and Android.
You can check out this page to learn more about using the Appery.io Tester app.

Sample QR Code that can be used to scan from the Appery.io Tester App