JQM Quickstart Server Code Tutorial
Server Code quick start tutorial that demonstrates how to creating your first JQM app backend.
Important Note!The option of creating new apps with thejQuery Mobile framework was removed but we still support the projects that were created with it earlier.
Introduction
If you are new to Server Code, this is a good place to start.
Server Code allows writing custom app code using JavaScript that runs (executes) on the Appery.io server. The code is then used as the app backend. In this tutorial, you are going to create a backend for a greeting app. From the app (client) you will be able to enter a name, invoke the Server Code script (backend), and the backend will return a greeting, including the current time.
Let's start by creating the Server Code script.
Creating a Server Code Script
The first step in this tutorial - you are going to create and test the Server Code script.
- Open the Server Code page.
- On the left side, click the Create script button. The script editor will open.
- For the Name field, enter greetingScript and click Save.
What's nice is that a sample script is already there and that's the script you are going to use, just copy it and paste into the code editor field:
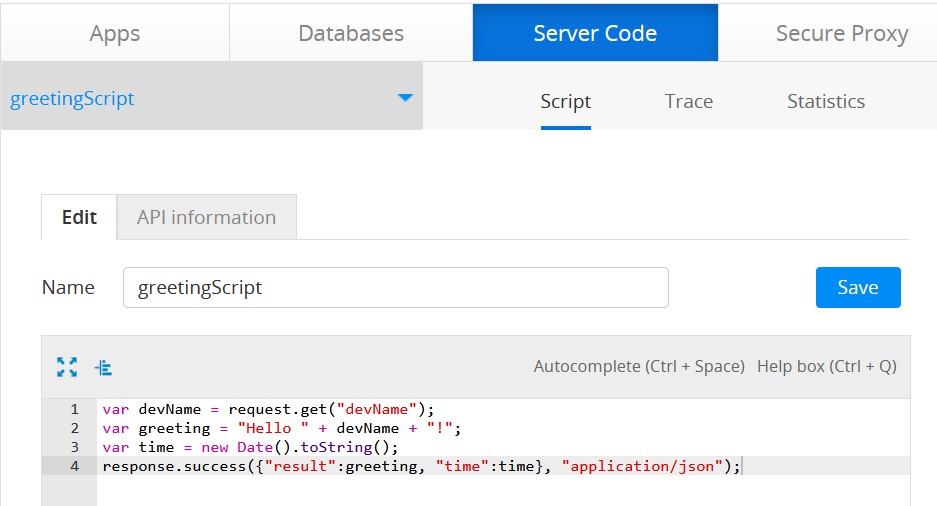
Let's quickly review the script code. The code looks like this (without comments):
var devName = request.get("devName");
var greeting = "Hello " + devName + "!";
var time = new Date().toString();
response.success({"result":greeting, "time":time}, "application/json");
The script takes the name (or developer name) as the input into the script. In the first line, the script reads the parameter value devName.
Script REST APIA Server Code script is automatically exposed via a REST API. This means to invoke a script from an app you will simply be invoking a REST API. Inputs into the script are simply REST API parameters.
On line #2, a greeting variable is created by by combining Hello and the developer name.
On line #3, a time variable is set by invoking a standard JavaScript Date API.
On line #4, the script response is created. This is the response returned by the REST API when the script is invoked.
That's all for the script. Next you are going to test the script.
Testing Script
It's always a good idea to test your backend (here, script) before using it in the app. This way you can debug the logic without invoking it from the app. Debugging the script from an app is more difficult.
Testing the script in Server Code is simple. Go to the Run tab and click the Save and Run button. You should see output that looks like this:

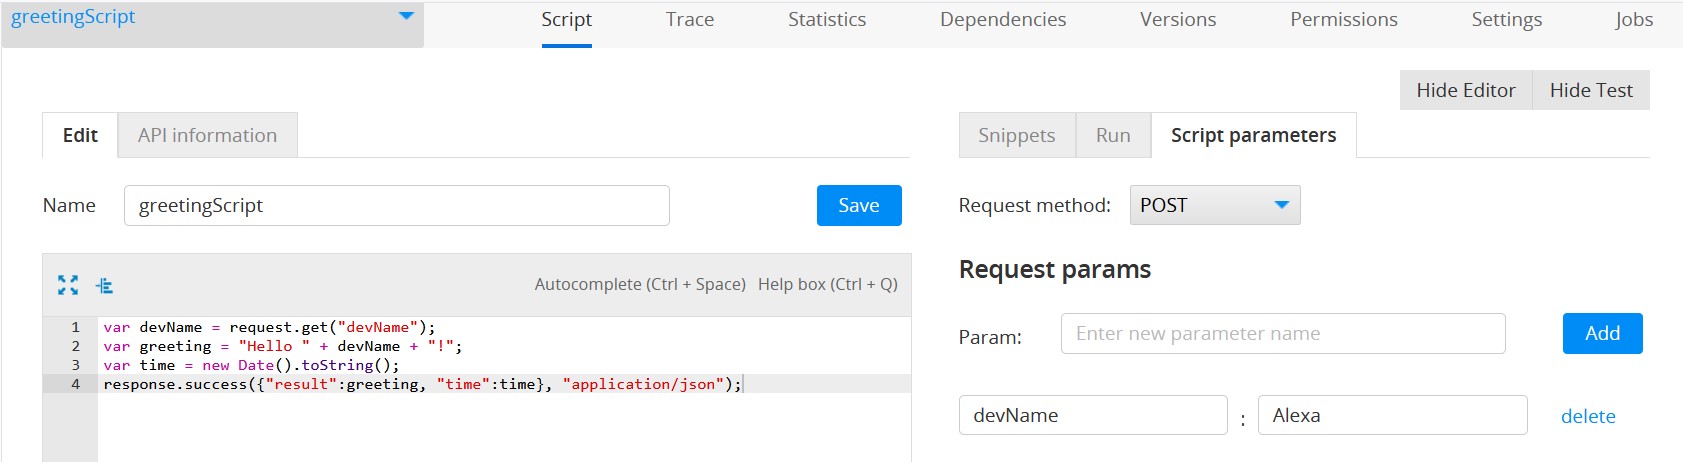
You got a response from the script and almost everything looks good, but the greeting label doesn't have the name. Remember that the name is passed as a parameter into the script. Any time a script accepts a parameter, you can add the parameters in Script parameters tab for testing.
- Switch to the Script parameters tab.
- Set the Request method to POST. This means the script will be invoked via a GET request from the app.
- Under Request params, enter devName and click Add.
- Enter any test value for devName, for example: Alexa:
- Switch back to the Run tab and click the Save and run button to test the script again. You will see an updated response, now with the name:
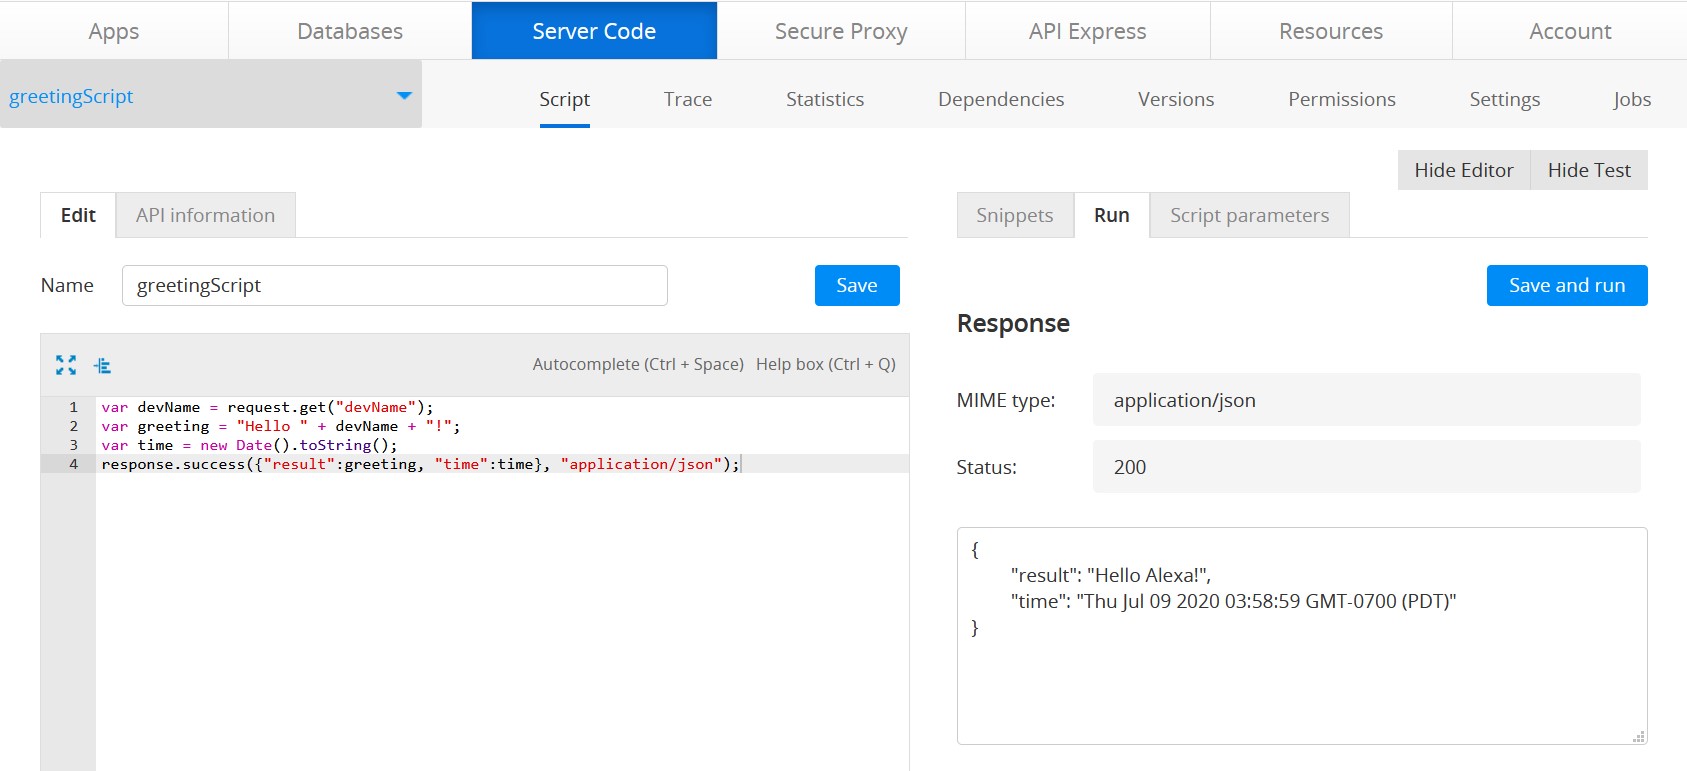
This means that the script works as expected.
Now that the script has been tested, the next step is to create an app that will use this script.
Creating New App
You will now build an app with one page that will invoke this script. The first step is to create a new app.
- Go to the Apps tabs.
- Click the Create new app button.
- For app name enter: greetingApp.
- Click on the jQuery Mobile tab, select JQM blank template, and then click Create. The App Builder will load the newly created app.
Next, you are going to import the script into the app.
Importing Server Code Script
The script is imported as a REST API into the app.
- Select CREATE NEW > Server Code Service.
- Select the script you created and then click the Import selected services button. You should see the script under the Services folder.
- Open the script, then go to Request tab. You will see that Alexa is set, that's the value you used to test the script. Delete this name, otherwise, it will be used as the default value for the service.
- Go to the Test tab. This is where you can test the REST API (script) inside the App Builder. Enter any name value and click the Test button. You should see the same response as when you tested the script in Server Code.
- Click Import as Response to define a response for this service. You can switch to the Response tab to see the response created.
Now it's time to design the page.
Designing Page
In this step, you are going to build the page.
- Open Pages > startScreen.
- Click on the header and changes its Text property under the PROPERTIES tab to: App.
- Drag and drop the Input component.
Under the Properties tab, perform the following:- Delete the Text value.
- Set the Placeholder value to Developer name.
- In the Common section, change the Name to nameInput.
- Drag & drop the Button component below the input. Change its Text property to Say Hello.
- Next, drag & drop two Label components and place them below the button. For both labels, clear the Text property to make them blank.
- With the first label selected, set its Name to greeting. Set the second label Name to time.
This is for the page. You can test the page by clicking the Test button in the App Builder.
Next is to map and invoke the service from this page.
Mapping Service to the Page
In this step, you are going to add the service to the page, map it, and then invoke it.
- Switch to the DATA tab.
- For data source, select Service > greetingScript_service, click Add.
- Rename restservice1 to greetingService.
- Now let's do the input mapping. Click the Mapping button for Before send event.
- Click Expand all links on both sides of the mapping editor.
- Using drag and drop, map nameInput/Text to query/devName.
- Click Save & return.
- Click Mapping for Success event, then click Expand all on both sides.
- Create the following mappings:
- result to greeting/Text
- time to time/Text
- Click Save and return.
- Go back to the DESIGN view.
- Select the button and open the EVENTS tab (bottom). This is where you will add an event to invoke the service.
- Make sure that the button is selected and the Event is set to click. For Action, select Invoke service > greetingService, click Save.
- Save all the changes.
You are now ready to test the app.
Testing App
To test the app in the browser, simply click the TEST button. The app will launch in the browser inside a frame that looks like a phone.