Todo Sample jQM App
Simple Todo app built with jQuery Mobile.
Important Note!The option of creating new apps with thejQuery Mobile framework was removed but we still support the projects that were created with it earlier.
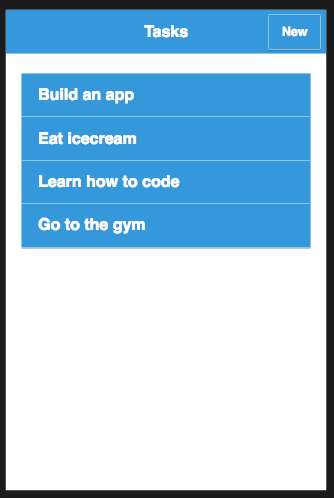
This sample app displays a list of tasks from a database. A new task can be added to the list. The app looks like this:

Todo app.
This sample app uses and demonstrates:
- jQuery Mobile (app).
- Server Code (app backend).
- Database (app backend).
Ionic Todo List TutorialYou can also check our step-by-step Ionic Todo List tutorial where we show how to build a mobile app that displays a list of data from a cloud database. The app communicates with the database via a REST API.
Backend
The app backend consists of a database and Server Code scripts.
Database
To get to the database:
- Create a new database called: todoDB.
- When the database is created, click the Create new collection button. Name the collection task.
- Inside the new collection, click +Col to create a new column. Name the column: taskName of type String.
- Now using +Row enter a number of records. For example, add the following tasks:
- Build an app.
- Learn how to code.
- Buy ice cream.
- Go to the gym.
Now you are ready to move to the app logic with Server Code scripts.
Server Code Scripts
There are two scripts that you need. The first script will retrieve all the tasks from the database and the second script will create (save) a new task into the database.
- From the Server Code page, click the Create script button.
- The script editor will load. Set the name to taskList and click Save.
- Now copy and paste the following code into the script editor (delete the default script)
// Database ID from database > Settings tab
var dbId = "...";
var collectionName = "task";
var result = Collection.query(dbId, collectionName);

Apperyio.response.success(result, "application/json");- You need to set the database ID in this script. Go to the database you have just created and then to Settings tab. There you will see the database ID (API key). Copy and set it inside the script.
- It's a good idea to test the script. Go to Run tab and click the Save & Run button. You should see a response from the script -- showing all the tasks from the database.
Now let's work on the second script that saves a new task into the database.
- From the Server Code page, click the Create script button.
- The script editor will load. Set its name to newTask and click Save.
- Now copy and paste the following code into the script editor (delete the default script)
// Database ID from database > Settings tab
var dbId = "...";
var newTask = request.get("newTask");
var collectionName = "task";

var result = Collection.createObject(dbId, collectionName, {
  "taskName": newTask
});
Apperyio.response.success(result, "application/json");- Set the database ID to what was created in the first script.
- This script takes one parameter (line 3) -- the task name. In order to test the script go to the Script parameters tab. For Param enter: newTask.
- Once the parameter has been added, enter any sample task and then click Save & Run. A new task will be saved into the database. Refresh the database to get the new updated list.
Next, you are going to configure the app (client) with the backend.
App (UI)
To get the app UI:
- Create a new jQuery Mobile app based on the Blank template.
- Inside the App Builder, select CREATE NEW > From plugin. Under Appery.io Examples select Todo App.
- Click the Import selected plugin button.
- Select tasks as the starter page and click Apply settings.
Next, you are going to work on connecting the app to the backend you just created.
- Inside the App Builder, open Services > taskList_service.
- In the Settings tab, replace the {servercode} with the Server Code script you created in the previous step. To find the script ID, open API information for the taskList script. You will see a service URL (in Service URL section), the ID in the URL is the value that you will need to copy. Just double-check you opened/copied the right script ID.
- Do the same for Services > newTask_service service. Open newTask script and copy its script ID.
Testing App
You are now ready to test the app. Click the Test button in the App Builder to launch the app in the browser.
Want to know more?You can also check our Appery.io Community video that shows how to create a List Details application with database integration using the Appery.io List Details plugin here:
Updated 7 months ago
