X-Appery-Session-Token
In this document, you will learn what X-Appery-Session-Token is and how it is used in Appery.io.
X-Appery-Session-Token is the Appery.io-generated session ID that specifies the particular user's session instance initiated the moment the user Sign in (Login) functionality is activated.
Sign out (Logout)The Sign out (Logout) process logs a user out from the database and removes the user session token. This session token will no longer be valid to make any API requests. Also, this method returns no response.
Successful user login will login a user into the backend (Appery.io Database) and return a session token. This session token is then passed with other APIs to do actions on behalf of this user.
Only the sessionToken and id parameters will be returned in the response after successful authentication. If you want to retrieve custom fields (email, for example) created in the predefined Users collection, you should send the second request after authentication is done.
Invoking Social Network APIWhen a user logs in via a social network, a new user will be created in the default Users collection of the Appery.io Database and X-Appery-Session-Token will be returned for further API calls.
Note that the returned token doesn’t allow triggering social network providers API. It’s only valid for Appery.io API calls, for example, the Database REST API. In other words, you won't be able to invoke a Facebook API to get a list of your friends. In order to do this, you will need to setup the standard Facebook login functionality.
You can find instructions on how to do it here.
The returned sessionToken should be saved to access the user information in subsequent app requests. To do it, you can save this token in browser's local storage.
In this document, we will explain how it's done.
Creating Database
First of all, we need to create a new database to be able to import the needed services to it:
- Go to the Databases tab (you will need to be registered in the platform).
- Click Create new database and, in the new window, enter its name and then click Create:

- After the database is ready to start with, click Create new collection, enter the new custom collection name in the modal window, and confirm by clicking the Create button:

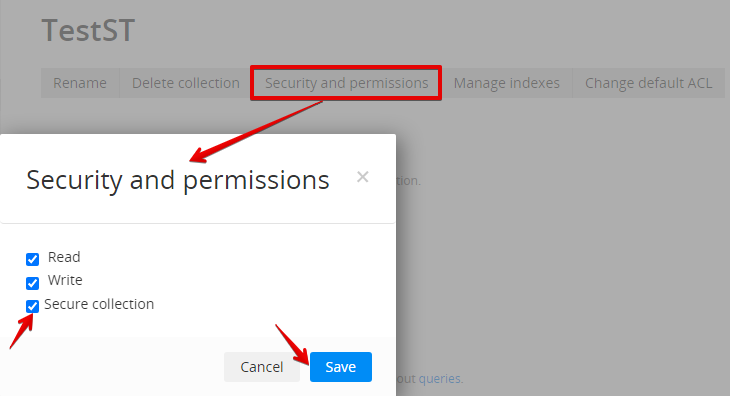
- Go to the Security and permissions tab and enable the Secure collection check box. Then save:
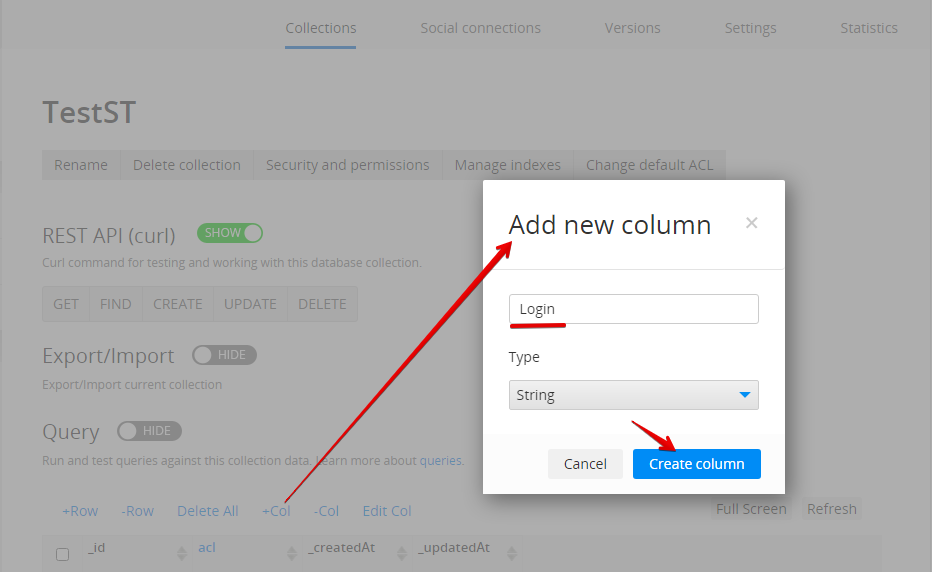
- Now, to create a new column, click + Col and in the modal window that opens provide its name (for example, Login) and set the column type (here, String):
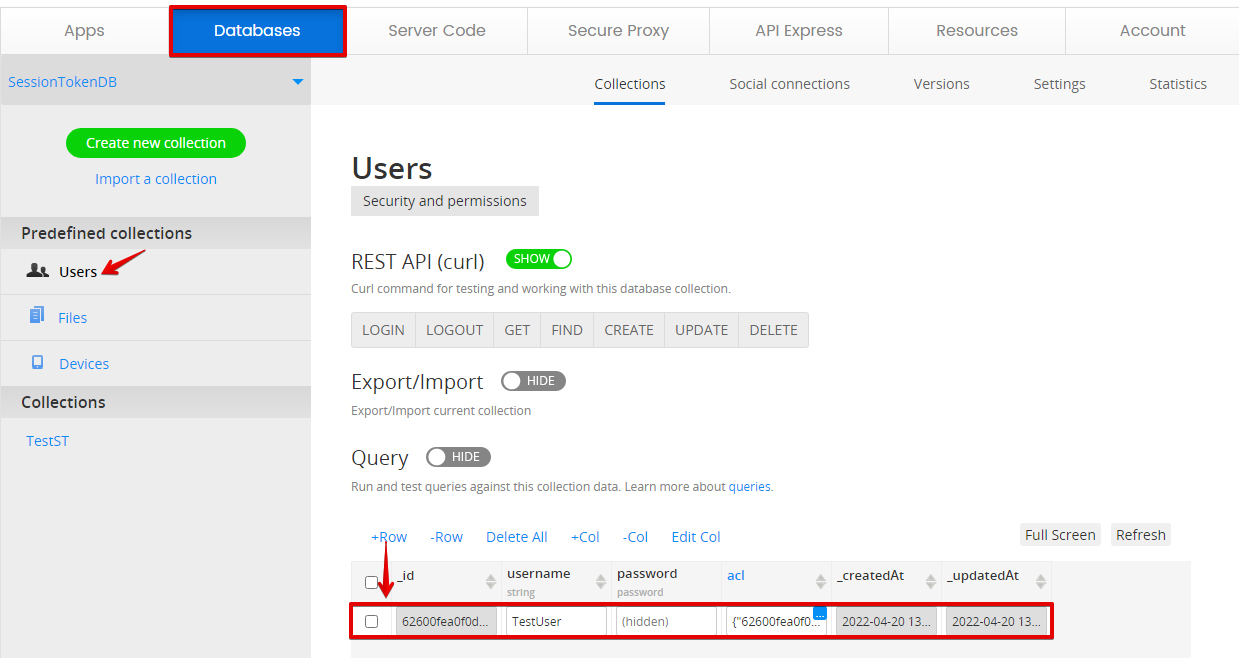
- Switch to the predefined Users collection and click +Row to add a record about a new database user, TestUser. Also, provide any password you like (for example, 123):
Working with X-Appery-Session-Token
Creating New Ionic App
To create a new Ionic app:
- From the Apps tab, click Create new app.
- Select Blank as the application type, enter an app name, and click Create.
Importing Database Services
To make login possible, we will need to add the corresponding service. First of all, we will need to import it along with the other services, create and list, that will be used in our app.
- When in the app, first, press CREATE NEW >Database Service and select the database we created earlier (SessionTokenDB). Enable the check boxes for the login database user service and create and list collection services and confirm importing them into the project:
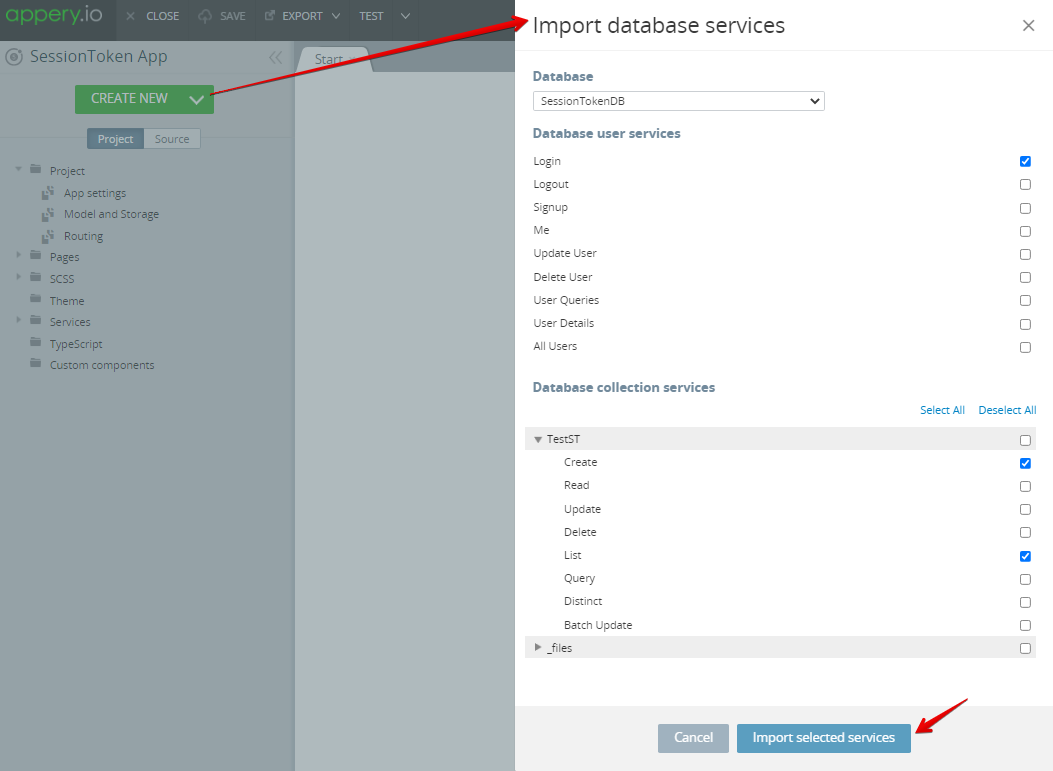
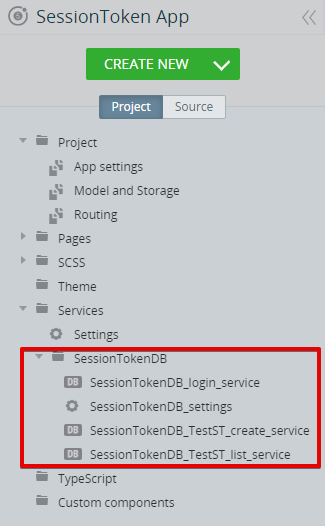
If you now go to the Project tab and unfold the Services > SessionTokenDB folder, you will see that the needed database (login) and TestST collection (create and list) services have been imported into the project:
Obtaining X-Appery-Session-Token
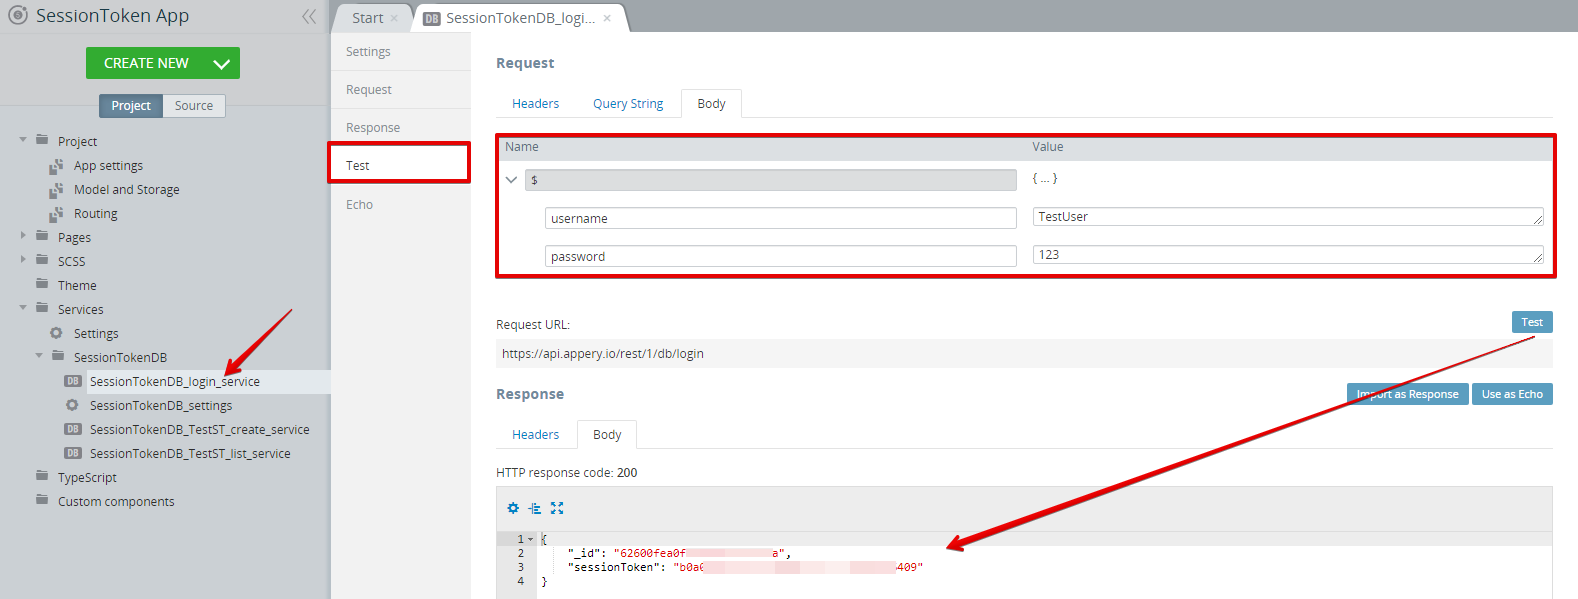
- In the Project view tree, select SessionTokenDB > SessionTokenDB_login_service and open its Test tab.
- In the Request > Body section, enter the username (TestUser) and password (123) values (the credentials defined in this step), and click Test. The response you get will contain the record id and its sessionToken value (we will need it later):
- Open the Model and Storage tab and add a Storage variable:
tokenof String type:

Obtaining X-Appery-Session-Token from Server CodeThe sessionToken value can also be obtained from under the Server Code > Script > Script parameters tab.
Please check this link to learn how to do it.
Tip!Saving the returned sessionToken in browser's local storage is needed for accessing the user information in subsequent app requests via the imported services.
Creating App UI and Defining login and create Services
- Now, go to the Screen1DATA panel, select SessionTokenDB_login_service from the datasource drop-down, and click the Add button:

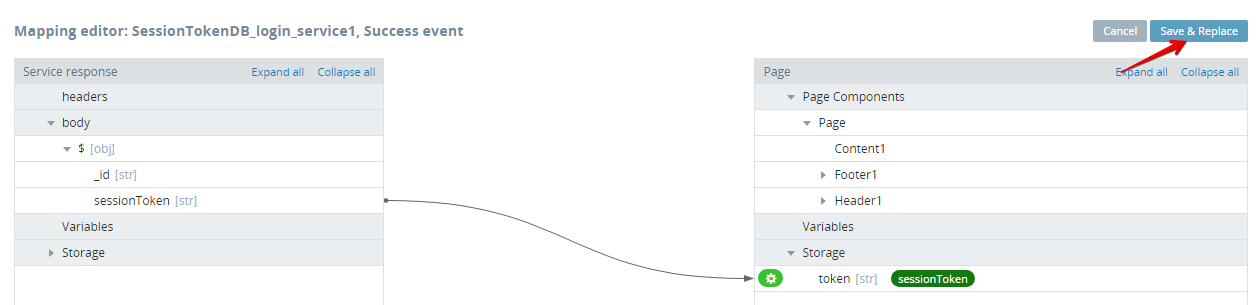
- Click the service Success > Mapping button, then create the following mapping and click Save & Replace to save your work:
Now, when the database service that manages user login is defined, we can proceed with setting the TestST collection services, we imported into the project:
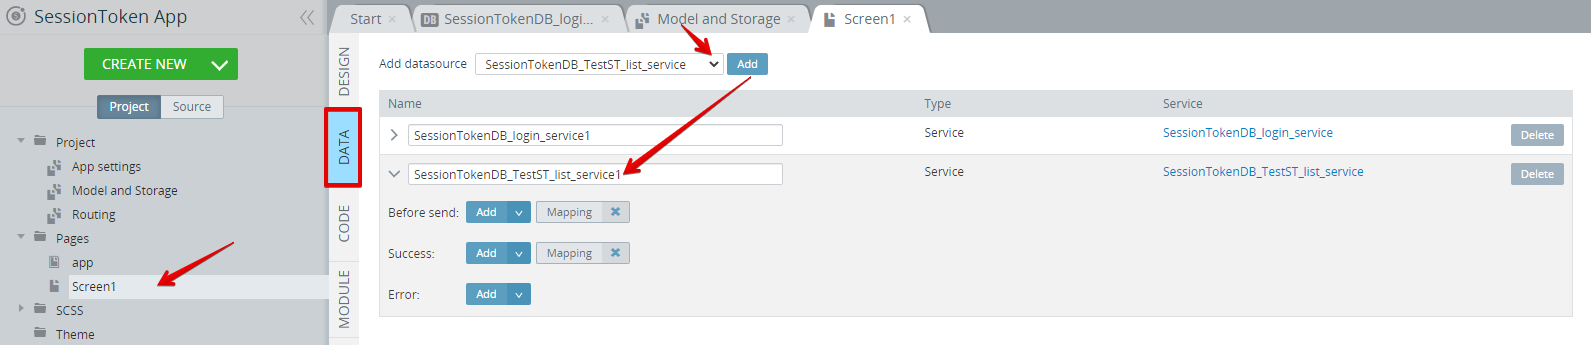
- Under the page DATA panel, select the SessionTokenDB_TestST_list_service_service from the datasource drop-down, and click the Add button:
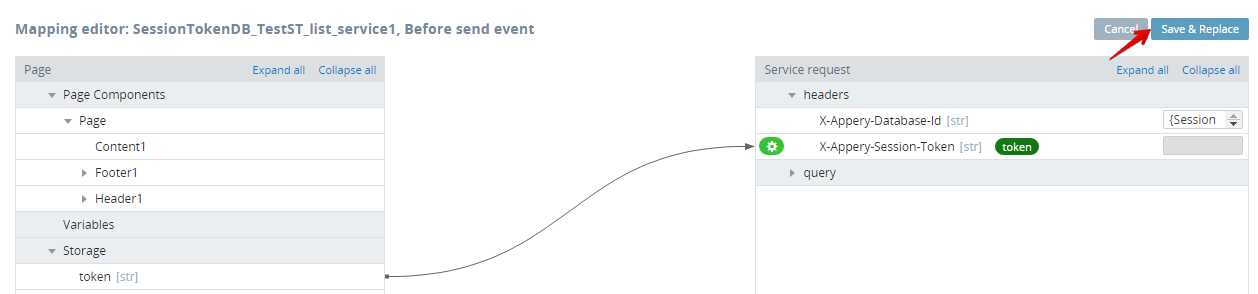
- Now, create the following mapping for the service Before send event and save it:
- Now, open the SessionTokenDB_login_service (see this section) and copy the X-Appery-Session-Token value to clipboard.
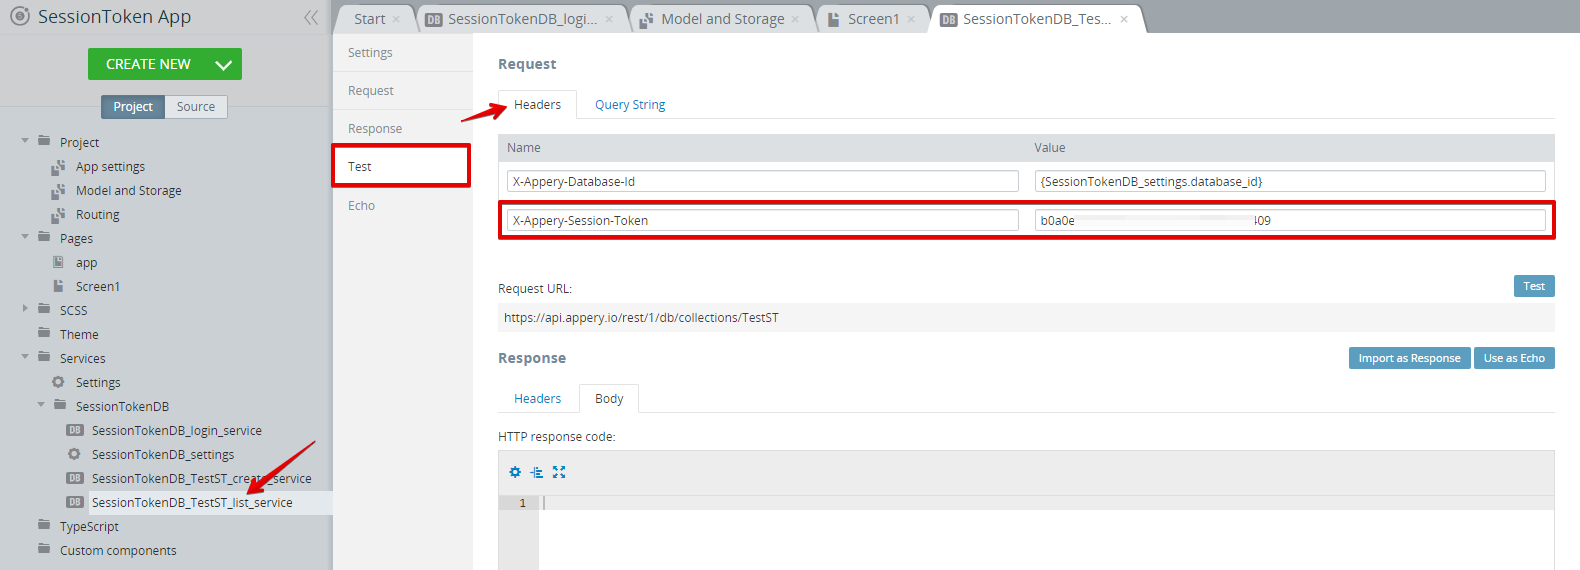
- Go to SessionTokenDB_TestST_list_service and open its Test > Request >Headers tab and paste the copied session token:
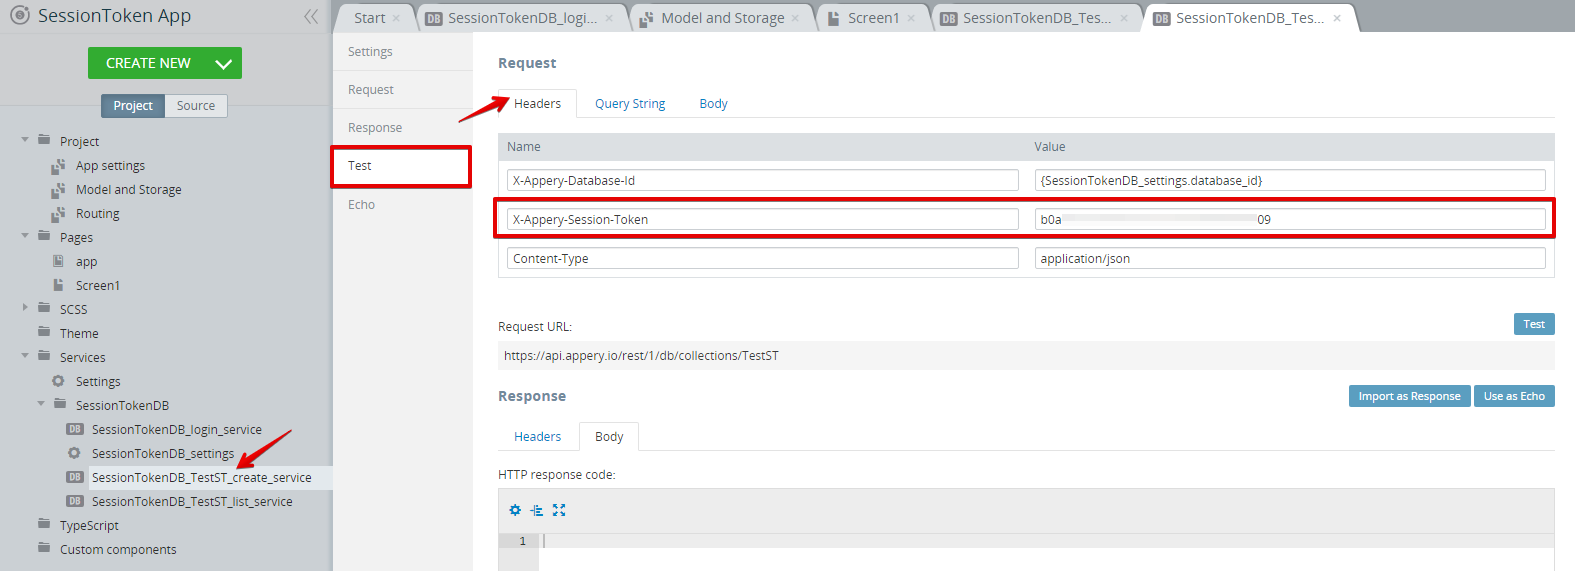
- Repeat the previous step for SessionTokenDB_TestST_create_service:
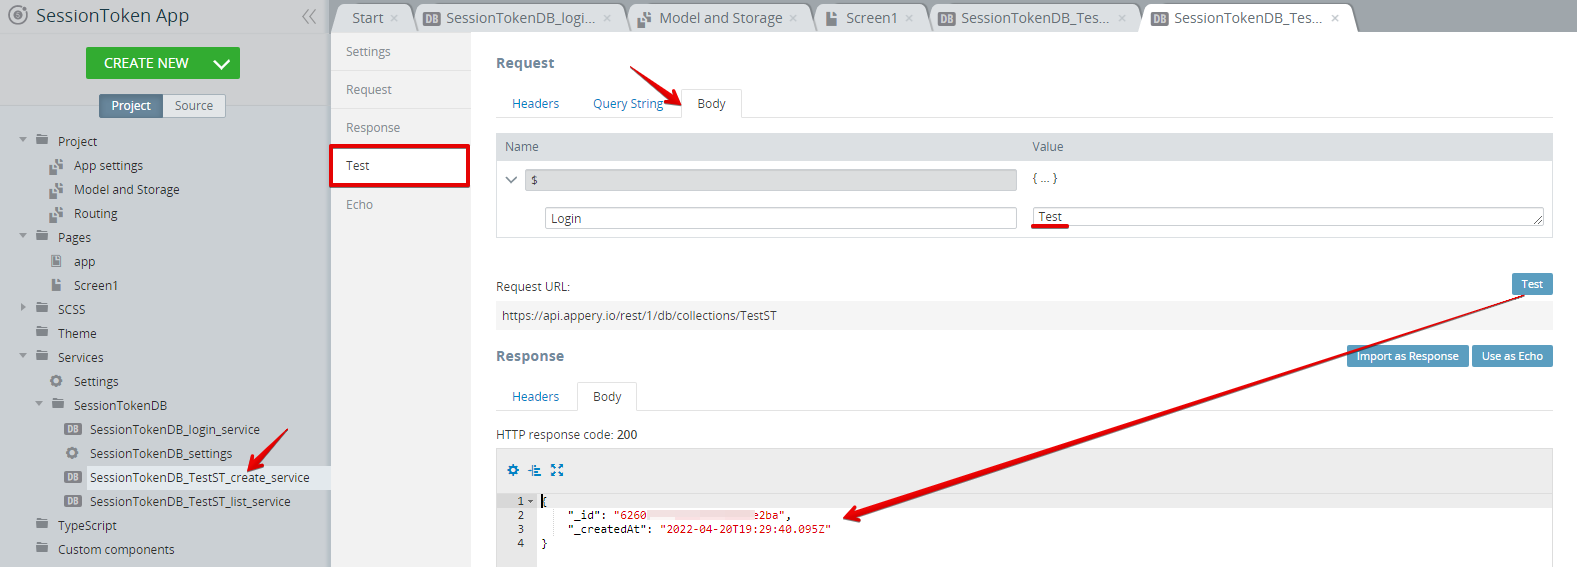
If you now switch to the service Body tab, enter some test data, and click Save, you will see a new record has been made in the Response section:
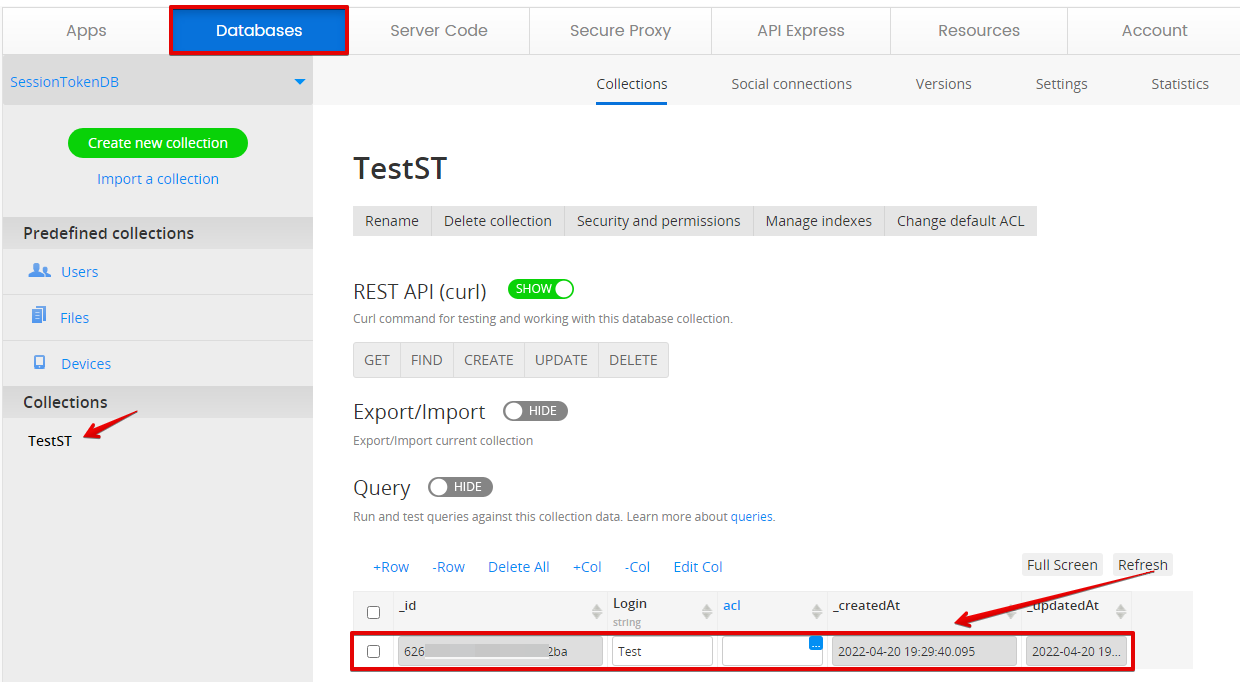
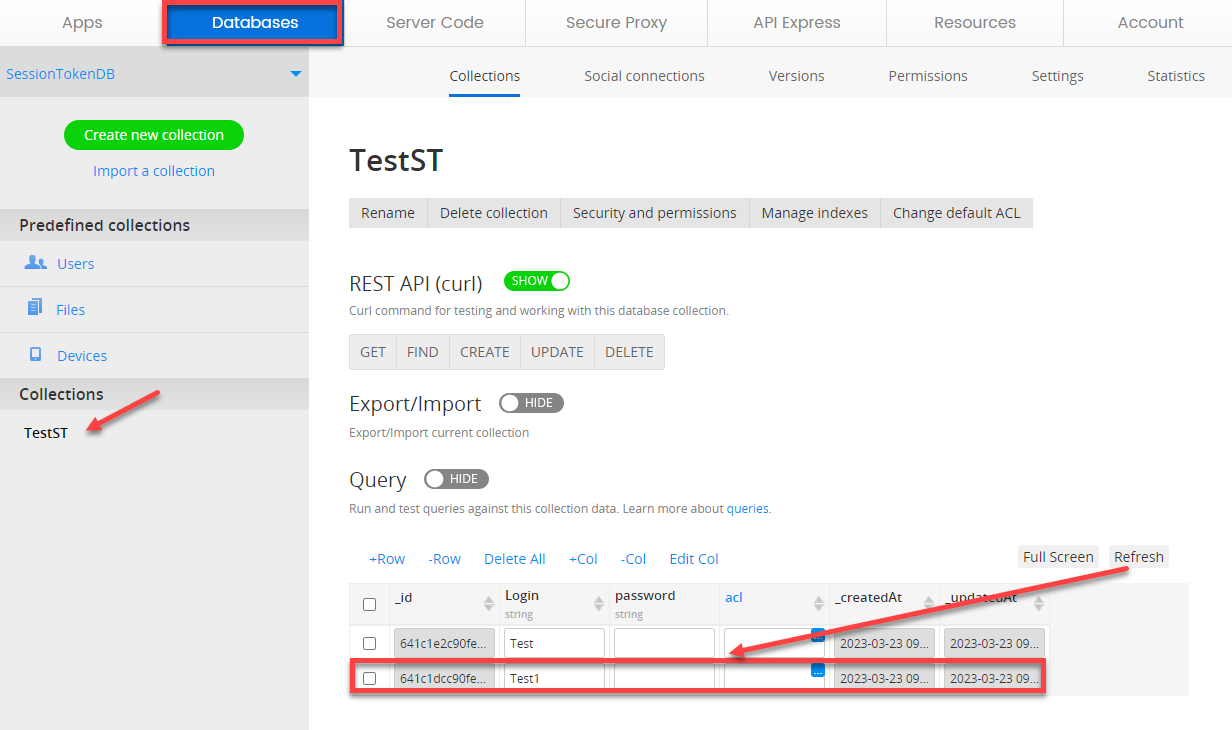
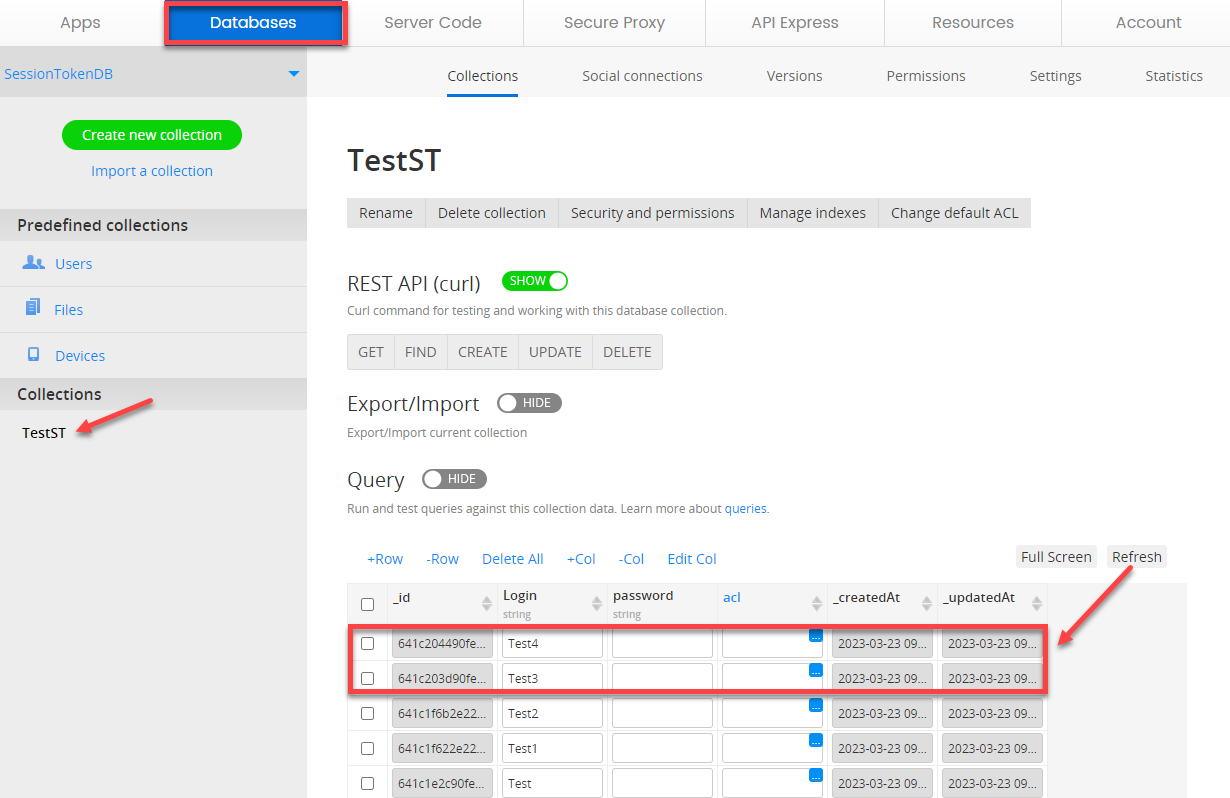
To make sure the record has been added to the TestST collection, go to the linked database and open the TestST collection: the id, Login, and createdAt values should correspond to the values from the service response above:
- Go back to the Screen 1DESIGN panel and add two Input and one the Button components to the editor.
- Select the first Input component and change its Label Text field to User.
- Now, select the other Input component and change its Label Text field to Password. Also, set its Type property to Password.
Tip!It's a good practice to replace the generated components' names with some meaningful names, so you can easily identify the components you are working with. This can be very useful when there are many similar UI components.
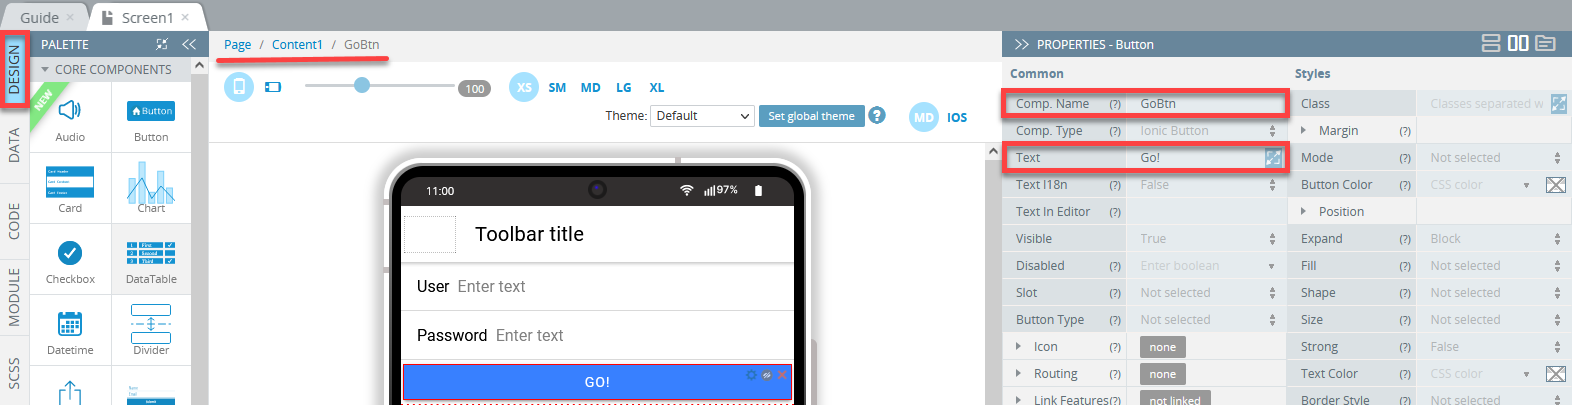
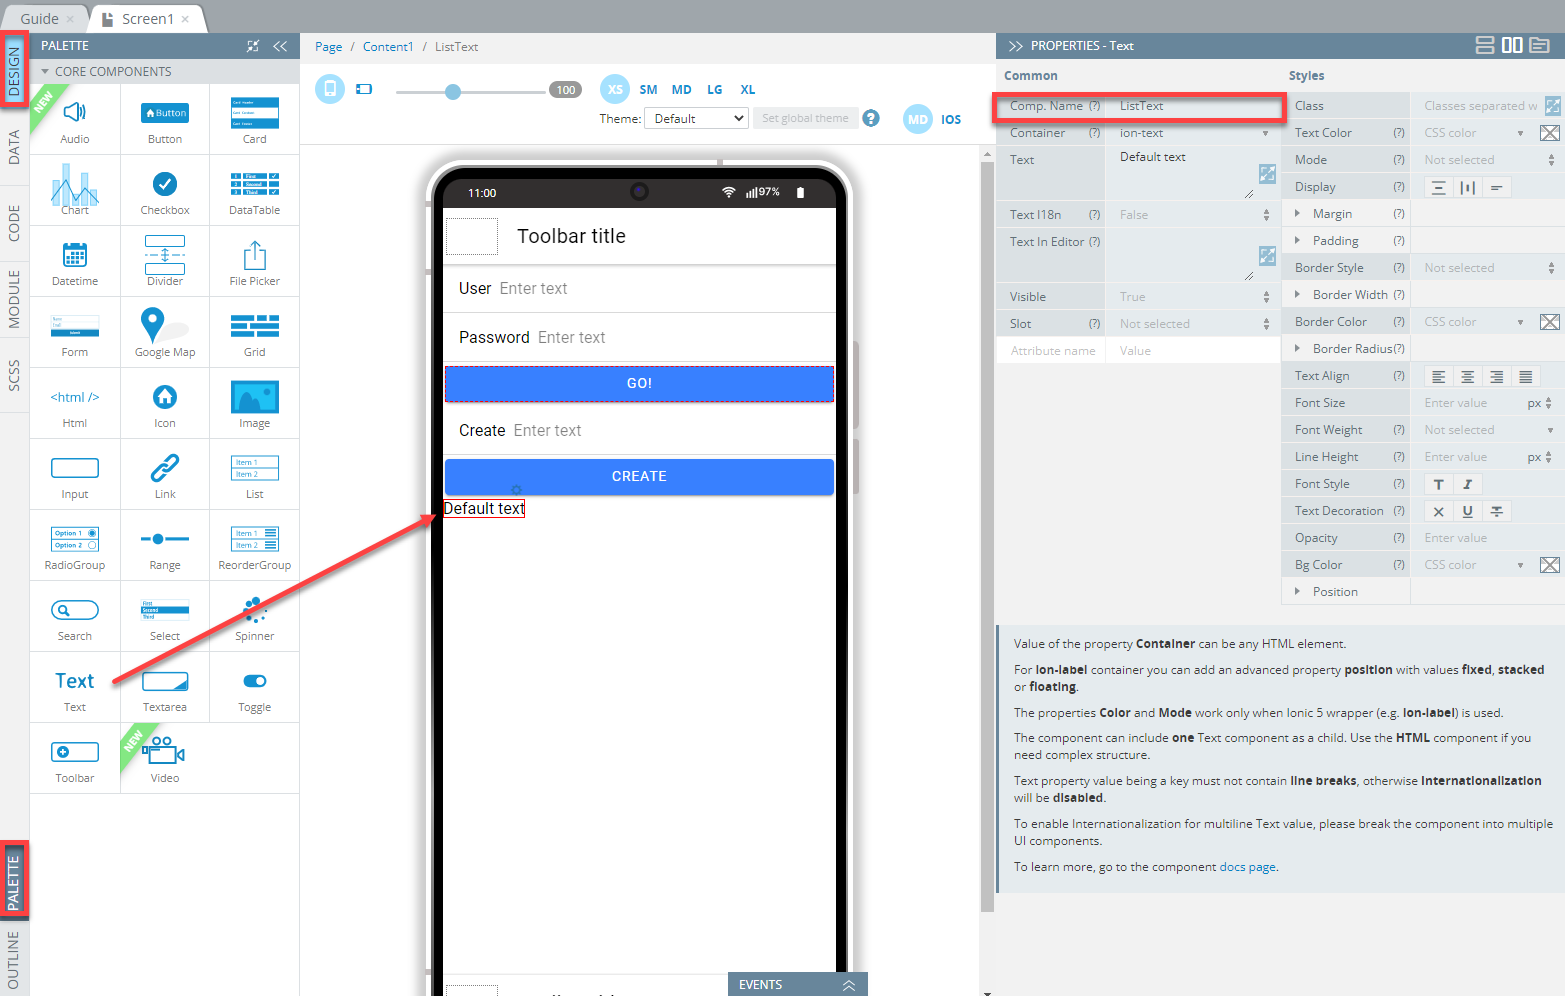
- Next, select the button and change its Text property under the PROPERTIES panel menu to Go! (you might also like to rename its Comp. Name property):
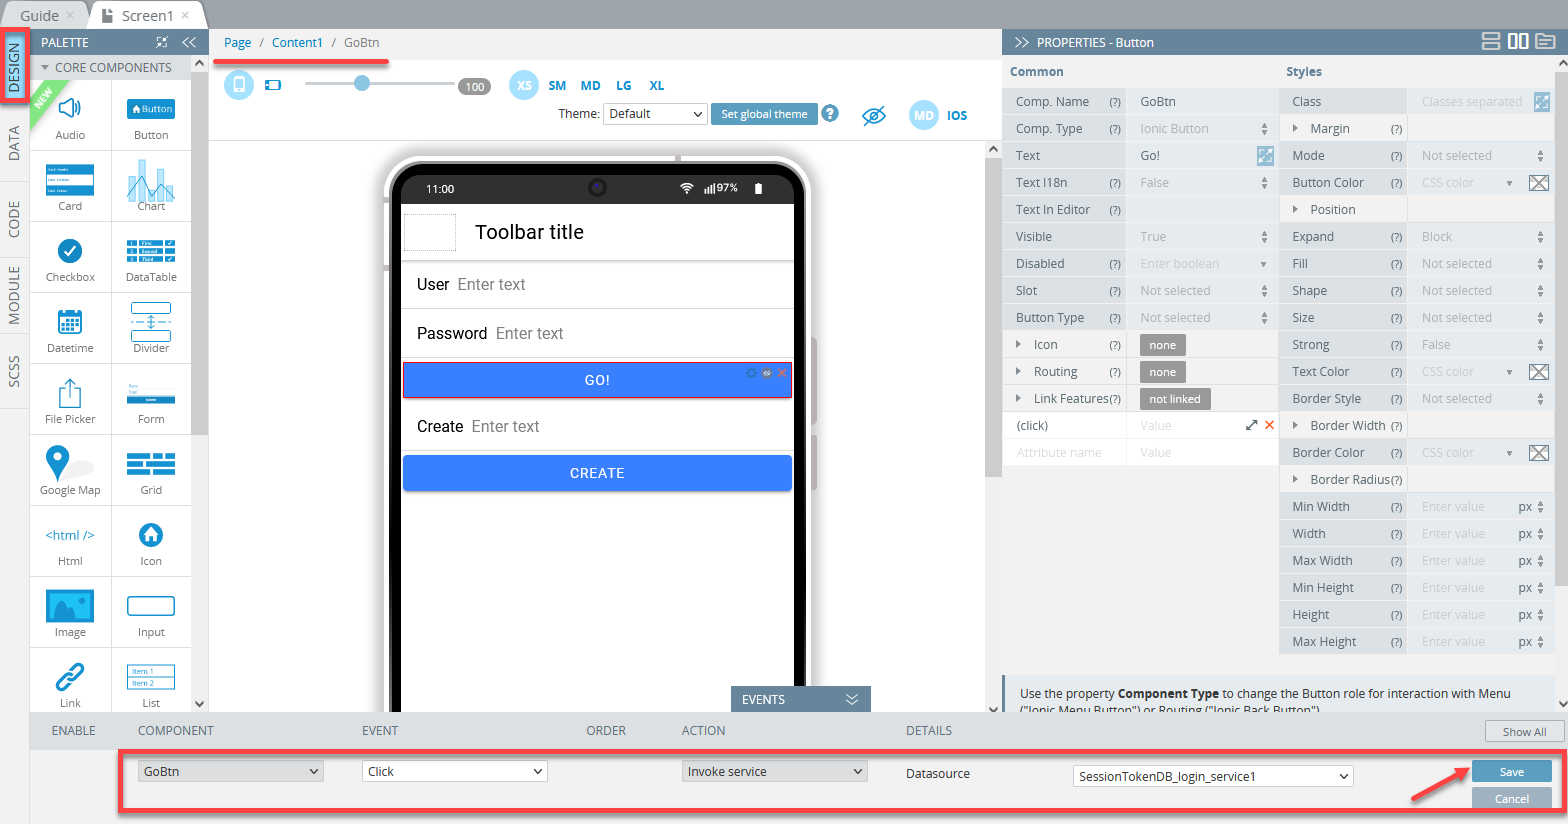
- For the Click event of the Go! button, select the Invoke service action, and then select SessionTokenDB_login_service from the drop-down list of the Datasource field. Click the Save button:
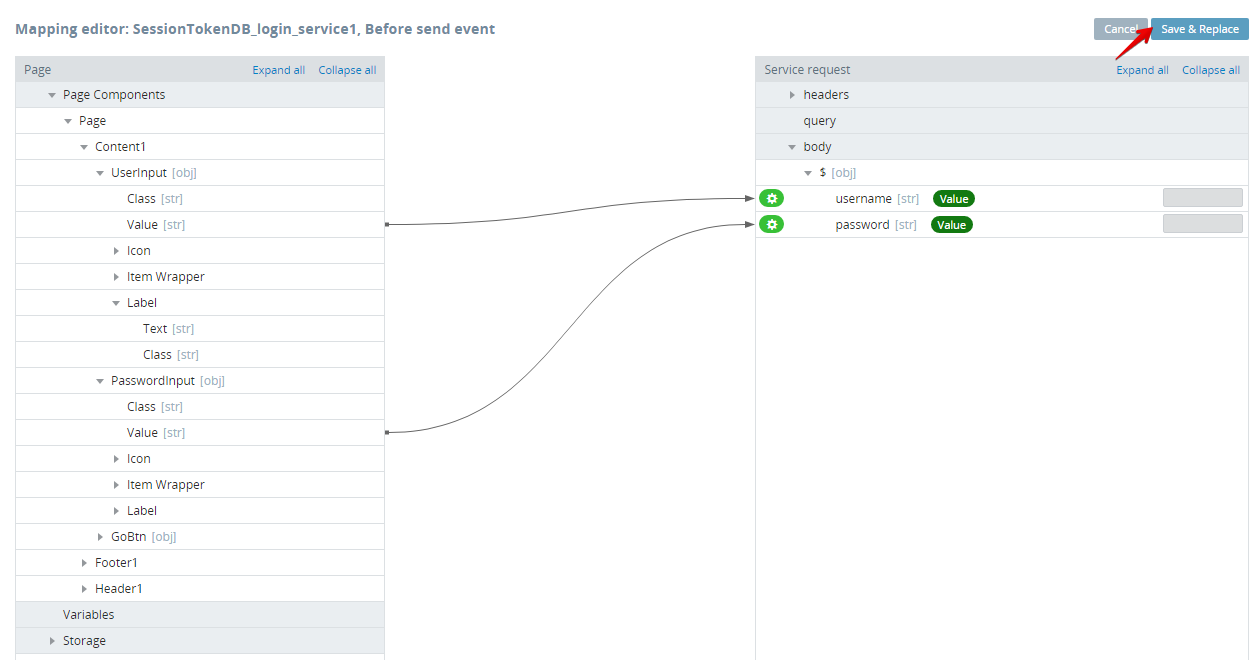
- Under the page DATA panel, create the following SessionTokenDB_login_service > Before send mapping. Then click Save and Replace:
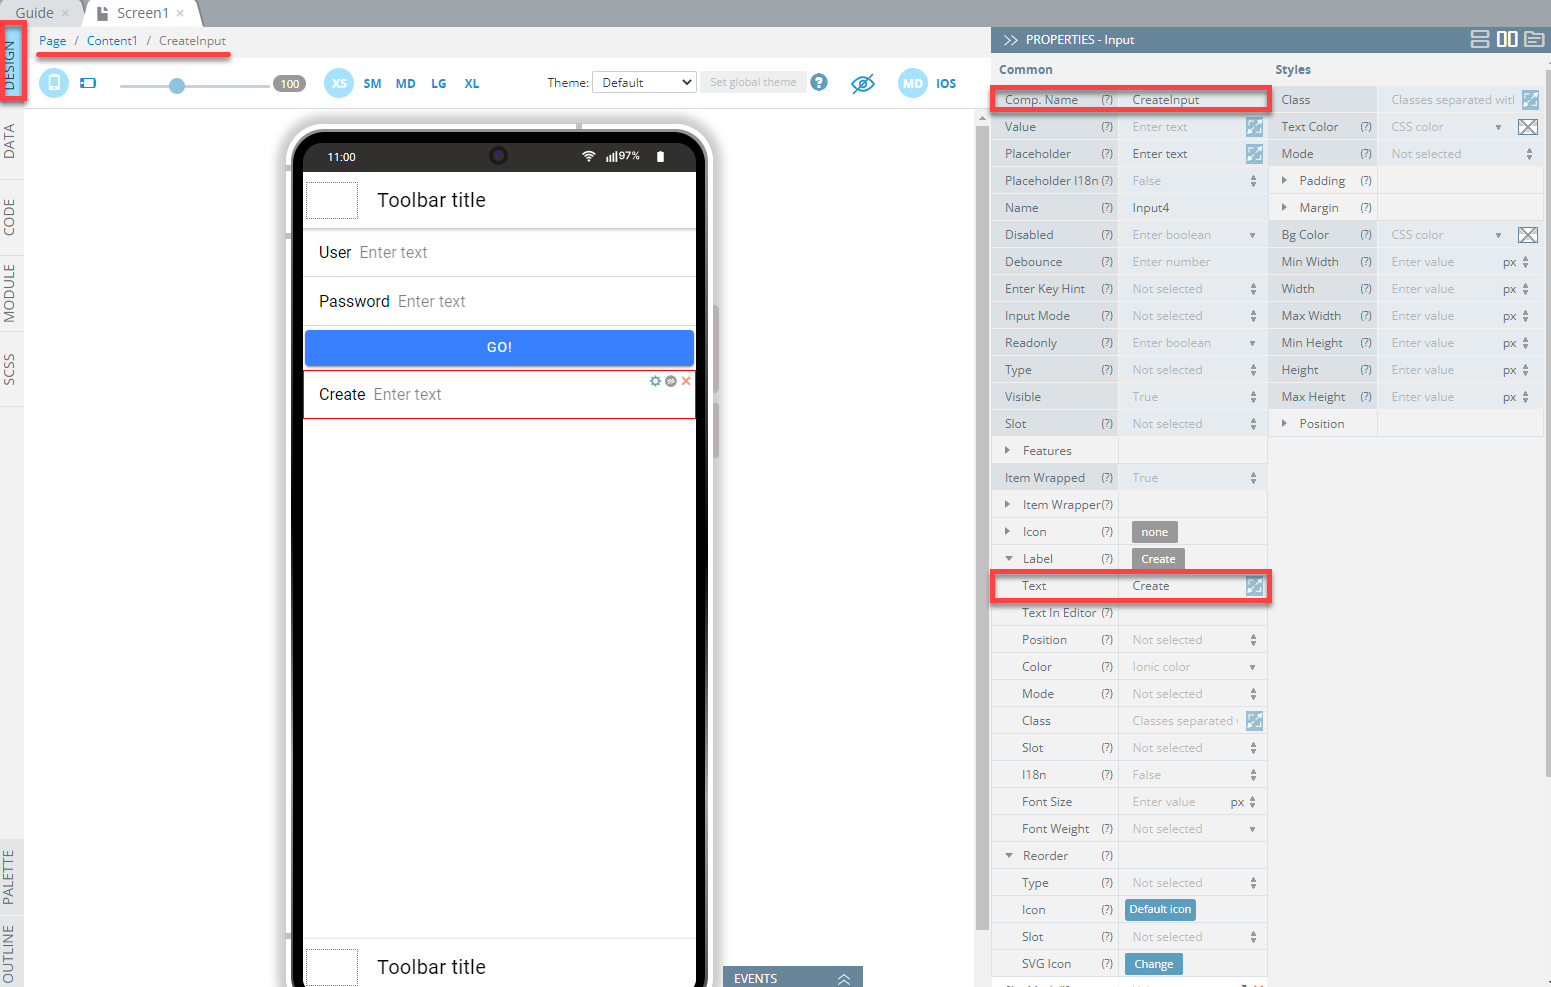
- Go back to the Screen 1DESIGN panel and add one more Input component to the editor and set its Label > Text value to Create (also, you can rename its Comp. Name if you like to get better organized):
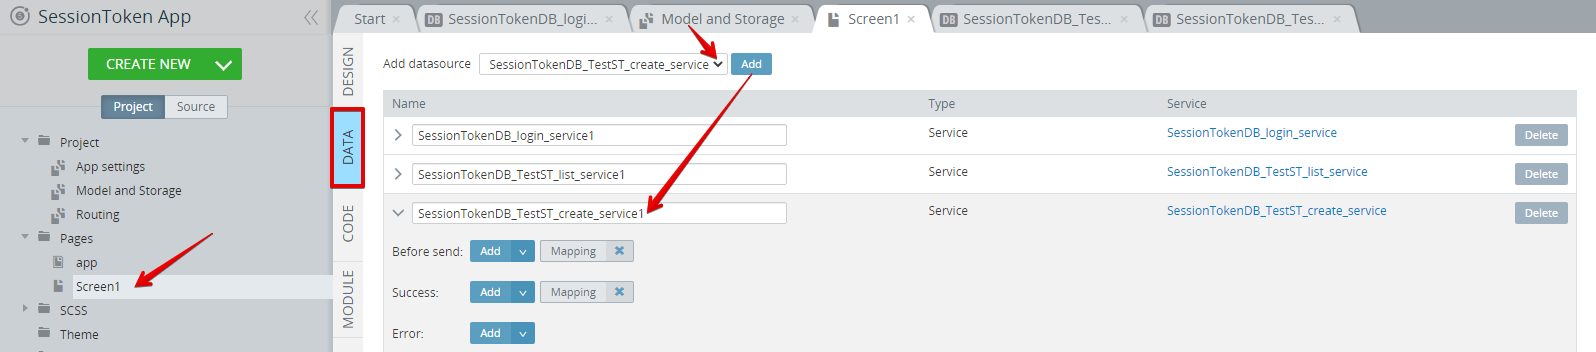
- Next, open the page DATA panel, select SessionTokenDB_TestST_create_service from the datasource drop-down, and click the Add button:
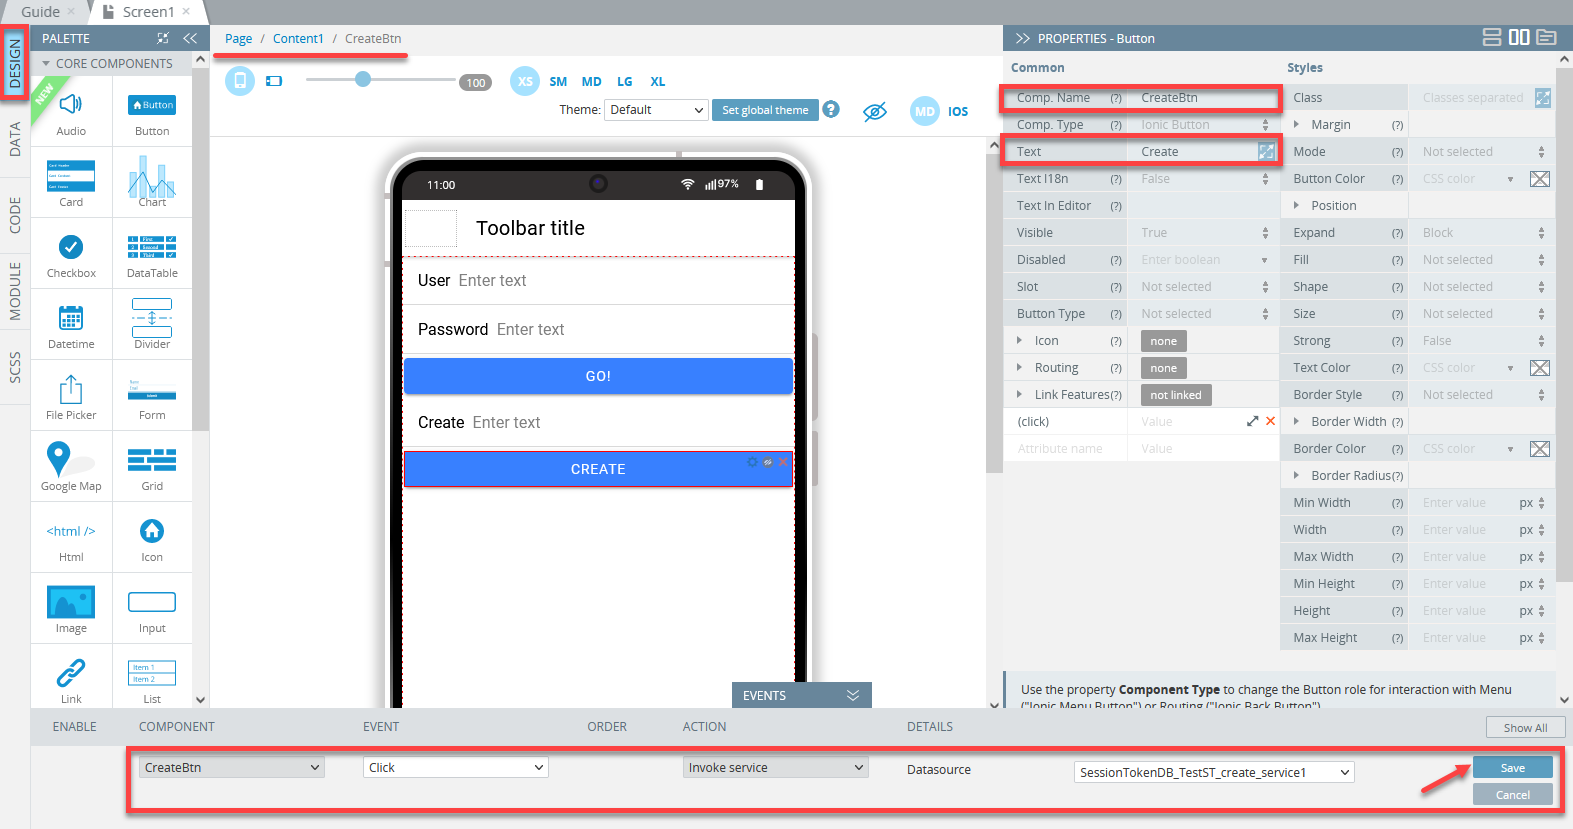
- Go to the page DESIGN panel and add one more Button, name it CreateBtn, add Text = *Create, and define it with the following Click event (Invoke service action and SessionTokenDB_TestST_create_service we just added). Don't forget to save your work:
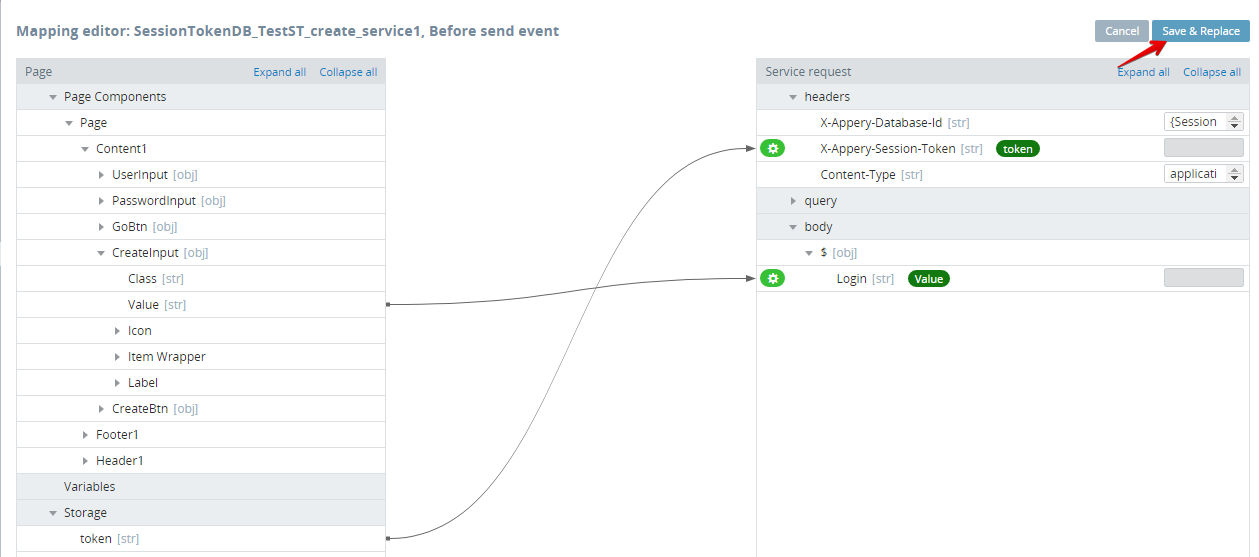
- Next, open the page DATA panel, select the SessionTokenDB_TestST_create_service > Before send > Mapping button, create the following mapping and click Save & Replace:
Testing login, create Functionality
Click the SAVE and then TEST buttons in the App BuilderToolbar to open the app in preview.
First, enter the user login credentials (defined in this section), then click the Go! button to see 200 code with the returned sessionToken value:

Now, enter some test data into the Create input and click the Create button to see the response about the newly created collection entry:

Now, click the Appery.io Database link in the App BuilderToolbar and go to the linked database and open its custom TestST collection to make sure the returned data match the collection data:
There is one more thing we can do to get the collection records right on the app screen: to add the *list service to the app.
Defining list Service
To define the list service functionality (the service has already been imported in this step):
- First, add the Text component to the screen:
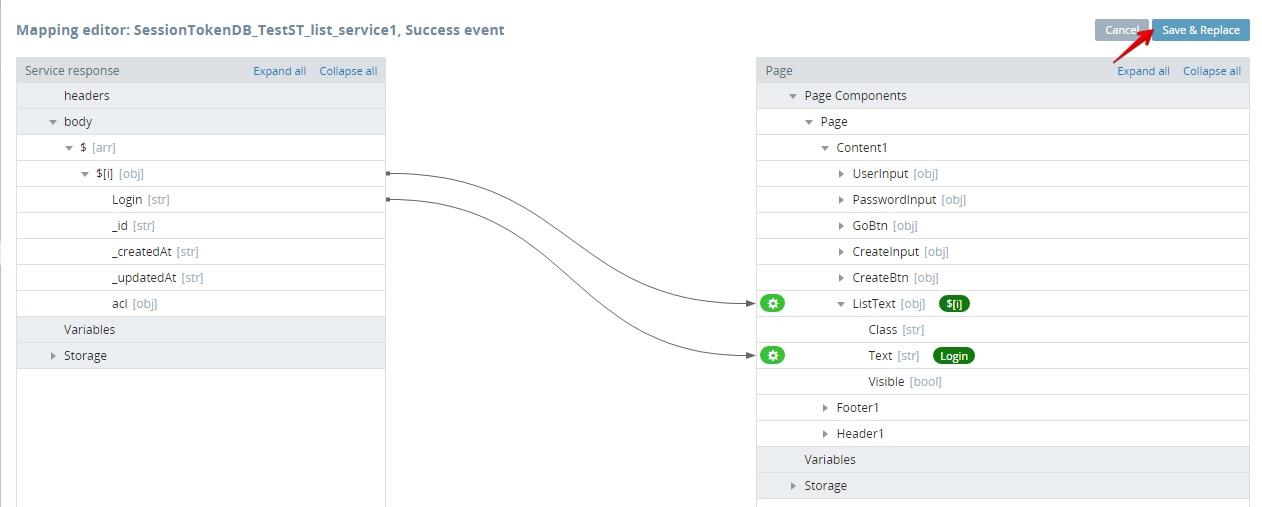
- No, go to the DATA panel and create the SessionTokenDB_TestST_list_service1 Success mapping like this:
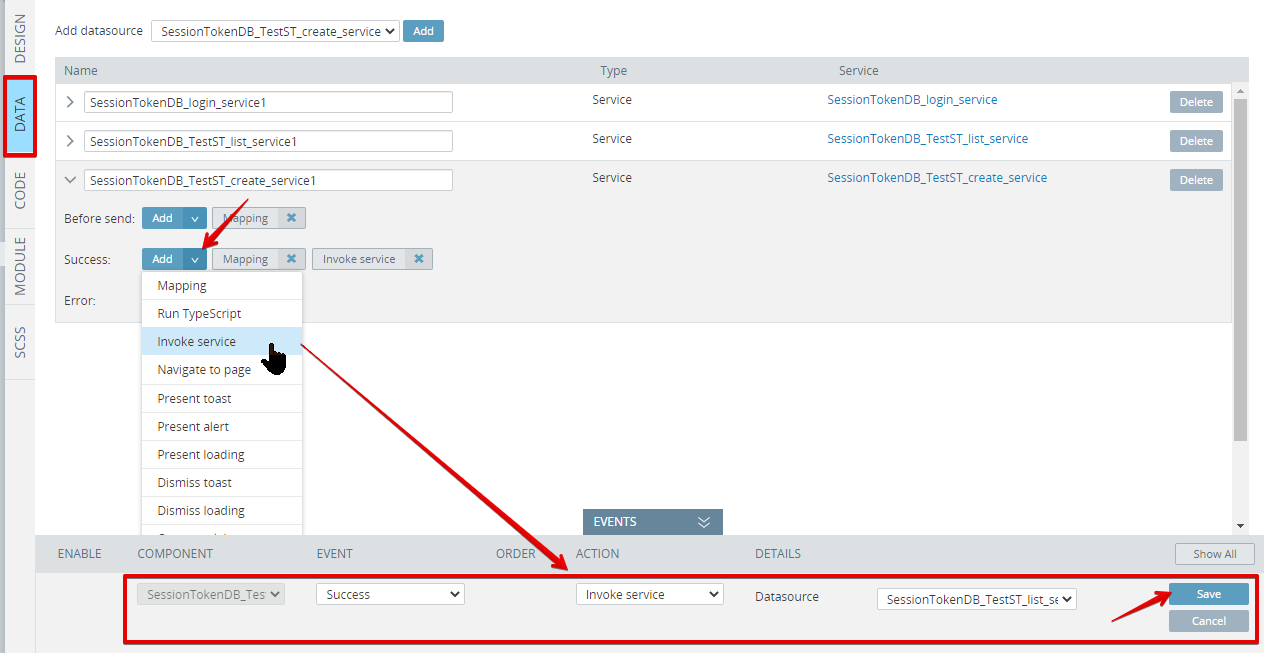
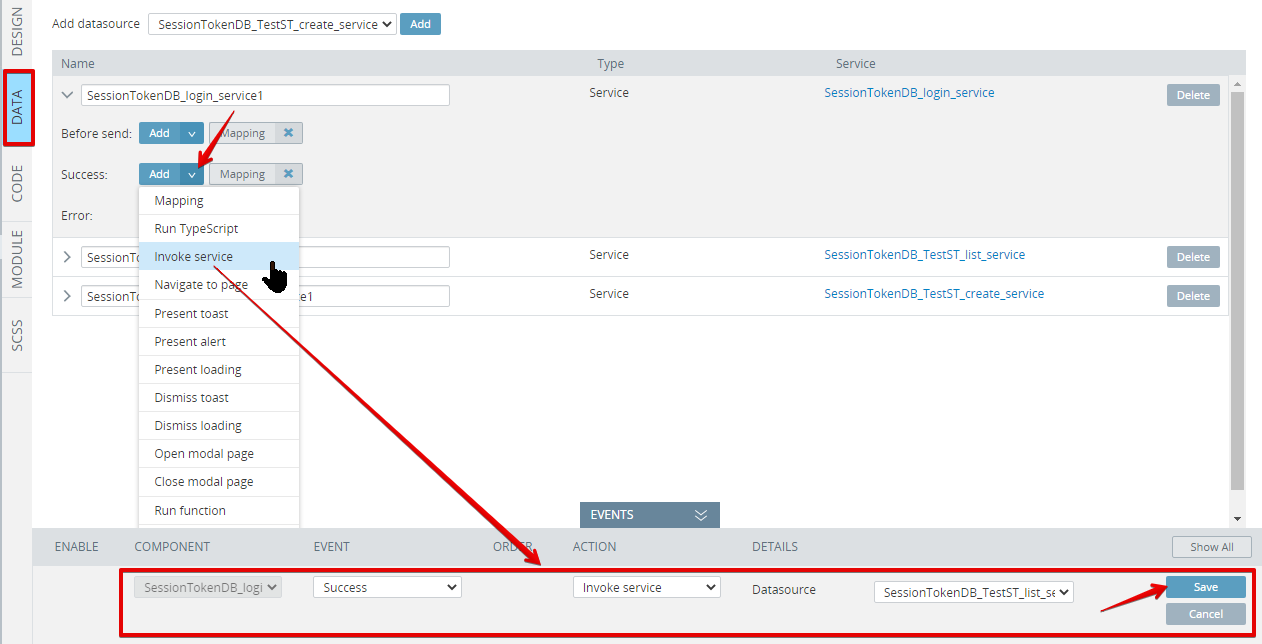
- Also, to define the service Invoke service action, click the Add button of the Success service, and then set the SessionTokenDB_TestST_list_service value from the drop-down of the Datasource field. Click the Save button:
- Now, switch to the SessionTokenDB_TestST_login_service and add the Invoke service action to its Success event with selecting the same SessionTokenDB_TestST_list_service value from the drop-down:
- Finally, open Screen1 DESIGN panel and select the Page component. Then, unfold the EVENTS tab from bottom and set the After page showing event defined with the SessionTokenDB_TestST_list_service:
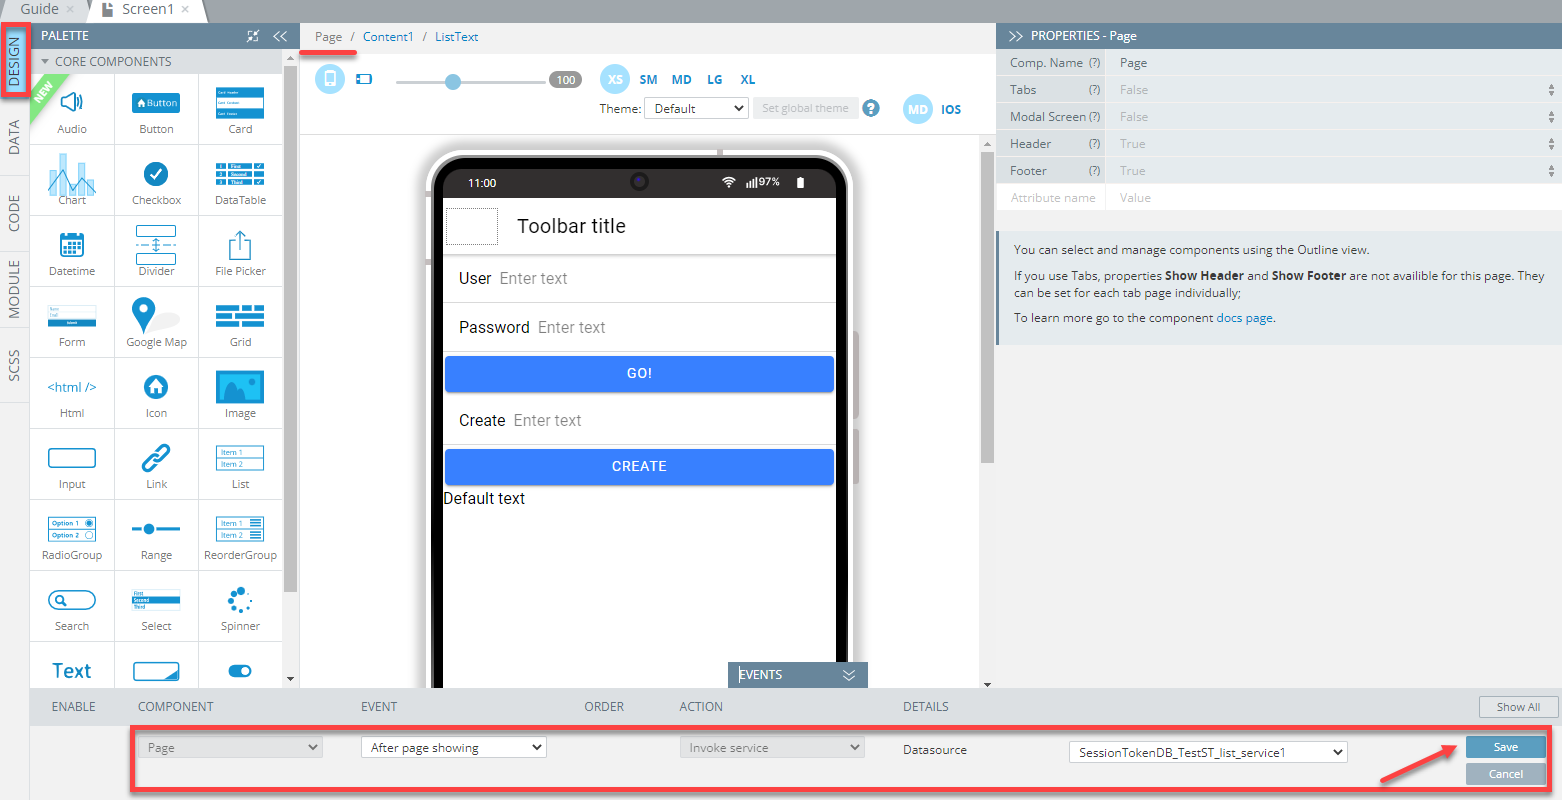
- Save your work.
Testing list Functionality
Click the SAVE and then TEST buttons in the App BuilderToolbar to open the app in preview.
First, let's test if we can now access the list of collection records without the need to check the database collection every time we add a new entry.
First, log in by entering the user login credentials (defined in this section), then click the GO! button to see the full list of collection records:
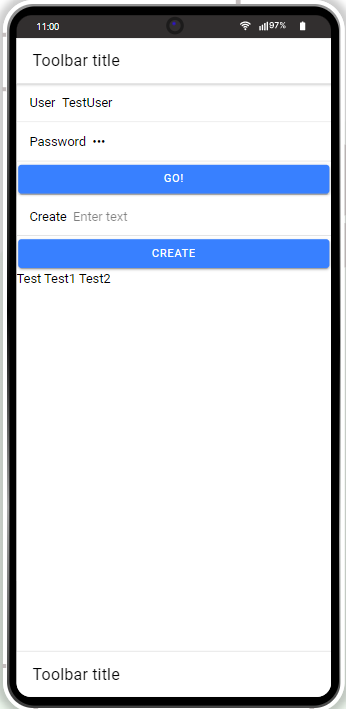
Now, try entering new data into the Create input and then clicking the Create button: the list of records is instantly updated with the new record(s):
If you still need to make sure the records are in the database, click the Appery.io Database link in the App BuilderToolbar to open the linked database and then go to its custom TestST collection to make sure the added entries are there:
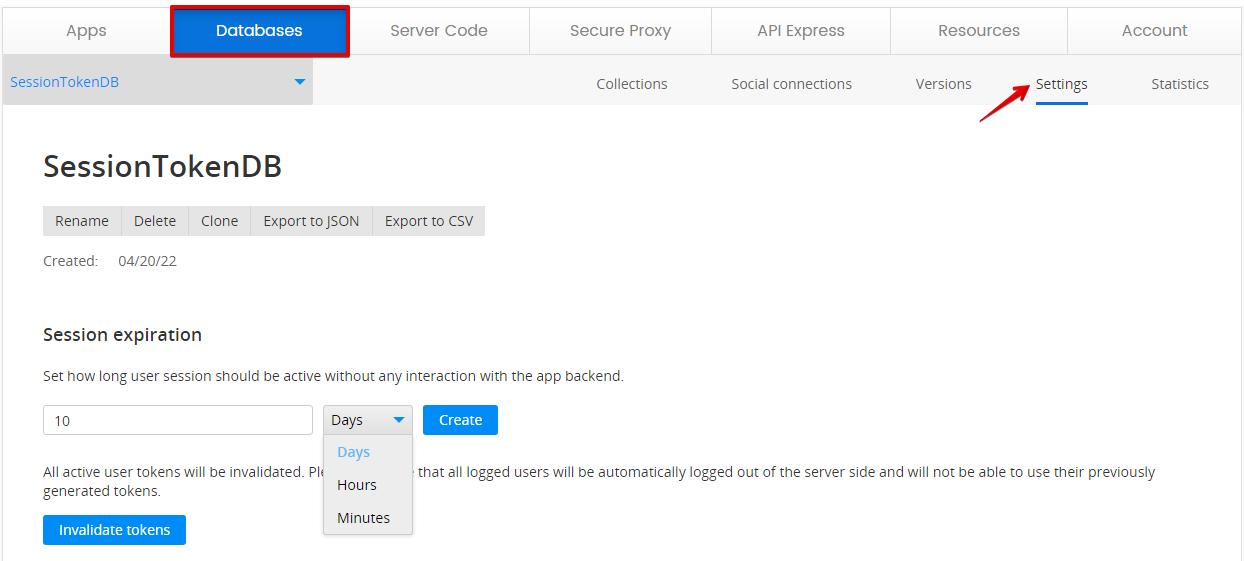
Tip!To change the sessionToken lifetime, go to Databases >Settings and specify the needed session timeout:
Updated about 1 year ago