Part 2. Adding Camera Service
Part 2. Adding Camera Service
In this part, we will demonstrate how to use a device camera and take photos from the app and then upload them to the database. For this, we will use the Appery.io Camera plugin for Ionic apps based on Cordova Camera Plug-in and Ionic Native Camera Plug-in.
Adding Take Photo and Preview Photo Options
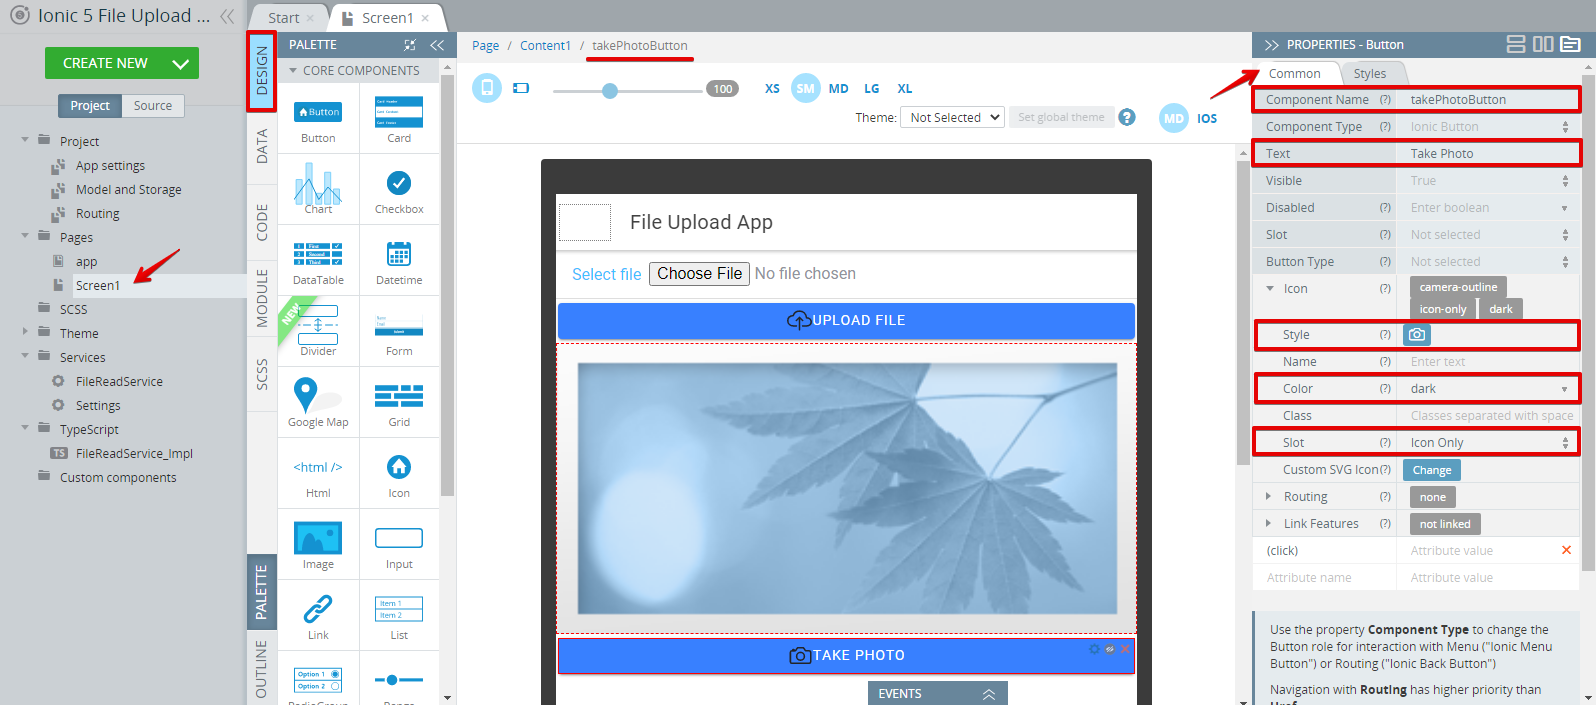
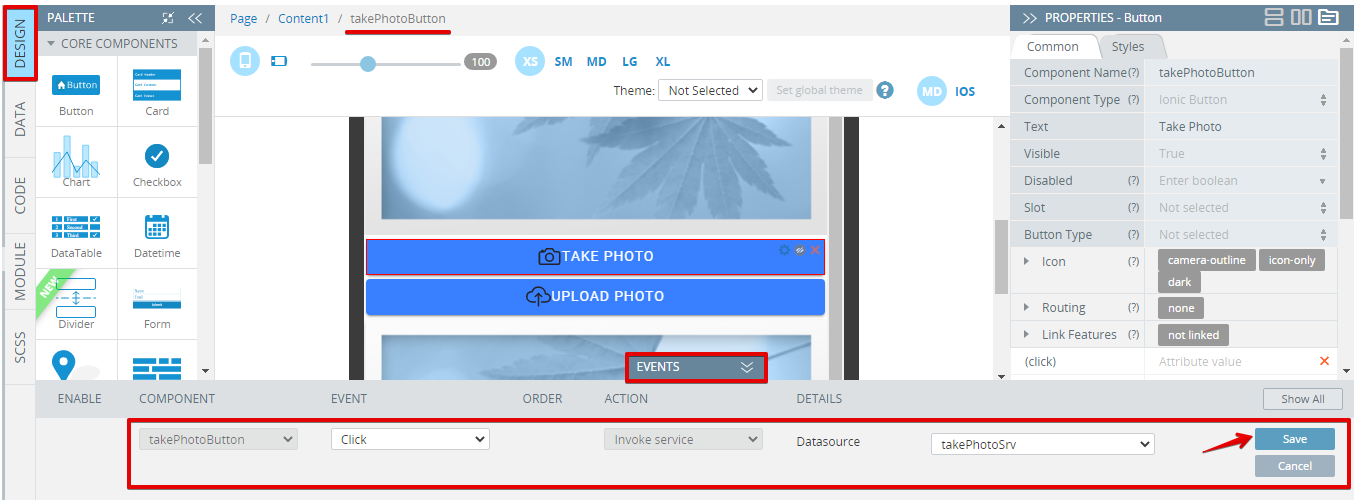
- First of all, let's modify the app UI and add a button that will activate the camera service:
Drop the Button component from PALETTE to the Content area and modify its properties under the Common tab:
- Component Name = takePhotoButton;
- Text = Take Photo;
- Icon > Style = camera-outline (to open the icon selection window click the No icon button);
- Icon > Color = Dark;
- Icon > Slot = Icon Only:
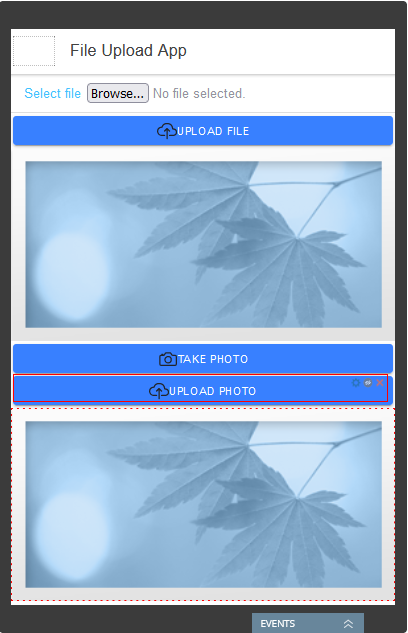
- We will also need another Button component to invoke the photo upload service, so let's add it from PALETTE and set its common properties as follows:
- Component Name = uploadPhotoButton;
- Text = Upload Photo;
- Icon > Style = cloud-upload-outline (to open the icon selection window click the No icon button);
- Icon > Color = Dark;
- Icon > Slot = Icon Only.
- To finish with the page UI, add one more Image component so, drag it from PALETTE and then drop it under the UPLOAD PHOTO button.
When ready, the page should look like this:
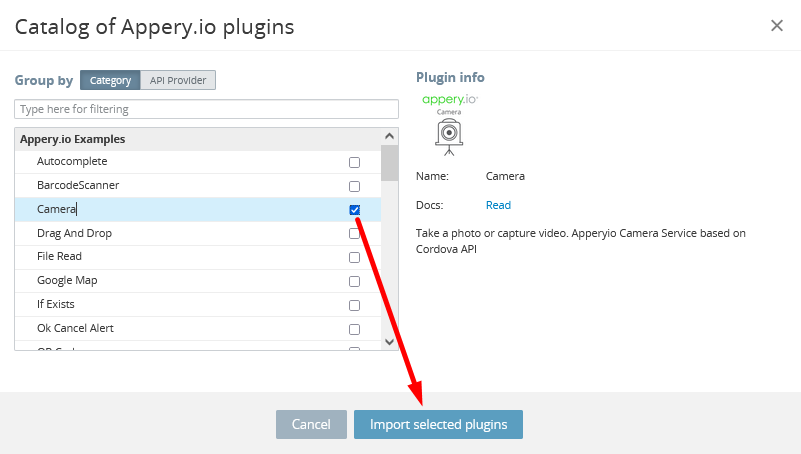
- Now, let's add the camera service to the app: click CREATE NEW > From Plugin, locate the Camera plugin, and import it into your app:
You can now navigate to Project > App settings > Cordova plugins >Core Cordova plugins to make sure that the Camera Cordova plug-in is enabled.
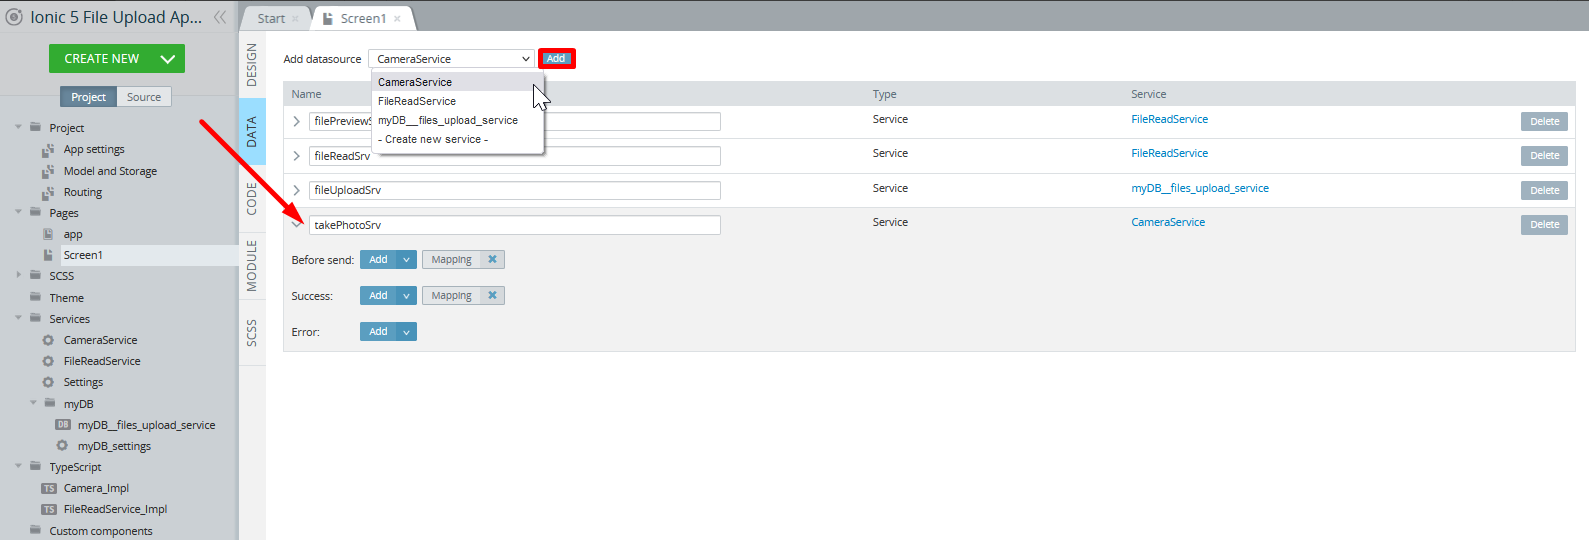
- Open the Screen1DATA panel. The first step is to add a datasource for the Camera service. Select Service > CameraService and click the Add button. Rename the datasource to takePhotoSrv:
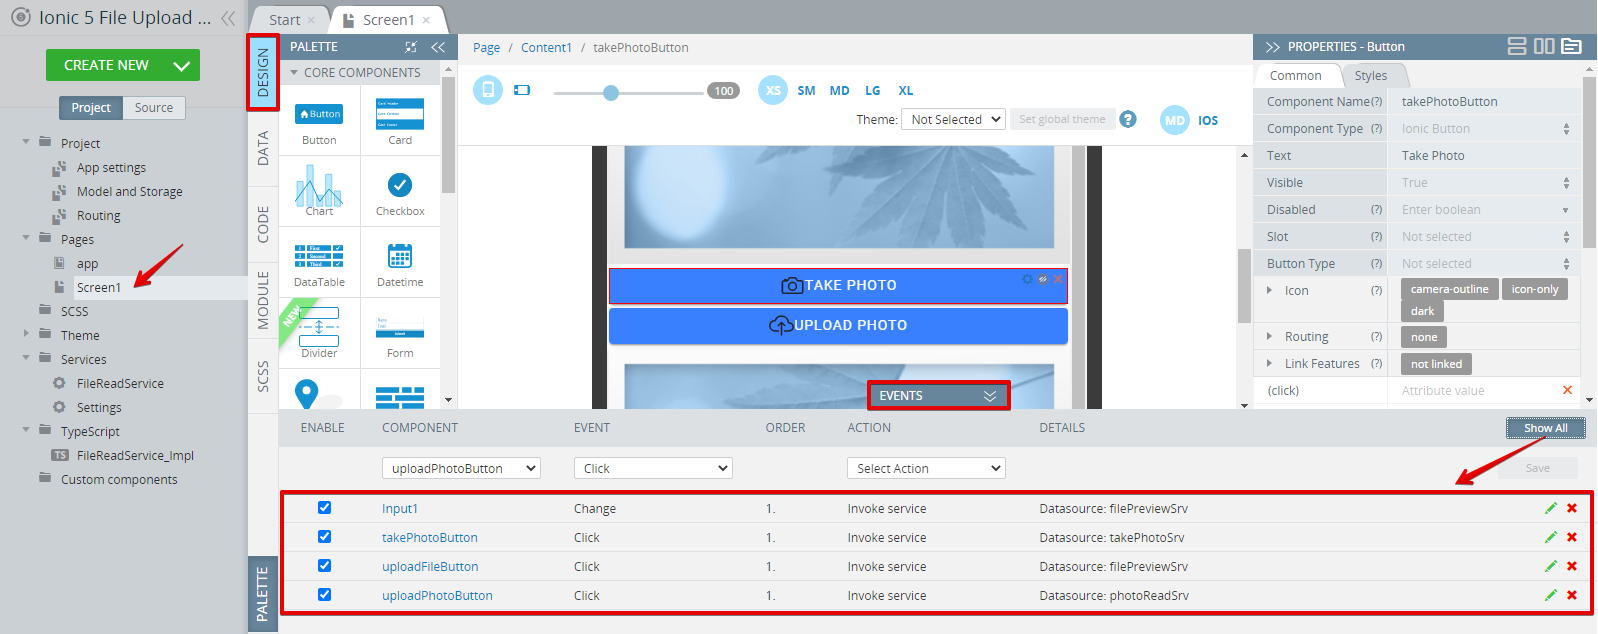
- Switch to the DESIGN panel and unfold the EVENTS tab from the bottom, select the TAKE PHOTO button and, define its Click event with the Invoke service action; for the datasource, select takePhotoSrv from the drop-down list and save:
- Now, you can switch back to the page DATA panel and open the Before send mapping of the takePhotoSrv service to review the right mapping panel. Here, you can set up or edit different camera settings such as quality, camera direction, etc. To do it, click the Expand all link:
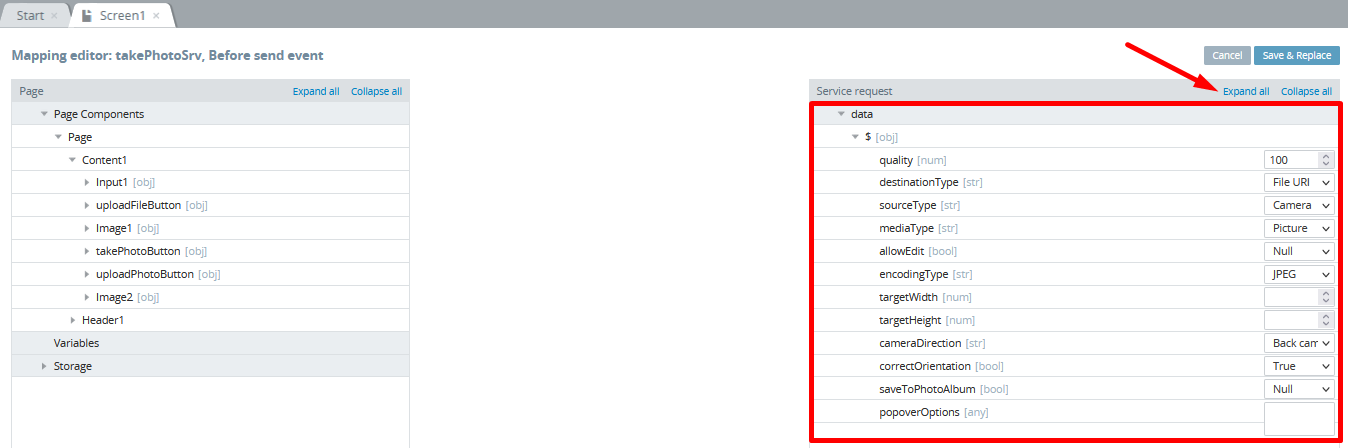
- Click Save & Replace to exit this view.
Adding Photo Upload Option
To save the photo file after the service processed it, we will need to create another variable.
- To do it, open Project > Model and Storage > Storage and add a storage variable
fileURIof type String (for Storage, select Storage):

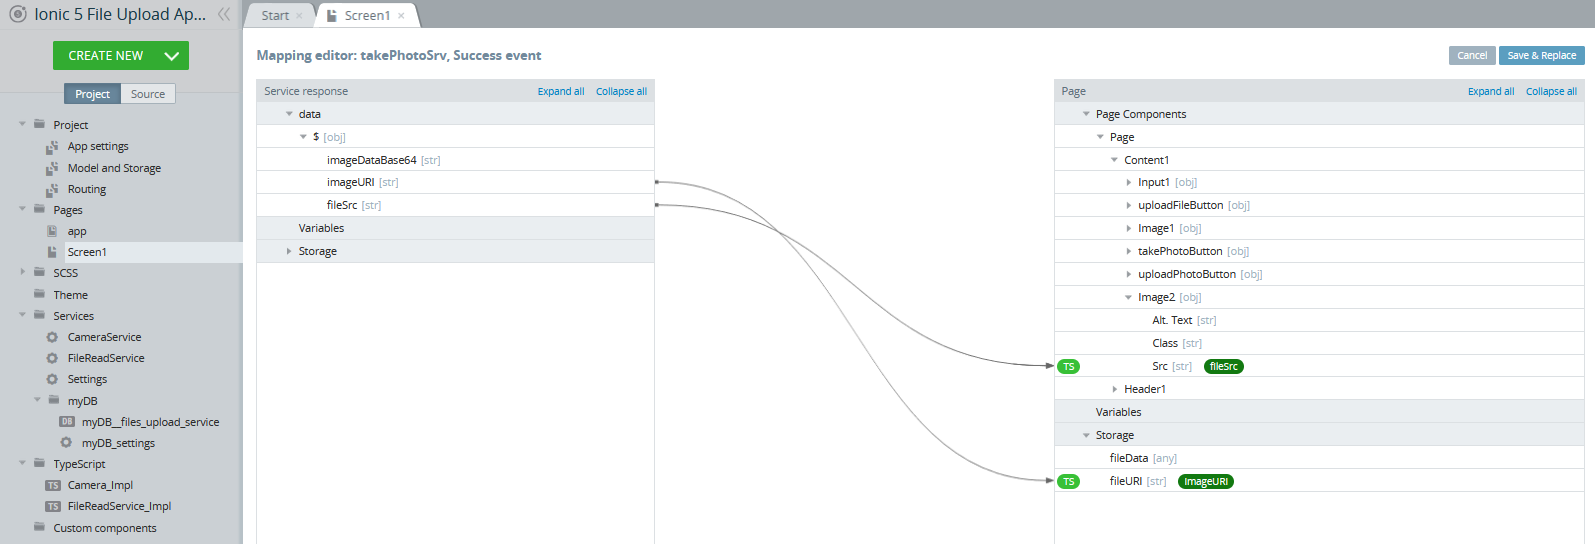
- Next, switch back to the Screen1DATA panel, click the Success mapping button next to the takePhotoSrv service, create the following mapping and save:
Now, when we have the URI of the photo image, we need to read it before it can be uploaded to the database.
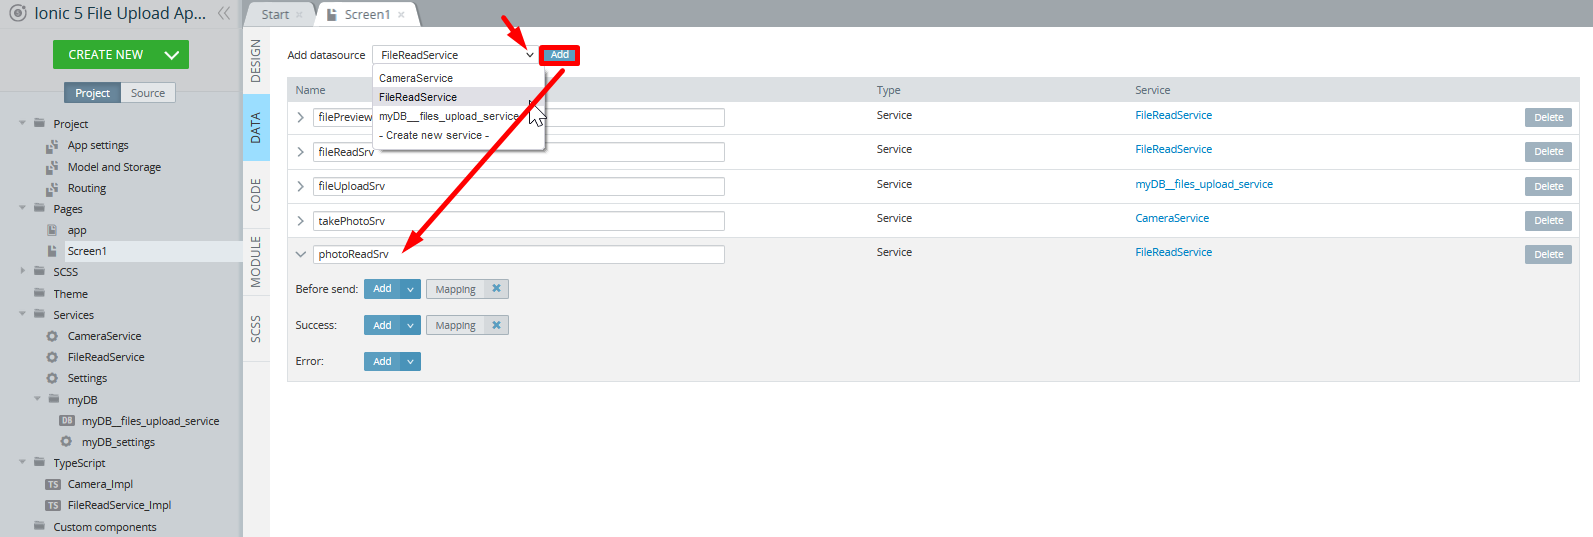
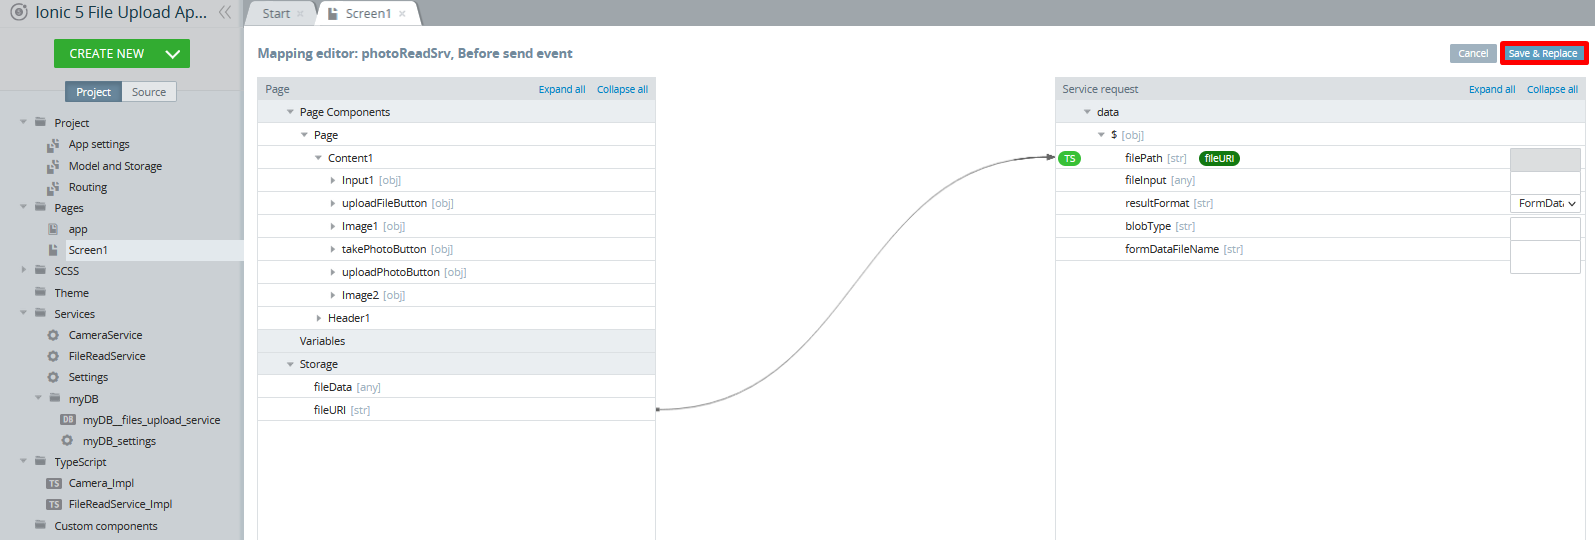
- To add this functionality, in the Screen1DATA panel, select the FileReadService datasource and click Add, then rename the service to photoReadSrv:
- Open the mapping editor for the Before send event, create the following mapping and click Save & Replace:
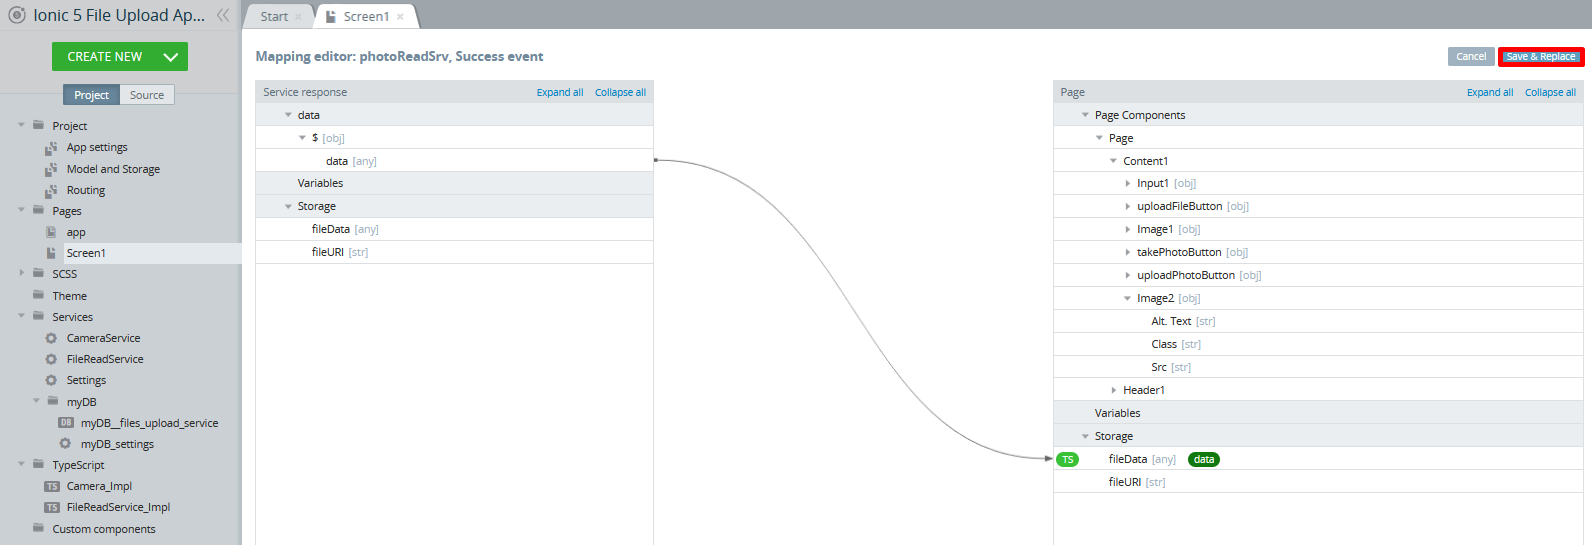
- The service Success mapping should be defined as follows:
To add the photo upload functionality, we will invoke the same upload service used for uploading files.
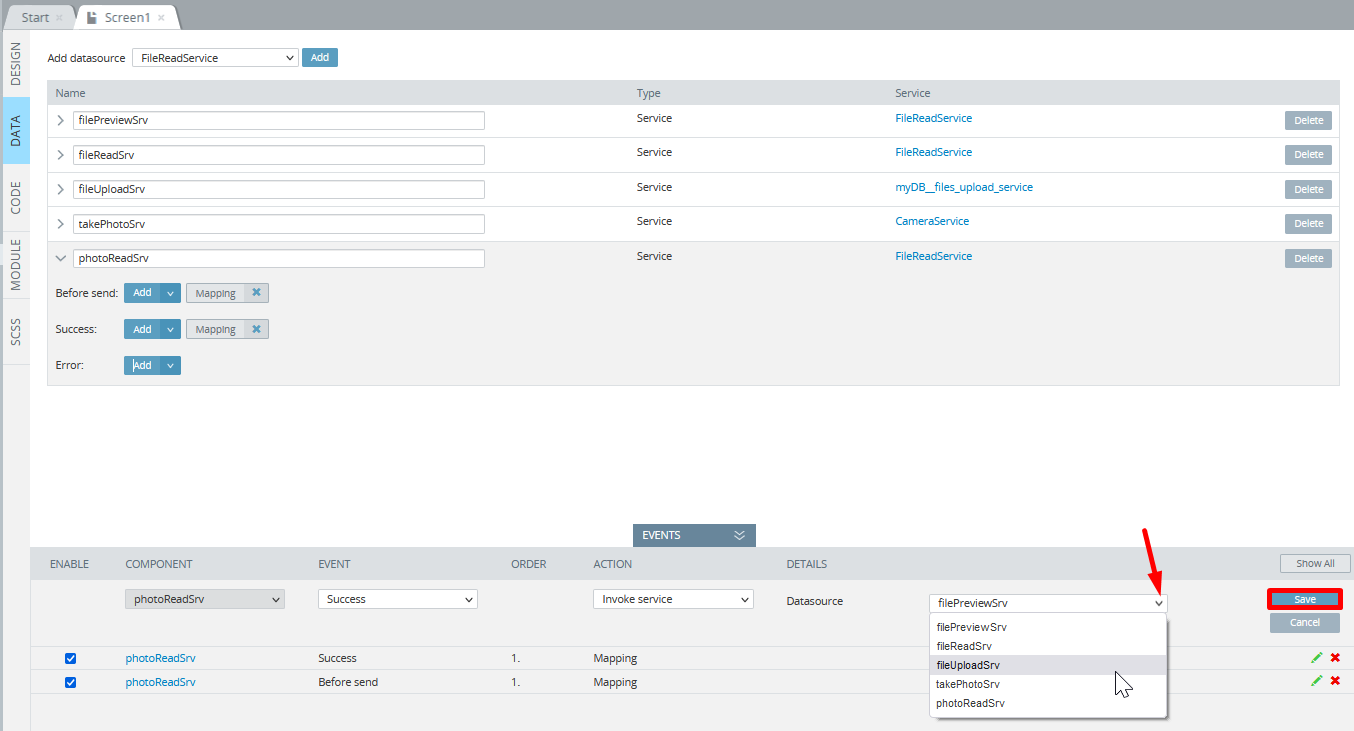
- Click the arrow button next to Add of the photoReadSrv service Success and select Invoke service from the actions list:

- Define the event with the fileUploadSrv service and save:
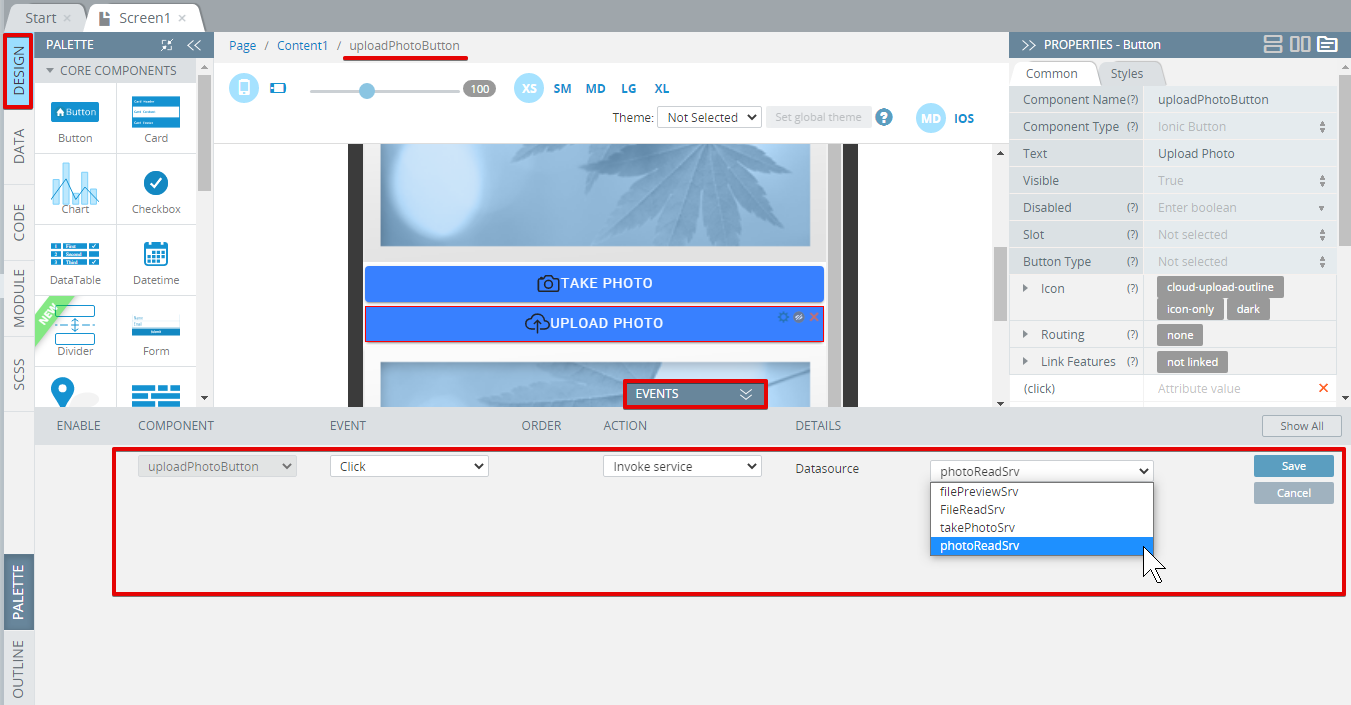
- Finally, go to the DESIGN panel and select the UPLOAD PHOTO button.
- Then define its Click event with the Invoke service action; for the datasource, select photoReadSrv from the drop-down list and save:
Here is how the page EVENTS tab should look like with all the needed components defined (click the Show all button to see all events):
Don't forget to save your changes.
Congratulations! You are ready to test the app.
App Testing
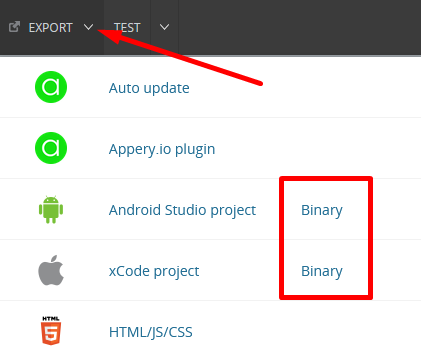
To use the Cordova camera service, you need to run the app on the device.
You can, for example, export the app as an Android binary by clicking EXPORT > Binary (both iOS and Android options are available) in the top menu:
After the build is completed, the file can be downloaded and you can also see a QR code:
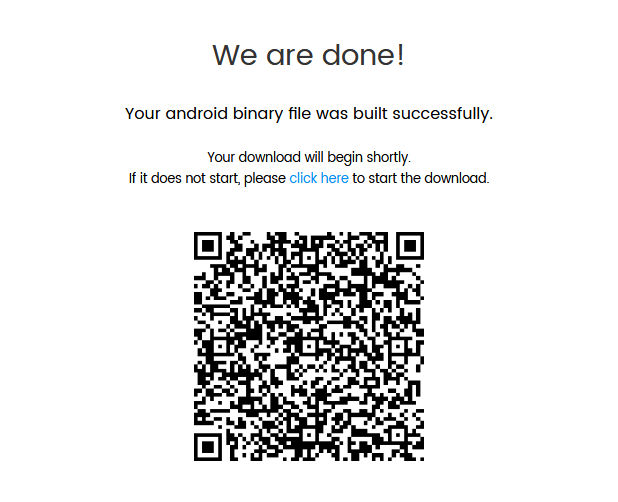
You can now scan the QR code shown to install it on your device.
App ExportPlease check this section to learn more about app export.
When in the app, click the TAKE PHOTO button to start the Camera service but before you can use it, you will also need to allow taking pictures, recording videos, and accessing photos and media on your device:
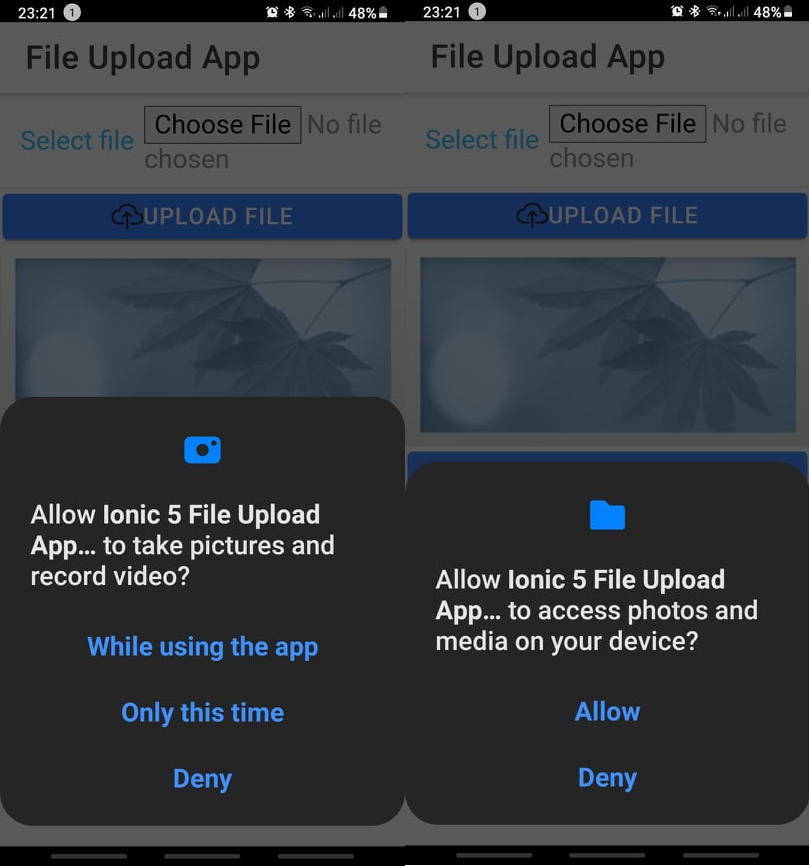
Here is how the app should look like on your device:

The app in action
In a couple of moments, when you check the Files collection of the myDB database, you will see that that the photo entry is already there:

Updated Files collection
Video: Take Photo and Upload into Appery.io DatabaseYou might also like this Appery.io video that shows how to create an Ionic application using the Appery.io Take Photo and Upload into Appery.io Database plug-in:
You can also check this Appery.io Community video that shows how to add a camera service to mobile application: