Ionic File Upload to Firebase
This tutorial describes how to create an Ionic app that can upload files from the device to the Firebase project storage using the Cordova plugins.
Want to know more?You can also check out our Ionic Camera and File Upload Plugins App and/or Ionic: Uploading Multiple Files to Appery.io Database tutorials to learn more!
Part 1. Importing Plugins
First of all, let's import three Cordova plugins that will be used in the app.
Important notice!Be informed that when creating an app with Cordova plugins it is important that the needed plugin be imported before you proceed with the app UI or create it from a backup.
Importing cordova-plugin-file-opener2
- Log in to Appery.io and from the Appery.io dashboard, navigate to Resources > Cordova plugins tab.
- Click Import Cordova plugin and select the From Git tab.
- Enter https://github.com/pwlin/cordova-plugin-file-opener2 in the Repository URL field.
- Enter master in the Repository branch field and click the Import plugin button.
Importing cordova-plugin-filepath
- Under the Resources > Cordova plugins tab, click Import Cordova plugin and select the From Git tab.
- Enter https://github.com/hiddentao/cordova-plugin-filepath in the Repository URL field.
- Enter master in the Repository branch field and click the Import plugin button.
Importing cordova-filechooser
- Click Import Cordova plugin once again and select the From Git tab.
- Enter https://github.com/ihadeed/cordova-filechooser.git in the Repository URL field.
- Enter master in the Repository branch field and click the Import plugin button.
All the plugins should now be added to the list of Cordova plugins:

Cordova Plugins Added
Part 2. Defining Firebase Project
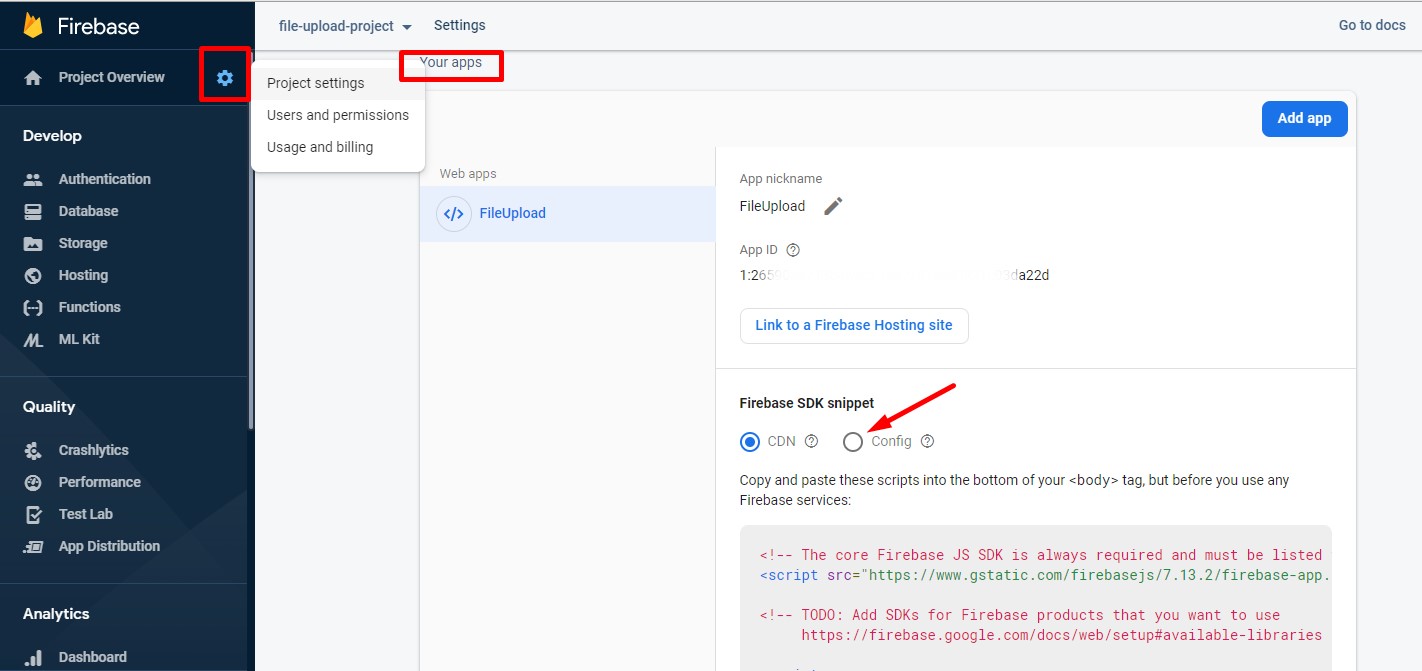
- Sign up to https://firebase.google.com and create a new project.
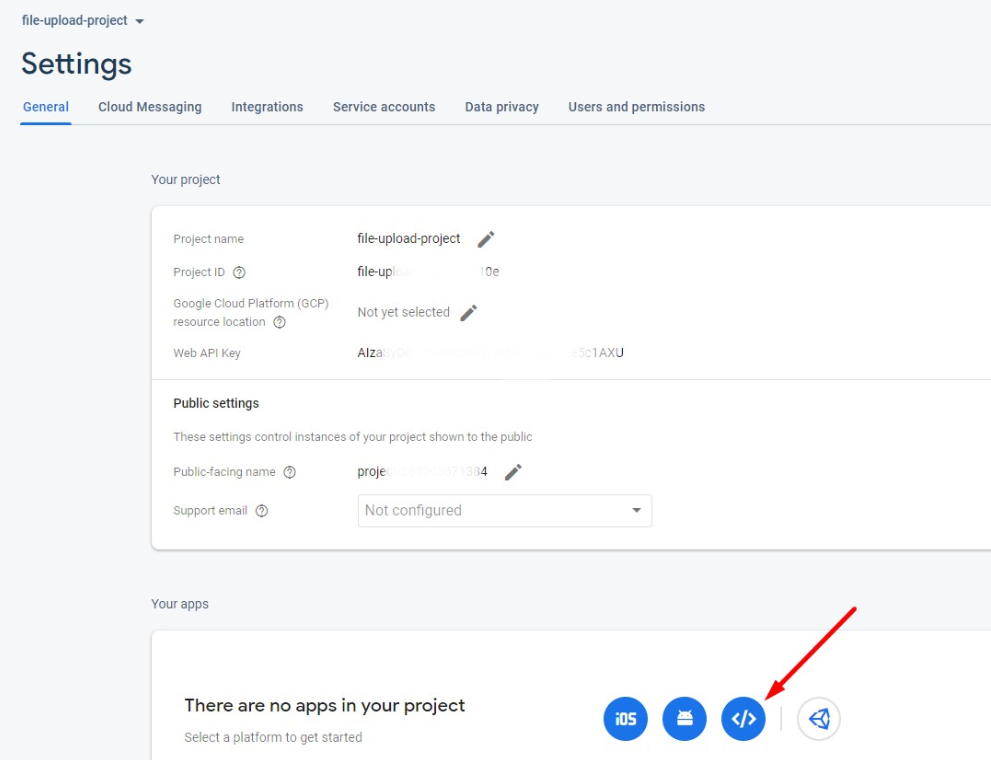
- Go to the Project settings tab:

Firebase project settings
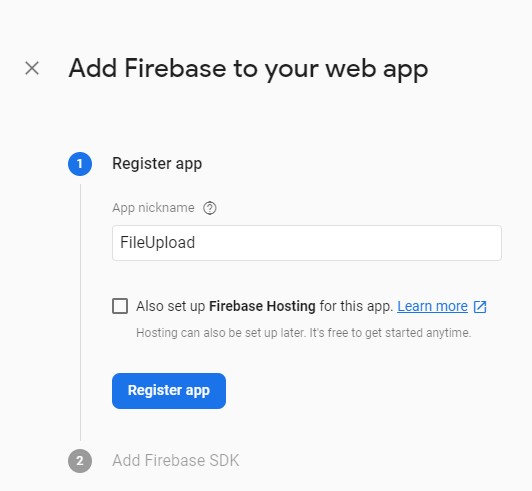
- In the Your apps section, select the WEB platform icon for your new app:
- Then register your app nickname:
- The page with your Firebase SDK opens. It will be used for your Appery.io project later.
- Now, go to the Storage tab and click Get started to set the rules:
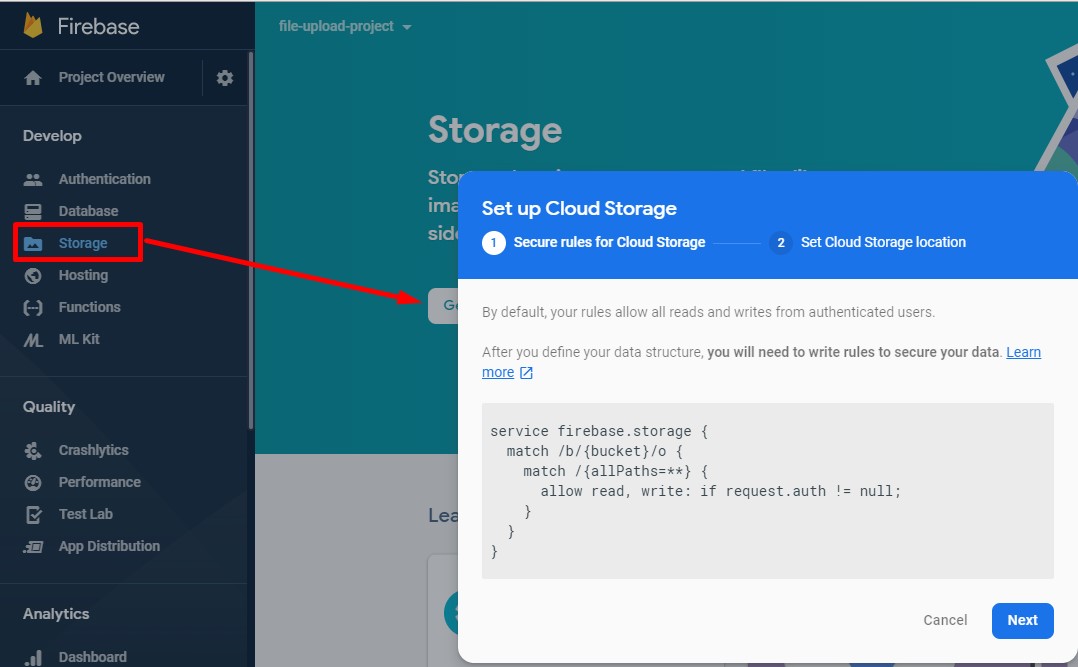
- Click Next to proceed with publishing the rules.
- To finish setting up the Firebase storage, let's remove the string
: if request. auth ! = nullfrom the rules code to allow unrestricted access to the database:

Modified Storage Rules
Note that if you keep the default rules, the access to the database will be restricted and only the users with permissions described in this database will be able to write to and/or read from it.
Part 3. Creating App
- Go to the Apps tab and click Create new app.
- Select Ionic Blank for the application type, enter the app name, for example, Ionic FileUpload App, and click Create.
Enabling Cordova Plugins
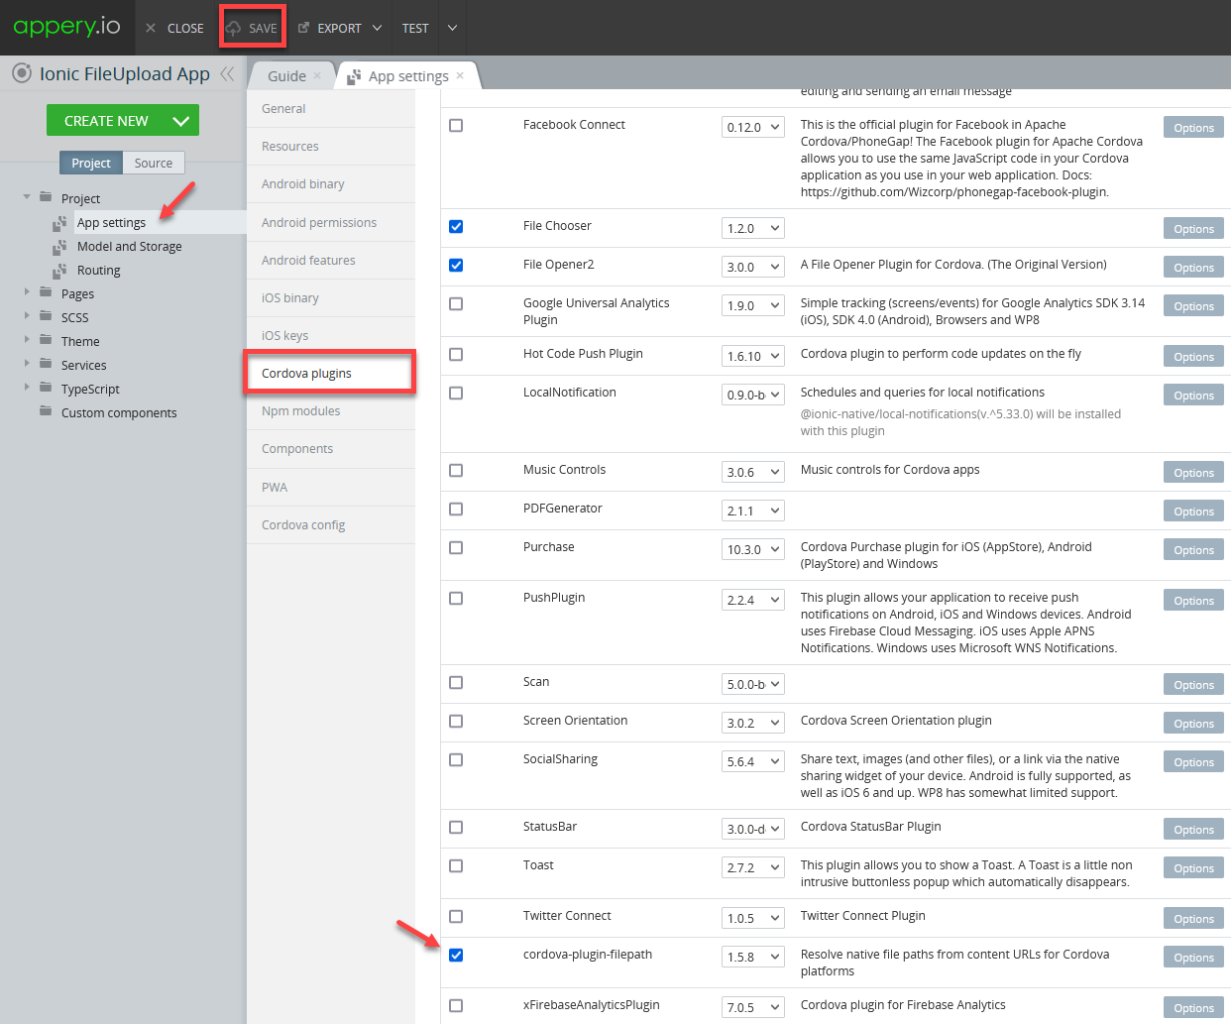
- Inside the app, navigate to Project > App Settings > Cordova plugins.
- Select the Core Cordova plugins tab, then select the File plugin:

- Now, switch to the Imported Cordova plugins tab and select the File Opener 2 and FileChooser plugins:
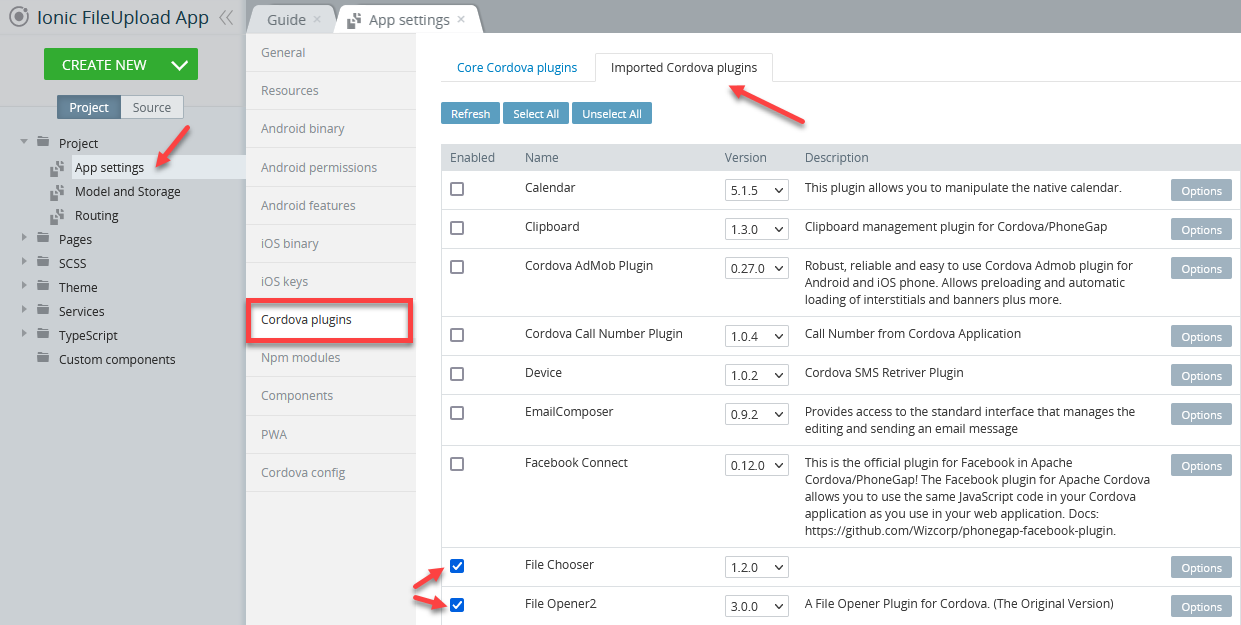
Then, scroll down to enable the cordova-plugin-filepath plugin and click the SAVE button at the top:
Adding Dependencies
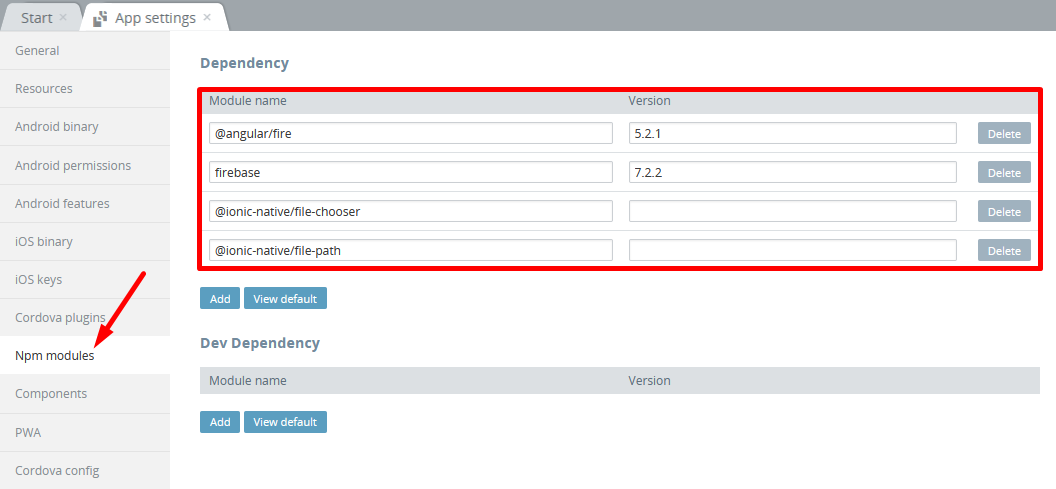
- Go to Project > App settings >Npm modules and add 4 new Dependencies:
- @angular/fire of version = 5.2.1
- firebase of version = 7.2.2
- @ionic-native/file-chooser
- @ionic-native/file-path:
- Now, unfold the Pages folder and choose the app page.
- Go to the page MODULE panel and in the Imports section, add the following modules:
import { AngularFireModule } from '@angular/fire';
import { AngularFirestoreModule } from '@angular/fire/firestore';
import { AngularFireDatabaseModule } from '@angular/fire/database';
import { AngularFireStorageModule } from '@angular/fire/storage';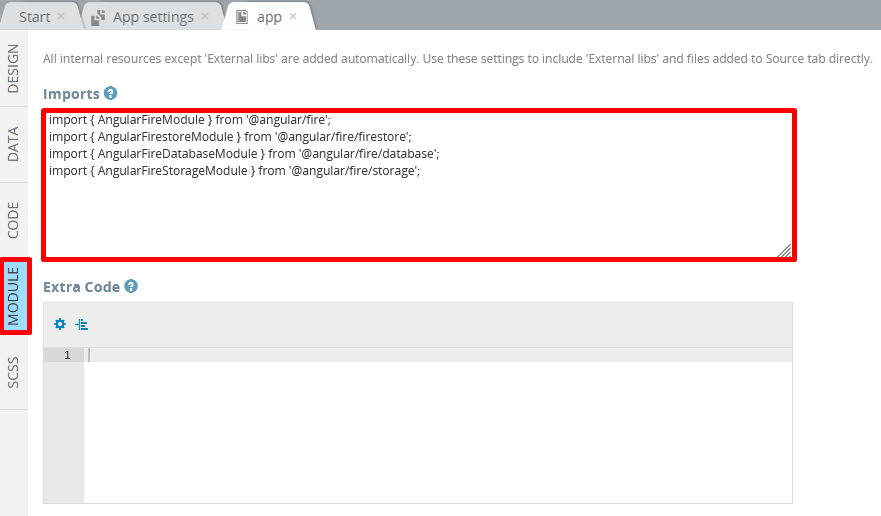
- Now, go back to your Firebase project Settings page (check step 5 of the # Part 2. Defining the Firebase Project section of this tutorial), scroll down to the Your apps section and select Config:
- Copy and paste the script into the Pages > app > Module > NgModule Settings > Imports field replacing the first line of the config code
const firebaseConfig =byAngularFireModule.initializeApp(and its closing;by),. Then, add these two lines below:
AngularFirestoreModule,
AngularFireStorageModule
Here is the sample code to be added to the Imports field:
AngularFireModule.initializeApp({
  apiKey: "TestCodeTestCodeTestCodeTestCode",
  authDomain: "test-project-TestCode-firebaseapp.com",
  databaseURL: "https://test-project-5b77f.firebaseio.com",
  projectId: "test-project-5b77f",
  storageBucket: "test-project-5b77f.appspot.com",
  messagingSenderId: "306524925173",
  appId: "1:TestCode:web:TestCodeTestCodeTestCode"
  }),
AngularFirestoreModule,
AngularFireStorageModule
When ready, the NgModule Settings > Imports value field should be defined like the one in the screenshot:

Defining App Logic
- Click CREATE NEW > TypeScript, name it fireBaseService and click Create Script with entering the following code:
import { Injectable } from '@angular/core';
import {AngularFireDatabase} from "@angular/fire/database";

import {AngularFireStorage} from "@angular/fire/storage";

export interface Idea {
  id?: string,
  name: string,
  notes: string
}

@Injectable()
class FireBaseService {

    constructor(private af: AngularFireStorage){}


    async uploadFileToStorage(file, type, name) {
        const randomId = Math.random()
            .toString(36)
            .substring(2, 8);

        let oMyBlob = new Blob([file], {type : type})

        const uploadTask = this.af.upload(
            `files/${new Date().getTime()}_${randomId}_${name}`,
            oMyBlob
        );

        uploadTask.then(async res => {
            console.log('file upload finished!');
        }).catch(err =>  {
            console.log('file wasnt upload. Error: ' + err);
        });
    }

}
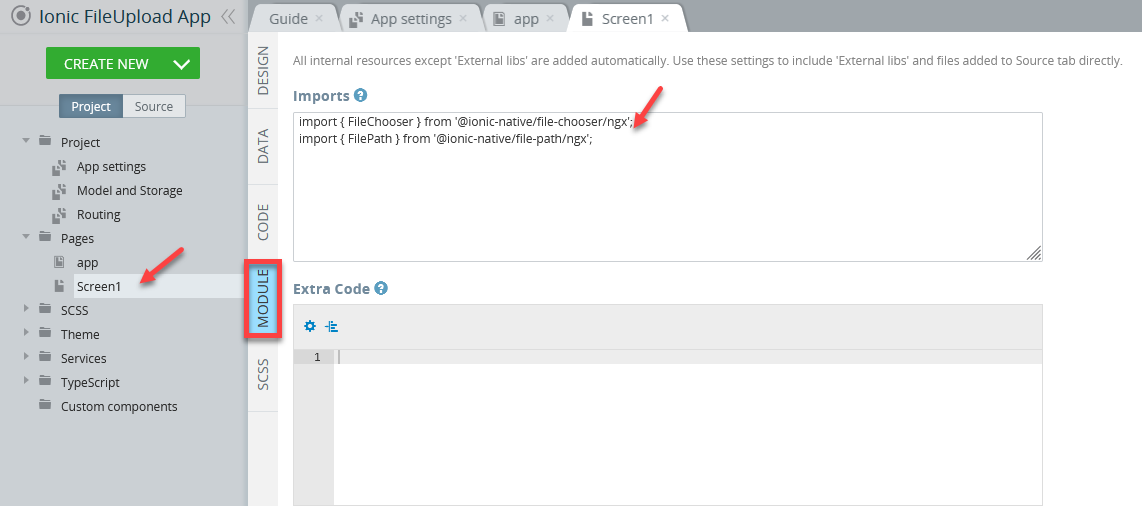
export { FireBaseService as ExportedClass };- Now, open Pages > Screen1 MODULE panel and add the below code to the Imports section:
import { FileChooser } from '@ionic-native/file-chooser/ngx';
import { FilePath } from '@ionic-native/file-path/ngx';
Here is what it should look like:
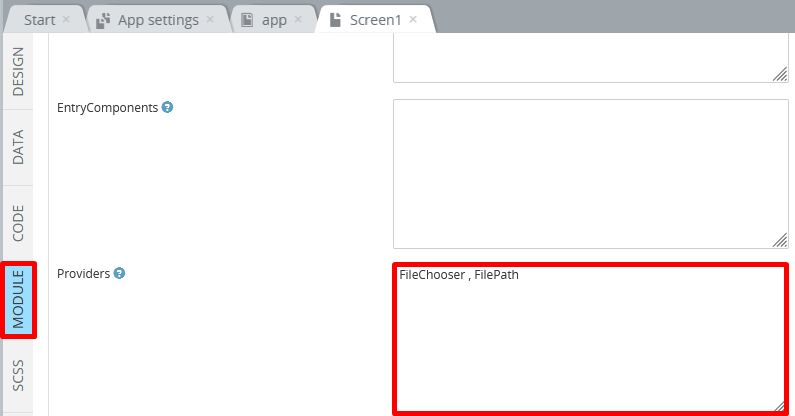
- Then, scroll down and add the below code for the Providers value:
FileChooser , FilePath :
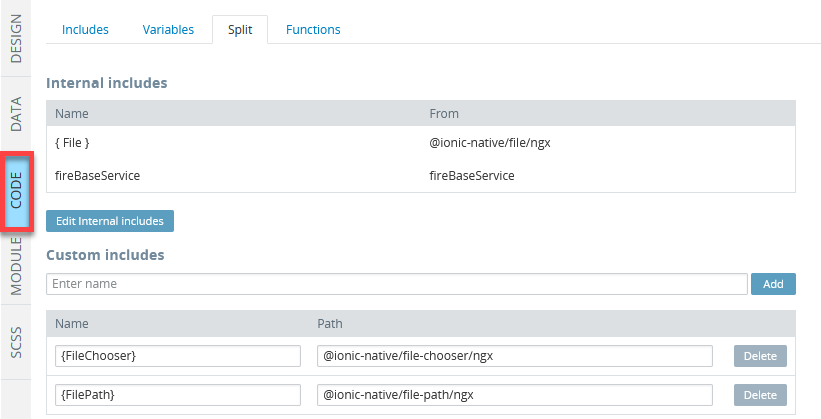
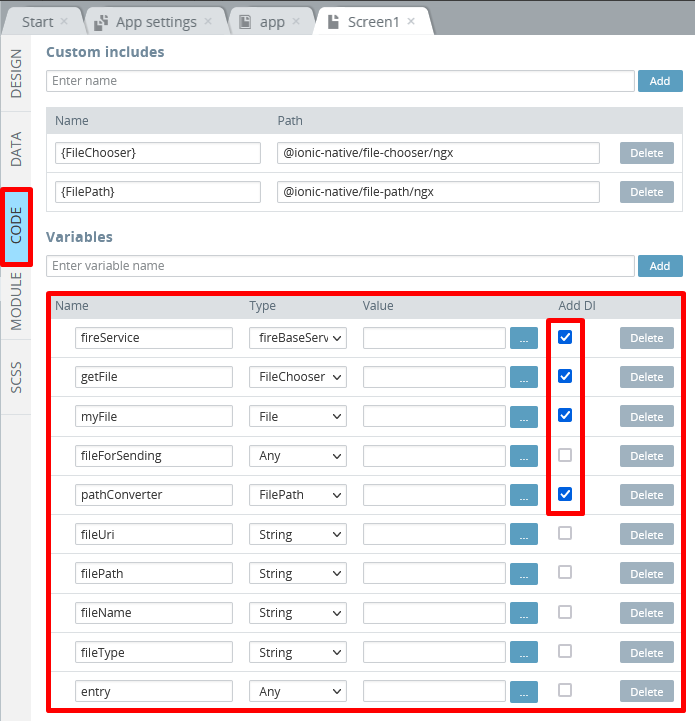
- Open Pages > Screen1 CODE panel, and add two custom includes:
{FileChooser}with path@ionic-native/file-chooser/ngx
{FilePath}with path@ionic-native/file-path/ngx. - Next, click the Edit internal includes button and select the { File } and fireBaseService dependencies. Click Save:
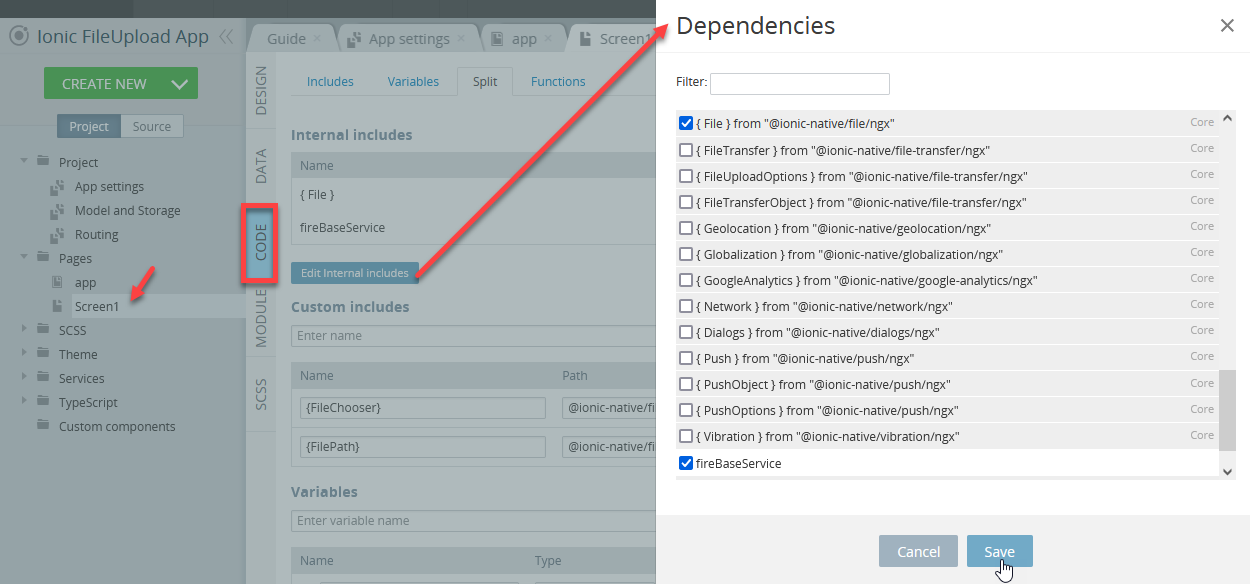
- Here is what CODE panel with the added inludes should look like:
- Finally, scroll down to the Variables section and add the following variables:
fireServiceof fireBaseService typegetFileof FileChooser typemyFileof File typefileForSendingof Any type.
Next, one by one add the following variables, all of String type:pathConverterfileUrifilePathfileNamefileType.
Lastly, add the entry variable of Any type.
Please note that the Add DI check box should be checked for the fireService, getFile, myFile, and pathConverter variables:
Creating App UI
- Go to the Screen 1 DESIGN panel and, under its PROPERTIES panel, set the Footer property to False, then select the Header Toolbar title element and change its Text property to File Upload App.
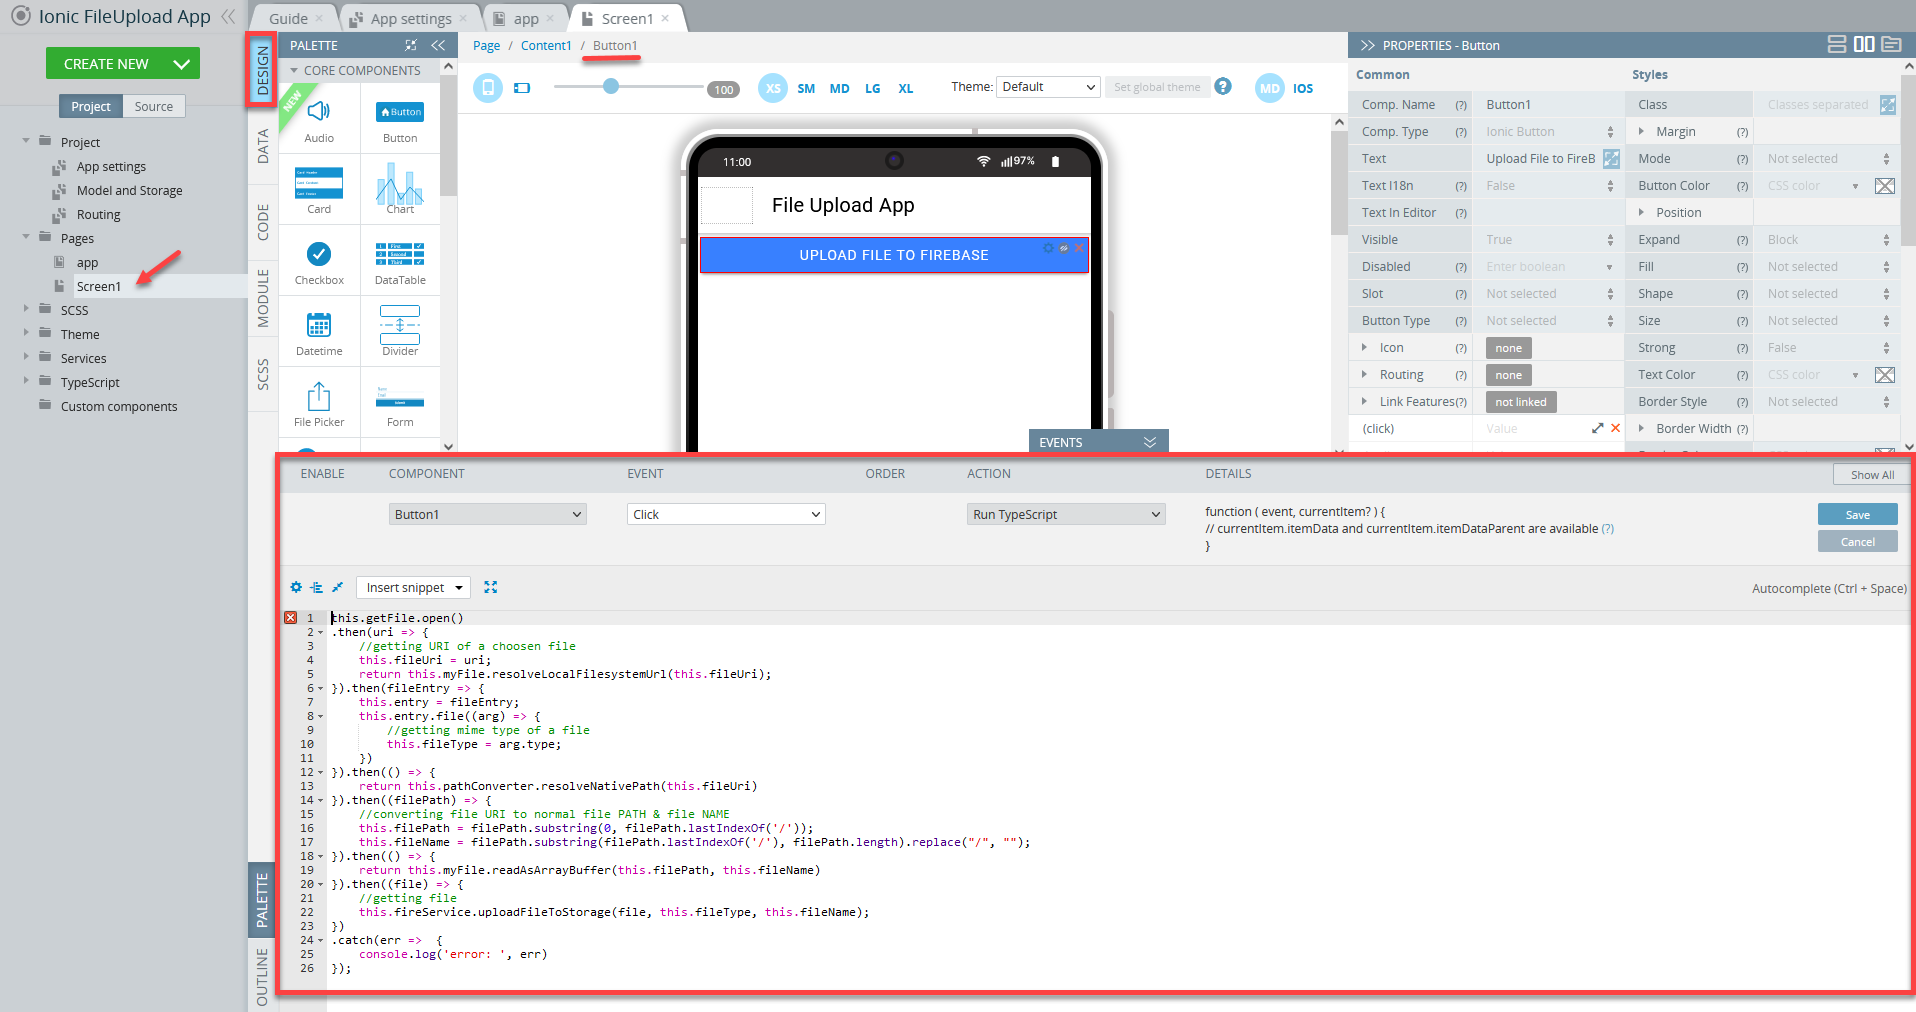
- Drop the Button from PALETTE and set its Text property to Upload File to Firebase. Then, expand the EVENTS tab from the bottom, select the Click event for the button and set Run TypeScript for its action.
- Enter the following code into the code editor and save it:
this.getFile.open()
.then(uri => {
    //getting URI of a choosen file
    this.fileUri = uri;
    return this.myFile.resolveLocalFilesystemUrl(this.fileUri);
}).then(fileEntry => {
    this.entry = fileEntry;
    this.entry.file((arg) => {
        //getting mime type of a file
        this.fileType = arg.type;
    })
}).then(() => {
    return this.pathConverter.resolveNativePath(this.fileUri)
}).then((filePath) => {
    //converting file URI to normal file PATH & file NAME
    this.filePath = filePath.substring(0, filePath.lastIndexOf('/'));
    this.fileName = filePath.substring(filePath.lastIndexOf('/'), filePath.length).replace("/", "");
}).then(() => {
    return this.myFile.readAsArrayBuffer(this.filePath, this.fileName)
}).then((file) => {
    //getting file
    this.fireService.uploadFileToStorage(file, this.fileType, this.fileName);
})
.catch(err =>  {
    console.log('error: ', err)
});
Here is what the event should look like in the Visual Builder:
That's it! You can save the project now and proceed with testing.
App Testing
Note that to use the plug-in, you will need to run the app on the device. You can, for example, export the app as an Android binary by clicking EXPORT > Binary (both iOS and Android options are available) in the top menu to install it on the device:

When the app is ready, install it on your device, run the application, and try uploading local files to your Firebase project storage.
Note that before you can use the app, you will also need to allow taking photos, recording videos and accessing photos, media, and files on your device.
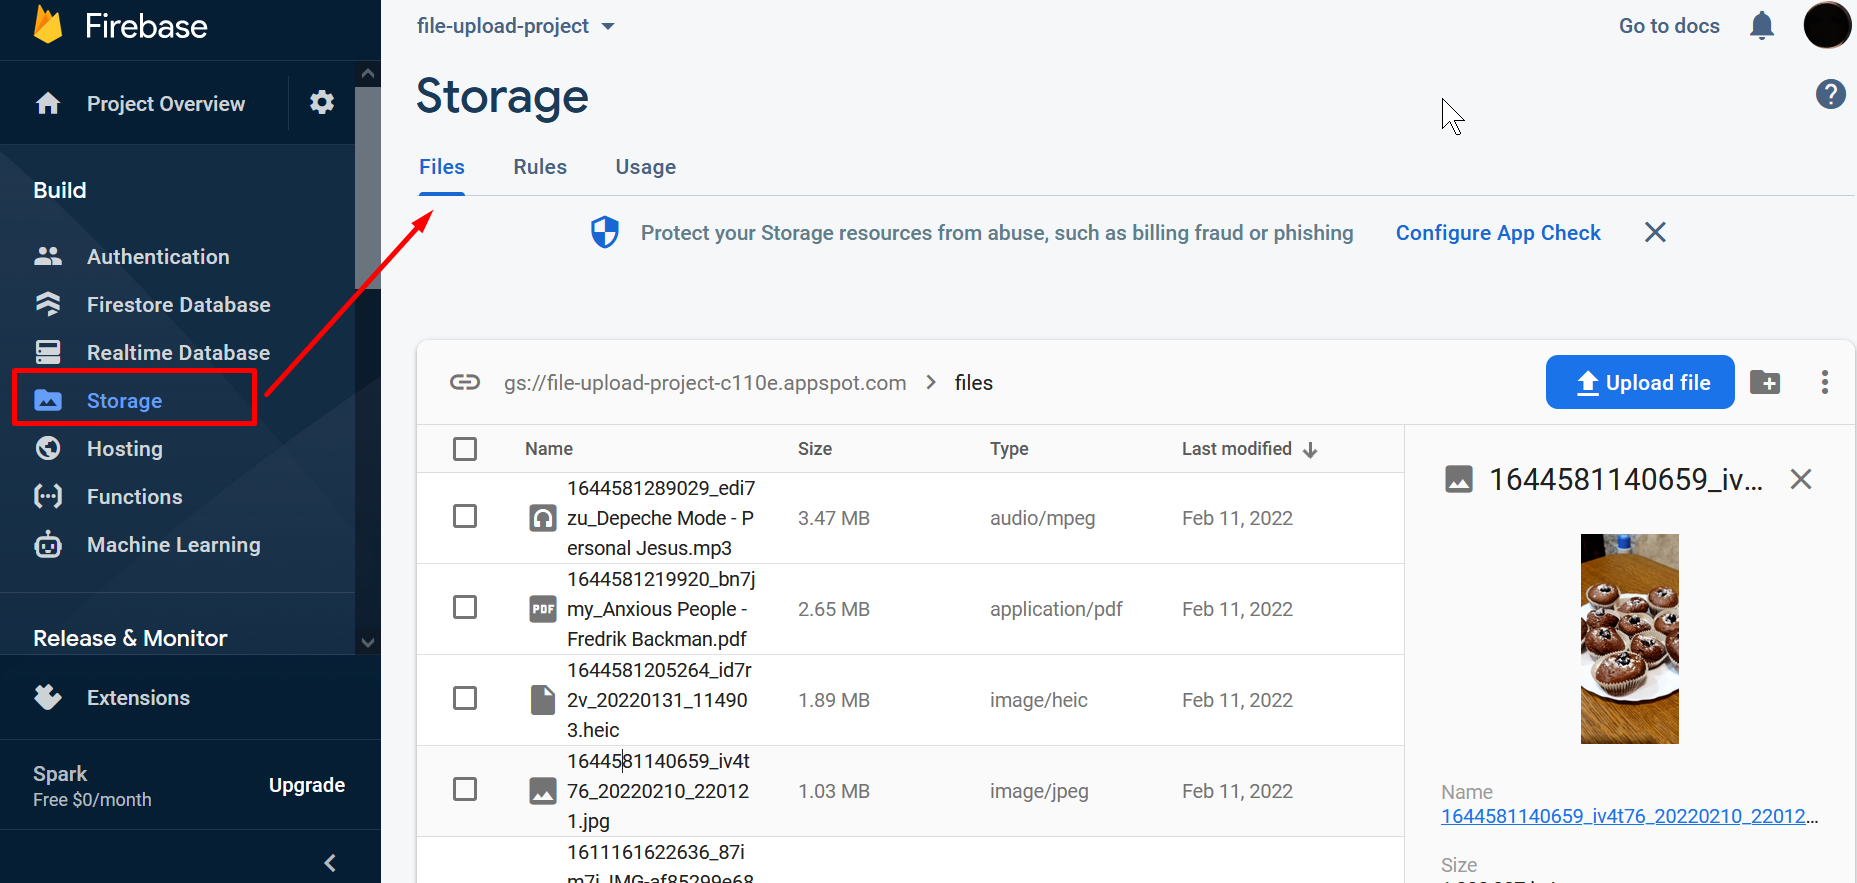
- Now, open the Files tab of your Firebase project storage or update the page to check that the picture has been loaded successfully:
Important Note!Please note that you will need to generate the iOS certificate with the In-App Purchase capability to build an
.ipafile.
You can check this document in case you need help with exporting your application for iOS.
Here, you will find information on generating certificates for Android.
Note as well that starting from August 2021, new apps are required to publish with the Android App Bundle (.aab) on Google Play.
Please read more here.
You can also check this Appery.io YouTube video that shows how to create iOS certificates and publish the app to the App Store:
Updated about 1 year ago