6. Working with Model, Storage and Global Functions
This section explains what Ionic Model, Storage and Global Functions is about
Model
Models can simplify development by defining complex app data structures. In general, a model allows you to mimic real-life scenarios in your app.
Model and Storage Video TutorialPlease check this Appery.io YouTube Education Guide video to learn how to work with Model and Storage:
Generally, it is a custom data structure type that can be used to create new objects based on itself. Variables that are stored in certain storage can also use models as structure templates.
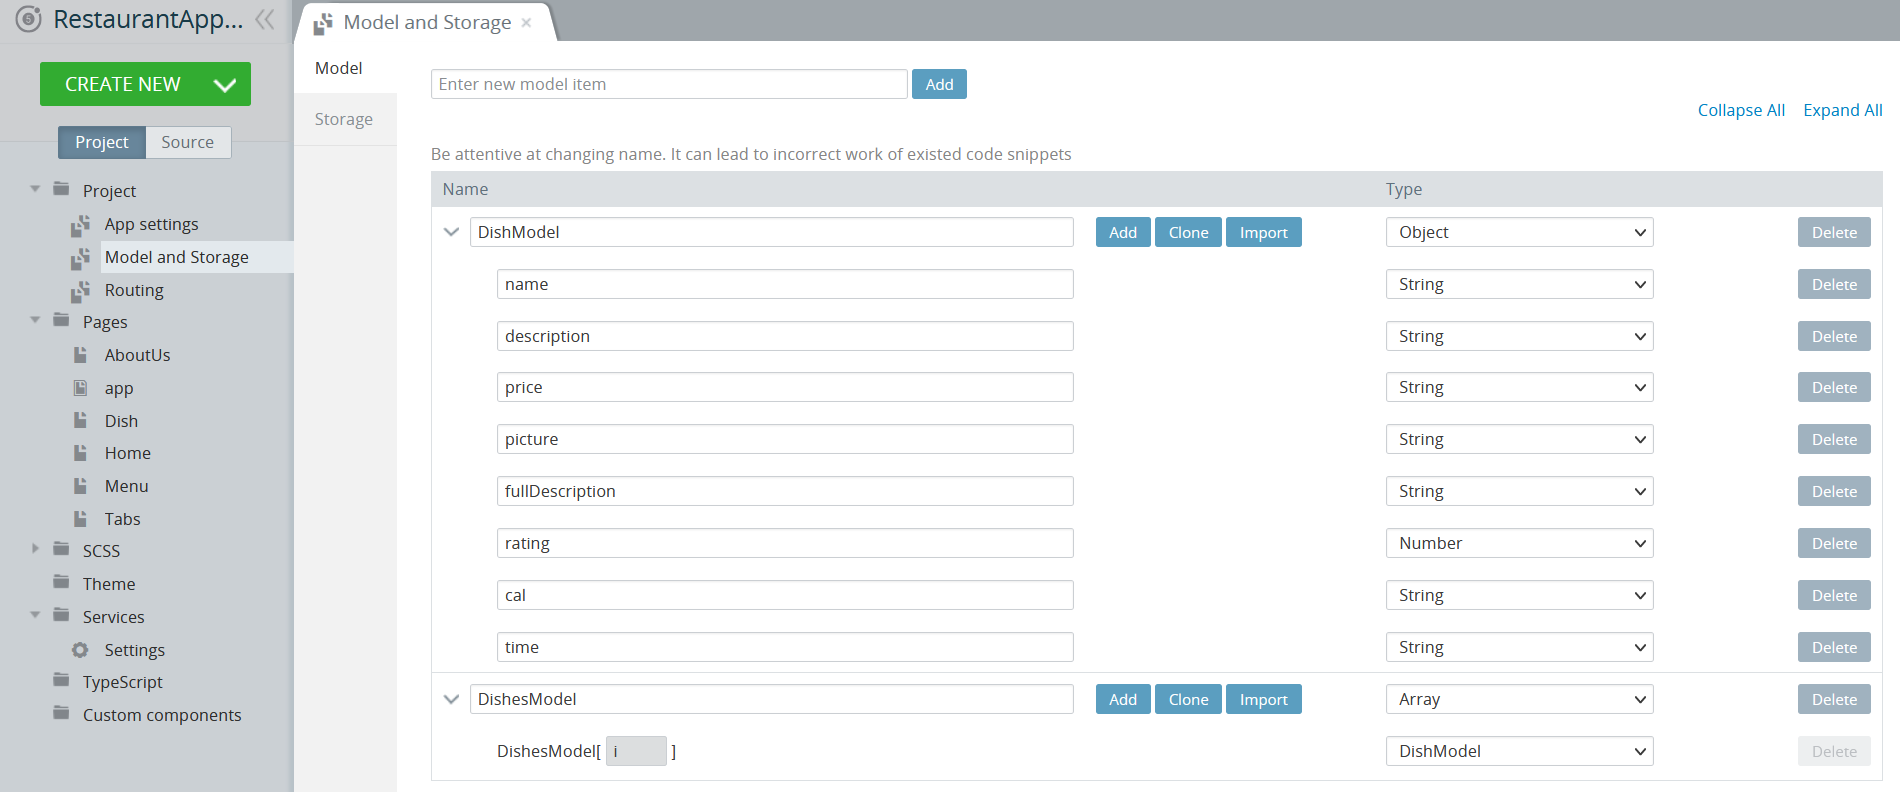
For instance, if you are building an app that has a map with a location markers list, you can define the DishModel object and the DishesModel array.
Here’s where the storage feature comes in. Let’s say your app displays the markers on the map, and you need to keep (save) the data somewhere in the app. A single location or a collection of locations can be saved into storage.
To define models and/or storage, go to Project > Model and Storage.
Under the Model tab, type a name for a new model item and click Add. Then create the data structure you need by clicking Add (cloning existing model(s) can also be used) and specifying the names and types:
Model CloningThe Clone feature can be used to simplify creating a replica model that can be later modified:

Model Import
The Import functionality gives the possibility of updating the existing model structure from JSON data.
To update the existing model, click on the Import button from the buttons bar of the existing model to be updated.
Data for updating should be in
JSONformat.

Data should have the same structure as the model to be created.
Every model property type (Object, Array, String, etc.) is defined automatically from the value of the same property in JSON data.
Import doesn't replace the existing structure of the model but updates and extends it:
- property is updated when its type is changed;
- property is added if the model doesn't have a property with the same name.
All child properties will be removed if the type of parent is changed.
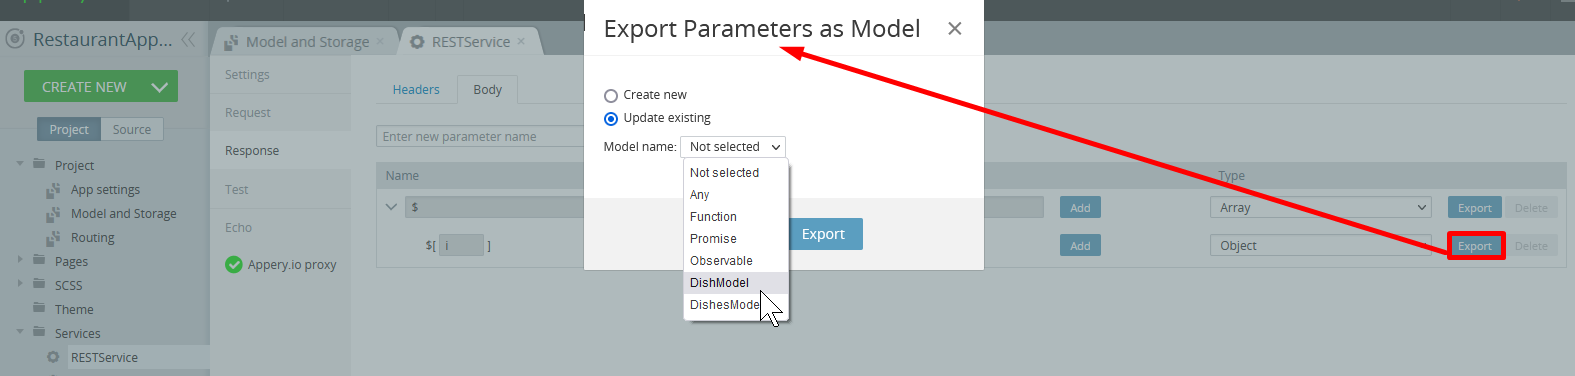
Export Server Response as Model
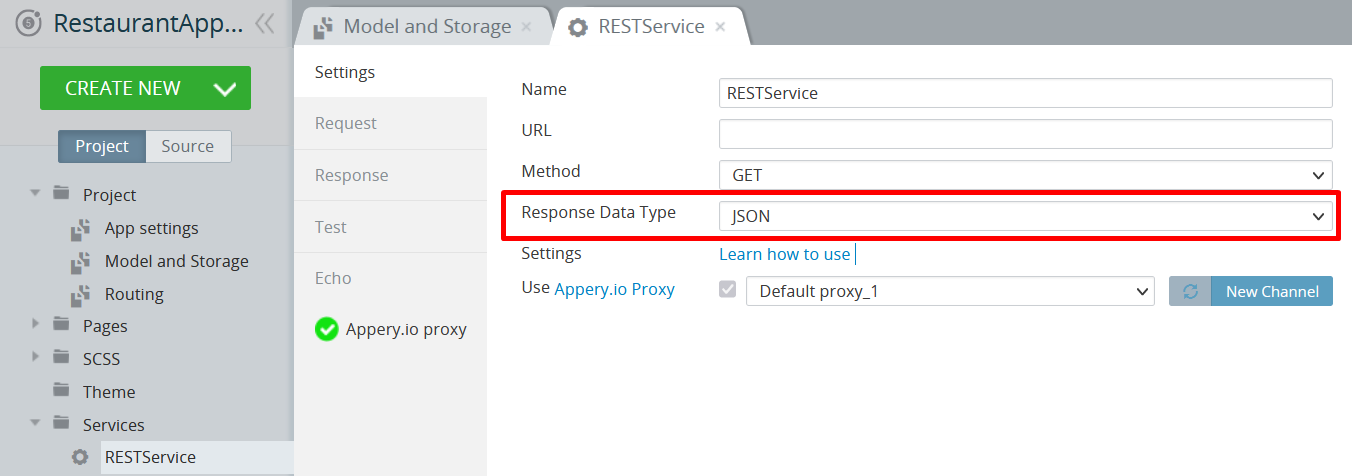
This functionality gives the possibility of creating a model or updating the existing model from a service response.
Service response can be exported only if its Response Data Type is set as JSON (option in service Settings):
Export is available on the Response > Body tab of the service editor:
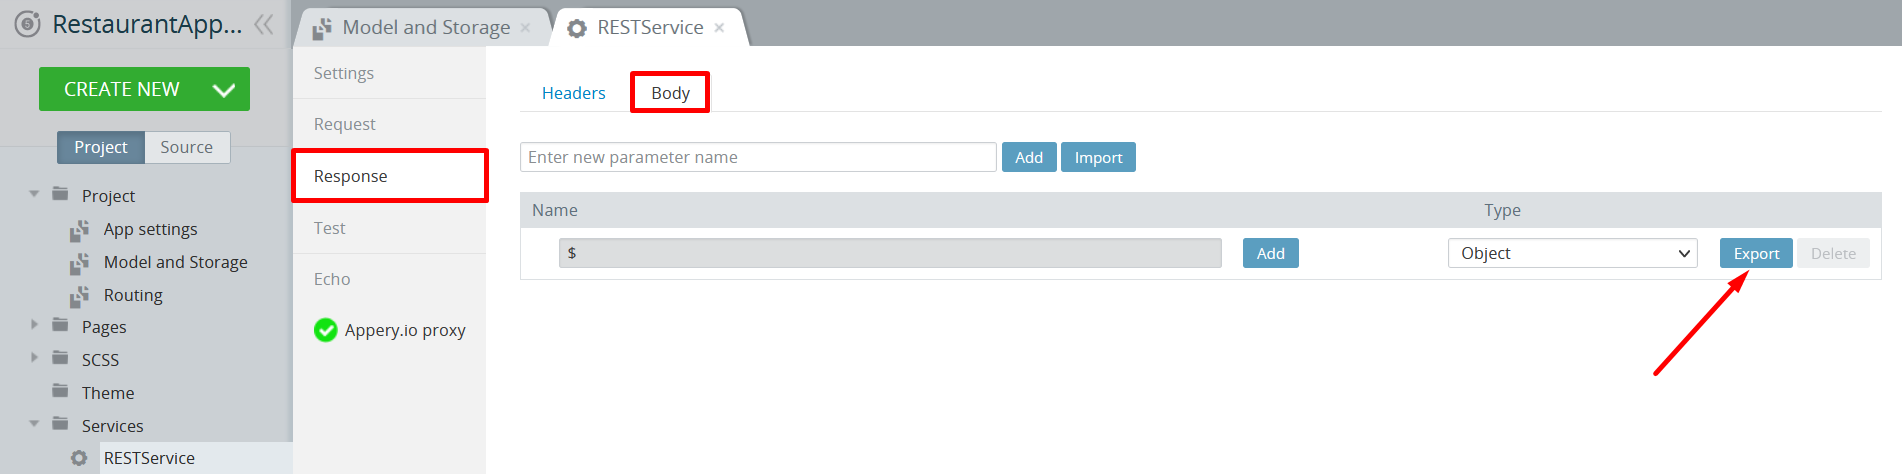
To export the structure of a service response as a model click on the Export button from the buttons bar of the response root element.
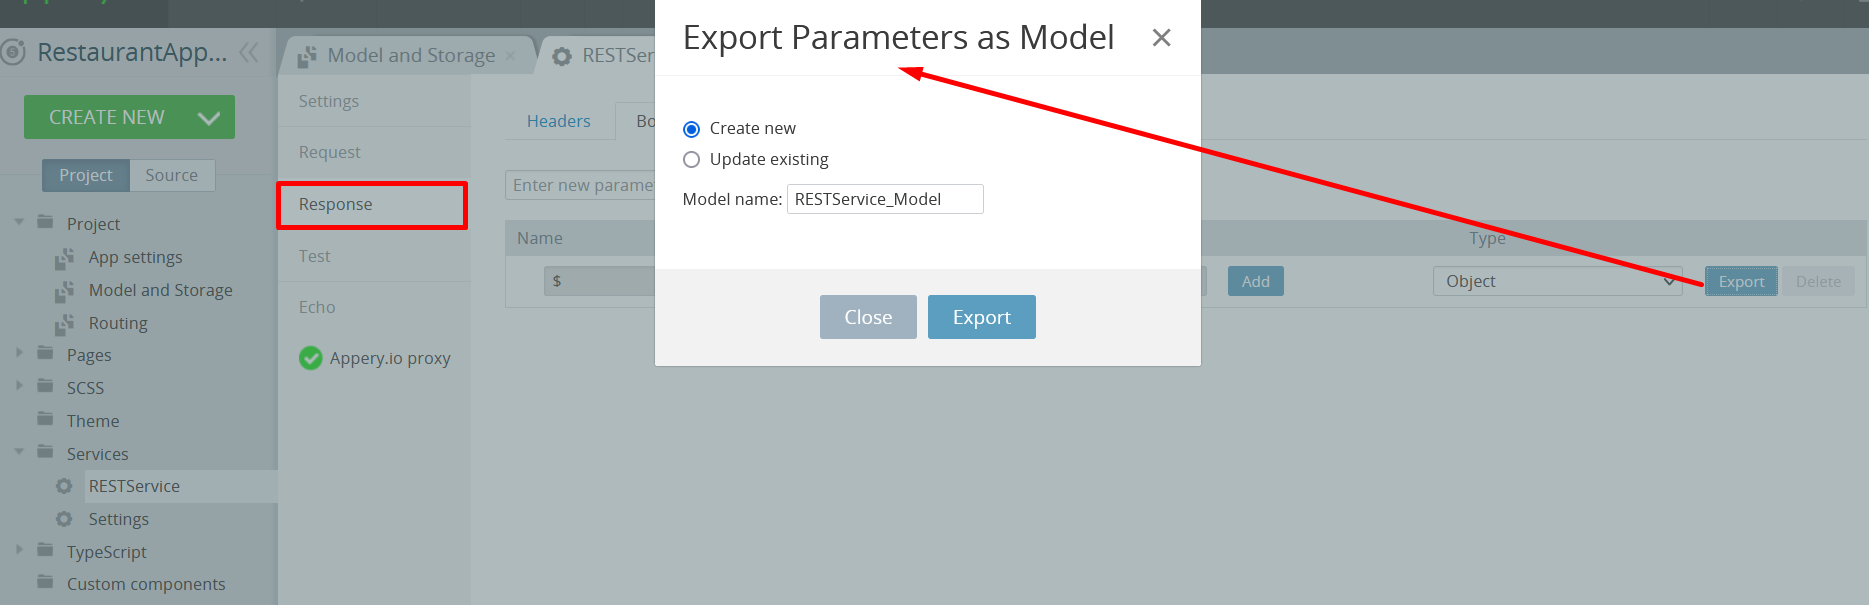
There are two export options:
- create a new model (name of a model should be entered);
- update the existing model (model is chosen from the drop-down):
Update Existing Model
Export doesn't replace the existing structure of the model but updates and extends it:
- property is updated when its type is changed;
- property is added if the model doesn't have a property with the same name.
All child properties will be removed if the type of parent is changed.
Export Arrays
If the response is an array (the root element of the response has Array type) and its [i] element has the Object type, there is an additional possibility of exporting the [i] element as a model:
Supported Data Types
Models can be of Array or Object type.
When defining a model, you can use the following data types to specify the type for a specific model field:
- String;
- Boolean;
- Number;
- Array;
- Object;
- Any.
Storage
Storage is a virtual client-side environment where any data can be stored. By using models, data can be stored in specific storage based on the chosen model structure. Depending on the chosen storage, stored data will be accessible for different amounts of time.
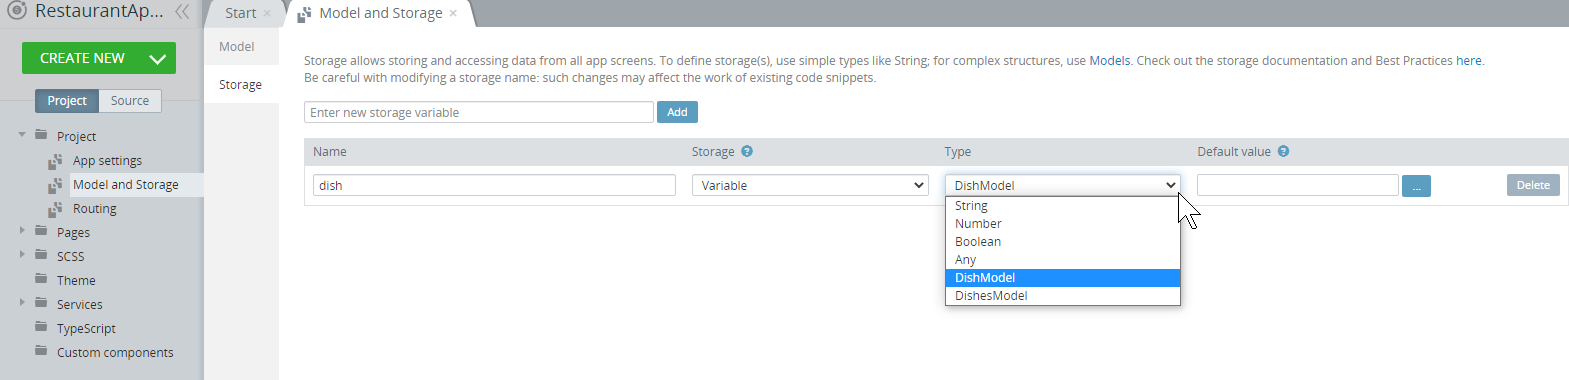
When you are done defining the model structure, you can also create a storage variable with a matching type. To do it, switch to the Storage tab and create a new storage variable item.
Note that, in our example, there are now DishModel and DishesModel types in the Type drop-down list. That means that these storage variables will contain the same structure as the model:
Storage Types
There are 2 storage entity types you can choose in an Ionic app:
-
Storage – storages of this type are stored in the IndexedDB database of the system browser (Safari (iOS) or Google Chrome (Android)). It means that they persist even after a user closes the application or restarts the mobile device. However, if the browser cache is manually cleared, this data will be deleted. This storage type is best for storing the last viewed items, e.g. last viewed products to show after an app user returns to the application.
Storage works in an asynchronous way. -
Variable – storages of this type persist between pages and are cleared after a user exits the app.
Using this storage type is recommended for the cases when you need a global variable to be used for different app pages, e.g. if a user selects a product and you need to show its details, show product edit screen, or other product-related screens.
Changing variable type and custom code!Please note that if you once create a variable of the Storage type, use it in some custom code and then decide to change it to the Variable type, making corresponding changes into your code will be required since such changes may affect the work of existing code snippets!
So, if the existing function was once created under the CODE > Functions tab using snippets, make sure that you manually edit the code everywhere it is used in the app.However, if it has been created by mapping, these changes will be applied automatically.
Get variable/ Set variable/Get from storage/Set to storage SnippetsWe also offer snippets that can be used for setting and getting global variables for your project. Click the links below to learn more:
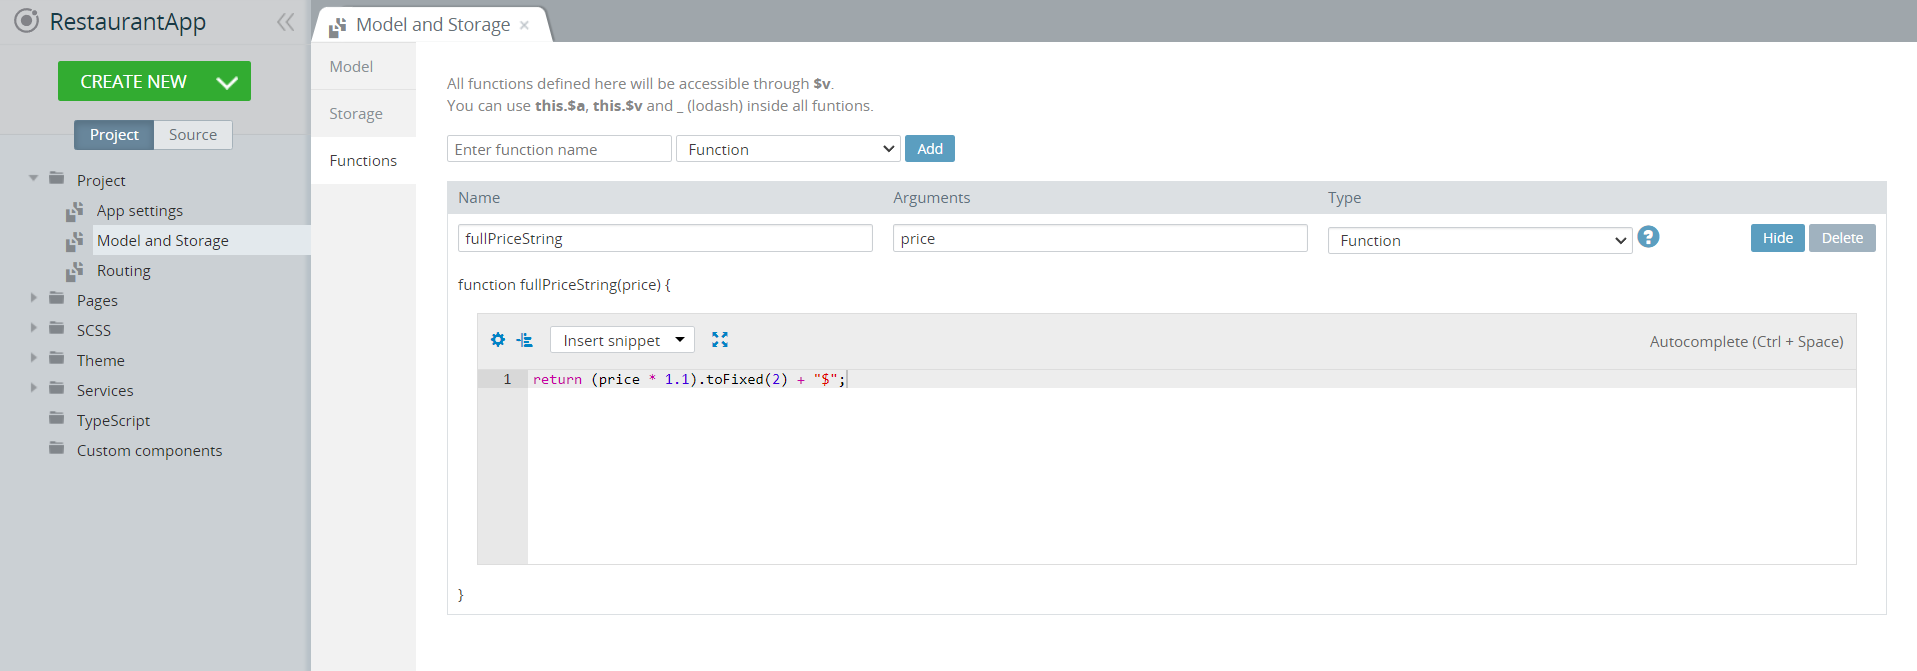
Global Functions
This section is available only in Ionic projects
If your application has common code that is used on different screens you can move it to global functions.
All functions defined in this section will be accessible through this.$v.
You can use this.$a, this.$v and _ (lodash) inside all funtions.
Storage and Variable Mapping
In Ionic, mapping is also available for binding models and storage variables.
If a storage variable (Storage or Variable) is added under the Model and Storage > Storage tab, it will be automatically added to the service on any app page and can be used for any service.

Setting Storage Default ValueYou are free to set the storage default value but be informed that it is added as is, e.g. setting string value should be done in quotation marks: 'Text'.
Note as well that the default value of storage type will be set only if this storage was not set yet (value won't be overwritten if it is already set).
For example, a new storage variable, dish appears on a new app page service automatically and is ready to be mapped:

However, the variables created for a specific page under its CODE > Variables tab:
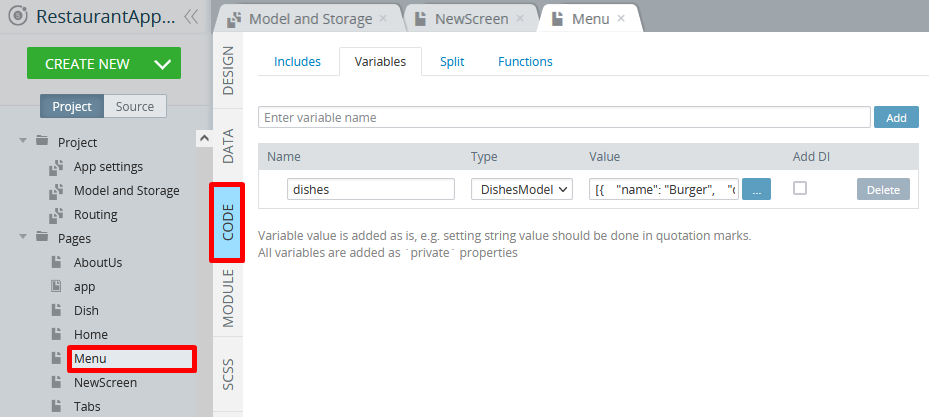
can be used for this specific page only:
Want to know more?You might also like our detailed instructions on how to use mapping for defining the Visible or Disabled UI components properties.
Appery.io Global Variable
Appery.io also offers using its own global variable, $v, that can be customized according to your needs and does not require declaring variables under the Model and Storage >Storage tab with further creating mappings (unlike Storages).
With this variable, you can create corresponding global Appery.io-environment mechanisms throughout the project which can be used extensively to pass information between sections of the app code.
Example
As an example, let's examine a simple two-page questionnaire app created for collecting the Online Form Survey answers that can be then submitted to the server for further processing:

The following section describes how these template pages were created:
- At first, we customized both pages' UI by setting their Footer properties to False.
- Also, both Toolbars were customized with their Toolbar title Text properties: Online Form Survey (for Screen1) and Review your answer (for Screen2).
- Also, one Button was added to both pages' Toolbar buttons areas with modifying their Icon Styles.
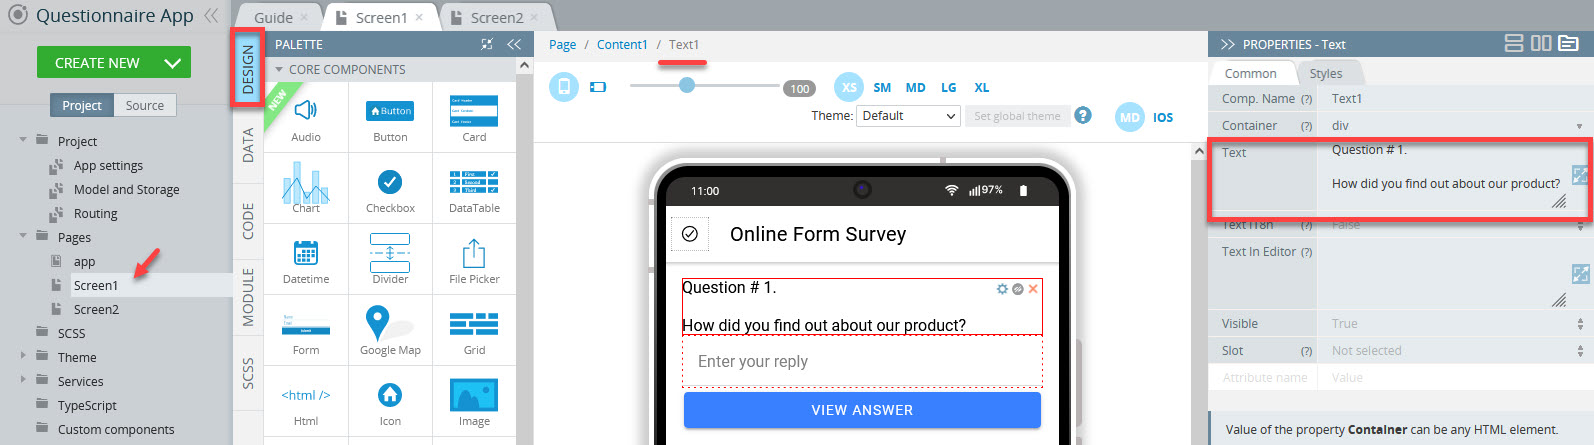
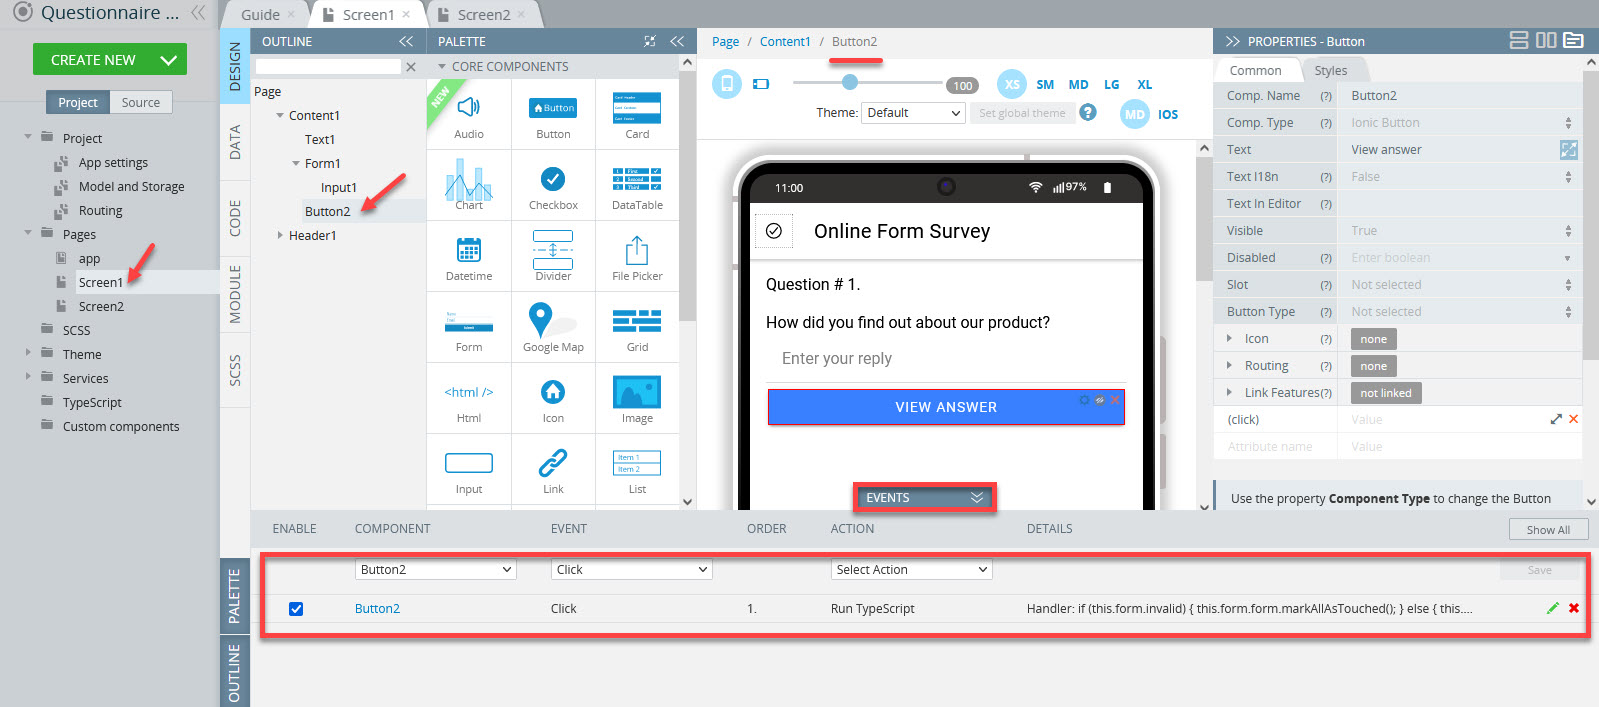
Screen1
- The page has a Text UI component with its Text property defined like this:
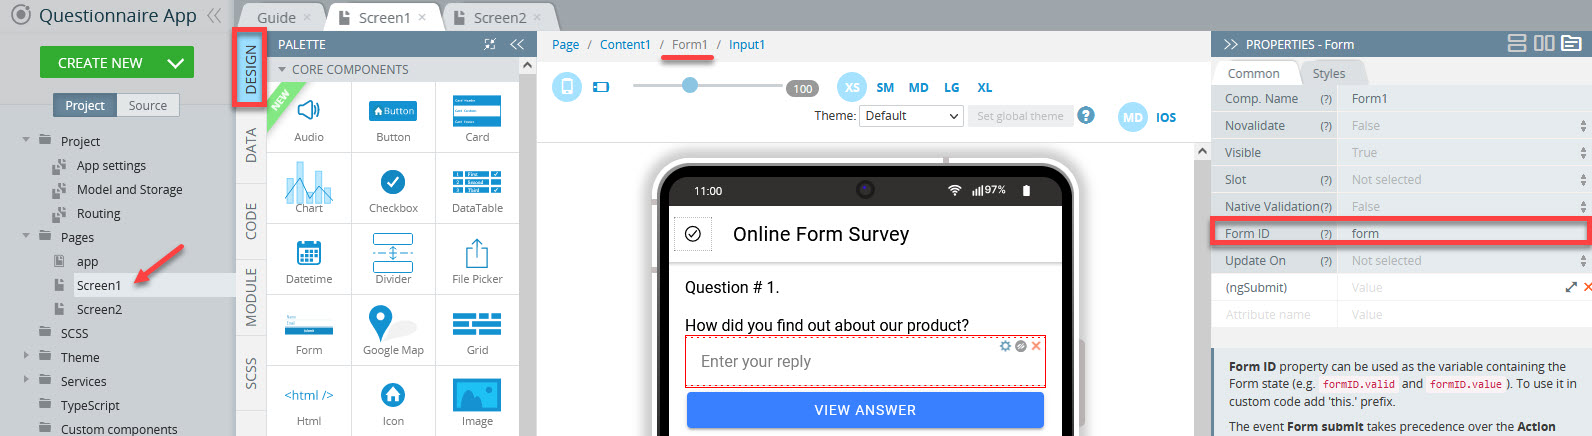
- Then, the Form component is placed with its Form ID property set to form:
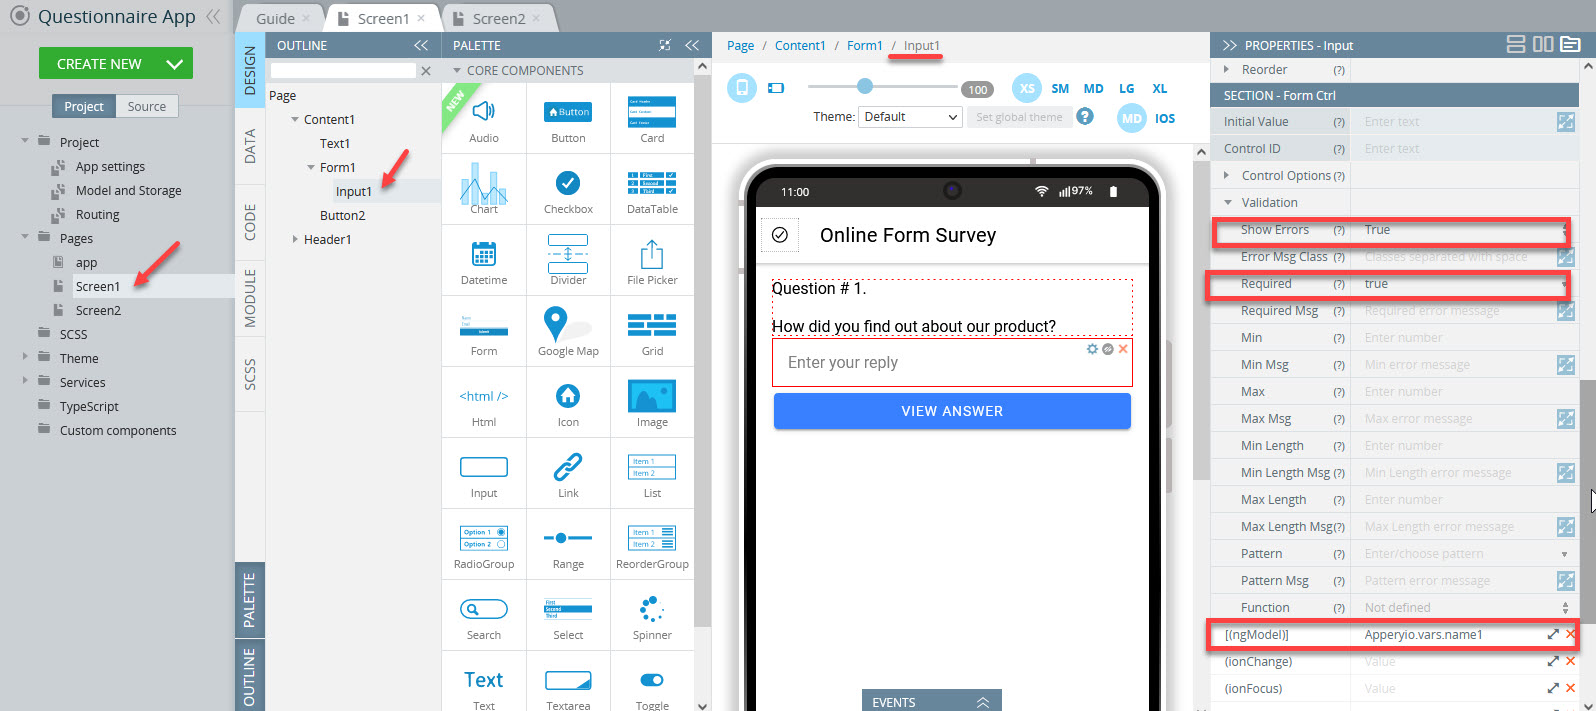
- The Form also contains an Input with the cleared Label text and its Form Control Section (scroll down the PROPERTIES panel scrollbar to locate it) defined like the following:
- Validation > Show Errors = True
- Validation > Required = true
- [(ngModel)] = $v.name1 where
$vis the global variable that allows sending data without using any functions and declaring under the Storage tab andname1stands for the data to be passed across the app:
- Finally, the Button component is placed under the form with its Text = View Answer and its Click event defined with the Run TypeScript action with the following code:
if (this.$a.markFormAsTouched(this.form)) return;

this.$a.navigateTo("Screen2");
Here is what the EVENTS tab looks like with this event saved:
Screen2
- The page has a Text UI component with its Text property defined with the expression with the Appery.io global variable
{{$v.name1}}. This variable is responsible for retrieving the data assigned to it:
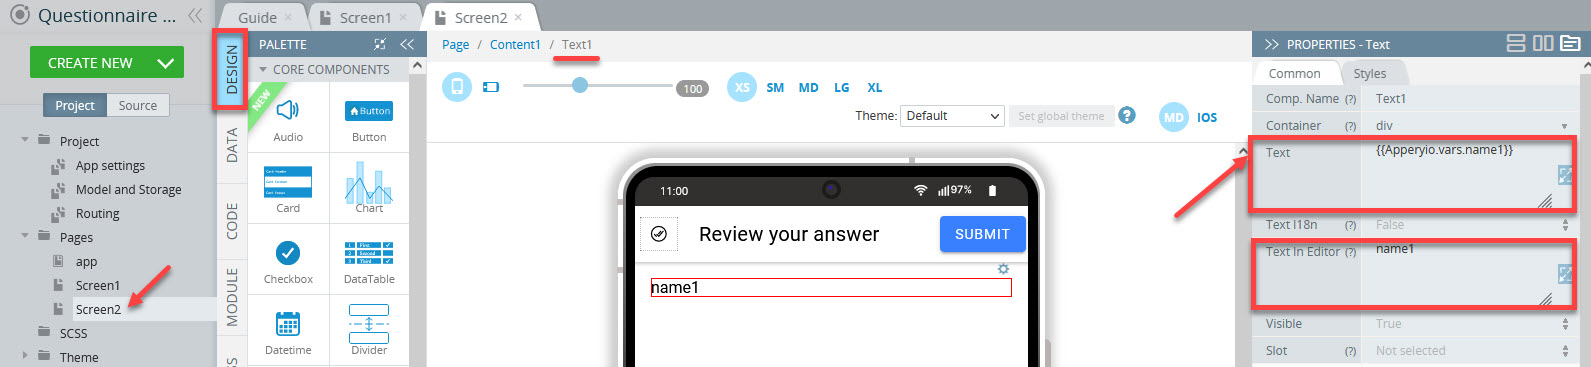
Text In EditorNote the Text In Editor property - it is used to fine-tune your app UI right in the editor even though this component also has some functional code added as its Text property. Without this property, the application will work as expected but with it, the mobile frame looks more appealing.
For more details, you can check our YouTube video here.
- Additionally, Screen2 has another Button added to the Toolbar component with Text = Submit and Slot = Primary.
This button can be further defined to submit the answer and open the new question dialog page.
Best Practices
Suppose we have the database collection TravelList with the following structure:

Database collection.
It’s easy to create a model Location with the same structure:

App model.
Then, you can create a storage variable based on the model structure:

App storage variable
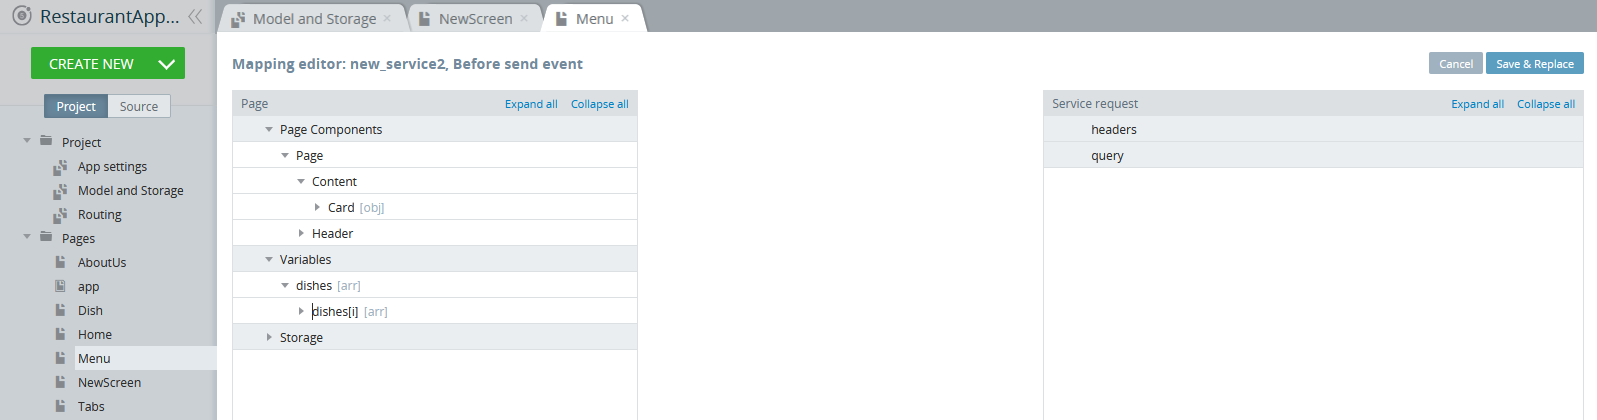
Now, when you use the service to get the TravelList collection data, you can map its response to your storage variable, as in the following:

Mapping.
This approach will be effective only when you need to get a single item for the TravelList collection. To get the whole list of customers, you should create another model with the type of Array and array items type as Location:

App model
Note the second model with the name LocationsList. Now, you can change your storage variable type to LocationsList.
After the following mapping is created, the storage variable travelList will contain a travel list array:

Mapping
Updated about 1 year ago