Ionic Solutions
Ionic solutions and how-tos.
Small apps that show Ionic features and other how-tos.
Using Native APIs from Ionic
One of the premium features of the Ionic framework is its ability to allow simple integrations by adding native device functionality.
Here, we will demonstrate how you can easily add any Cordova plugin to your app. You can check the list of officially supported plugins on this page.
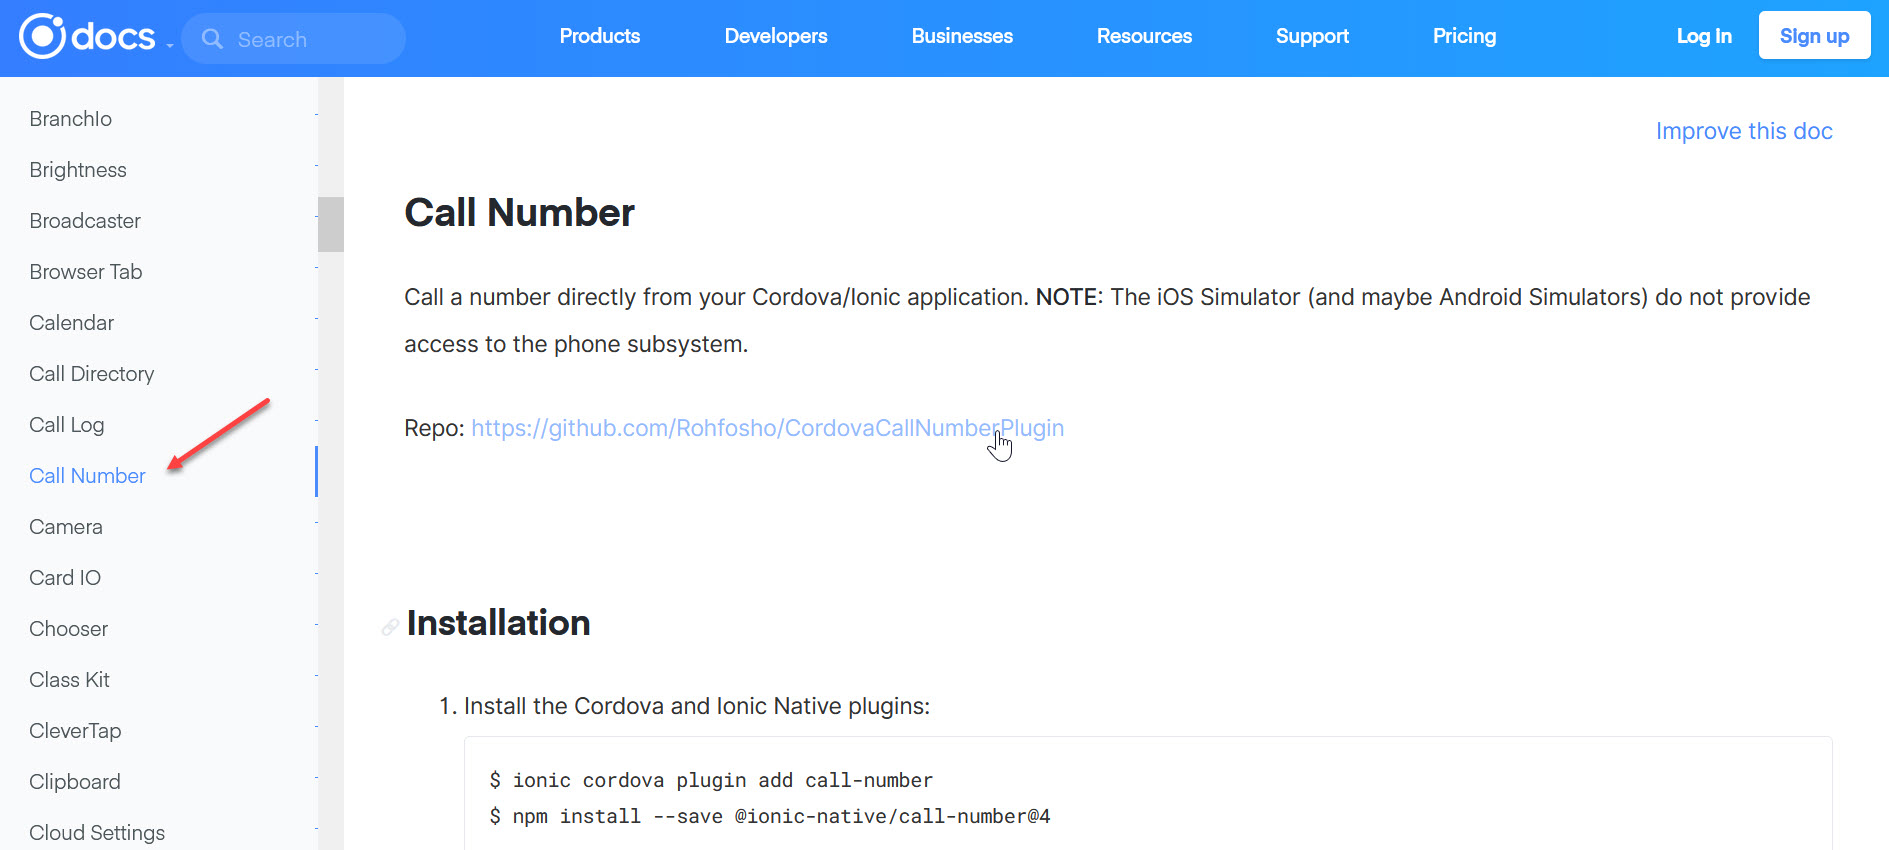
Call Number
In this example, we will demonstrate how to define the Call Number npm package.
-
First of all, select the needed plugin and open its page. Then, click the link to the plug-in Github page:
-
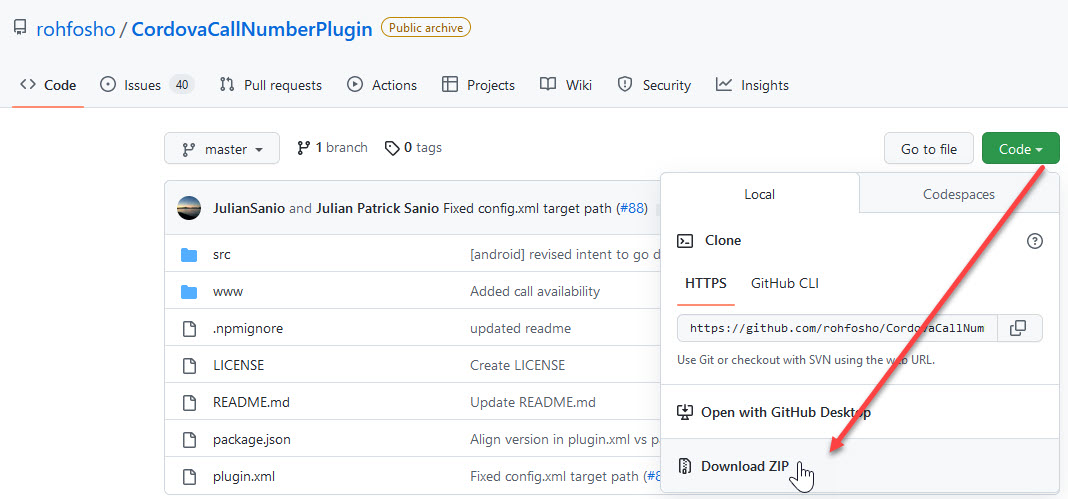
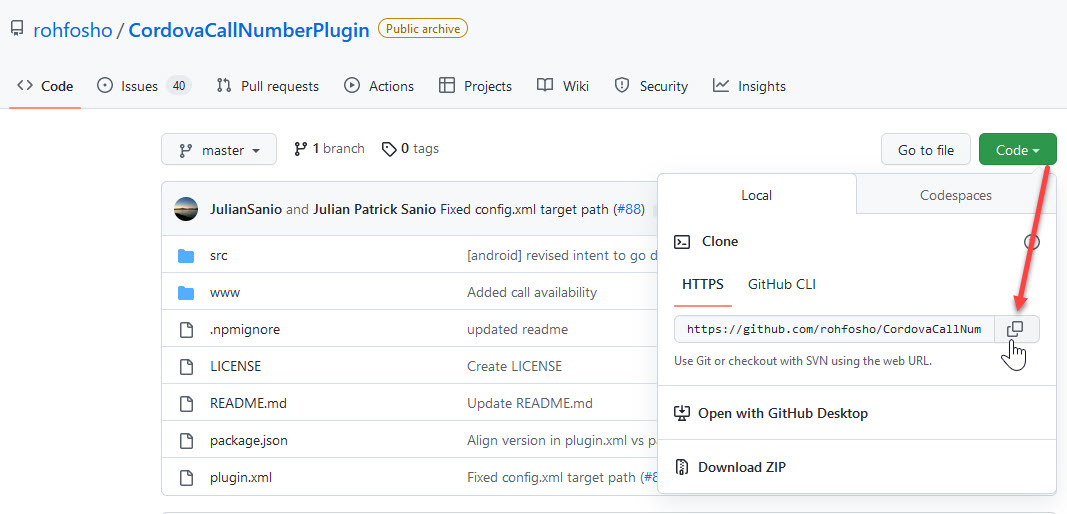
Import the plugin by choosing one of the two ways:
-
download ZIP to your drive:
-
or import with Git URL:
> 👍 Importing Cordova plug-ins
>
> You can check this document to learn more details about importing Cordova plugins from GitHub.
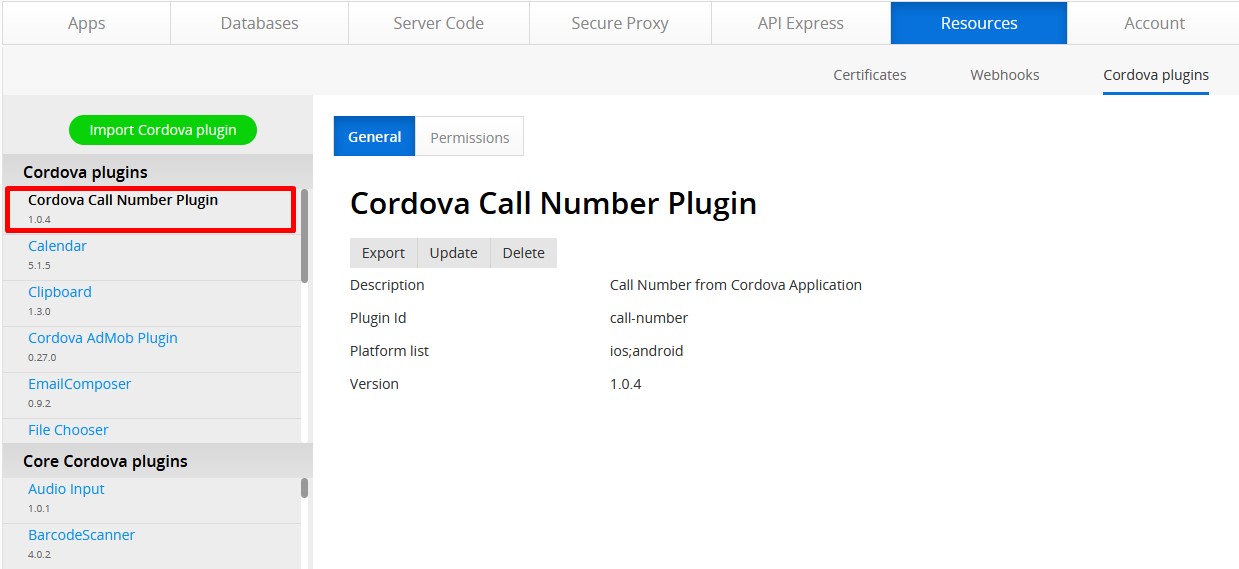
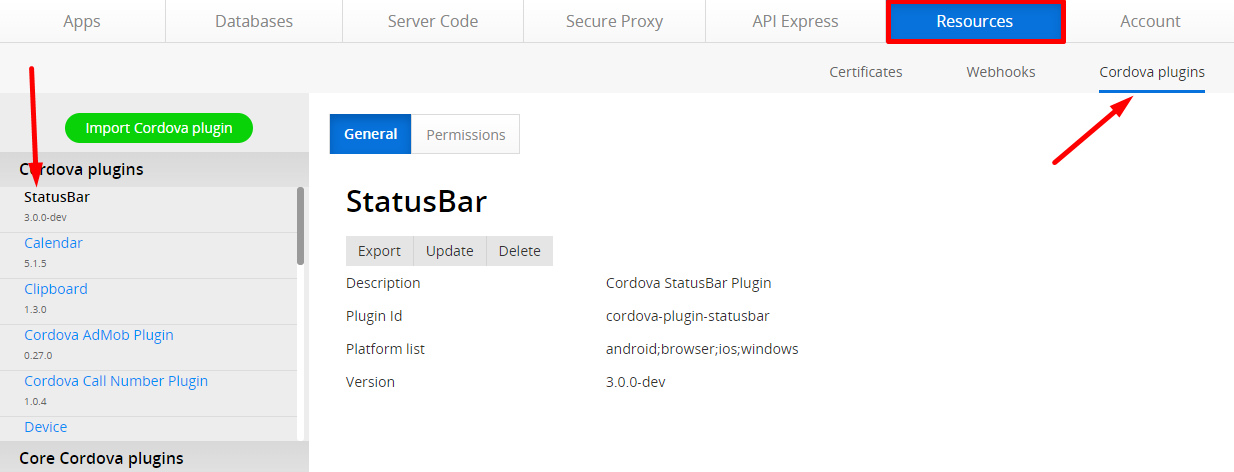
The plugin should now be added to the Cordova plugins list under the Resources > Cordova plugins tab:
-
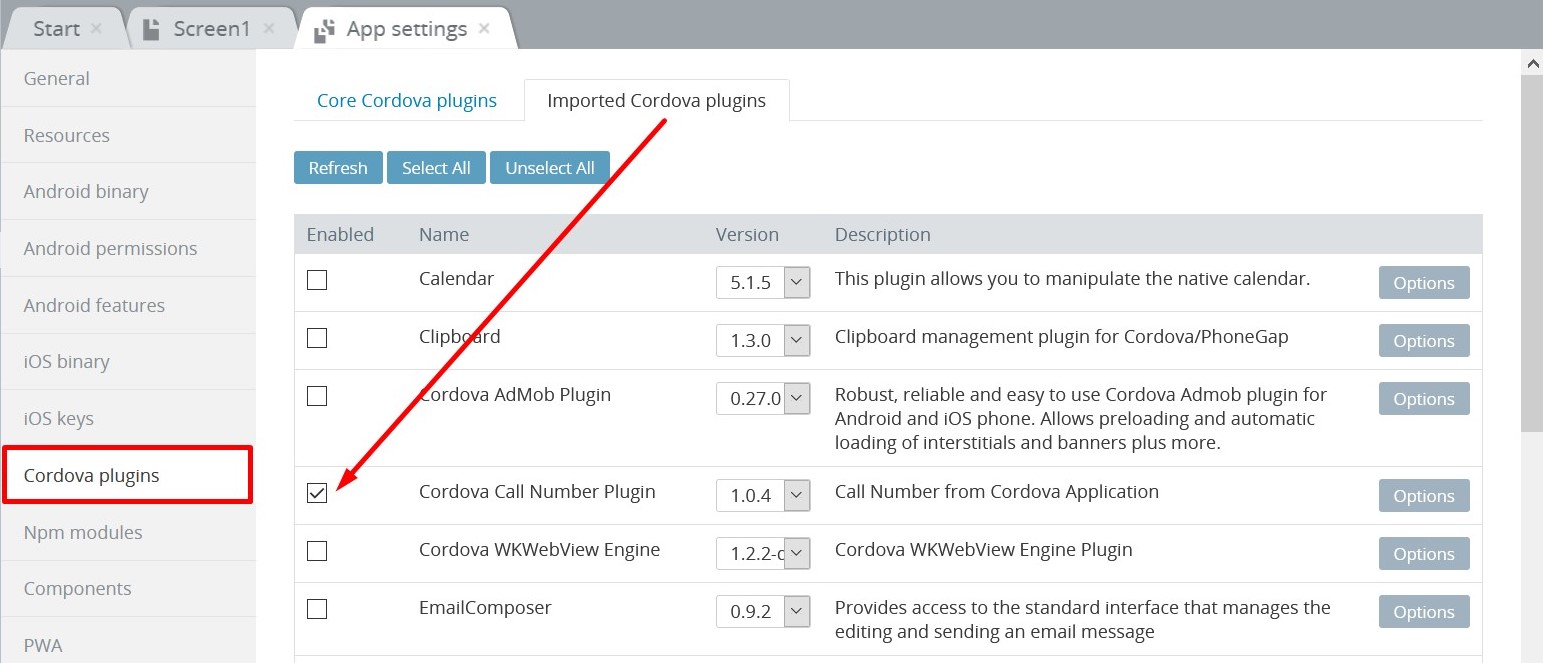
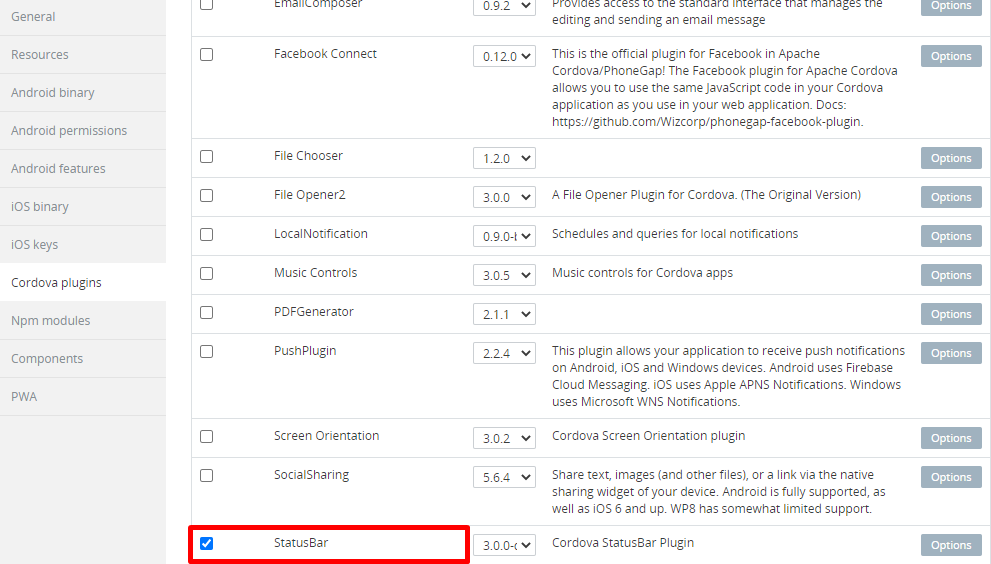
Now, in the app, go to App settings > Cordova plugins > Imported Cordova plugins, enable the plugin and save the app:
-
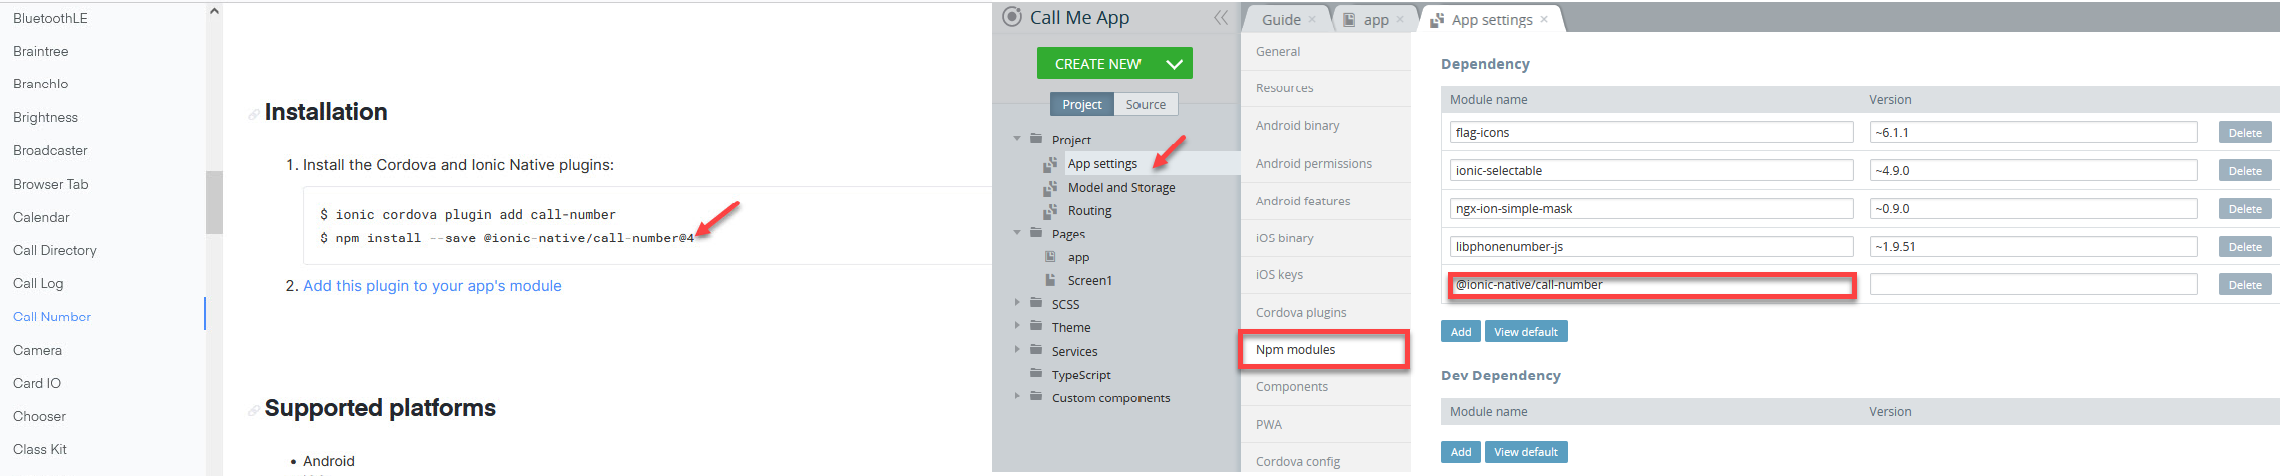
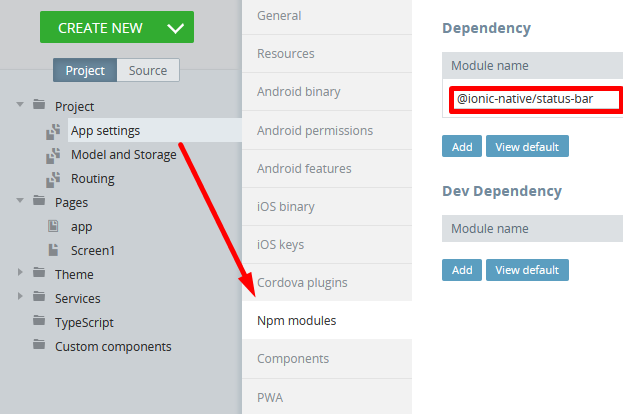
Open the App Settings > Npm modules tab, add a new dependency and copy the npm path (
@ionic-native/call-number) from the plugin documentation to the Dependency field and add the number of version indicated:
-
Now, scroll down the plugin doc page and copy the
importline code (import { CallNumber } from '@ionic-native/call-number';) to the Imports section of the app page MODULE panel and add the/ngxpart to it so that it looks like this:import { CallNumber } from '@ionic-native/call-number/ngx';:
!!!
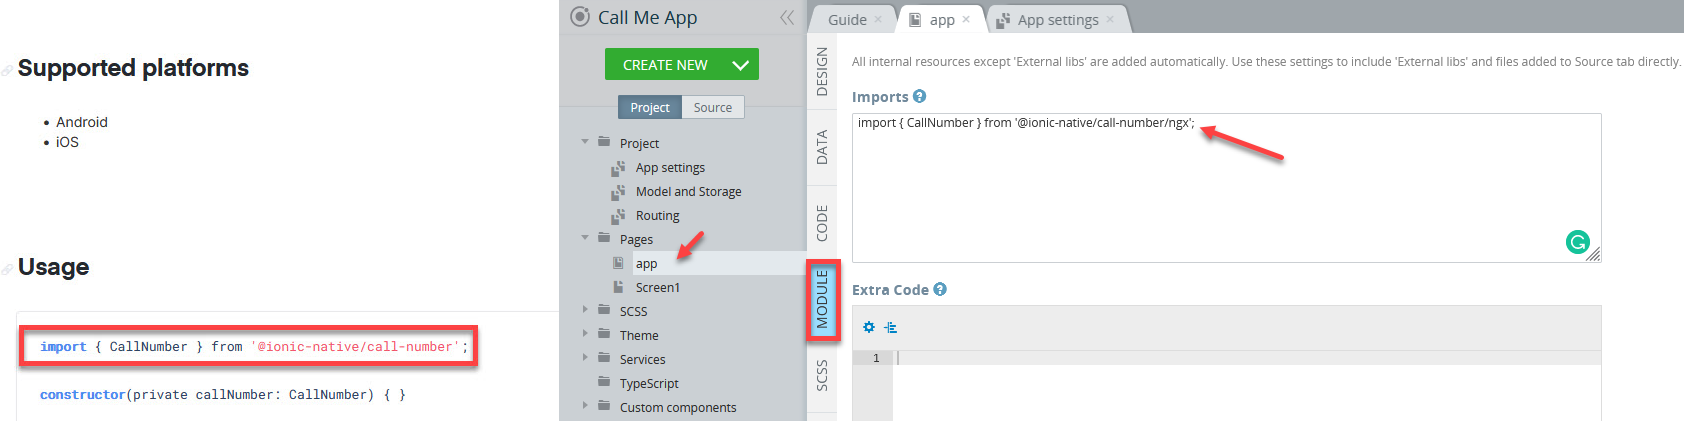
> 👍 /ngx
>
> Make sure that the code you copy ends with /ngx.
> Otherwise, you will get an error!
-
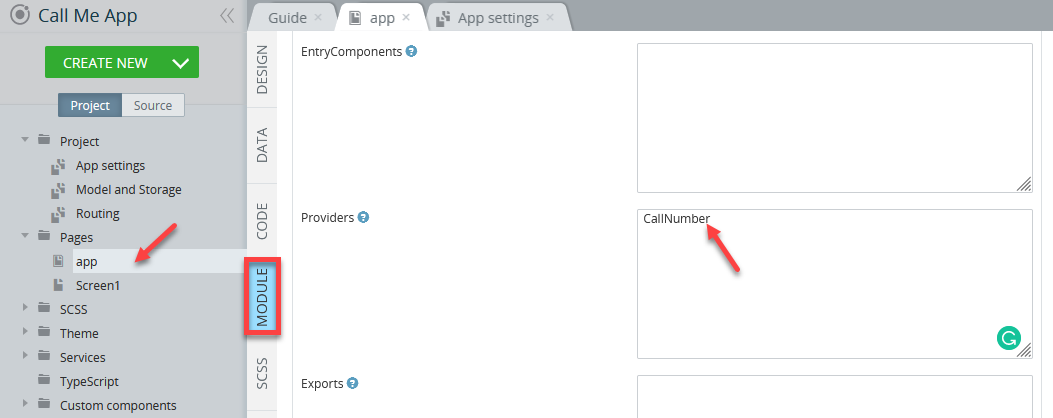
Add the plugin to the Providers field under the app page MODULE panel (just scroll the page down to locate this field):
-
Finally, copy the code from the import (with adding
/ngx) and constructor lines and paste it to the app page Custom Includes (with adding/ngxto the path) and Variables sections where the plugin will be used and select the Add DI checkbox for the variable:
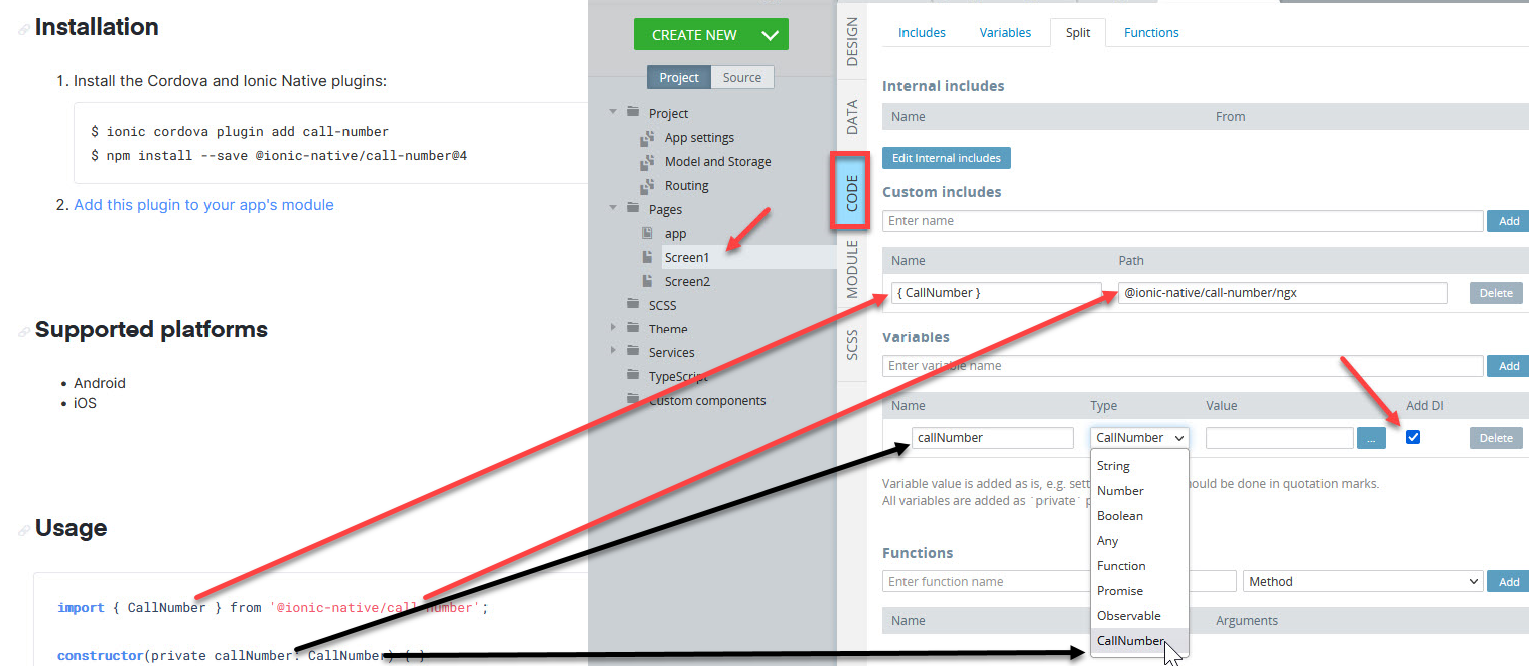
> 📘 Note!
>
> DI stands for Dependency Injector.
- Enjoy using the plugin you just added to your app!
Show Status Bar on Device
Recently, an issue from Ionic has been reported preventing the top status bar from appearing on the device. If you are the unlucky one facing this issue, check the workaround suggested by our Team below.
Actually, you will need to follow the steps that are similar to those described in the Using Native APIs from Ionic section with the only difference: the plugin to be used is Status Bar.
-
So, first of all, open the plugin page and click the link to the plugin Github page.
-
Import the plugin (more information about how you can do it can be found here).
-
Check that the plugin is added to the Cordova plugins list under the Resources > Cordova plugins tab:
-
In the app, open App settings > Cordova plugins > Imported Cordova plugins, enable the plugin and save:
-
Switch to the App Settings > Npm modules tab, add a new dependency and copy the npm path
@ionic-native/status-barto the Dependency field:
> 📘
>
> This can be found in the plugin documentation:
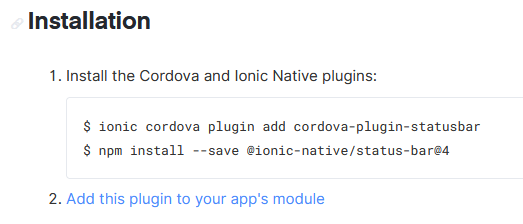
-
Now, scroll down the plugin documentation page to the Usage section and copy the import line code (
import { StatusBar } from '@ionic-native/status-bar/ngx';) to the Imports section of the page where the plugin will be used (this will also apply to all app pages by default) MODULE panel:
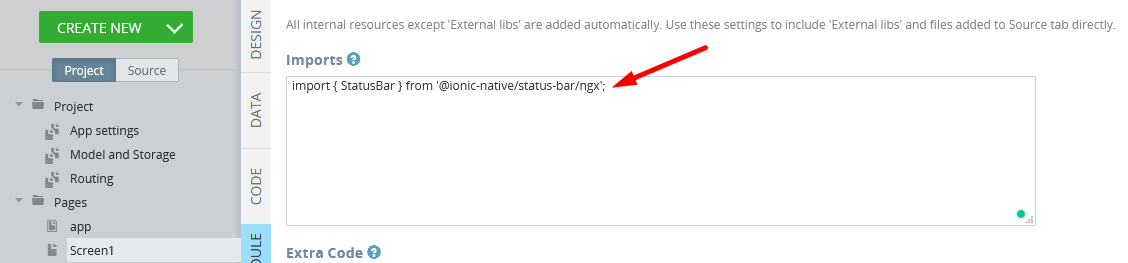
-
Scroll the MODULE panel page down to locate the Providers field and add the StatusBar plugin:
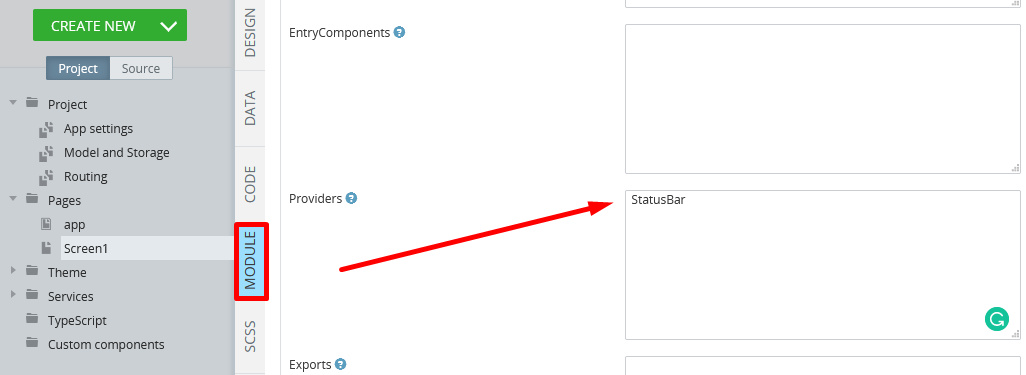
-
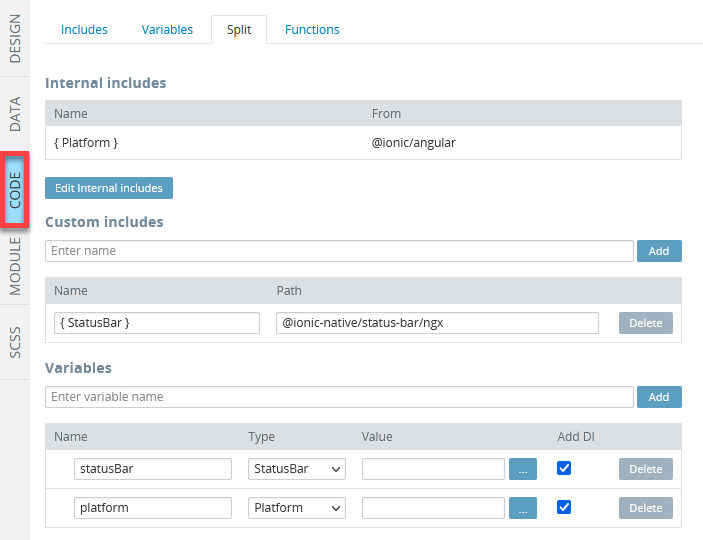
After that, go to the CODE panel and click Edit Internal includes and add the { Platform } from "@ionic/angular" dependency to the project:
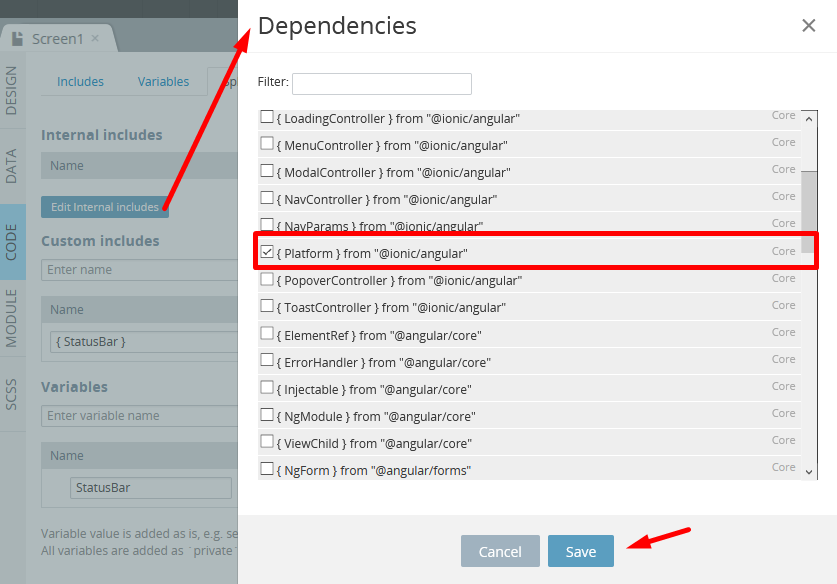
-
Then, copy the code from the import and constructor lines (go back to the plugin documentation page for reference) and paste it for Custom includes and Variables fields.
-
Also, add one more variable,
platformof the Platform type. Make sure that the Add DI check boxes are selected for both variables.
When ready, your page CODE panel should look like shown in the screenshot:
-
Finally, open the screen DESIGN panel, expand the EVENTS tab from the bottom and define the Page create event with the following code:
this.platform.ready().then(() => {
    if (this.platform.is('android')) {
        this.statusBar.overlaysWebView(false);
        this.statusBar.backgroundColorByHexString('#4d838f');
    }
});
This is how it should look like in the App Builder:
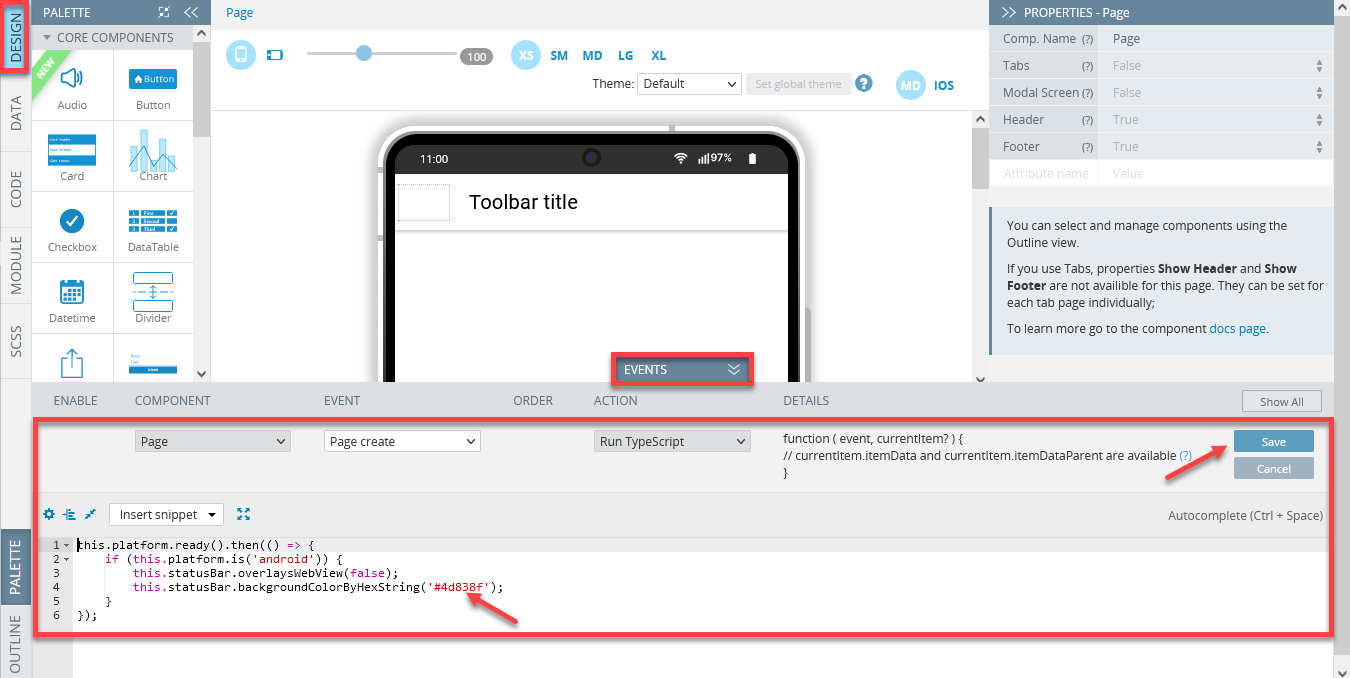
Now, you can save your app and build it to check on the device: the status bar should be of specific color indicated in the code (#4d838f).
Passing Data to/from Modal Screen
In this example, you will learn how to pass properties from Screen1 to a modal screen and back.
-
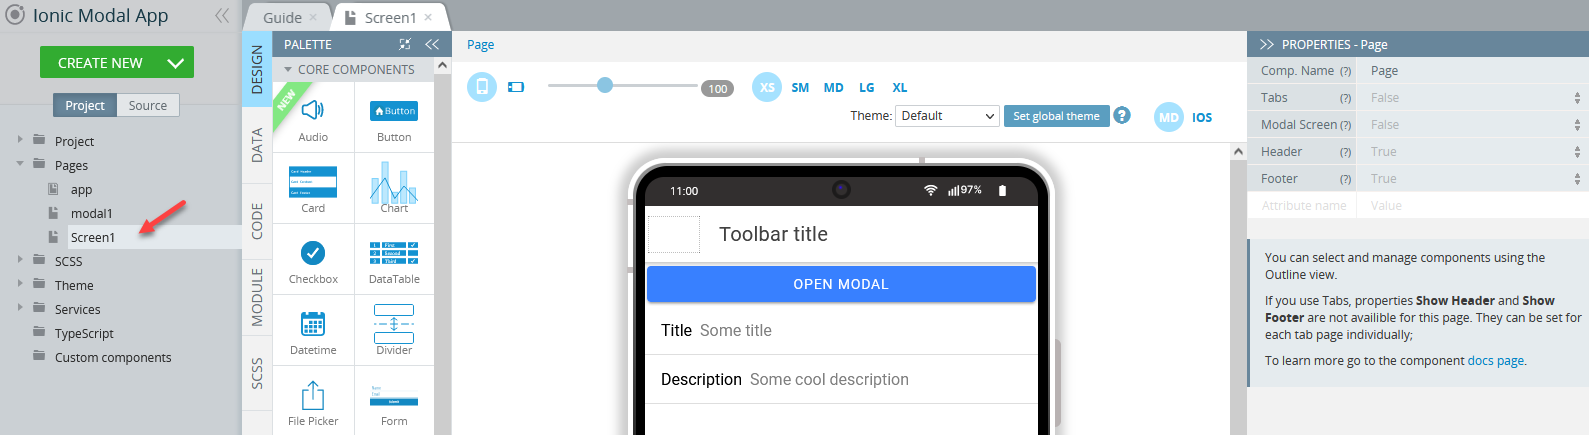
Suppose, we have two properties, for example, Title and Description added as Inputs on Screen1 and a modal screen named modal1.
-
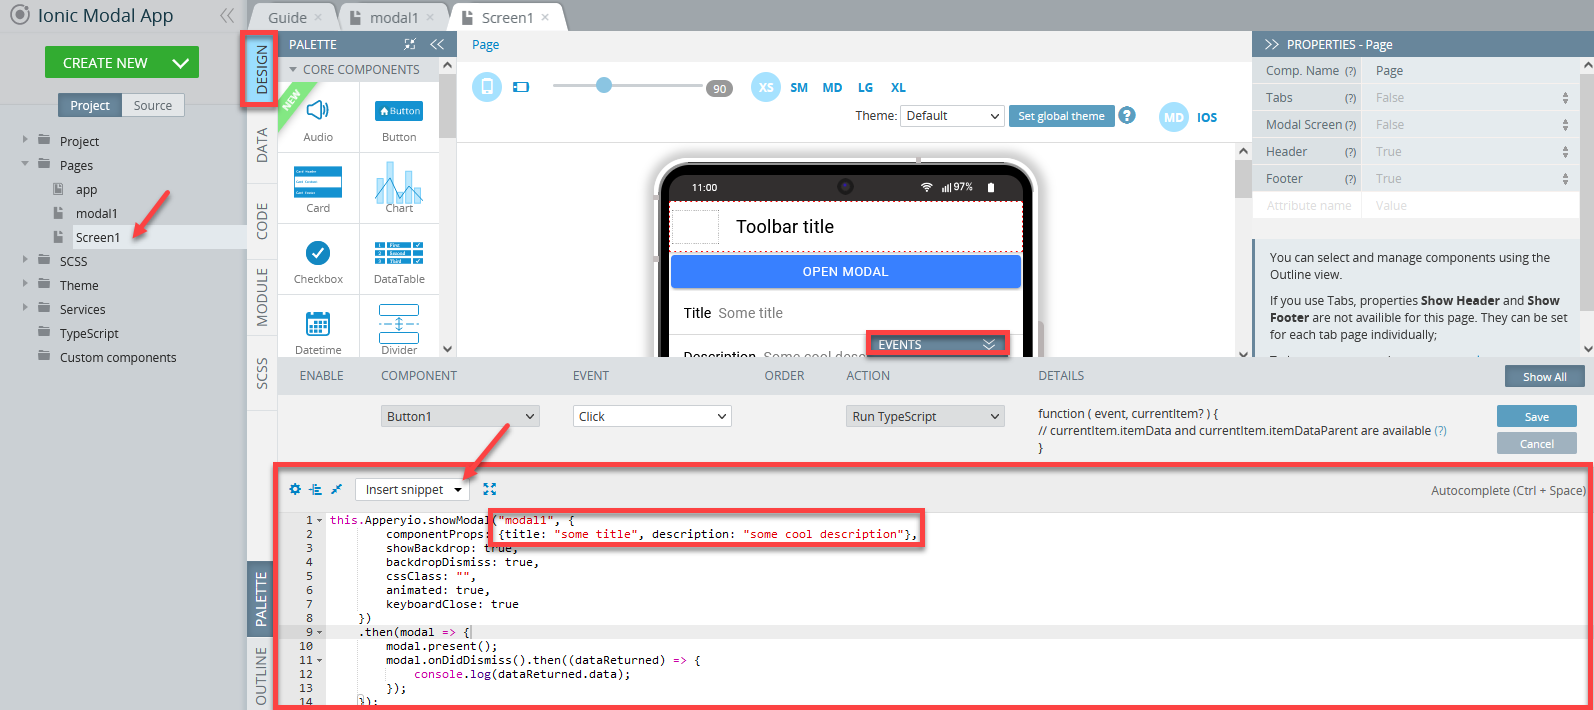
On Screen1, create a Button, name it Open modal:
-
Then, unfold the Screen1 EVENTS tab below, select the button and, for its Click event, select the Run TypeScript action and run the following TypeScript by using the Show modal snippet (select from the Insert snippet dropdown):
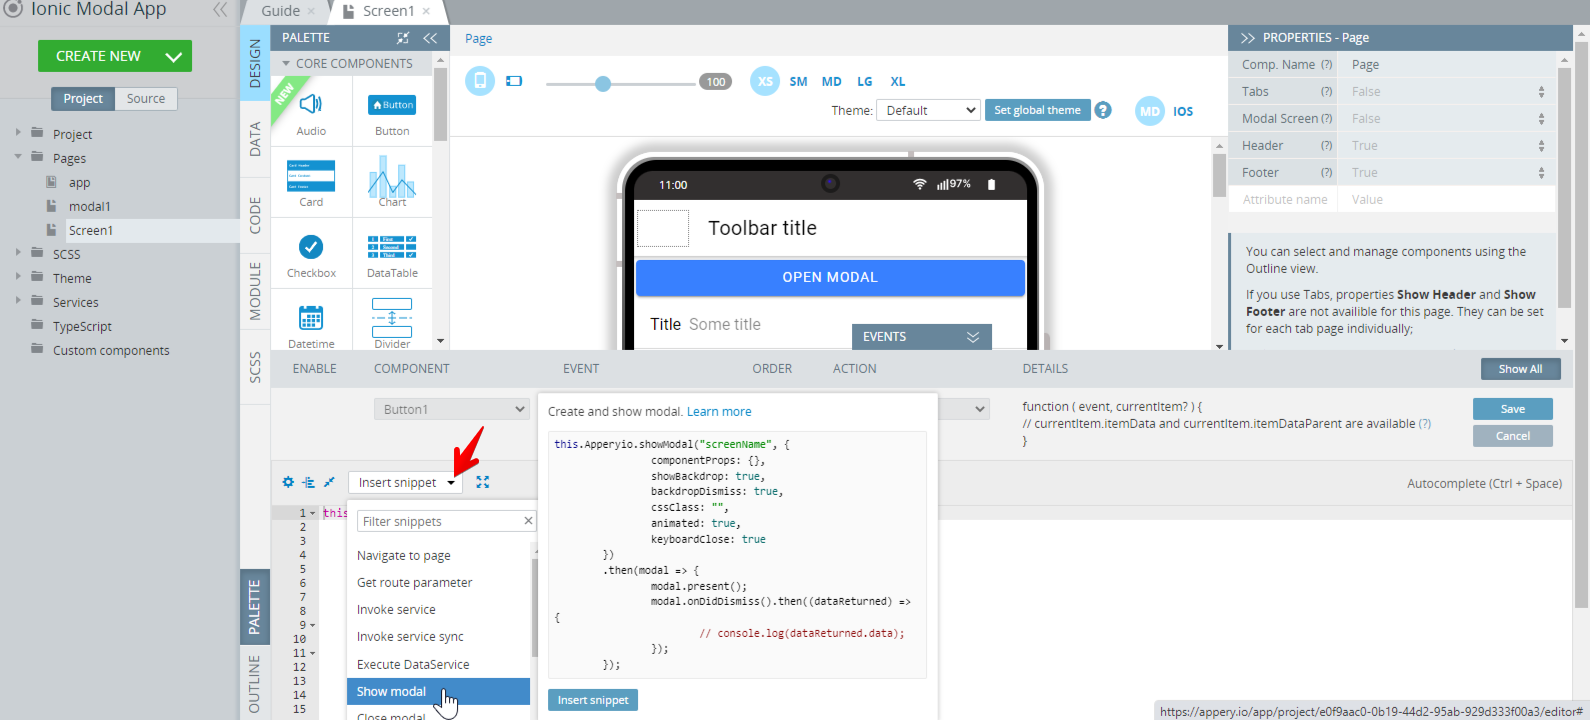
Make sure that necessary adjustments have been made to the code:
this.Apperyio.showModal("modal1", { // "modal1" is modal screen name
        componentProps: {title: "Some title", description: "Some cool description"}, // here is data that we want to send
        showBackdrop: true,
        backdropDismiss: true,
        cssClass: "",
        animated: true,
        keyboardClose: true
    })
    .then(modal => {
        modal.present();
        modal.onDidDismiss().then((dataReturned) => {
            console.log(dataReturned.data); // here we can process data received from modal screen
        });
    });
-
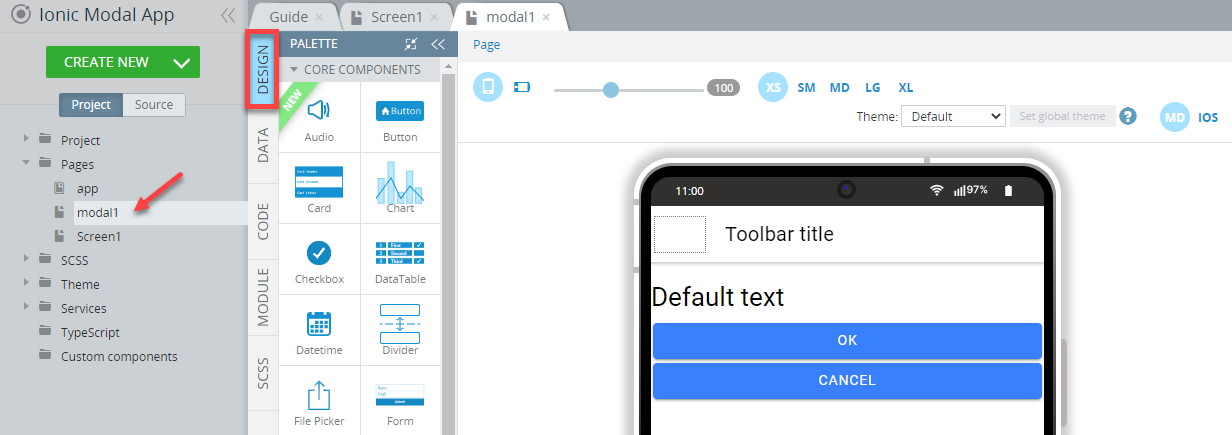
Now, go to modal1 screen and add one Text and two Button components to it:
-
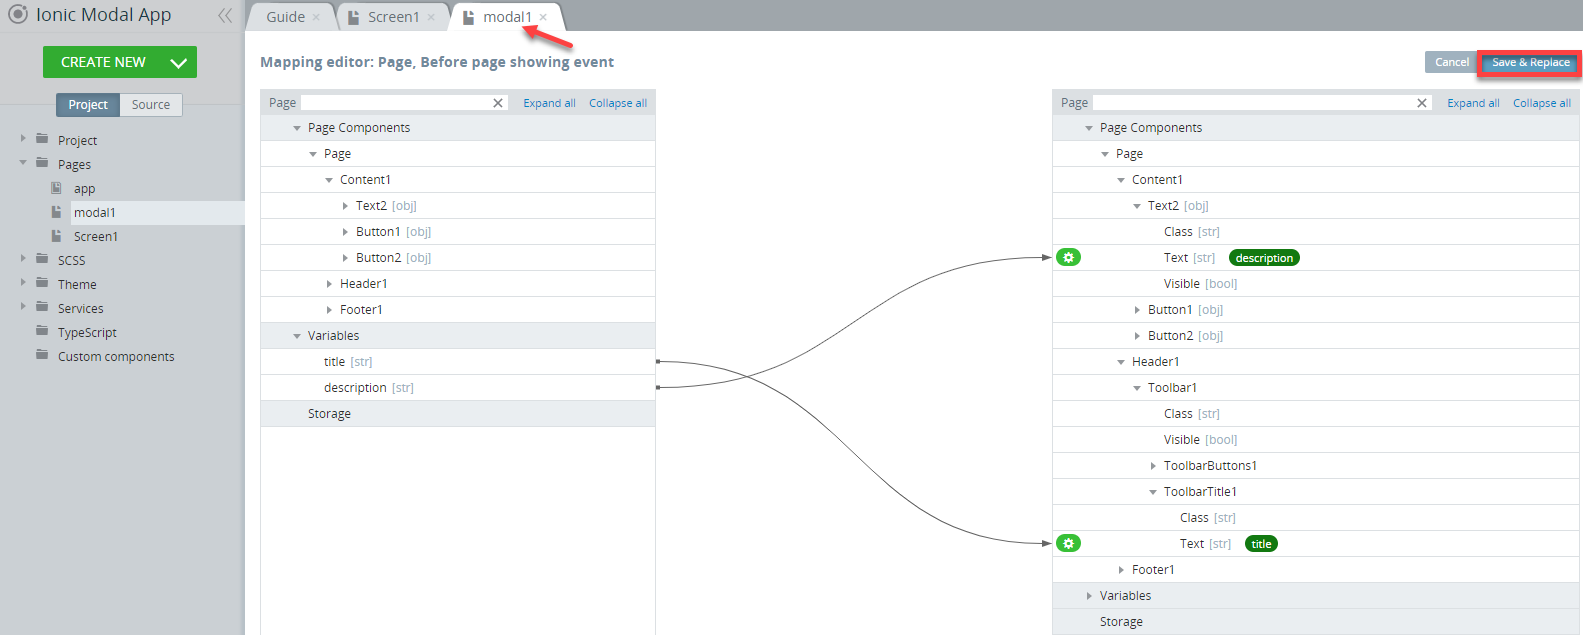
Now, switch to the modal1 CODE panel and add two variables with the names
titleanddescription; both of String type:

> 🚧
>
> Make sure that the variables' names correspond with the object properties' names defined in step 3: {title: "Some title", description: "Some cool description"}.
> This is why we create variables with the names title and description of String type in this step.
-
To use them on modal1 inside the code,
this.titleandthis.descriptioncan be used.
But we advise using the mapping feature. For example, in this case, the following mapping can be used for the Before page showing event of the Page component where the variables are mapped to their corresponding components on the screen:
-
To close modal and send data from modal1 back to Screen1, select the OK button and, by using the Close modal snippet (select from the Insert snippet dropdown), run the following Run TypeScript event by the button click with passing the data we need to send (in this case,
{action: "ok"}):

-
To close modal with passing different data, for example,
cancel, select the Cancel button and, by using the same Close modal snippet, run the following Run TypeScript event by the button click but sending different data to the modal ({action: "cancel"}):

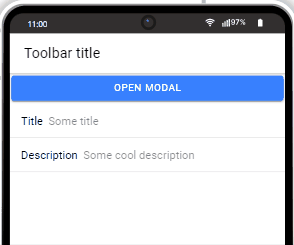
Now, test the app opening the modal screen:
Basics about Working with Select Component
Populating Select Options with Data Using Variables
-
To populate options with Select, you need to have an array with items inside.
-
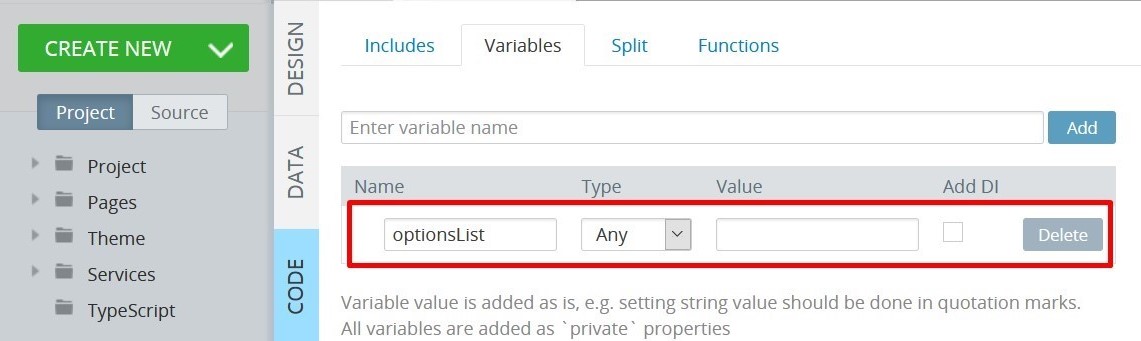
Add a new variable to the page. Name it to
optionsListand set its type as Any:
-
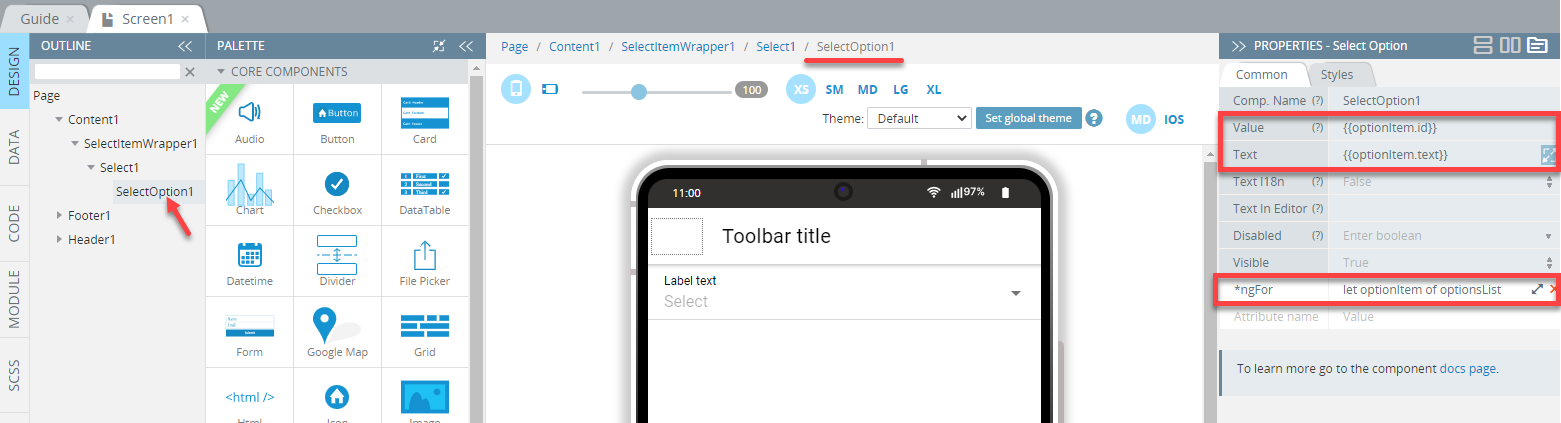
Go to the page DESIGN panel and add (or activate) the Select option component. Then define its attributes under the PROPERTIES panel as follows:
- *ngFor = let optionItem of optionsList. This attribute will multiply the Select Option component with every item in the array in the variable optionsList.
- Value = {{optionItem.id}}. This attribute sets a value for certain select option and will be used to get or set the selected option.
- Text = {{optionItem.text}}. This attribute sets a select option text.
- Now, you can fill the
optionsListvariable with an array in the code. Executing this code will populate the Select component:
this.optionsList = [
    {"text": "Red", "id": "1"},
    {"text": "Green", "id": "2"},
    {"text": "Blue", "id": "3"}
];
Getting and Settings Selected Option(s) into Variable
-
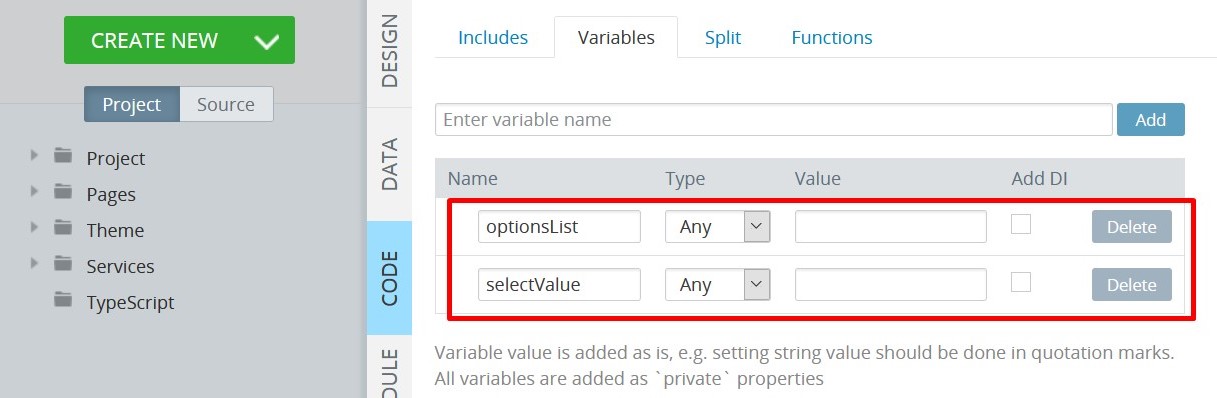
Add another variable,
selectValue, to the page and set its type to Any:
-
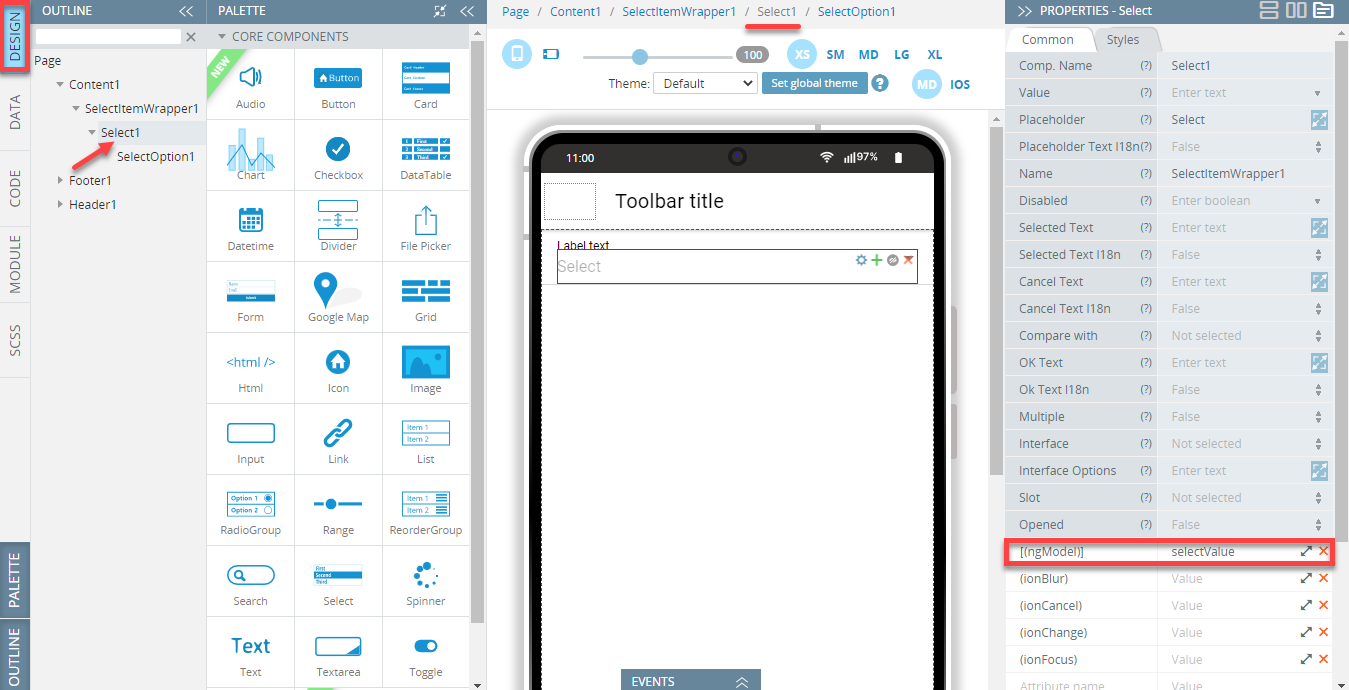
On the page DESIGN panel, activate (by clicking on it) the Select component and set its [(ngModel)] attribute to selectValue:
-
Now, you can use the following code to check the selected option in the Select component:
//where "2" is a value of option which you want to be selected.
this.selectValue = "2";- To get the selected option, use the below code:
//Here this.selectValue variable will contain a String.
alert(this.selectValue);
Multiple Select
-
To make the Select component to multiple checked options, set its Multiple attribute to True:
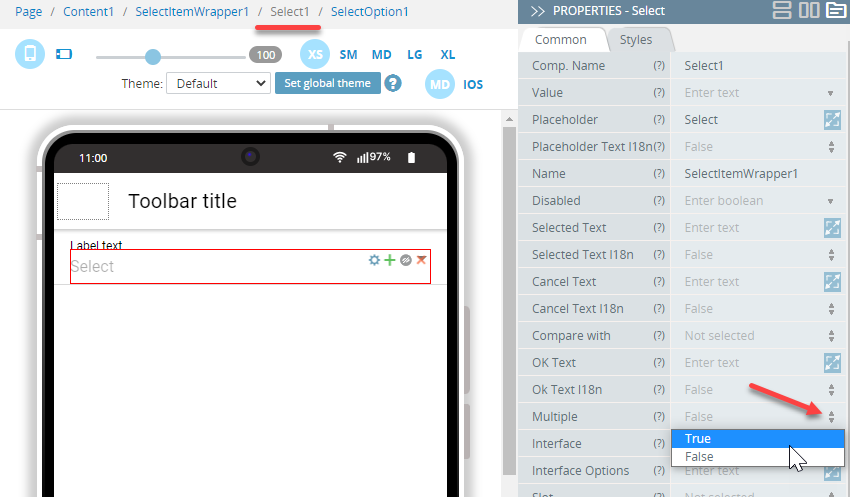
-
Now, you can use the following code to check multiple selected options in the Select component:
//where "2", and "3" are values of options that need to be selected.
this.selectValue = ["2", "3"];- To get multiple selected options, use the following code:
//Note in multiple mode, this.selectValue variable will contain an array with selected items.
alert(JSON.stringify(this.selectValue));
Internationalization in Ionic Apps
Check this document to learn how to use the ngx-translate third-party internationalization (i18n) library to build a multilingual Ionic app.
Videos
> 👍 Example with Generating PDF Files
>
> You can watch the below video tutorial to learn how to generate PDF files in Appery.io mobile and web applications using the jsPDF npm module and complimentary plugins like jsPDF AutoTable.
> Follow these instructions to create well-structured PDFs that render correctly across a host of devices and screen resolutions:
`}
You can also check our Youtube Channel featuring the newest and/or most requested Appery.io platform options.
Updated about 1 year ago