iOS
iOS app export.
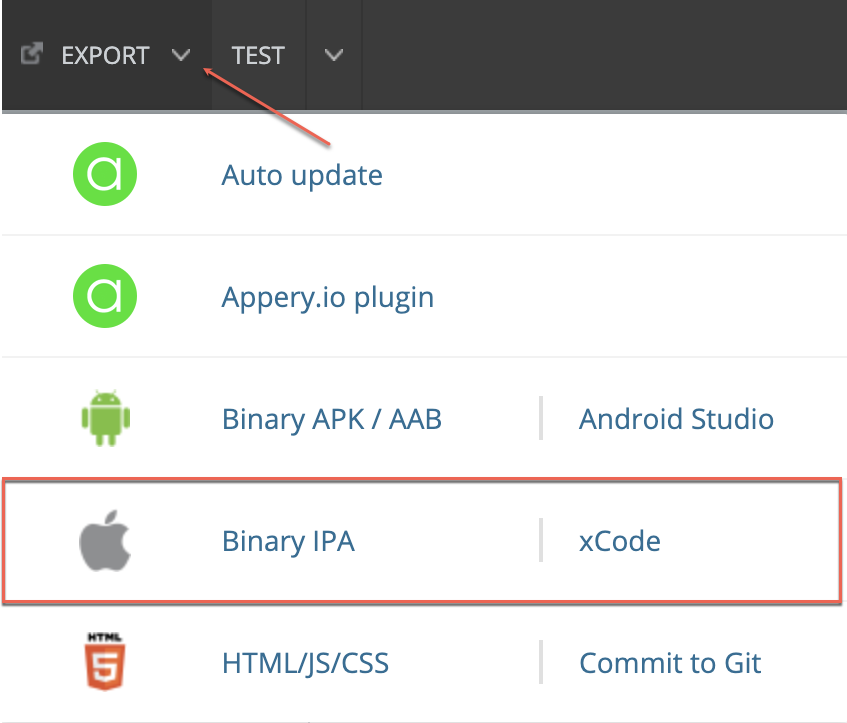
You have 2 options when exporting your app for iOS: Binary IPA or xCode (source code):
- Binary app (you can select to build Release or Release and Publish type
.ipa) – this app version can be published to the App Store.
Release and Publish BuildsIf the Release and Publish type is selected under the iOS binary tab, building the release app version will be performed together with publishing it to the App Store.
Please check this step-by-step Appery.io YouTube Education Guide video to learn how you can develop an iOS mobile app with Appery.io right in the browser using a Windows desktop.
Also, you will learn how to install it on an iPhone for testing and then publish it to the App Store:
When ready, your binary package will look like this:
- xCode project (source code) – you get HTML/CSS/JS + the PhoneGap library configured as an xCode projects. If you decide to build for xCode, you will get the
.zipfile:
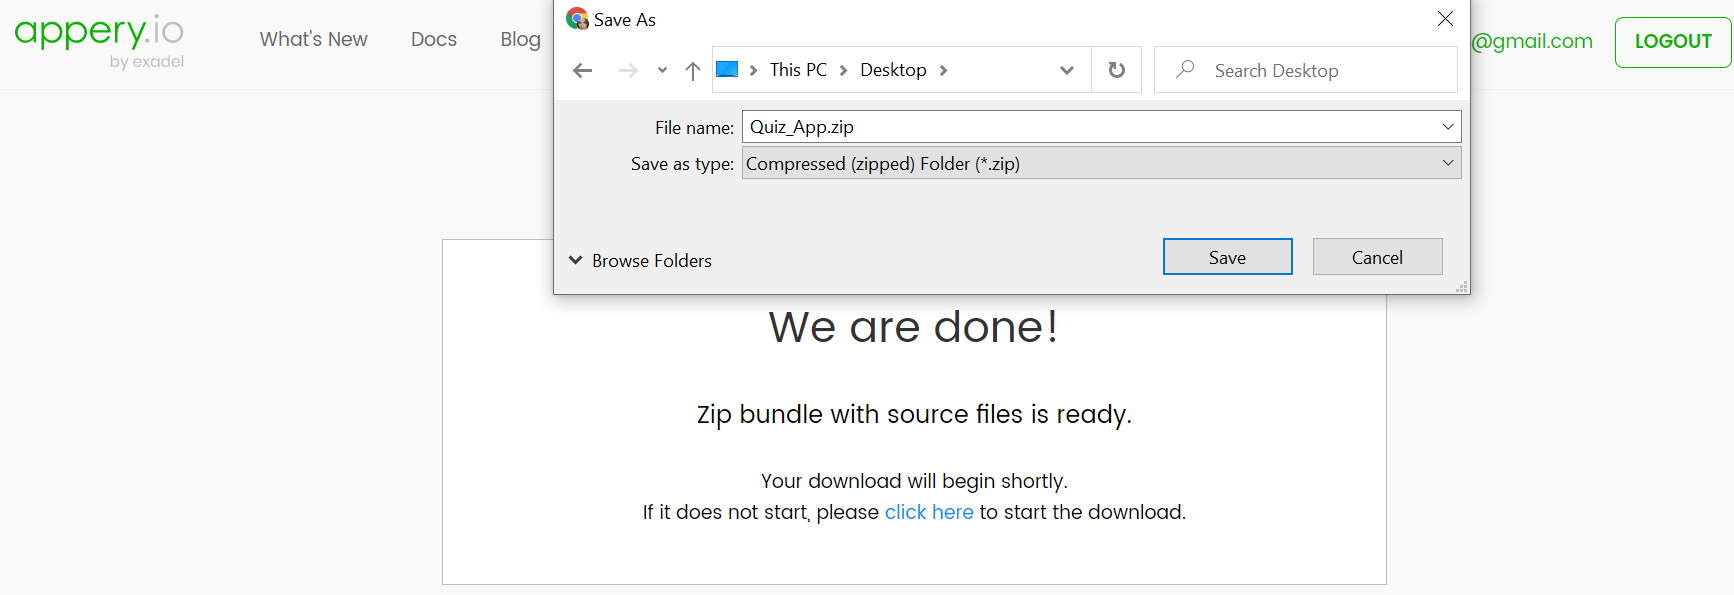
Once your project is generated, the QR-Code can be used to upload the application to your device or save the file for further use.
Important!Before you start your build, make sure your account has at least one iOS certificate file. Otherwise, you will get an error notification.
Binary App
The Appery.io platform provides a cloud-based building app service that is programmed as a Cordova app for iOS, which you can publish to the App Store. Since iOS is more demanding in terms of certificates, some additional actions are required to build an .ipa.
You can select between two types when building the release version that is to be submitted to Apple: Release or Release and Publish. Both build types are similar with the only difference that when building the Release and Publish will automatically submit your app to the App Store for publishing.
Important!Before you start building the iOS binary file, make sure you have the following:
- Apple certificate (
.p12).- Apple provisioning profile (
.provision).- Bundle ID (
com.company.) – can be found in your Apple certificate.Check A Beginner’s Guide to iOS Provisioning Profiles for details.
iOS Binary Settings
Appery.io comes with iOS binary file settings where you can configure everything you need to package the app for iOS.
Among other binary settings, app label, bundle ID, Cordova iOS version, and build type can be defined.
Also, enabling the automatic app update feature is available from under this tab.
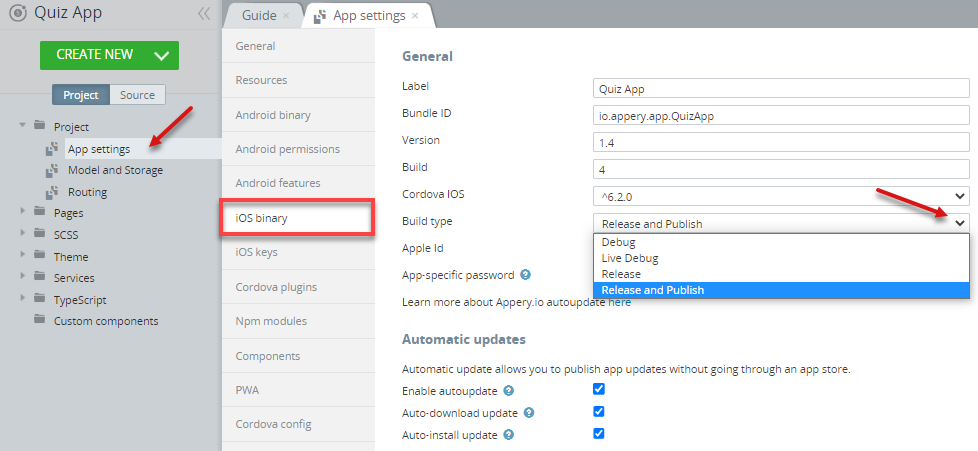
Build Type Setting
To build your app binary, go to your project, click App Settings > iOS binary > Build type and select the Release or Release and Publish option from the drop-down (by default, the Debug type is set that is used for testing purposes only. Also, the Live Debug option is designed for quick testing and/or debugging your project and cannot be used for publishing):
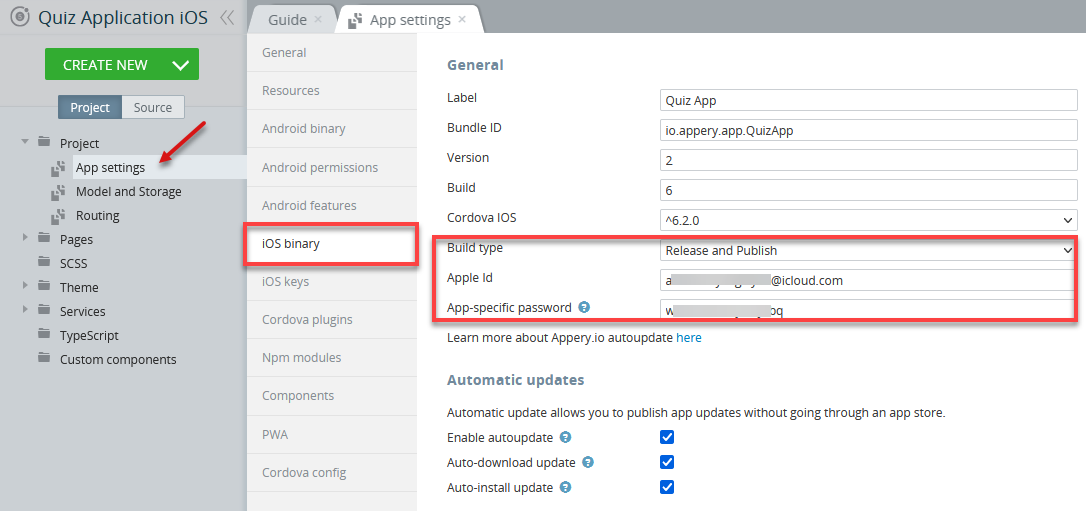
Release and Publish BuildsIf you build your app with publishing for iOS, please make sure you provide your Bundle Id, Version, Build, Apple Id and add the app-specific password that is generated on the Apple side.
Read more here.
With the Release/Release and Publish options selected, JavaScript assets will be minified to reduce the binary size.
Publishing for iOS
Release and Publish Building
Publishing Appery.io apps for iOS is made easy with the integrated Release and Publish option, so before you can start building your release app with further publishing it, select this type under App settings > iOS Binary tab:
Important Note!The Release and Publish building option is available for the projects built with Ionic only!
Also, to build your app with publishing for iOS, you will need to provide your Bundle Id (ID you provided for the uploaded certificate (you made it when registering the app on the Apple website)), Version, Build.
Also, you will need to make sure you specified the correct Apple Id and added the app-specific password generated on the Apple side:

Important!Make sure you also provided the correct Bundle Id, Version and Build data.
Example: Generating App-Specific Password
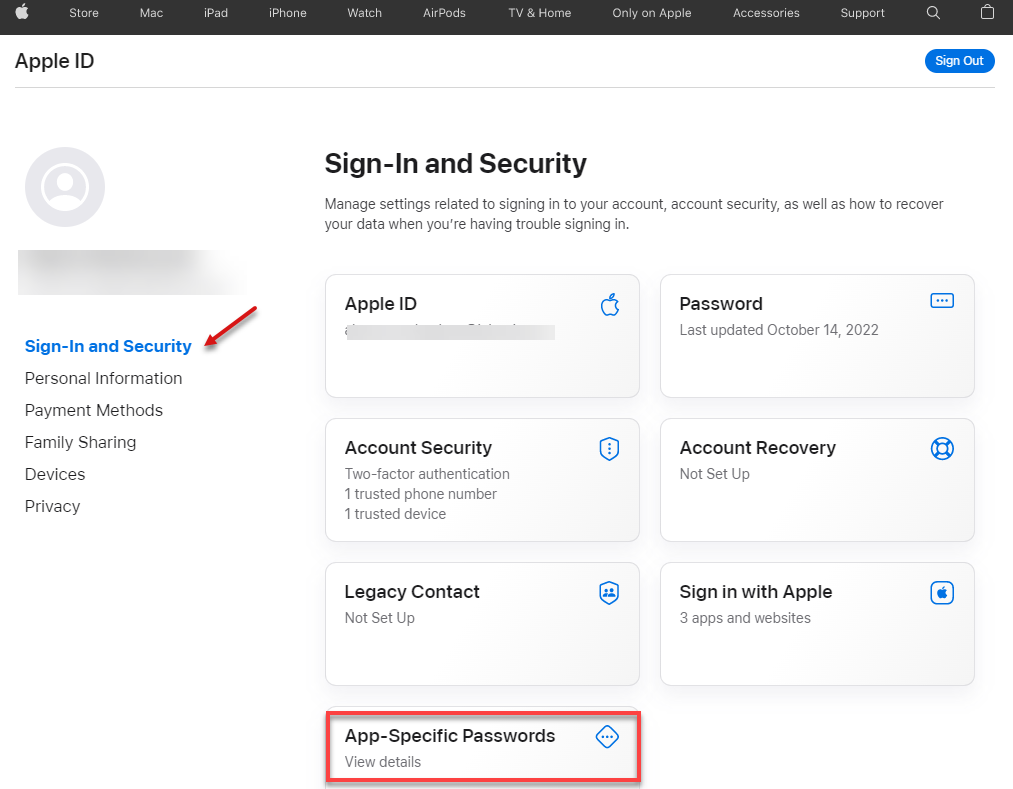
Below are the sample steps for generating the app-specific password.
- First of all, sign in to appleid.apple.com.
- In the Sign-In and Security section, select App-Specific Passwords:
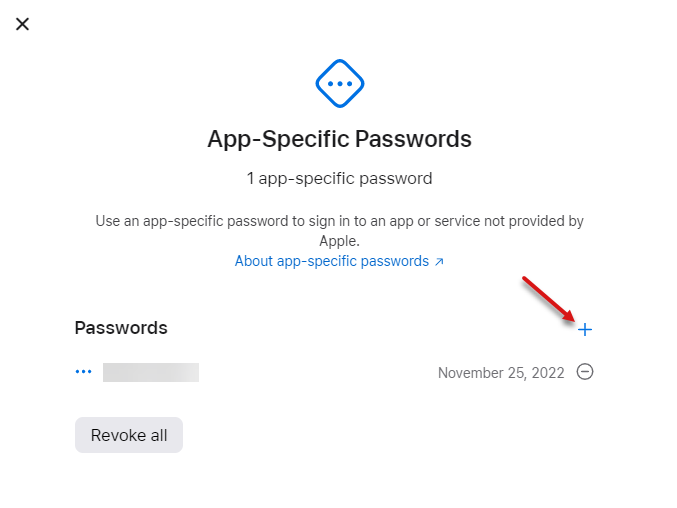
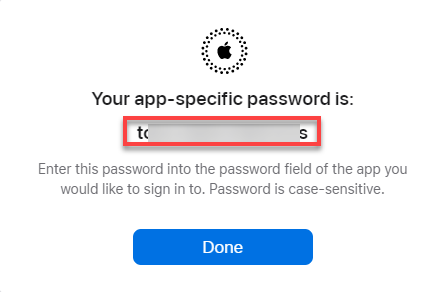
- Click Generate an app-specific password or select the blue plus sign icon (shown if you already have some passwords):
- You will be asked to confirm the password by reentering your Apple Id pass:
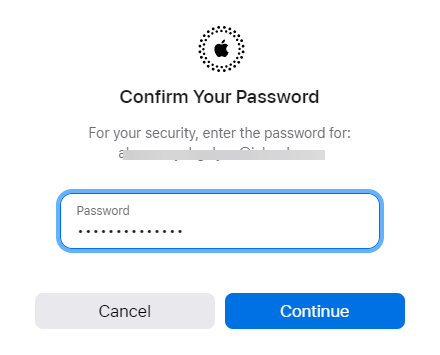
- After you click Continue, the app-specific password is generated so that you can copy it to clipboard and then paste for your Appery.io app (under the App settings > iOS Binary tab):
Want to know more?Here is the document from Apple with more details on how to generate an app-specific password.
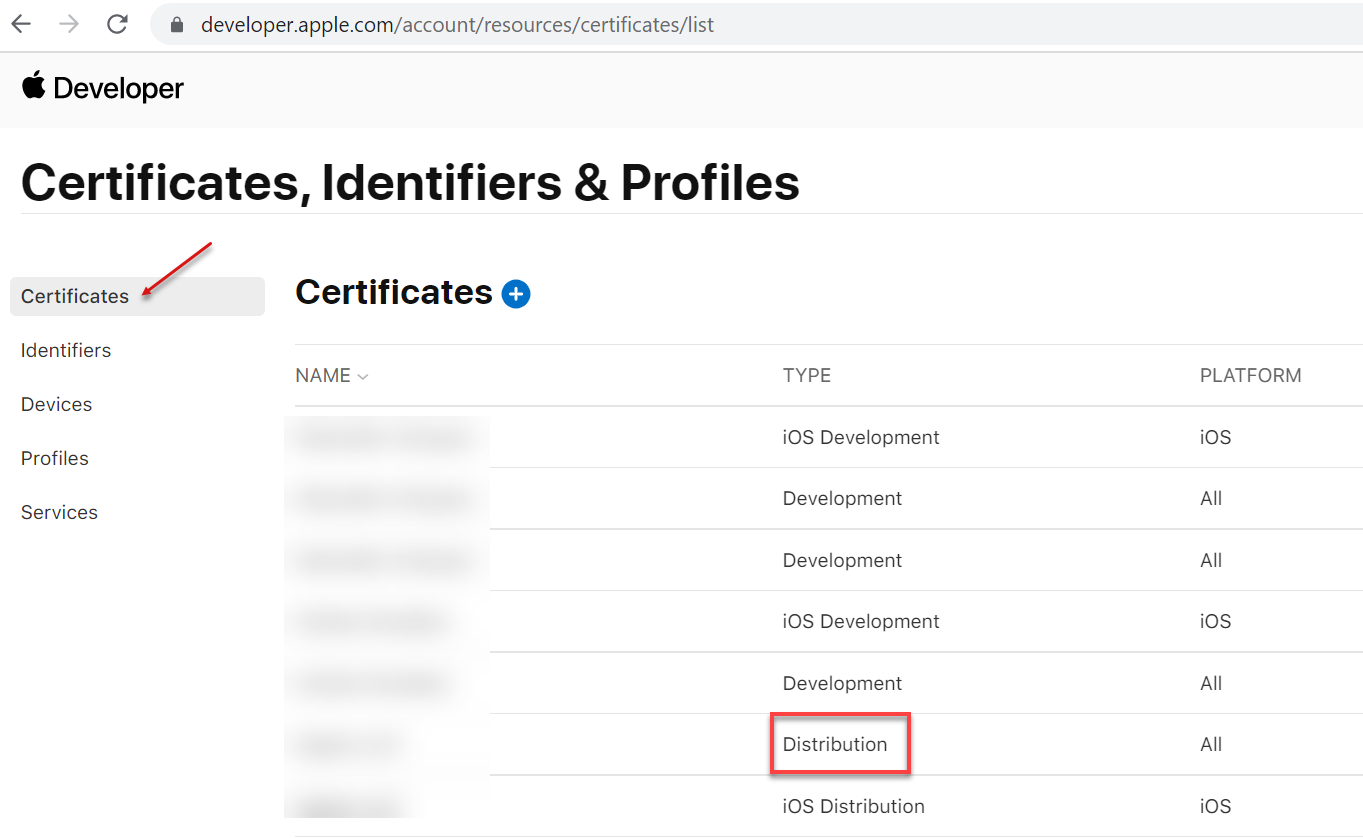
iOS Certificate File
Another important prerequisite for building an iOS binary file: your account should have at least one iOS certificate file:
You can select to import the iOS certificates or generate them under the App Builder Resources tab in three simple steps and then used for generation of a binary file.
Importing iOS Certificate
Before You Get StartedBefore you can build an iOS binary, you need to sign up for the iOS Developer Program and provide all of the developer information and certificates below. If you are new to this, here is a good link to get you started: Managing Your Signing And Provisioning Assets. You also will need a Mac to submit the binary to the App Store.
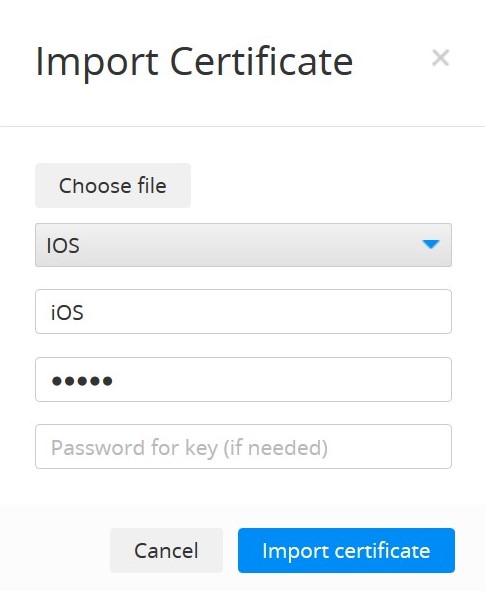
- Go to the Resources > Certificates tab.
- Click Import Certificates > iOS.
- Click Choose file and select your iOS Distribution .p12 file.
- Type your password for this certificate and click Import certificate:
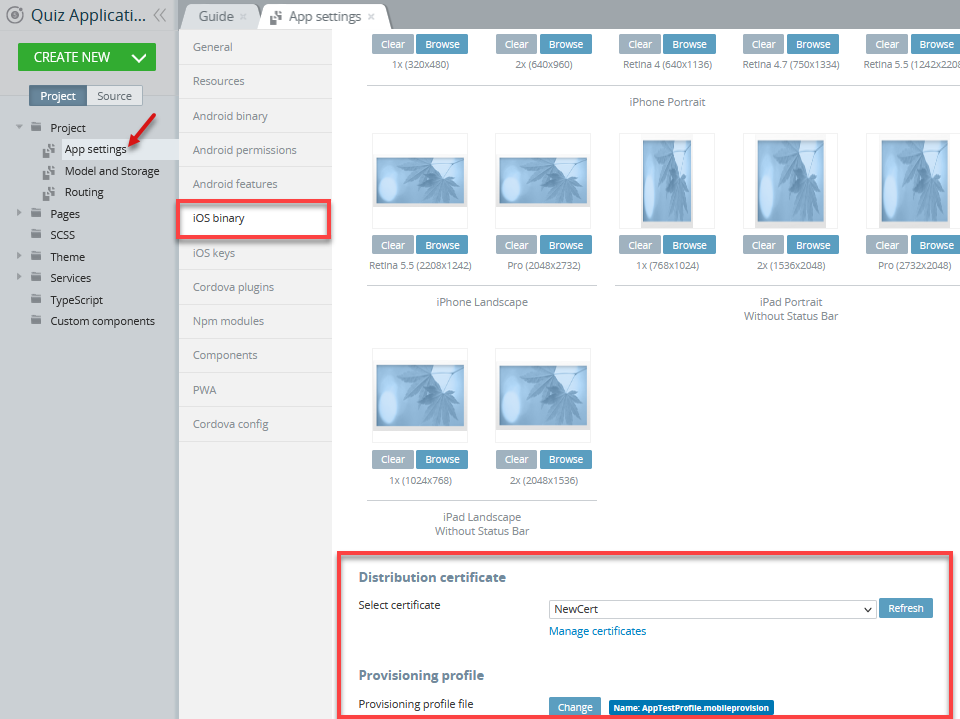
- Go to App Settings >iOS binary.
Generating iOS CertificatesiOS certificates can also be automatically generated.
- For Bundle ID, make sure you type the bundle ID that you provided for the uploaded certificate (you made it when registering the app on the Apple website). For example, io.appery.app.QuizApp.
- Scroll down the page and under the Distribution certificate section, select the earlier uploaded
.p12certificate from the drop-down menu.
Important!Make sure you upload the
.p12file otherwise you will get an error notification.
- Click Change in the Provisioning profile section and upload the
.mobileprovisionfile:
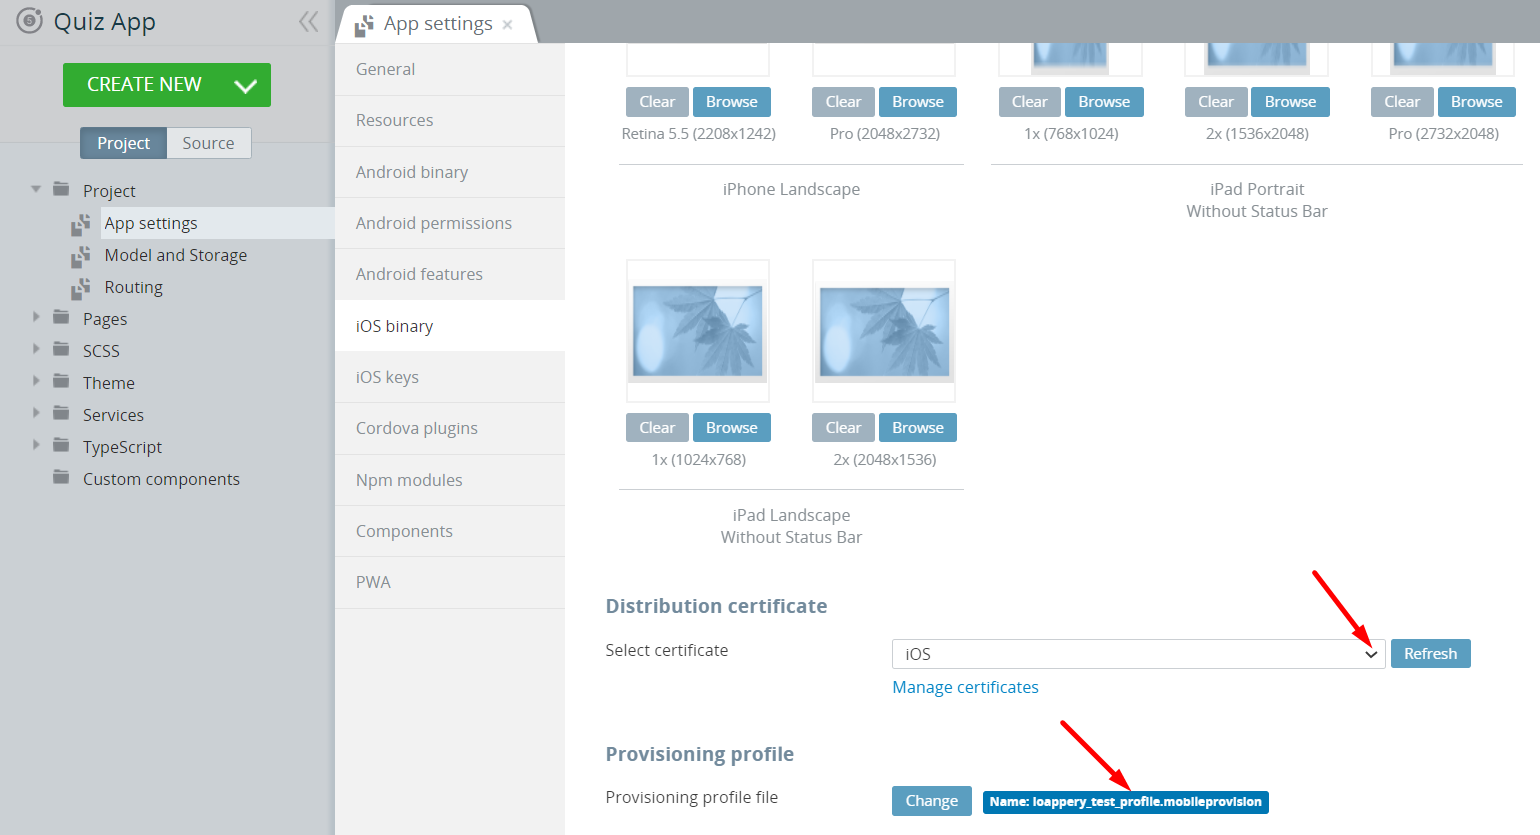
Important: Release and Publish BuildsIf you are building the Release and Publish type, please double check that the Apple Distribution certificate type is provided for the Distribution certificate value:
Click Save.
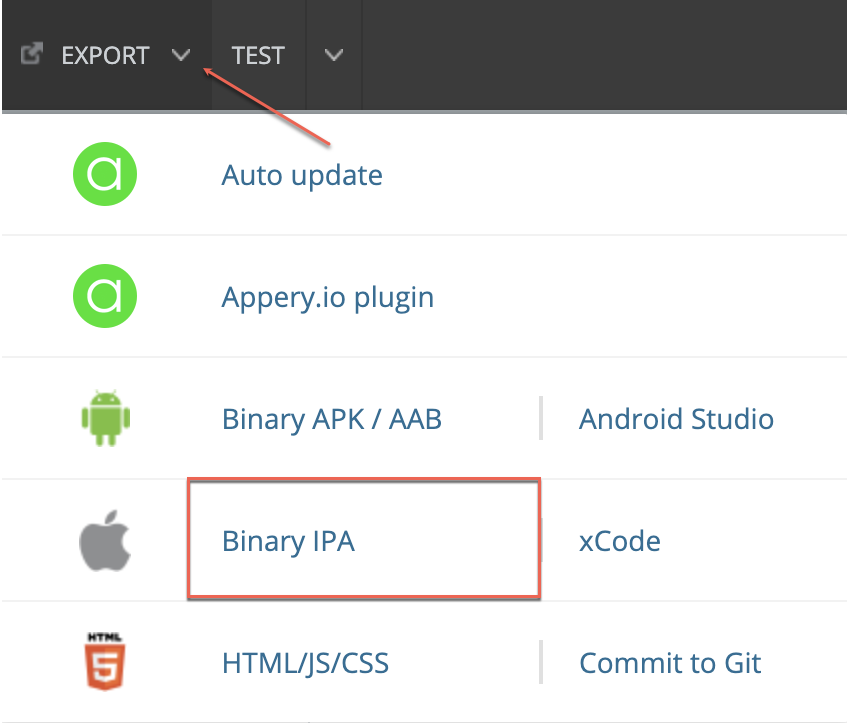
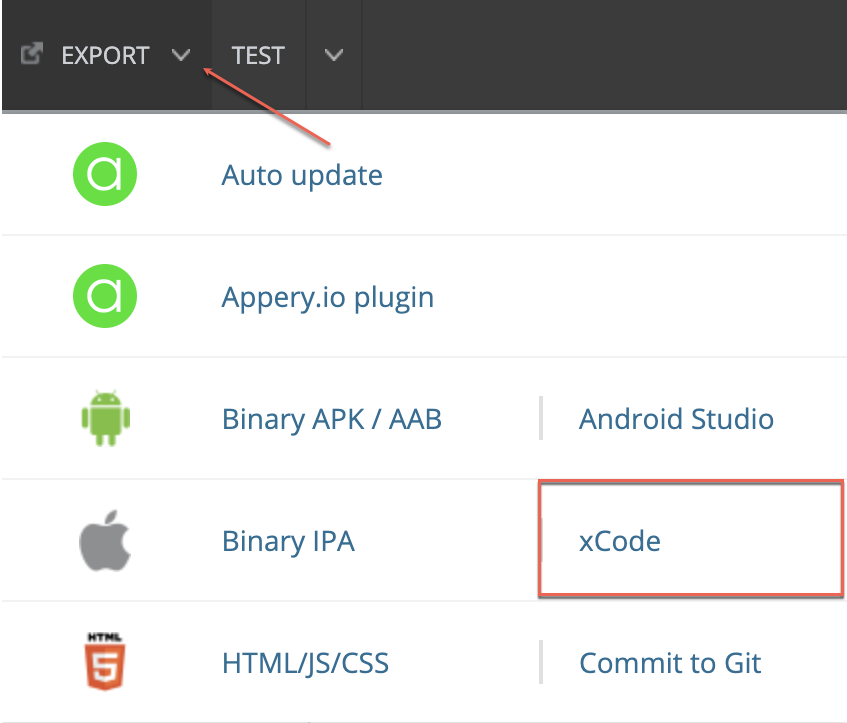
- To publish the app for iOS, click EXPORT > Binary IPA:
Note that building the .ipa file could take a while.
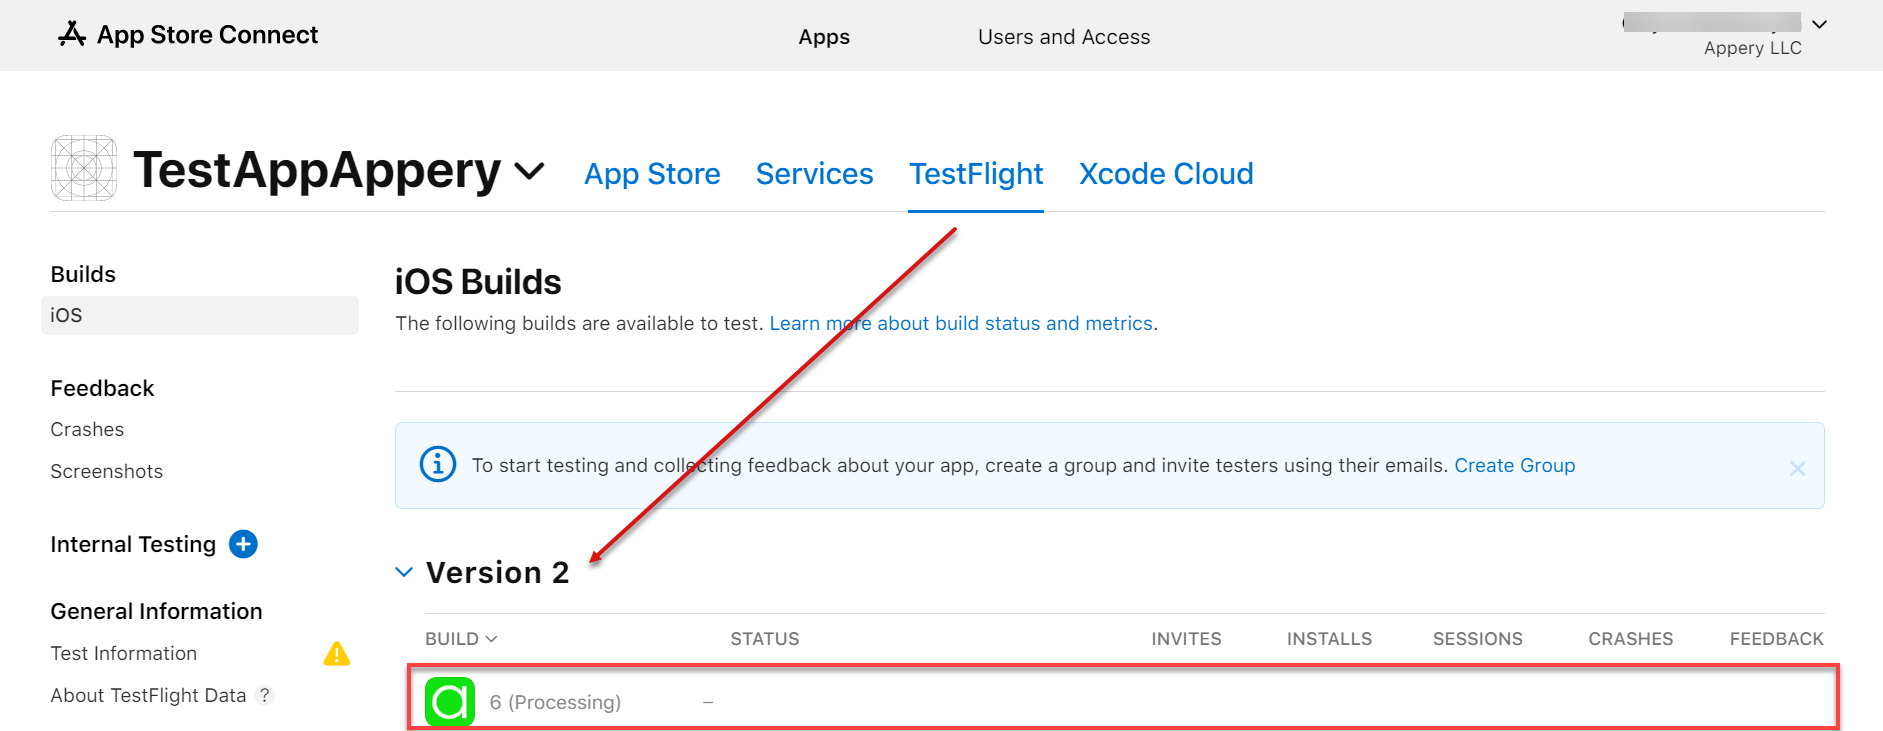
Also, when started, your build progress should be shown for the project in your https://appstoreconnect.apple.com/ account:
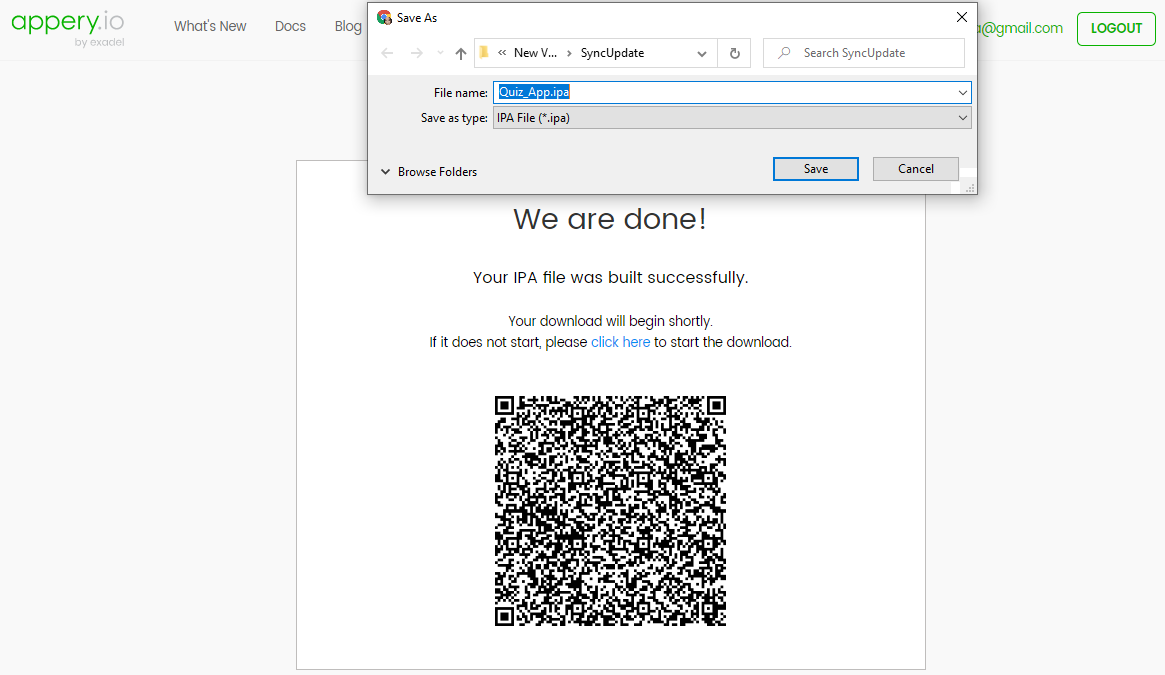
- After the build is completed, the
.ipafile can be downloaded and you’ll also see a QR code:
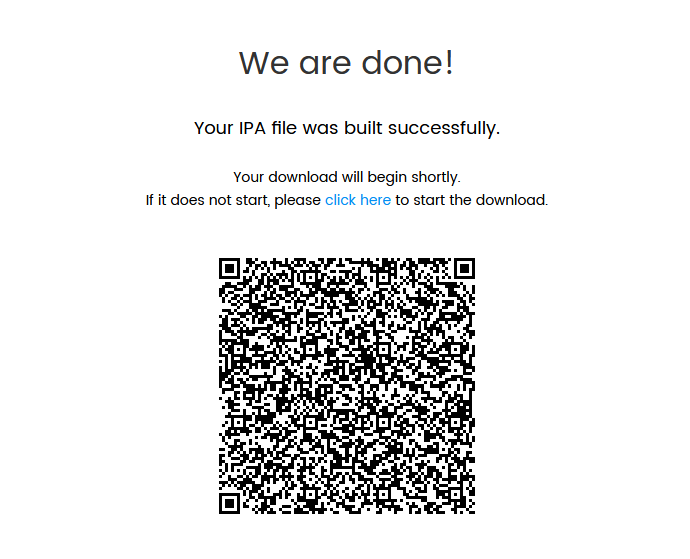
Now, you can scan this QR code (use the Qrafter app, for example) to download the file directly on your iOS device and install it.
- Also, in your https://appstoreconnect.apple.com/ account, the build progress (takes some time to update) should finalize with the possibility to manage it according to your needs:
Troubleshooting certificate is not valid Error
Error: Certificate is not valid / Certificate is not valid or trustedExport will be successful only when valid certificates are used.
If you get the certificate is not valid / certificate is not valid or trusted error, please make sure you have the corresponding Apple Root and Intermediate Certificates (G3, G4, and/or G5) from the Apple certificate authority installed.
Generating iOS Certificates
Please follow the steps from this document to get your iOS certificates generated for submitting the app to the App Store.
More References on Generating iOS Certificates
The following links can also be helpful if you select to generate iOS certificates outside Appery.io .
Windows
Mac OS
- App distribution guide (from Apple).
Publishing Apps to App StorePublishing your app to the App Store is outside the scope of our support.
Keys and Settings
Important Information about the Camera Plug-inThe keys variables are currently not working, please refer to our workaround hint here:
https://docs.appery.io/docs/known-issues#camera-plugin-variables-for-ios-projects-
iOS 10> requirementStarting from iOS 10 it's mandatory that
NSCameraUsageDescriptionandNSPhotoLibraryUsageDescriptionbe added to the info.plist.There is no need to add such settings manually in project Source files, instead, you can add them in App Settings > iOS keys options as a key value.
If you don't pass the variable, the plug-in will add an empty string as value.
The latest Cordova plug-ins (starting from the Libraries version 4.1 JQM and 1.1 Ionic) require adding keys and values when the app is being approved by the App Store. The plug-ins that come bundled with your app, the keys are set by default. To view or modify the settings, click the Options button.
Here are some examples.
| Plug-in | Key | Value |
|---|---|---|
| Camera | CAMERA_USAGE_DESCRIPTION | This app uses the camera to scan QR code. |
| Camera | PHOTOLIBRARY_USAGE_DESCRIPTION | This app needs to access the photo library. |
| Camera | LOCATION_IN_USE_USAGE_DESCRIPTION | This app will use your device location services. |
The
NSPhotoLibraryUsageDescriptionfield can be cleared/replaced by some Cordova plug-ins if they are used in an app. To avoid this, the related plug-ins should be additionally redefined with the parameters needed.
Keys Redefinition CasesThere is a set of plug-ins that uses
CAMERA_USAGE_DESCRIPTIONparameter to setNSCameraUsageDescriptionkey.
They are:
- phonegap-plugin-barcodescanner
- cordova-plugin-media-capture
- cordova-plugin-camera
Just add
CAMERA_USAGE_DESCRIPTIONto all plug-ins from the list which are enabled in the App Settings.The same is true for
LOCATION_IN_USE_USAGE_DESCRIPTIONparameter for these plug-ins:
- cordova-plugin-camera
- cordova-plugin-geolocation

Camera options.
| Plug-in | Key | Value |
|---|---|---|
| Barcode Scanner | CAMERA_USAGE_DESCRIPTION | This app uses the camera to scan QR code as a value. |

Barcode Scanner options.
iOS 10 < requirementStarting from iOS 10 it's mandatory that the
NSLocationWhenInUseUsageDescriptionentry be added to the info.plist.There is no need to add such settings manually in project Source files, instead, you can add them in App Settings > iOS keys options as a key value.
If you don't pass the variable, the plug-in will add an empty string as value.
| Plug-in | Key | Value |
|---|---|---|
| Geolocation | GEOLOCATION_USAGE_DESCRIPTION | This app will use your device location services. |
| Geolocation | LOCATION_IN_USE_USAGE_DESCRIPTION | This app will use your device location when running. |
Building an iOS App with Xcode
To publish the app for iOS with Xcode, click EXPORT > Binary IPA:
Before You BeginYou will need the following before you start this process:
- Mac macOS 10.12+ or higher
- Xcode 9+ or higher with iOS SDK installed.
- You should be enrolled in the iOS development program and have the correct certificates and provisioning profiles. You can get Xcode, iOS SDK, certificates, and profiles from http://developer.apple.com.
Running in an iOS Simulator
Source Archive FileExtract the ZIP archive file that you've downloaded from Appery.io and after archive extraction open folder
/platforms/ios/there you can find files for Xcode with extensions.xcodeprojand.xcworkspace- if you using a Push notification in your project then it is preferable to open a.xcworkspacefile.
If you want to run an Appery.io app in the iOS Simulator:
- Open [app_name].xcodeproj with Xcode.
- Select the correct scheme to run: [app_name] > iPhone X or [app_name] > iPad X in the top-left part of the Xcode window.
- Click Run in the top-left corner of the Xcode window (PushApp is the app name).
Launched AppYou should see a Build Successful message. With the iOS Simulator running the app is launched.
Running on a Mobile iOS Device
Running the Appery.io app on an iOS device is a more involved procedure than running it in the simulator. Notice that steps #1 and #2 are optional if you have already completed them for a different app.
- Add the certificate to the keychain. Double-click on the
.cerfile and confirm adding the certificate. You can now see the certificate in the keychain window. Repeat this process for the distribution certificate. - Open the [app_name].xcodeproj with Xcode.
- Select the [app_name] project file at the top of the project navigator.
- Select the Build Settings tab, and proceed to the Code Signing section (PushApp is the app name).
- Find the Code Signing Identity group and open it. If you use the app source code you built and exported from Appery.io, there should be 2 sub-items – Debug and Release.
Different Certificate PurposesIf you have a developer’s certificate, you should ensure that the values for Debug > Any iOS SDK and Release > Any iOS SDK are set to your developer’s certificate. We recommend setting the iOS Developer value there, this enables automatic profile selection. However, you can click the value and see the certificate and profile that can be used by Xcode for code signing.
- Open the General tab of the [app_name].xcodeproj. Find the Bundle Identifier parameter, and set its value to the corresponding value of the allowed application identifiers for your provisioning profile.
- Select the correct scheme to run: [app_name] > [Your connected device's name] and click Run.
Submitting your App to the App Store
This section lists a number of helpful hints when submitting your app to the App Store.
Tip: Release and Publish BuildsWe highly recommend publishing your Appery.io apps for iOS using our integrated Release and Publish option.
Submitting to App StorePlease note that submitting your iOS to the App Store is outside the scope of our standard support but is included in our paid support packs.
Since the recent Xcode version 11 update, the Application Loader had been deprecated as a separate tool for IPA file submissions. The Apple approach is changed and we suggest following this tutorial for IPA files submission to the App Store (please note that the Xcode is now mandatory).
Please, check these articles that can be useful:
- Submitting your iOS and iPadOS apps to the App Store
- App Store Connect workflow
- Upload your app binary files (Transporter app is most often used by our customers)
- How to submit App to App Store.
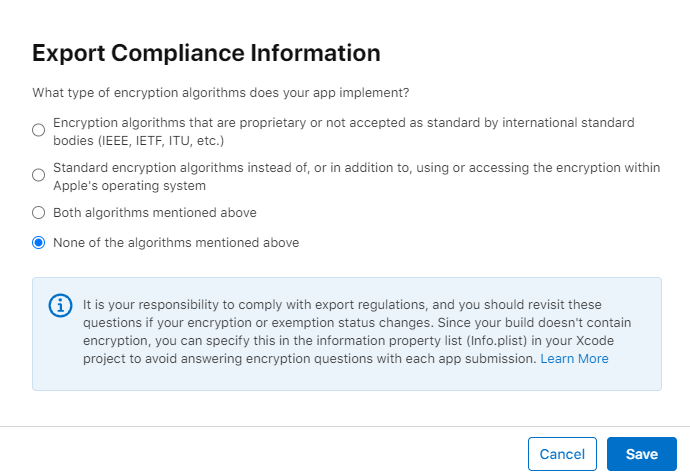
When submitting your app for review you might need to answer the following questions:
Question
- Is your app designed to use cryptography or does it contain or incorporate cryptography? (Select Yes even if your app is only utilizing the encryption available in iOS or OS X.)
- Does your app qualify for any of the exemptions provided in Category 5, Part 2 of the U.S. Export Administration Regulations?
Answer
Appery.io Database is not encrypted by default. If you encrypt the database data by any means in your app (by either iOS frameworks or any third-party), then you should consider answering Yes to both questions.
Question
Does this app use the Advertising Identifier (IDFA) is a unique ID for each iOS device and is the only way to offer targeted ads. Users can choose to limit ad targeting on their iOS device."
Answer
By default, an Appery.io app does not use an Advertising identifier.
Known Issues
Troubleshooting iOS Build
The following is a list of the most common reasons the iOS build might fail. Please review them and try to export again if you come across any issues:
- Provisioning profile doesn’t match the Bundle ID – Make sure you are using the correct (and valid) provisioning profile for the environment that you use as described in the troubleshooting guide.
- Bundle ID incorrect format – The Bundle ID provided has an incorrect format.
The Bundle ID correct format is:com.companyName.appName.
This is NOT a valid Bundle ID:XZCSDF.com.companyName.appName. - Expired certificate – Make sure your certificate hasn’t expired.
- No certificate uploaded – Make sure you have uploaded a valid certificate.
- Certificate is not valid / Certificate is not valid or trusted - Make sure you have the corresponding valid Apple Root and Intermediate Certificates (G3, G4, and/or G5) from the Apple certificate authority installed.
Useful LinksPlease read http://stackoverflow.com/questions/3436260/bundle-id-suffix-what-is-it for more information on bundle IDs.
Troubleshooting iOS Mobile Submissions
Check the app permissions. For instance, if you have telephony selected in UIRequiredDeviceCapabilities (Project > App settings > iOS keys) and are submitting the app for the iPad as well, the App Store will not accept the app as you cannot make calls from an iPad.
Will My App Still Work?When testing your app you will still be able to install and work it, but the App Store will not accept your app as it cannot make calls.
Updated 8 months ago