Adding Push Notification Services
This document demonstrates how to add the predefined Push Notification services to an Ionic application.
Introduction
The predefined Push Notification services that can be added to your Ionic mobile app include:
- Device Add Channel
- Device ID
- Device Info
- Device Register
- Device Remove Channel
- Device Unregister
- Device Update
- Send Push Notification.
Setting Push Notifications App
- To get access to the predefined Push Notification services, we will need to create a new blank Ionic app first.
- When in the app, first, press CREATE NEW > Backend Services to see that the Push Service sub-menu is absent from the list:
- So, click the Push link in the App BuilderToolbar to open the Push Notifications settings page for this app:
- Arrange so that needed Push Notifications Settings are defined for the app:

Testing on Device!Note that to be able to receive Push Notification messages, you need to build (
.apk/.aabfor Android or.ipafor iOS) and install it on your device.
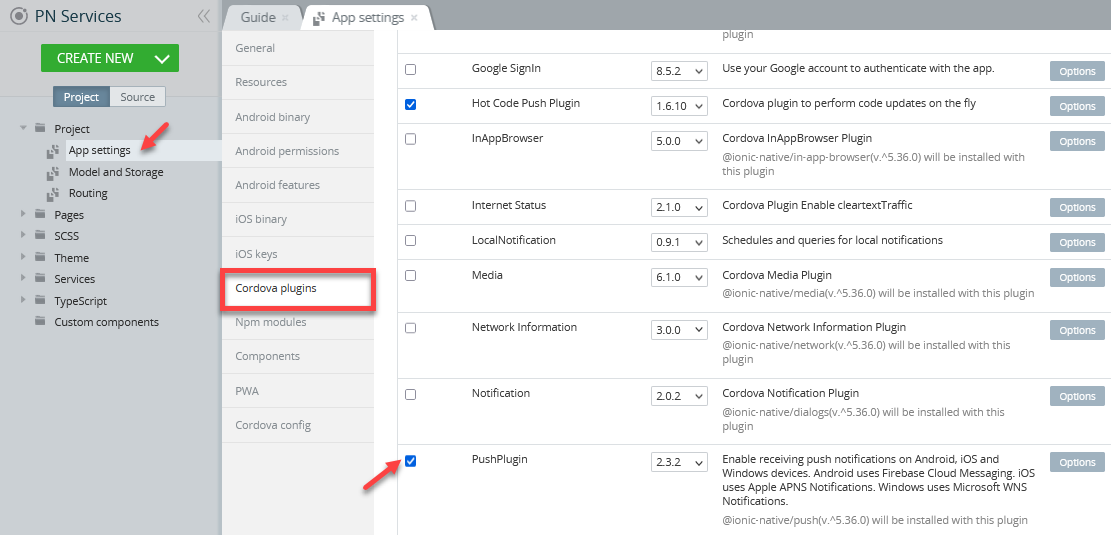
- Enable the PushPlugin check box under the Core Cordova Plugins tab of the App Settings sub-menu:
- Now, click the SAVE and CLOSE buttons of the App BuilderToolbar and then reopen the app and click the CREATE NEW button to see that the Appery.io backend push services can now be imported from under the Backend Services section:
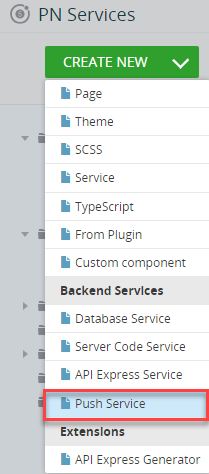
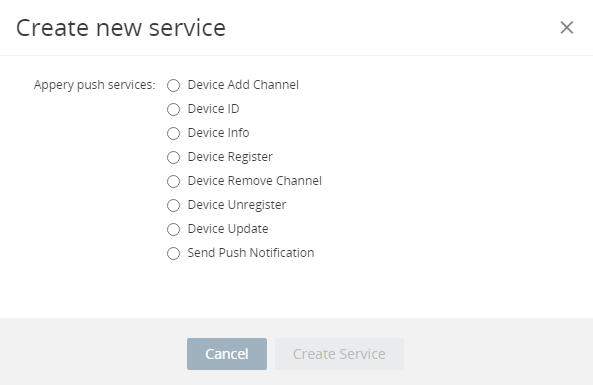
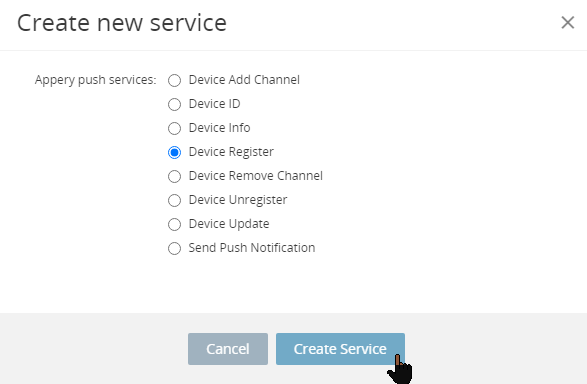
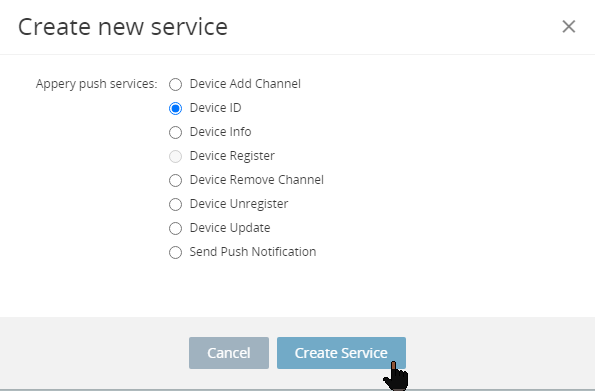
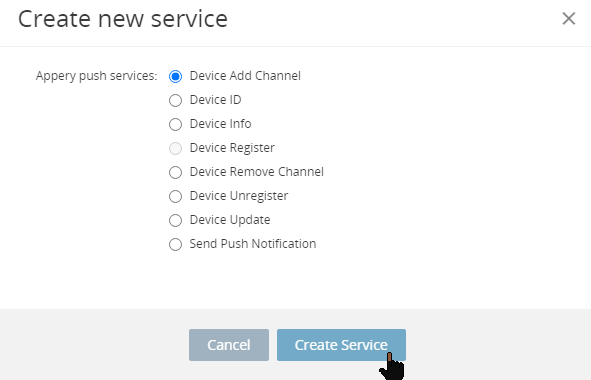
- This means you are all set now and can now start working with the predefined services: click Push Service to open the Create new service modal window with the following push services options to be selected:
- Device Add Channel
- Device ID
- Device Info
- Device Register
- Device Remove Channel
- Device Unregister
- Device Update
- Send Push Notification:
Adding Device Register Service
- In the the Create new service window, select the Device Register service and click the Create Service button:
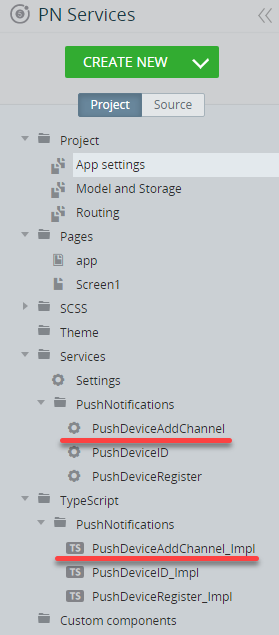
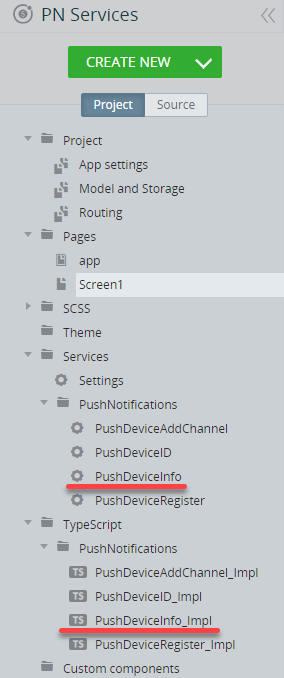
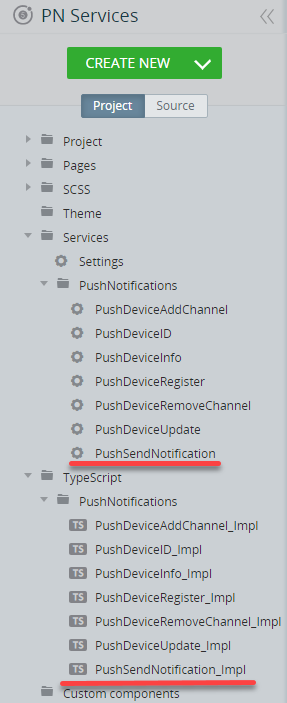
If you now go to the Project tab and unfold the Services > Push Notifications folder, you will see that the PushDeviceRegister service has been added. Also, the TypeScript > PushNotifications folder contains the PushDeviceRegister_Impl file:

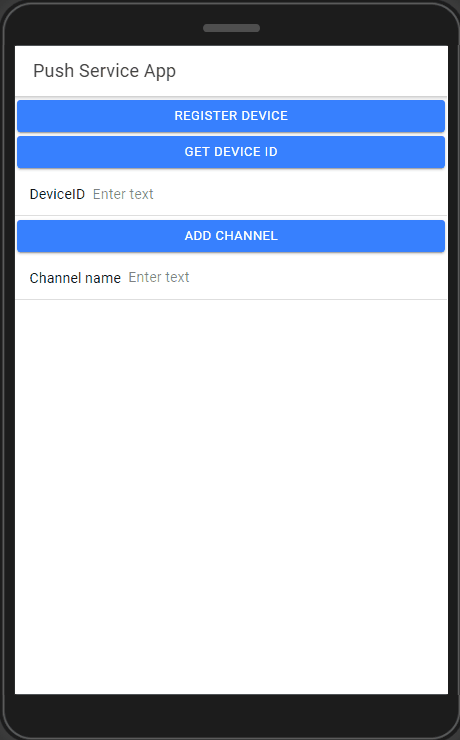
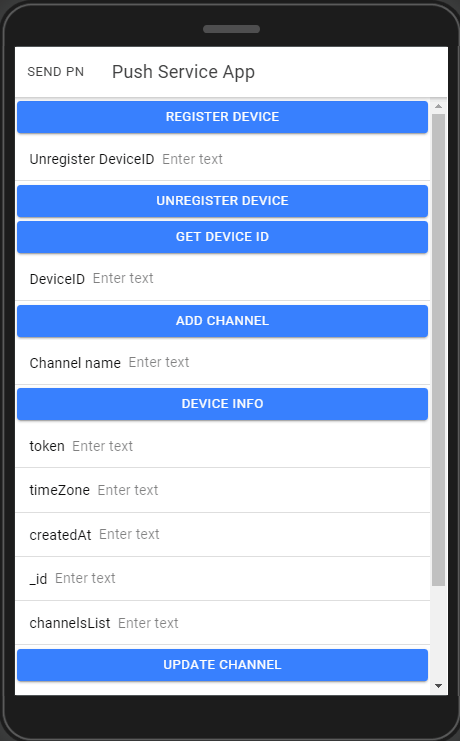
- Go to the Screen1DESIGN panel and add the Button component to the editor.
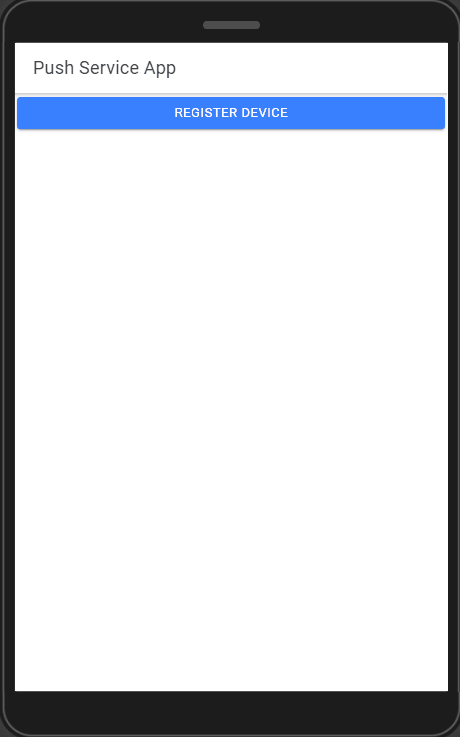
- To make the app UI more well-round, first, click on the Toolbar title in the app screen and change it to Push Service App by changing the Text property under the PROPERTIES panel menu.
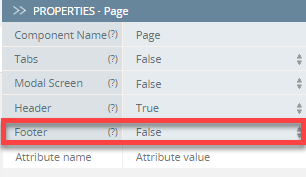
- Now, select the Page component from the breadcrumbs (you can also use the OUTLINE view to locate the needed component) and set the page Footer property to False as we will not use it in the app (you will also be asked to confirm changing the property):
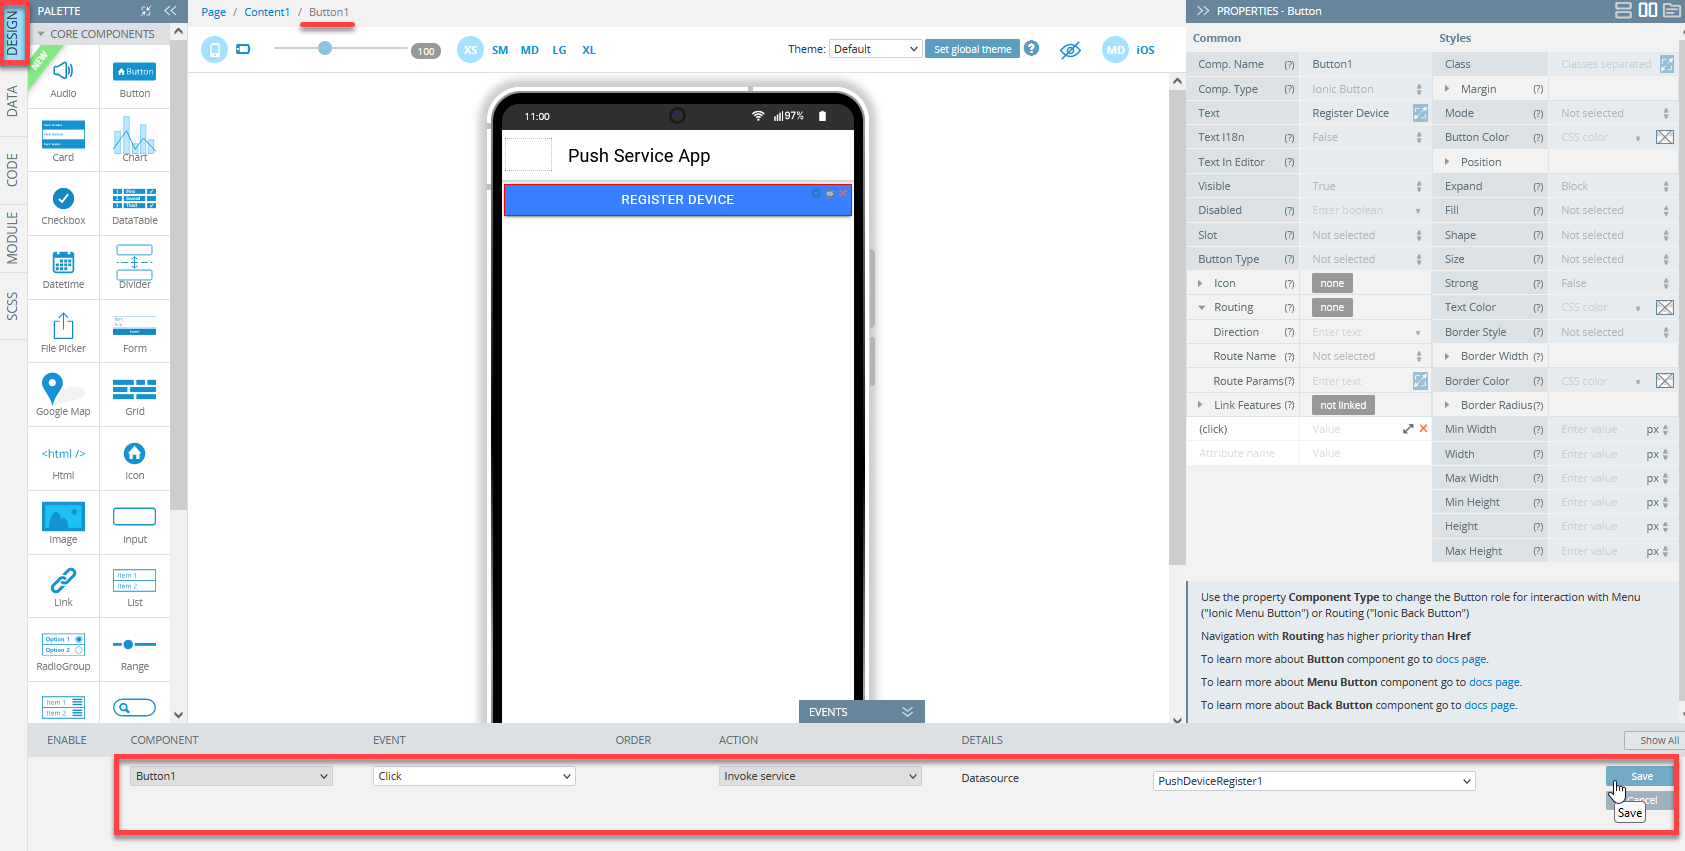
- Then, select the button and change its Text property under the PROPERTIES panel menu to Register Device:

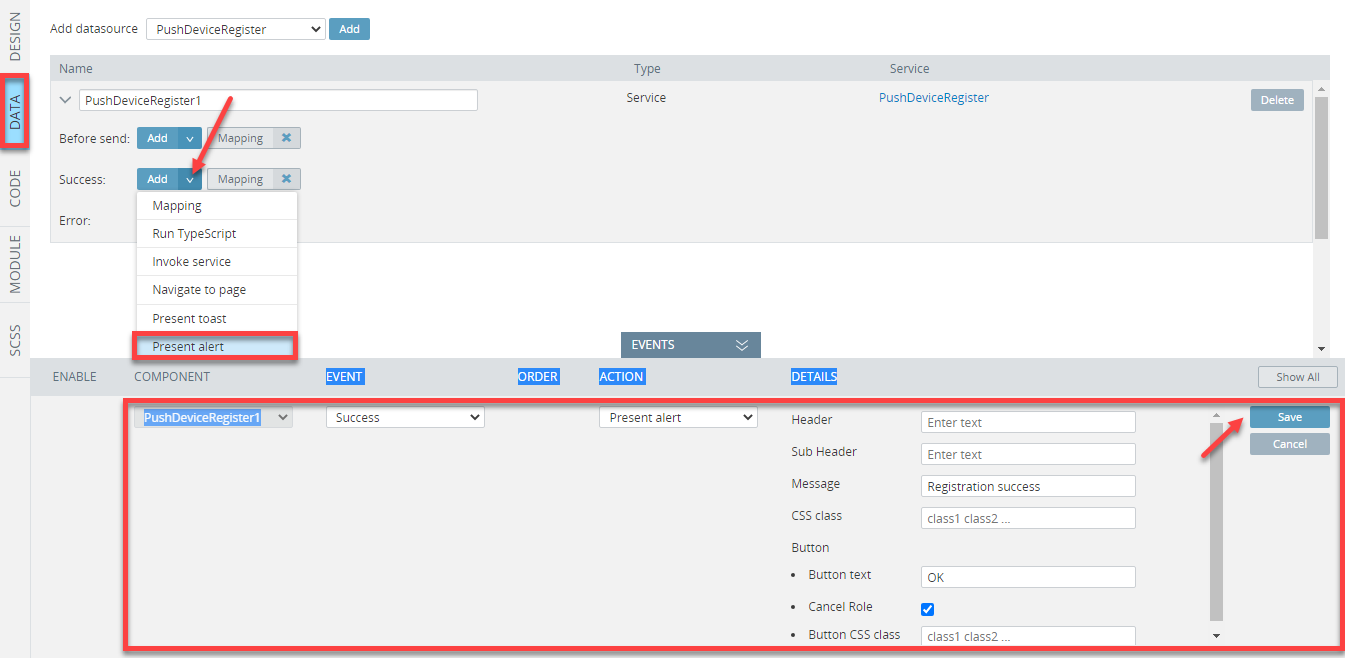
- Open the page DATA panel, select the PushDeviceRegister service from the datasource drop-down, and click the Add button:

- To invoke the Present alert action, click the Add button of the Success service and then fill the Message field with Registration success.
Also, enable the Cancel Role check box and then click the Save button:
- Now, go to the page DESIGN panel, and for the Click event of the Register Device button, select the Invoke service action, and then set the PushDeviceRegister1 value from the drop-down of the Datasource field. Click the Save button:
- You can now click the SAVE and then TEST buttons in the App BuilderToolbar to open the app in preview.
- Click the Register Device button to see that the Registration success message appears:
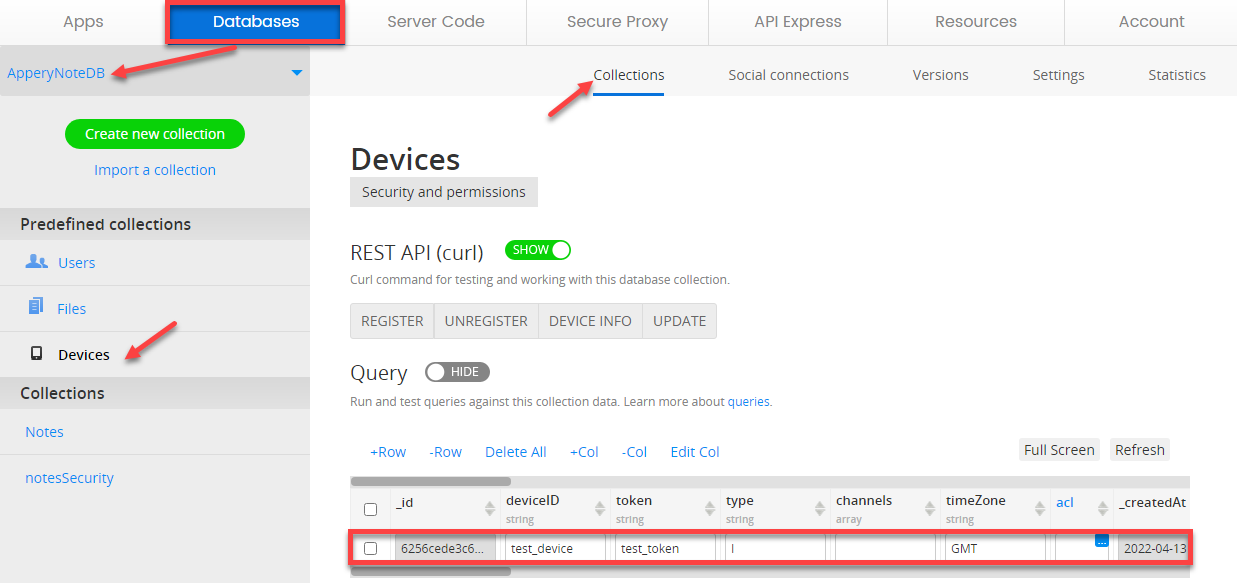
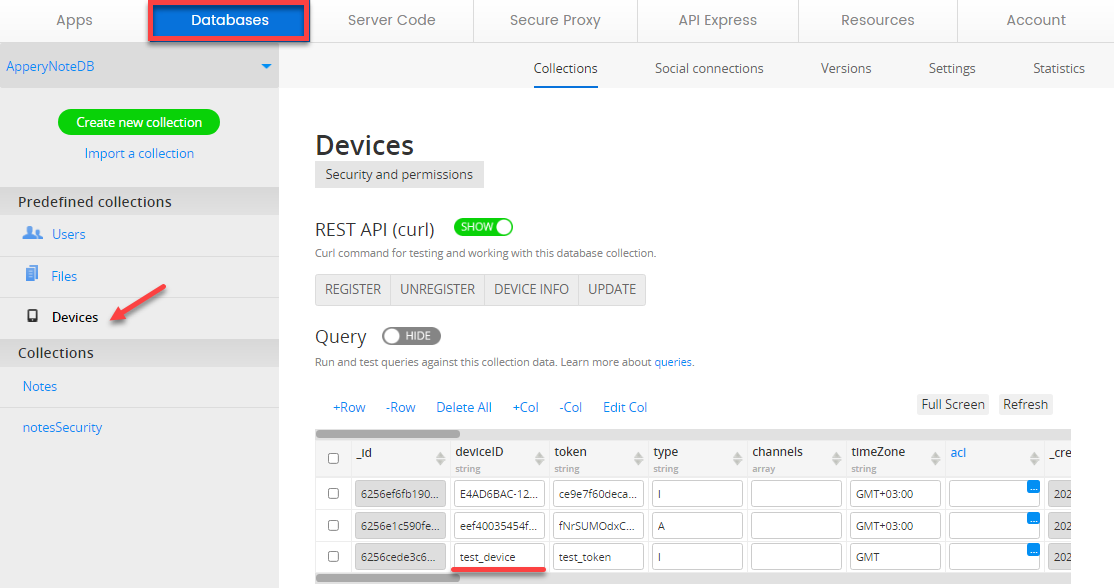
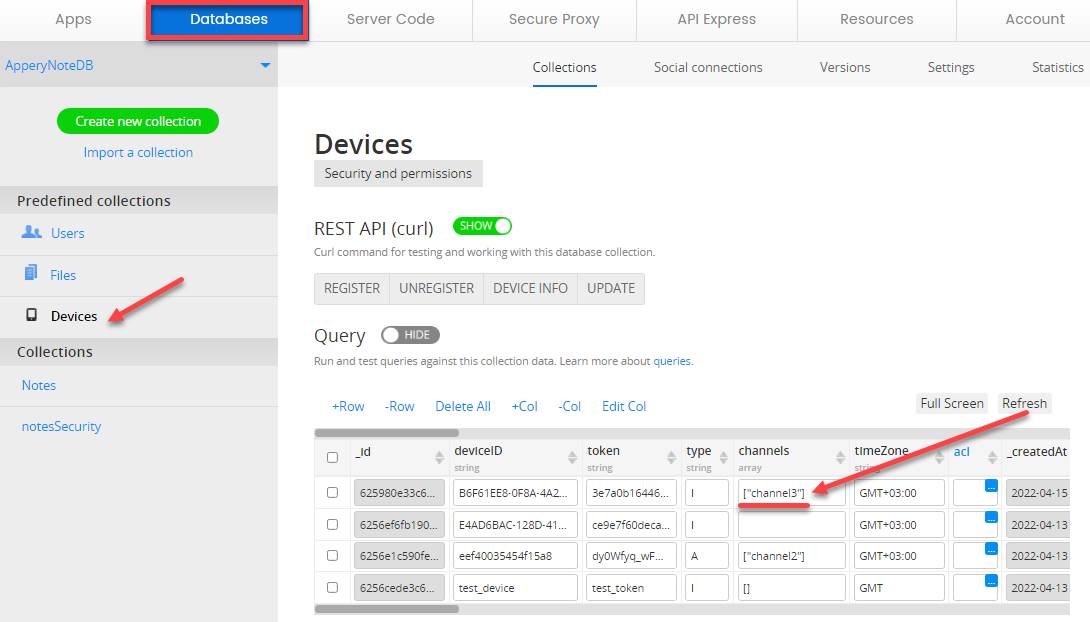
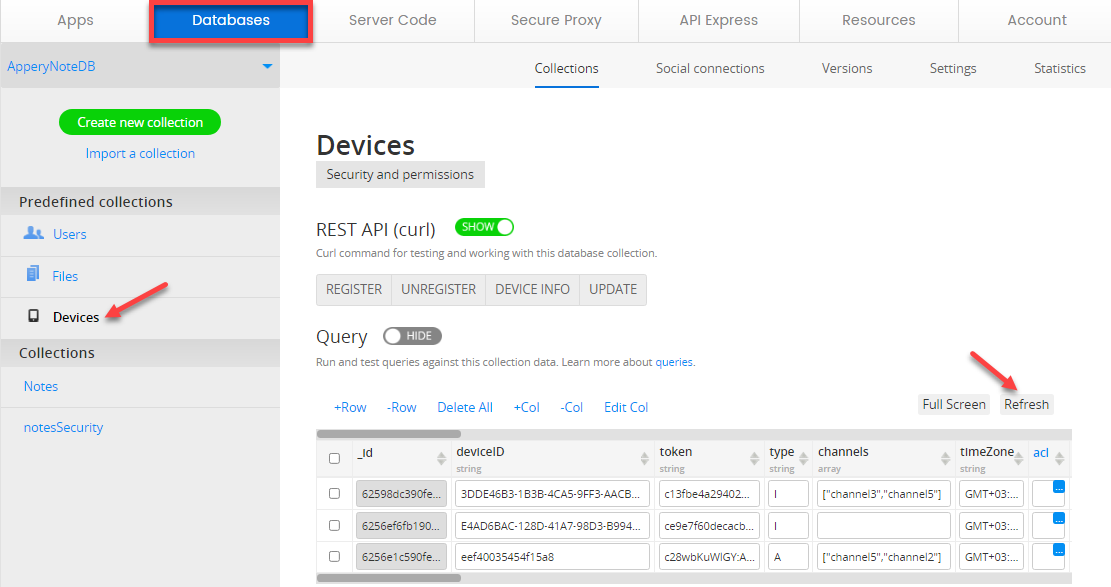
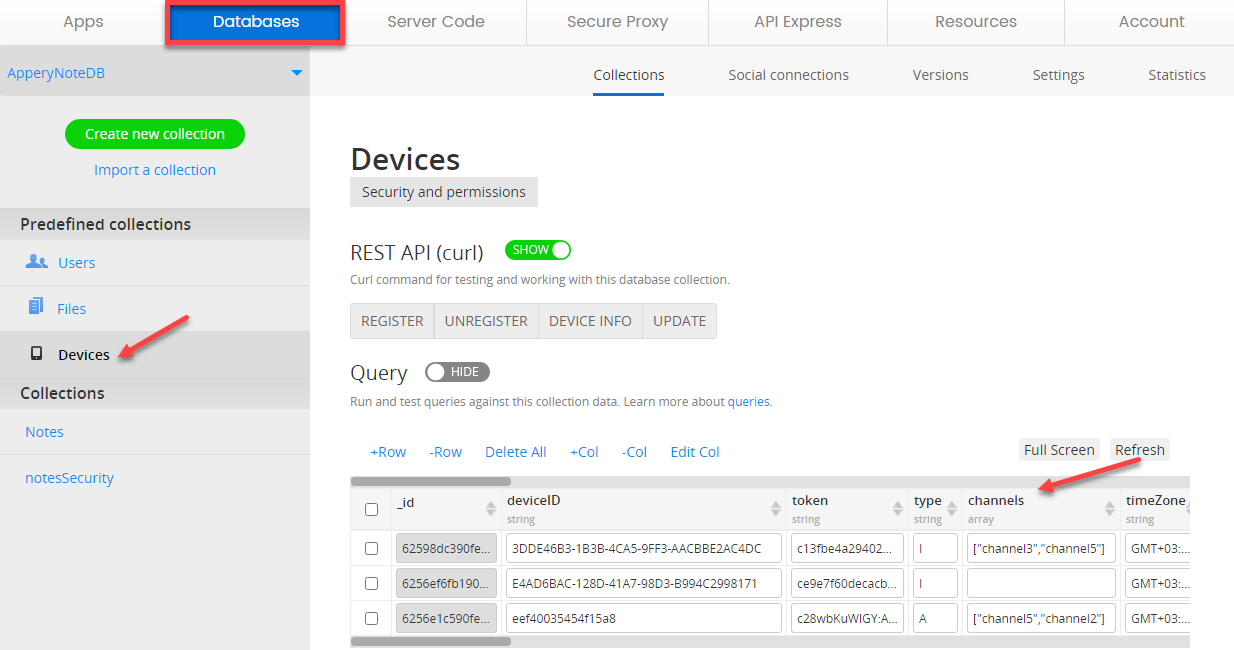
- Now, click the Appery.io Database link in the App BuilderToolbar to open the linked database and then go to its predefined Devices collection.
The columns id, deviceID, and token should be filled with data:
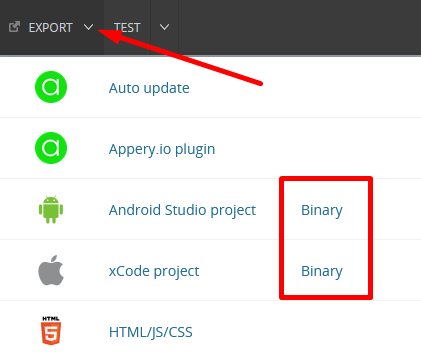
- Now, export the app as an Android binary by clicking EXPORT > Android Binary (both iOS and Android options are available) in the top menu to install it on the device:

- Open the app on the device and click the Register Device button.
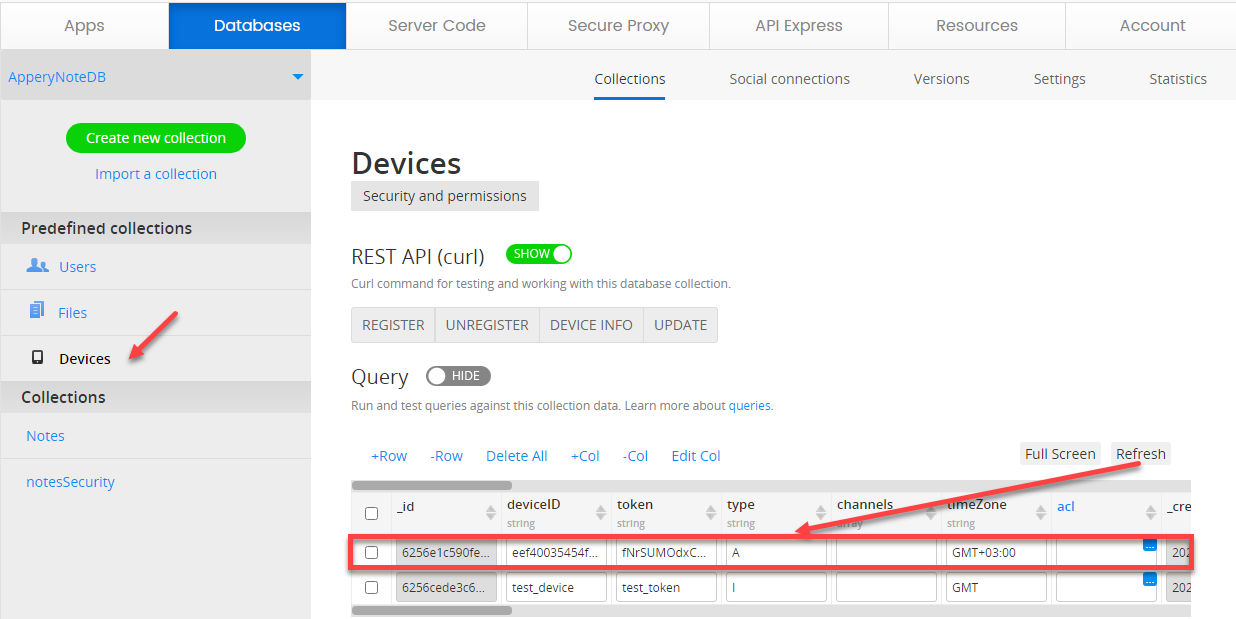
- To make sure the database records are updated, go back to the predefined Devices collection and refresh it: the table should be updated with the data of your test Android mobile device:
- You are free to experiment with exporting the app as an iOS binary as well by clicking EXPORT > iOS Binary in the top menu. In this case, after you install the app on the device and click the Register Device button the database Devices collection should be updated with a new record of the registered iOS device after you click Refresh:

Important Note!Please note that you will need to generate the iOS certificate with the In-App Purchase capability to build an
.ipafile.
You can check this document in case you need help with exporting your application for iOS.
Here, you will find information on generating certificates for Android.
Note as well that starting from August 2021, new apps are required to publish with the Android App Bundle (.aab) on Google Play.
Please read more here.
You can also check this Appery.io YouTube video that shows how to create Android and iOS certificates:
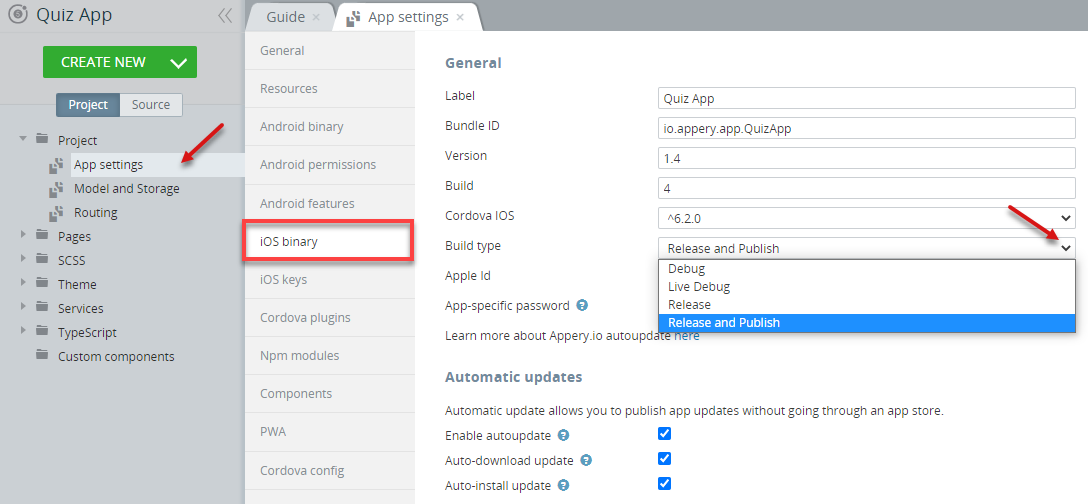
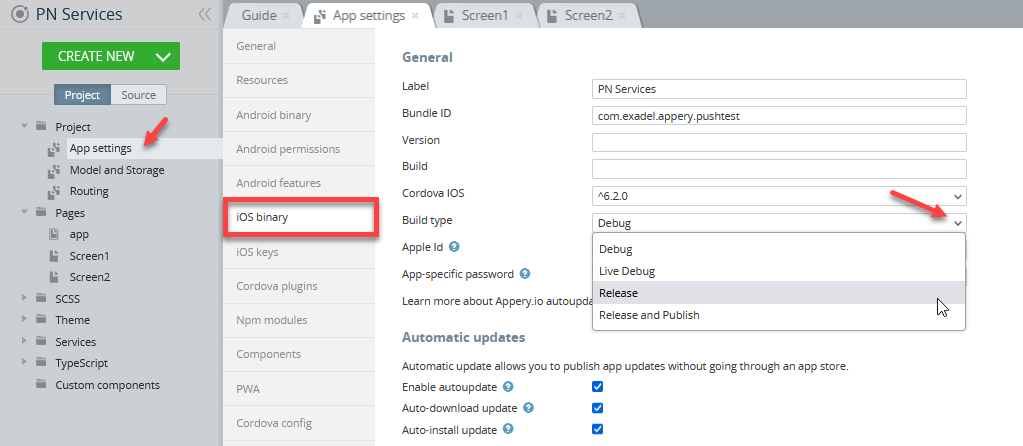
Note!Note as well that before you can proceed with exporting your production app, you will need to go to Project view > Project > App settings >Android binary/iOS binary to select the Release or Release and Publish (for iOS) build type (Debug is the default type for both and can be used for testing purposes only):
Adding Device ID Service
Now, let's update our app and add the Device ID service to it.
- Click the CREATE NEW button and select Push service under the Backend Services section.
- In the the Create new service window, select the Device ID service and click the Create Service button:
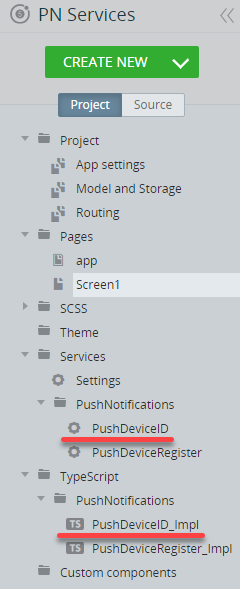
If you now go to the Project tab and unfold the Services > Push Notifications folder, you will see that the PushDeviceID service has been added to the list. Also, the TypeScript > PushNotifications folder contains the PushDeviceID_Impl file:
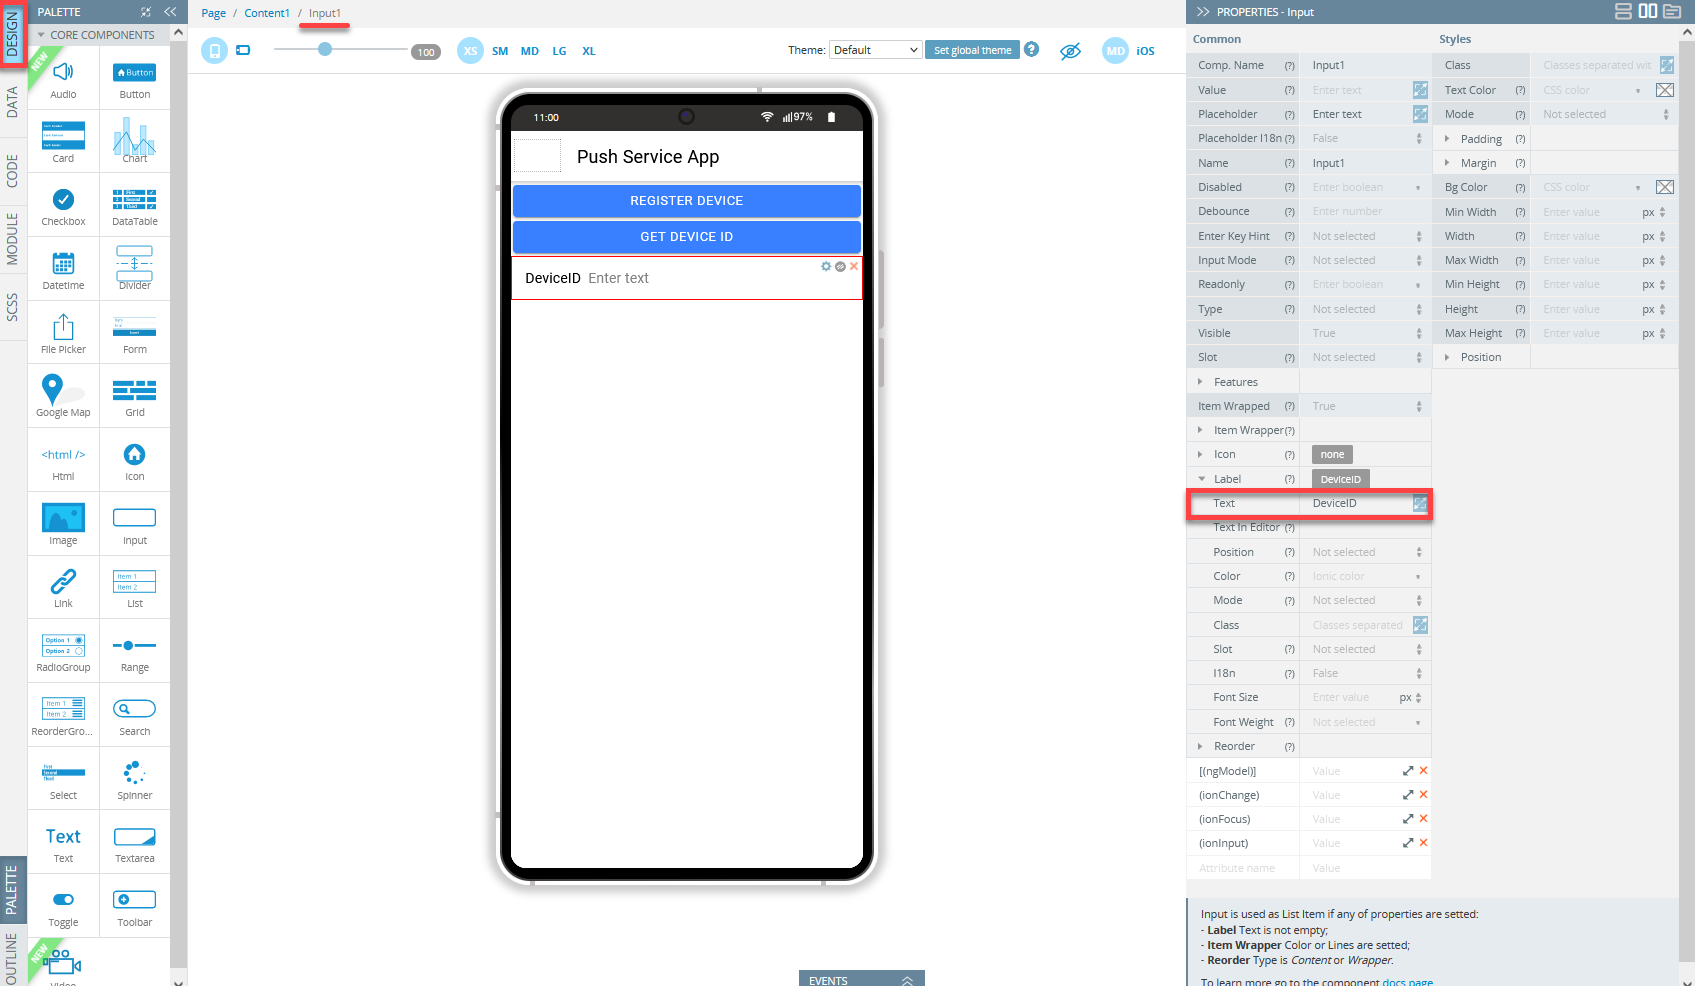
- Go back to the Screen1DESIGN panel and add the Button and Input components to the editor.
- Select the button and change its Text property under the PROPERTIES panel menu to Get Device ID.
- Now, select the Input component and change its Label Text field to DeviceID:
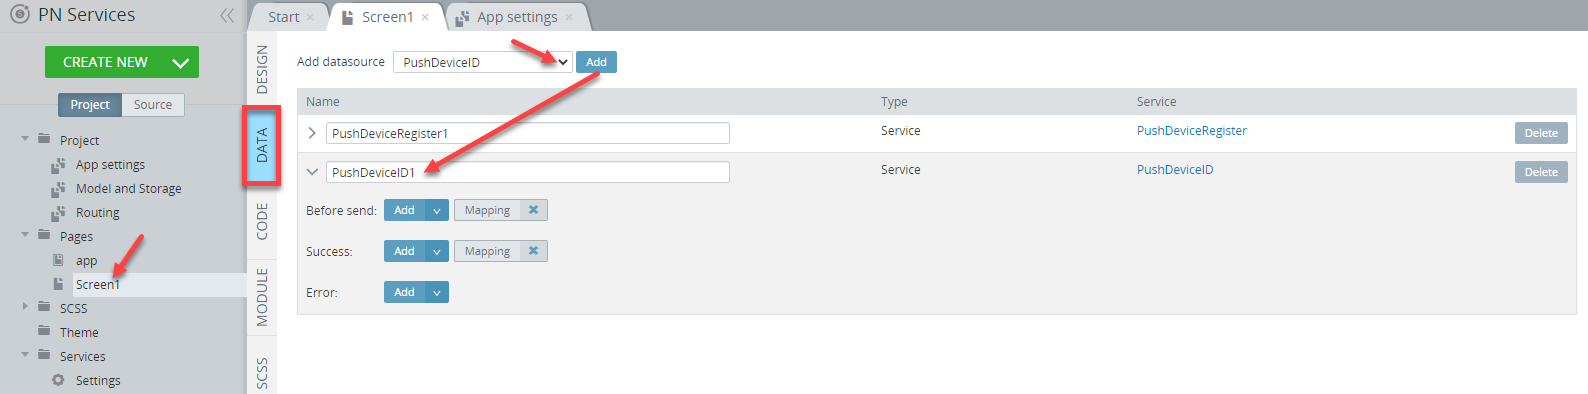
- Next, open the page DATA panel, select the PushDeviceID service from the datasource drop-down, and click the Add button:
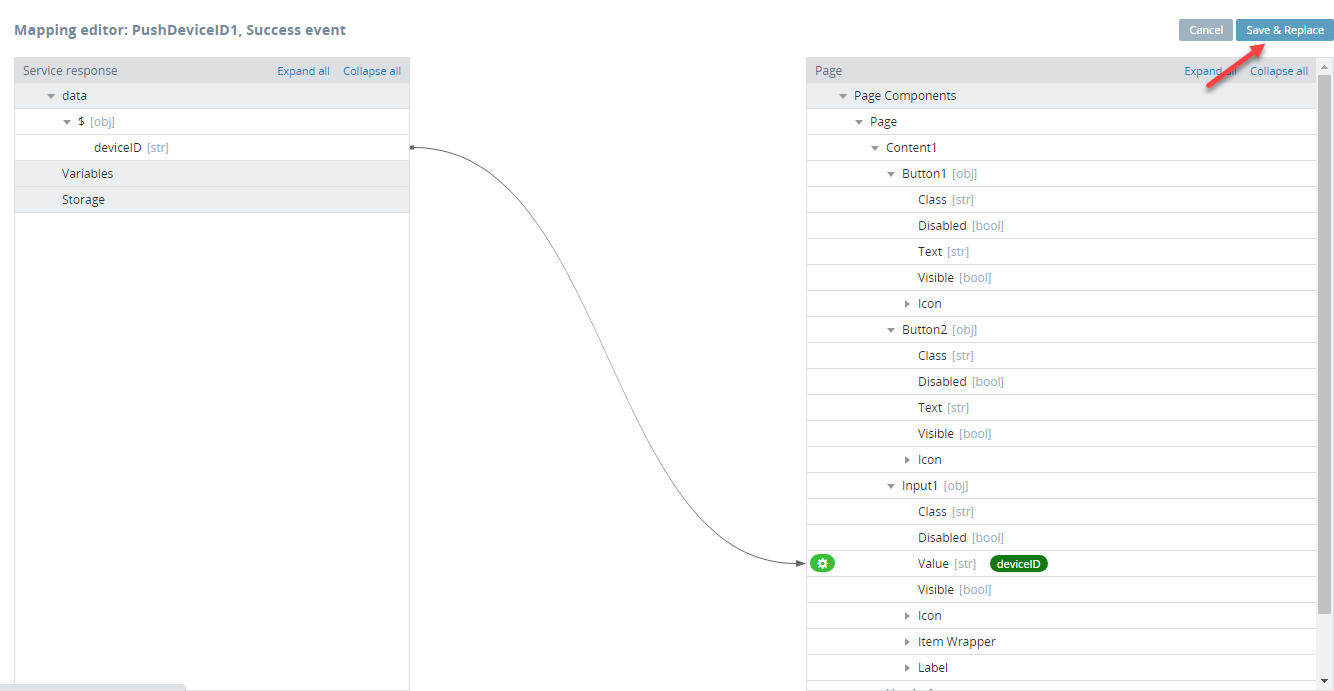
- In the open mapping editor window, click the service Success > Mapping button, create the following mapping and click Save & Replace:
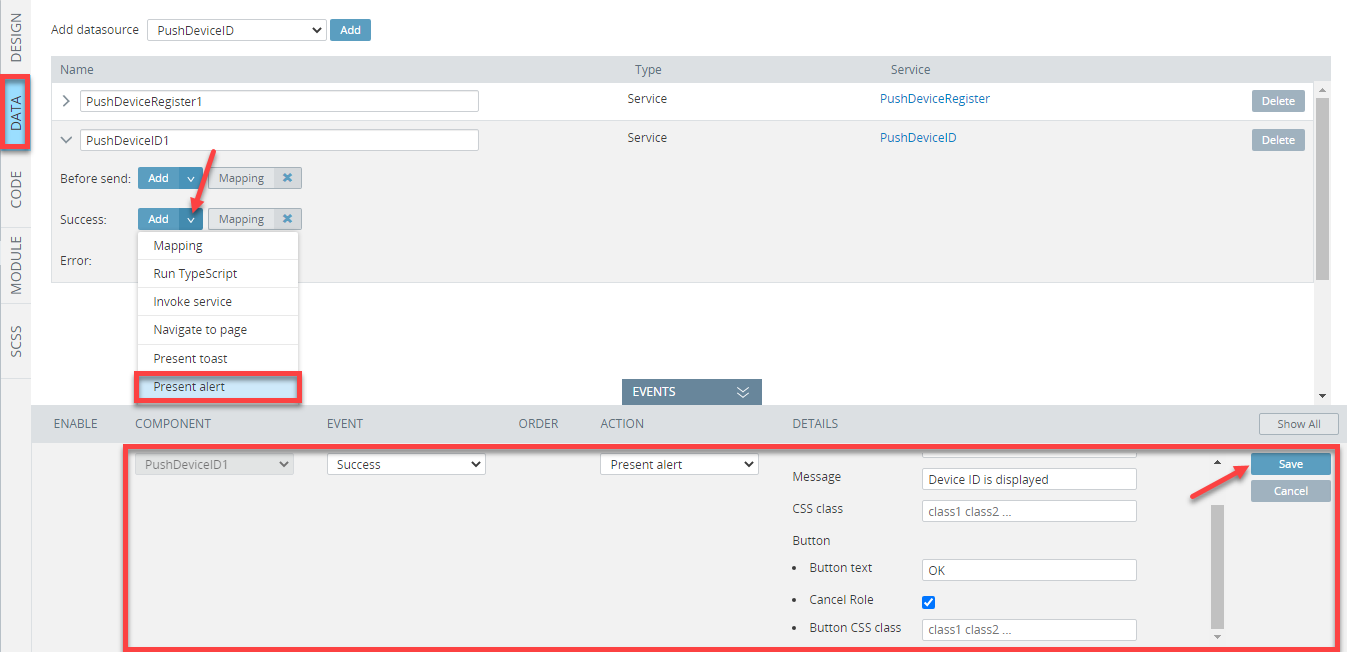
- To invoke the Present alert action, click the Add button of the Success service and then fill the Message field with Device ID is displayed.
Also, enable the Cancel Role check box and then click the Save button:
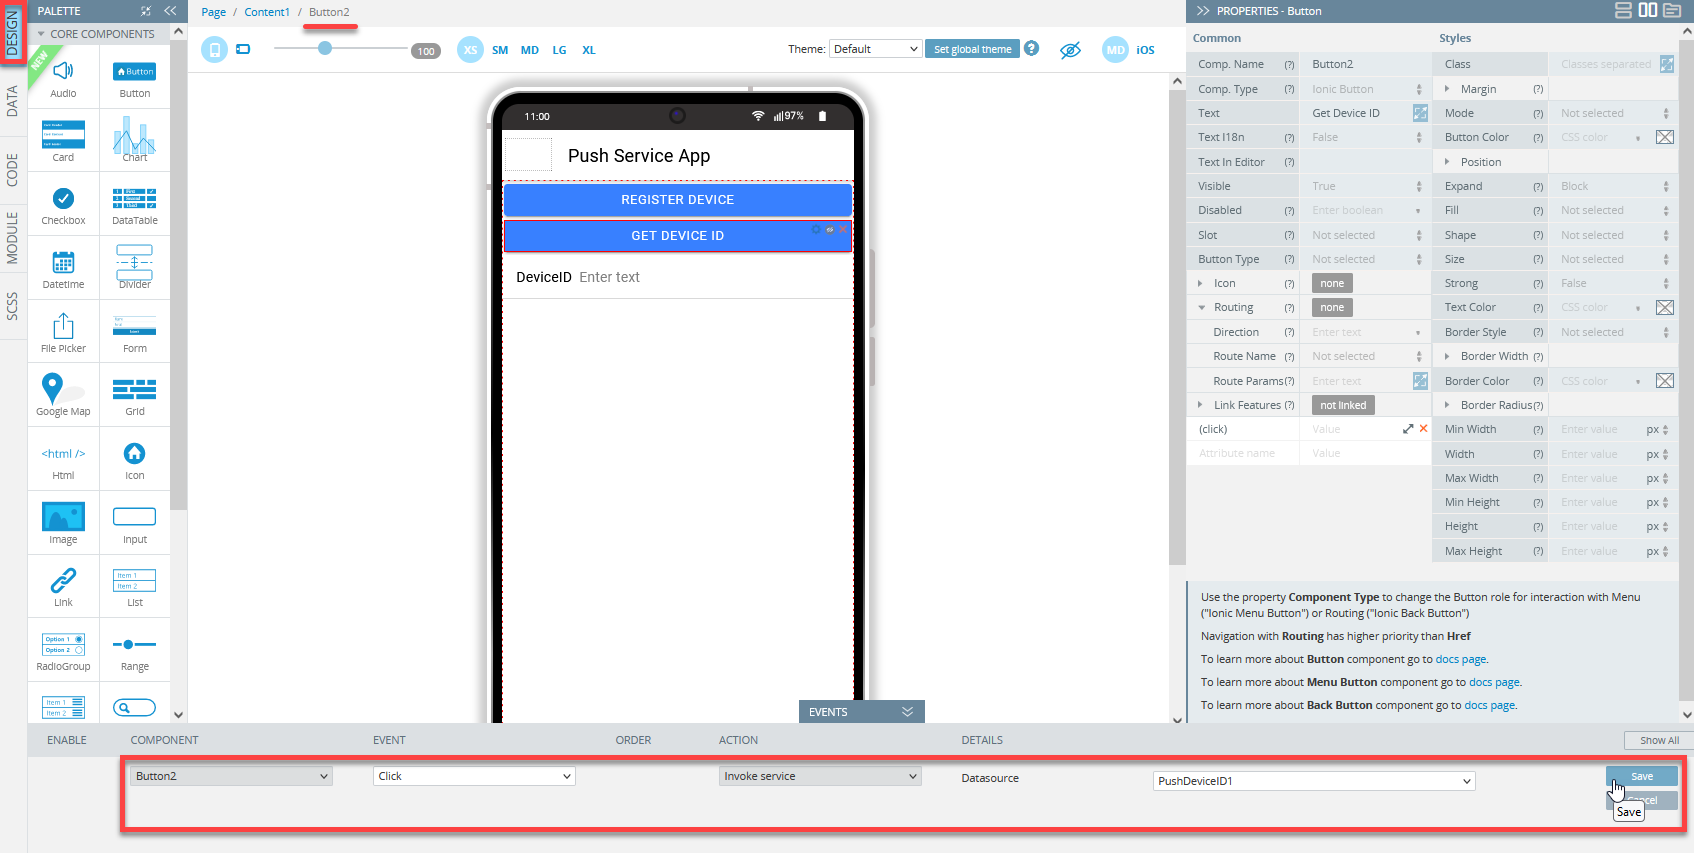
- Now, go to the page DESIGN panel, and for the Click event of the Get Device ID button, select the Invoke service action, and then set the PushDeviceId value from the drop-down of the Datasource field. Click the Save button:
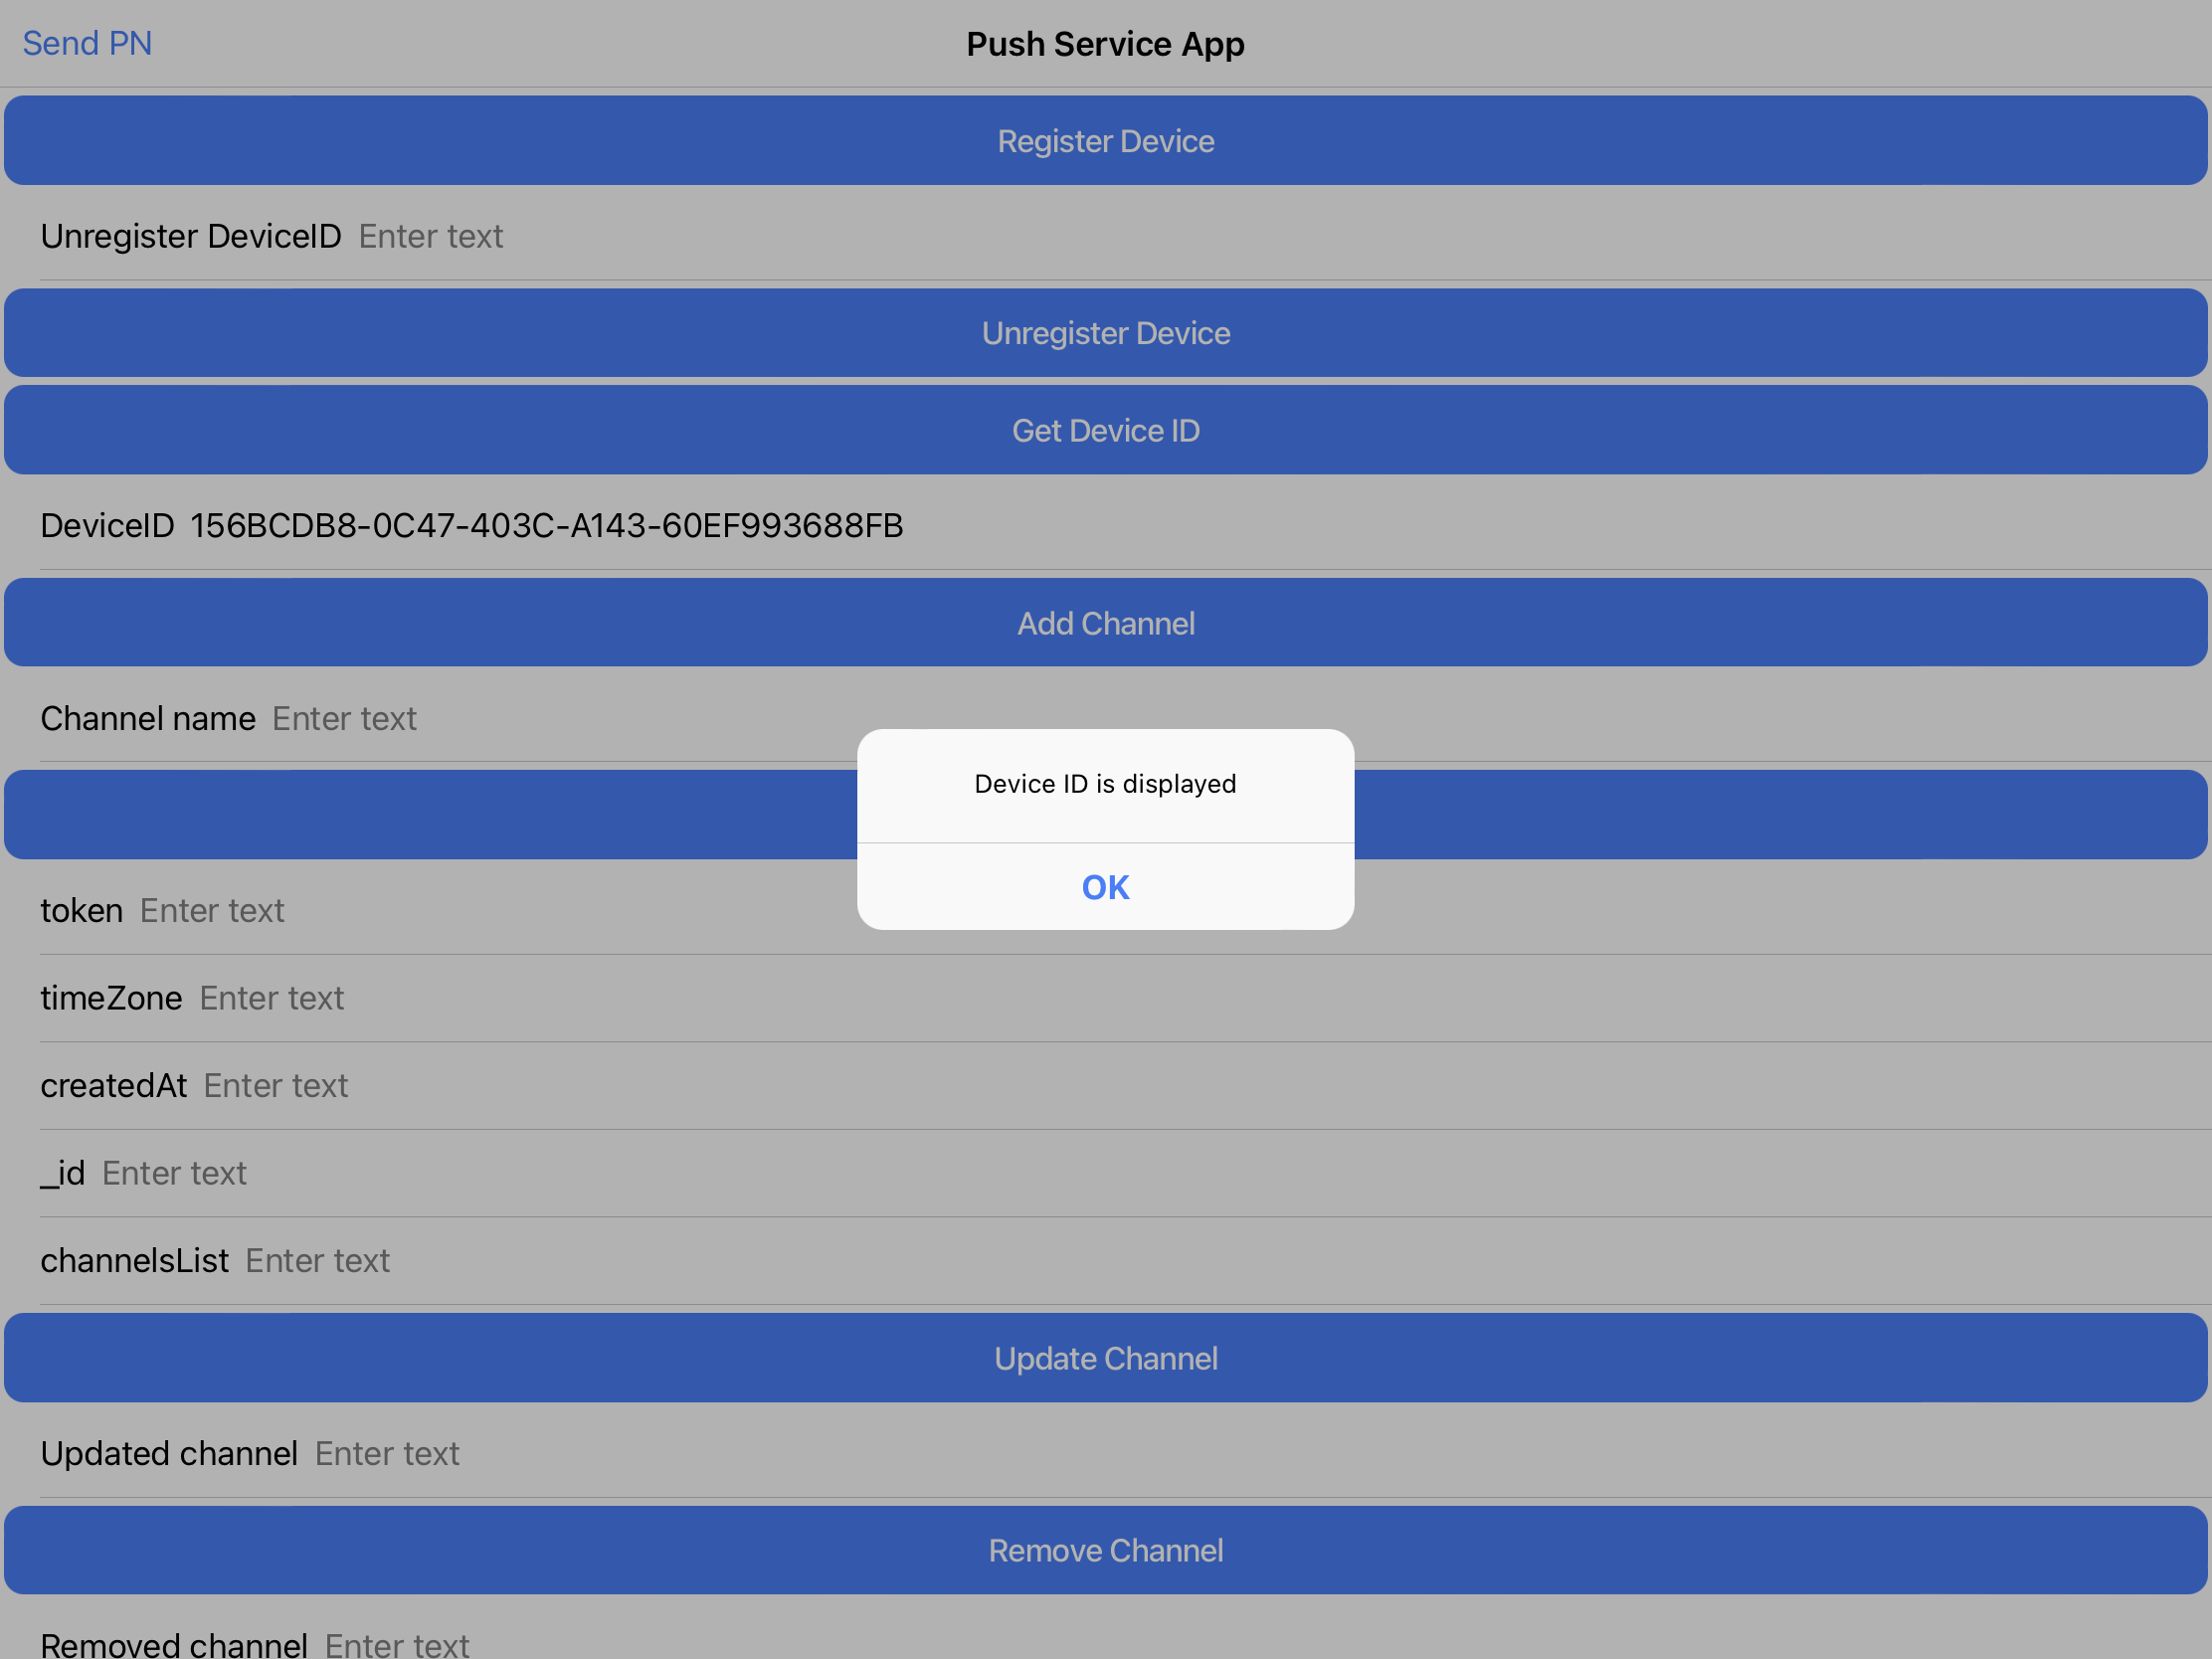
- Click the SAVE and then TEST buttons in the App BuilderToolbar to open the app in preview.
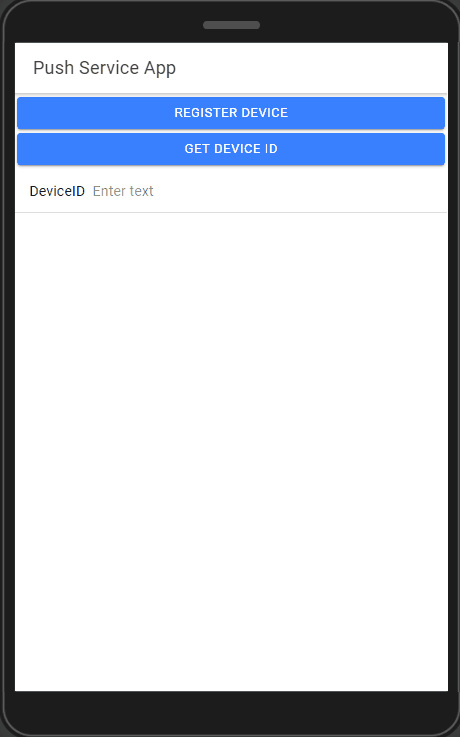
- Click the Get Device ID button. The deviceID field is filled with the test_device value. Also, the message Device ID is displayed should be displayed:
- Now, click the Appery.io Database link in the App BuilderToolbar and go to the linked database and open its predefined Devices collection.
The value from the deviceID column should correspond to the value DeviceID field on preview:
- Now, export the app as an Android binary by clicking EXPORT > Binary (both iOS and Android options are available) in the top menu to install it on the device:

- Open the app on the device and click the Get Device ID button to see that the deviceID field is now filled with your device's data:

Android Device ID displayed on the device screen
- To make sure the database records are also updated, go back to the predefined Devices collection and refresh it: the table should be updated with the data of your test Android and/or iOS mobile device(s):

Android Device ID in the Database
Adding Device Add Channel Service
- In the Create new service window, select the Device Add Channel service and click the Create Service button:
If you now go to the Project tab and unfold the Services > Push Notifications folder, you will see that the PushDeviceAddChannel service has been added. Also, the TypeScript > PushNotifications folder contains the PushDeviceAddChannel_Impl file:
- Go back to the Screen 1DESIGN panel and add the Button and Input components to the editor.
- Select the button and change its Text property under the PROPERTIES panel menu to Add Channel.
- Now, select the Input component and change its Label Text field to Channel name:
- Next, open the page DATA panel, select the PushDeviceAddChannel service from the datasource drop-down, and click the Add button:
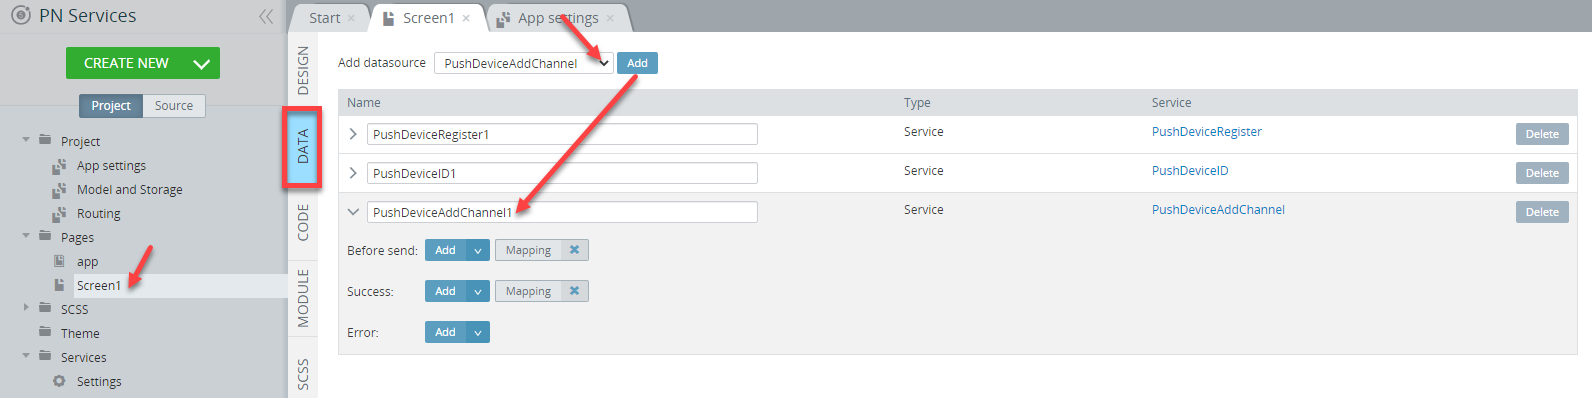
- In the open mapping editor window, click the service Before send > Mapping button, create the following mapping and click Save & Replace:
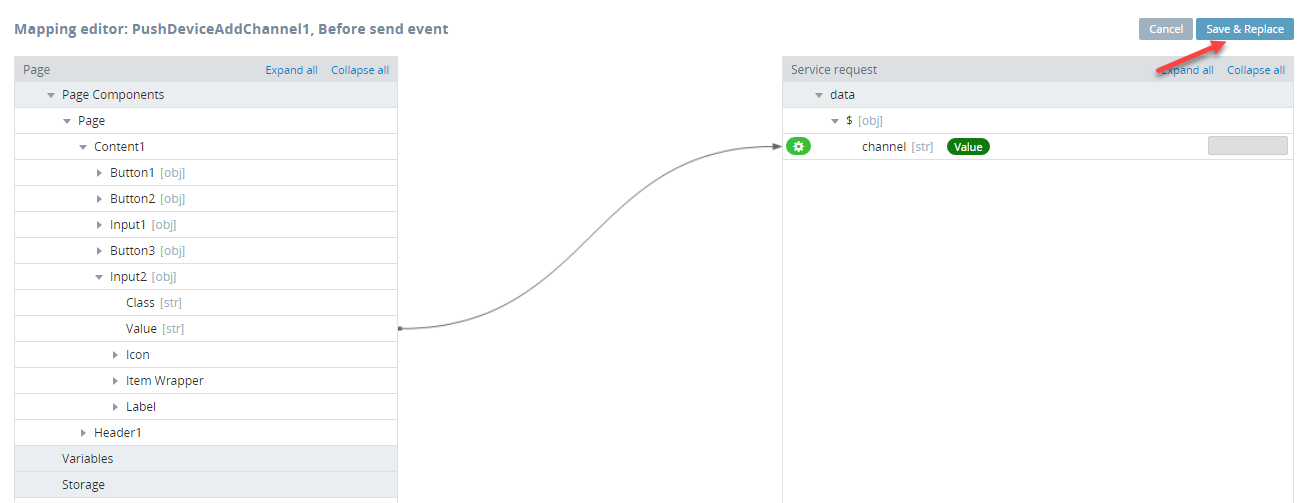
- To invoke the Present toast action, click the Add button of the Before send service and then fill the Message field with Channel is added.
Also, enable the Cancel button check box and then click the Save button:
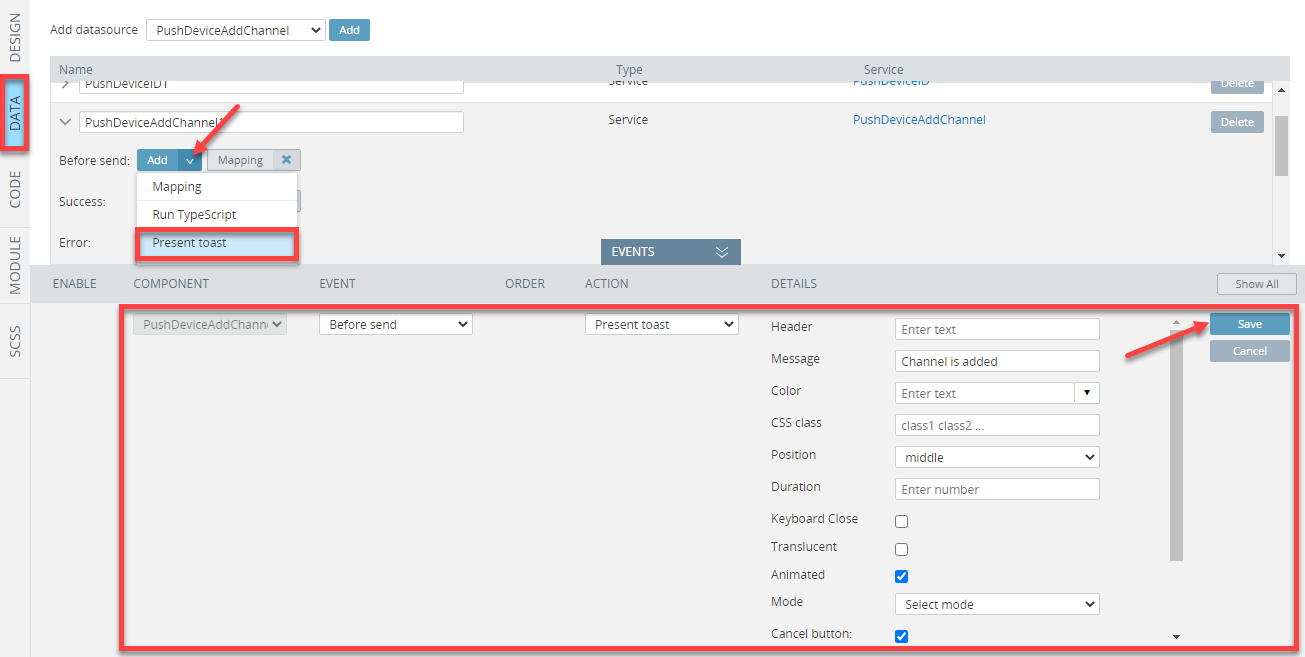
- Now, go to the page DESIGN panel, and for the Click event of the Add Channel button, select the Invoke service action, and then set the PushDeviceAddChannel value from the drop-down of the Datasource field. Click the Save button:
- Click the SAVE and then TEST buttons in the App BuilderToolbar to open the app in preview.
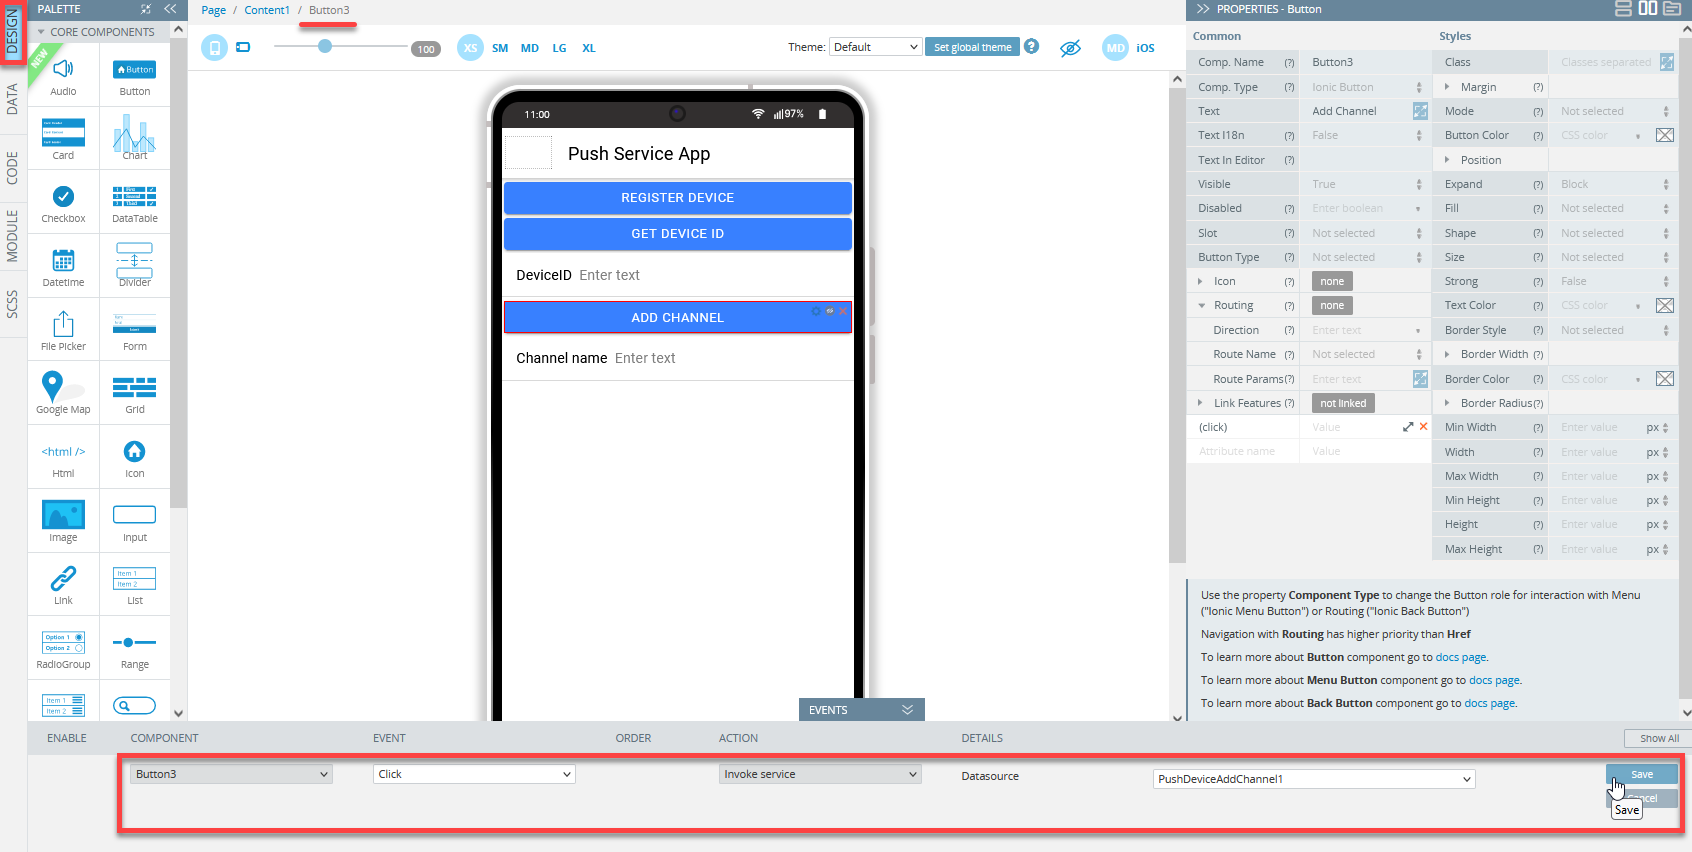
- Fill the Channel name field with the channel value and click the Add Channel button: the message Channel is added should be displayed:
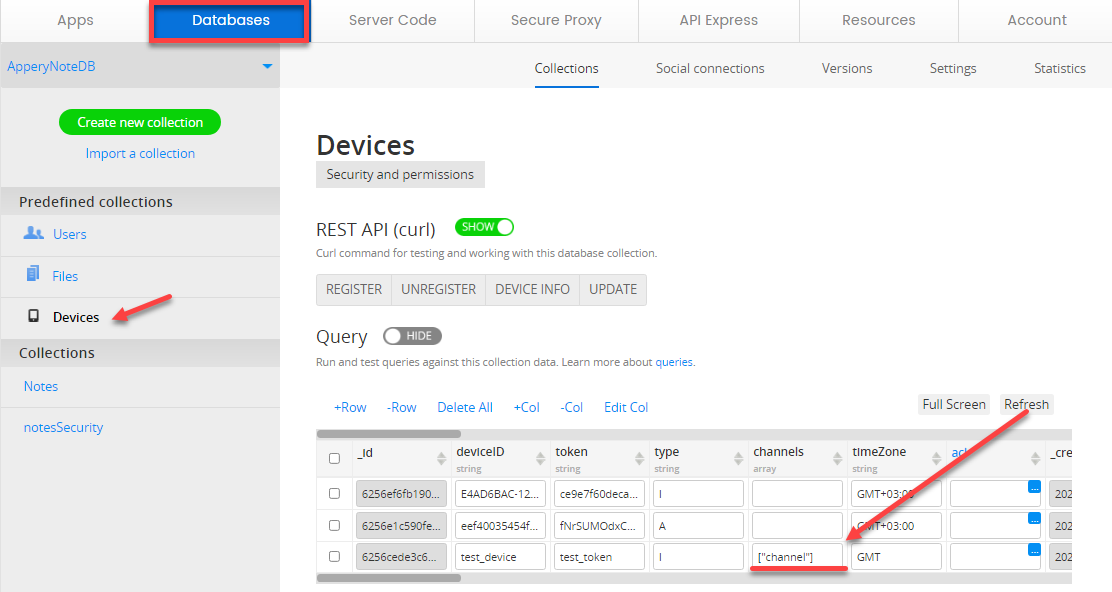
- Now, click the Appery.io Database link in the App BuilderToolbar and go to the linked database and open its predefined Devices collection: the value from the channels column should correspond to the value Channel name field on preview:
- Now, export the app as an Android binary by clicking EXPORT > Binary (both iOS and Android options are available) in the top menu to install it on the device:

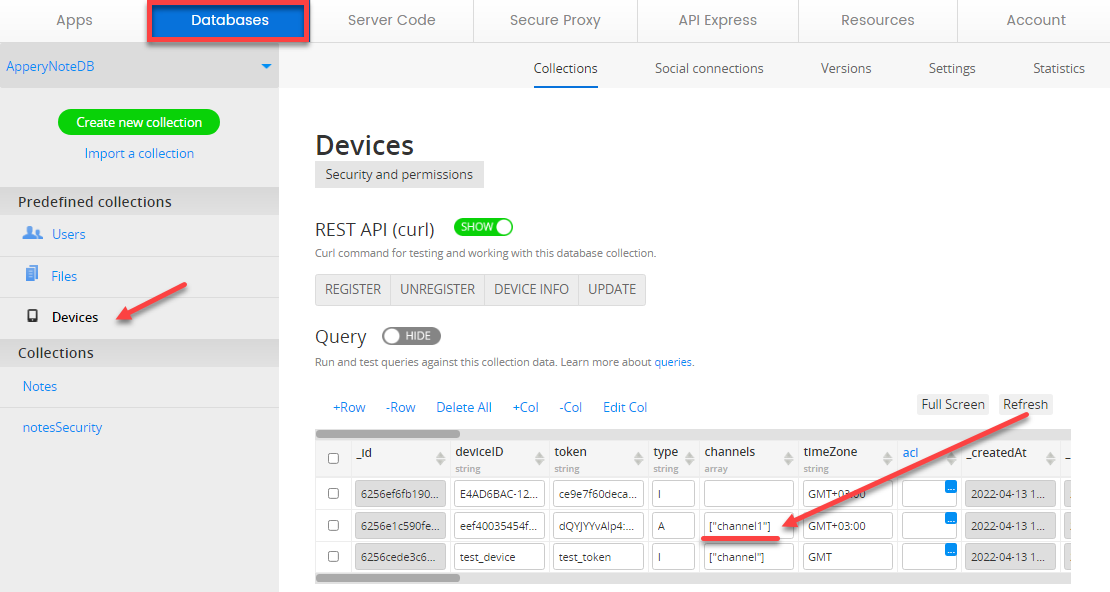
- Open the app on the device and fill in the Channel name field with some value, for example, channel1 and click the Add Channel button: the message Channel is added should be displayed:

Channel added to an Android device
- To make sure the database records are also updated, go back to the predefined Devices collection and refresh it: the value from the Channel name column should correspond to the Channel name value of your test Android and/or iOS mobile device(s) on preview:
Adding Device Info Service
- Click the CREATE NEW button and select Push service under the Backend Services section.
- In the the Create new service window, select the Device Info service and click the Create Service button:

If you now go to the Project tab and unfold the Services > Push Notifications folder, you will see that the PushDeviceInfo service has been added. Also, the TypeScript > PushNotifications folder contains the PushDeviceInfo_Impl file:
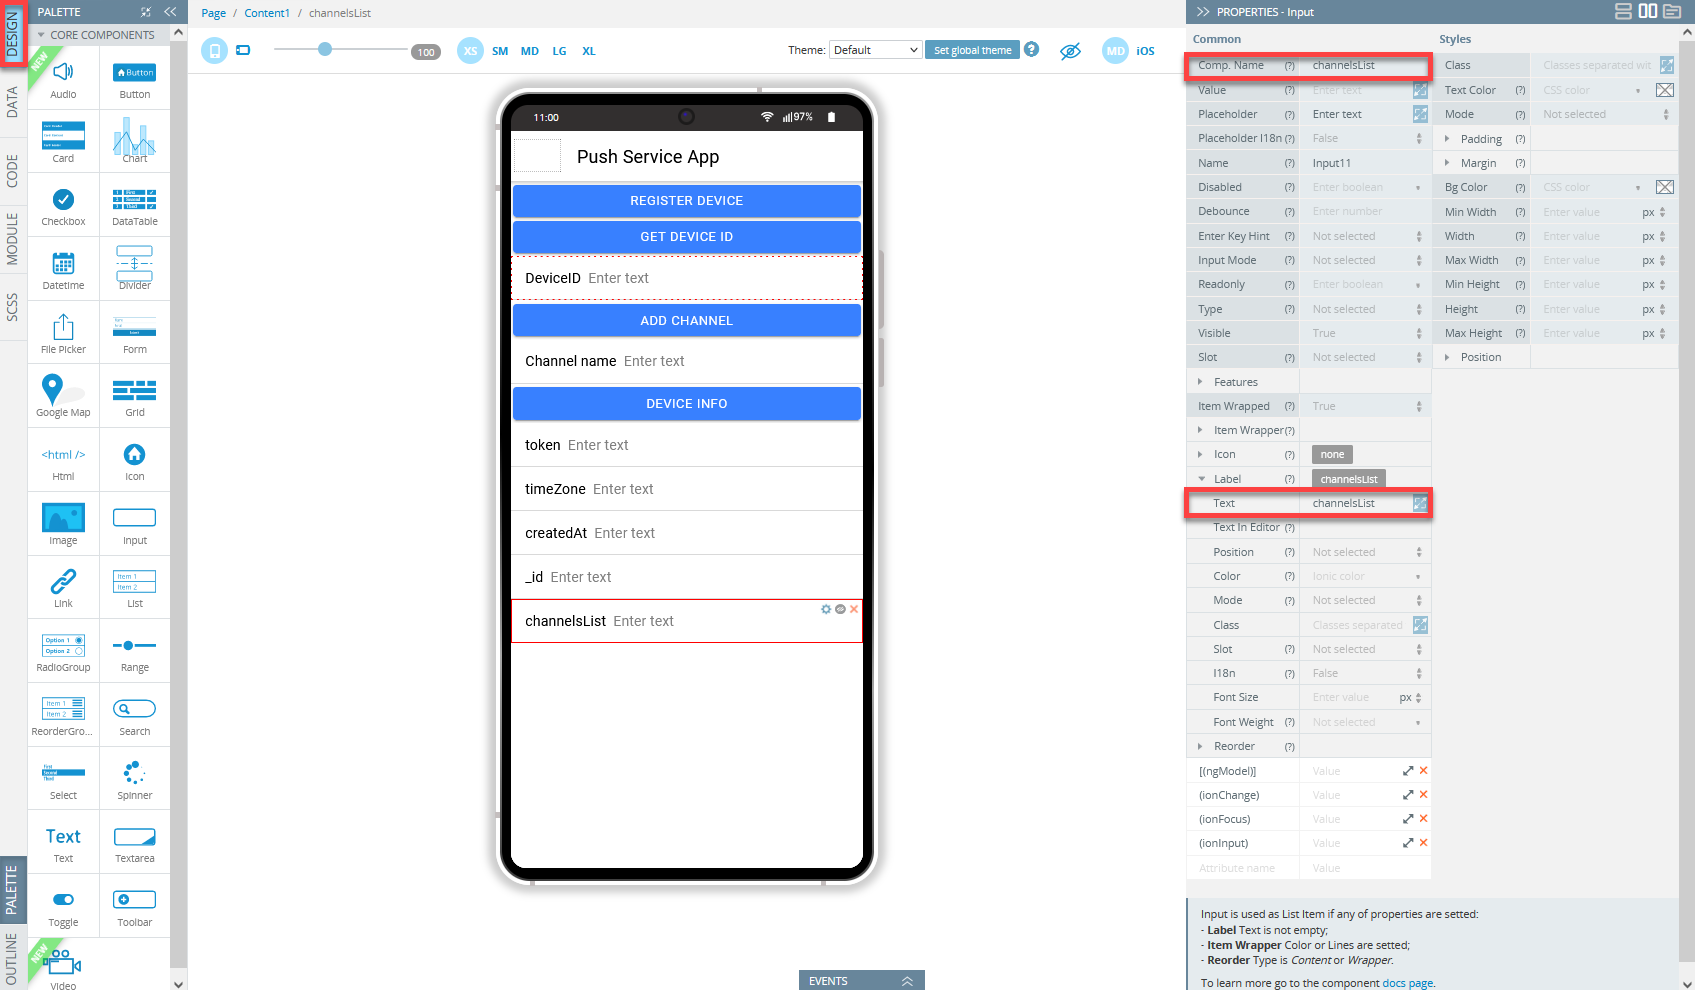
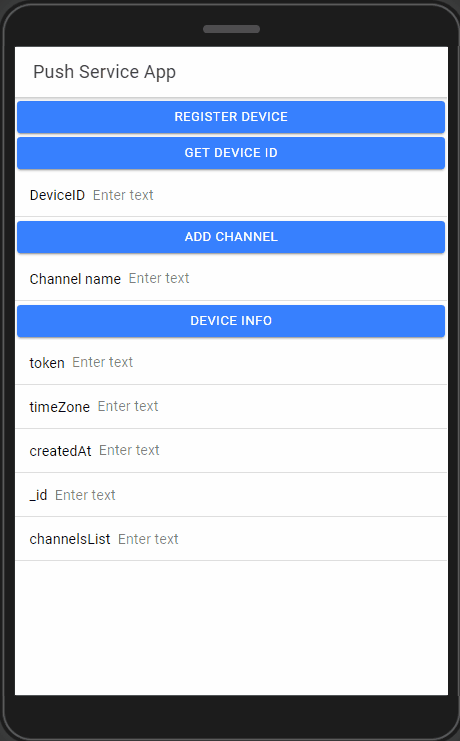
- Go to the Screen 1DESIGN panel and add one Button and five Input components to the editor.
- First, select the button and change its Text property under the PROPERTIES panel menu to Device Info.
- Now, one by one, select the Input components and change their Label Text fields to token, timeZone, createdAt, id, channelsList.
Tip!It's a good practice to replace the generated components' names with some meaningful names, so you can easily identify the components you are working with. This can be very useful when there are many similar UI components.
For example, in this page, we assigned the inputs the names they have for their Label > Text properties:
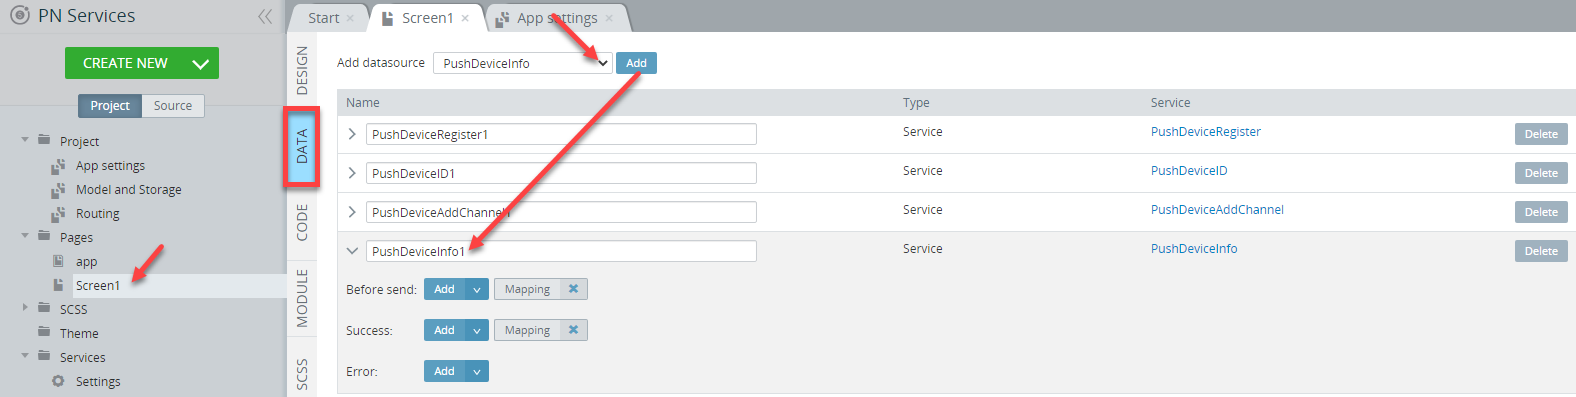
- Next, open the page DATA panel, select the PushDeviceInfo service from the datasource drop-down, and click the Add button:
- In the open mapping editor window, click the service Success > Mapping button, create the following mapping and click Save & Replace:

Note!Please make sure to expand the needed components' folders to map to the corresponding
valueproperties!
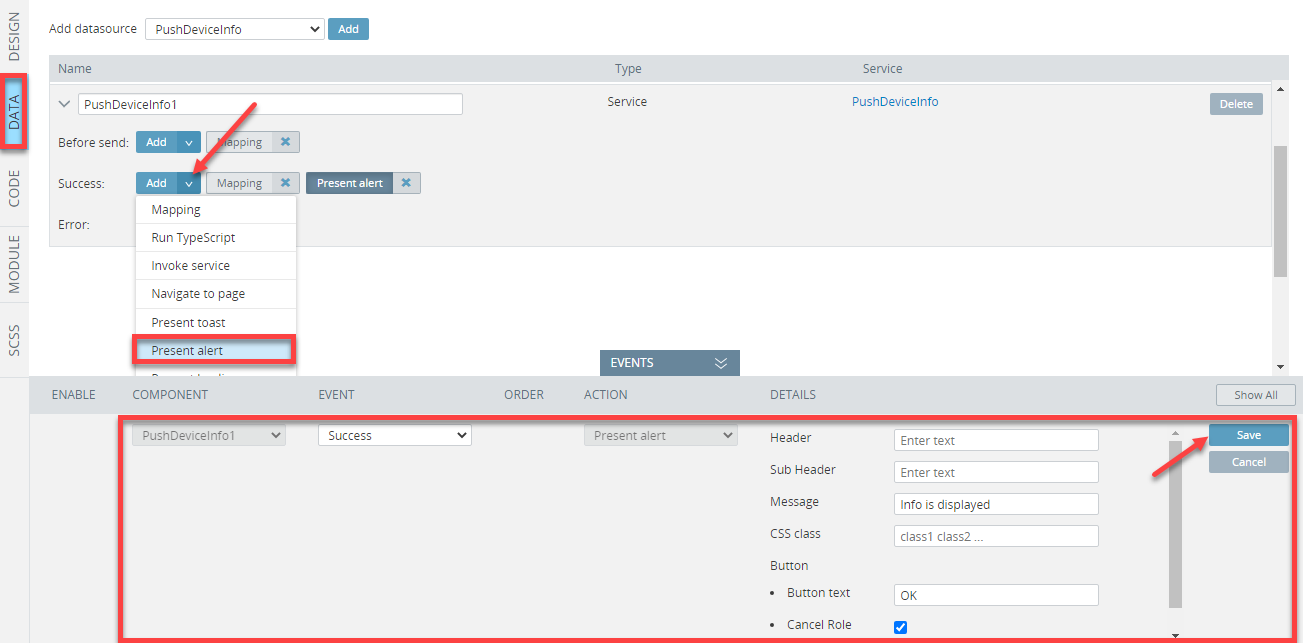
- To invoke the Present alert action, click the Add button of the Success service and then fill the Message field with Info is displayed.
Also, enable the Cancel Role check box and then click the Save button:
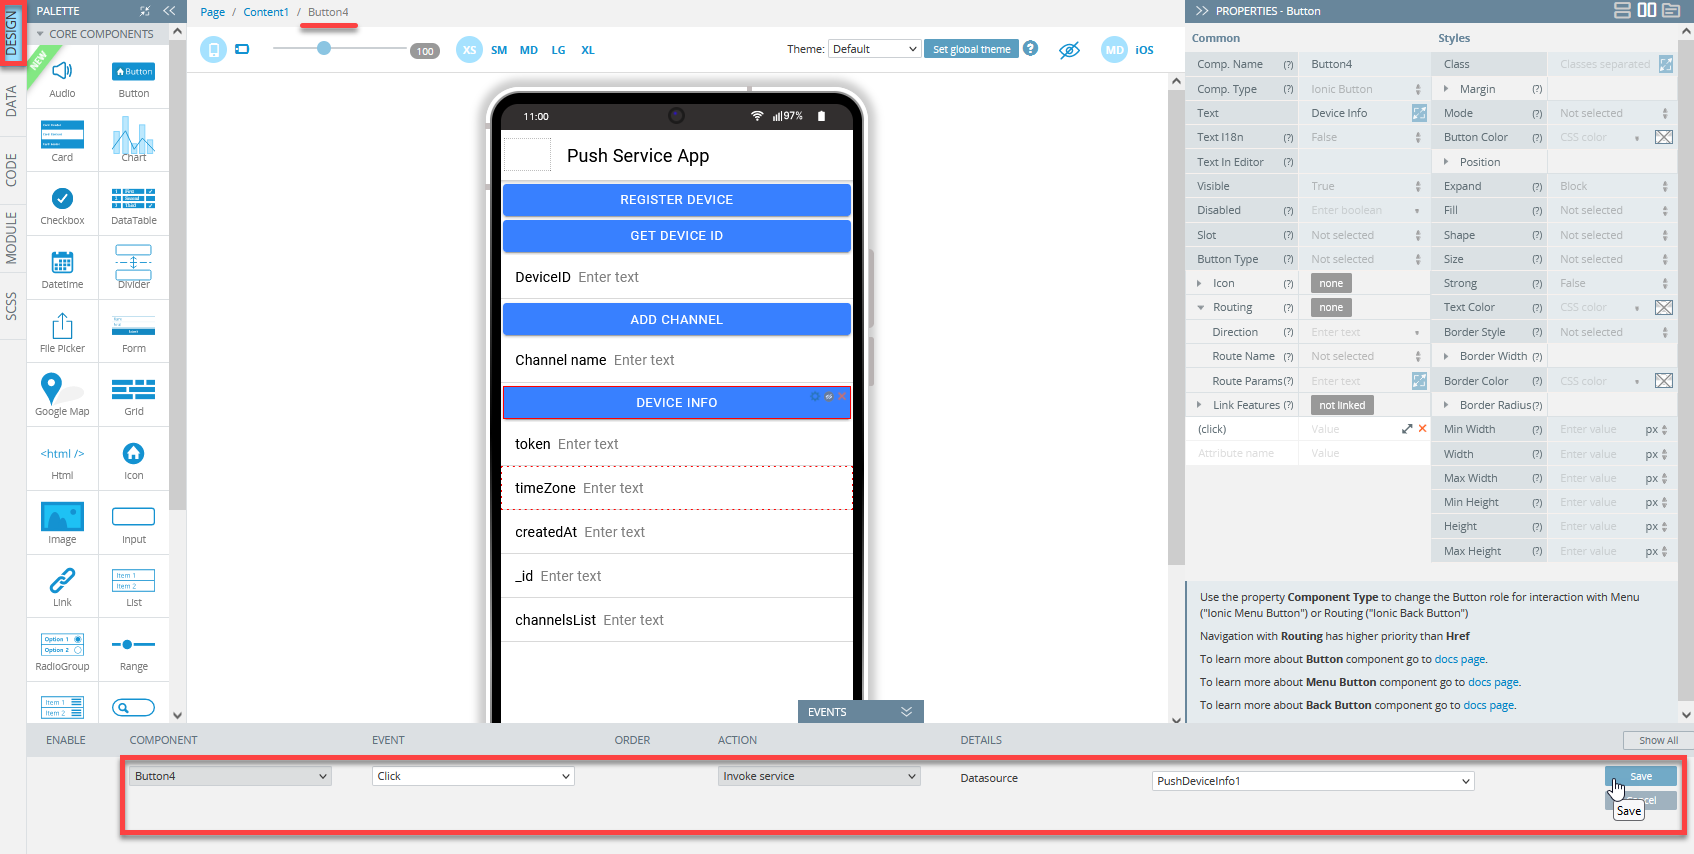
- Now, go to the page DESIGN panel and for the Click event of the Device Info button, select the Invoke service action, and then set the PushDeviceInfo value from the drop-down of the Datasource field. Click the Save button:
- Click the SAVE and then TEST buttons in the App BuilderToolbar to open the app in preview.
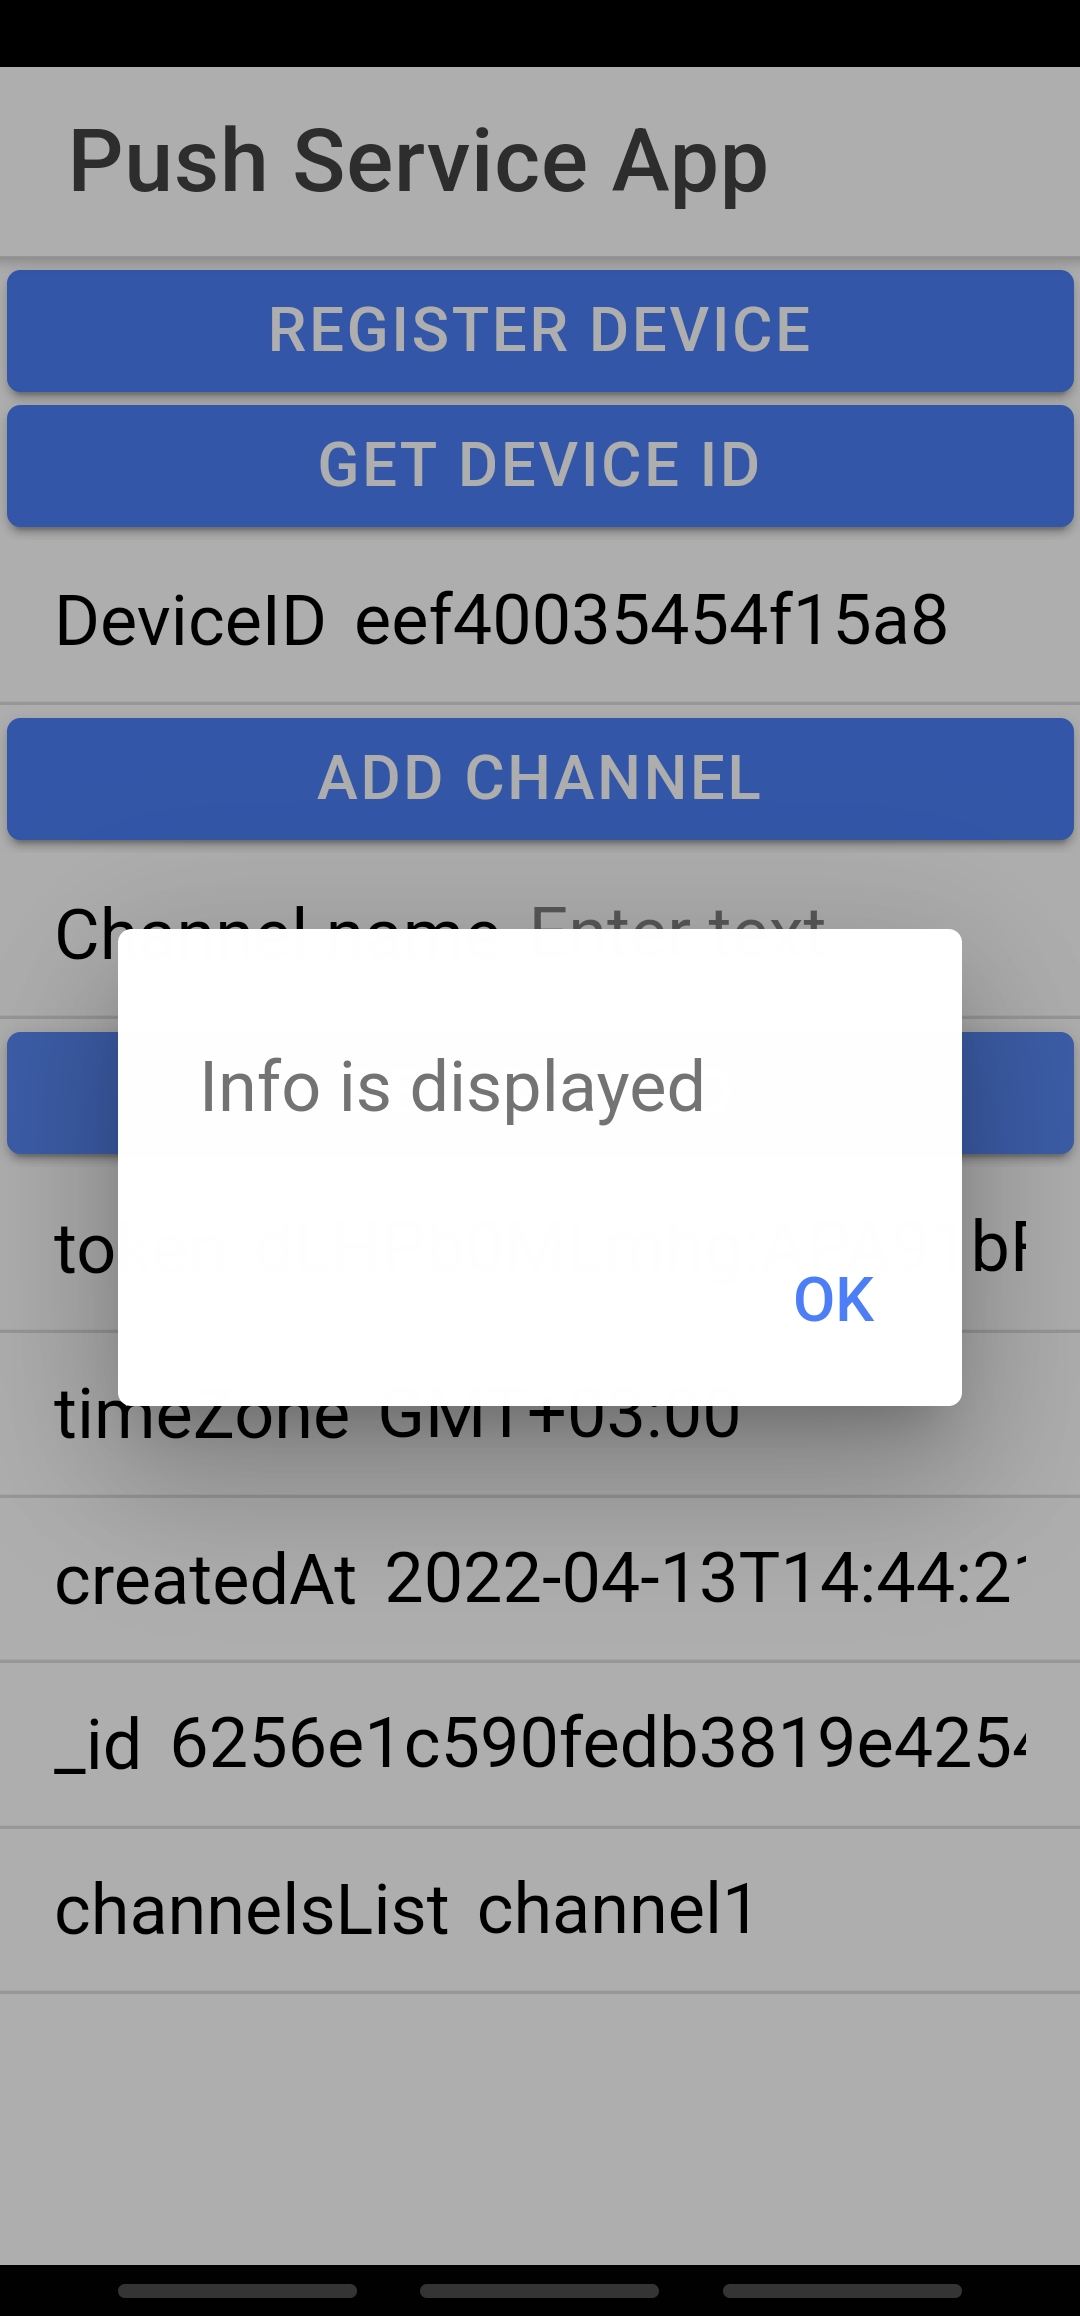
- Click the Get Device ID to get the deviceID value and then the Device Info buttons to fill the token, type, timeZone, createdAt, id, channelsList fields. Also, the message Info is displayed should appear:
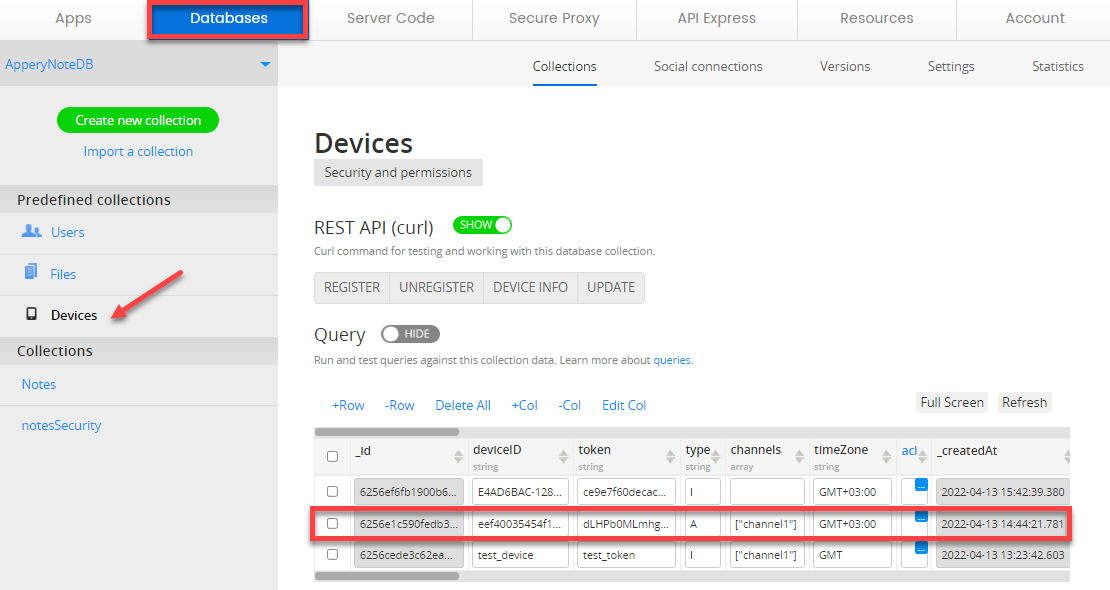
- Now, click the Appery.io Database link in the App BuilderToolbar and go to the linked database and open its predefined Devices collection.
The value from the deviceID, token, timeZone, createdAt, id, and channelsList datatable columns should correspond to the values of the deviceID, token, timeZone, createdAt, id, channelsList fields on the app preview:

- Now, export the app as an Android binary by clicking EXPORT > Binary (both iOS and Android options are available) in the top menu to install it on the device:
- Open the app on the device and click the Device Info button to see that the deviceID, token, type, timeZone, createdAt, id, channelsList fields are now filled with some data.
Also, the message Info is displayed should appear:
- Now, click the Appery.io Database link in the App BuilderToolbar and go to the linked database and open its predefined Devices collection: the values from the database columns should correspond to the value fields on preview:
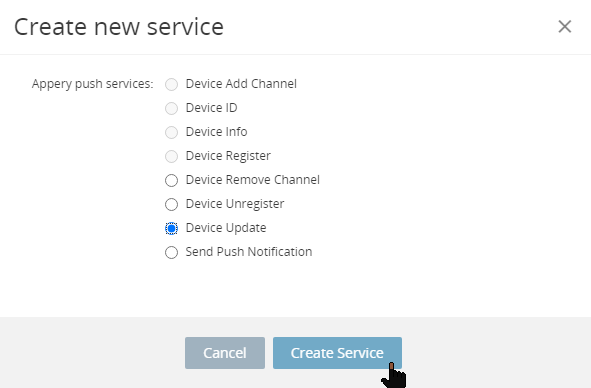
Adding Device Update Service
- In the the Create new service window, select the Device Update service and click the Create Service button:
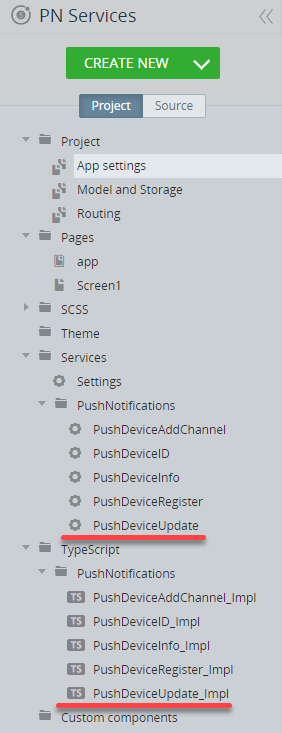
If you now go to the Project tab and unfold the Services > Push Notifications folder, you will see that the PushDeviceUpdate service has been added. Also, the TypeScript > PushNotifications folder contains the PushDeviceUpdate_Impl file:
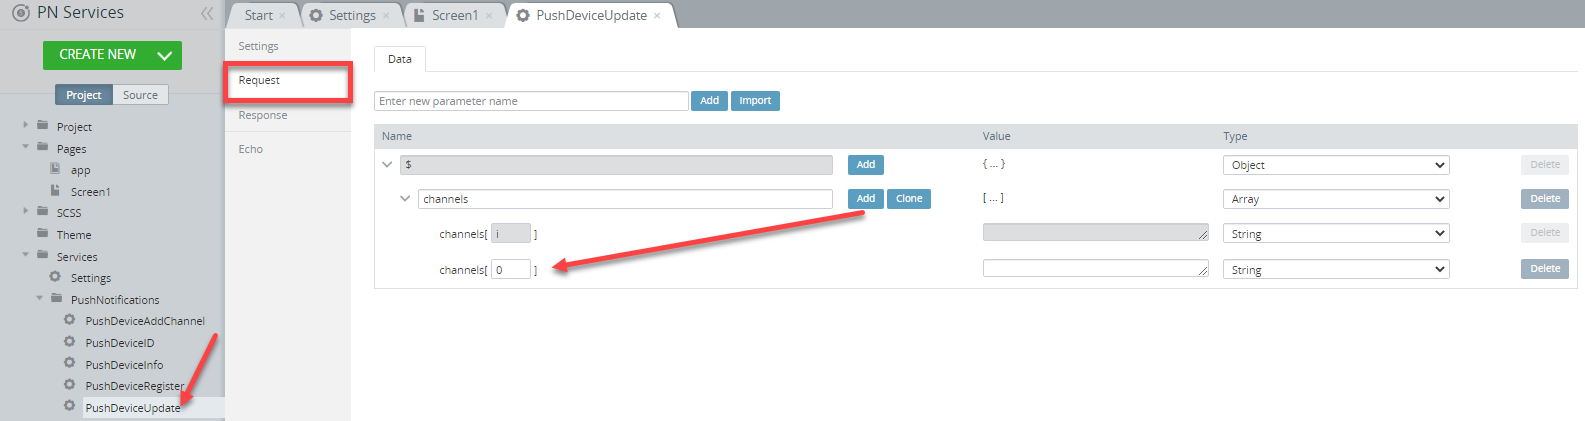
- Select the PushDeviceUpdate service and open its Request tab to add a new nested parameter, channels of String type:
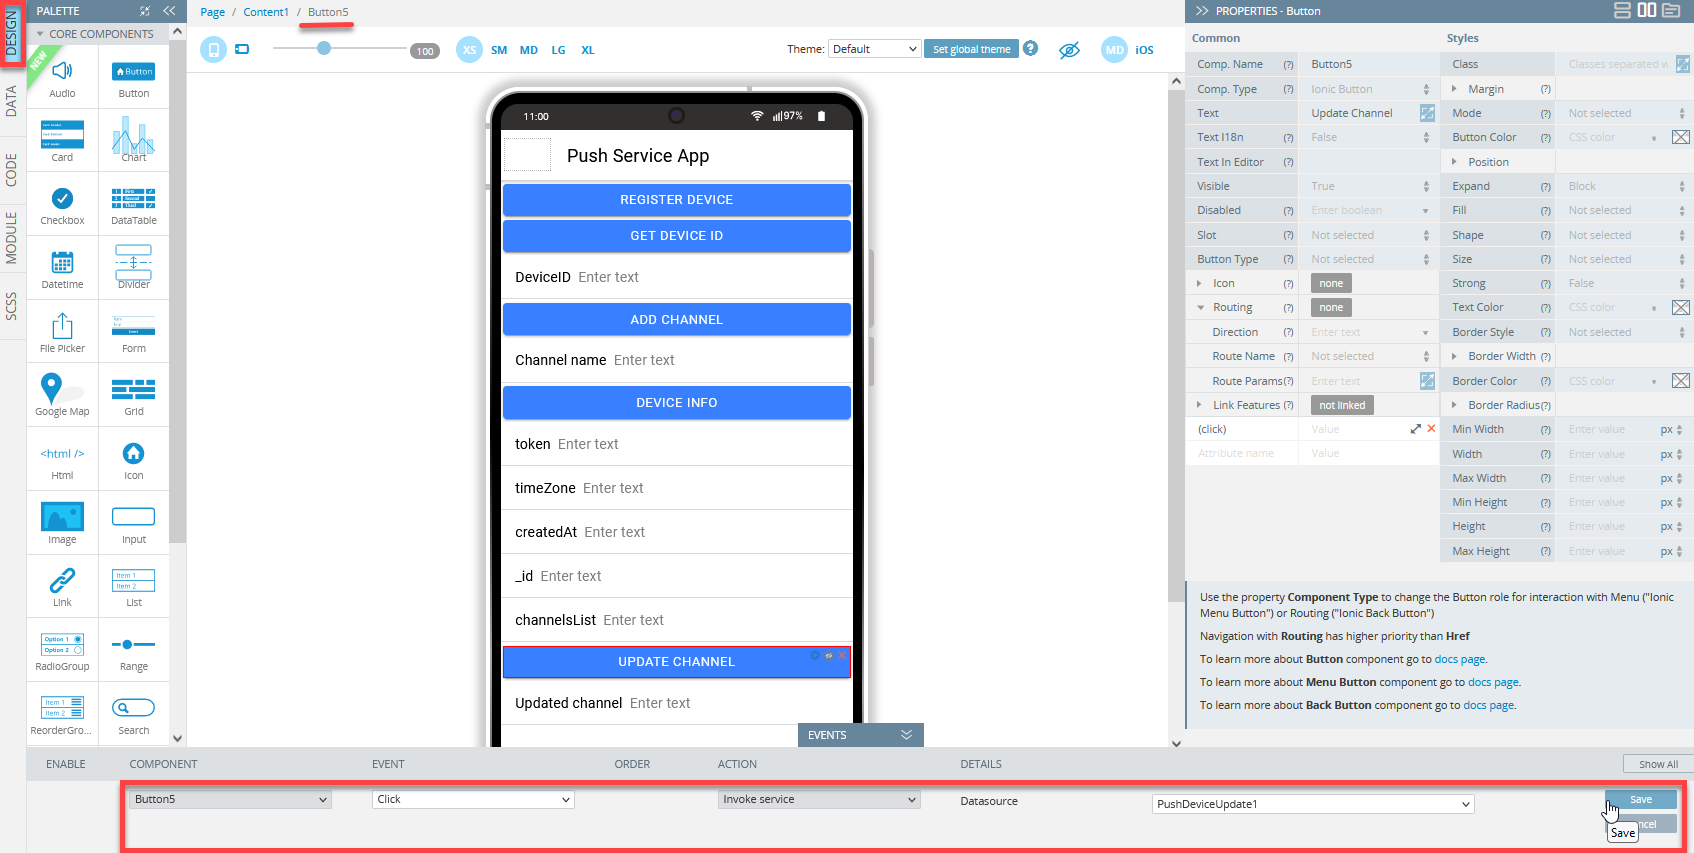
- Now, go to the Screen 1DESIGN panel and add the Button and Input components to the editor.
- First, select the button and change its Text property under the PROPERTIES panel menu to Update Channel.
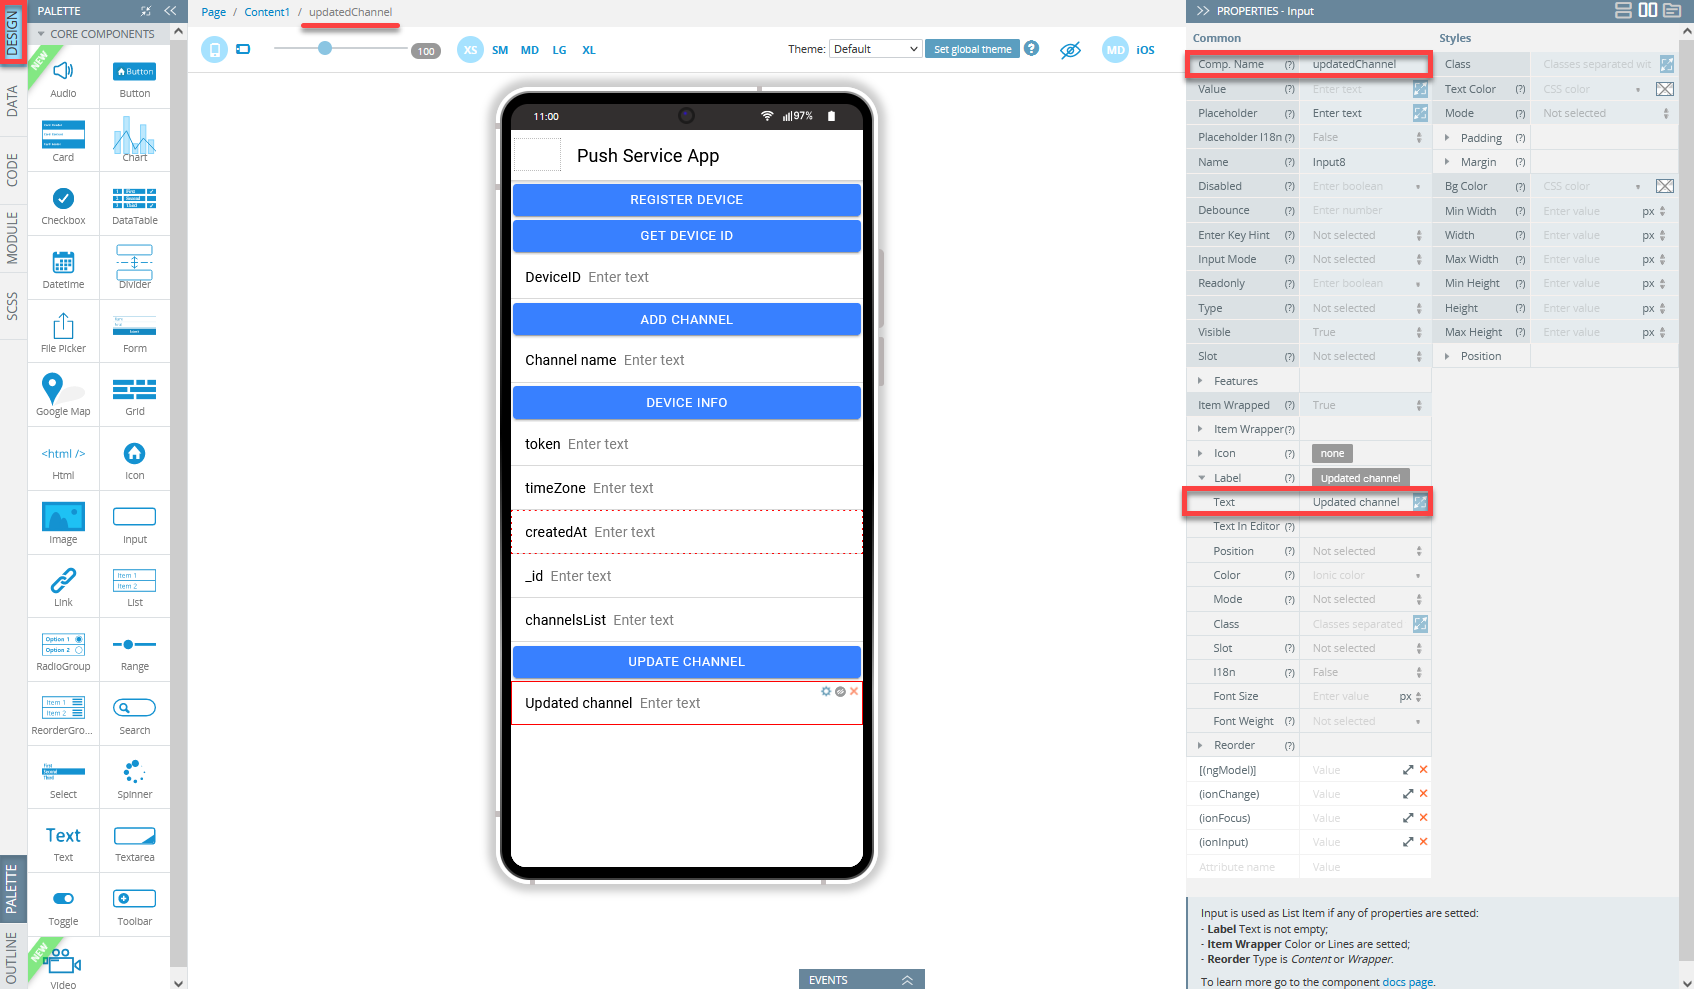
- Now, select the Input component and change its Label Text field to Updated channel (you might also like to rename its Component Name):
- Open the page DATA panel, select the PushDeviceUpdate service from the datasource drop-down, and click the Add button:
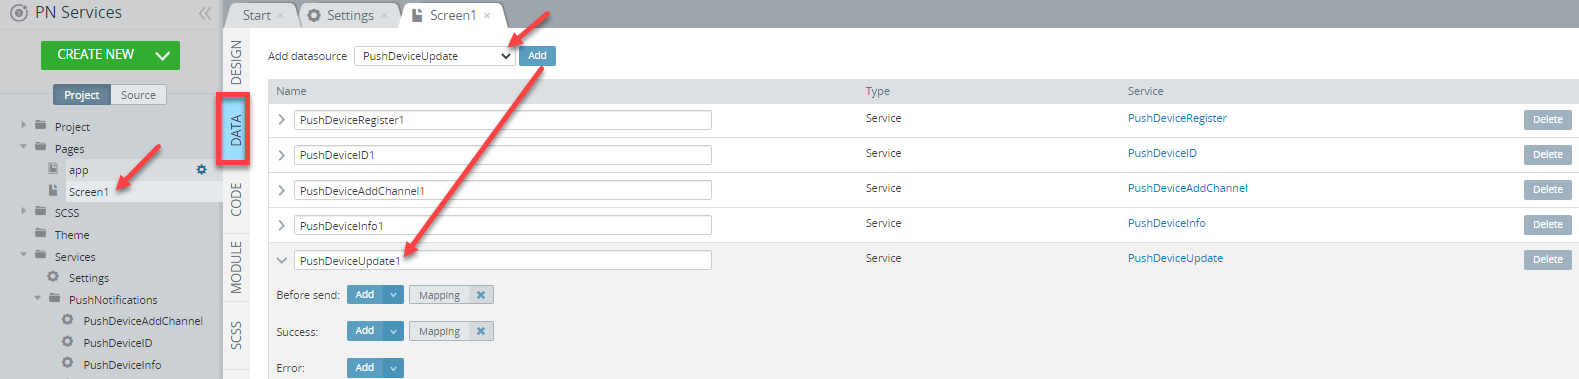
- In the open mapping editor window, click the service Before send > Mapping button, create the following mapping and click Save & Replace:
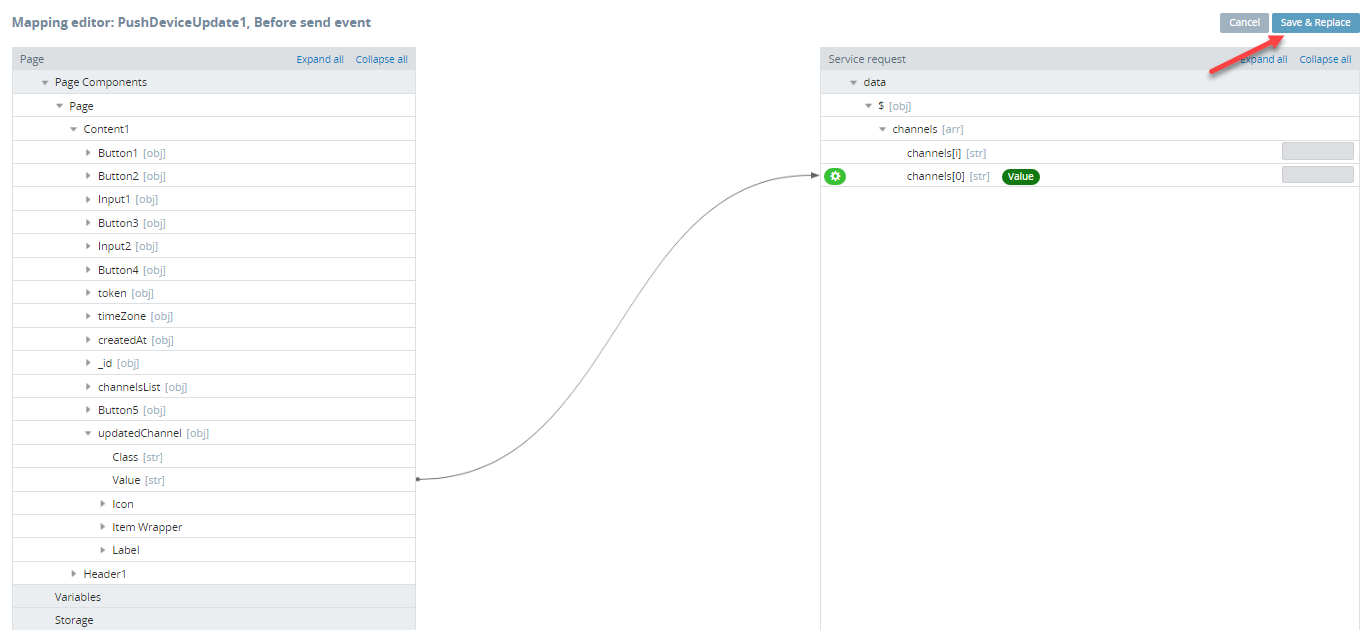
- To invoke the Present toast action, click the Add button of the Before send service, fill the Message field with Channel update is done. Also, enable the Cancel button check box and then click the Save button:
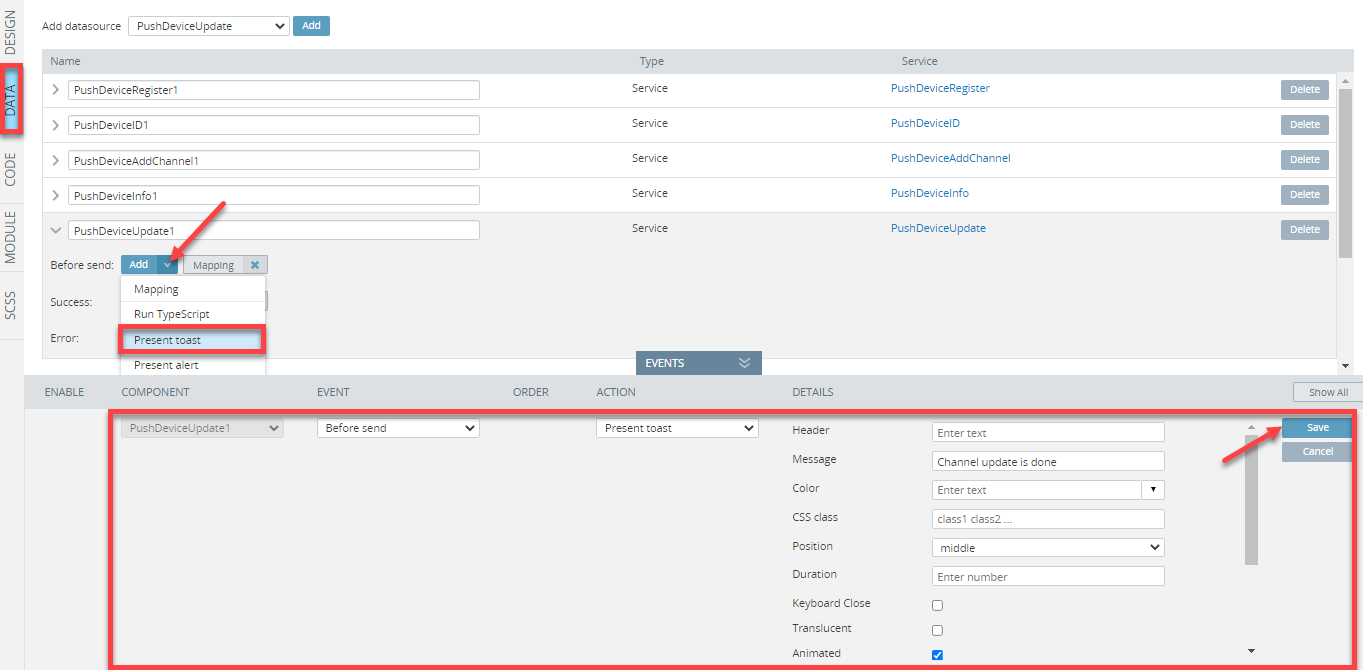
- Now, go to the page DESIGN panel and for the Click event of the Update Channel button, select the Invoke service action, and then set the PushDeviceUpdate value from the drop-down of the Datasource field. Click the Save button:
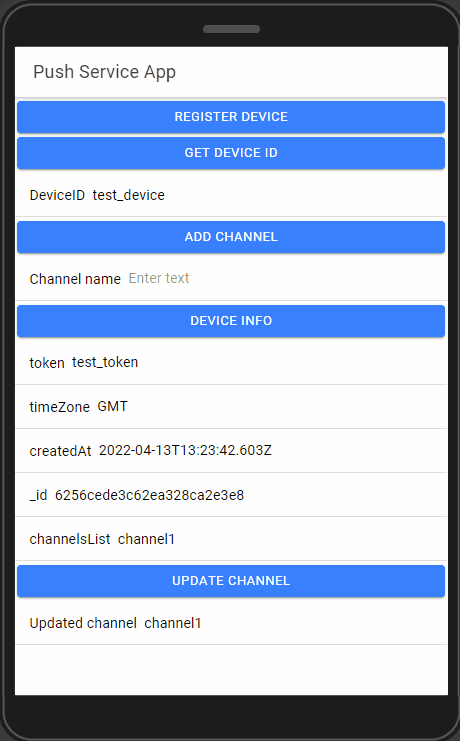
- Click the SAVE and then TEST buttons in the App BuilderToolbar to open the app in preview and note the channel name in the channelsList field.
- Now, fill the Updated channel field with a new channel value and click the Update Channel button: the message Channel update is done should be displayed.
Now, click the Device Info button to see the updated channel data:
- Now, click the Appery.io Database link in the App BuilderToolbar and go to the linked database and open its predefined Devices collection: the value from the channels column should correspond to the value of the Updated Channel field on preview:

- Now, export the app as an Android binary by clicking EXPORT > Binary (both iOS and Android options are available) in the top menu to install it on the device:

- Open the app on the device and click the Device Info button to see that the deviceID, token, timeZone, createdAt, _id, channelsList fields are now filled with some data.
Also, the message Info is displayed should appear:

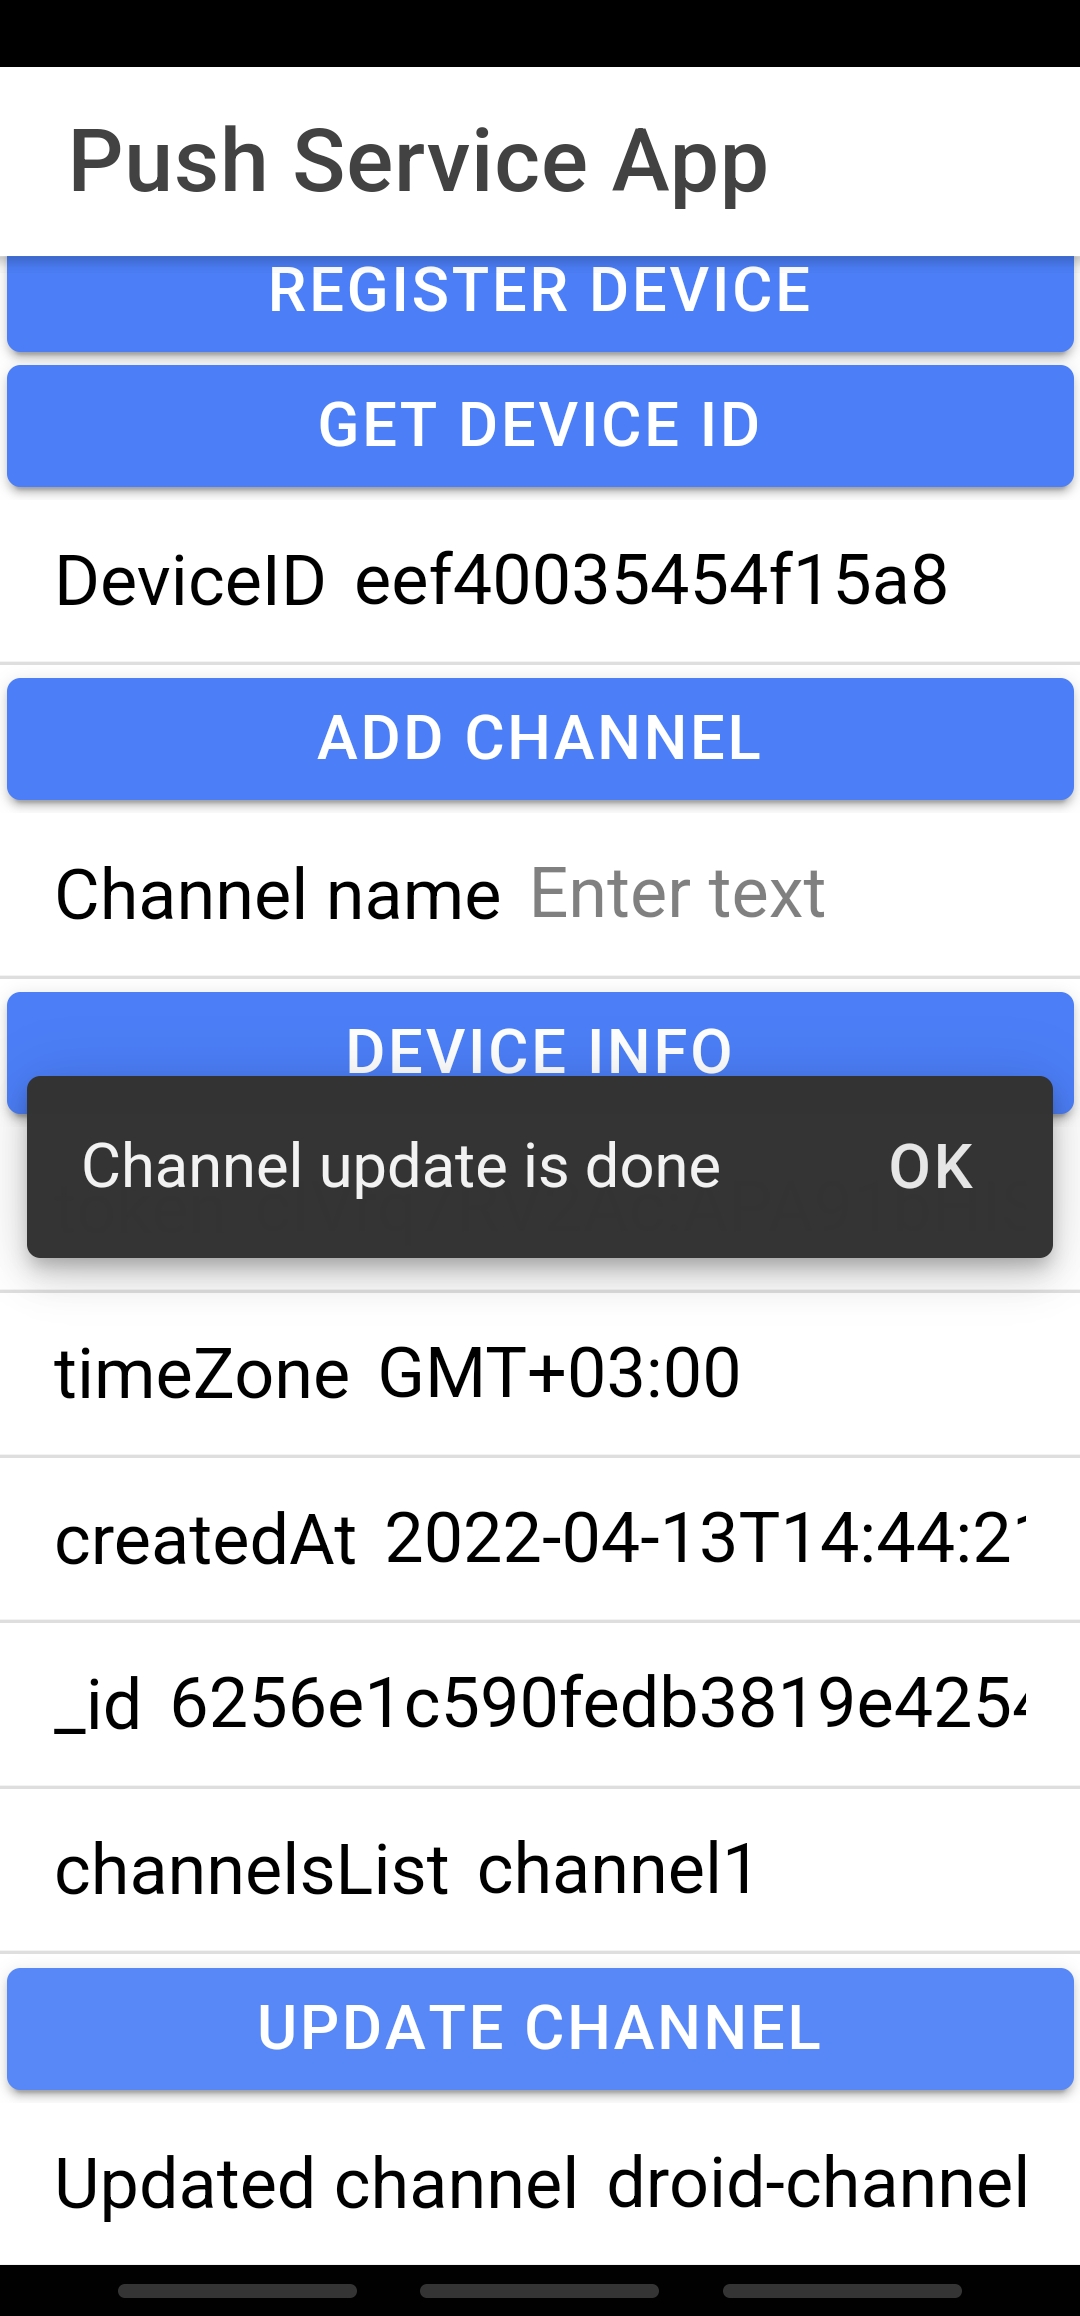
- Now, fill in the Updated Channel field with some value (for example droid-channel) and click the Update Channel button: the message Channel update is done should be displayed:
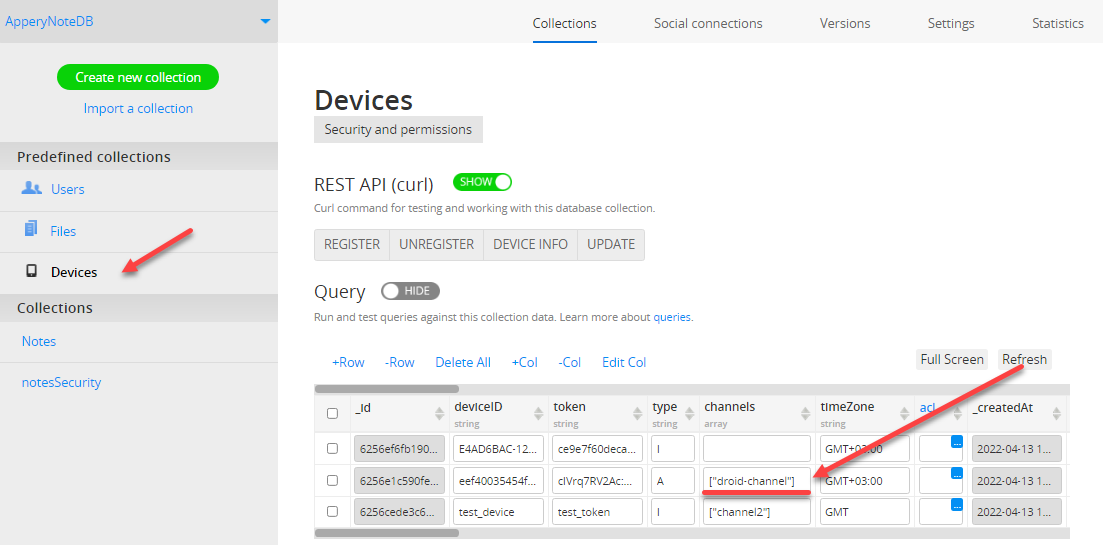
- To make sure the database records are also updated, go back to the predefined Devices collection and refresh it: the value from the channels column should correspond to the value of the Updated Channel field of your test Android and/or iOS mobile device(s) on preview:
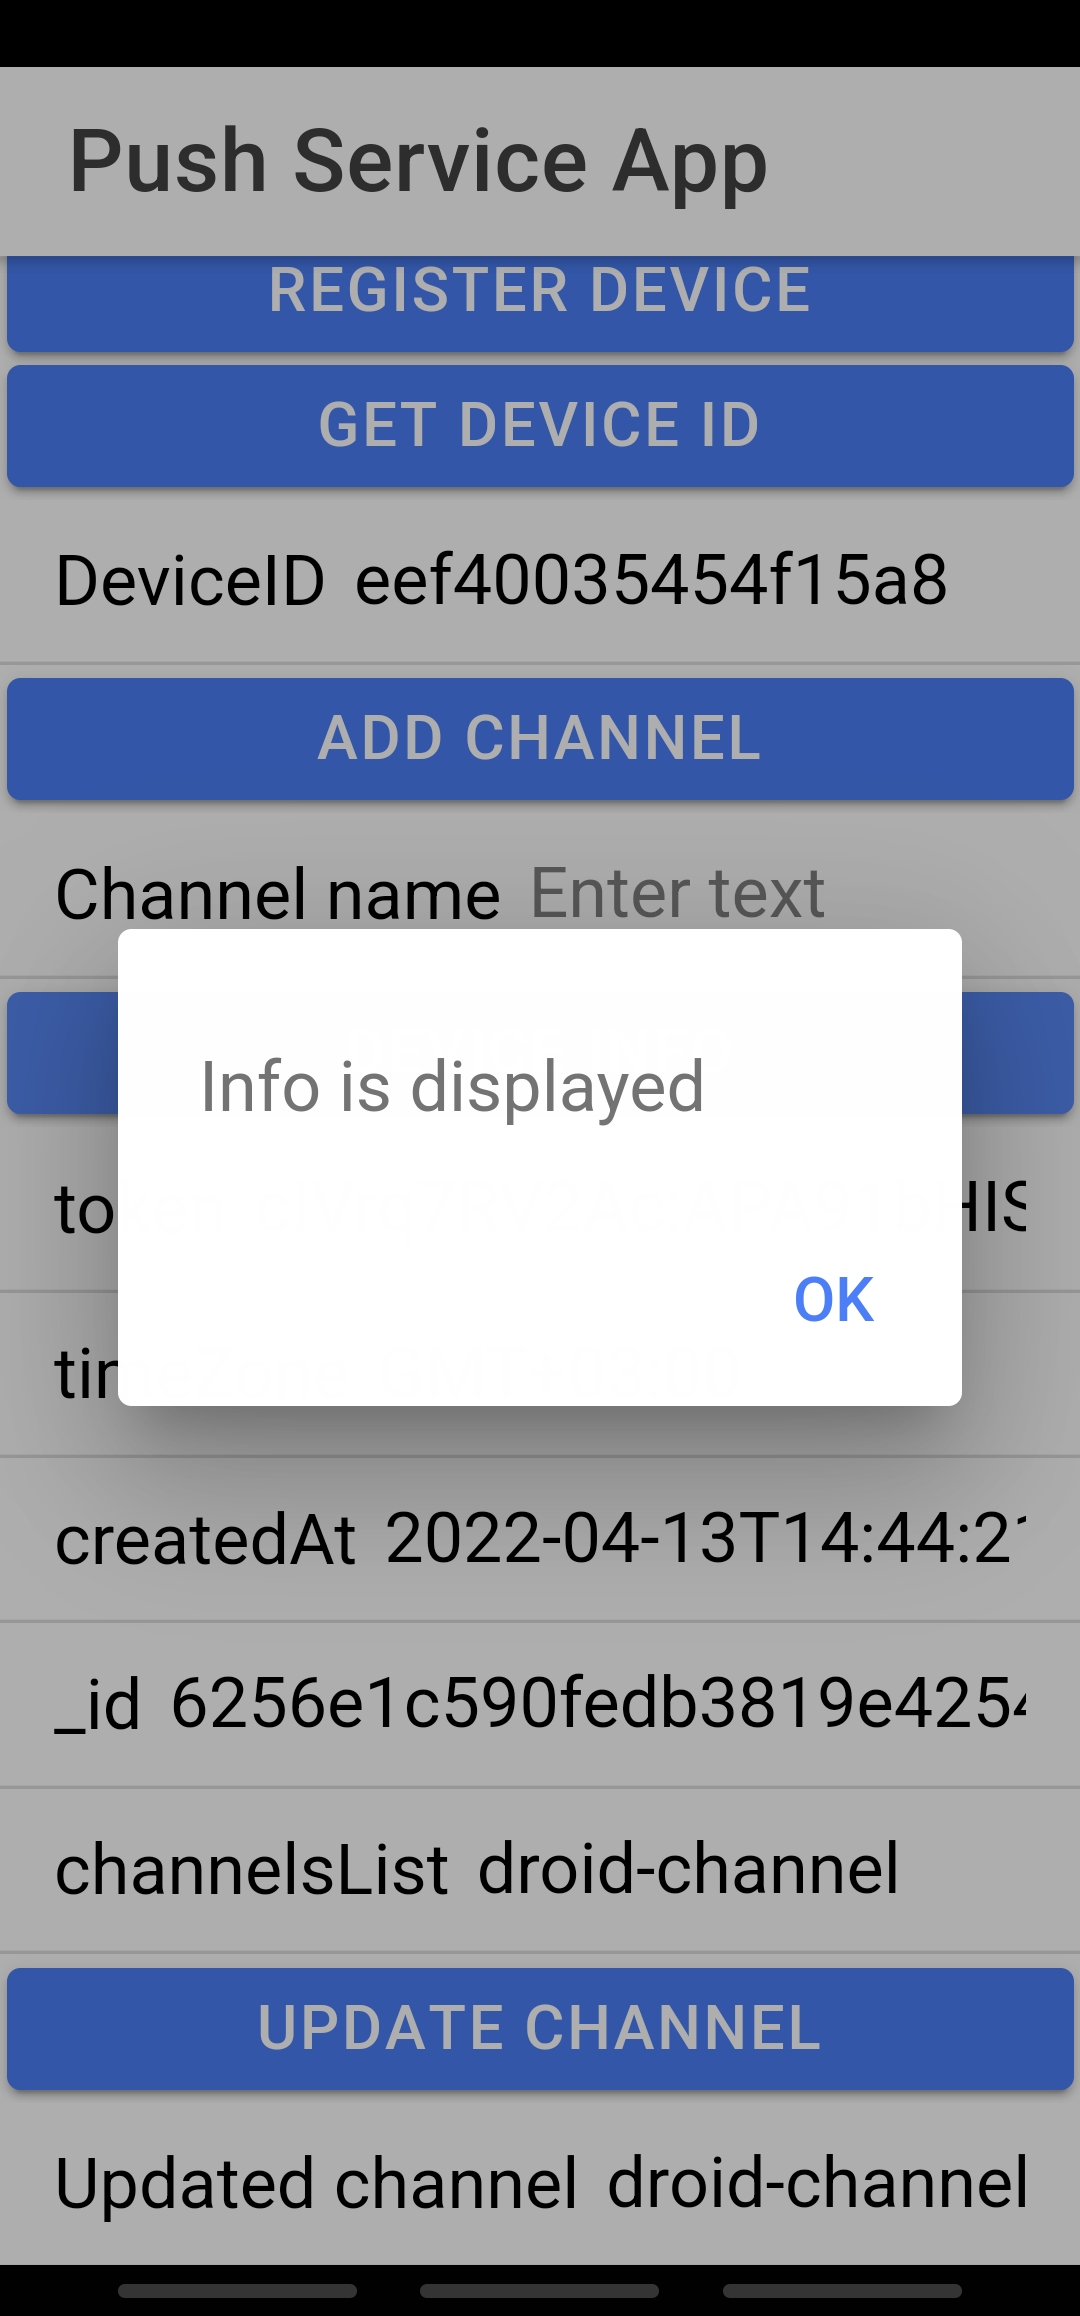
- If you now click the Device Info button again, the message Info is displayed and the channelsList field with the updated channel value (droid-channel) will be displayed:
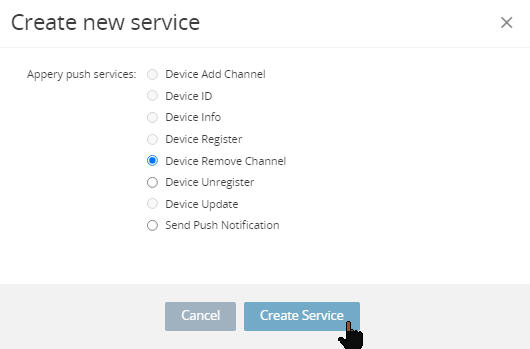
Adding Device Remove Channel Service
- In the Create new service window, select the Device Remove Channel service and click the Create Service button:
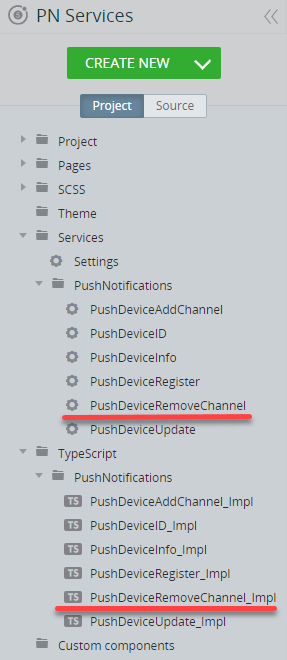
If you now go to the Project tab and unfold the Services > Push Notifications folder, you will see that the PushDeviceRemoveChannel service has been added. Also, the TypeScript > PushNotifications folder contains the PushDeviceRemoveChannel_Impl file:
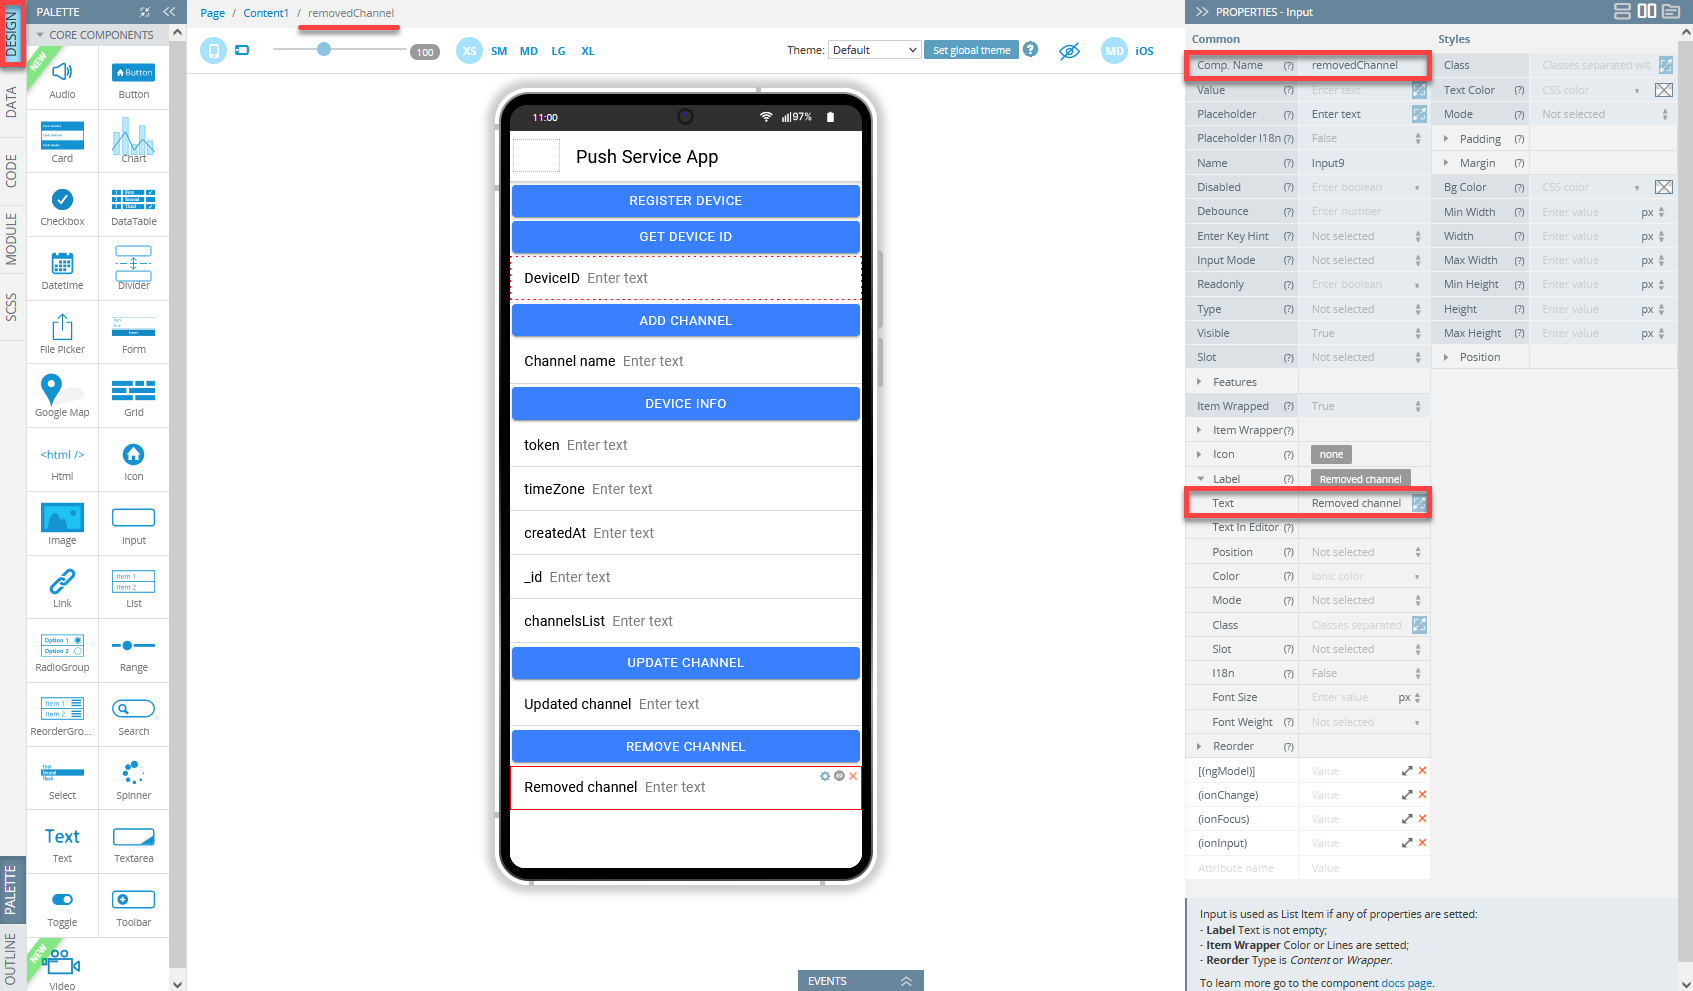
- Go to the Screen 1DESIGN panel and add the Button and Input components to the editor.
- Select the button and change its Text property under the PROPERTIES panel menu to Remove Channel.
- Now, select the Input component and change its Label Text field to Removed channel (you might also like to rename its Component Name):
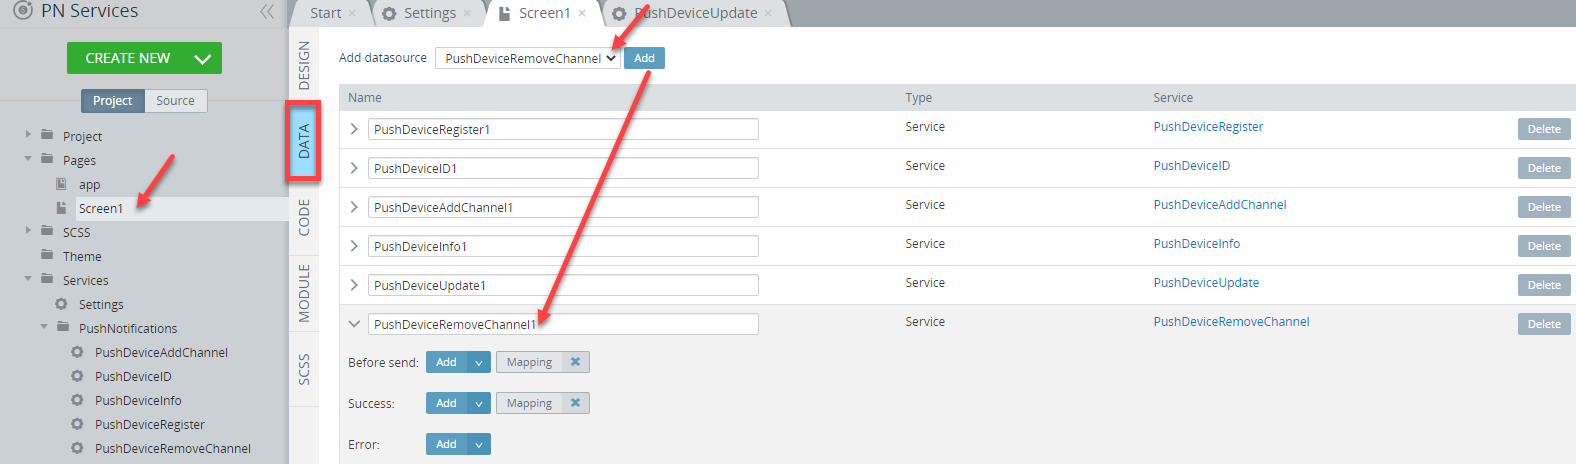
- Next, open the page DATA panel, select the PushDeviceRemoveChannel service from the datasource drop-down, and click the Add button:
- In the open mapping editor window, click the service Before send > Mapping button, create the following mapping and click Save & Replace:

- To invoke the Present alert action, click the Add button of the Before send service and then fill the Message field with Channel is removed.
Also, enable the Cancel Role check box and then click the Save button:
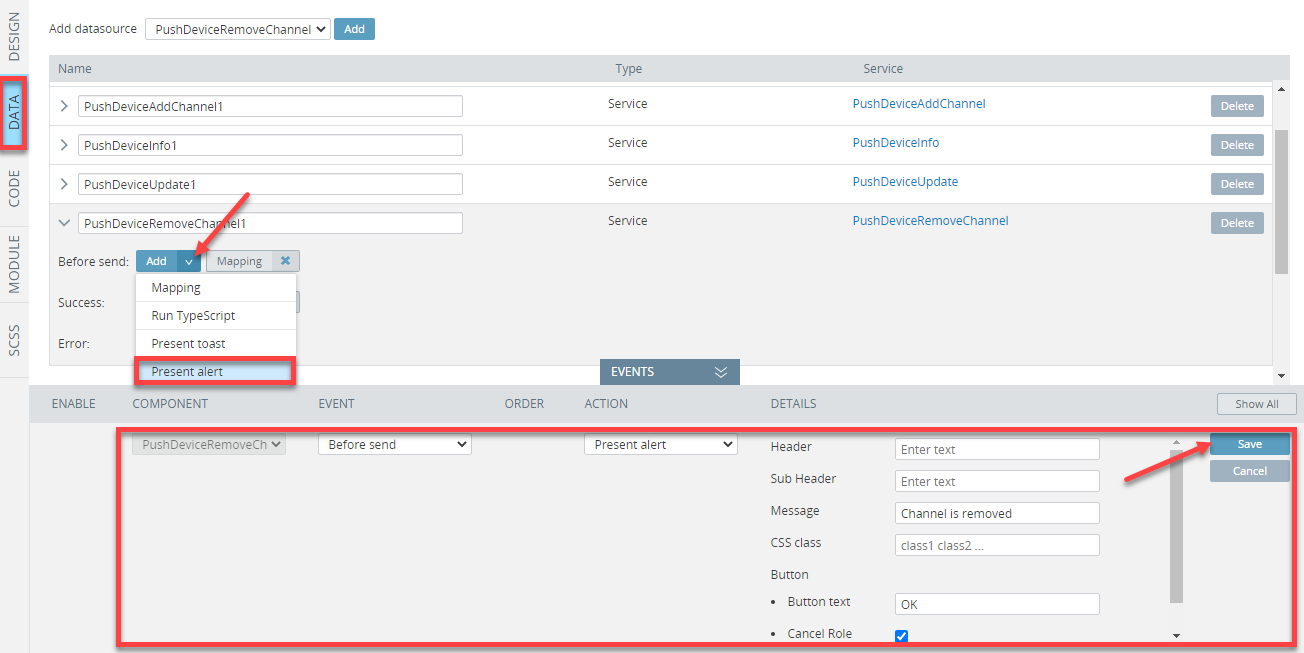
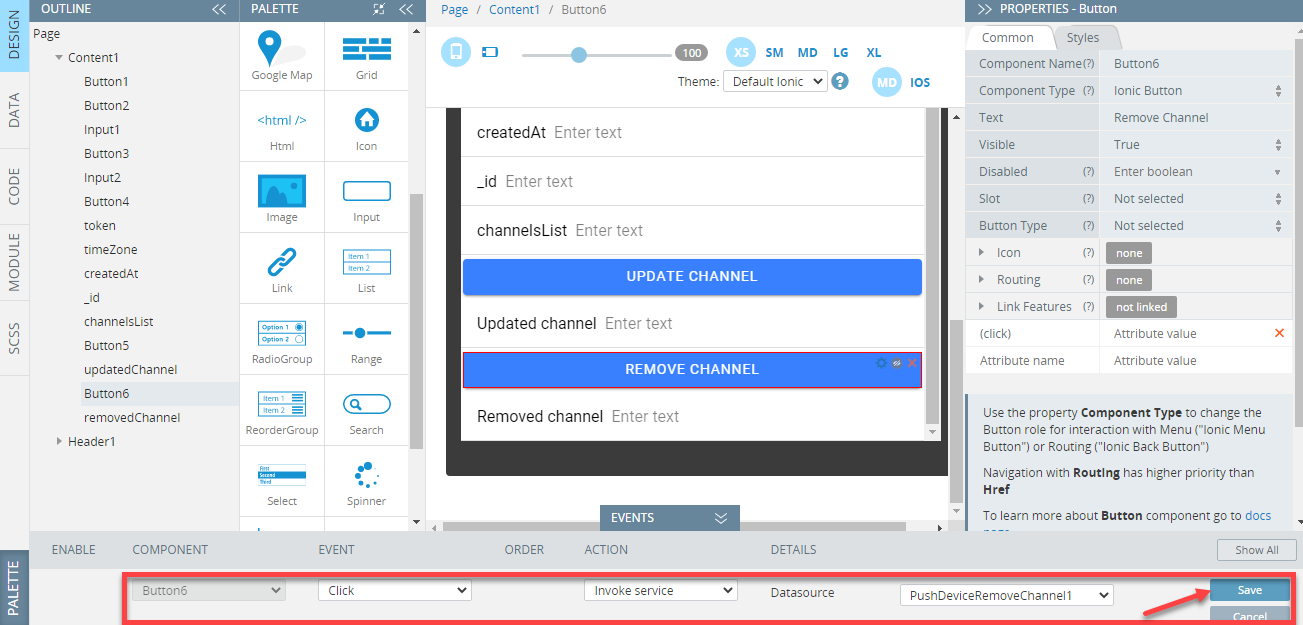
- Now, go to the page DESIGN panel and for the Click event of the Remove Channel button, select the Invoke service action, and then set the PushDeviceRemoveChannel value from the drop-down of the Datasource field. Click the Save button:
- Click the SAVE and then TEST buttons in the App BuilderToolbar to open the app in preview and note the channel name in the channelsList field.
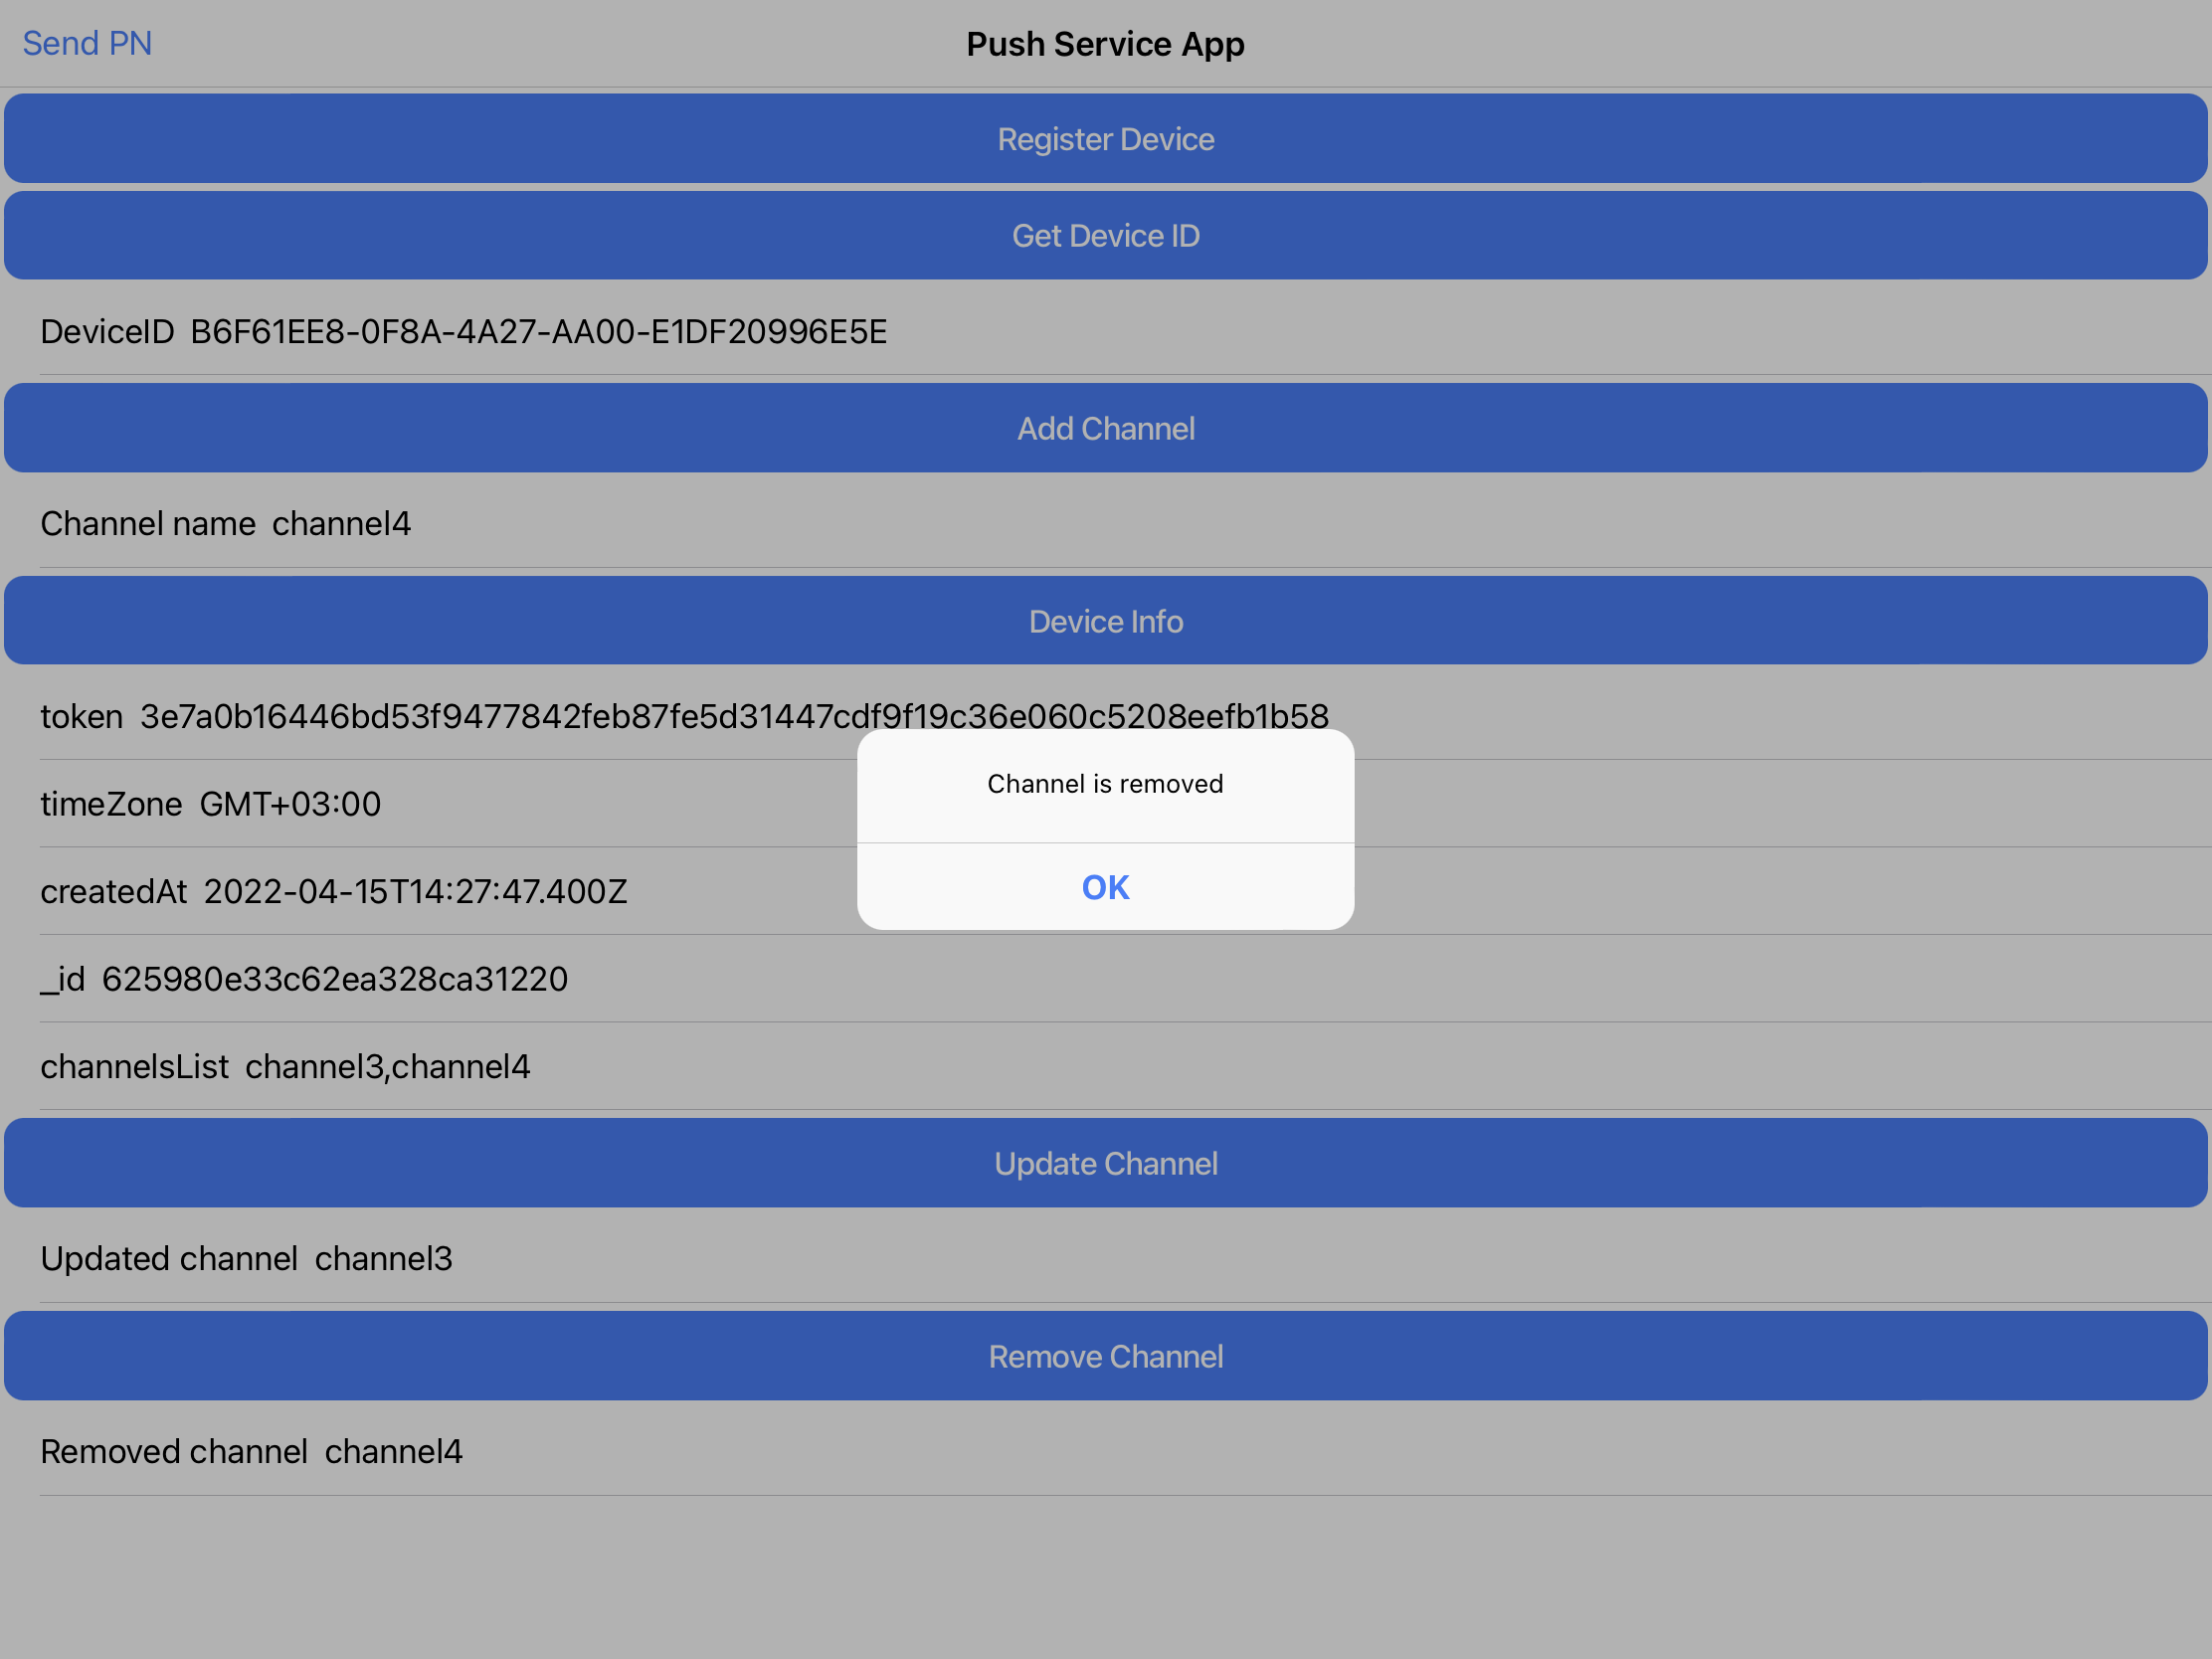
- Now, fill the Removed channel field with the existing channel value and click the Remove Channel button: the message Channel is removed should be displayed.
Now, click the Device Info button to see the updated empty channel data:

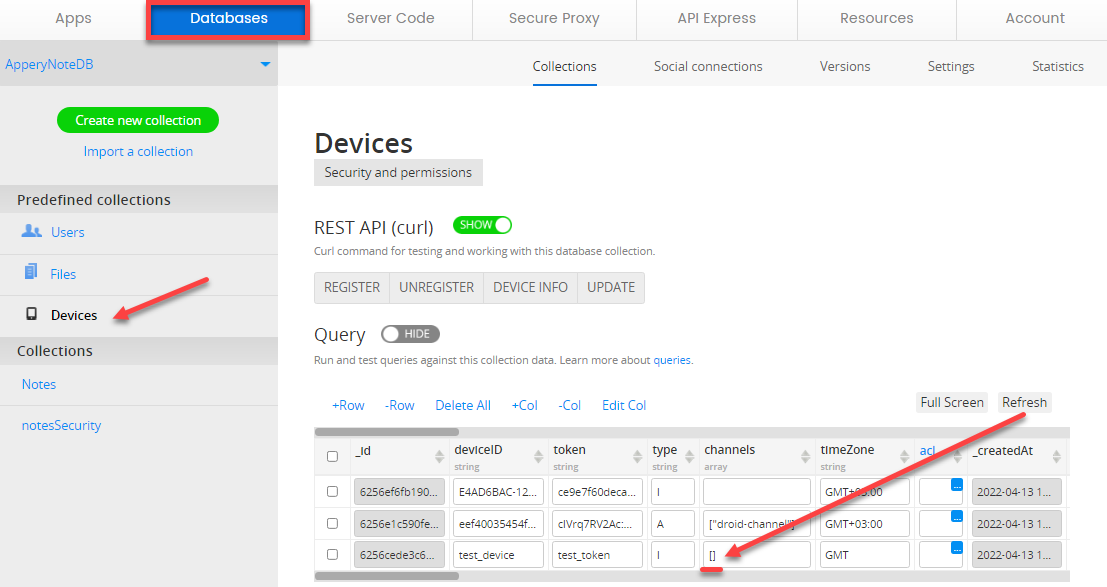
- Now, click the Appery.io Database link in the App BuilderToolbar and go to the linked database and open its predefined Devices collection: the value channel2 is removed from the channels column:
Here is how this functionality works on an iOS device: when you remove one of the two channels (namely, channel4) that were added before:
and then go to the linked database and open its predefined Devices collection you will see that the value channel4 is removed from the channels column for the iOS device:
Adding Send Push Notification Service
- In the Create new service window, select the Send Push Notification service and click the Create Service button:

If you now go to the Project tab and unfold the Services > Push Notifications folder, you will see that the PushSendNotification service has been added. Also, the TypeScript > PushNotifications folder contains the PushSendNotification_Impl file:
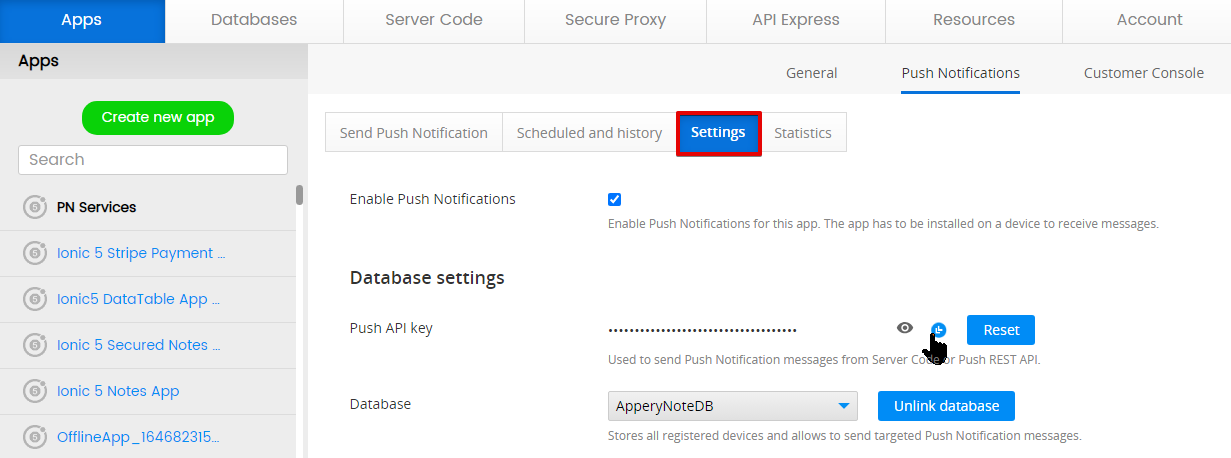
- First, open the Settings tab of your application Push Notification and copy its apiKey value:
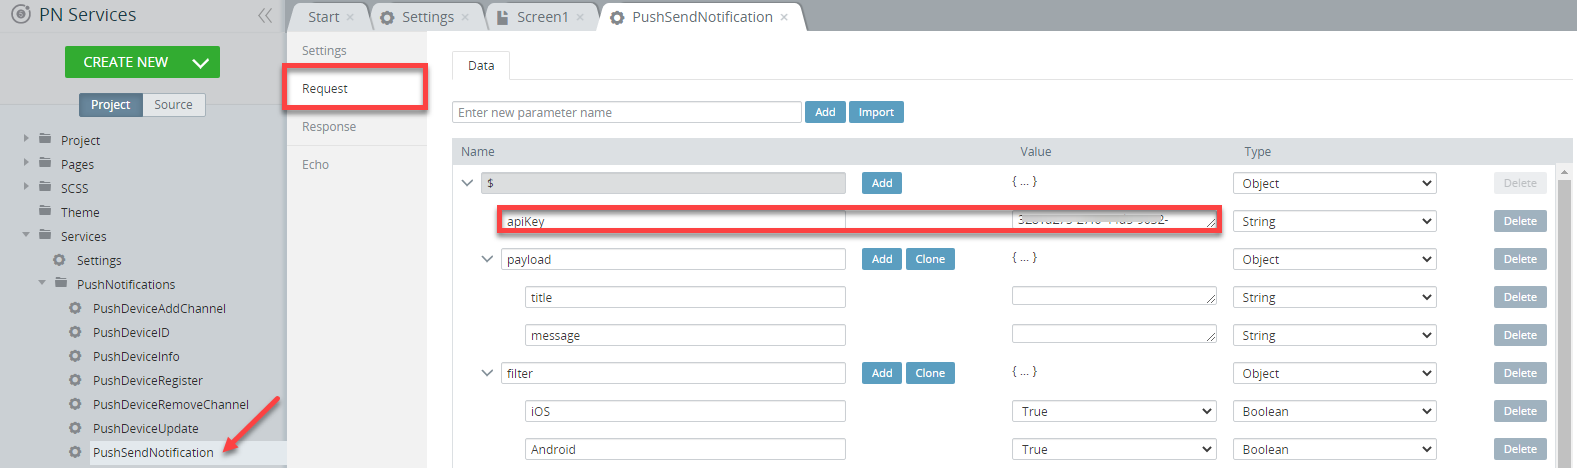
- Now, open thePushSendNotification Service > Request tab and paste the copied apiKey. Save:
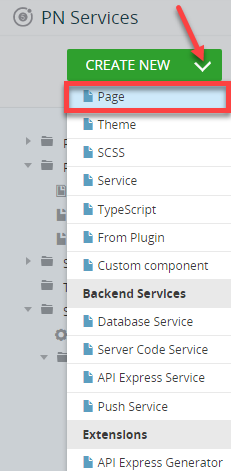
- Let's create a new blank page by clicking CREATE NEW > Page:
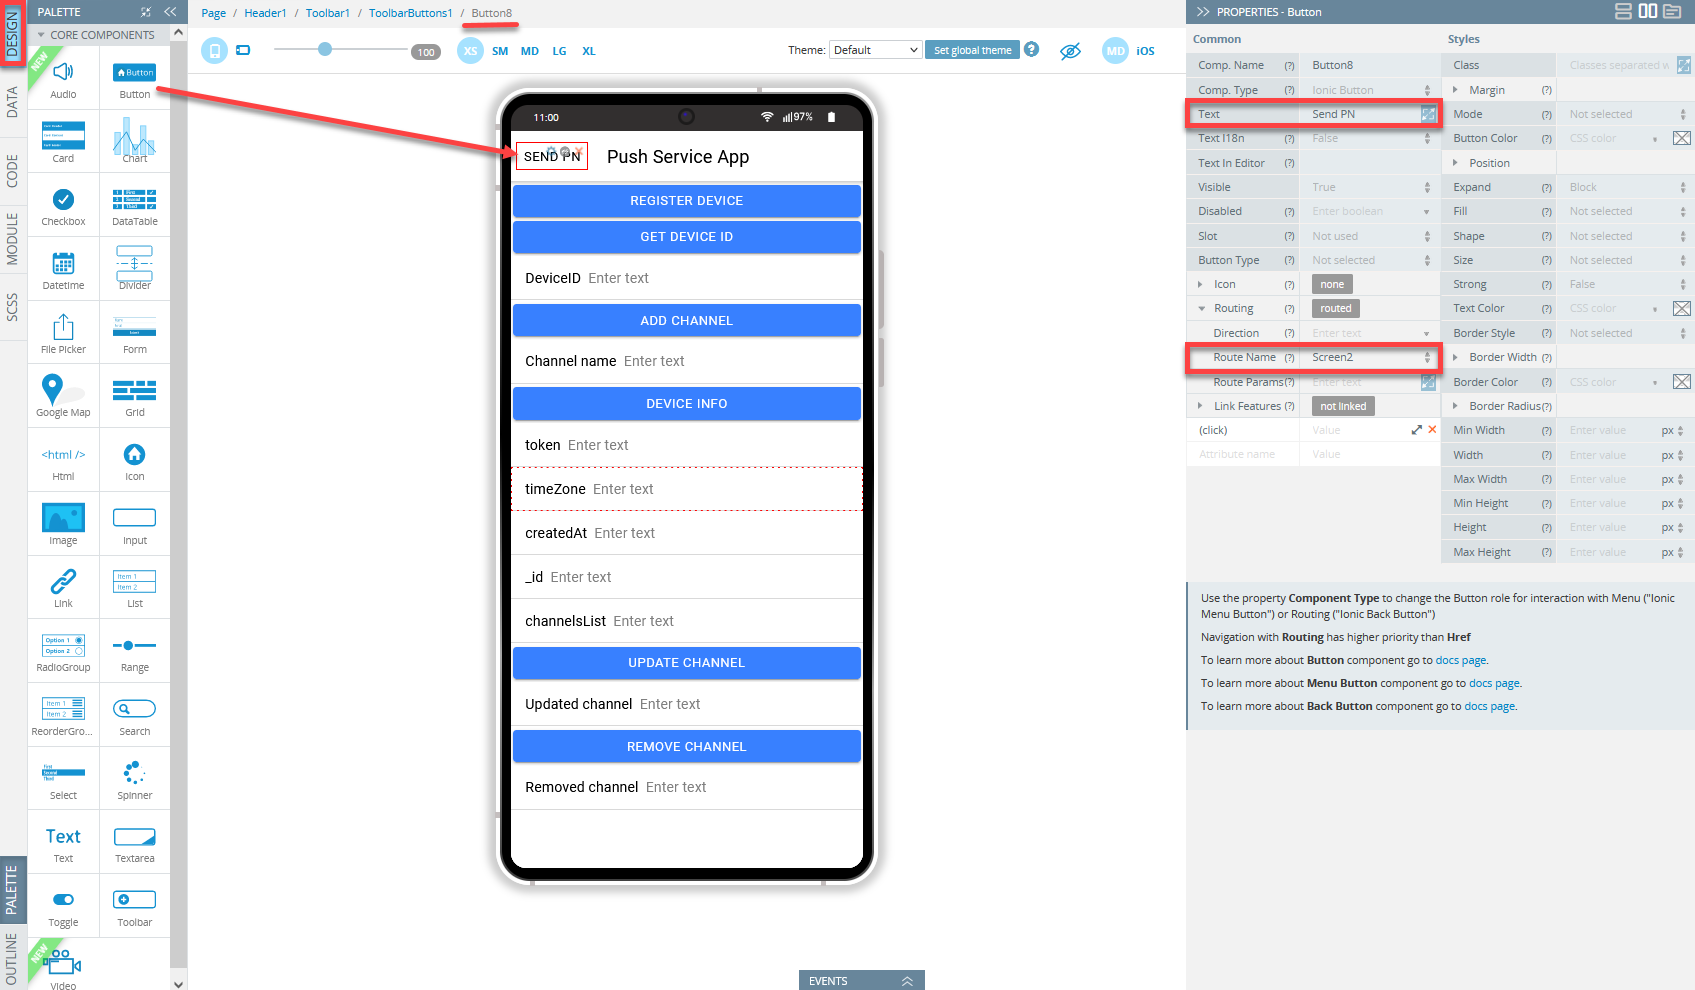
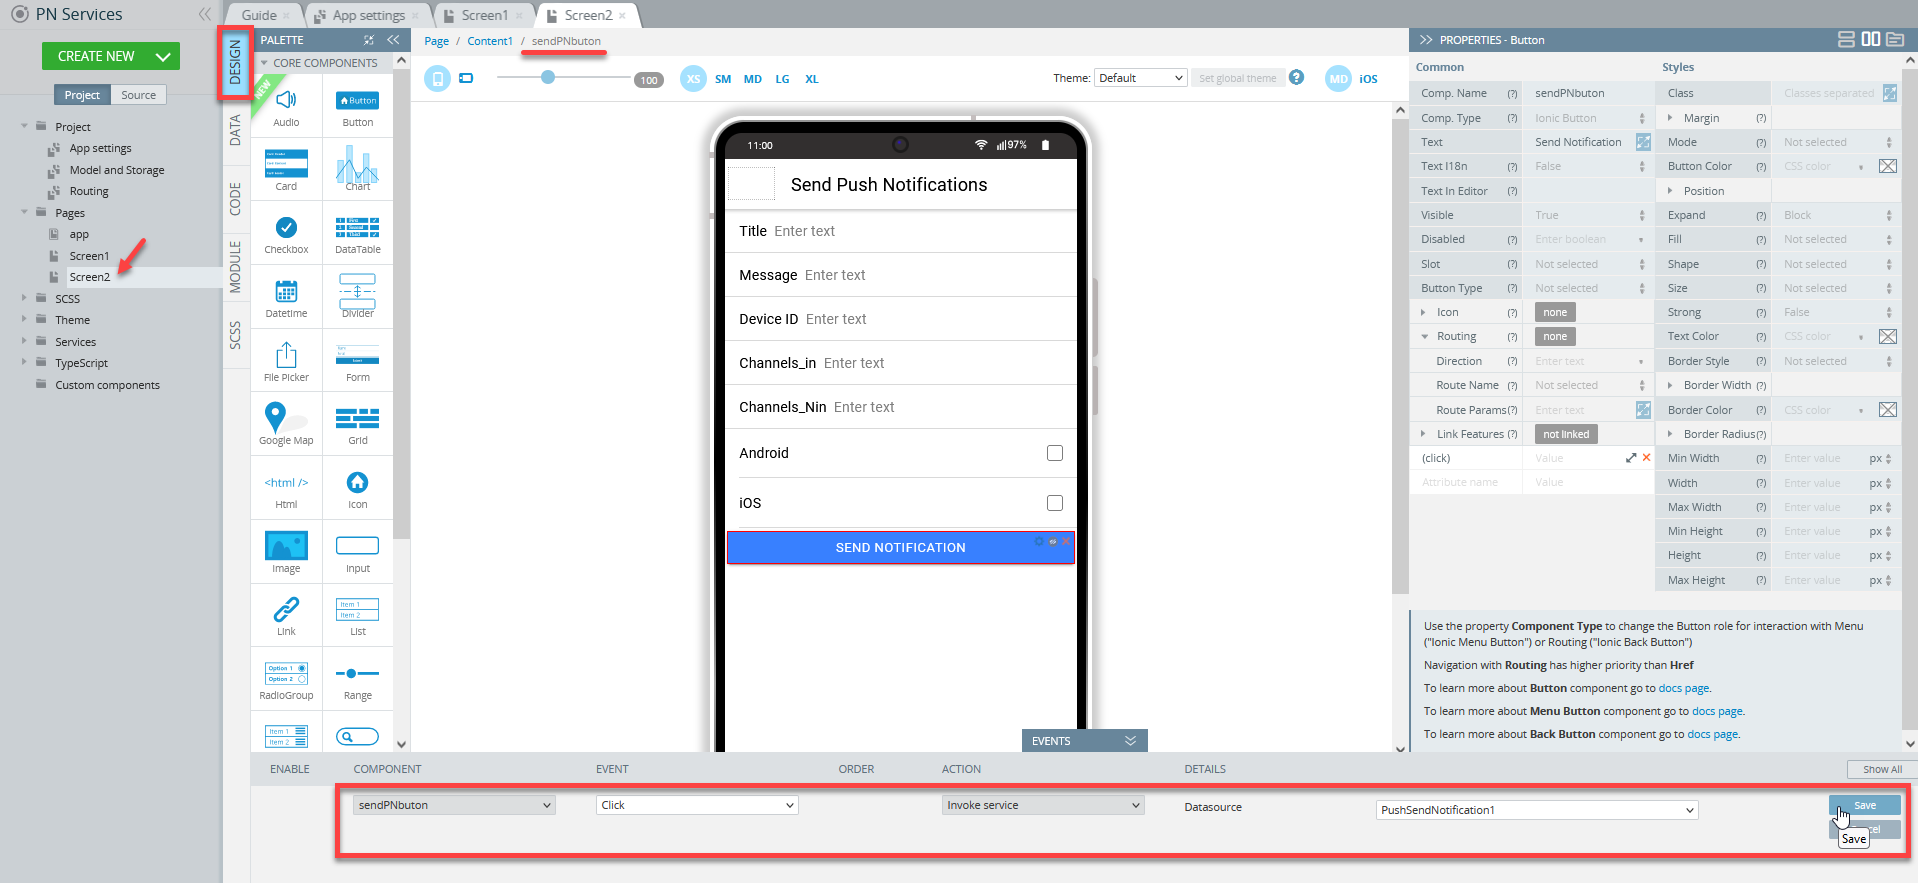
- First, open the Screen 1DESIGN panel and drag a Button to the Toolbar buttons area and define its Component Type property as Ionic Button and its Text property as Send PN.
Also, set the Route Name to Screen2 under the PROPERTIES Routing menu:
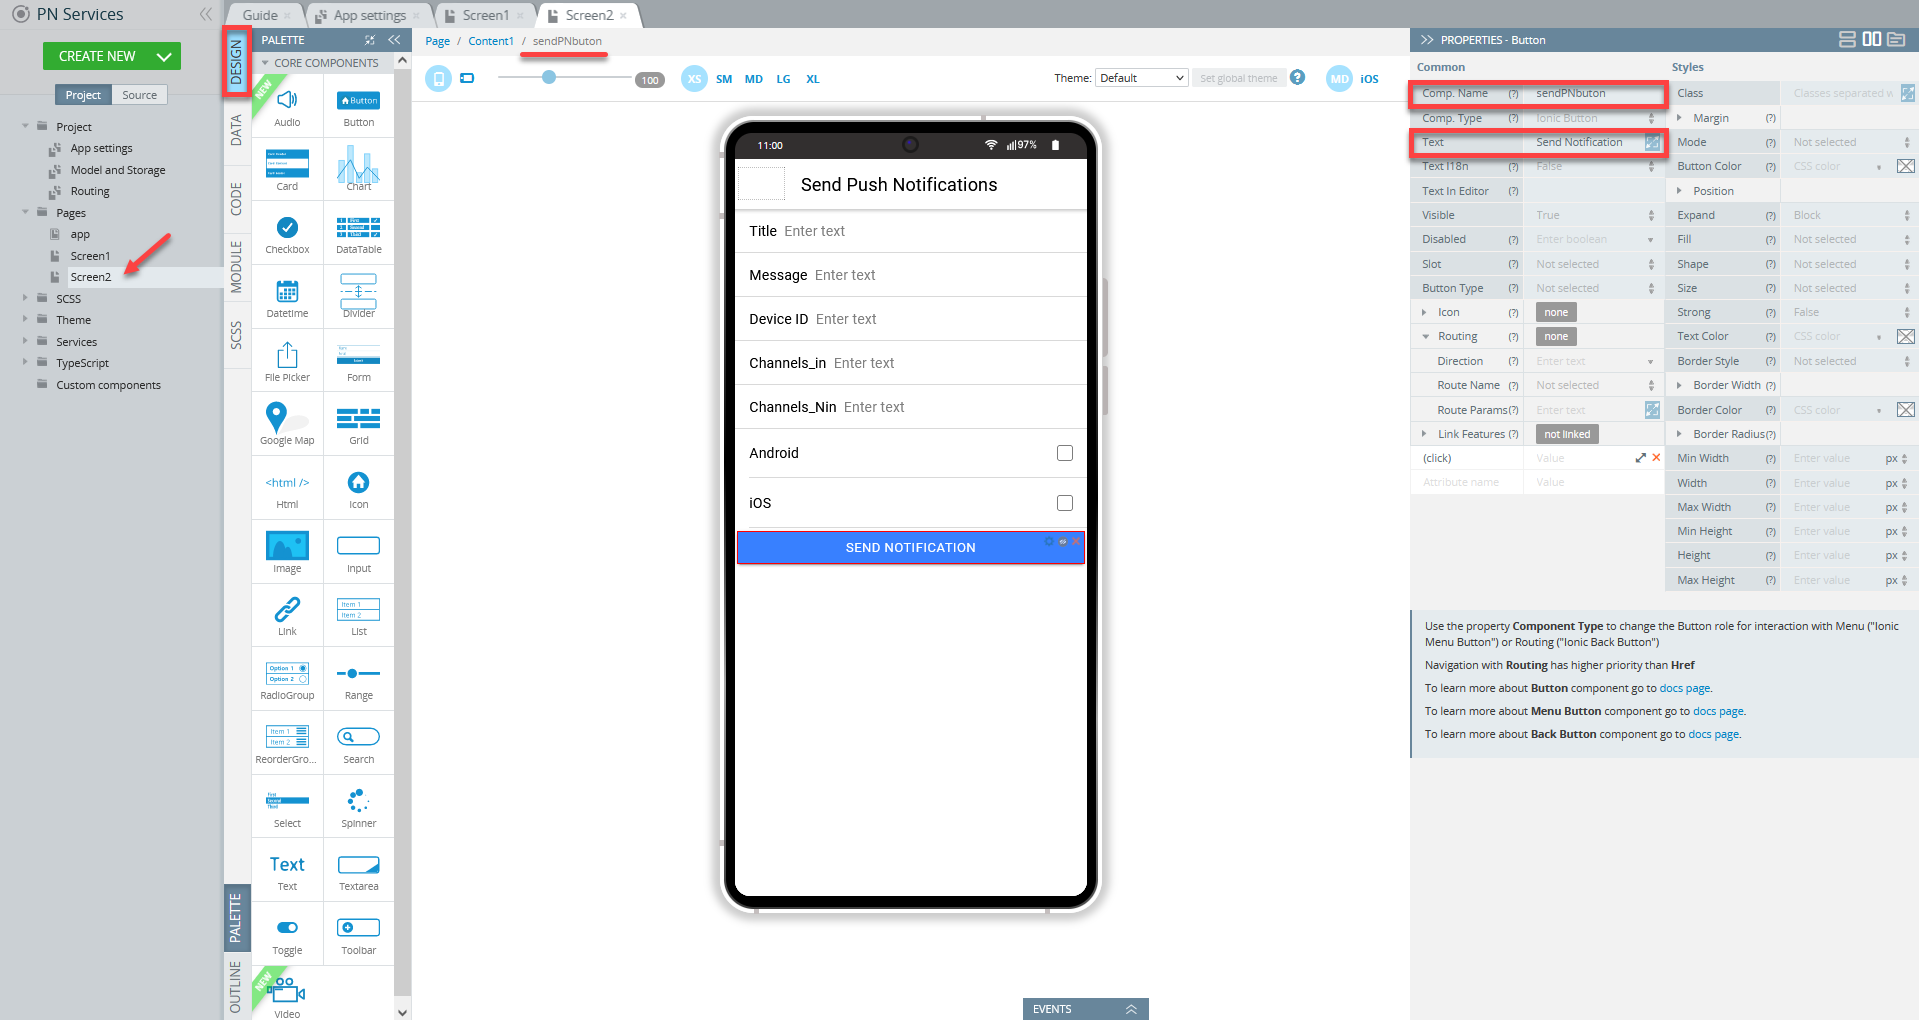
- Now, switch to the Screen 2DESIGN panel and click on the Toolbar title in the app screen and change it to Send Push Notifications by changing the Text property under the PROPERTIES panel menu.
- Next, select the Page component from the breadcrumbs (you can also use the OUTLINE view to locate the needed component) and set the page Footer property to False as we will not use it in the app (you will also be asked to confirm changing the property).
- Now, add five Input, two Checkbox, and one Button components to the editor.
- One by one, select the Input components and change their Label Text fields to Title, Message, Device ID, Channels_in, and Channels_Nin.
- Also, set the Label > Text properties of both check boxes to Android and iOS correspondingly.
- Now, select the button and change its Text property under the PROPERTIES panel menu to Send Notification:
Tip!It's a good practice to replace the generated components' names with some meaningful names, so you can easily identify the components you are working with. This can be very useful when there are many similar UI components.
- Next, open the page DATA panel, select the PushSendNotification service from the datasource drop-down, and click the Add button:

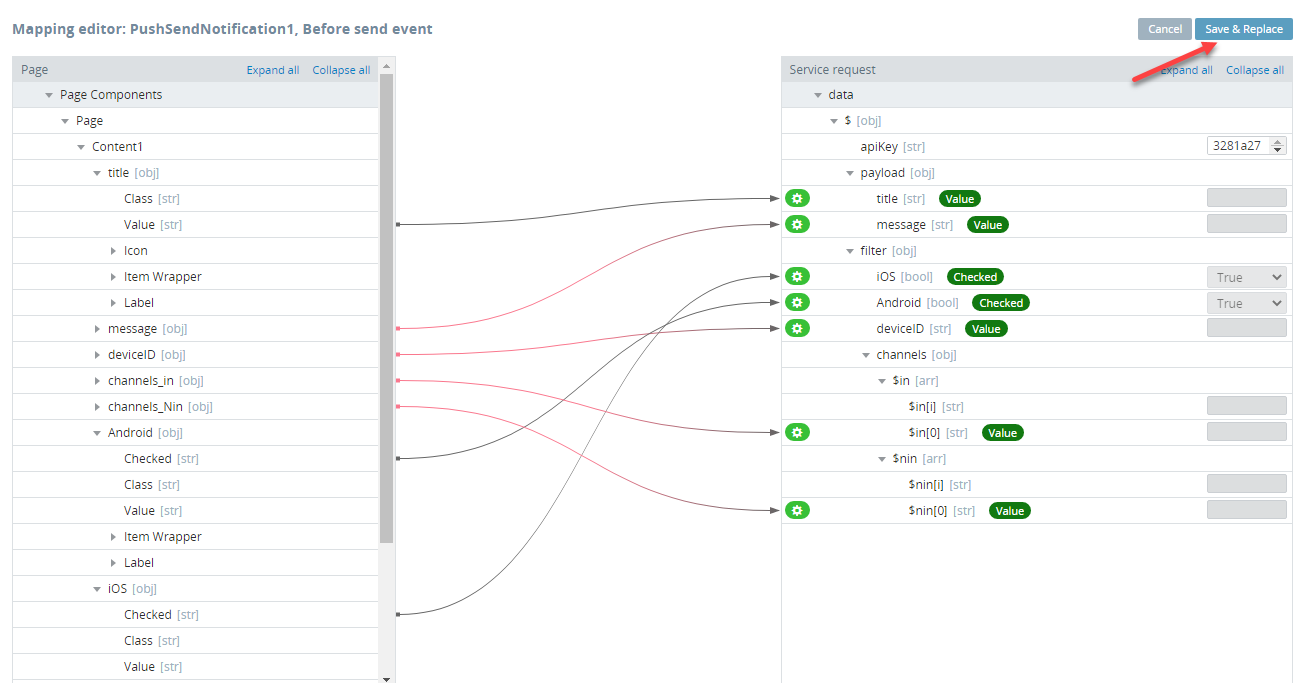
- In the open mapping editor window, click the service Before send > Mapping button, create the following mapping and click Save & Replace:
- To invoke the Present alert action, click the Add button of the Before send service and then fill the Message field with Notification is sent.
Also, enable the Cancel Role check box and then click the Save button:

- Now, go to the page DESIGN panel, and for the Click event of the Send Notification button, select the Invoke service action, and then select PushSendNotification from the drop-down of the Datasource field. Click the Save button:
- Now, export the app as an Android binary by clicking EXPORT > Binary (both iOS and Android options are available) in the top menu to install it on the device(s):

- Click the SAVE and then TEST buttons in the App BuilderToolbar to open the app in preview and click the header SEND PN button to open the Send Push Notifications page.
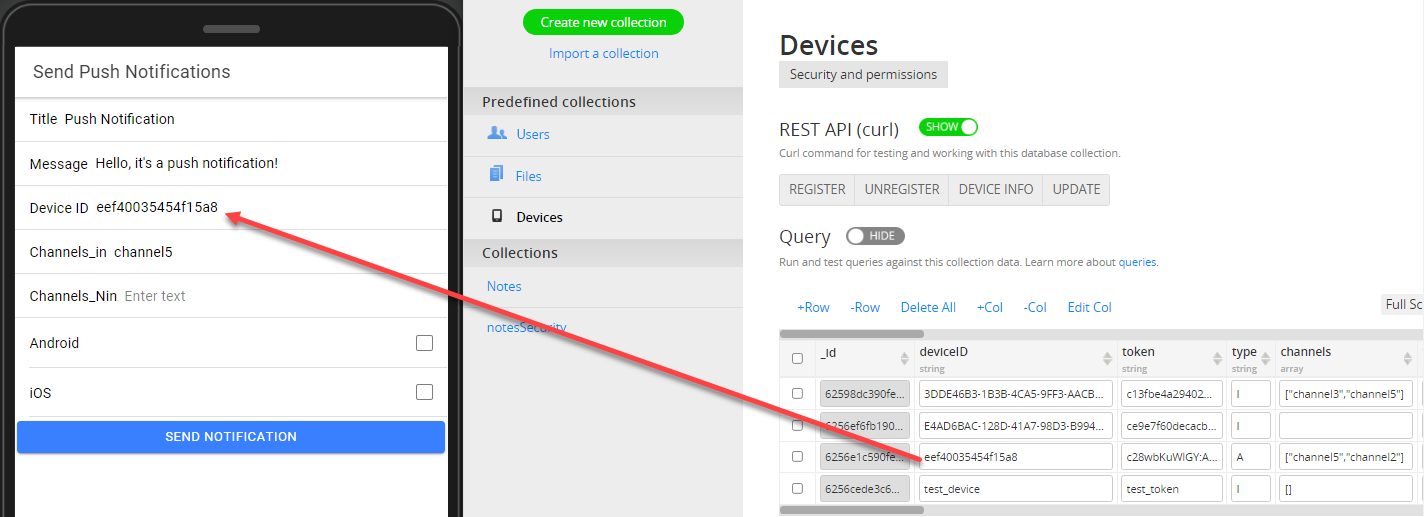
When on the page, fill the Title, Message and paste the Device ID, and Channels_in values from the corresponding fields of your Android device from the Devices collection of the linked database. Then, enable the Android check box and click the Send Notification button:
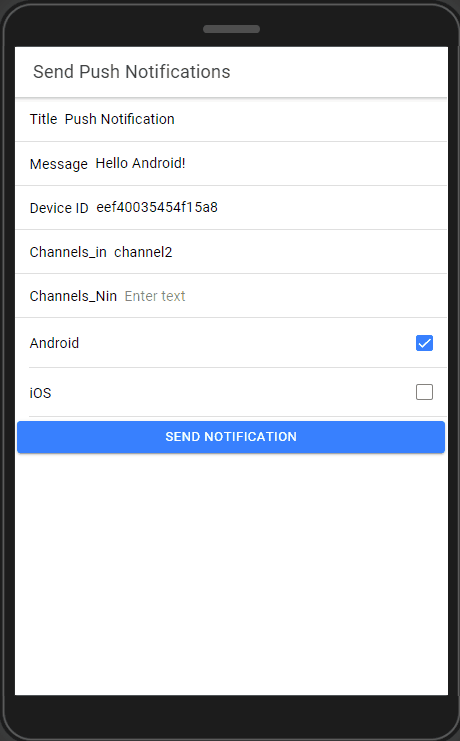
- The push message with the entered title and message values should be delivered to your Android device instantly:

Push notification displayed on the Android device screen
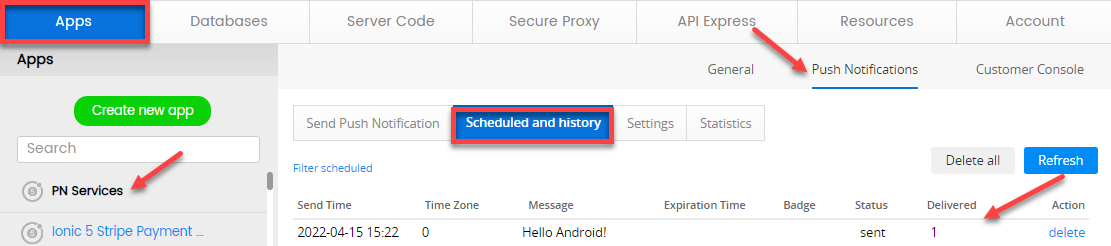
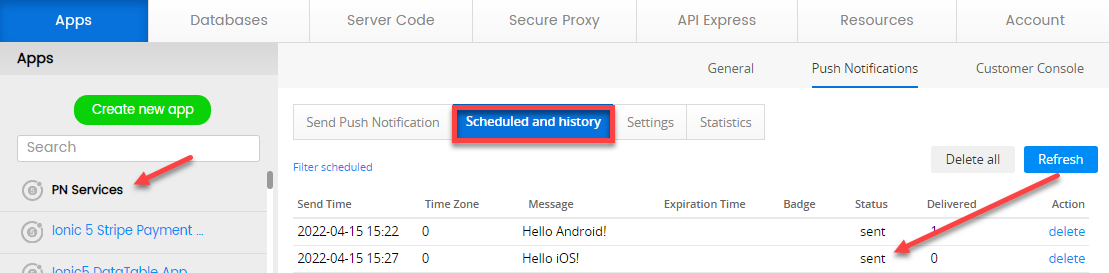
- You can also check that the notification has been sent to the target Android device if you go to the Scheduled and history view (click the Push link in the App Builder Toolbar to open the Push Notifications settings page for this app) and refresh it: the message sent to your Android device is now on the list:
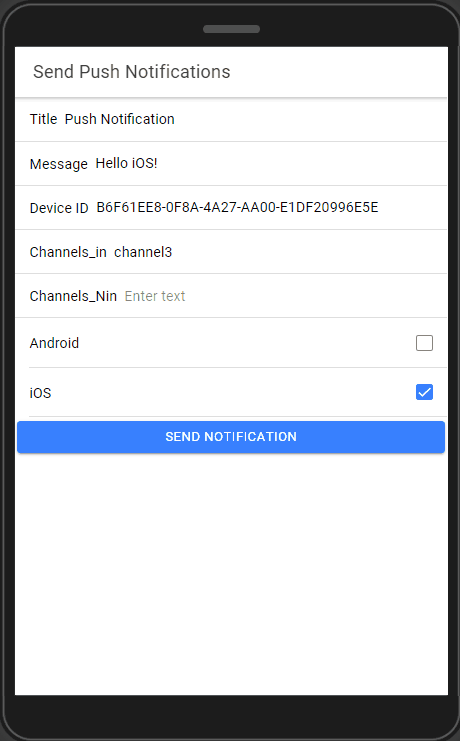
- Now, fill the Title, Message and paste the Device ID, and Channels_in values from the corresponding fields of your iOS device from the Devices collection of the linked database but enable the iOS check box and click the Send Notification button: the push message with title and message values should be delivered to your iOS device:
- To review the notifications history is updated with the iOS records, go to the Scheduled and history view and refresh it: the message sent to your iOS device is now on the list:
Note!Make sure you allowed the app sending notifications to your device:

Note!If you want to send push messages to an Android device only (and not to an iOS device that has the same channel, for example, channel5), open the Devices collection of the linked database and review the devices channels list; then open the app preview and and fill the channels_in field with channel5 (common for both device types) and the channels_Nin field with the channel3 value (absent from the iOS channels list). The push message will be sent to an Android device only:

Note!If you want to send push messages only to a particular device which has the same channel as other devices, fill the channels_in field with the value that is common for both devices types, for example, channel5, but indicate the needed device's deviceID field. The push message will be sent to a device with the indicated deviceID value only:
Adding Device Unregister Service
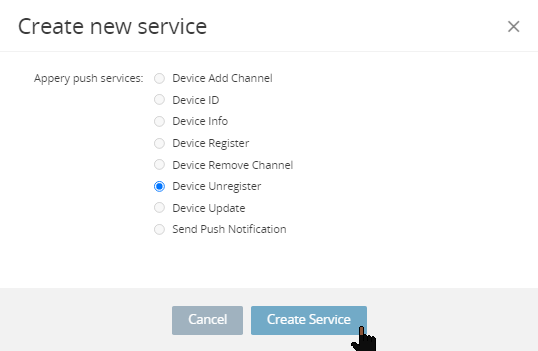
- In the the Create new service window, select the Device Unregister service and click the Create Service button:
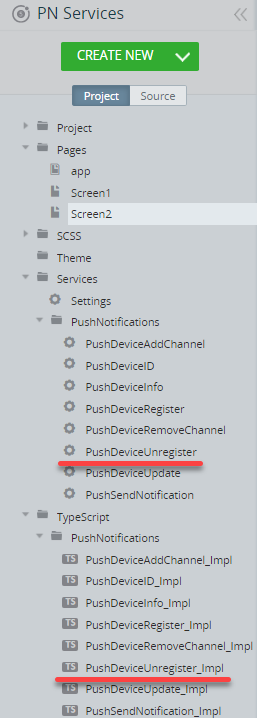
If you now go to the Project tab and unfold the Services > Push Notifications folder, you will see that the PushDeviceUnregister service has been added. Also, the TypeScript > PushNotifications folder contains the PushDeviceUnregister_Impl file:
- Go to the Screen 1DESIGN panel and add the Input and the Button components to the editor placing them under the Register Device button.
- First, select the Input component and change its Label Text field to Unregister DeviceID.
- Now, select the button and change its Text property under the PROPERTIES panel menu to *Unregister Device.
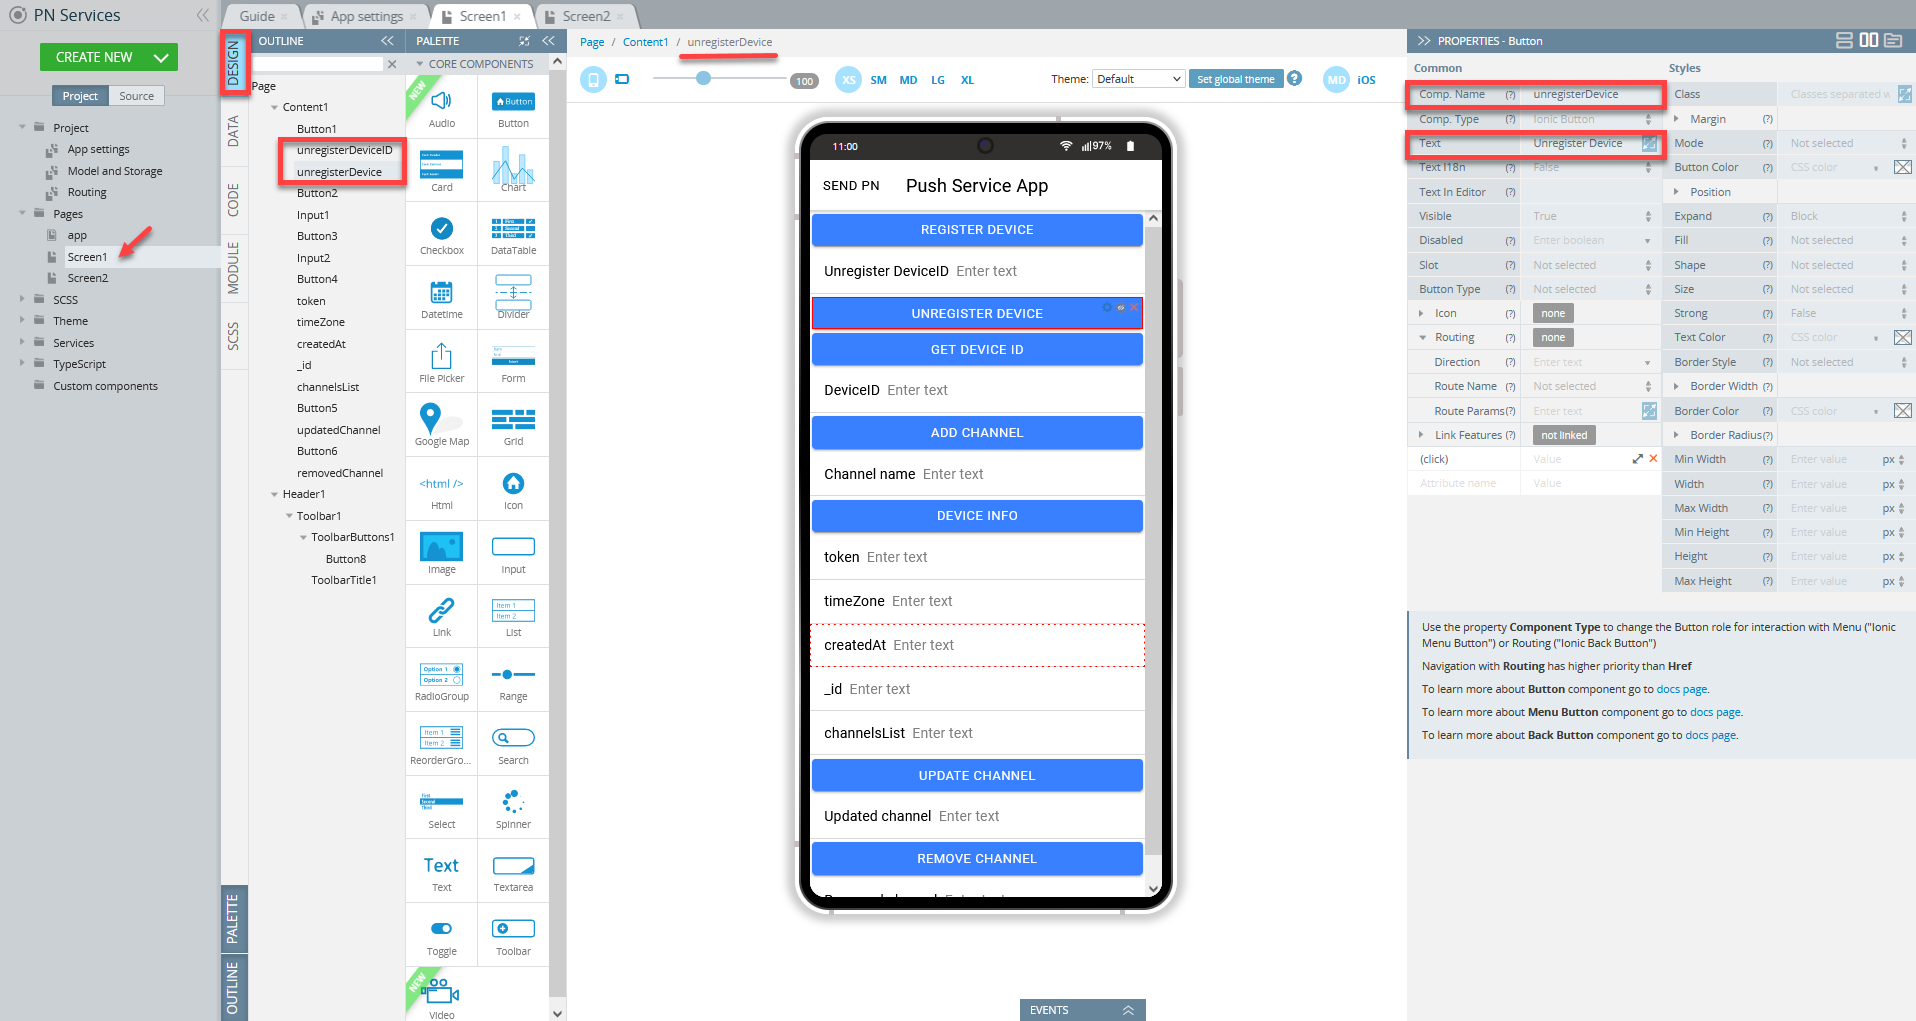
Tip!It's a good practice to replace the generated components' names with some meaningful names, so you can easily identify the components you are working with. This can be very useful when there are many similar UI components.
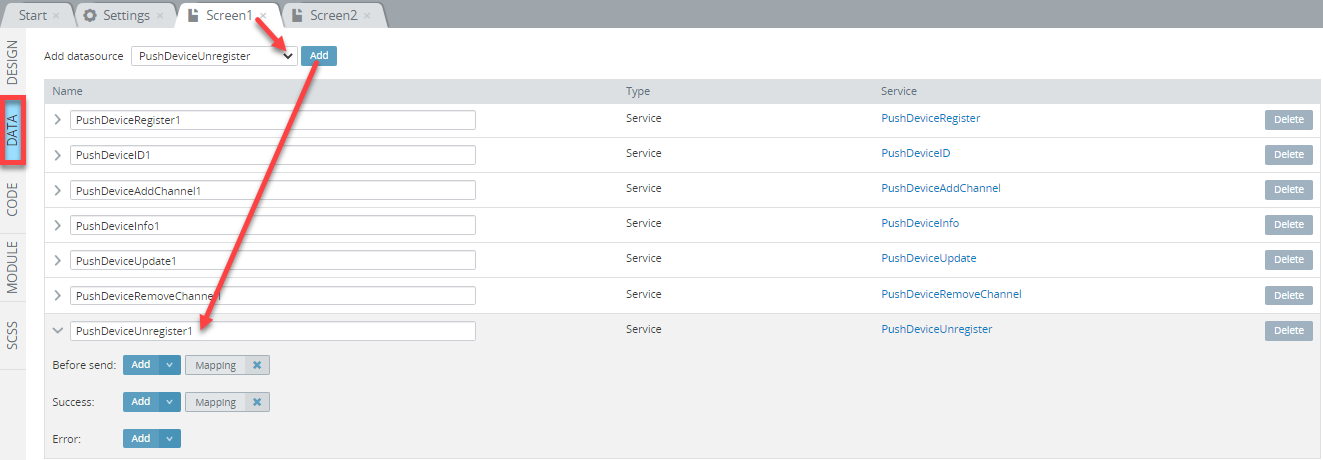
- Next, open the page DATA panel, select the PushDeviceUnregister service from the datasource drop-down, and click the Add button:
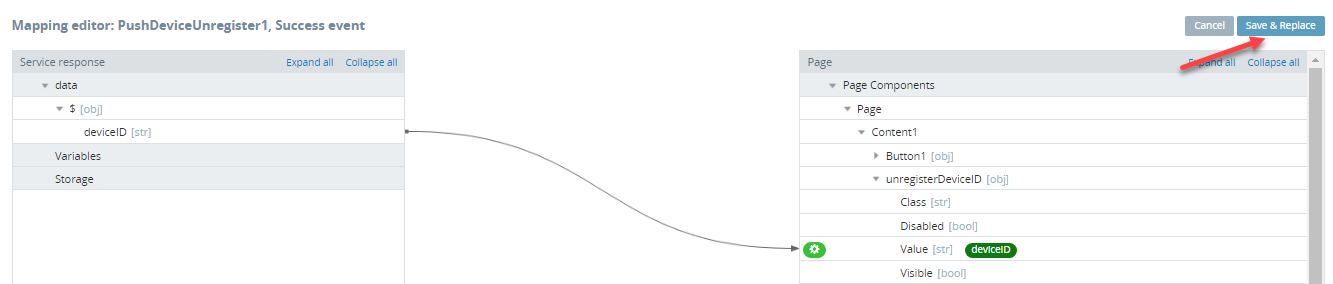
- In the open mapping editor window, click the service Success > Mapping button, create the following mapping and click Save & Replace:
- To invoke the Present alert action, click the Add button of the Success service and then fill the Message field with Unregistration success. Also, enable the Cancel Role check box and then click the Save button:

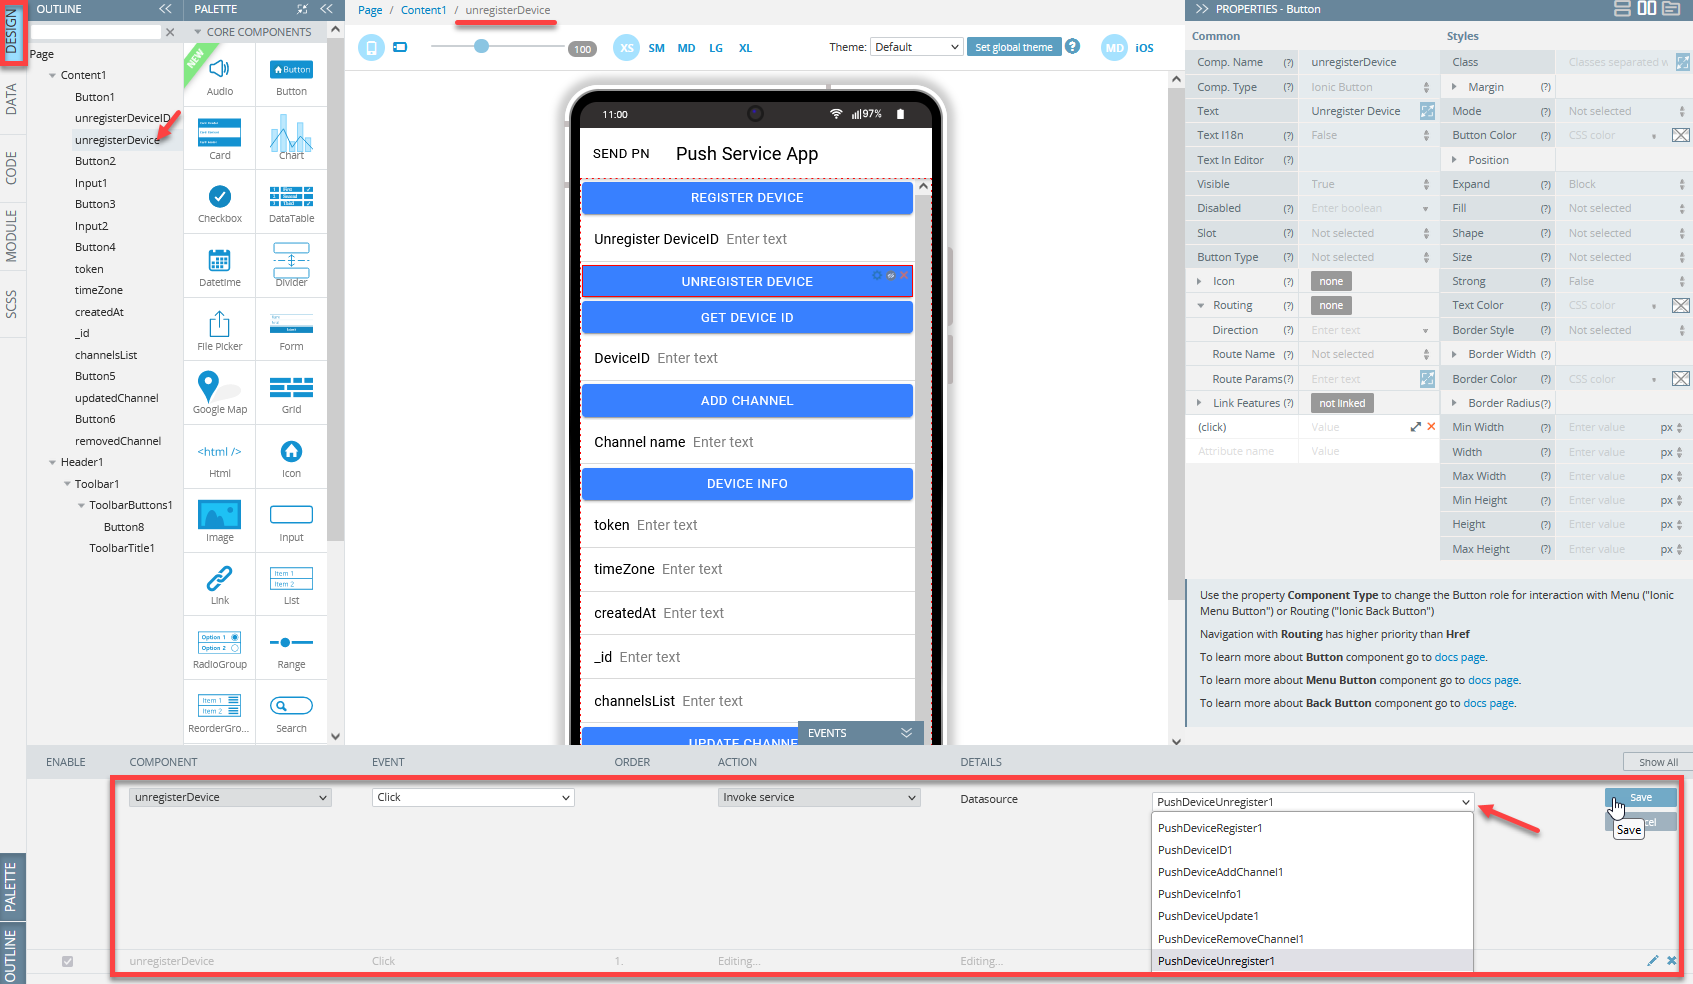
- Now, go to the page DESIGN panel and for the Click event of the UNREGISTER button, select the Invoke service action, and then set the PushDeviceUnregister value from the drop-down of the Datasource field. Click the Save button:
- Click the SAVE and then TEST buttons in the App BuilderToolbar to open the app in preview.
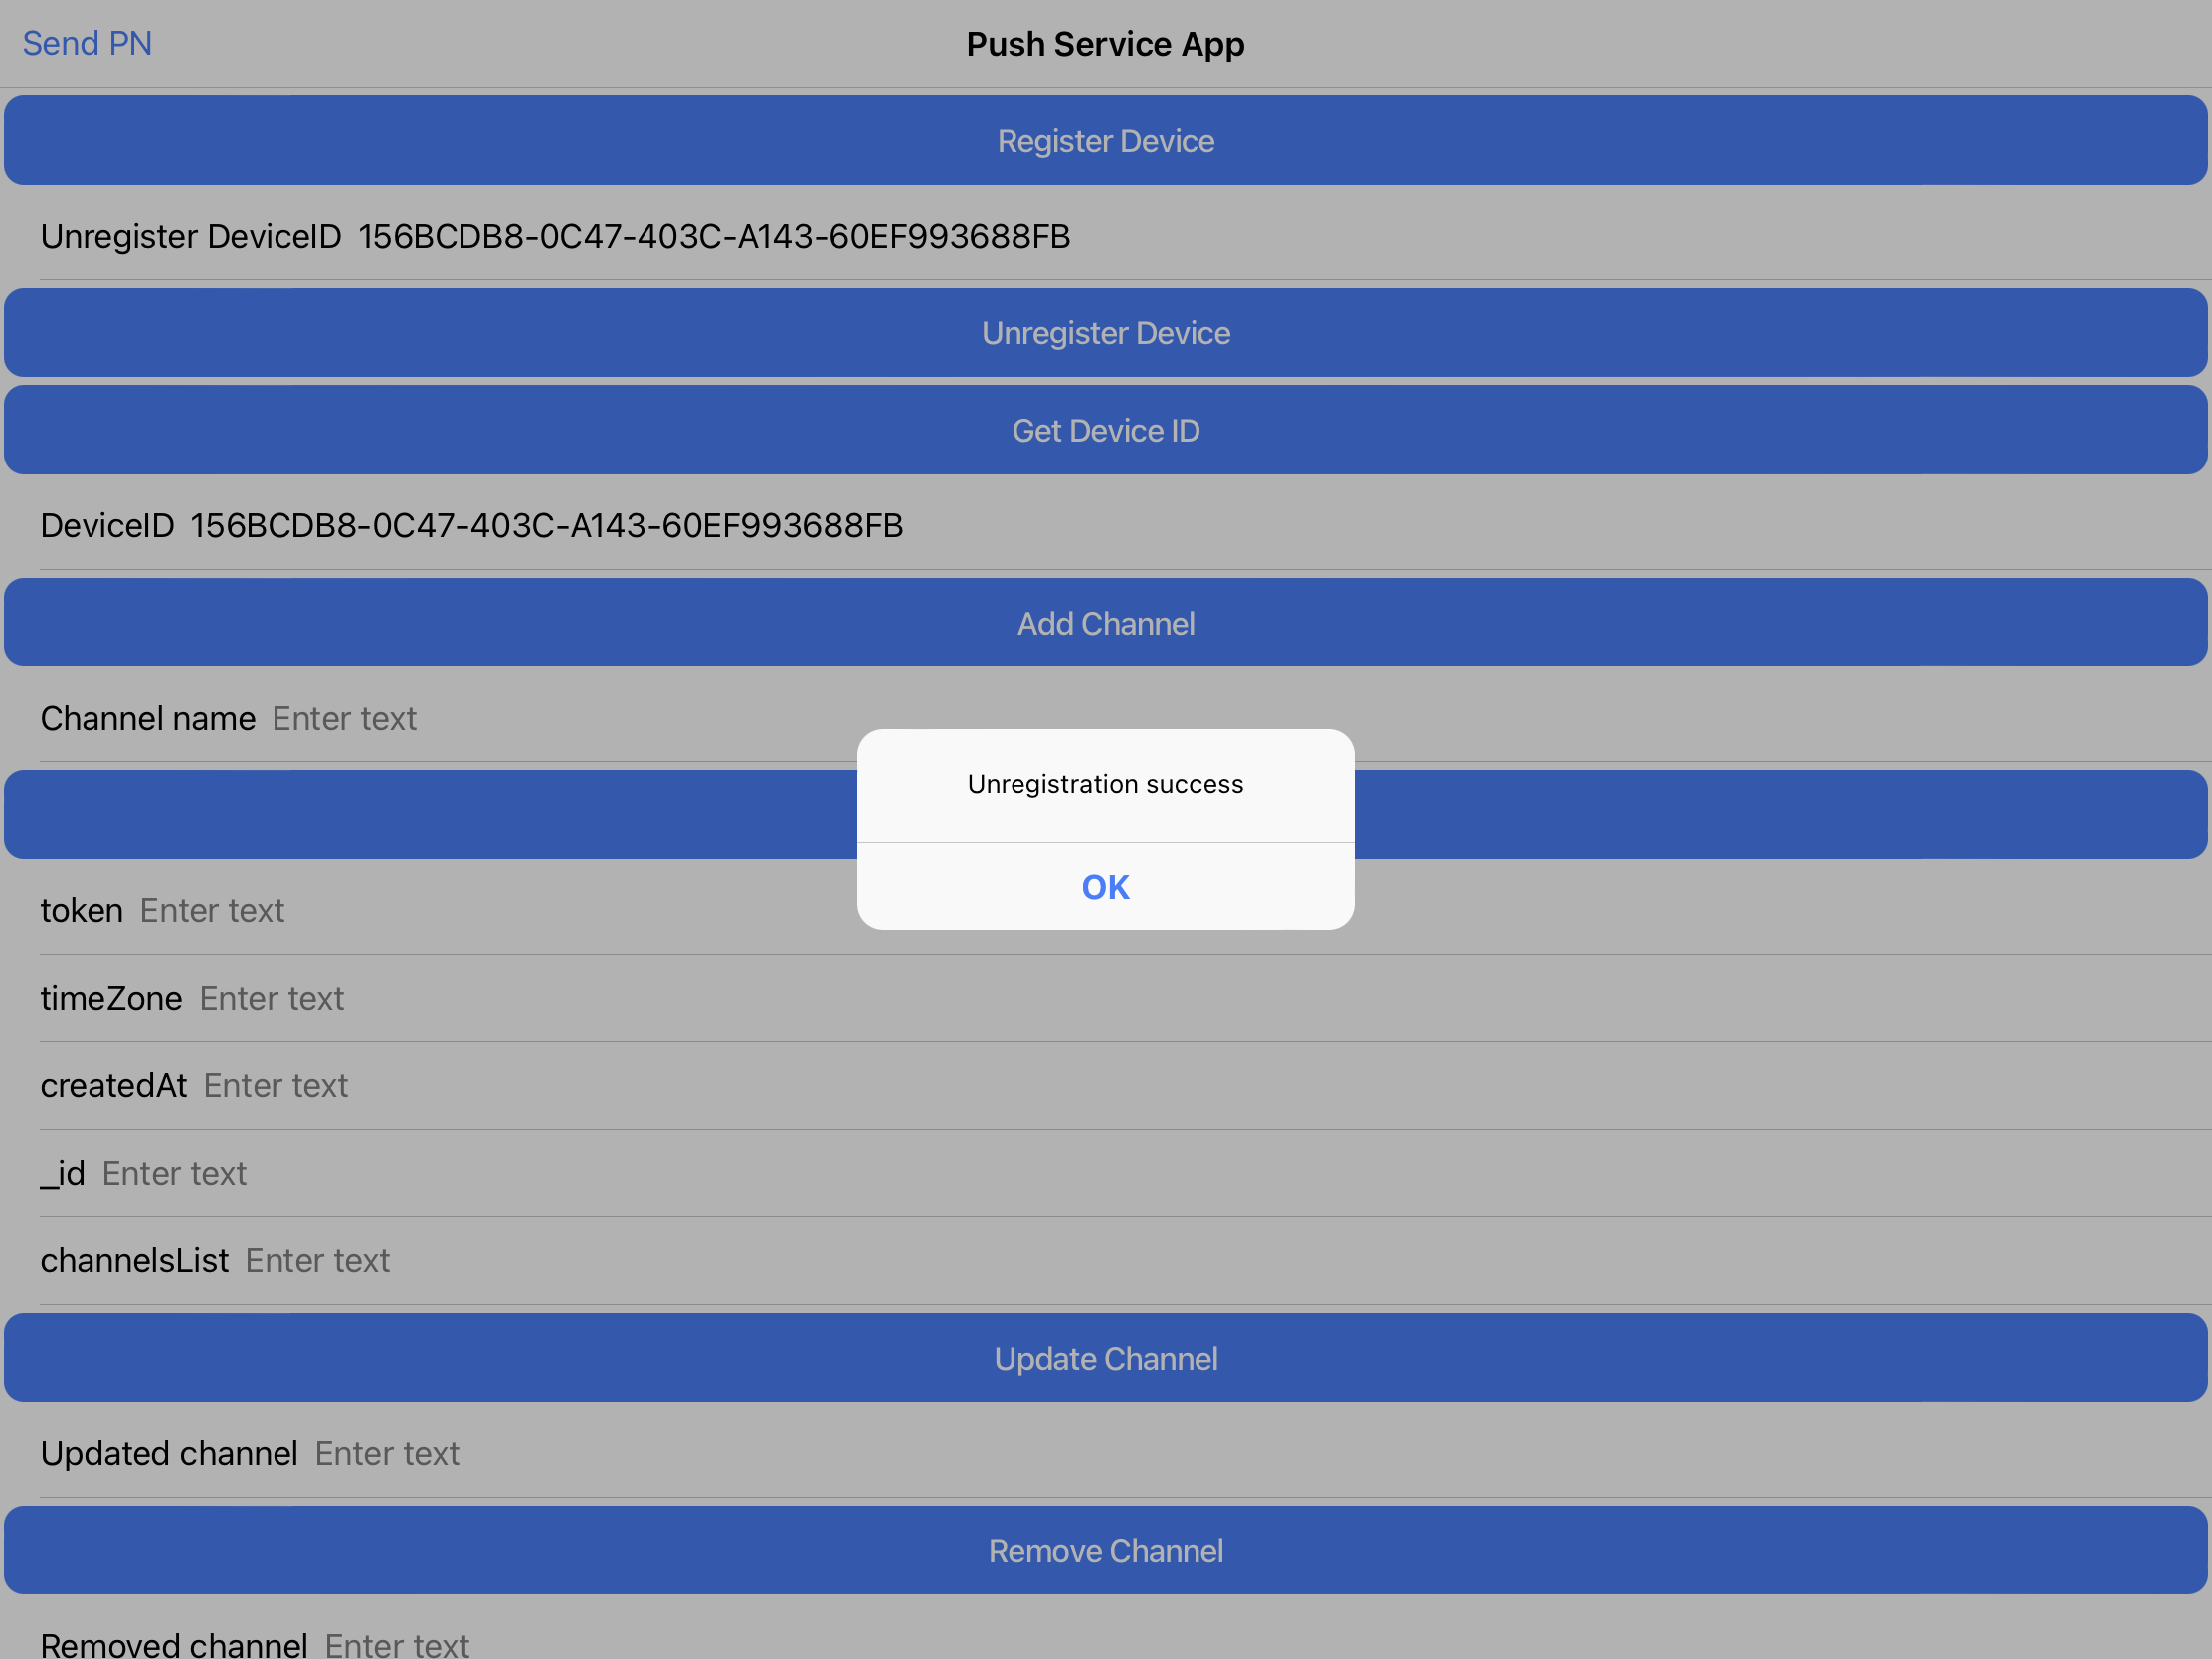
First, click the Get Device ID button. The device id should be displayed: test_device.
The Unregister Device ID field is also filled with the test_device value. Now, click the Unregister Device button: the message Unregistration success should be displayed.
Also, if you now click the Device Info button, no device data will be displayed:
- To make sure the device has been unregistered, click the Appery.io Database link in the App BuilderToolbar and open the linked database, then go to its predefined Devices collection and click Refresh: the device with the value test_device is removed from the devices list:
- Now, export the app as an iOS binary by clicking EXPORT > Binary (both iOS and Android options are available) in the top menu to install it on the device:

- Open the app on the device and click the Register Device button (if the device has been registered before, you can skip this step), and then click the Get Device ID button to preview the device ID:
Check that the displayed ID corresponds with the device ID value from the deviceID column of the linked database:

Now, click the Unregister Device button to see that the Unregister DeviceID field is now filled with your device's data. Also, the message Unregistration success should be displayed:
- To make sure the database records are also updated, go back to the predefined Devices collection and refresh it: the table should be updated and the your test iOS device (and/or Android) mobile device(s) with the indicated ID will be missing from the list:
Important Note!Please note that you will need to generate the iOS certificate with the In-App Purchase capability to build an
.ipafile.
You can check this document in case you need help with exporting your application for iOS.
Here, you will find information on generating certificates for Android.
Note as well that starting from August 2021, new apps are required to publish with the Android App Bundle (.aab) on Google Play.
Please read more here.
You can also check this Appery.io YouTube video that shows how to create Android and iOS certificates:
Selecting Build TypeBefore you can proceed with exporting your app, go to Project view > Project > App settings > Android binary/iOS binary to select the Release build type (Debug is the default type for both and can be used for testing purposes only).
If the Release and Publish type is selected under the iOS binary tab, building the release app version will be performed together with publishing it to the App Store.
Push Notifications TestingTo test sending and receiving Push Notification messages the app has to be installed on the device.
Note that Push Notification messages cannot delivered when running the app with the Appery.io Tester app but you can use the Live Debug feature to test this functionality.
Updated about 1 year ago