Ionic Two-factor Authentication. Part 1
Introduction
In this tutorial, we will show how to set up two-factor authentication using Twilio and a user registration feature with a phone binding to your Appery.io app.
Important!Note that automatic reading of the verification code is available for Android devices only!
Here's how it works: when a user signs up, the user's mobile phone is used to verify the user's identity by entering the number sent by the authentication app.
Twilio Account Setup
- First of all, go to https://www.twilio.com/try-twilio and create a new account.
- Login and go to the console.
- Confirm your email and telephone number.
Twilio setup tipYou can quickly go through the Twilio onboarding questionnaire or click Skip to dashboard instead.
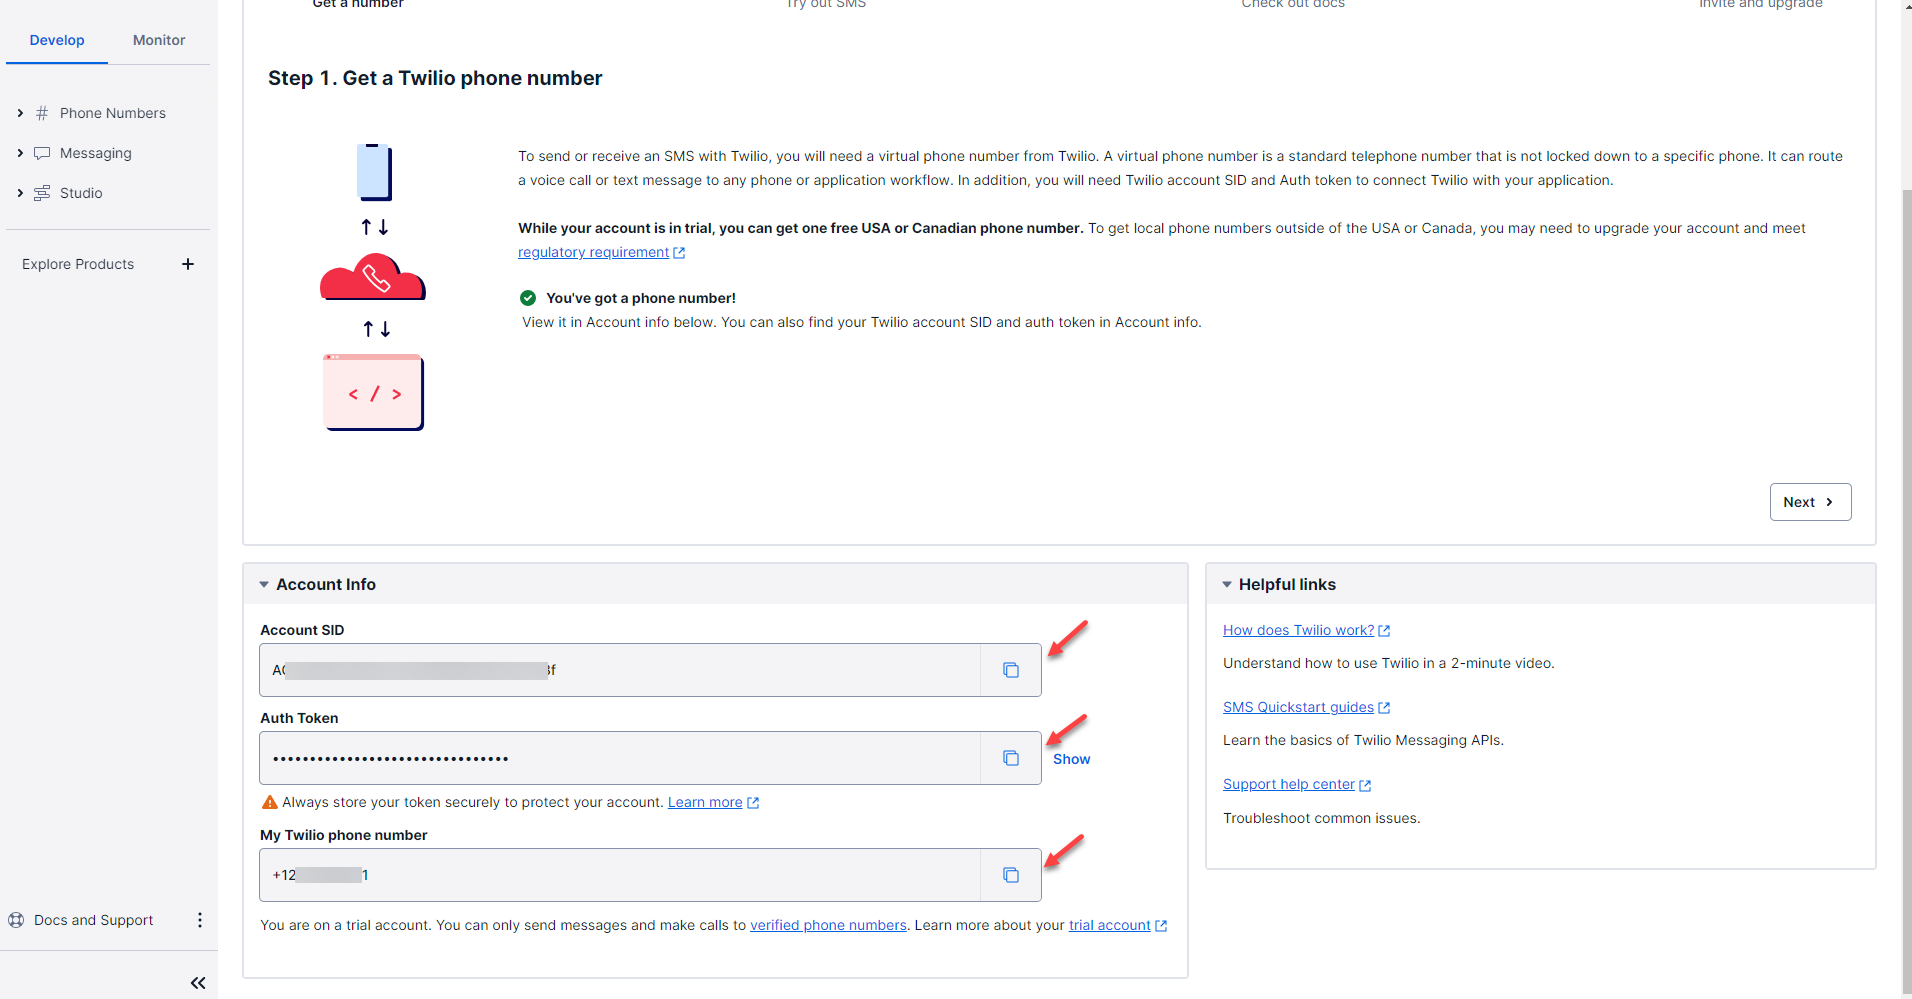
- On the dashboard, click Get a trial phone number:
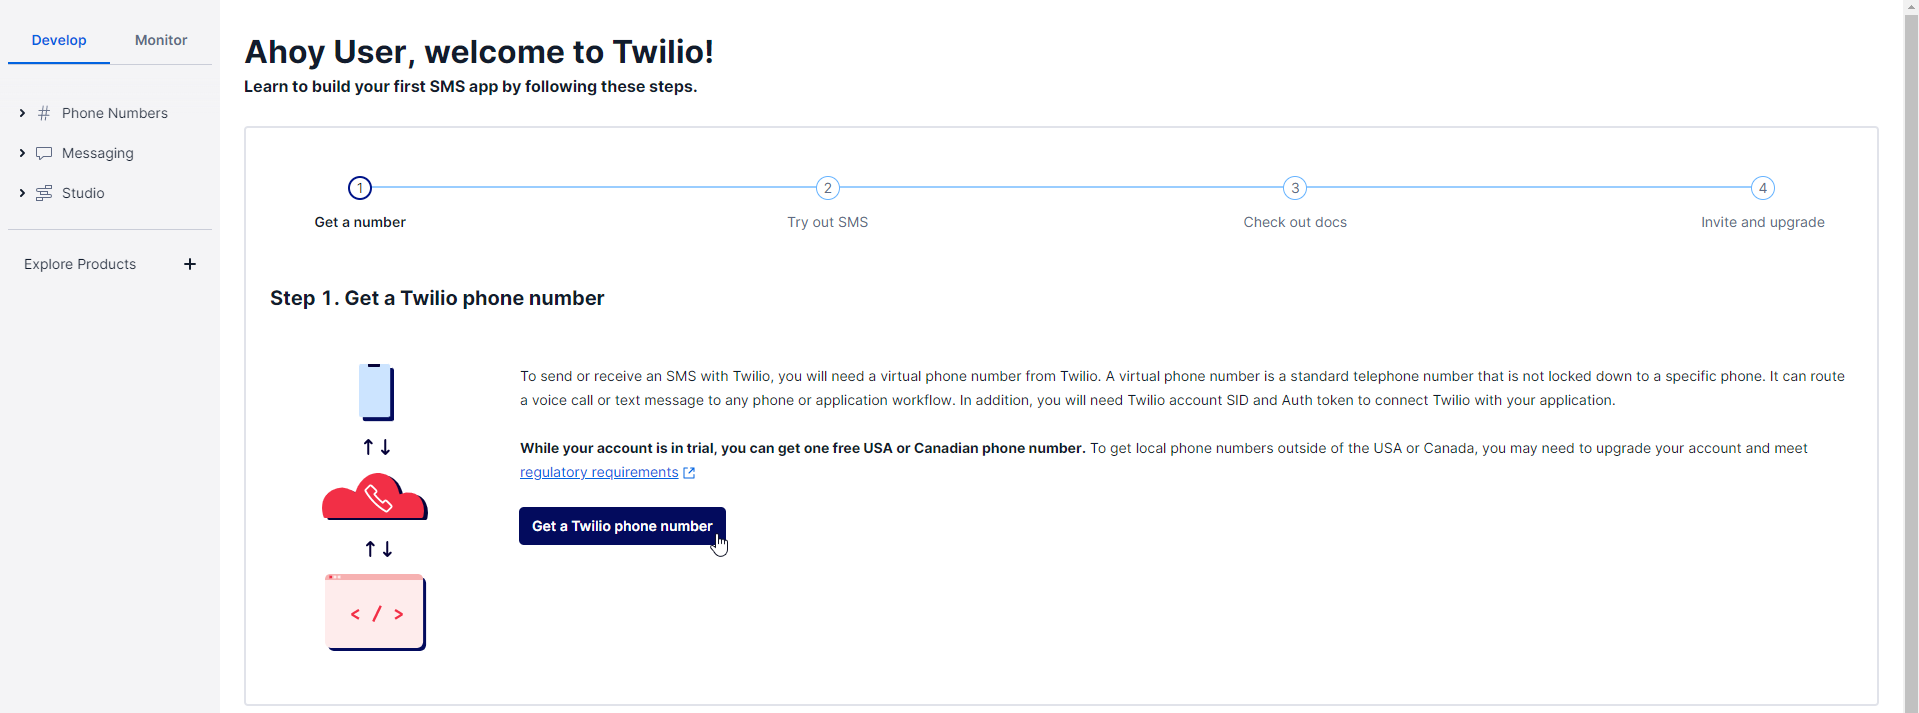
- In the popup that appears you will see your first Twilio phone number. It will be used to send SMS messages to users who sign up for your app. Click Choose this Number and then click Done:
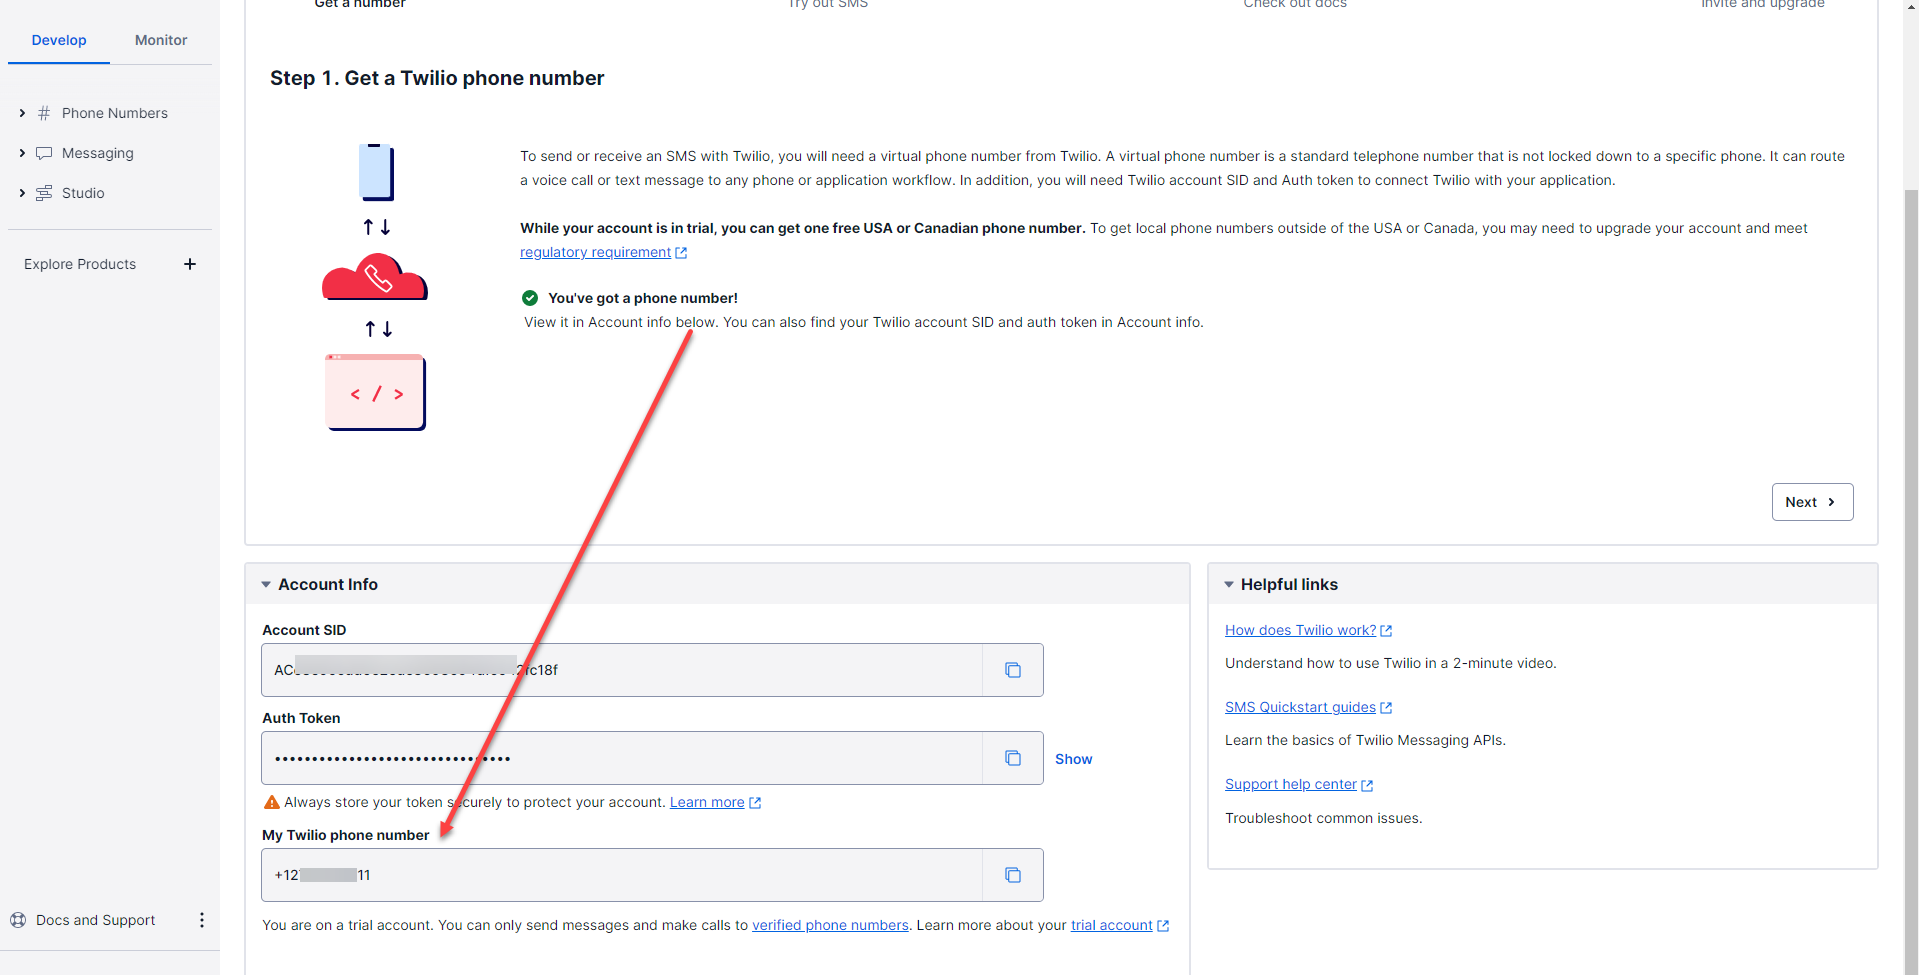
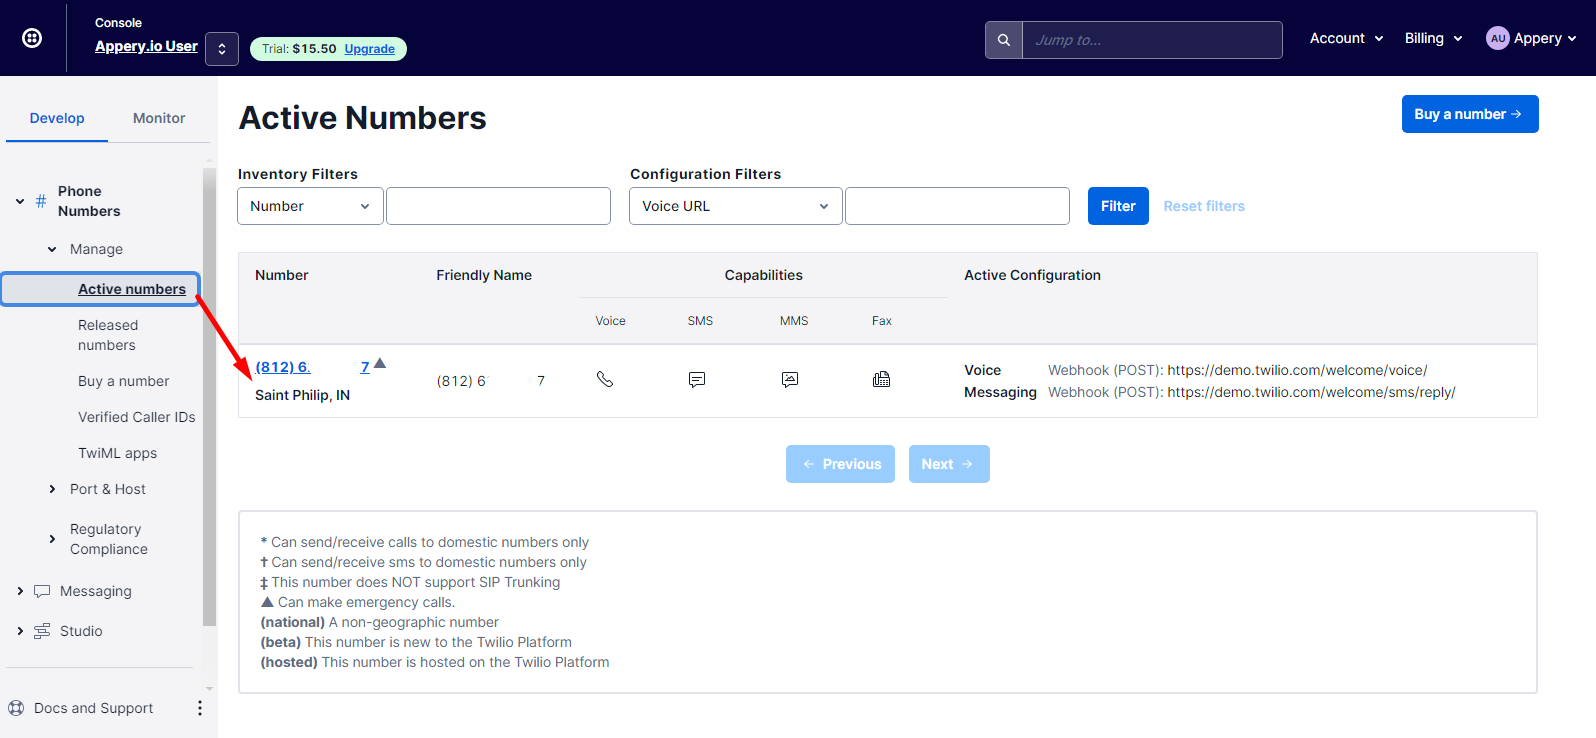
- Check that the phone number that you will use for testing has been added to the Active Numbers list under the Phone Numbers > Manage section:
- Now, check your Verified Caller IDs tab: it should contain the verified number: this number will receive a notification code from your Twilio trial account.
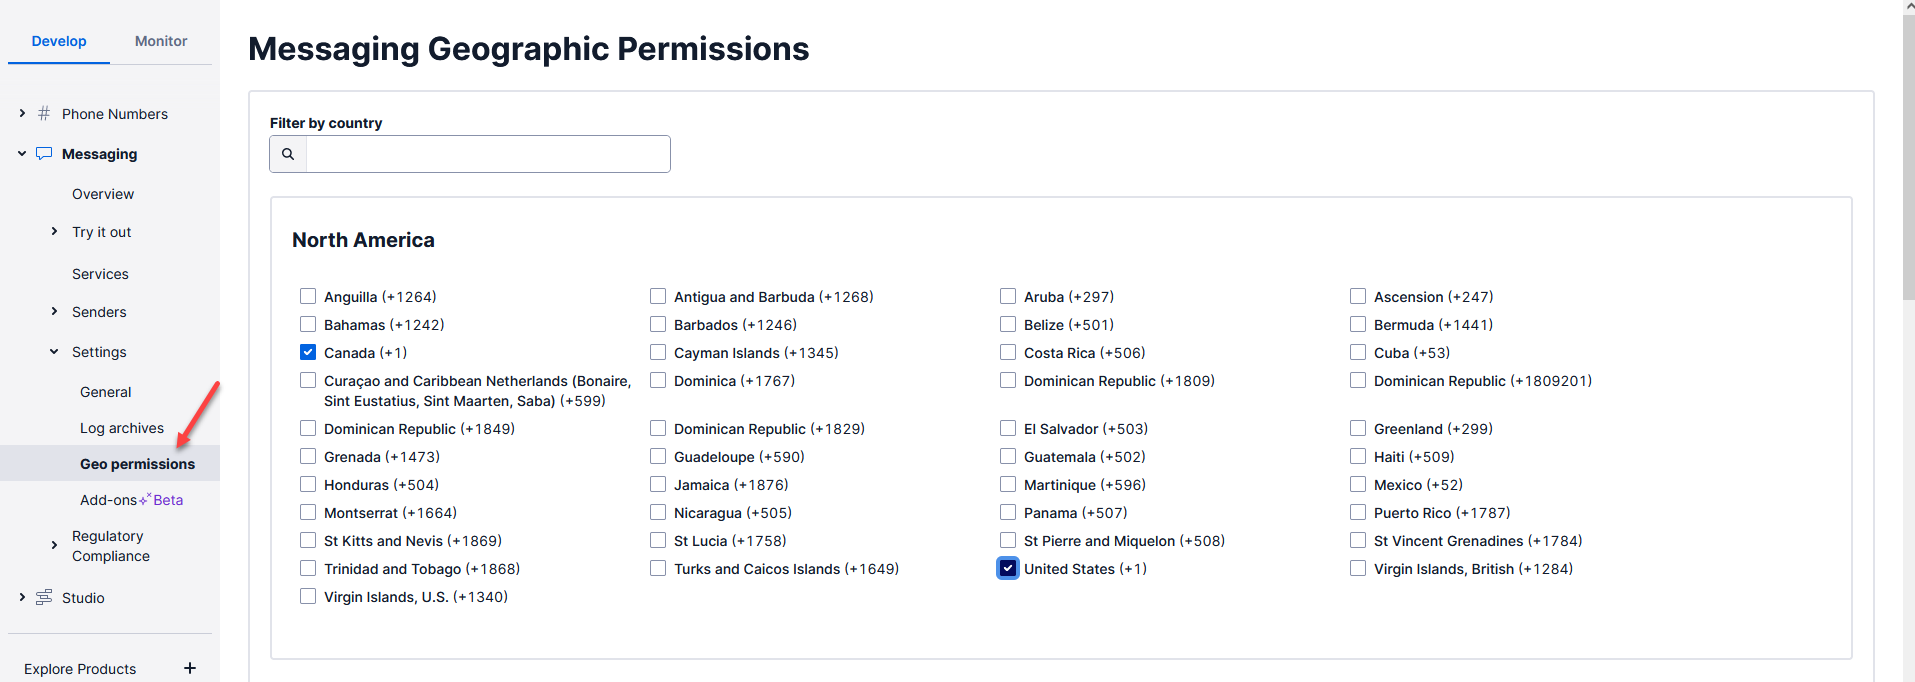
- Also, make sure that sending SMS for the indicated region (in this case, for the US region) has been enabled in your Twilio console: Settings > Geo permissions for Messaging section:
Creating Twilio Server Code Library
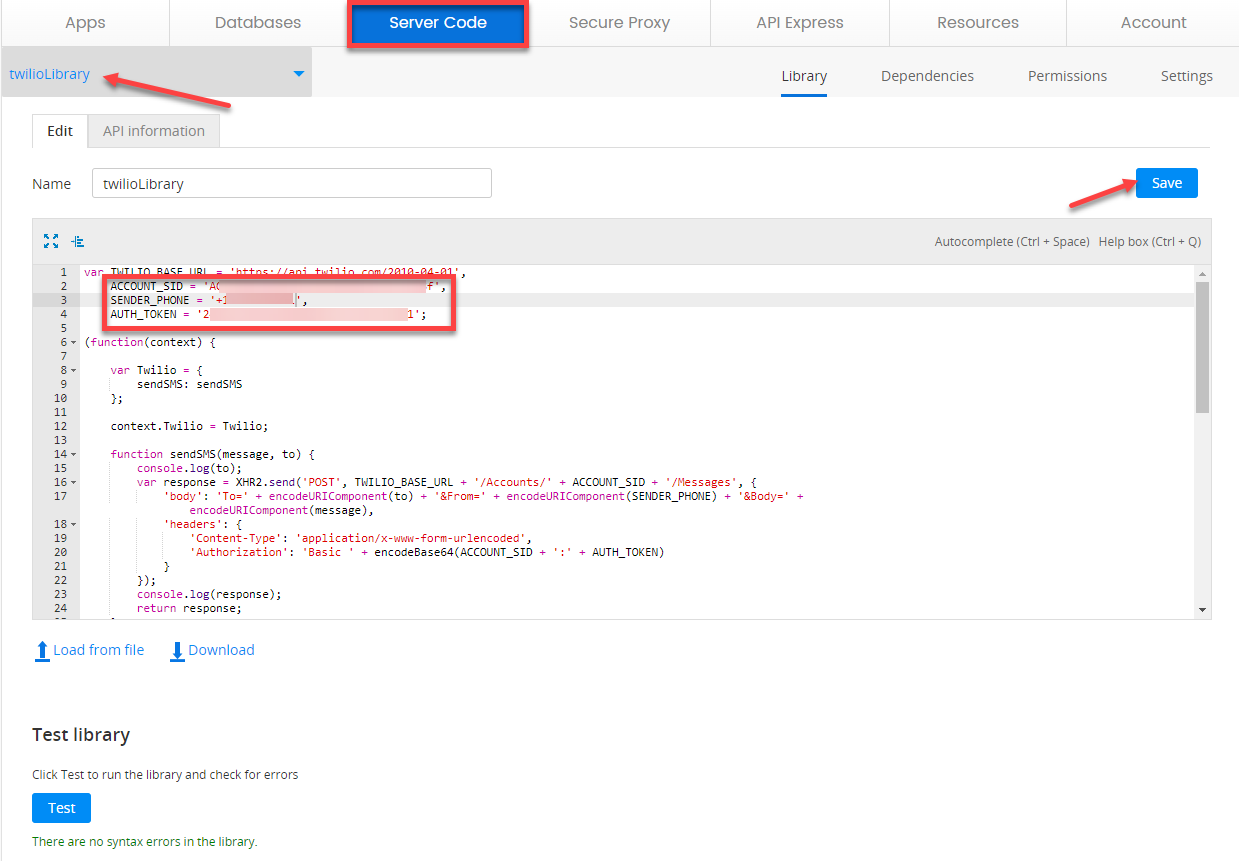
- Log in to Appery.io and open the Server Code tab.
- Click Create library and enter twilioLibrary for its name. Copy the code below and paste it into the code editor:
var TWILIO_BASE_URL = 'https://api.twilio.com/2010-04-01',
    ACCOUNT_SID = '',
    SENDER_PHONE = '',
    AUTH_TOKEN = '';

(function(context) {

    var Twilio = {
        sendSMS: sendSMS
    };

    context.Twilio = Twilio;

    function sendSMS(message, to) {
        console.log(to);
        var response = XHR2.send('POST', TWILIO_BASE_URL + '/Accounts/' + ACCOUNT_SID + '/Messages', {
            'body': 'To=' + encodeURIComponent(to) + '&From=' + encodeURIComponent(SENDER_PHONE) + '&Body=' + encodeURIComponent(message),
            'headers': {
                'Content-Type': 'application/x-www-form-urlencoded',
                'Authorization': 'Basic ' + encodeBase64(ACCOUNT_SID + ':' + AUTH_TOKEN)
            }
        });
        console.log(response);
        return response;
    }

    function encodeBase64(input) {
        var keyStr = 'ABCDEFGHIJKLMNOP' +
            'QRSTUVWXYZabcdef' +
            'ghijklmnopqrstuv' +
            'wxyz0123456789+/' +
            '=';
        var output = "";
        var chr1, chr2, chr3 = "";
        var enc1, enc2, enc3, enc4 = "";
        var i = 0;
        do {
            chr1 = input.charCodeAt(i++);
            chr2 = input.charCodeAt(i++);
            chr3 = input.charCodeAt(i++);
            enc1 = chr1 >> 2;
            enc2 = ((chr1 & 3) << 4) | (chr2 >> 4);
            enc3 = ((chr2 & 15) << 2) | (chr3 >> 6);
            enc4 = chr3 & 63;
            if (isNaN(chr2)) {
                enc3 = enc4 = 64;
            } else if (isNaN(chr3)) {
                enc4 = 64;
            }
            output = output +
                keyStr.charAt(enc1) +
                keyStr.charAt(enc2) +
                keyStr.charAt(enc3) +
                keyStr.charAt(enc4);
            chr1 = chr2 = chr3 = "";
            enc1 = enc2 = enc3 = enc4 = "";
        } while (i < input.length);
        return output;
    }

})(this);- Go back to the Twilio console. Copy Account SID, Auth Token and the My Twilio phone number values:
- At the top of the previously created twilioLibrary script, replace the values of the ACCOUNT_SID, SENDER_PHONE and AUTH_TOKEN variables with the above values. Save the server code and then scroll down to click the Test button to check for errors:
Creating Appery.io Database
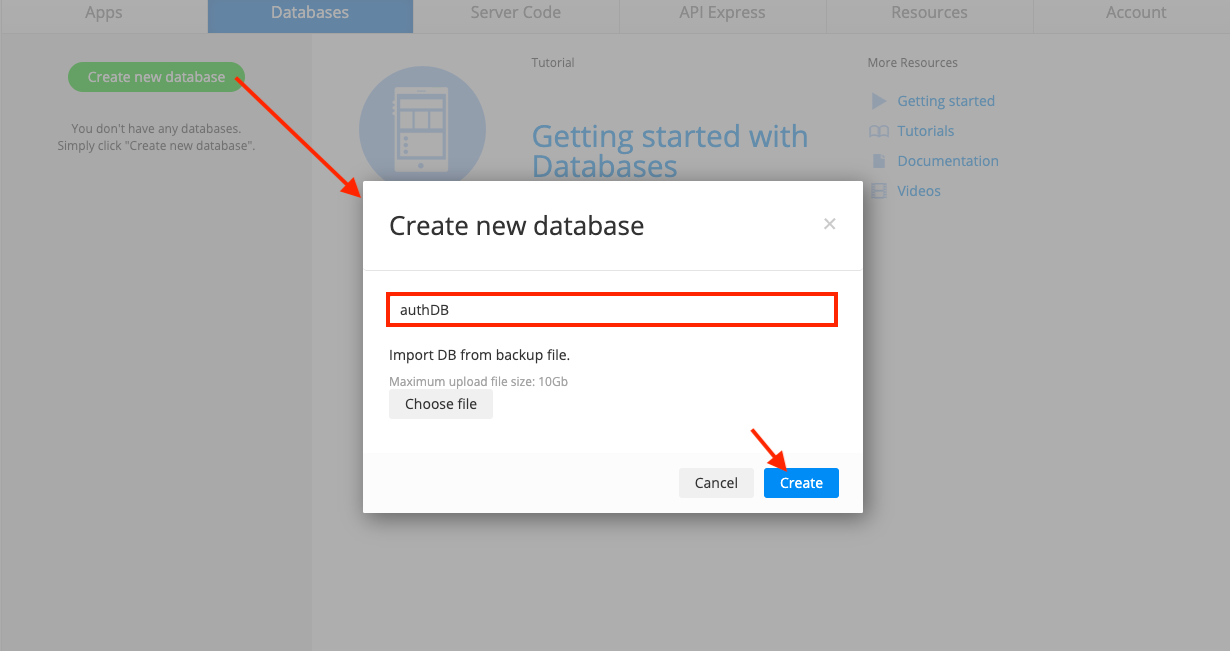
- Open the Databases tab and click Create new database.
- Enter authDB as the name of a new library and click Create:
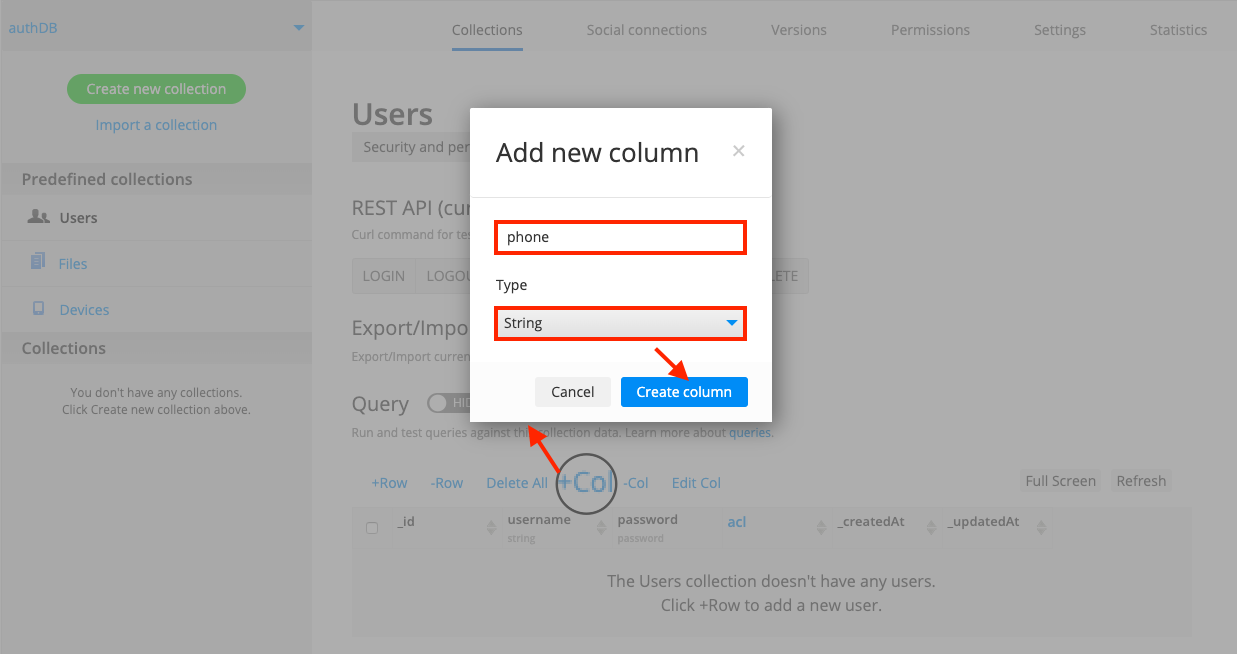
- You will see the predefined Users collection. We will use it to store information about registered users. Let's modify the collection a bit by adding one more column. Create a new phone column of String type:
- Then, click Create new collection. Enter TemporaryStack as a new collection name and confirm creating:
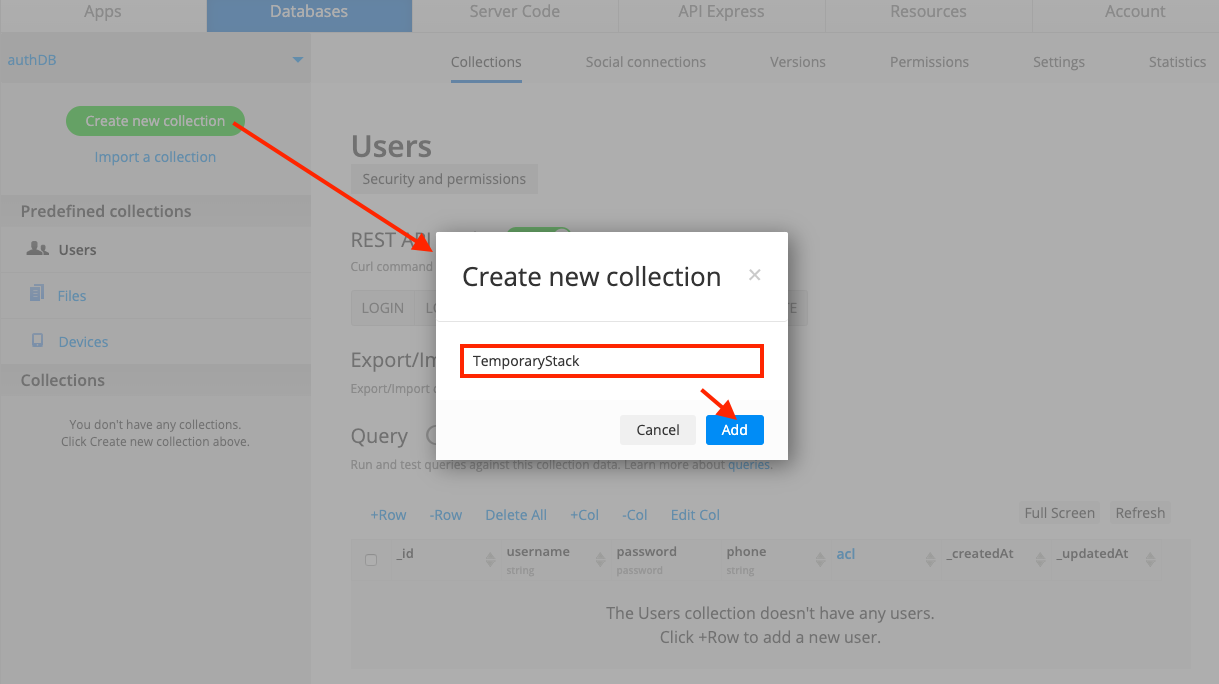
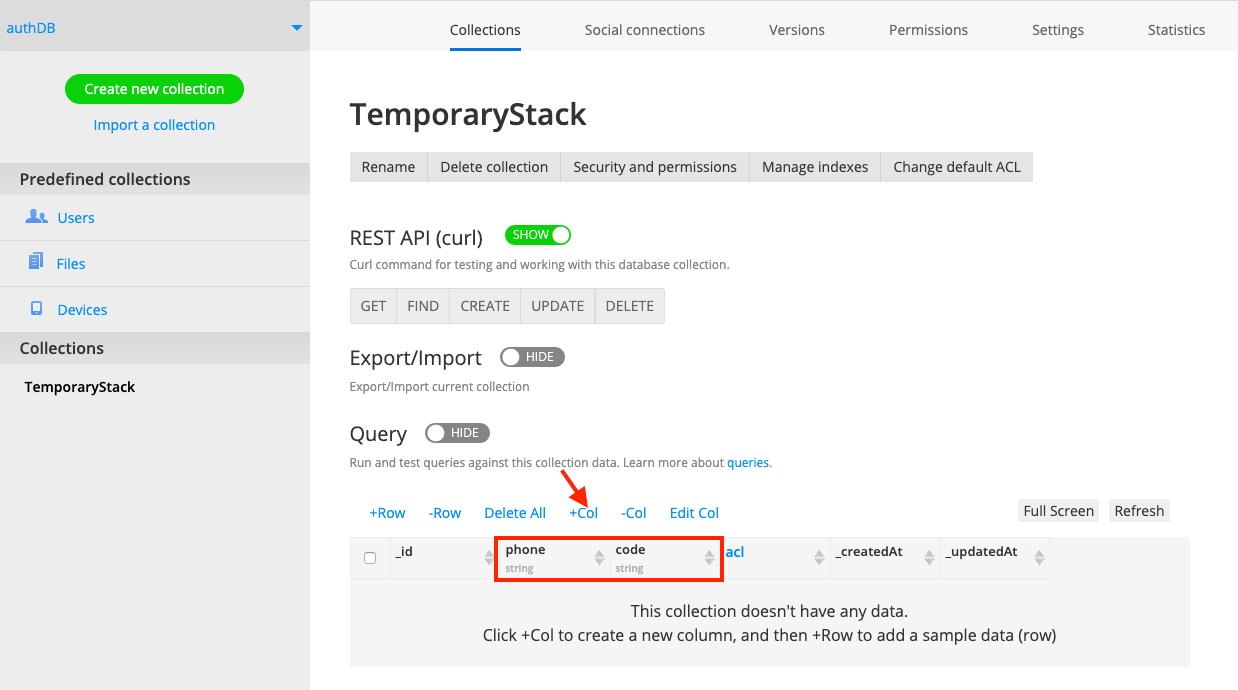
- This collection will be used as a temporary storage of verification codes. In the collection, add two new columns: phone and code, both of String type:
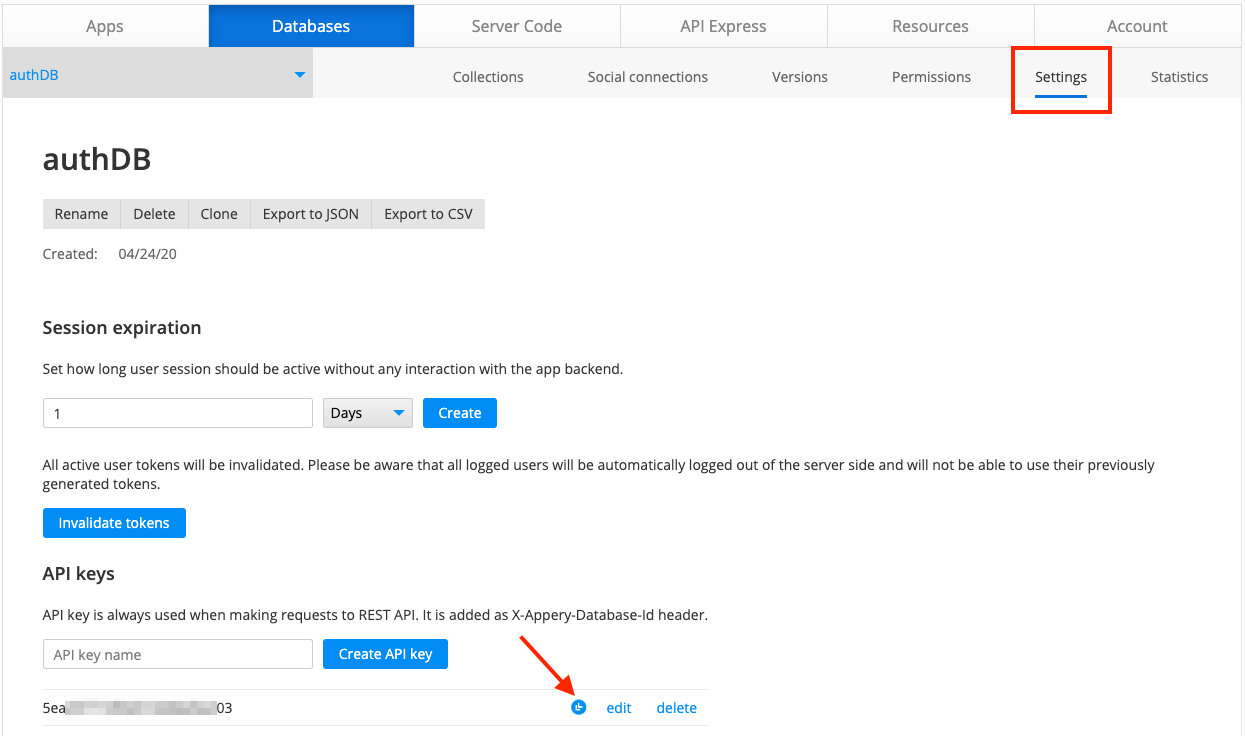
- That's it, the database is ready. Let's also copy the database API key from the Settings tab, we will need it in the next steps:
Creating Appery.io Registration Server Code
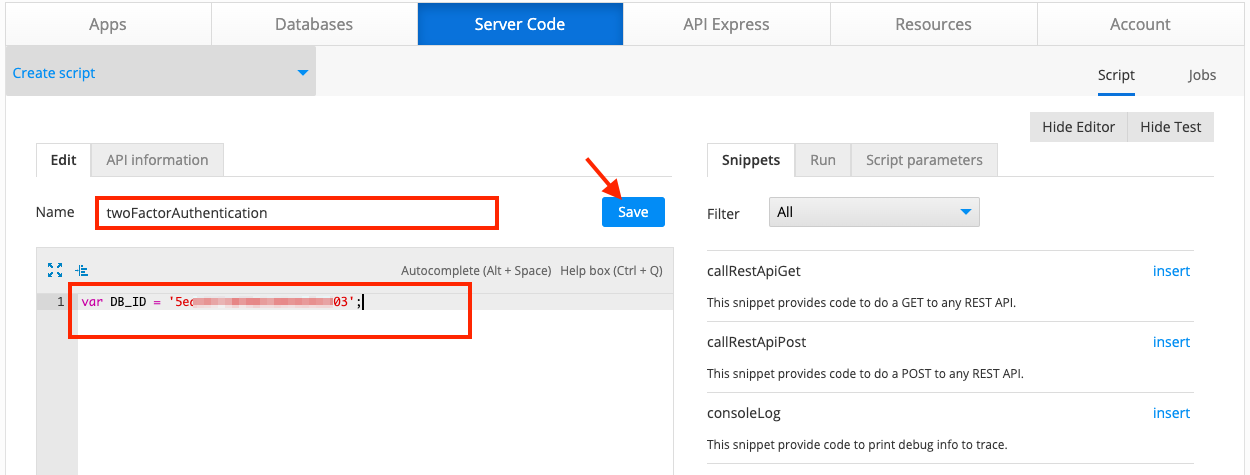
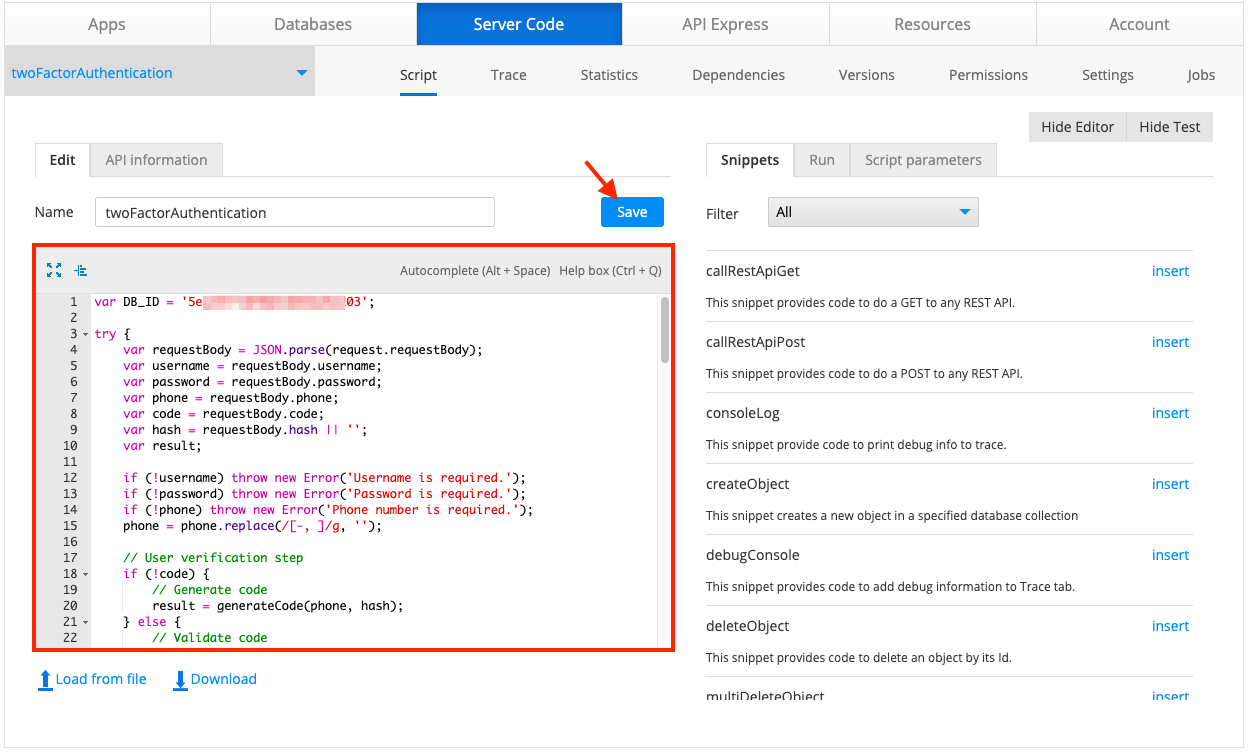
- In the Server code tab, click the Create Script button to create a new script.
- Enter twoFactorAuthentication as its name and remove all code in the code editor. Then, type this line of code:
var DB_ID = 'YOUR_DB_API_KEY';. Set the copied database API key as the DB_ID constant value (replace YOUR_DB_API_KEY text inside single quotes with its value). Click Save:
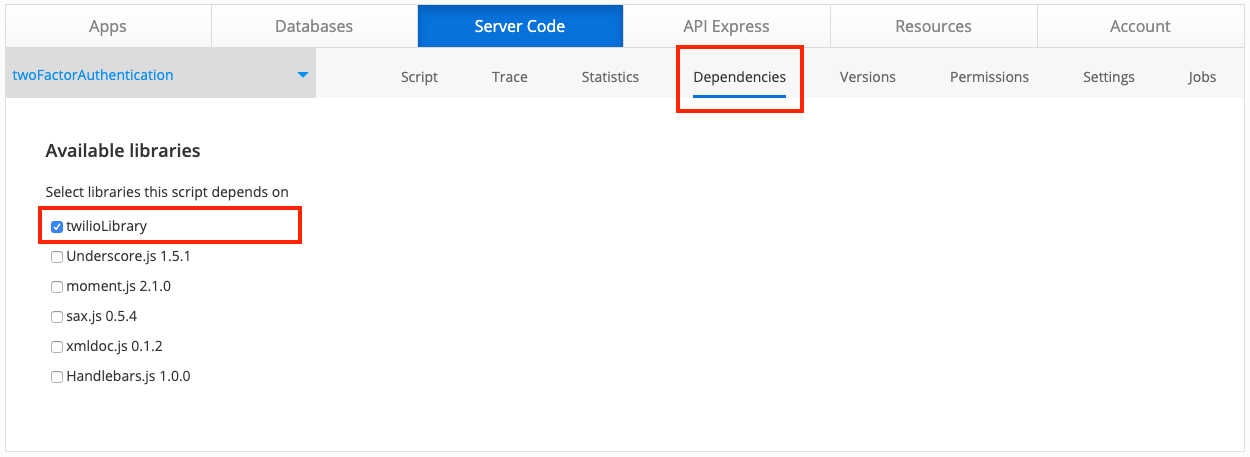
- Go to the script Dependencies tab and select twilioLibrary as a dependency:
- Then let's go back to the Script tab and complete the server code:
var DB_ID = 'YOU_DB_API_KEY';

try {
    var requestBody = JSON.parse(request.requestBody);
    var username = requestBody.username;
    var password = requestBody.password;
    var phone = requestBody.phone;
    var code = requestBody.code;
    var result;

    if (!username) throw new Error('Username is required.');
    if (!password) throw new Error('Password is required.');
    if (!phone) throw new Error('Phone number is required.');
    phone = phone.replace(/[-, ]/g, '');

    // User verification step
    if (!code) {
        // Generate code
        result = generateCode(phone);
    } else {
        // Validate code
        result = validateCode(phone, code);
    }

    // User registration step
    if (typeof result === "boolean") {
        if (!result) throw new Error('Verification code is not valid.');

        // Register user
        result = registerUser(username, password, phone);
    }

    response.success(result, "application/json");
} catch (e) {
    response.error({
        status: 'error',
        message: e.message
    }, 403);
}

function generateCode(phone) {
    var code = Math.floor(100000 + Math.random() * 900000);
    var message = 'Your verification code is: ' + code;

    // Send the generated code using the Twilio service
    var smsResult = Twilio.sendSMS(message, phone);
    if (!!smsResult && smsResult.status === 201) {
        var stackResult = getFromStack(phone);

        if (stackResult && stackResult.length) {
            // Update phone number and code for user verification step
            return Collection.updateObject(DB_ID, "TemporaryStack", stackResult[0]._id, {
                "phone": phone,
                "code": code
            });
        } else {
            // Save phone number and code for user verification step
            return Collection.createObject(DB_ID, "TemporaryStack", {
                "phone": phone,
                "code": code
            });
        }
    } else {
        throw new Error('Please check the phone number format');
    }
}

function getFromStack(phone) {
    var params = {
        criteria: {
            "phone": {
                "$eq": phone
            }
        }
    };
    // Search for existing records in the temporary stack
    return Collection.query(DB_ID, "TemporaryStack", params);
}

function validateCode(phone, code) {
    var validationResult = false;
    var stackResult = getFromStack(phone);

    if (stackResult && stackResult.length && stackResult[0].code === code) {
        validationResult = true;
        cleanFromStack(stackResult[0]._id);
    }

    return validationResult;
}

function cleanFromStack(id) {
    Collection.deleteObject(DB_ID, "TemporaryStack", id);
}

function registerUser(username, password, phone) {
    var user = DatabaseUser.signUp(DB_ID, {
        "username": username,
        "password": password,
        "phone": phone
    });
    return user;
}
Reviewing Created Code
Code reviewLet's take a look at the parts of this code to understand its logic.
Note, that this part of the tutorial is optional and is intended to help you understand what is happening in the code.
- The following code part,
generateCodefunction, adds logic of generating a one-time code and sending this code via SMS. Also, when the code is sent, we will store it in our temporary stack for validation purposes in the following steps:
function generateCode(phone) {
    var code = Math.floor(100000 + Math.random() * 900000);
    var message = 'Your verification code is: ' + code;

    // Send the generated code using the Twilio service
    var smsResult = Twilio.sendSMS(message, phone);
    if (!!smsResult && smsResult.status === 201) {
        var stackResult = getFromStack(phone);

        if (stackResult && stackResult.length) {
            // Update phone number and code for user verification step
            return Collection.updateObject(DB_ID, "TemporaryStack", stackResult[0]._id, {
                "phone": phone,
                "code": code
            });
        } else {
            // Save phone number and code for user verification step
            return Collection.createObject(DB_ID, "TemporaryStack", {
                "phone": phone,
                "code": code
            });
        }
    } else {
        throw new Error('Please check the phone number format');
    }
}- The next additional function,
getFromStack, supports the previousgenerateCodefunction and is used to search for existing verification codes in the temporary stack:
function getFromStack(phone) {
    var params = {
        criteria: {
            "phone": {
                "$eq": phone
            }
        }
    };
    // Search for existing records in the temporary stack
    return Collection.query(DB_ID, "TemporaryStack", params);
}- The next function,
validateCode, adds logic for validating the one-time code. If the code is valid, it cleans the record from the temporary stack:
function validateCode(phone, code) {
    var validationResult = false;
    var stackResult = getFromStack(phone);

    if (stackResult && stackResult.length && stackResult[0].code === code) {
        validationResult = true;
        cleanFromStack(stackResult[0]._id);
    }

    return validationResult;
}- The next simple function,
cleanFromStack, clears the record from the temporary stack:
function cleanFromStack(id) {
    Collection.deleteObject(DB_ID, "TemporaryStack", id);
}- The
registerUserfunction adds user registration logic:
function registerUser(username, password, phone) {
    var user = DatabaseUser.signUp(DB_ID, {
        "username": username,
        "password": password,
        "phone": phone
    });
    return user;
}- And this part is a "skeleton" of our server code script, that uses previously reviewed functions:
var DB_ID = 'YOUR_DB_API_KEY';

try {
    var requestBody = JSON.parse(request.requestBody);
    var username = requestBody.username;
    var password = requestBody.password;
    var phone = requestBody.phone;
    var code = requestBody.code;
    var result;

    if (!username) throw new Error('Username is required.');
    if (!password) throw new Error('Password is required.');
    if (!phone) throw new Error('Phone number is required.');
    phone = phone.replace(/[-, ]/g, '');

    // User verification step
    if (!code) {
        // Generate code
        result = generateCode(phone);
    } else {
        // Validate code
        result = validateCode(phone, code);
    }

    // User registration step
    if (typeof result === "boolean") {
        if (!result) throw new Error('Verification code is not valid.');

        // Register user
        result = registerUser(username, password, phone);
    }

    response.success(result, "application/json");
} catch (e) {
    response.error({
        status: 'error',
        message: e.message
    }, 403);
}
Creating Mobile App
- On the Apps tab, click the Create new app green button to start a new project. Enter Ionic twoFactorAuth App as the app name, Ionic Blank type and click Create.
- First, let’s create a storage that will contain the data required for the server code. Go to Project > Model and Storage. On the Storage tab, add a new storage variable named
localData. Set its Type to Any:

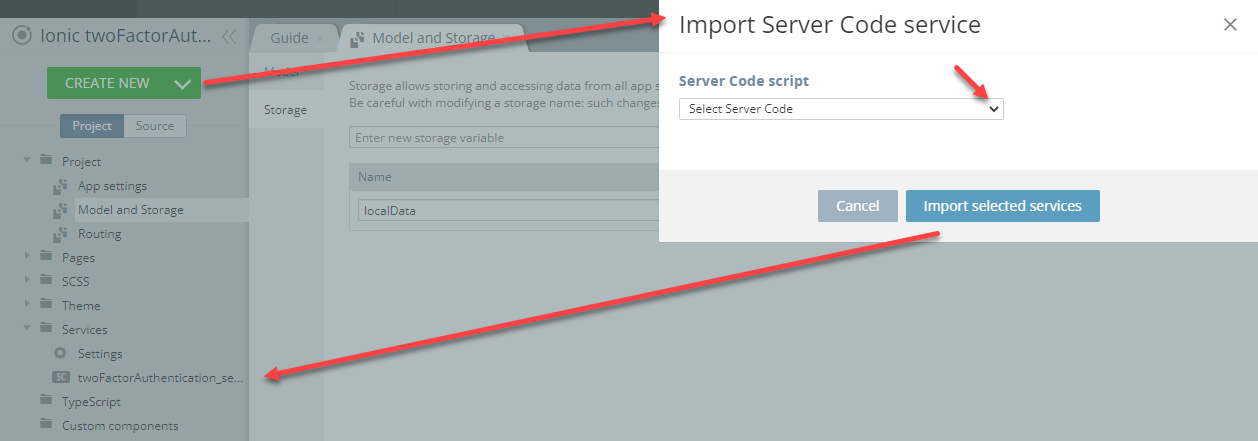
- From the left panel in the editor, click CREATE NEW > Server Code Service. Select the twoFactorAuthentication server code which we’ve created in the previous steps:
- Unfold the Pages folder in the project tree on the left. Rename the default Screen1 page to SignUp by clicking the small cog icon next to the page name.
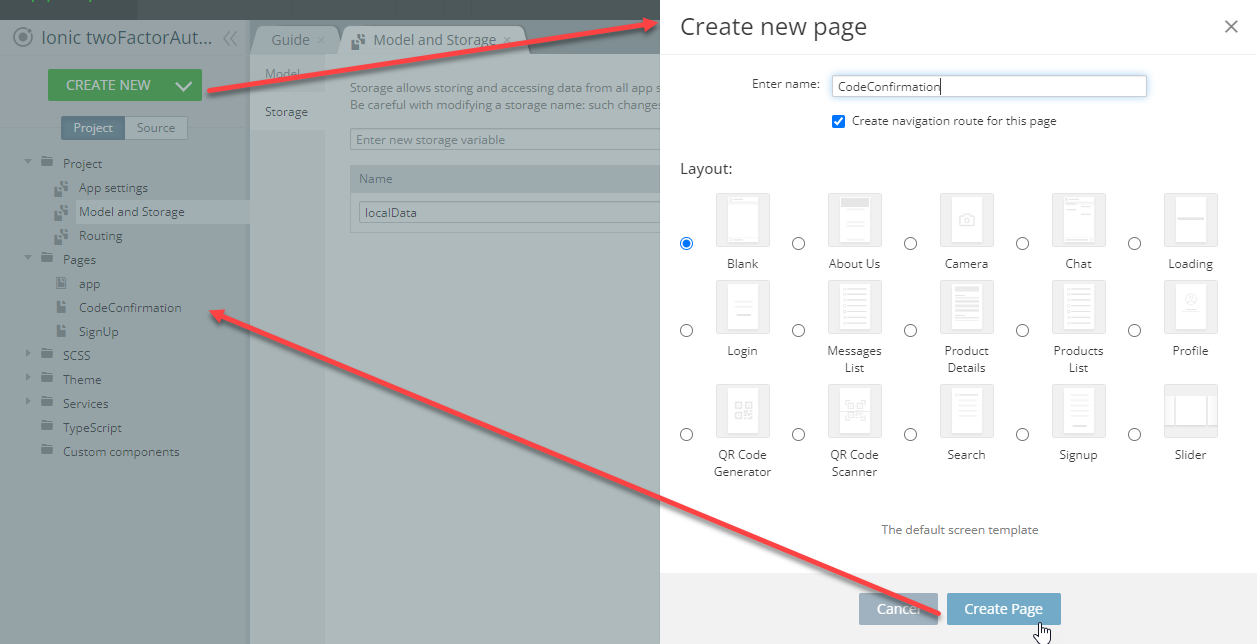
- Create one more page, for submitting the confirmation code. Click CREATE NEW > Page, enter CodeConfirmation as a new page name and confirm creating:
Defining Signup Page UI
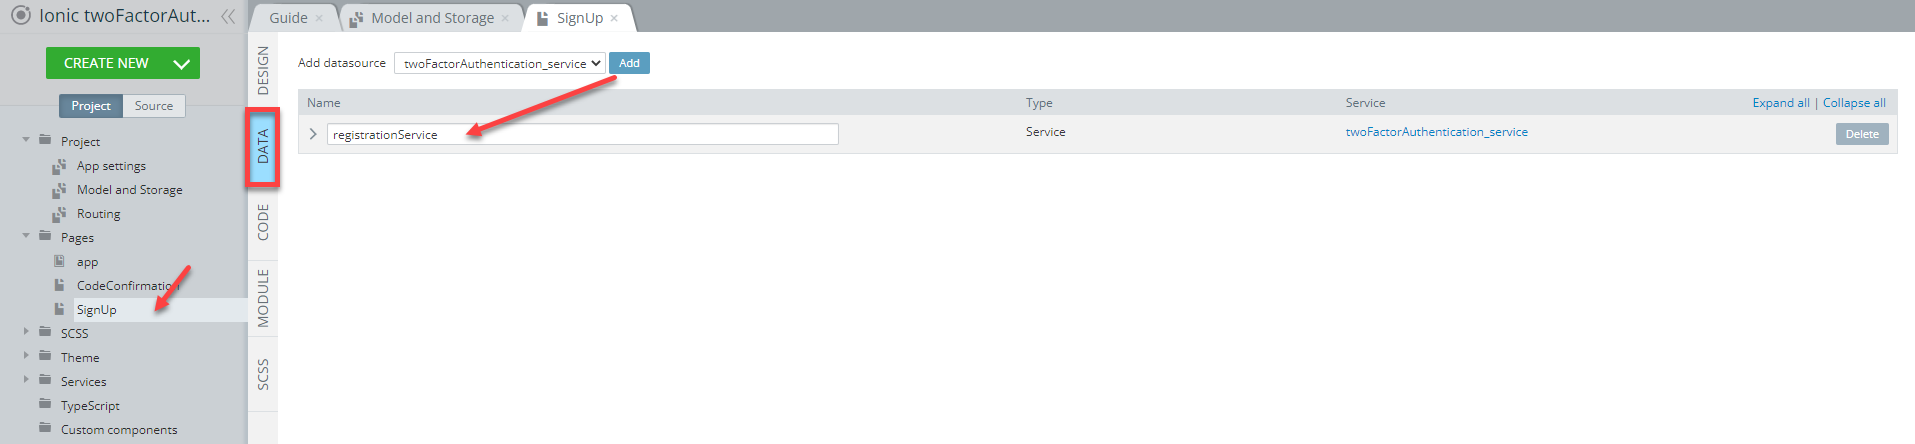
- Open the SignUp page, go to its DATA panel, select the service you just imported, and click Add. Change the service's generated local name to registrationService:
- We will send the collected data to the server code with the use of mapping. Click the Mapping button in the Before send section. Map localData storage variable to the data parameter of the service request, as shown in the screenshot below. Click Save & Replace:

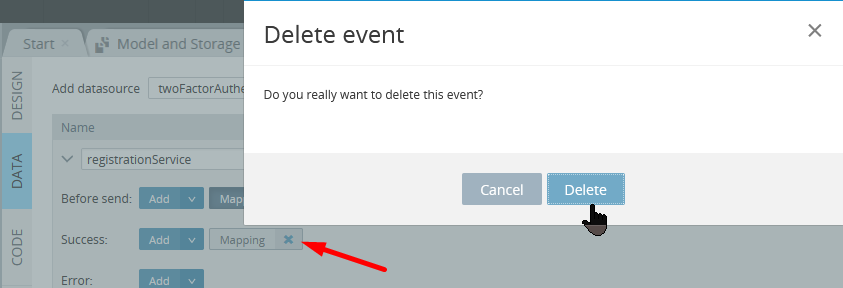
- We won't need mapping in the Success section, so you can remove it:
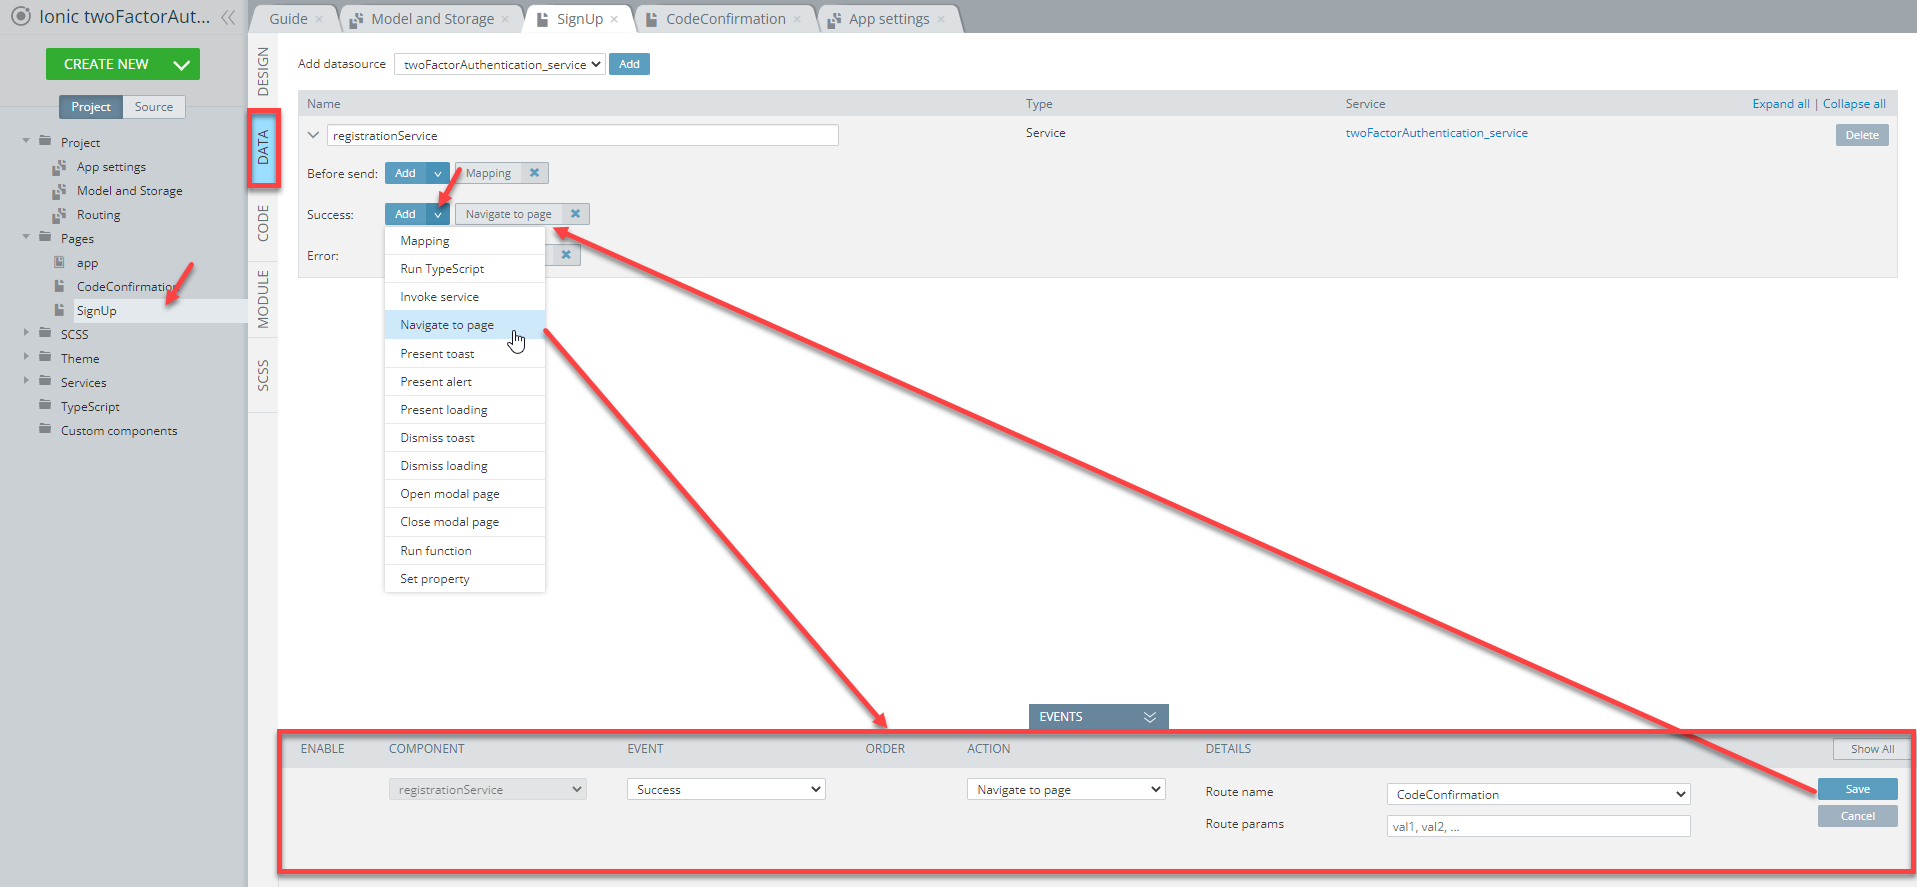
- Then, click the Add button in the Success section. Select Navigate to page and set CodeConfirmation as the Route name:
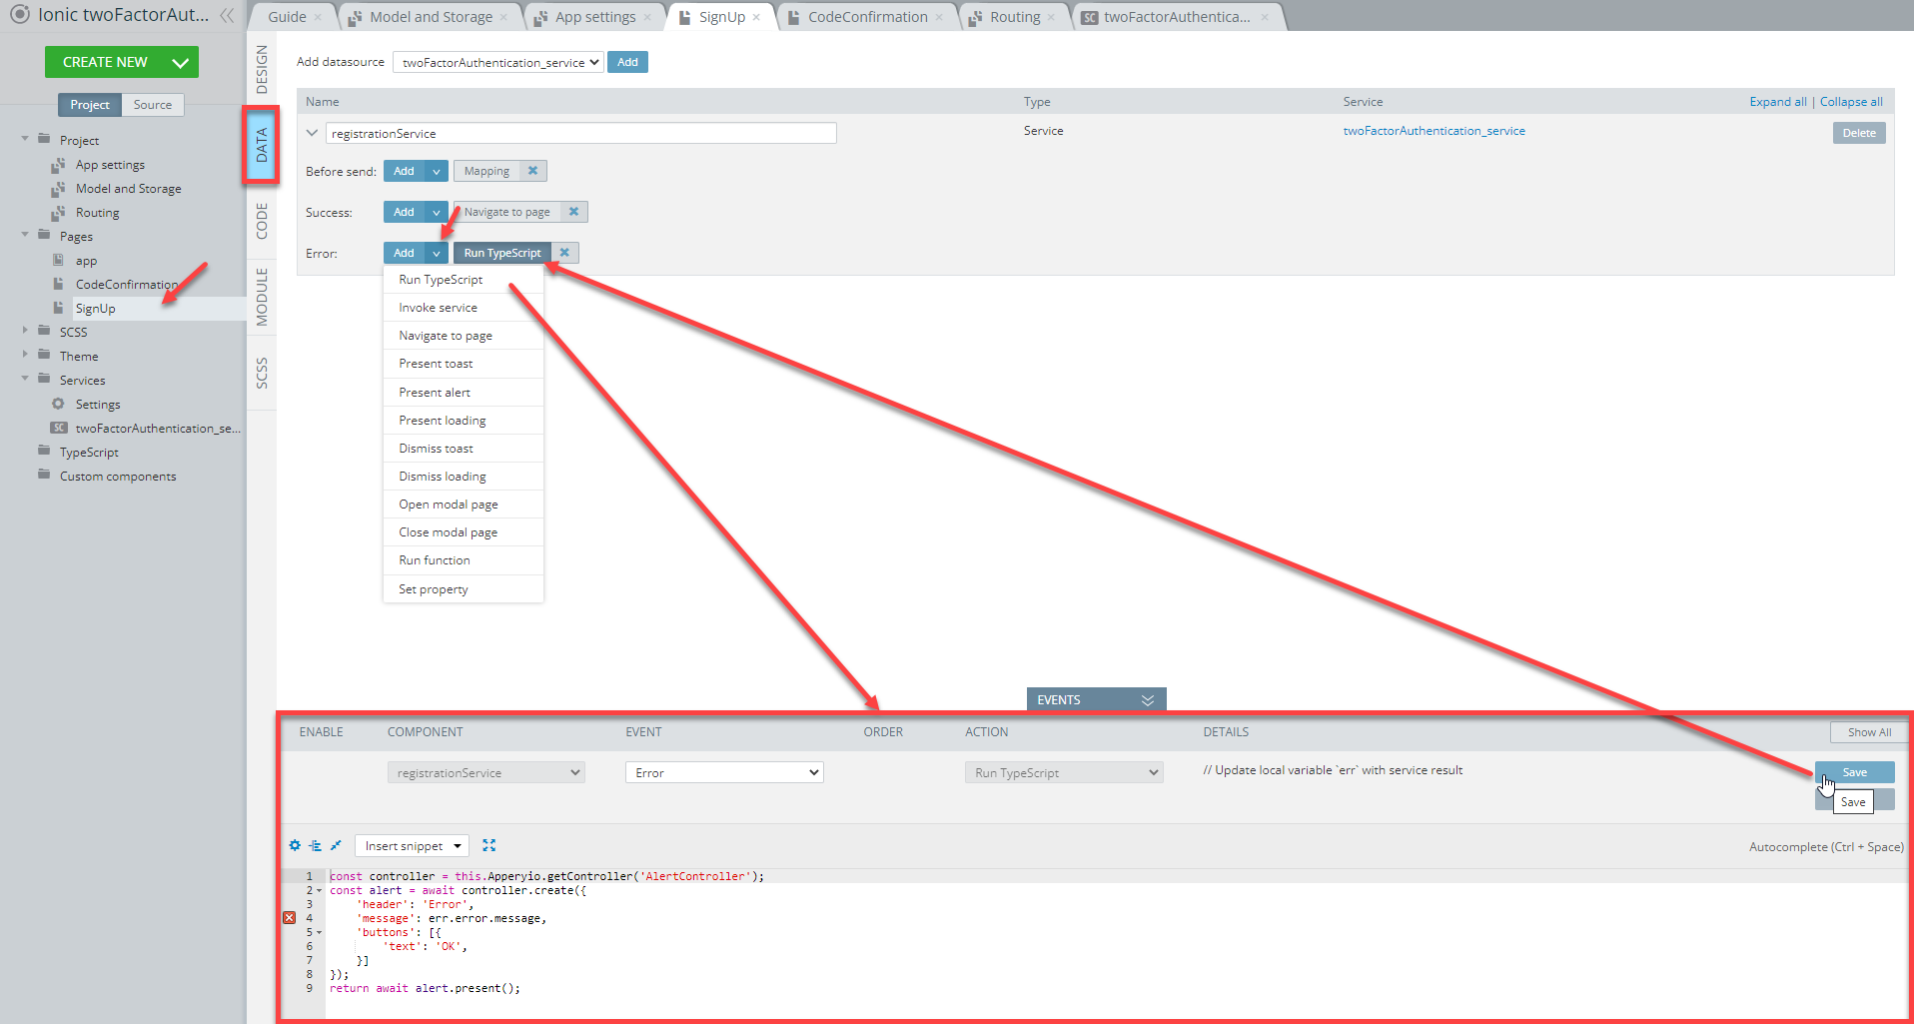
- Let's also create a custom popup for error handling. Click the Add button in the Error section. For the action, select Run TypeScript and add the following code in the editor. Don't forget to save the changes:
const controller = this.Apperyio.getController('AlertController');
const alert = await controller.create({
    'header': 'Error',
    'message': err.error.message,
    'buttons': [{
        'text': 'OK',
    }]
});
return await alert.present();
Here is how this event should look like:
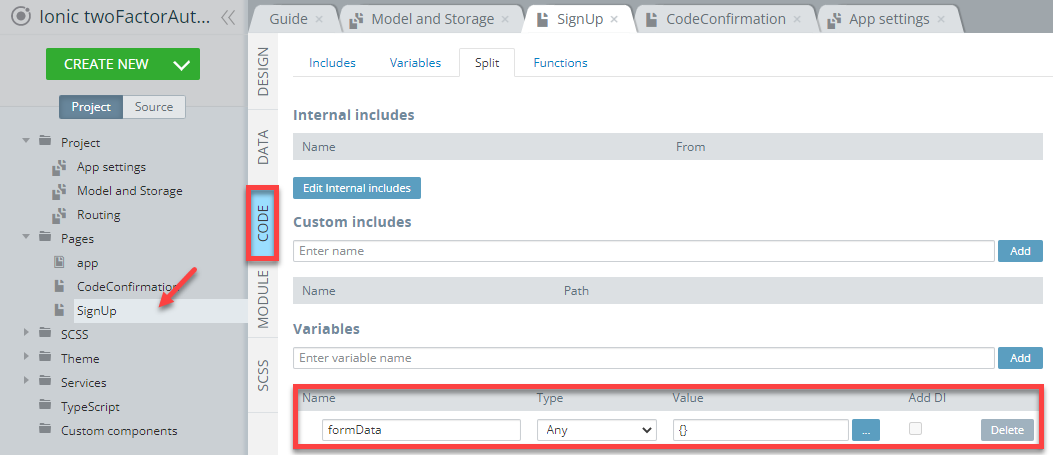
- Now, switch to the CODE panel. In the Variables section create a new variable with
formDatafor its name and of Any type with{}default value:
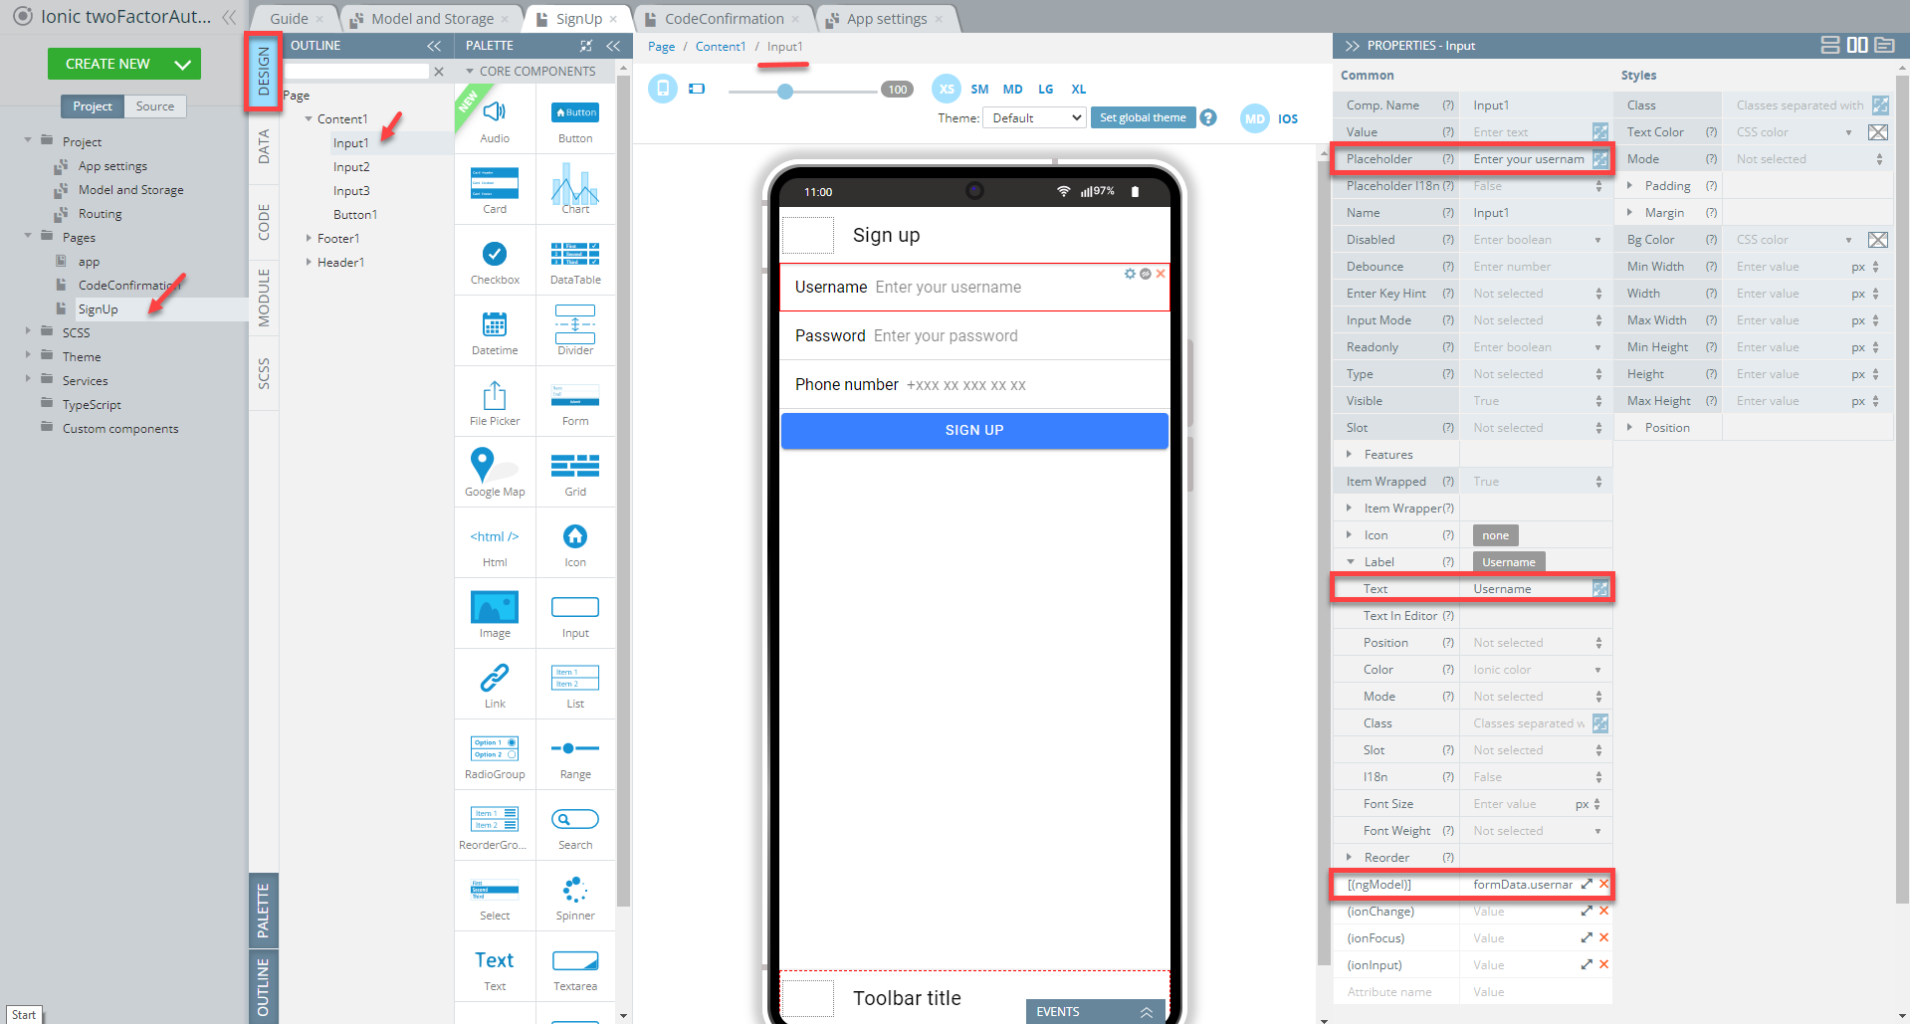
- Then, go to the DESIGN panel. In the header, change the Text property of the Toolbar title component to Sign up.
- Drop three Input components and one Button component to the page from PALETTE, one below the other.
- For the Button1 component: change its Text property to Sign up.
- Set the following properties for the created inputs:
- Input1 component: Placeholder = Enter your username, Label > Text = Username, [(ngModel)] = formData.username:
-
Input2 component: Placeholder = Enter your password, Type = Password, Label > Text = Password, [(ngModel)] = formData.password.
-
Input3 component: Placeholder = +xxx xx xxx xx xx, Type = Tel, Label > Text = Phone number, [(ngModel)] = formData.phone.
- Let’s add the logic to save form data to our storage. Select the Button1 component and expand the EVENTS tab from the bottom. For the Click event, set the Run TypeScript action. In the code editor, type the following code. Save the changes:
let localData = await this.Apperyio.data.getStorage("localData");

if (localData) {
    delete localData.code;
}

await this.Apperyio.data.setStorage("localData", {...localData,
    ...this.formData
});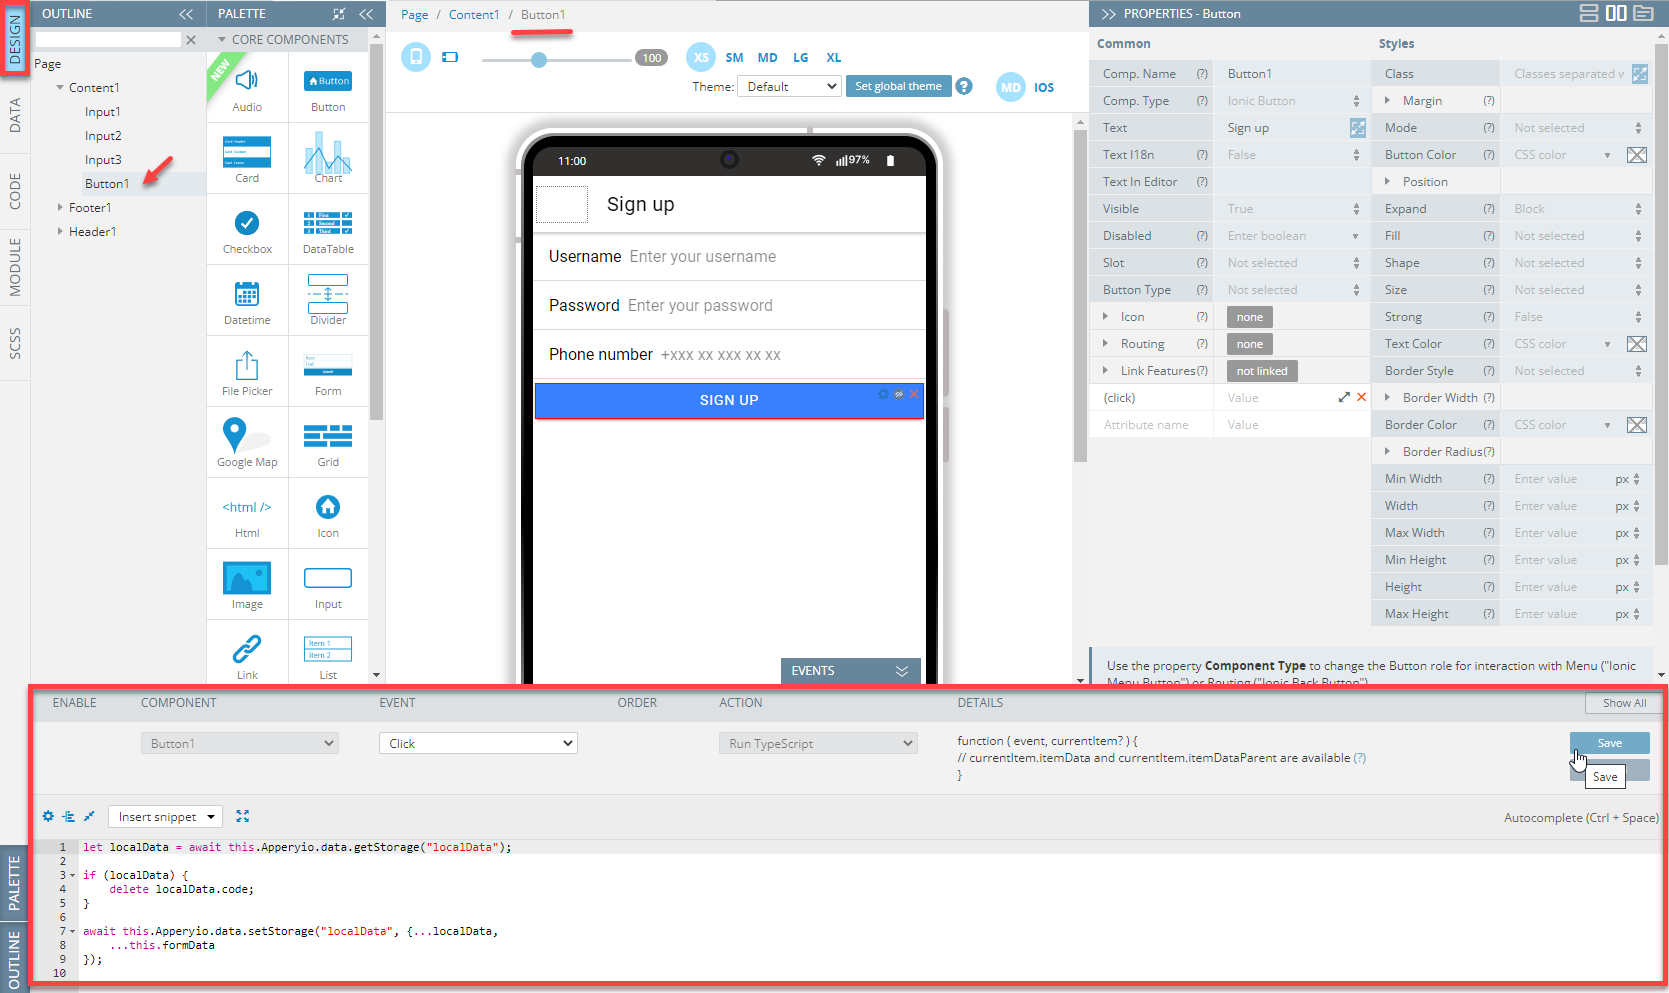
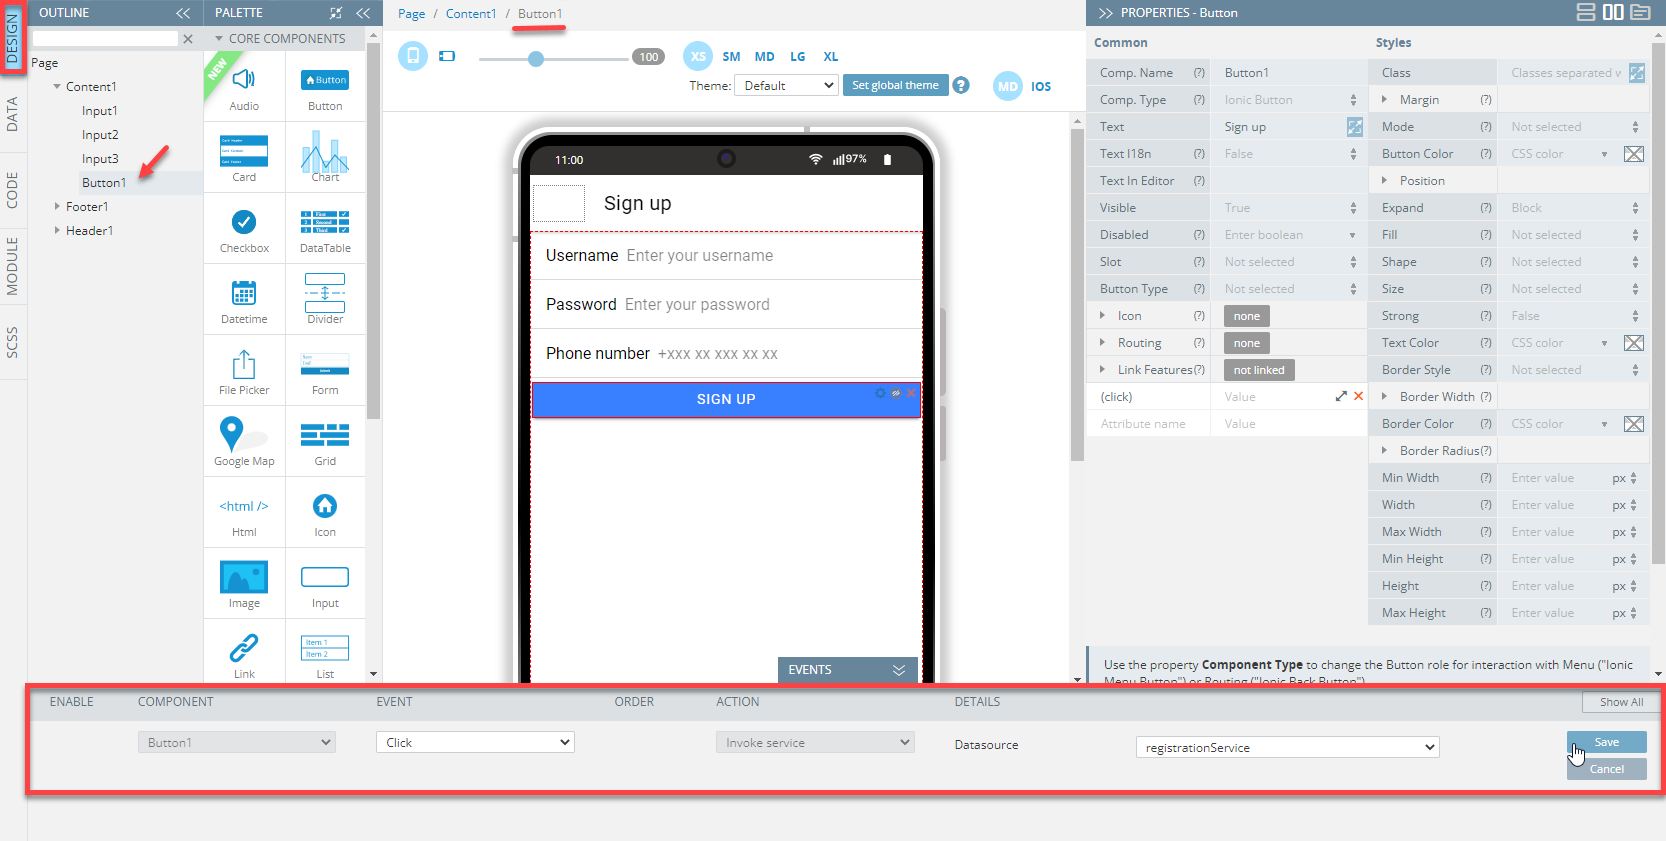
- Then, create one more Click event for Button1 and select Invoke service. Select registrationService as the Datasource:
Defining Code Confirmation Page
- Switch to the CodeConfirmation page and open its DATA panel. In the drop-down, select the imported service and click Add. Change the service's generated local name to codeVerificationService:
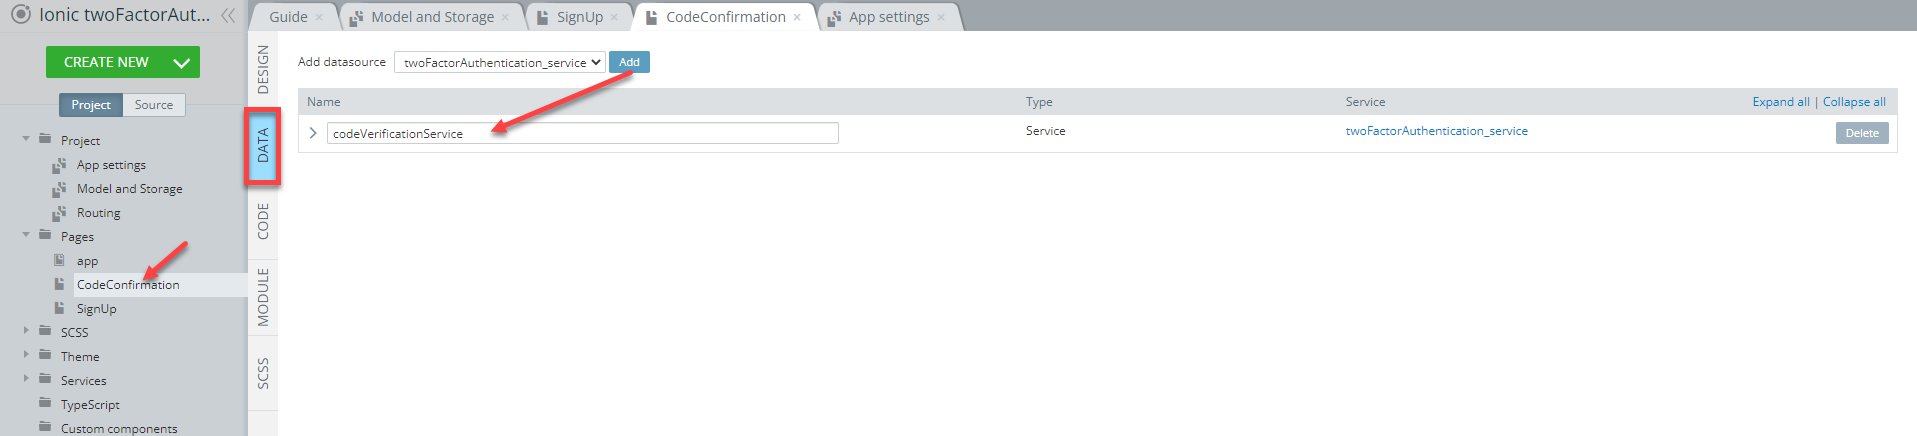
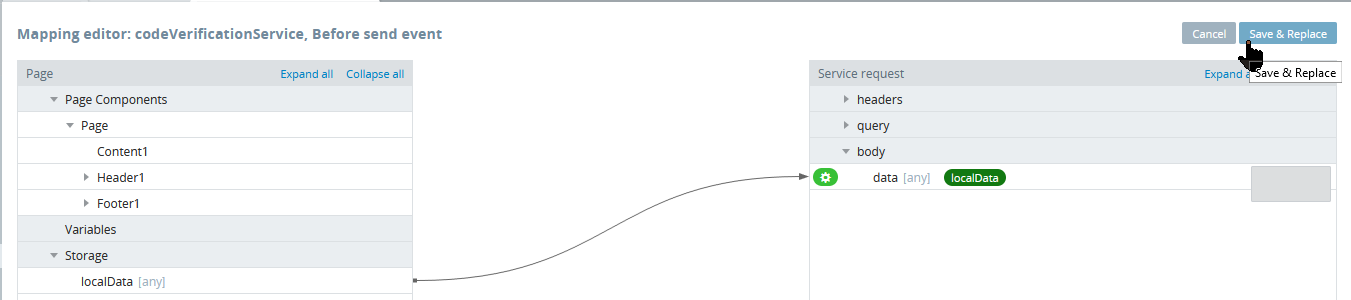
- Click the Mapping button in the Before send section. With the use of mapping, we will send the collected data to the server code. Map the
localDatastorage variable to the data parameter of the service request, as shown in the screenshot below. Click Save & Replace:
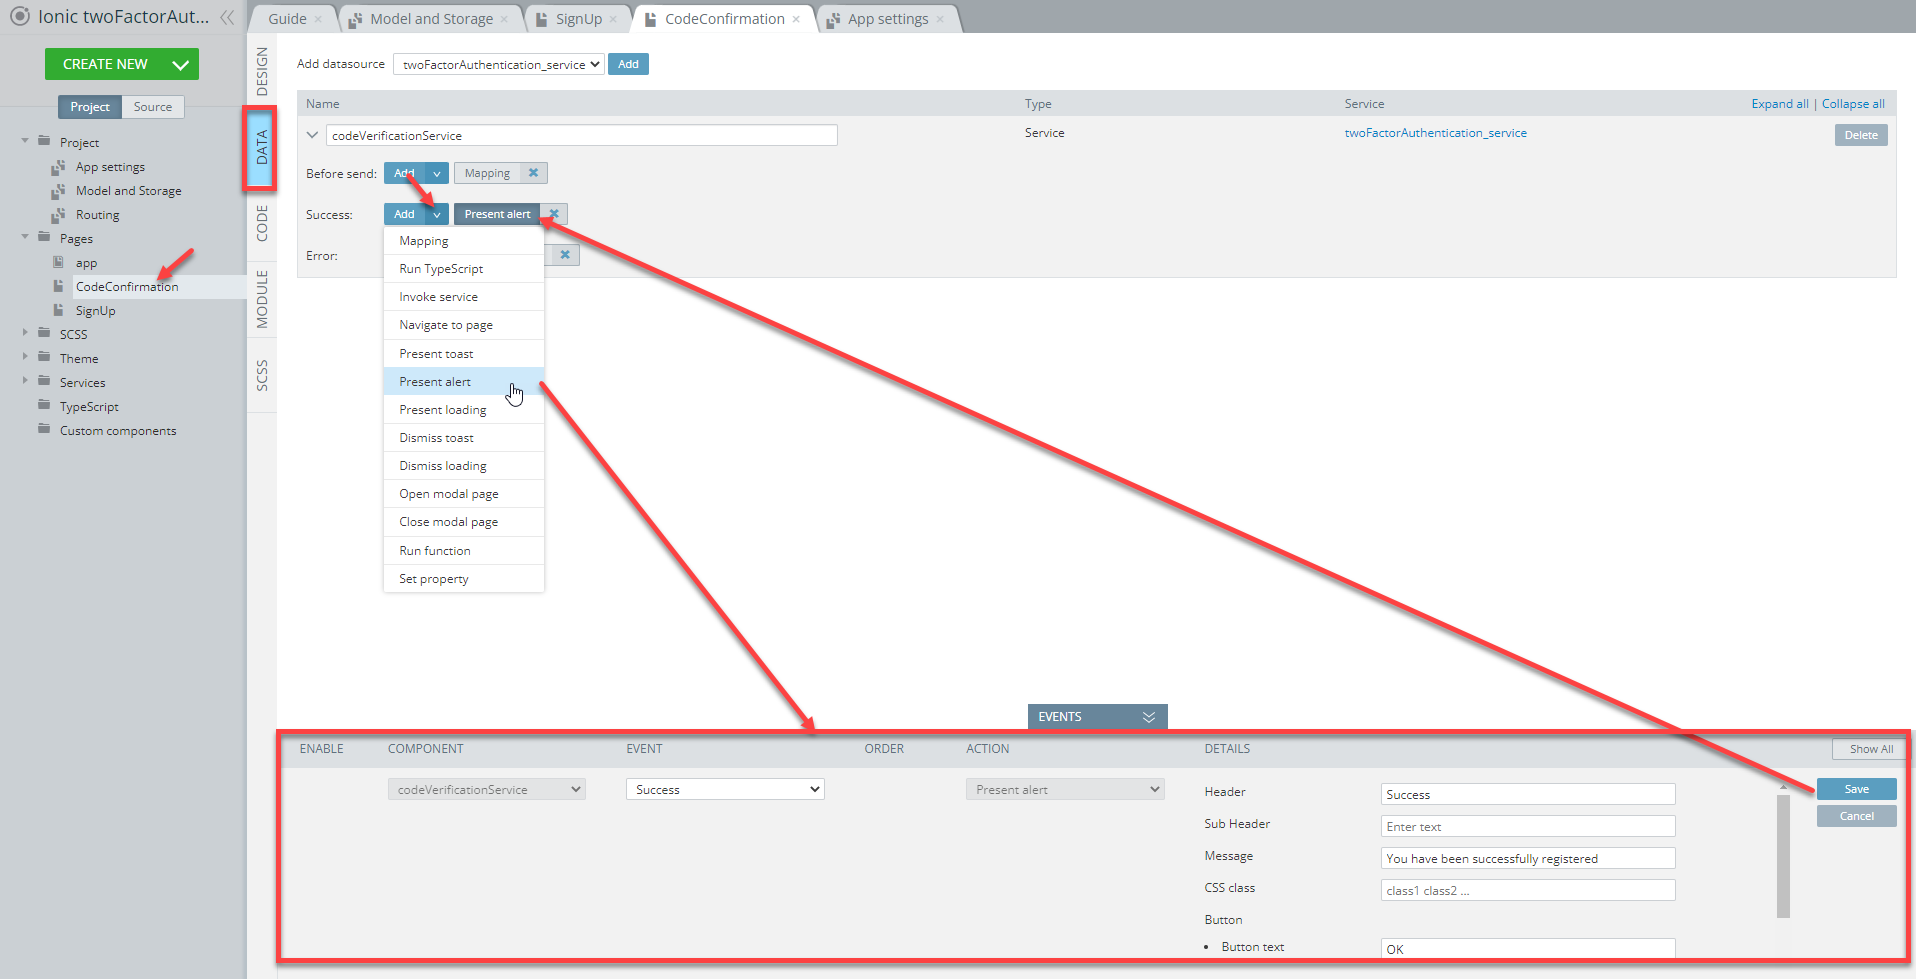
- We won't need the Success mapping here, so let's delete it. Then, click the Add button in the Success section and select Present alert. We can modify the alert popup parameters, let's set its Header to Success and its Message to You have been successfully registered:
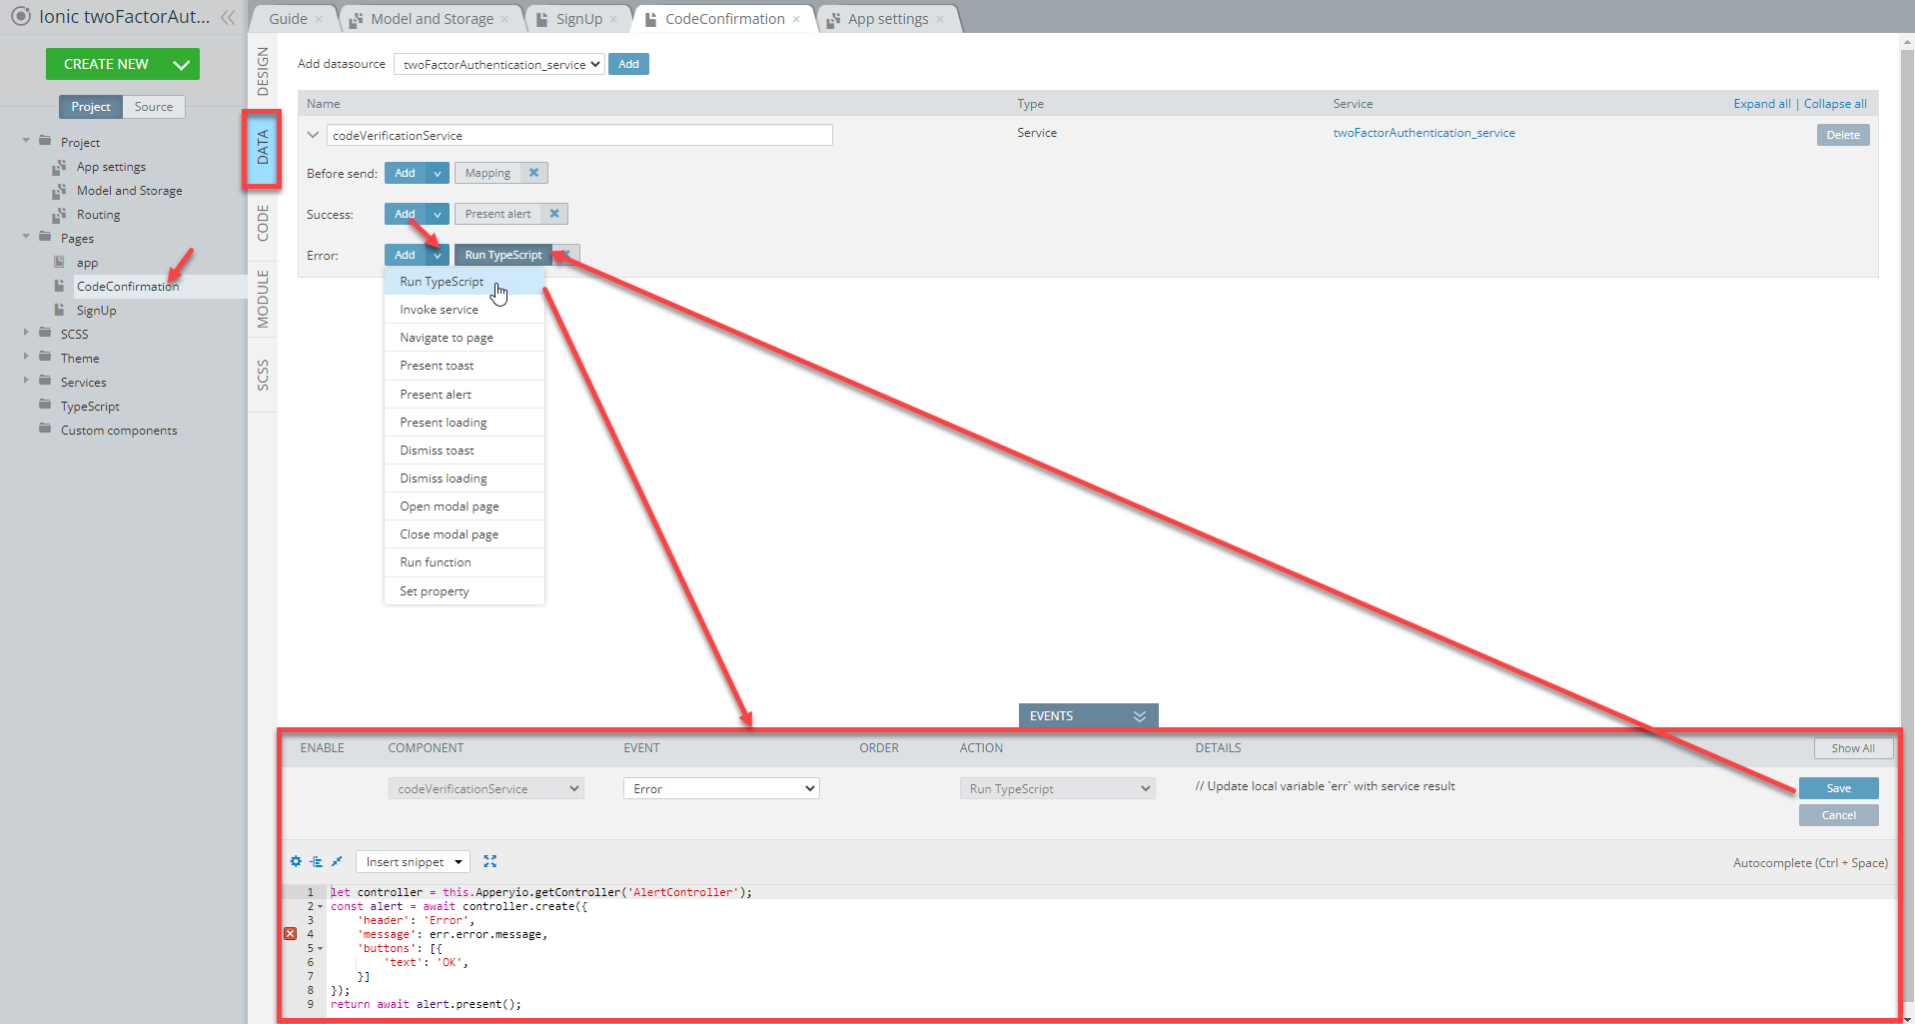
- Also, we will create our own custom popup for error handling. Click the Add button in the Error section. Select Run TypeScript and add the following code. Don't forget to save the changes:
let controller = this.Apperyio.getController('AlertController');
const alert = await controller.create({
    'header': 'Error',
    'message': err.error.message,
    'buttons': [{
        'text': 'OK',
    }]
});
return await alert.present();
Here is what the event creation process should look like:
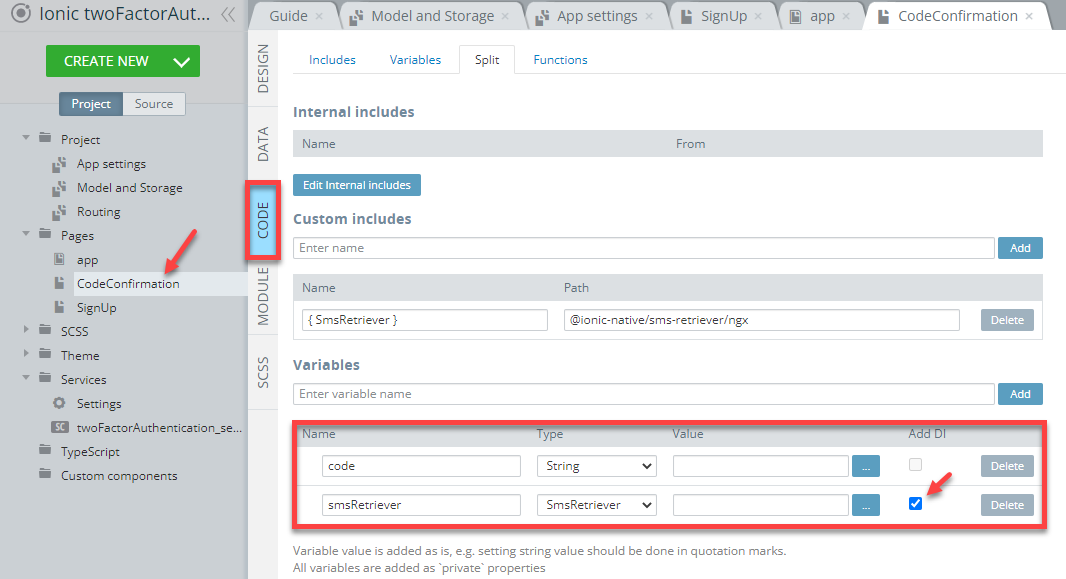
- Now, switch to the page CODE panel. First, in the Custom includes section, enter
{ SmsRetriever }and click the Add button. Type@ionic-native/sms-retriever/ngxinto the Path field:

- In the Variables section, create two new variables:
codeof String type andsmsRetrieverof SmsRetriever type. Make sure that the Add DI check box is checked for the second variable:
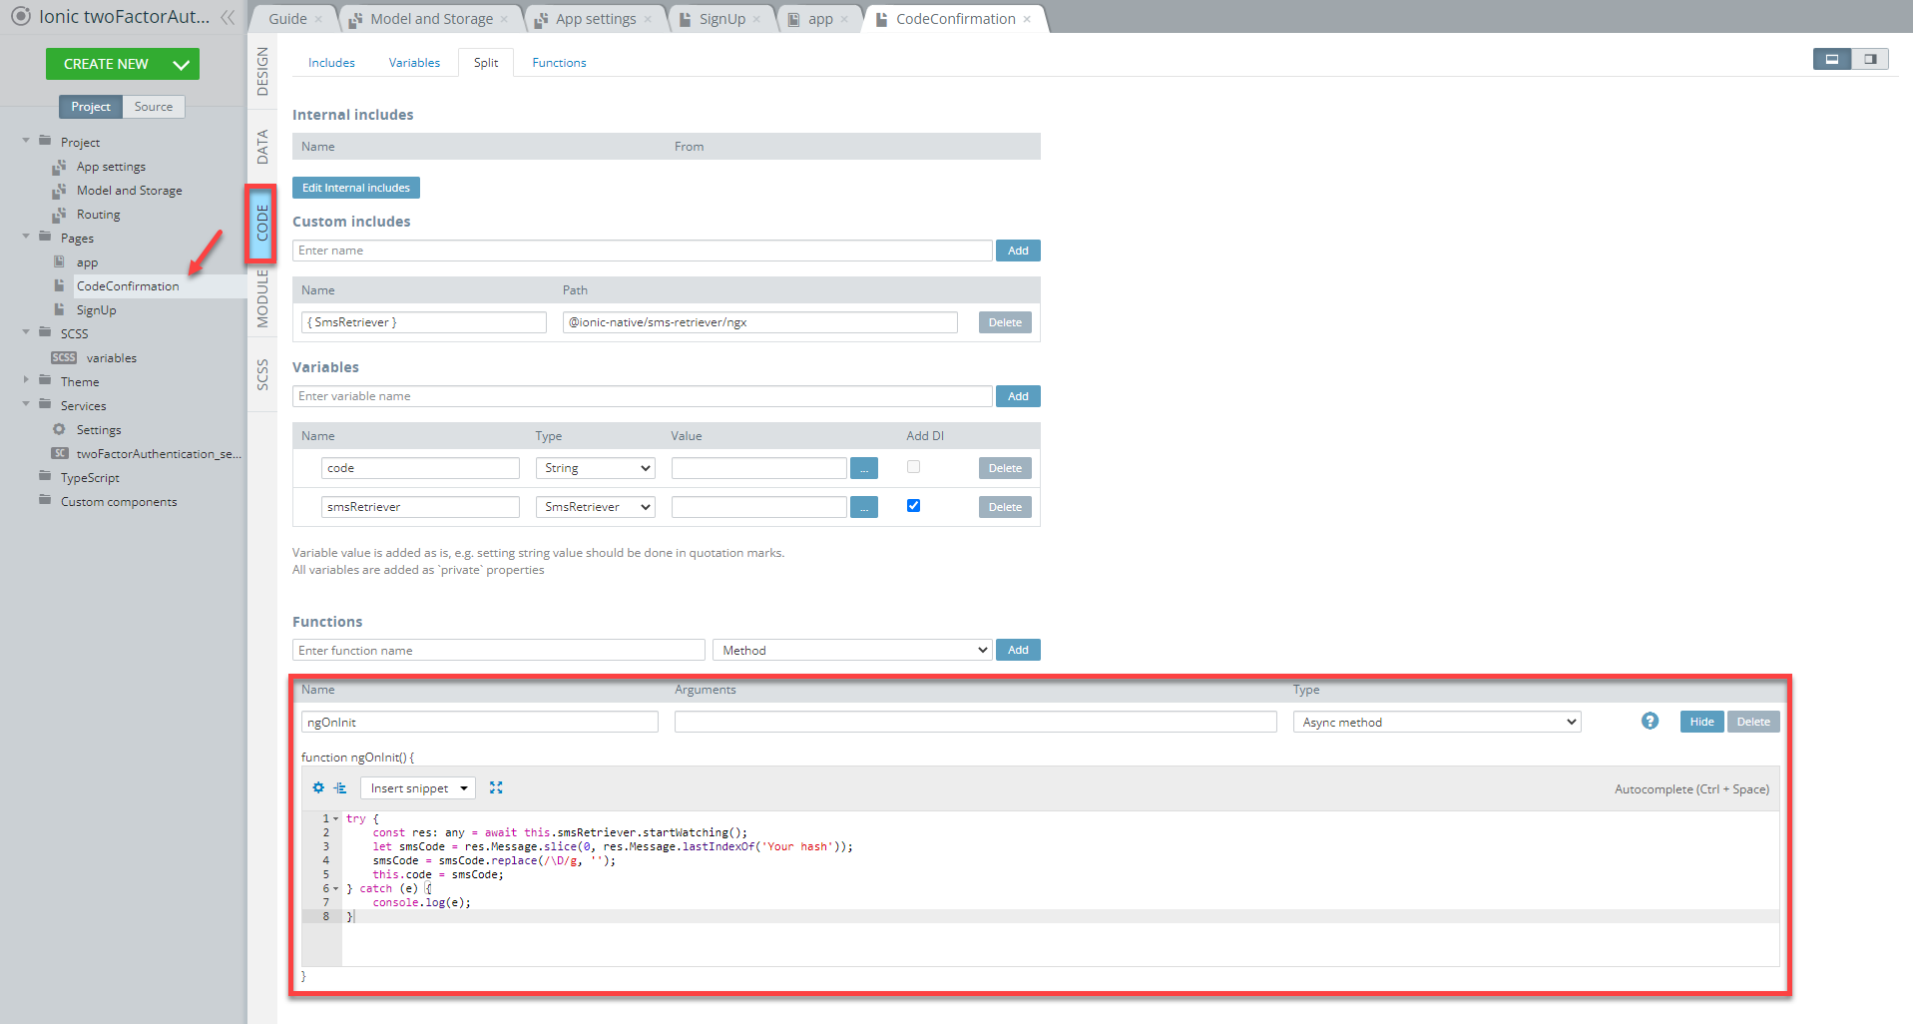
- Also, in the Functions section, create a new function named
ngOnInit, of the Async method type and add the following code to this function:
try {
    const res: any = await this.smsRetriever.startWatching();
    let smsCode = res.Message.slice(0, res.Message.lastIndexOf('Your hash'));
    smsCode = smsCode.replace(/\D/g, '');
    this.code = smsCode;
} catch (e) {
    console.log(e);
}
Here is what it should look like in the editor:
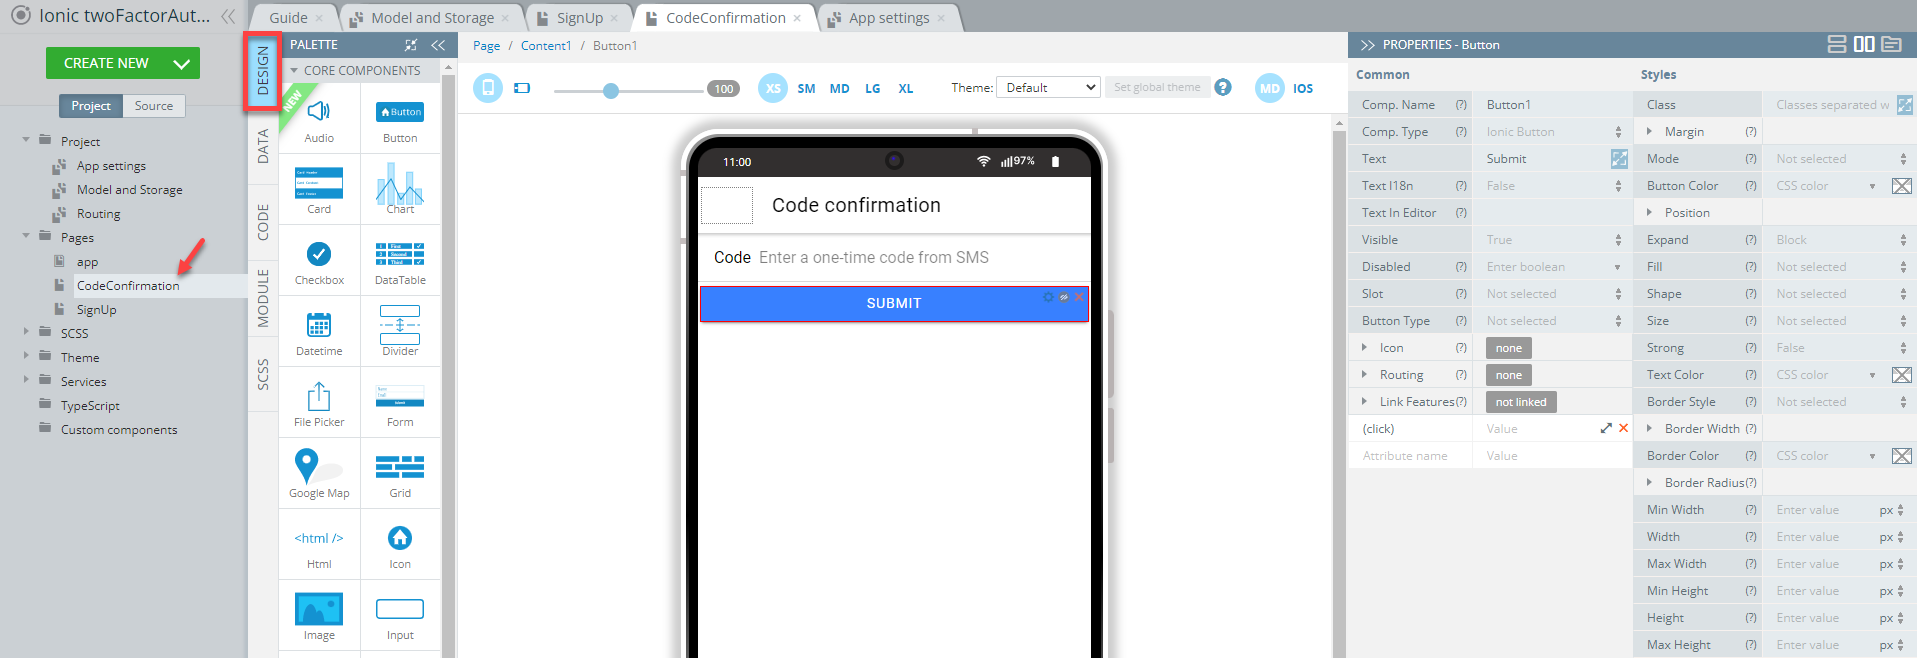
- Navigate to the DESIGN panel. In the header, change the Text property of its Toolbar title to Code confirmation.
- Drag the Input component and the Button component to the page. Set the following properties for the created components:
-
For the Input1 component: Placeholder = Enter a one-time code from SMS, Label > Text = Code, [(ngModel)] = code.
-
For the Button1 component: change its Text property to Submit.
As a result, the page should look like this:
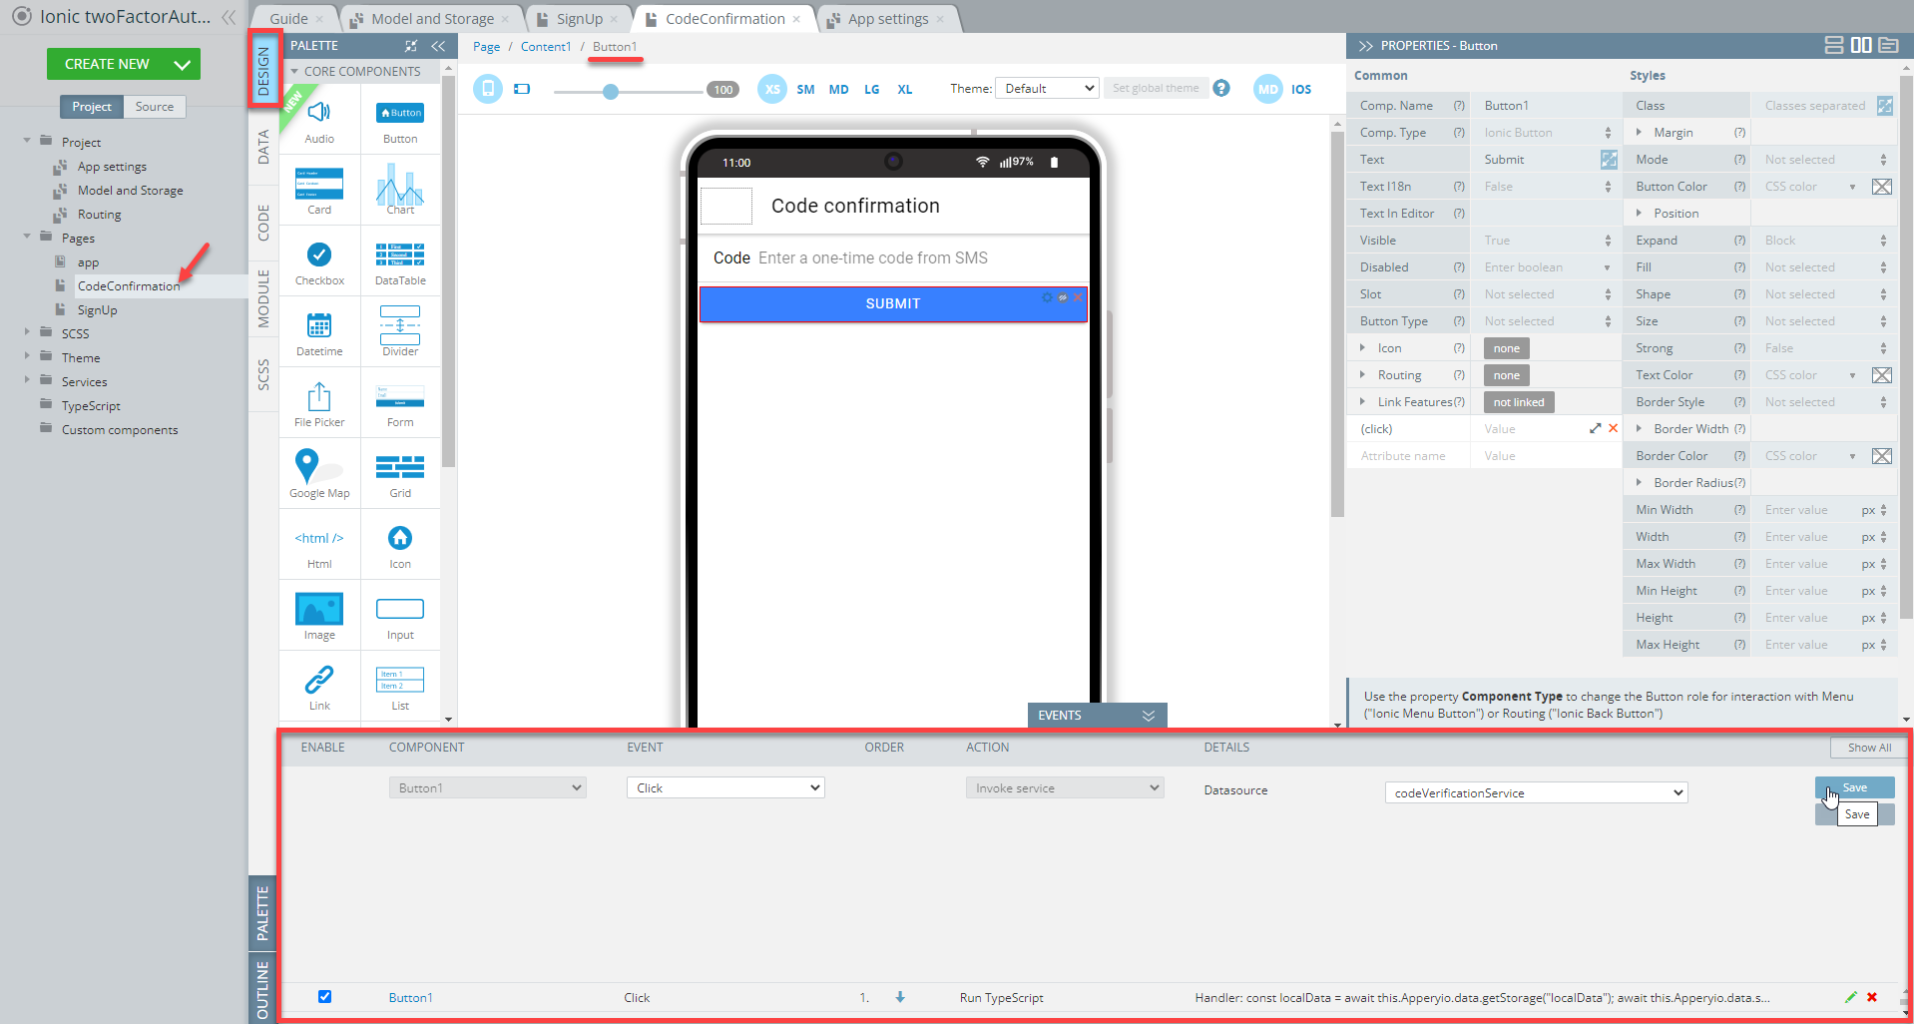
- Let’s add the logic of saving the verification code from the form to our storage. Expand the EVENTS tab and select the Button1 component. Select Click as the Event and Run TypeScript as the Action. Add the following code, and don't forget to save the changes after editing:
const localData = await this.Apperyio.data.getStorage("localData");
await this.Apperyio.data.setStorage("localData", {...localData, code: this.code});- Then, add one more Click event for the Button1 and select Invoke service for the Action and codeVerificationService as the Datasource:
Save all app changes.
You are now ready to import the needed Cordova plugin that will enable sending the SMS with code information. Also, you will need to add the needed dependencies to make the services work correctly.
Please proceed with Part 2 to learn how to do it.
Updated about 1 year ago