Teams, Sharing and Permissions
This document explains how to collaborate and work in teams
To make Appery.io a secure place, our cloud-based platform provides a service of managing permission rights. Under the Account tab, the following roles for all the users on the team can be set:
- Admin
- Team Lead
- Developer
- Tester
Within a team, view/edit/delete permissions to the following resources can be configured:
- Apps
- Databases
- Server Code
- Secure Proxy
- API Express
- Plugins
- Certificates
- Webhooks
In the end, we need a link to the Sharing and Collaboration section.
Introduction
Appery.io uses the cloud-based platform, which provides a service for managing permission rights. Under Account, the following roles and restrictions for all the users on the team can be set:
- Admin
- Team Lead
- Developer
- Tester
Within your team, you can: view, delete, and edit permissions to the following configured resources:
- Apps
- Database
- Server Code
- API Express
- Secure Proxy
- Plugins
- Certificates
- Webhooks
Team Building
Appery.io users with the Trial, Pro, Team, or Enterprise plan(s) can initiate building a team to share their resources/items. When invited, users must join your team, they must also be existing Appery.io users.
Every team user can have his/her own particular permissions to the resources and/or items within a team. Оnly Admins and Team Leads can manage team roles and enable/disable resources/items for their team. Once you have selected the permissions for each team member click the Save button to access the drop-down menu to implement your request:
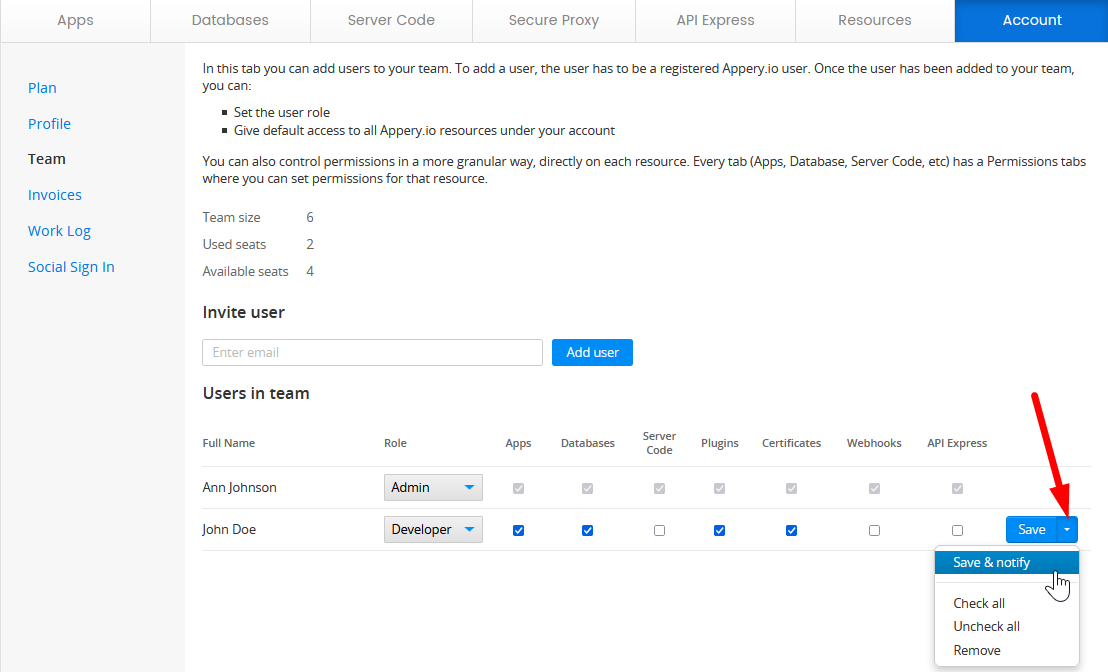
ChangesYou will have three options for changes: Check all, Uncheck all, and Remove. Once you have selected the correct box you have the option to save or save and notify. Saving and notifying will send a message to the user that their permissions have changed.
Adding User Seats
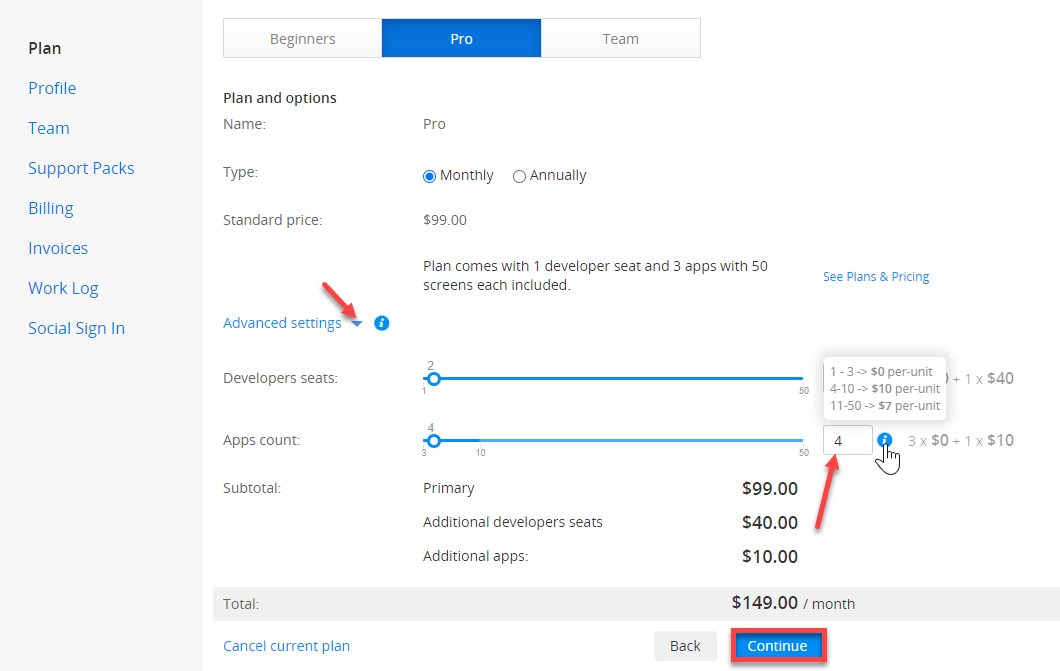
Important!To invite new users you must obtain seats first. Additional user seats are available within an active Trial, Pro, Team, or Enterprise plan. User seats can only be shared with Trial plan users. If a user has any other plan besides the Trial, he/she needs to switch/downgrade to the Trial plan.
Go to Account > Plan, and click Change plan. In a new window, enter the number of needed user seats, fill in your billing information, and click Continue:
Inviting Users
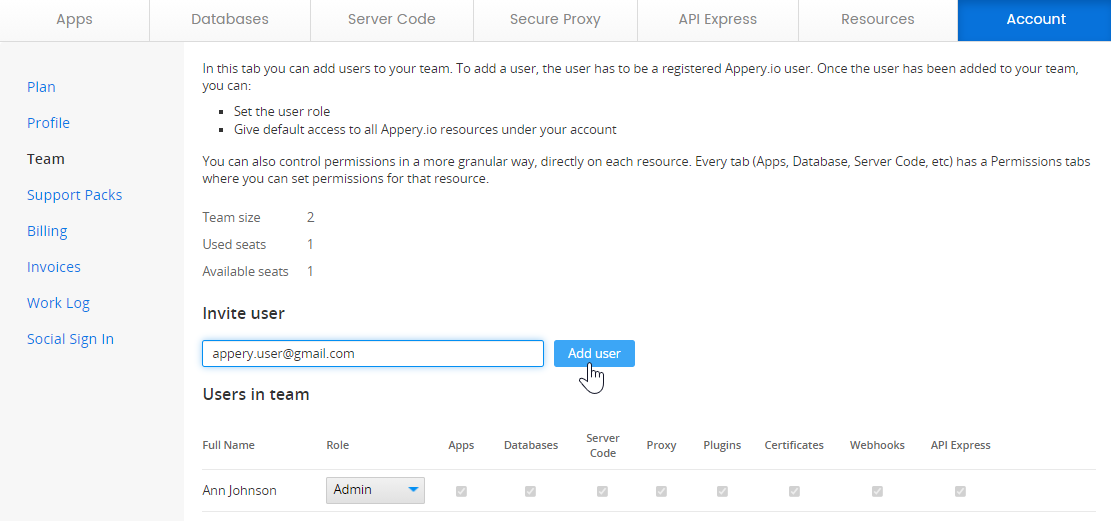
Once you have purchased additional seats for your team members, you can add users to your team. To do it, go to your account Team tab and provide the users' email addresses to invite them to the team:
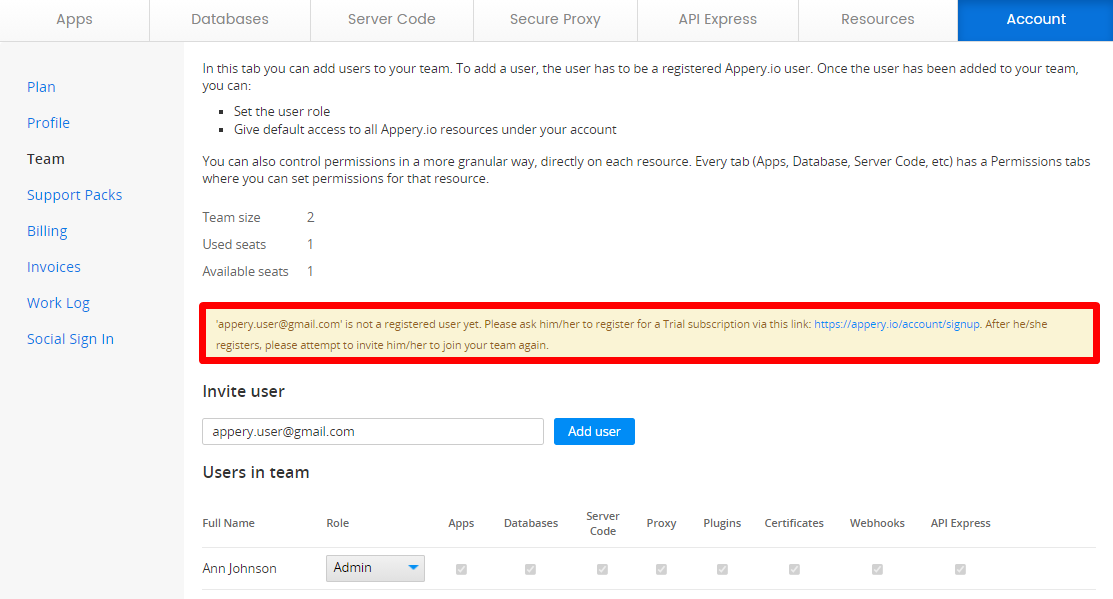
Before new users can join your team, they will be asked to sign up (if not registered yet). Until they register, the Admin will see a pending notification:
Users and TeamsA user can belong to only one team, and they may only have one role within that team.
How to Join a Team after Receiving an Invitation
Open your Account tab to see the invitation: you can either join the team or decline the invitation:
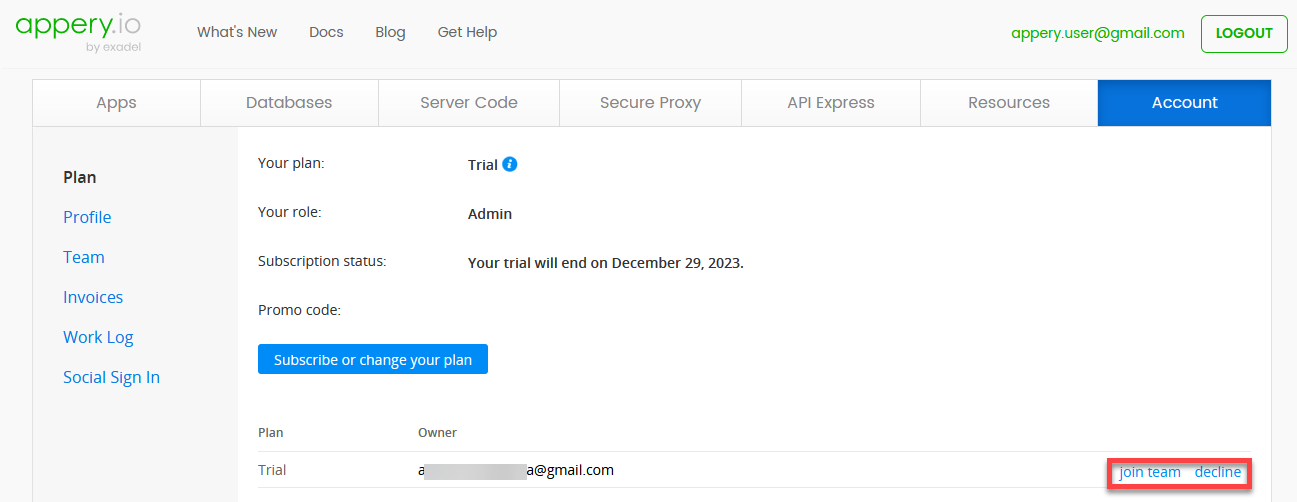
After clicking the join team link, you would get the warning notifying you of the changes that will be made to your account and that you will be asked to additionally agree to:
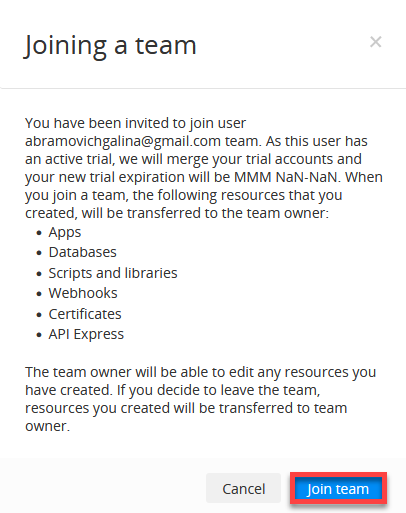
Note that all your previously created resources will be transferred to the new team owner: if one leaves the team, all the resources he/she has created in that team will be transferred to the new team owner.
Trial AccountsIf you accept an invitation from a user with a Trial account, your accounts will be merged and the nearest trial expiration date will be chosen.
Leaving a Team
To leave the team, go to the Plan tab under Account, select the Leave Team option, and confirm:
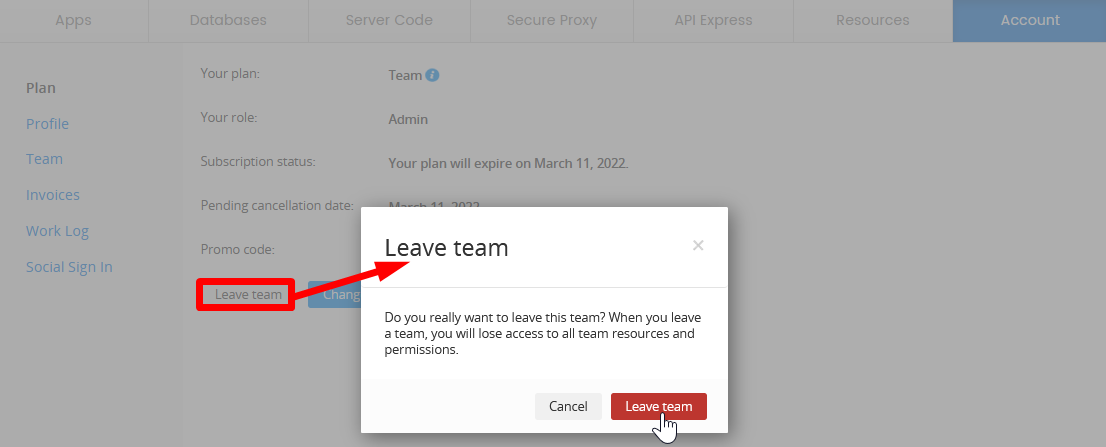
NoteThe users with roles other than Admin can change their plan only after they leave their team.
How to Manage SeatsPlease be aware that after a team user is removed from the team, the vacant developer seat is returned to the owner and can be used to invite new team members.
To remove the user seat you do not need anymore, go to Account > Change plan, modify the seat number, and apply the necessary changes to the plan by entering billing info again (this step is obligatory).
Please note: if you make any changes to your plan (edit number of users, upgrade/downgrade), you will need to select one of the current plans as our grandfathered plans cannot be modified (check the section My plan is grandfathered. Is there anything I should know about a grandfathered plan?).
User Roles and Permissions
Admin Role
Only Admins can edit billing information, buy support packs, and have full access to all the facilities within the project (creating, viewing, editing, and deleting resources/items).
There can be more than one admin on each team; if so, any of them can manage the subscription and billing information.
Only Admins can access the Plan, Profile, Team, Support Packs, Billing, Invoices, and Social Sign In tabs. Also, under the Account tab, Admins can view information on their plan, role, subscription, and next billing date.
Additionally, promo codes generated by Appery.io can be entered here to get discounts for some of its services. Changing or canceling a plan, or leaving the team is also accessible from this tab.
App Permissions
Note that only Admins can access the project Permissions tab where managing users and their permissions within this particular project is possible:
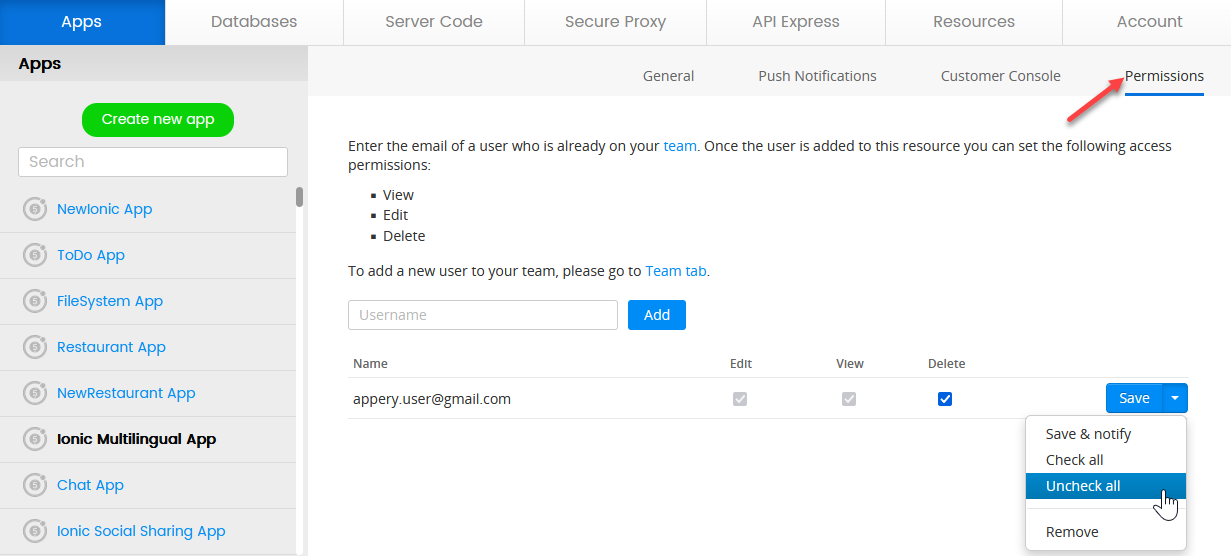
The user that does not meet the above requirement will get this notice:

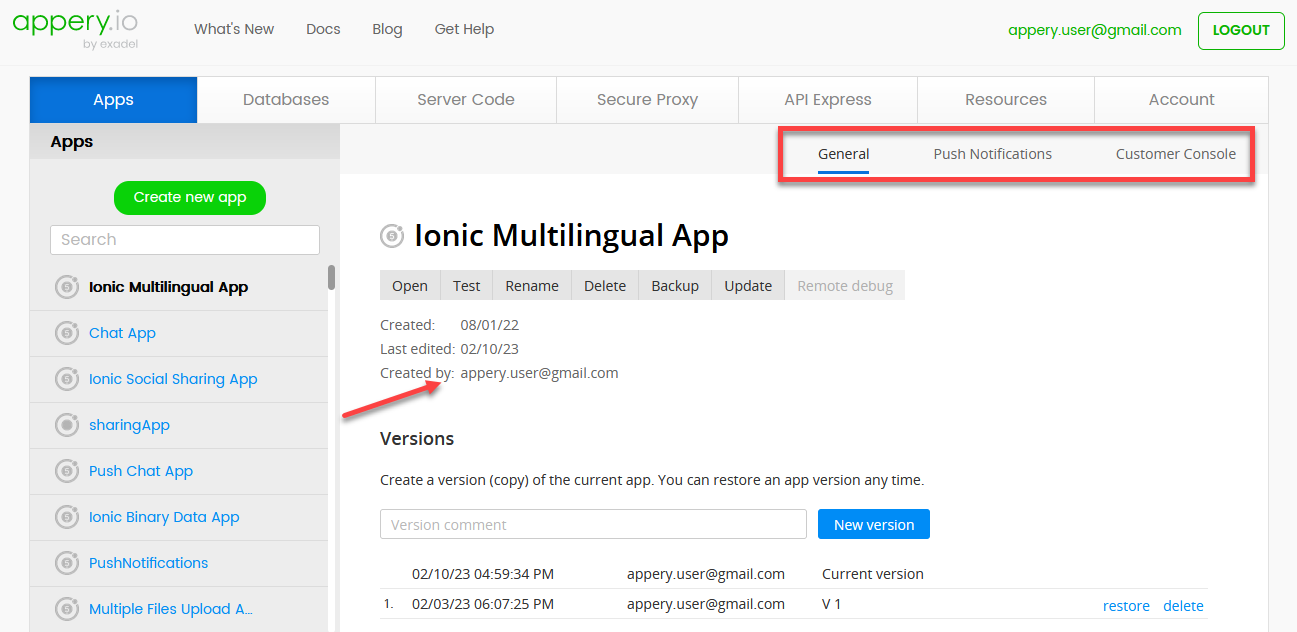
However, [email protected] (being a Developer on the project and the creator of this app) has access to the app:
ManagementAdmins can remove Team Leads/other Admins from the team, but Admins can’t remove their own account until a new Admin is assigned to the project.
Admins can’t disable their own permissions, as well as other Team Leads‘ permissions.
Team Lead Role
Team Leads manage the overall team workflow, but not its subscription; they can’t buy support packs either. By default, delete permissions are enabled for Team Leads as well as for Admins. Like Admins, Team Leads can remove users and enable/disable or delete resources/items for a particular user.
Team Leads can also change roles for Developers and Testers. They can also manage permissions for Developers and Testers and remove them from the team, but they can’t set/manage any permissions for Admins and Team Leads (including themselves). But, they can switch or downgrade any team users except admins.
Downgrading Team LeadsTeam Leads can downgrade to Developers or Testers, but will be unable to revert this migration later.
Developer Role
Developers can’t manage the subscription and billing information, change the roles of existing, or invite new users. By default, Developers only have viewing, editing, and sharing permissions - deleting items is not allowed.
Adding Permissions to DevelopersPermissions to any resource/item (including creating and deleting them) can be enabled/disabled for a Developer by Admins/Team Leads from the Permissions tab under Apps, Databases, Server Code, Secure proxy, Plugins, or Resources.
Tester Role
By default, Testers may only view the resources/items enabled by Admins/Team Leads. The options like Rename, Delete, Backup etc. are inactive. They can’t create new items on the project either.
In the builder, when making any changes to any of the items and trying to save them Testers will get a message:
"You have View only permissions to this app. You can make changes but you won't be able to save them".
Added PermissionsEdit and/or Delete permissions to a particular resource/item can be enabled for Testers by Admins/Team Leads from the corresponding Permissions tabs. A Tester can then make any changes to this particular resource/item, except creating new ones.
Updated 7 months ago
