App Settings
App Builder app settings.
This page covers various app settings, including settings for binary iOS and Android builds.
App Settings
When you are in the Appery.io App Builder, go to Project > App settings. Here, you’ll have the ability to configure many parts of your app.
The App settings tab has the following views:
- General – general information about the project: its name and description, start page, page size, and color scheme;
- Resources – built-in and user-added resources;
- Android binary – all necessary Android
.apkproperties to prepare your app for the Google Play Market; - Android permissions – list of selectable permissions;
- Android features – list of selectable features;
- iOS binary – developer information and certificates needed to build an iOS binary;
- iOS keys – list of keys, for which you can choose the value;
- Cordova plugins – settings to manage Core and Imported Cordova plugins;
- Npm modules (Ionic only) – used for managing the order of loading assets to Ionic-based applications;
- Components - settings for UI components;
- PWA – settings that prepare the app to be distributed as a PWA.
- Cordova config – used for configuring
config.xmlin the app source files.

jQuery Mobile app settings
Important Note!The option of creating new apps with the jQuery Mobile framework was removed but we still support the projects that were created with it earlier.

Ionic app settings
General
The General page has the following properties:
App Name
The name of this app. The app name can be edited on the app details page (after you exit the visual App Builder).
App Description
A short description of this app.
Enable Remote Debugging
Turns on the Remote debugging option which allows testing and debugging the app while testing it in the browser.
Enable Debug Console
Turns on the Debug console option which allows testing and debugging the app while running in the browser or on the device.
The following options are available in Ionic apps only:
Assets (Ionic)
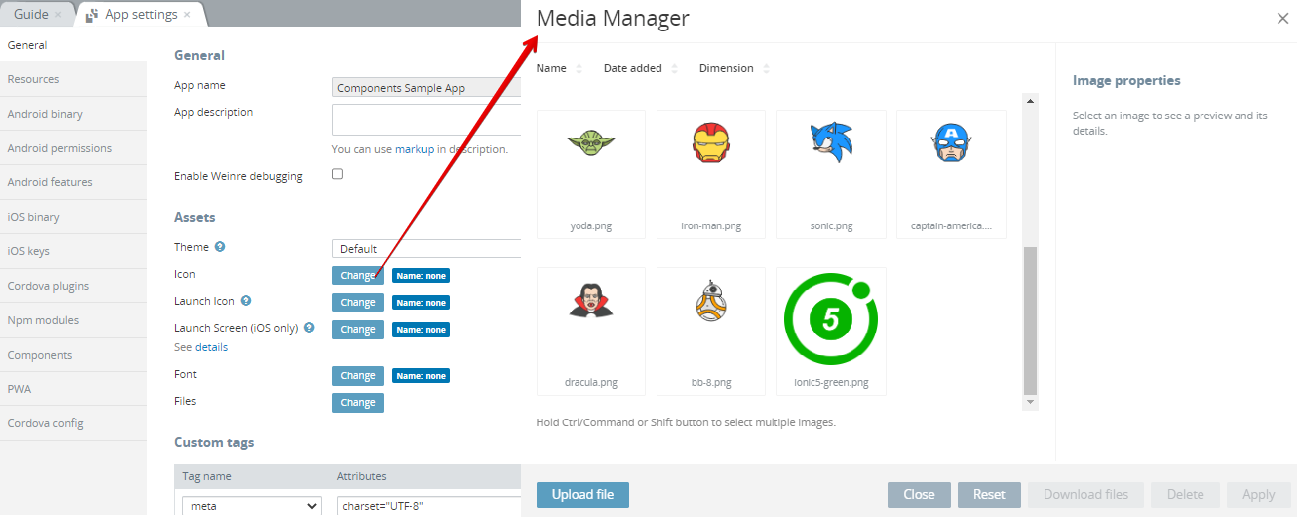
Allows access to the Theme Generator, Files Manager (along with the Media Manager) for uploading the needed files (for example, icons or fonts) to be used in the app. Click the icon Change button to open the Media Manager:
Launch Icons and Screens Generator
You can significantly simplify the process of adding launch icons and screens (iOS only) to your app by using our built-in generator instead of uploading sets of files of needed sizes via the Media Manager under the iOS binary/Android binary tabs.
Important!Note that Appery.io Launch Icons and Screens Generator works for projects with the latest Cordova libraries versions.
To do it, follow some simple steps:
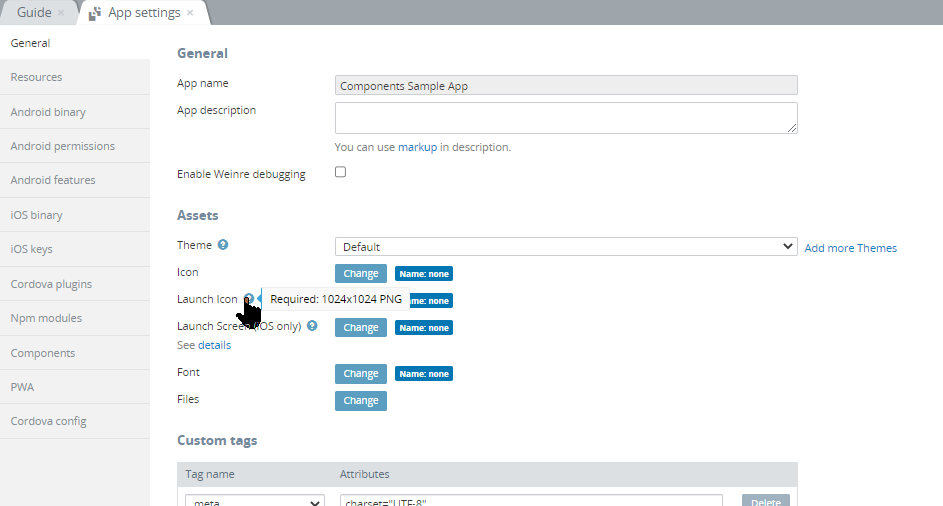
- Go to the General tab and click Change to upload the image file as a launch icon:
and/or as a launch screen (iOS only):
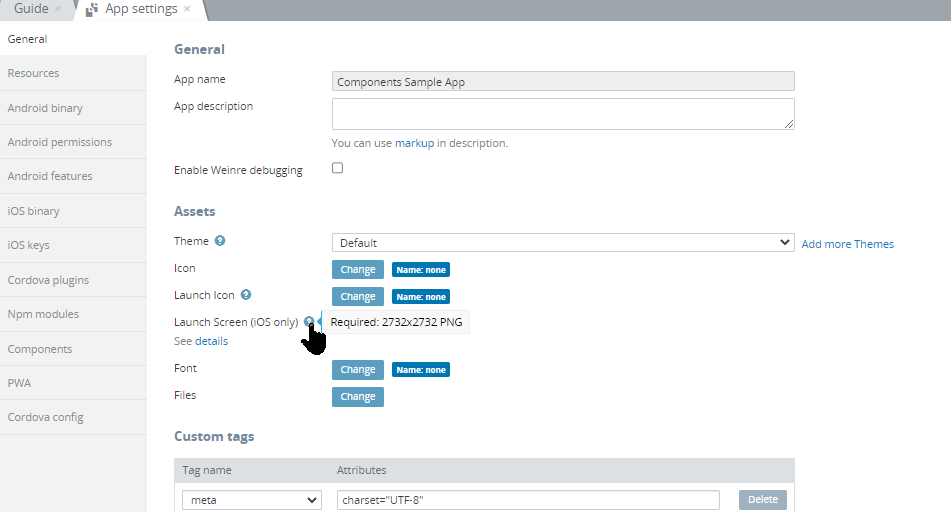
Important!Note that that only the
1024x1024 .PNGfiles for launch icons and2732x2732 .PNGfor launch screens (iOS only) are accepted.
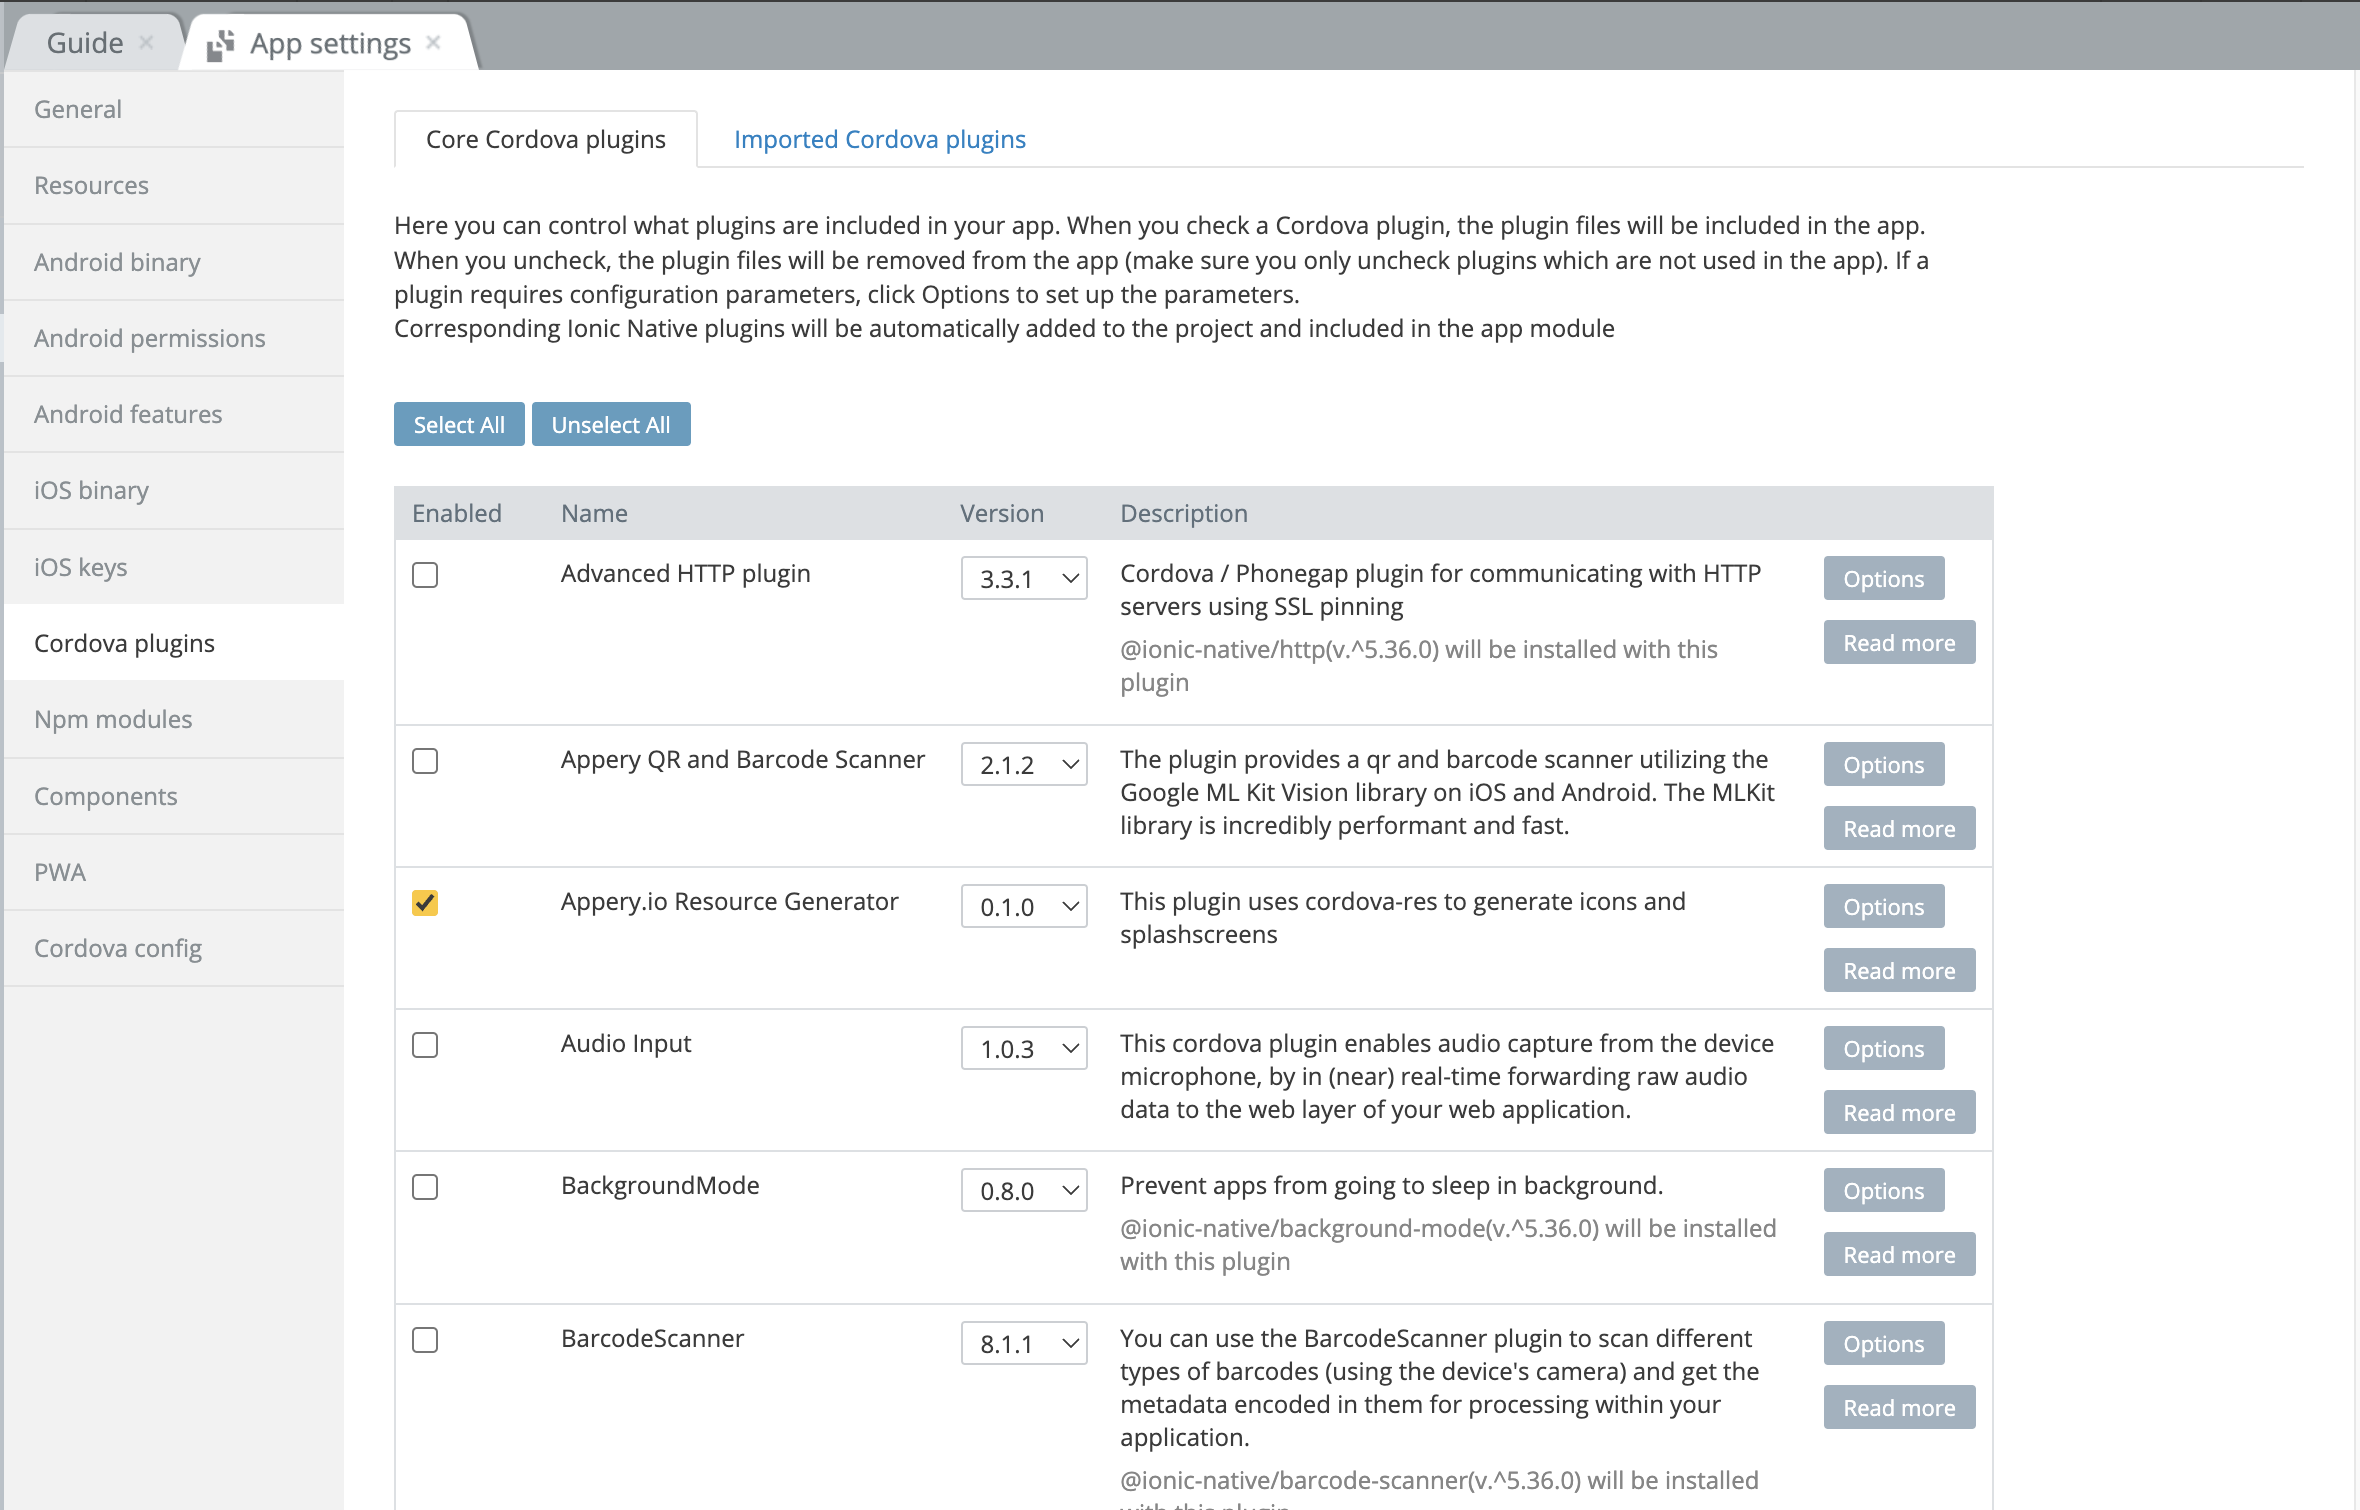
- Switch to the Cordova plugins >Core Cordova plugins tab and make sure that the Appery.io Resource Generator plugin is enabled (it is enabled for all new Ionic projects by default):
Now, you can generate icons and splash screens automatically and this is how it can look like on the device:
Please note that you are also free to upload some specific files independently if you need to do so.
Managing IconsIn a JQM project, to upload an icon for Android binary, click Change to start the Media Manager then, upload the image file and then confirm by selecting it.
In an Ionic app, you need to go to the corresponding section, Icons, for examples, and upload all the needed icons independently or use the Launch Icons and Screens Generator feature.
Custom Tags (Ionic)
The Custom tags section allows adding custom HTML meta tags that will be added to the app index.html page.
The following options are available in jQuery Mobile apps only:
Icon (JQM)
An icon that can be selected for the app.
Start Page (JQM)
The first page to be launched when running the app; may be selected from the list of all app pages.
Theme (JQM)
The color scheme of the app.
Swatch (JQM)
Based on the selected theme, this swatch will be the default for project pages and components if their Swatch property is set to Inherit.
Default Page Size (JQM)
Set a custom device/page size.
If the Custom size box is checked, the Default page size list becomes disabled. The selected size will be applied to all newly created pages. Additionally, screen size can be set for each page separately, in its PROPERTIES panel.
Render All pages in One HTML file (JQM)
jQuery Mobile framework option to place all HTML files into one file (multi-page template). This usually results in better performance.
Resources (Ionic)
The Resources view has the following options:
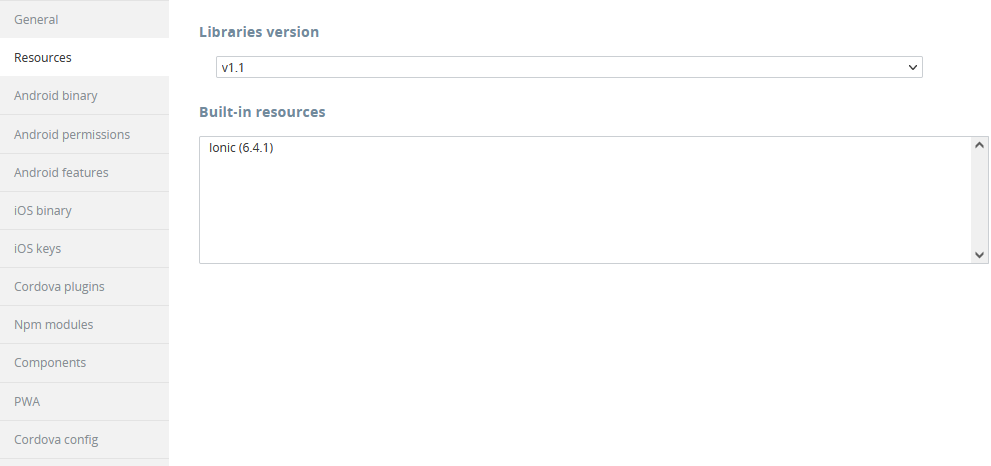
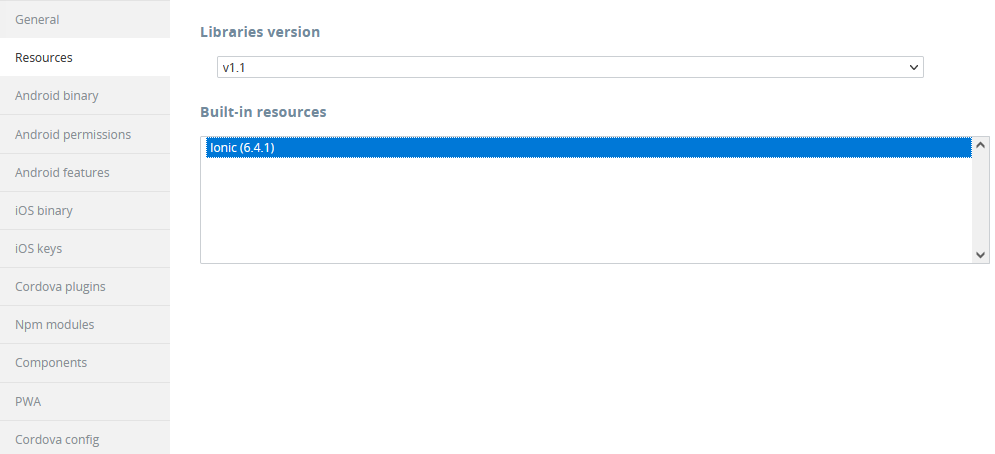
Libraries version
Inside the App Builder, a Library is a collection of one or more JavaScript files that are automatically included in a new app. For example, the following JavaScript files are included when creating a new Ionic app with version 1.1:
A library and its resources impact what app code is generated by the platform.
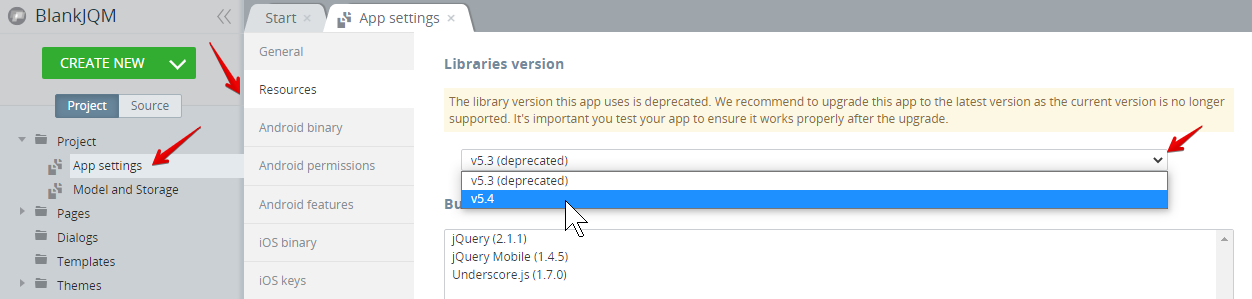
If one of the JavaScript files needs to be updated, a new library version will usually be created. A new app is always created with the latest library version. An existing app that has been created with the old version retains the old version.
Updating Library VersionWe highly recommend upgrading your app(s) to the latest version available. To do that, in your app, go to App settings > Resources, select the newest library version and click Apply.
When you update the library version, new app code will be generated which may impact the app logic and how it works. It's important you to test the app to ensure it works properly.
So, please make sure you test your app to check if it works properly after performing such an upgrade.
Angular Version 1.0 and 2.0The users with Angular version 1.0 will also need to re-import the Apperyio Ionic Push plugin to be able to send push messages.
Built-in Resources
A list of libraries and their versions that are used by Appery.io and correspond to the selected library version:
Resources (jQM)
The Resources view of the JQM project has the following options:
Libraries Version
A set of libraries that are used in an app. A new app always uses the newest library version.
A library and its resources impact what app code is generated by the platform.
If one of the JavaScript files needs to be updated, a new library version will usually be created. A new app is always created with the latest library version. An existing app that has been created with the old version retains the old version.
Updating Library VersionWe highly recommend upgrading your app(s) to the latest version available. To do that, in your app, go to App settings > Resources, select the newest library version and click Apply.
When you update the library version, new app code will be generated which may impact the app logic and how it works. It's important you to test the app to ensure it works properly.
So, please make sure you test your app to check if it works properly after performing such an upgrade.
The current JQM lib version (5.4) includes the latest version of jquery (3.6.0), so to make sure your JQM projects are published to app stores without any security warnings, please select it under App settings > Resources > Libraries version:
Important!Please be informed that the .size() method has been removed in jQuery 3.0.
So, if your project uses it it can stop working after library update.
To fix this issue, please replace it with the .length property to refer to the number of elements in the jQuery object.
Built-in Resources
A list of libraries and their versions that are used by Appery.io and correspond to the selected library version:

jQM Libraries versions
User-defined Resources
A list of external JavaScript resources added to the app. Use the Up/Down buttons to change the order in which the resources will be loaded.
Changing Library VersionPlease read the Library Version section before changing the library version.

jQuery Mobile app resources
Internal JavaScript Resources
New resources can be dynamically added to this table (for example, when adding JavaScript via CREATE NEW > JavaScript) or deleted from it by a user. They are also draggable and droppable and validation works for the attributes input.
Internal SCSS Resources
New resources can be dynamically added to this table (for example, when adding SCSS via CREATE NEW > SCSS) or deleted from it by a user. They are also draggable and droppable and validation works for the attributes input.
Android binary
In this section, you can configure Android binary file settings, upload launch icons and manage certificates.
In the Android binary view, you can set the properties necessary for generating an Android release binary version of your app that can be published to the Google Play Store:
- Set your app name and icon to be displayed on the device;
- Set your app version code and name (important when you publish your app to the Google Play Store);
- Select the SDK versions to be supported (more information about the Android SDK Platform can be found here);
- Select the build type for exporting app binary and enable/disable the automatic update option;
- Set the key parameters and add certificates.

Ionic 5 Android binary settings
Migration to Android 12Starting from 1 August 2022, Google Play requires that all new apps meet target API level 31 (Android 12).
In this connection, all Android built apps will be migrated to the SplashScreen API to ensure that it displays correctly in Android 12 and higher.
Moreover, starting on November 1, 2022, app updates must target API level 31 or above and adjust for behavioral changes in Android 12.
In conformity with this regulation, uploading custom launch images will be discontinued starting in Android 12 as the system will always apply the new Android system default splash screen on cold and warm starts for all apps.Also, to meet the target API level 31 presently required for publishing on Google Play, all the applications built with Appery.io were automatically migrated to Android 12. This migration involves no additional actions on your part but, if, for any reason, downgrade to an earlier version is needed, you can do it under App settings > Android binary >General tab.
Automatic Update
The automatic update feature allows publishing app updates without going through an app store.
Learn more about Automatic Update here.
Android permissions
In this section, you can set the Android permissions that your app requires.
Permission AdviceRead more about Android permissions. Be careful when adding/removing permissions. It’s not a good practice to give your app permissions which it doesn’t require. On the other hand, make sure to check permissions that your app requires or it won’t work properly.

Android permissions
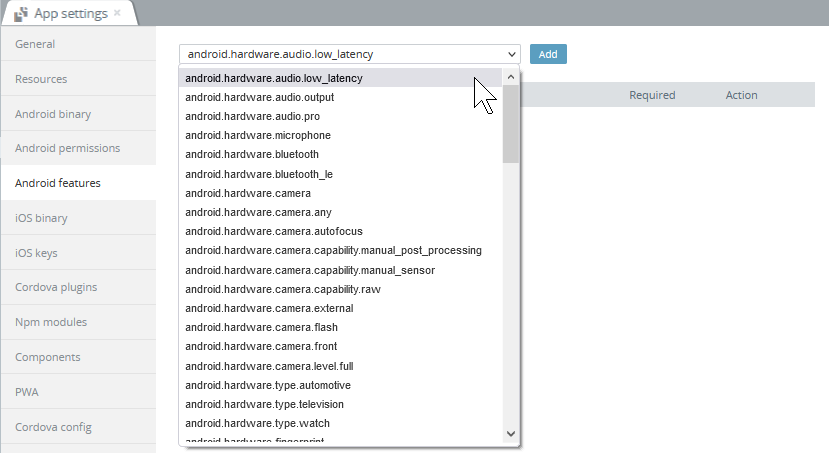
Android features
A list of selectable Android features that can be added to the app:
iOS binary
In the iOS binary view, you can set all developer information and certificates you need to generate an iOS App Store package:
- Set the app label and version;
- Select the build type for exporting app binary and enable/disable the automatic update option;
- Upload the icons and launch images of standard sizes;
- Upload the distribution certificate and provisioning profile.
You can specify several different icons for use in different situations. Appery.io allows uploading icons for apps running on iPad, iPhone, and iPod touch. Small icons are used when displaying search results, high-resolution icons are used for devices with Retina displays.
App IconsThe app icons file should preferably be a
.PNGfile with no transparency.

iOS binary settings
Note that you can also choose to generate icons and splash screens automatically by using the Launch Icons and Screens Generator feature.
Automatic Updates
The automatic update feature allows publishing app updates without going through an app store.
Learn more about Automatic Update feature here.
iOS keys
In the iOS keys view, you can configure the appearance of your app at launch time, and the behavior of your app once it’s running.

iOS keys
Cordova plugins
Core Cordova plugins
In this view, you can select what plugins are to be included in your app:

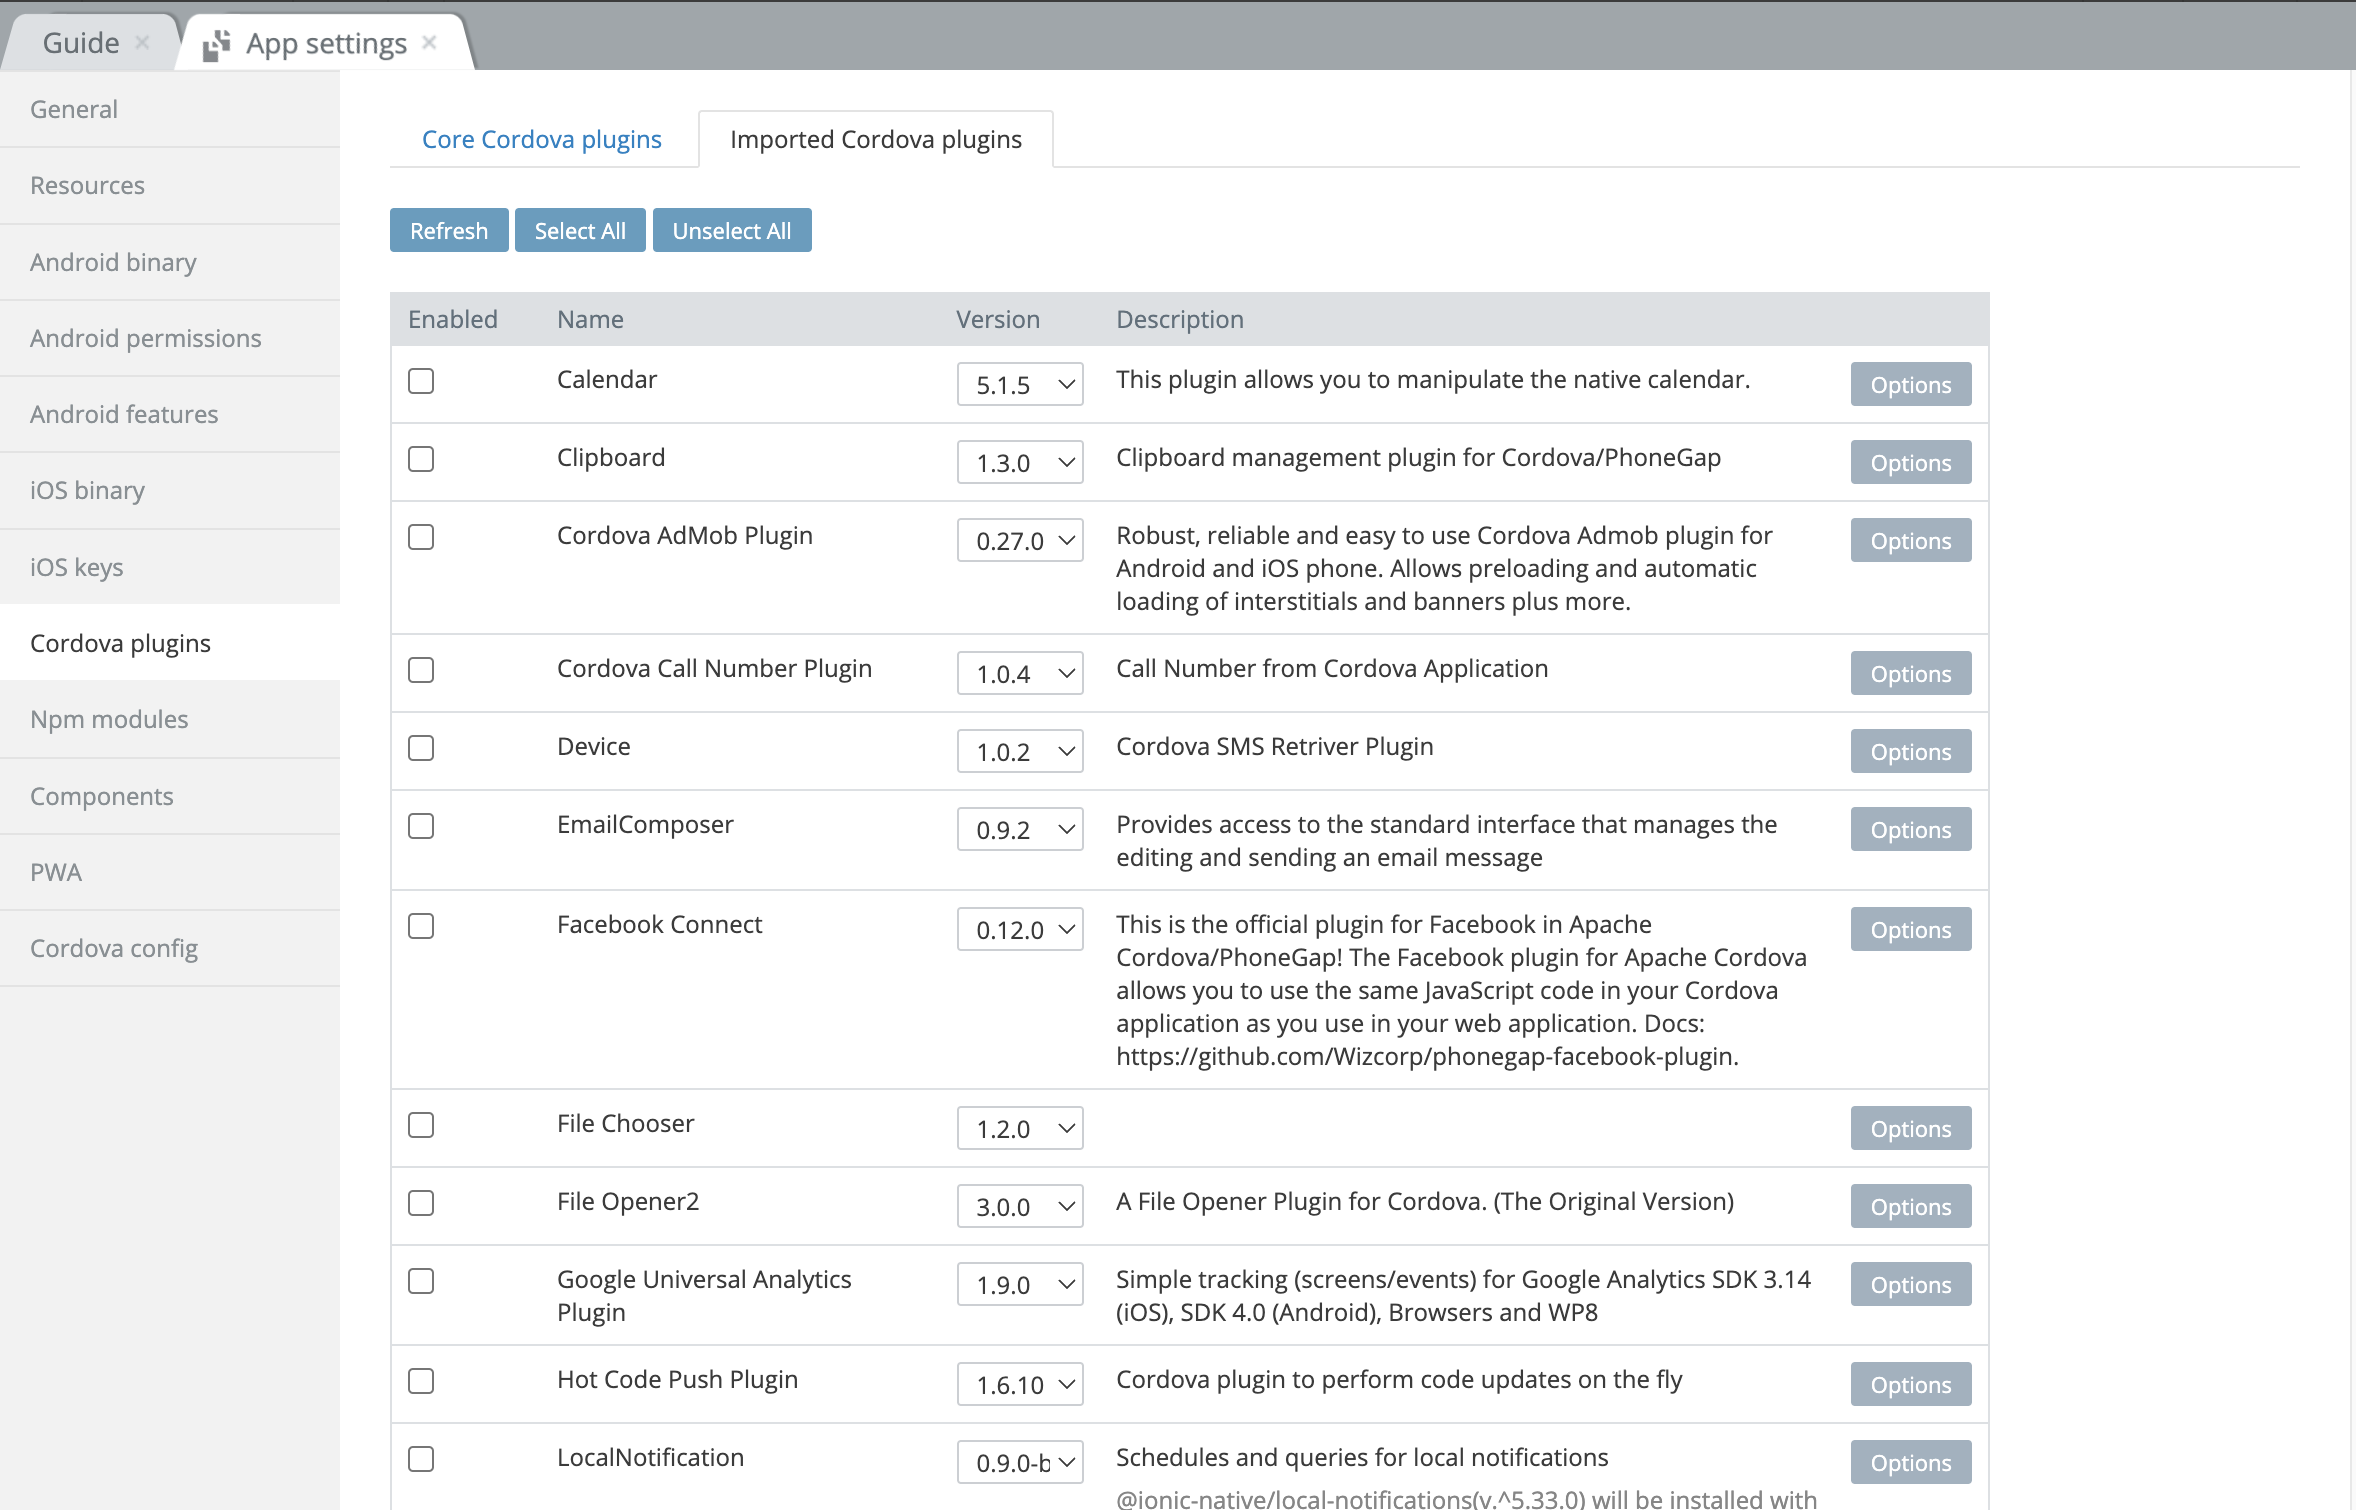
Imported Cordova plugins
When you install a custom Cordova plugin, additional permissions might be checked automatically that are required for the plugin to work properly:
Npm modules
This view can be used for managing the order of loading assets to Angular-based applications as it provides the option of defining the module's dependencies: sequencing the added files in the necessary order:

Npm modules Tab
Using Native APIs from Ionic: ExamplesYou can check this section to review how to add native device functionality to your Appery.io Ionic application.
You can check more about npm packages and modules here.
Components
This section allows for configuring Google Maps and Internationalization and Git settings:

Components Tab
Google Maps
The Google Maps (Ionic) or Map (jQuery Mobile) component API key is required for the component to work properly. Read how to get an API key. The same API key will be used for all Google Maps components in an app. If you are creating a hybrid app, you don't need to set any API key restrictions.
Internationalization
Allows use of the internationalization (i18n) library to build multilingual apps.
You can check here to learn how it can be used in an app.
Git settings
Define the Github repository and token to use GitHub for tracking changes in your application.
You can check here to learn how it can be used in an app.
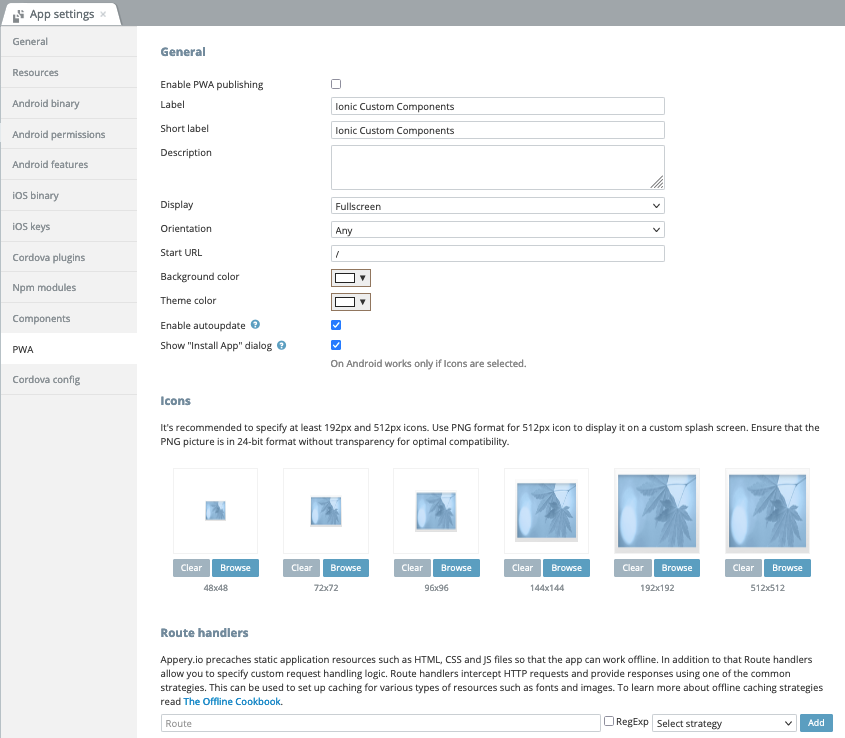
PWA
This section offers many settings that can prepare the app to be distributed as a PWA:
Cordova config
In this view, you can configure theconfig.xml in the app source files.
For example, you can easily add custom sounds to both Android and iOS app versions of your Appery.io project. You only need to select the needed tab under the Project > App Settings > Cordova config: Android and/or iOS:

Ionic Cordova config Android tab
Important!Note that, for Android, full path is required while iOS uses the short link to the file:

Ionic Cordova config iOS tab
Important Note!Note that iOS only accepts
.wav,.aiff, and.cafextensions, whereas Android accepts.wav,.mp3and.oggextensions.
Also, iOS has an additional length restriction of the audio clip: it should not exceed 30 seconds.
Launch Images and Launch Screens
If you want special icons and/or launch images for iOS and Android devices for your app, you can upload them under the iOS binary/Android binary tab. As the screen size on devices varies, you can set different image sizes for your launch images.
A splash (launch) screen is a screen that is shown after a user starts an app and before the app has loaded. You can also add your own custom launch storyboard images for such screens for iOS devices under the iOS binary tab.
Important Note!Starting from 1 August 2022, Google Play requires that all apps meet target API level 31 (Android 12).
In this connection, all Android built apps will be migrated to the SplashScreen API to ensure that it displays correctly in Android 12 and higher.
In conformity with this regulation, uploading custom launch images will be discontinued starting in Android 12 as the system will always apply the new Android system default splash screen on cold and warm starts for all apps.Please read here to learn about how to migrate your existing splash screen implementation to Android 12 and higher.
Just click Change to open the Media Manager where you can upload and/or select the needed image(s):

Launch Icons and Screens GeneratorYou can significantly simplify the process of adding launch icons and screens (iOS only) to your app by using our built-in generator instead of uploading sets of files of needed sizes via the Media Manager under the iOS binary tab.
Image Type And SizeAccording to the Cordova policy, all images to be used as splash screens should be uploaded in the
.pngformat only! Make sure your image files correspond with this rule!
You will need to Export the application as binary, and install it on the device to see the launch images/screens.
JQM And AngularJS ProjectsTo use launch images in JQM projects with libraries version 3.0 or angular projects, go to: Project > App settings > Cordova plugins and check the Splashscreen (Cordova Splashscreen Plugin) under the Core Cordova plugins tab.
Inserting Link into Description Using Markup
You can add a link using markup language in the following places in the App Builder:
- App description;
- Plugin description;
- App template description.
To insert a link use the following format: [link_url link_name].
For example, the markup [http://appery.io/ Appery.io main page] creates the following link: Appery.io main page. All text after space is used as the text for the link name.
Updated about 1 year ago