Ionic Internationalization Sample App
The tutorial demonstrates how to use ngx-translate third-party Internationalization (i18n) library to build a multilingual Ionic app.
Introduction
This sample app demonstrates a multilingual app created with Ionic by using ngx-translate third-party Internationalization (i18n) library. To test, try clicking the language switching buttons in the header along with clicking the SUBMIT YOUR FEEDBACK button:
For more details on using ngx-translate library, visit this documentation page.
Downloads and Resources
You can also try it yourself by creating from the backup:
- Download the app backup file.
- Click From backup and select the project backup file on your drive.
- Type in the app name.
- Click Create.
NEW: One-Click Template Installation!You can now enjoy the one-click-away option of installing the sample app: simply click the button below and in a moment, your app is ready to start! There’s no need to go to the Create new app dialog or download the template backup with further installing it.
But if you are interested in the detailed tutorial, please follow the steps below.
Creating New App
In this tutorial, we will demonstrate how to build a simple multilingual app using ngx-translate library.
- From the Apps tab, click Create new app.
- Select Ionic Blank as the application type, enter an app name, and click Create
- Unfold the Pages folder and select the Screen1 page.
- Select the Page component from the breadcrumbs (you can also use the OUTLINE view to locate the needed component) and set the page Footer property to False as we will not use it in the app (you will also be asked to confirm changing the property).
Setting up Internationalization
Defining Default language
Internationalization is enabled by default for all Ionic projects: App settings > Components of the Project Tab folder but you will need to define the Default language that will be displayed to your users on the app start:
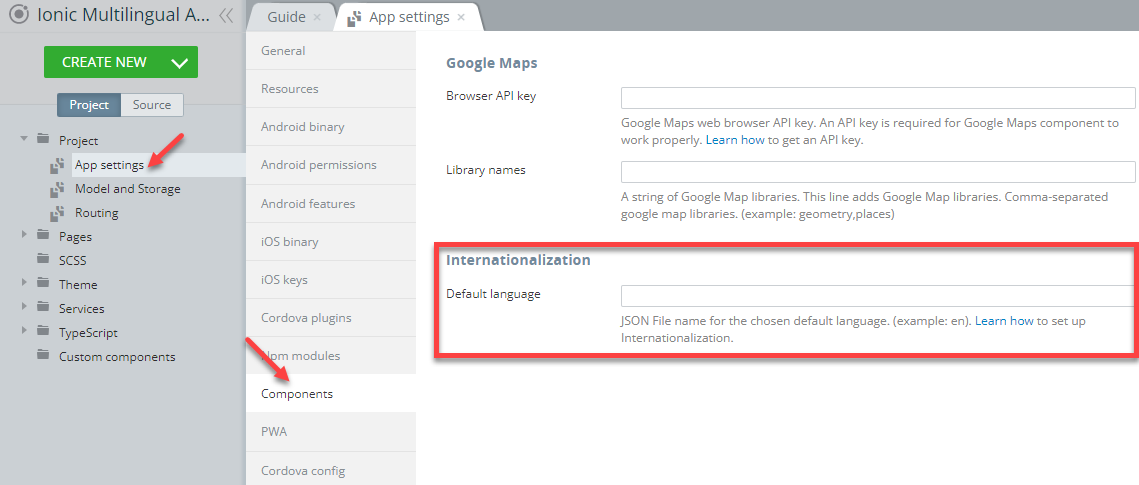
Internationalization option
This will define the language your app starts in and can be easily changed (for example, to es (Spanish) or de (German)) any time.
Creating Translation Files
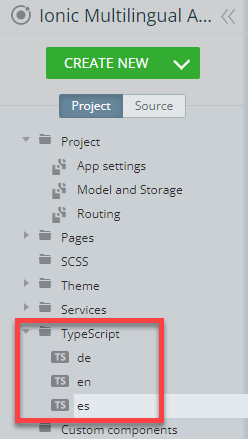
- So, it's time that we created the first translation file. Select CREATE NEW > TypeScript, from the drop-down, select the Angular i18n language type and enter its name, e.g. en. To confirm, click Create Script.
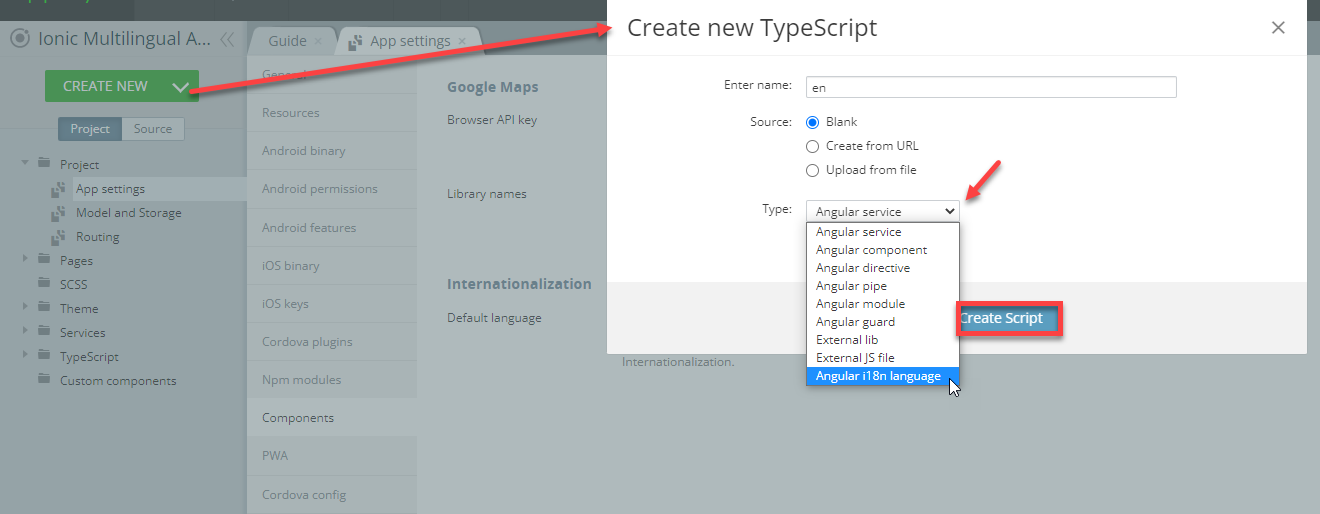
New language TypeScript
- Go back to App settings > Components to set the default language of your app, for example, English.
- Enter the appropriate JSON file name (here, en) in the Default language box.
Important Note!Make sure that the app default language and the TypeScript file (should be created additionally) have the same names:
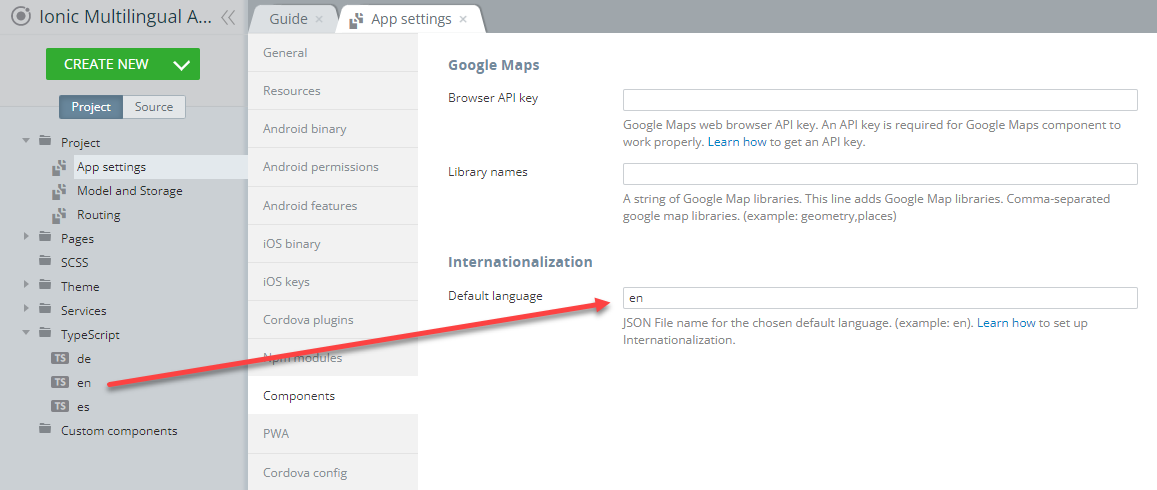
Default language: en
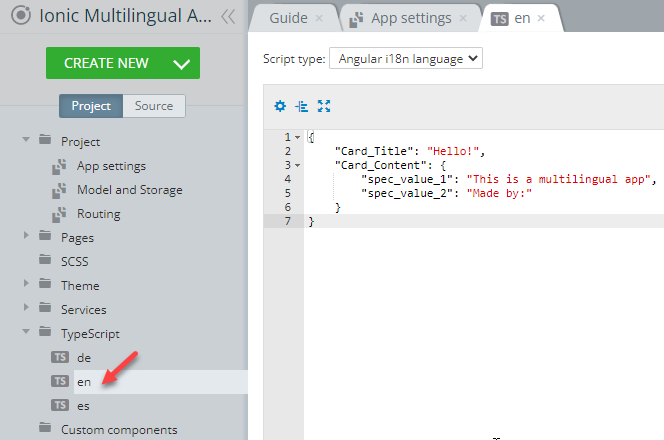
Defining JSON Translation Files
The only limitation of using the ngx-translate library is that translation cannot be dynamically generated. Therefore, before you can use the library, you need to define translations for all the app texts.
Each language is stored in a separate JSON file. It is represented as a set of key-value pairs, where the key is an identifier used by ngx-translate to find the translation strings, and the value is the actual text in the specified language.
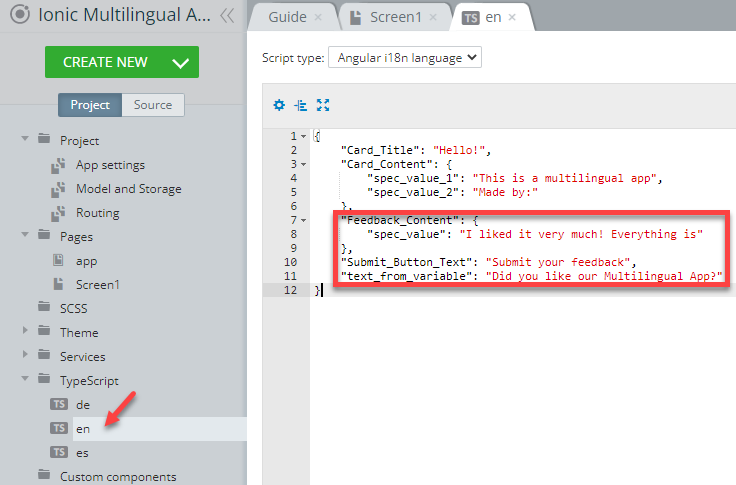
- Now, let's create a dictionary for the English translation. On the left, open the previously created en TypeScript and add some JSON dictionary, e.g:
{
    "Card_Title": "Hello!",
    "Card_Content": {
        "spec_value_1": "This is a multilingual app",
        "spec_value_2": "Made by:"
    }
 }
- Similarly, we need to create dictionaries for some more languages.
So, click CREATE NEW > TypeScript and selecting Angular i18n language from the drop-down, add two more JSON files, de and es.
They will be instantly added to the TypeScript folder of the Project view:
- Now, select them one by one and paste the following pieces of code to the de and es JSON files (for German and Spanish translations) respectively:
{
    "Card_Title": "Hallo!",
    "Card_Content": {
        "spec_value_1": "Dies ist eine mehrsprachige App!",
        "spec_value_2": "Hergestellt von:"

    }
}{
"Card_Title": "Hola!",
"Card_Content": {
"spec_value_1": "Esta es una aplicación multilingüe",
"spec_value_2": "Hecha por:"
}
}Building UI
Now, we are ready to build the app UI.
- Under the app Pages folder, go to Screen1 DESIGN panel.
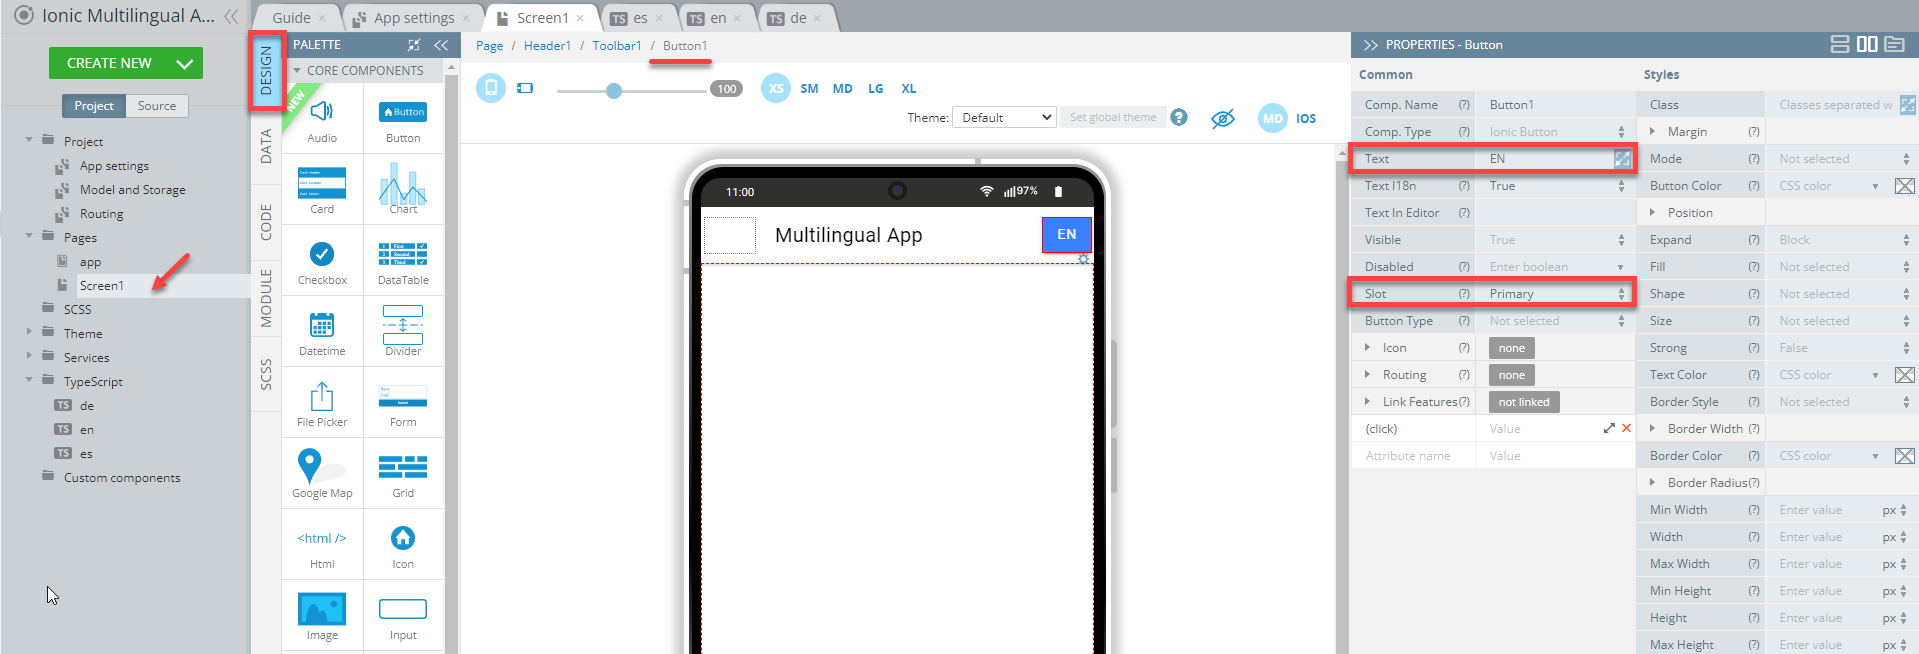
- Click on the Toolbar title in the app screen and change it to Multilingual App by editing the Common > Text property on the right menu:

- Drag the Button component and drop it to the app toolbar. Under the Common tab, change its Text property to EN. Also, change its Slot property to Primary to move it to the right of the toolbar:
- Create two more similar language switching buttons with their Text properties DE and ES, respectively and their Slot property set to Primary.
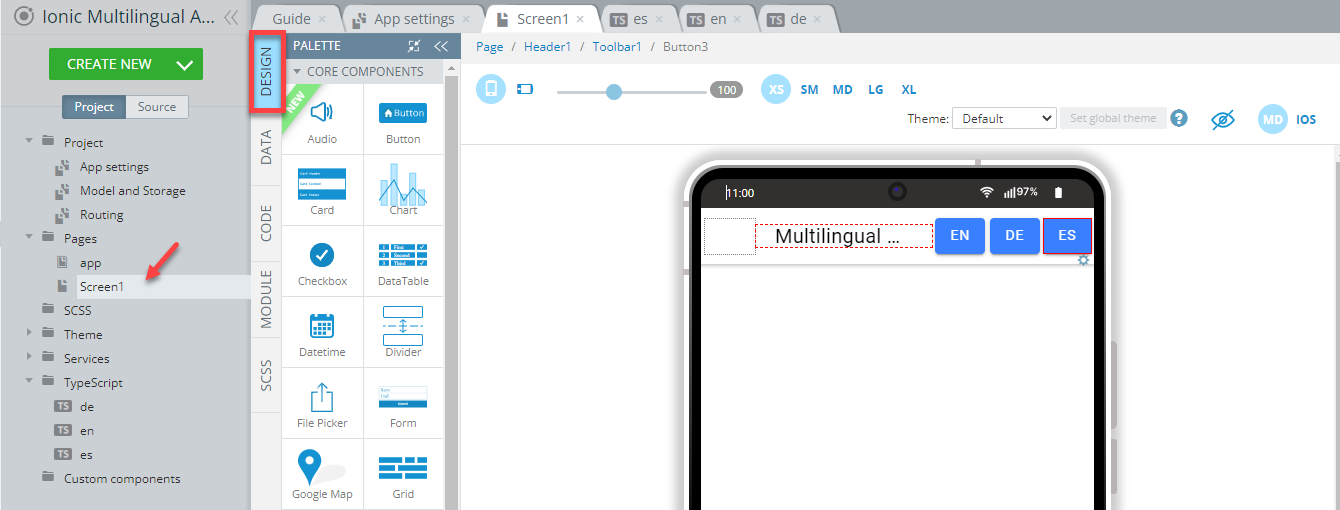
To arrange the buttons on the screen, you can simply use drag & drop.
- Now, drag the Card component and drop it to the screen, select its Card Item Title and set its Common > Title Text property to Card_Title, then switch to the Styles tab and set its Card Title Color property (in this sample app, #741b47 is used):
You are also free to select the CSS color from the available colors or use the Color-picker.
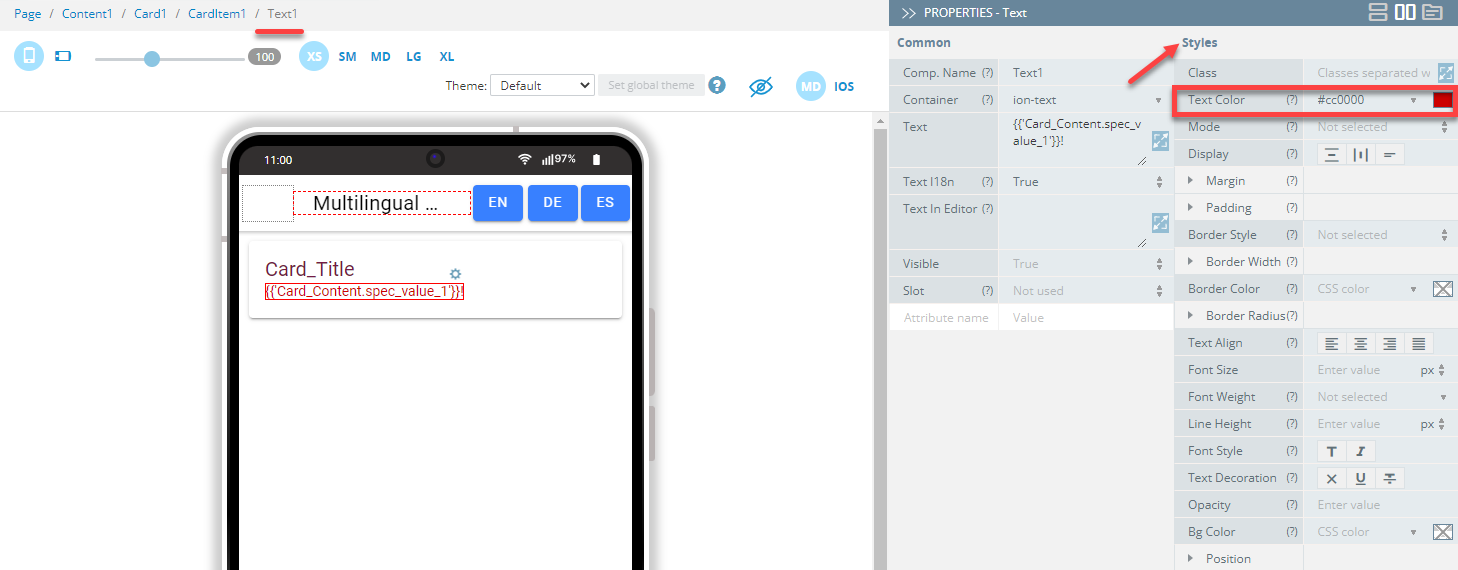
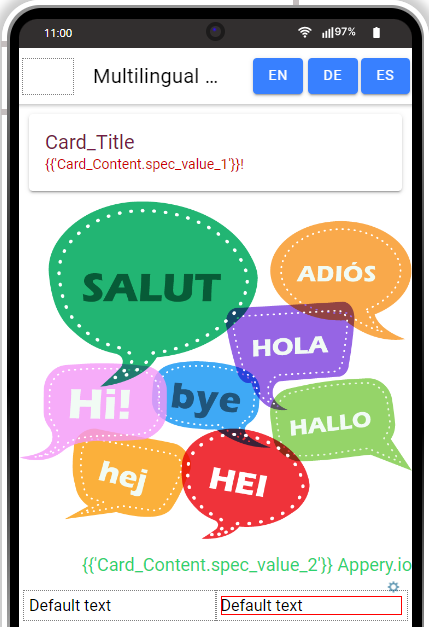
- Now, drag the Text component and drop it inside the Card Item:
- In the Common tab, insert
{{'Card_Content.spec_value_1'}}!for its Text property:

- Now, switch to the Styles tab and set its Text Color property (in this sample app, #cc0000 is used):
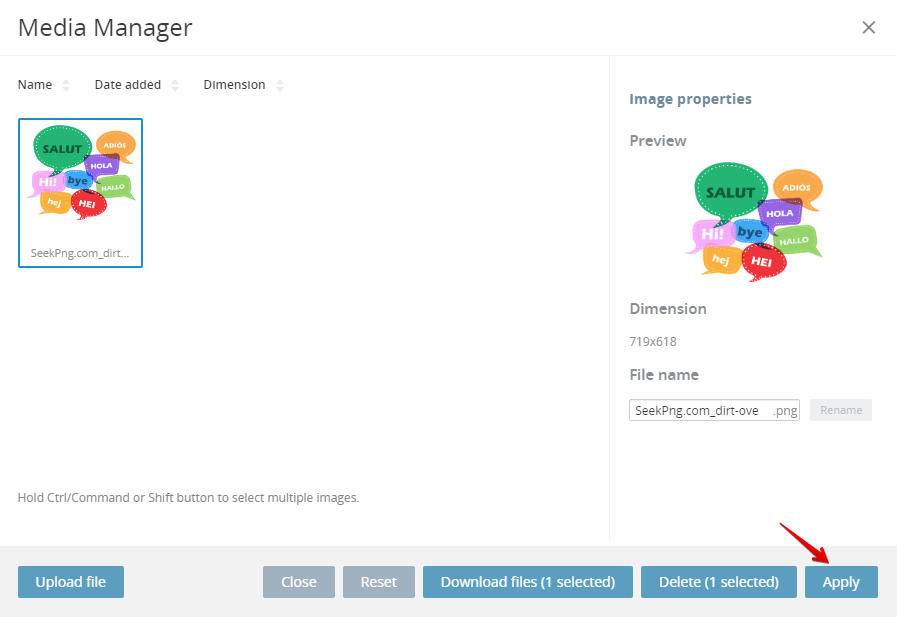
- Next, add the Image component to the screen and upload the needed image file (should be prepared beforehand) by clicking the Change button and using the Media Manager:
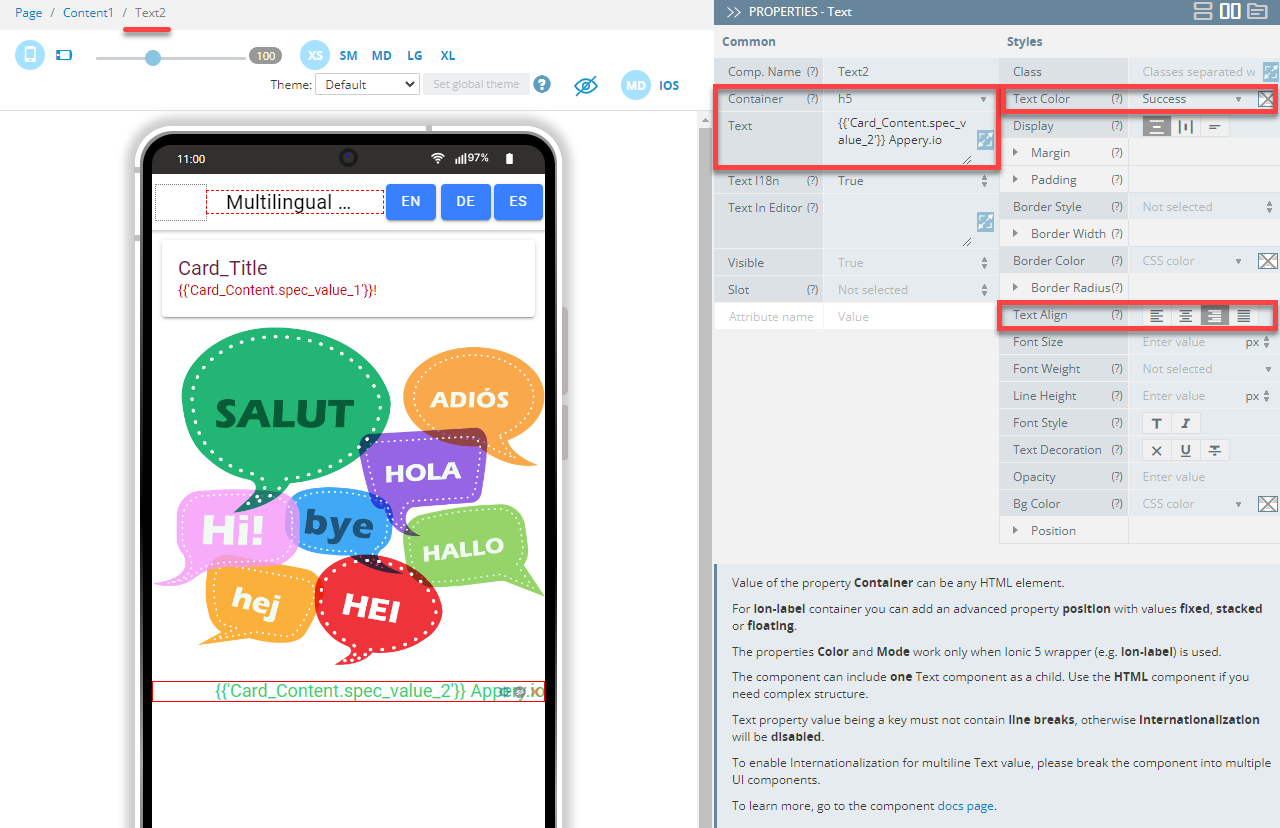
- Finally, add another Text component and under the Styles tab, select Success for the Text Color property and align text to the right under the Text Align property.
- Then, switch to the Common tab and specify its properties like this:
- Container h5
- Text {{'Card_Content.spec_value_2'}} Appery.io.
The component should look like this:
At the moment, the resulting app UI should look like this:
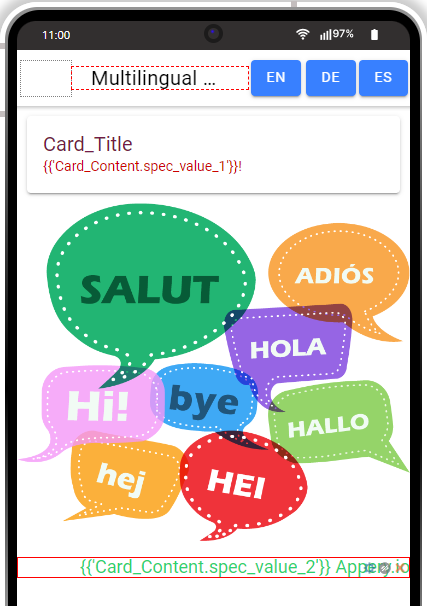
App UI view
Defining Application Logic
It's time to add interactivity to our app.
- Click the EN button (Button1) and expand the EVENTS tab from the bottom.
- There, for the Button1 component Click event, in the code editor, select Run TypeScript for action.
- In the code, click the Insert snippet drop-down and select the i18n set language snippet:
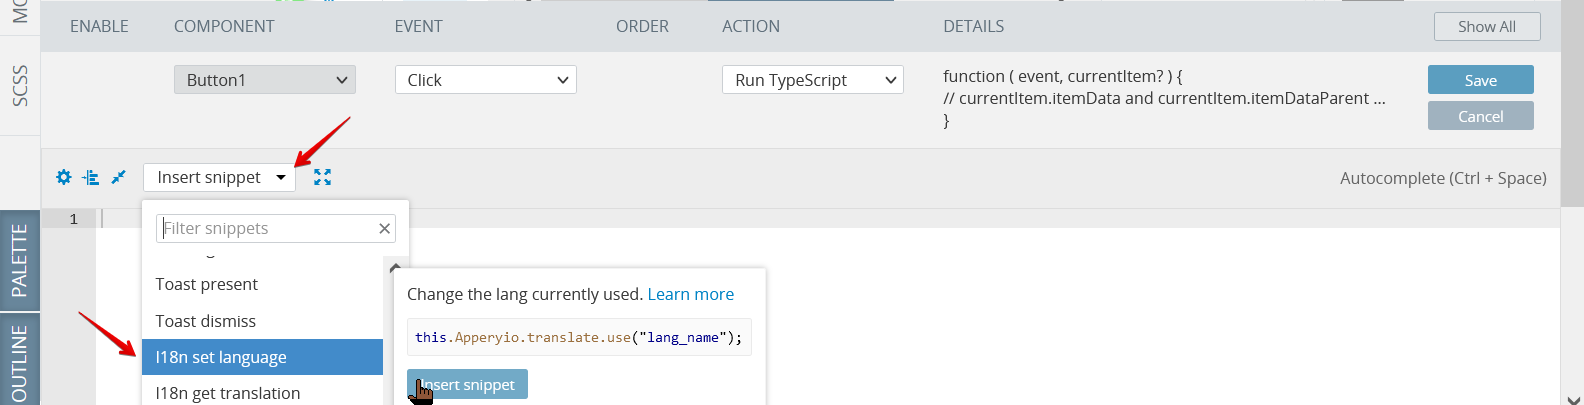
- Replace the text lang_name with en and click Save (or simply copy and paste the following code:
this.Apperyio.translate.use("en");):
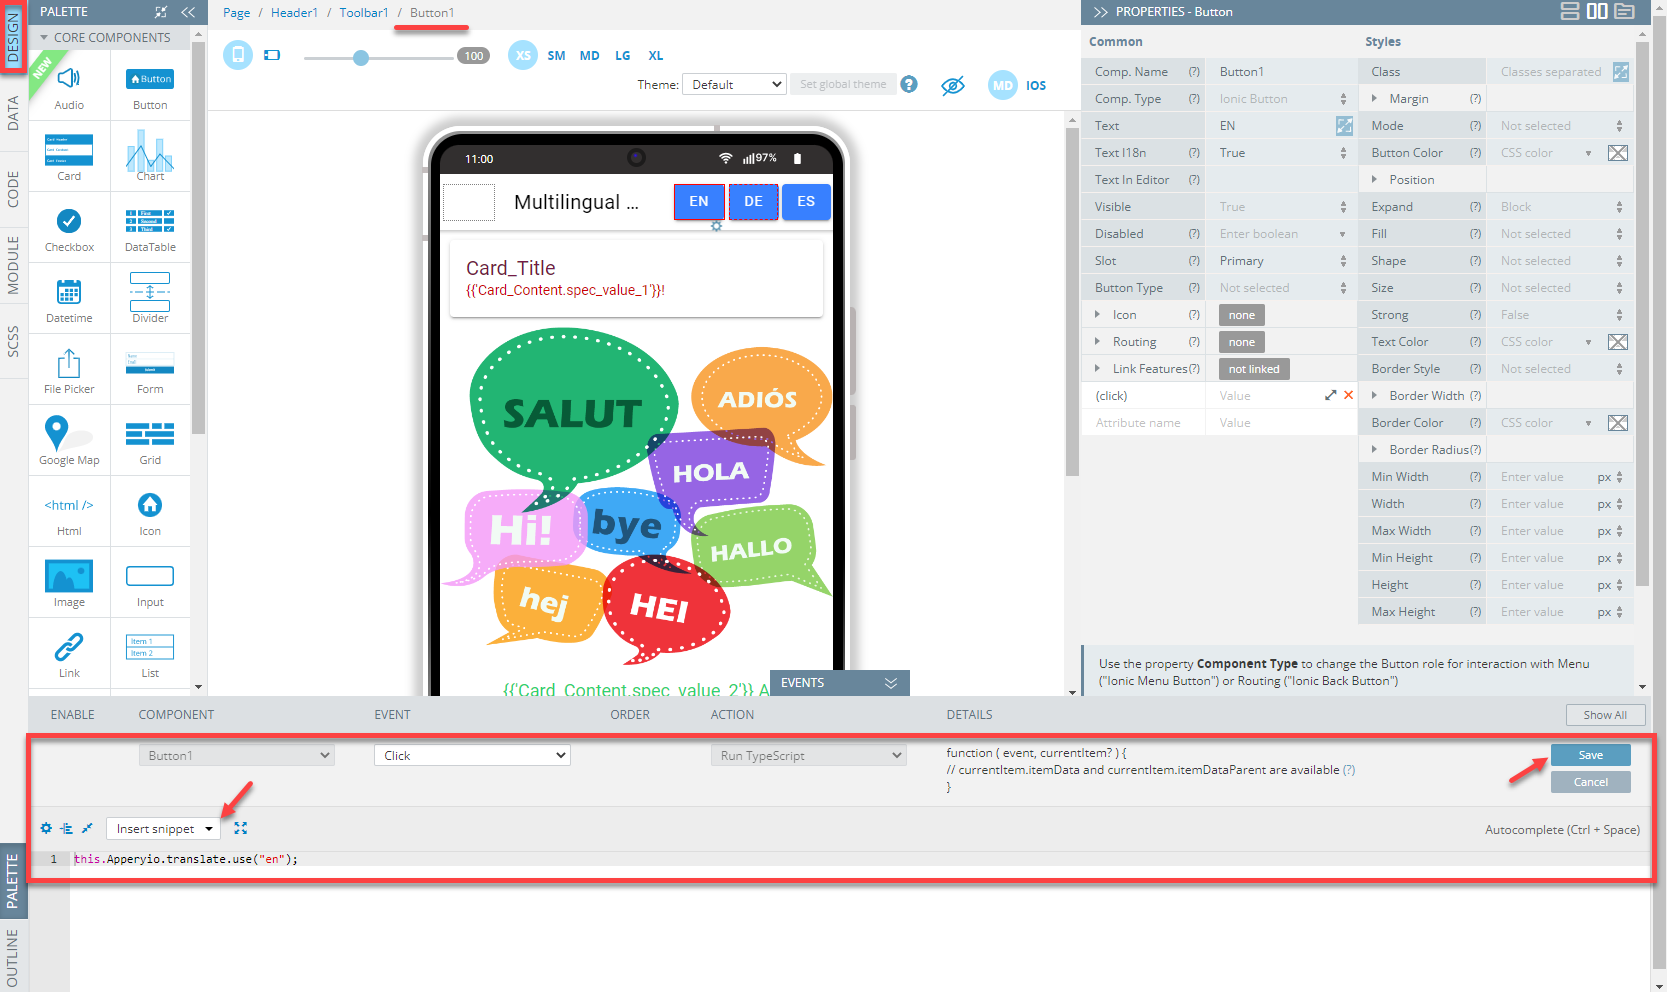
Setting language name
- Repeat steps 1 through 3 to create the similar events for the DE and ES language switching buttons. Use the appropriate translation name for each language:
this.Apperyio.translate.use("de");this.Apperyio.translate.use("es");- Click the SAVE button in the App Builder Toolbar to save all the changes.
App Testing
You can now try the app on preview.
Сlick the TEST button in the App Builder Toolbar to launch the app in the browser.
When the app starts, click the language buttons in the toolbar. Make sure that the app language switches on click:
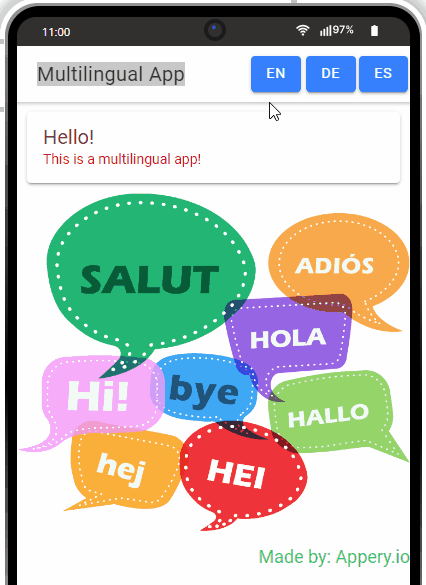
App in action
Note!Note that internationalization works for the Text content inside double braces and in quotation marks only (should be specified in the corresponding JSON translation files described here), for example
{{'Card_Content.spec_value_2'}}.
On the other hand, the data outside double braces (in this case,Appery.io) is not applied to the internationalization process and is displayed as is for all three languages:

Advanced Options
Working with Variables
We can also use Internationalization with parameters. They are passed as an object, and the keys can be used in the translation strings.
So, if you want to check out how you can insert values from variables, follow the steps below:
- Open the Screen1 CODE panel.
- Here, create a variable named
variable_as_textof String type with'text_from_variable'default value:

App variables
- Switch to the DESIGN panel and drag the Grid to the Content area. A grid with one default Grid Row with two child Grid Cell components will be created.
- Now, drag per one Text and drop them to each grid cell:
- First, select the left Text component and change its Text property to {{variable_as_text}} and set its Font Size property to 15 under the Styles tab; then define the Text property of the right Text component as {{'Feedback_Content.spec_value'}} SUPER!:
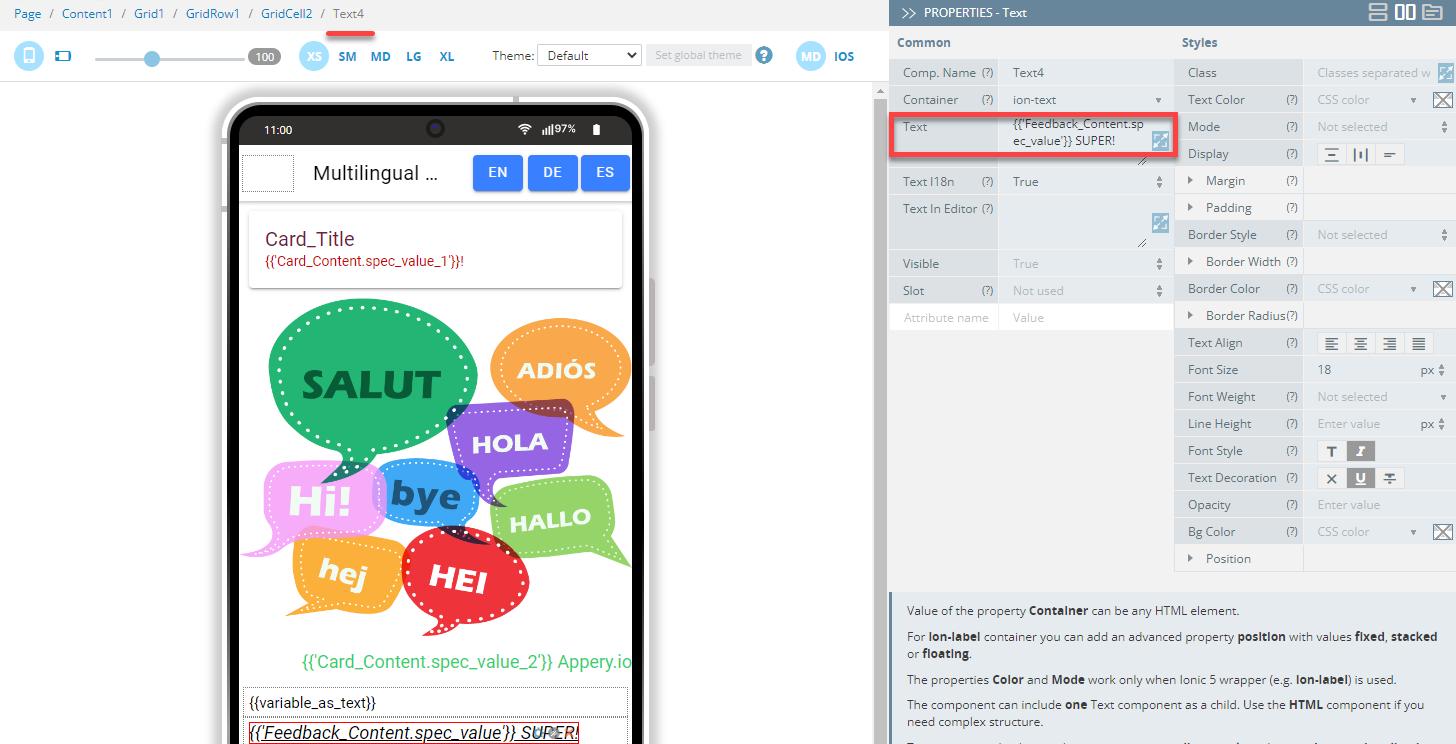
Defining Text2 component
- Under the grid that we've just created, drag one more Button component and drop it to the screen; then change its Text property to Submit_Button_Text:
Text3 component parameters
To make it all work, we now need to modify the TS files for all three languages.
- So, open them one by one and edit the corresponding pieces of code (add lines 7-11) so that the code look like this:
- for the English language:
{
    "Card_Title": "Hello!",
    "Card_Content": {
        "spec_value_1": "This is a multilingual app",
        "spec_value_2": "Made by:"
    },
    "Feedback_Content": {
        "spec_value": "I liked it very much! Everything is"
    },
    "Submit_Button_Text": "Submit your feedback",
    "text_from_variable": "Did you like our Multilingual App?
}In the code editor, it should look like this:
- for the German language:
{
    "Card_Title": "Hallo!",
    "Card_Content": {
        "spec_value_1": "Dies ist eine mehrsprachige App!",
        "spec_value_2": "Hergestellt von:"
    },
    "Feedback_Content": {
        "spec_value": "Ich mochte sie sehr! Alles ist"
    },
    "Submit_Button_Text": "Senden Sie Ihr Feedback",
    "text_from_variable": "Hat Ihnen unsere mehrsprachige App gefallen?"
}- and for the Spanish language:
{
    "Card_Title": "Hola!",
    "Card_Content": {
        "spec_value_1": "Esta es una aplicación multilingüe",
        "spec_value_2": "Hecha por:"
    },
    "Feedback_Content": {
        "spec_value": "¡Me gusto mucho! Todo es"
    },
    "Submit_Button_Text": "Envíe sus comentarios",
    "text_from_variable": "¿Te ha gustado nuestra aplicación multilingüe?"
}- Finally, we are ready to test the added functionality. In the top menu, click the TEST button in the App Builder Toolbar to test the updated app.
Note!Note that in this example of using a variable, internationalization works for the left Text component's content only that is inside double braces but without(!) quotation marks (described in Step 6, and specified in the corresponding JSON translation files in Step 8, here it is
***{{variable_as_text}}***.
The data outside double braces (in this case,SUPER!provided for the right Text component) is not applied to the internationalization process and is displayed as is for all three languages.
Working with Services Mapping
You can also use the mapping option for translations.
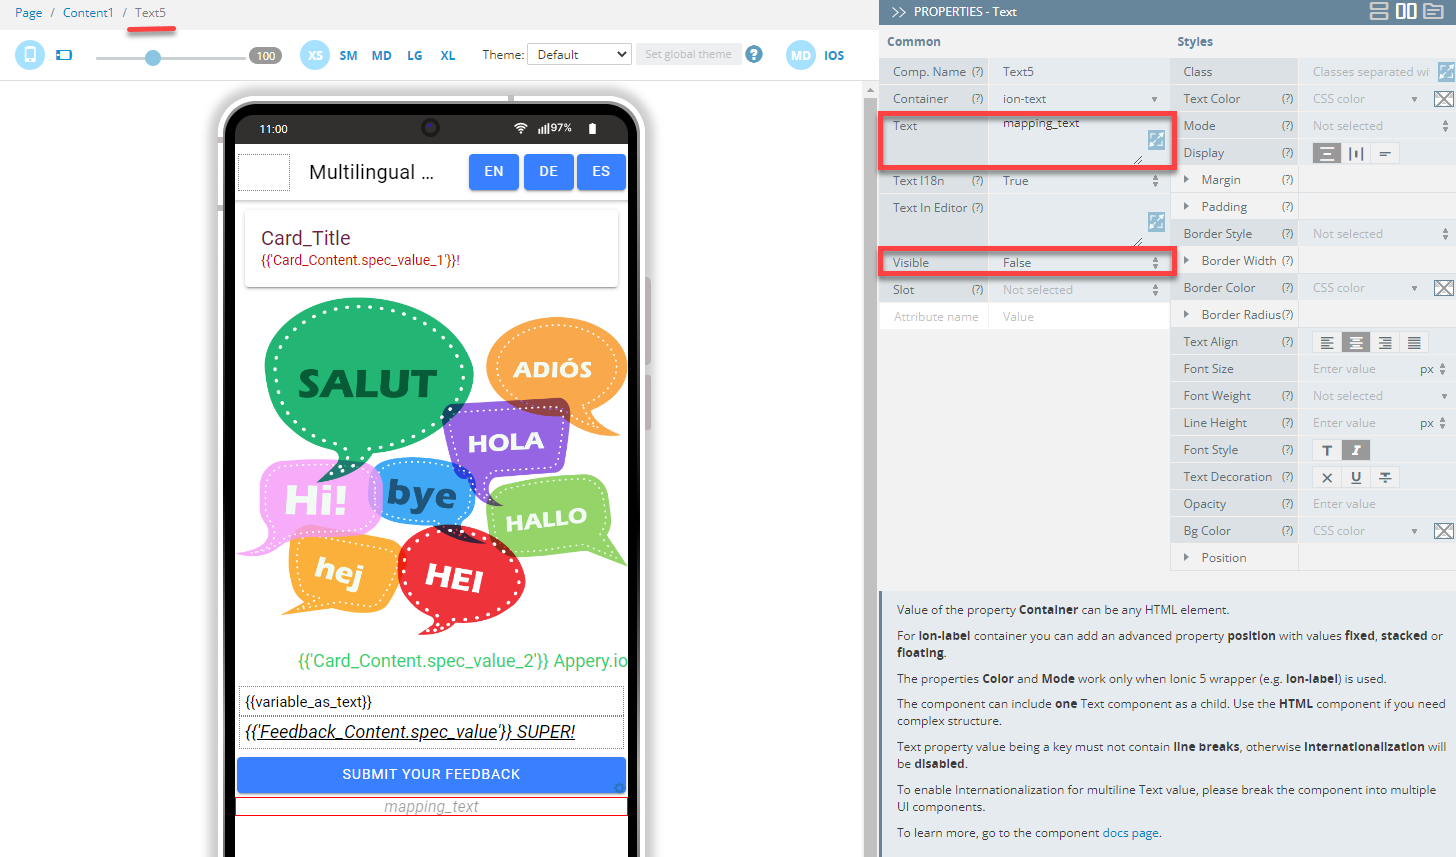
- To see how it works, let's first add another Text component to the screen placing it under the Button component and change its Text property to mapping_text and set its Visible property to False (this setting will hide the element on the app loading):
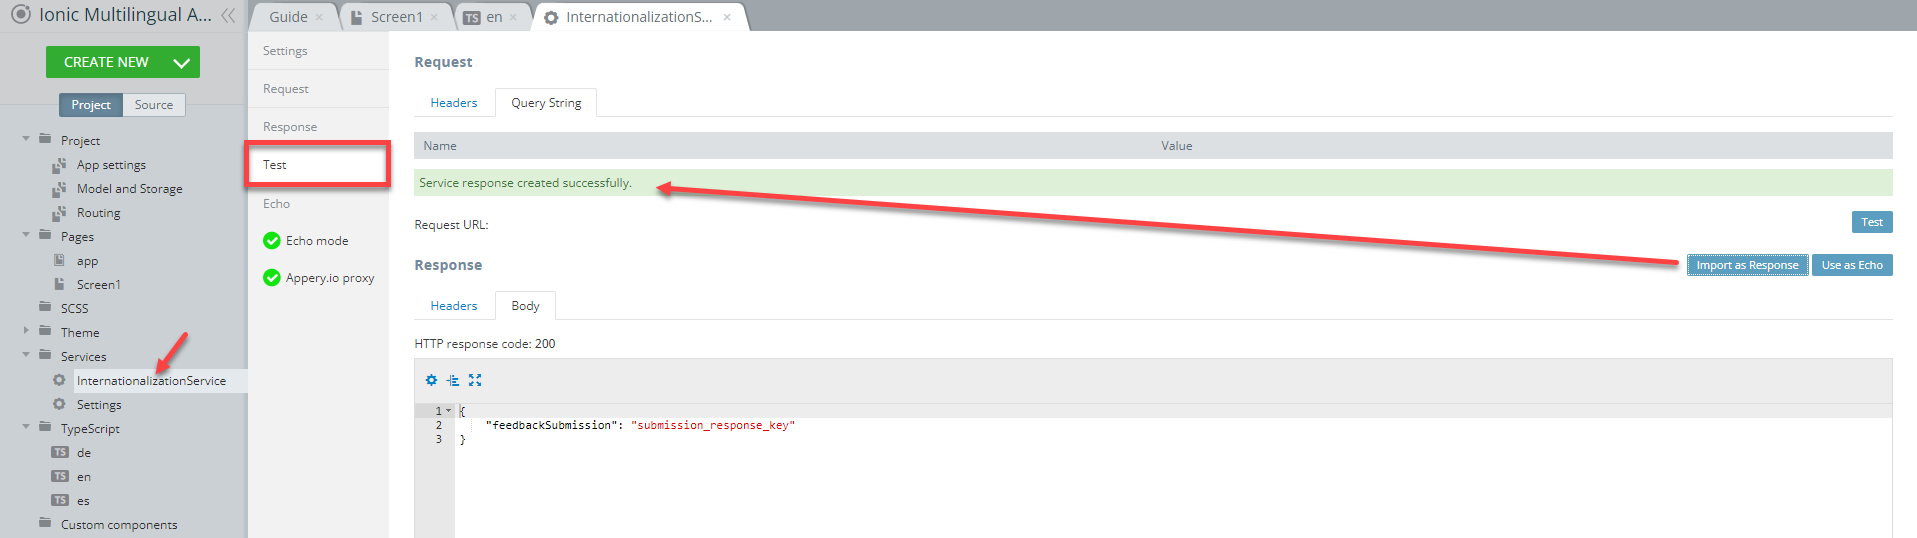
- Now, let's create a service: CREATE NEW> Service> RestService and click Create Service.
- Rename it, if needed, then, in the service, select the Echo tab, select the Enable Echo check box, enter the sample echo response (
{"feedbackSubmission": "submission_response_key"}) and save your work:

- Switch to the service Test tab and click Import as Response:
- Go back to Screen1 DATA panel, select InternationalizationService from the datasource drop-down, click the Add button (you can also rename it, if needed):

- In the open Mapping editor window, click the service Success > Mapping button, create the following mapping and click Save & Replace:
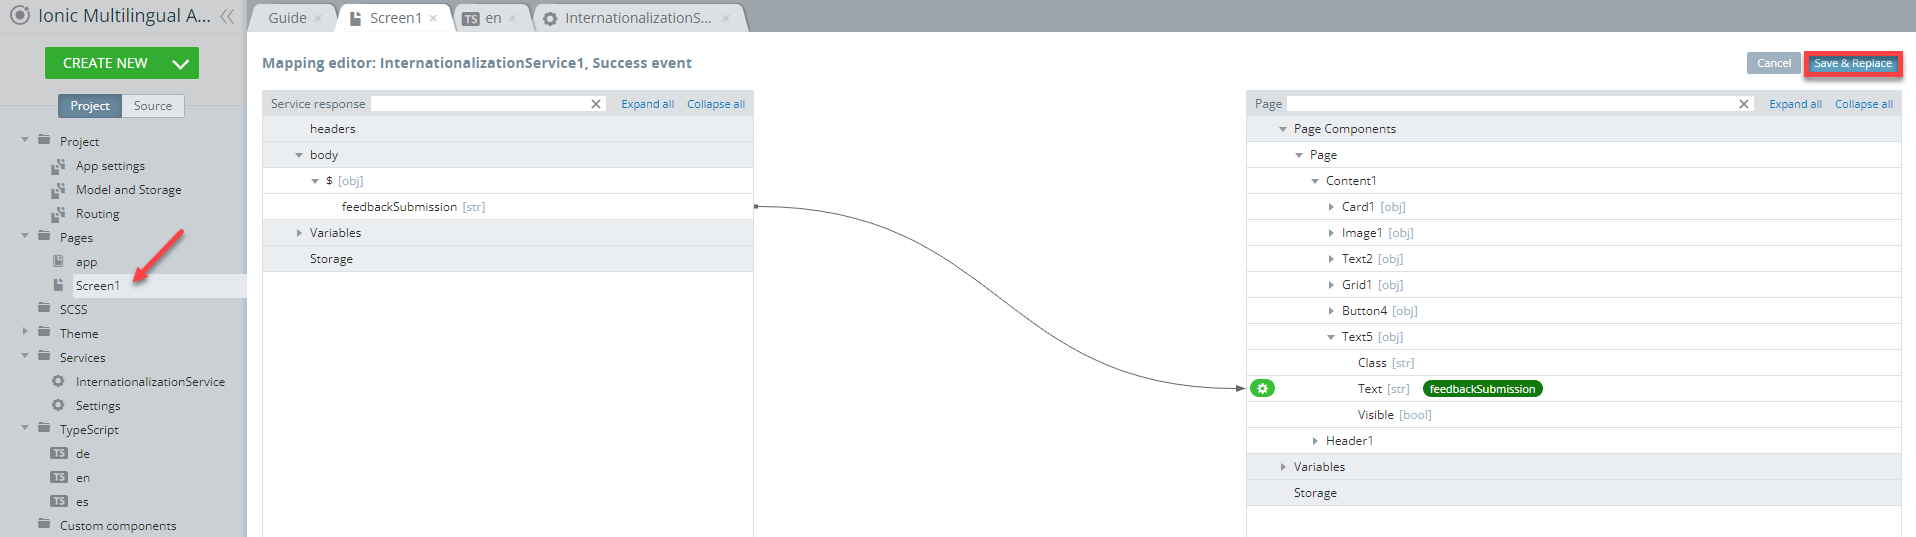
The service is created.
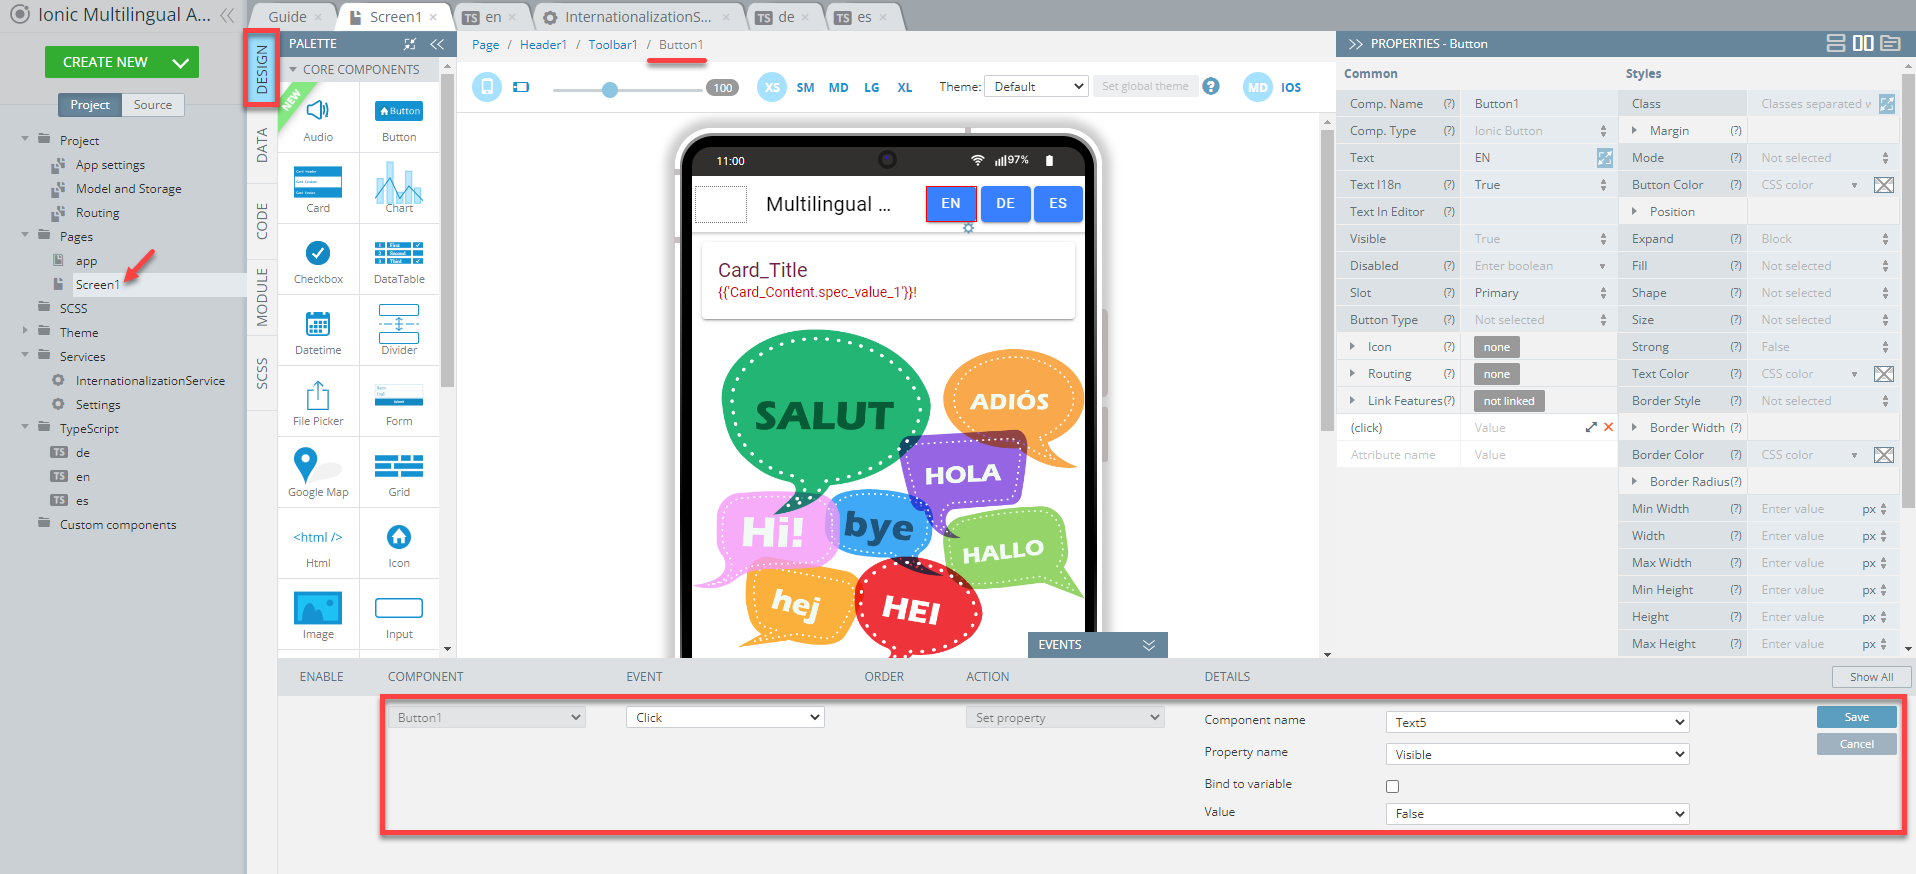
- Now, go to the page DESIGN panel and unfold the EVENTS tab.
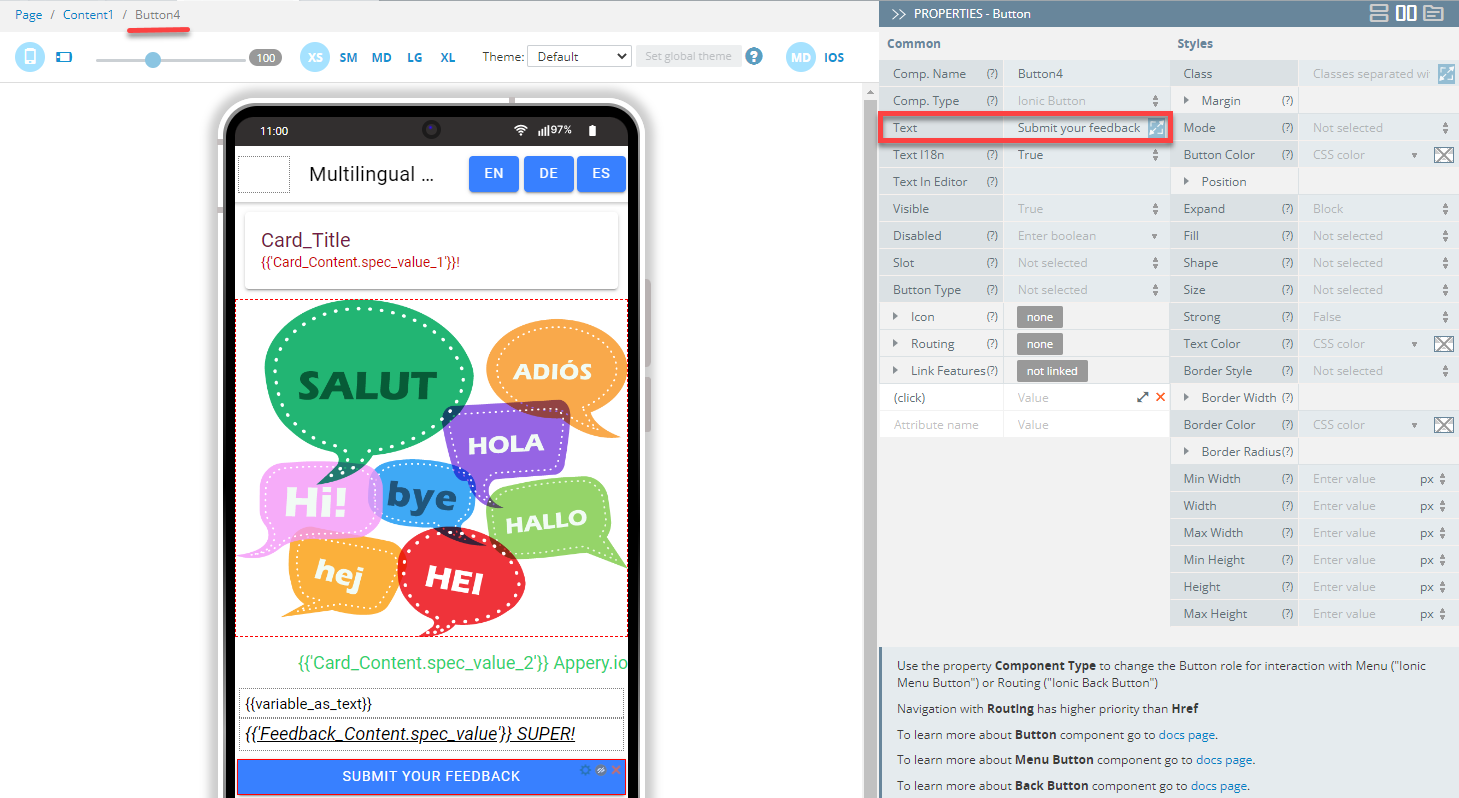
- For the Click event of the Button4 component, select the Invoke service action, select InternationalizationService1 from the datasource drop-down list and save:
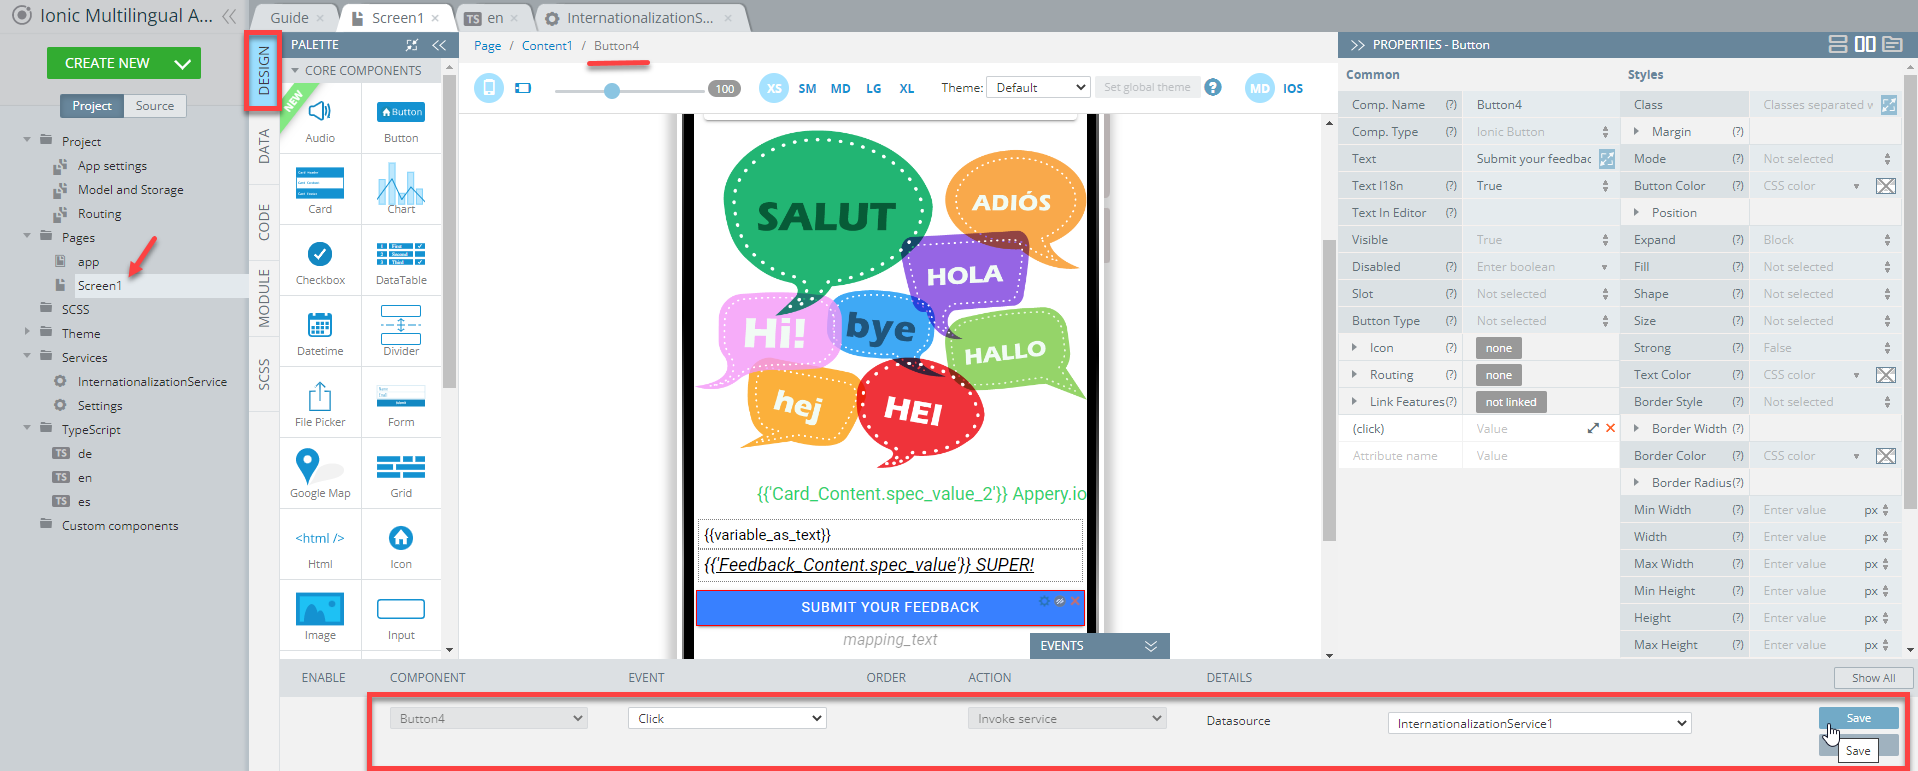
- Also, let's add another event (Set property) to this button that will allow make the Text5 component visible on button click:
- This component will be used to show the confirmation of the feedback submission and we will naturally want it to be retrieved in all three languages, so, select them one by one and paste the following pieces of code to the en, de and es JSON files (for the English, German, and Spanish translations) respectively:
- for the English language:
"submission_response_key": "Thank You for sending feedback!"- for the German language:
"submission_response_key": "Vielen Dank für das Senden von Feedback!"- for the Spanish language:
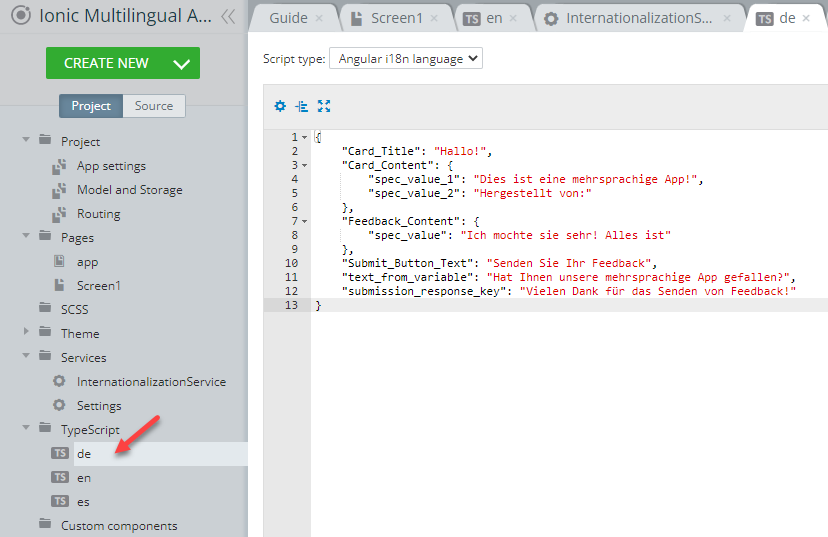
"submission_response_key": "Gracias por enviar comentarios!"Now, if you click the JSON file used for translating into the German language, it should look like this:
It's time you saved the changes and started the app in your browser: it should start in English (as it this language was set by default in App settings > Components) and, as expected, has no text on the first launch.
And, as you can see, the text value we defined in the corresponding TS file (en) becomes visible after the button is clicked:

You might have also noticed that for a fraction of a second the app displays the mapping_text message before retrieving the correct text value we provided for the default language.
To make the app look for the correct value on the service start, you will need to add the empty "mapping_text" value to the TS code file of the preferred default language (here, it's English):
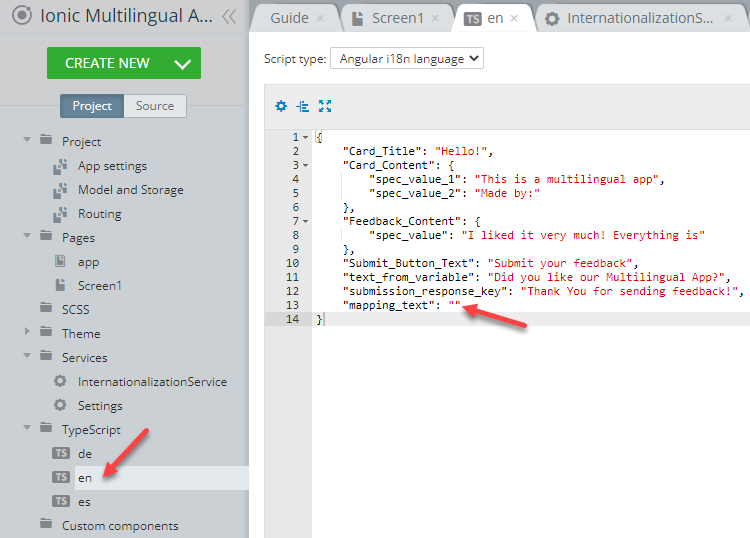
Now, when you reload the app and click the SUBMIT YOUR FEEDBACK button, you will see that the "mapping_text" message has gone:

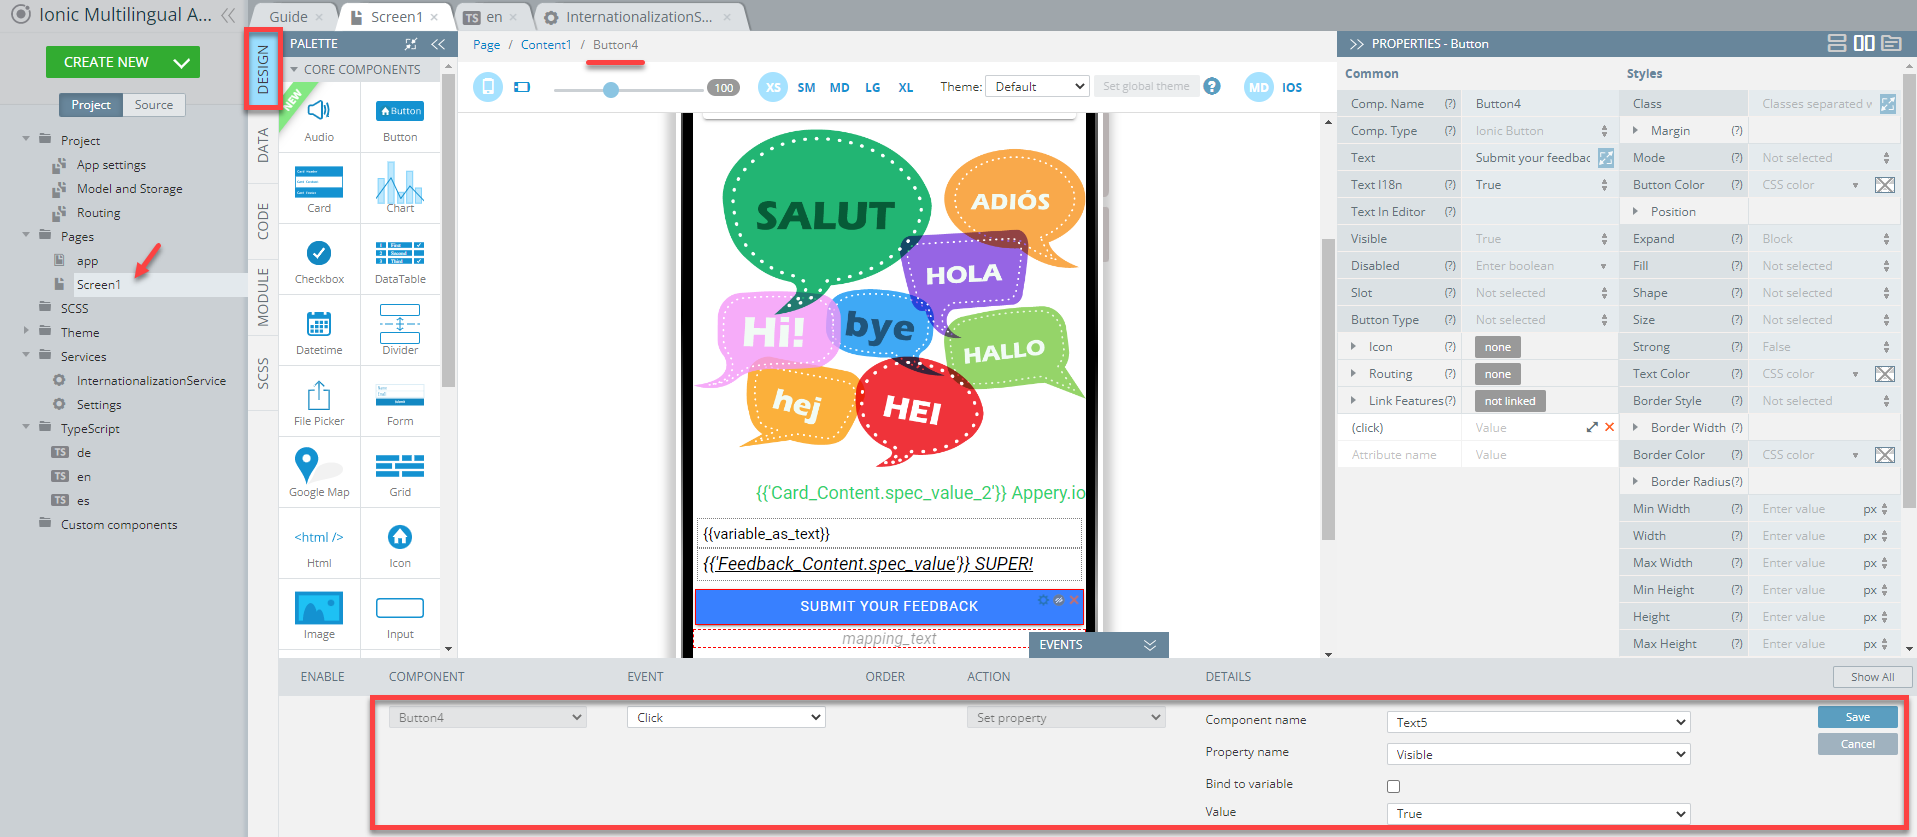
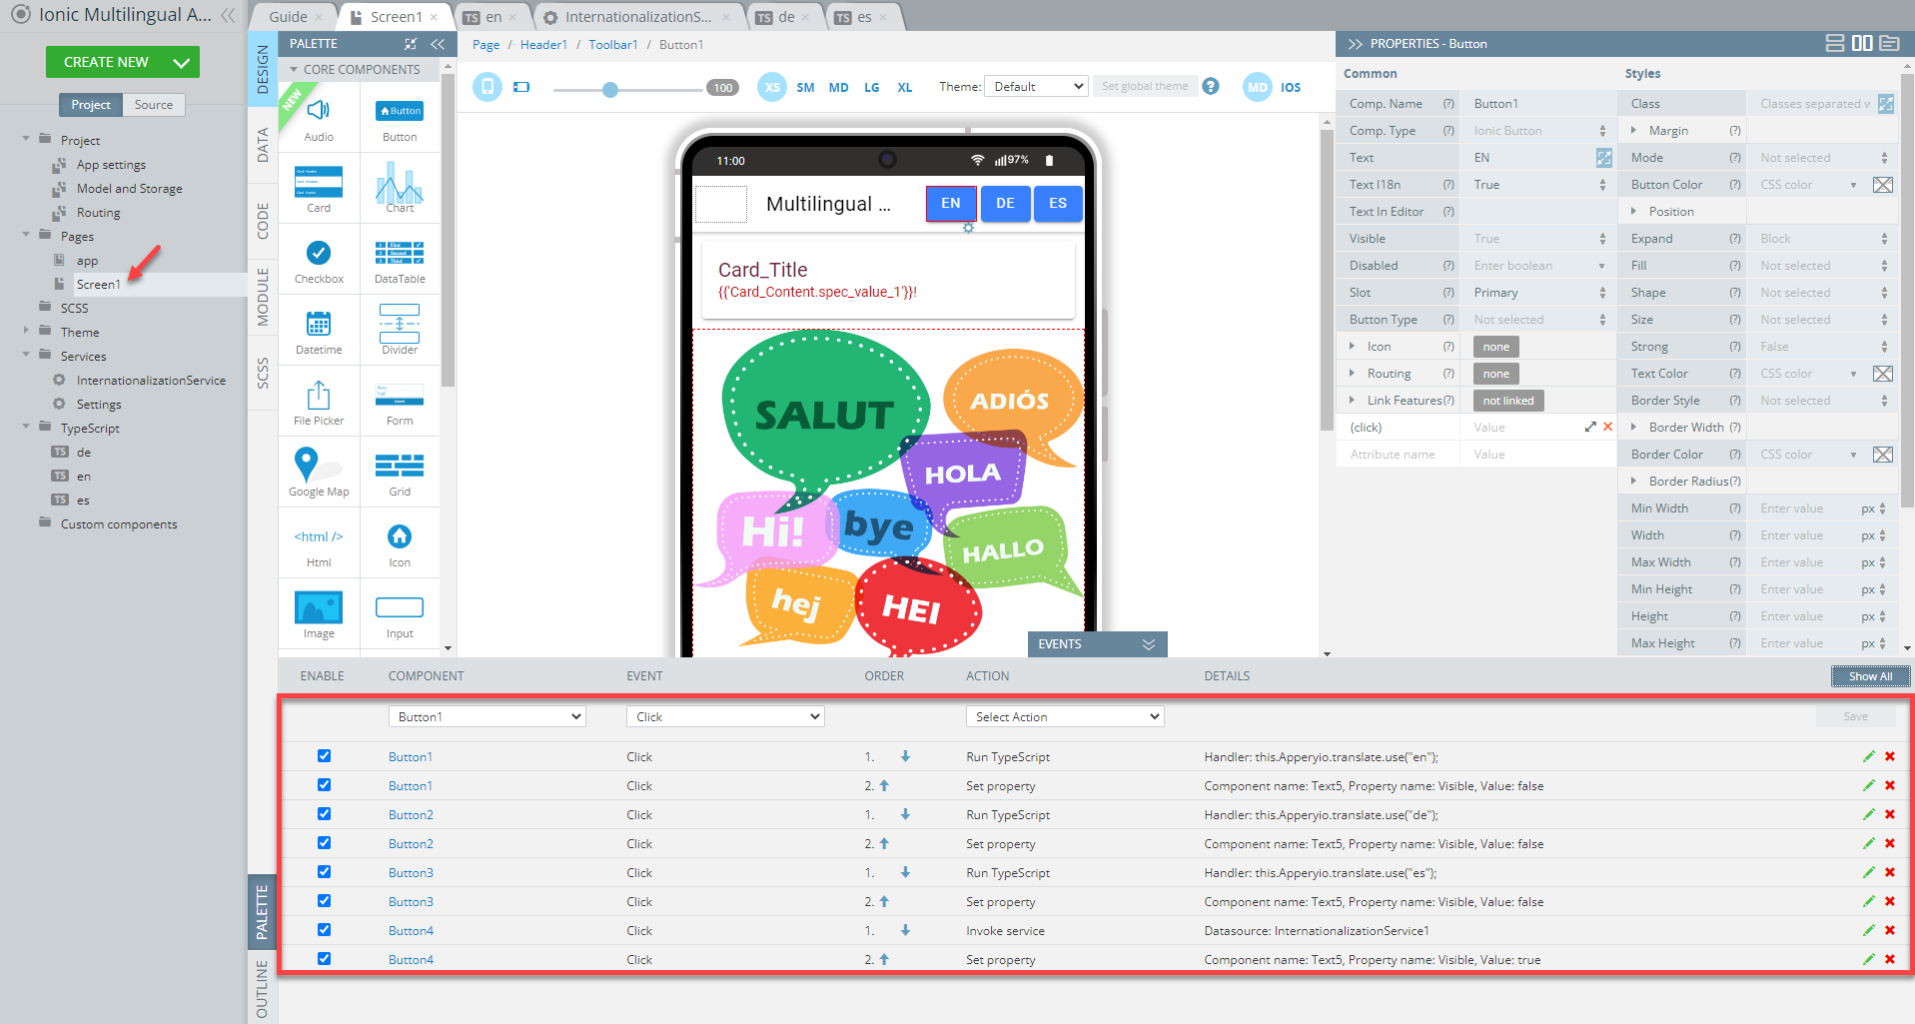
- The only thing is left: to make the app hide the text message after switching to another language.
To do it, we will use the same Set property event we used to make the Text5 component visible on the button click.
But, in this case, we will define it for all three language switching buttons in the toolbar and set the Value to False and save:
Set property event for EN button
- To make sure all the needed events are set correctly, you can click the Show All button; the Screen1 EVENTS tab should look like this:
Want to know more?Also, you are free to add internationalization to your existing app. For more details, check out this page or watch our our YouTube video to learn how to do it.
Testing App
Finally, we are ready to test the app. In the top menu, click the TEST button in the App Builder Toolbar to test our multilingual app. When the app starts, it should work as follows:

Advanced app performance
Testing on Device
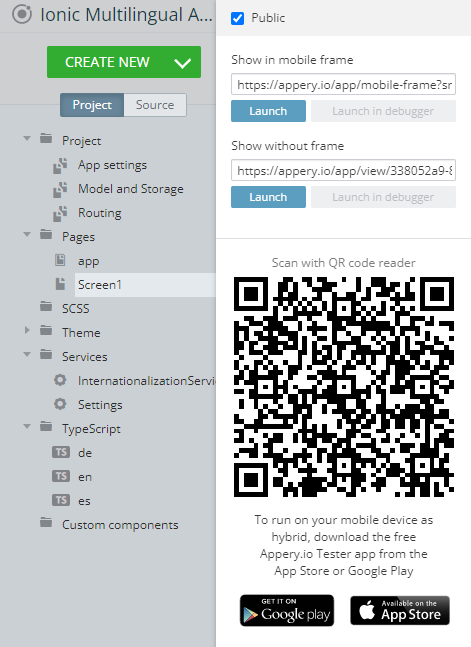
When your app version is ready, you might also like to test it on the device.
Appery.io Tester AppA great option to quickly test the app on the device is to use our Appery.io Tester app.
The app is free and available for both iOS and Android.
You can check out this page to learn more about using the Appery.io Tester app.
Updated about 1 year ago