Overview
Using and configuring the Customer Console.
Customer Console is a feature provided by Appery.io that helps customers manage apps. Through the console, customers can edit or view the database if certain access rights are provided by the developer. Customers can also send push notifications from the console if the application uses it.
Working with Customer Console
- To open the console, select the application and switch to the Customer Console tab, and then to the Console settings tab.
- Customer Console is supported by every app, but it’s not automatically configured. To configure Customer Console, click the Off toggle button to turn it on.
- Before proceeding with Customer Console, for user identification, a user must select a database from the drop-down menu.
- In the Console settings tab, you can see the link by which the console can be accessed by the customer. Upon clicking it and entering the valid data for authorization, access to the app files and collections is granted.
- The customer login and password should be stored in the Users collection of the database. Select the database from the drop-down list where the customer credentials are stored.
- On the Console settings tab, a company name and logo can be provided. Click Upload, and select the image you want to upload or click Reset to remove the current logo.
The customer will see this in their login window.
- If push notifications are enabled in your app, you can allow your customers to send them. To do this check the Enable push box.
- Switch to the Collection settings tab to manage customer access rights for database collections.
- Checking the Can view box enables the collection, and opens the additional options depending on the collection. You can also provide a user-friendly name for every collection.
Seeing An Icon?When viewing is enabled, an eye-sign appears next to the collection.
- If all the check boxes are checked, the customer can edit the collection without any restrictions.
- Access rights and a user-friendly name can be specified for every column as well.
- Under the Collection settings tab, users can also manage customer access rights for the Files collection. In this case, the Files collection that can be edited or viewed appears in the Files tab.
- If viewing the Files collection are disabled, a user can only upload new files and has no access to the files that are already in the collection.
Valid File NamesA valid file name contains only a-zA-Z0-9_.- characters and is between 1 and 218 characters.
- If appropriate access rights were added, from the console the customer can upload, delete, or download files
Push Notifications and the Console
If Push notifications were enabled (both: under the Push Notifications tab and under the Console settings tab) and the database used was linked with the app, after logging in to the console, a user will see two tabs – Data and Push Notification.
- In the Data tab, the customer can manage collections based on the provided access rights (see above).
- From the Send push notifications tab (Push Notification), the customer can send and schedule notifications.
- Scheduling can be done for each time zone where a device is registered or to all devices at once.
- After clicking Schedule the scheduled push notification will be added to the Scheduled and history tab.
Custom Hosting
The customer console can be hosted on different domains. Custom hosting is disabled by default, even if the correct certificate and key are uploaded. Click “Enable” to turn on custom hosting:
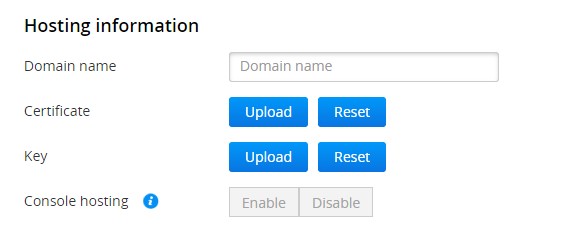
Obtaining a custom hosting certificate and key are out of the Appery.io support scope.
Domain configuration
Change the root “A” record to the ‘CNAME’ record of our hosting server:
achosting.appery.io.Or, if adding a new sub-domain, map it so that it points to the same hosting server.
For verifying your settings, you can try to ping your domain. It should be responding to the ping queries from IP address: 34.193.72.218
Updated about 1 year ago