Building a Notes App (Ionic) with Offline Support - Basic
How to build an Ionic app with offline support.
Introduction
This document provides step-by-step instructions that will walk you through the process of developing an application with offline capabilities. You will also learn how simple it is to use Appery.io App Client to add powerful caching functionality to your apps.
Note that this tutorial is for advanced developers who have prior experience building apps with Appery.io.
App You are Building
This tutorial will walk you through the process of creating the Notes app with offline support. The key feature of the app is the ability to work without an internet connection with data synchronization:
Downloads and Resources
You can also try it yourself by creating from the backup:
- Download the app backup file.
- Click From backup and select the project backup file on your drive.
- Type in the app name.
- Click Create.
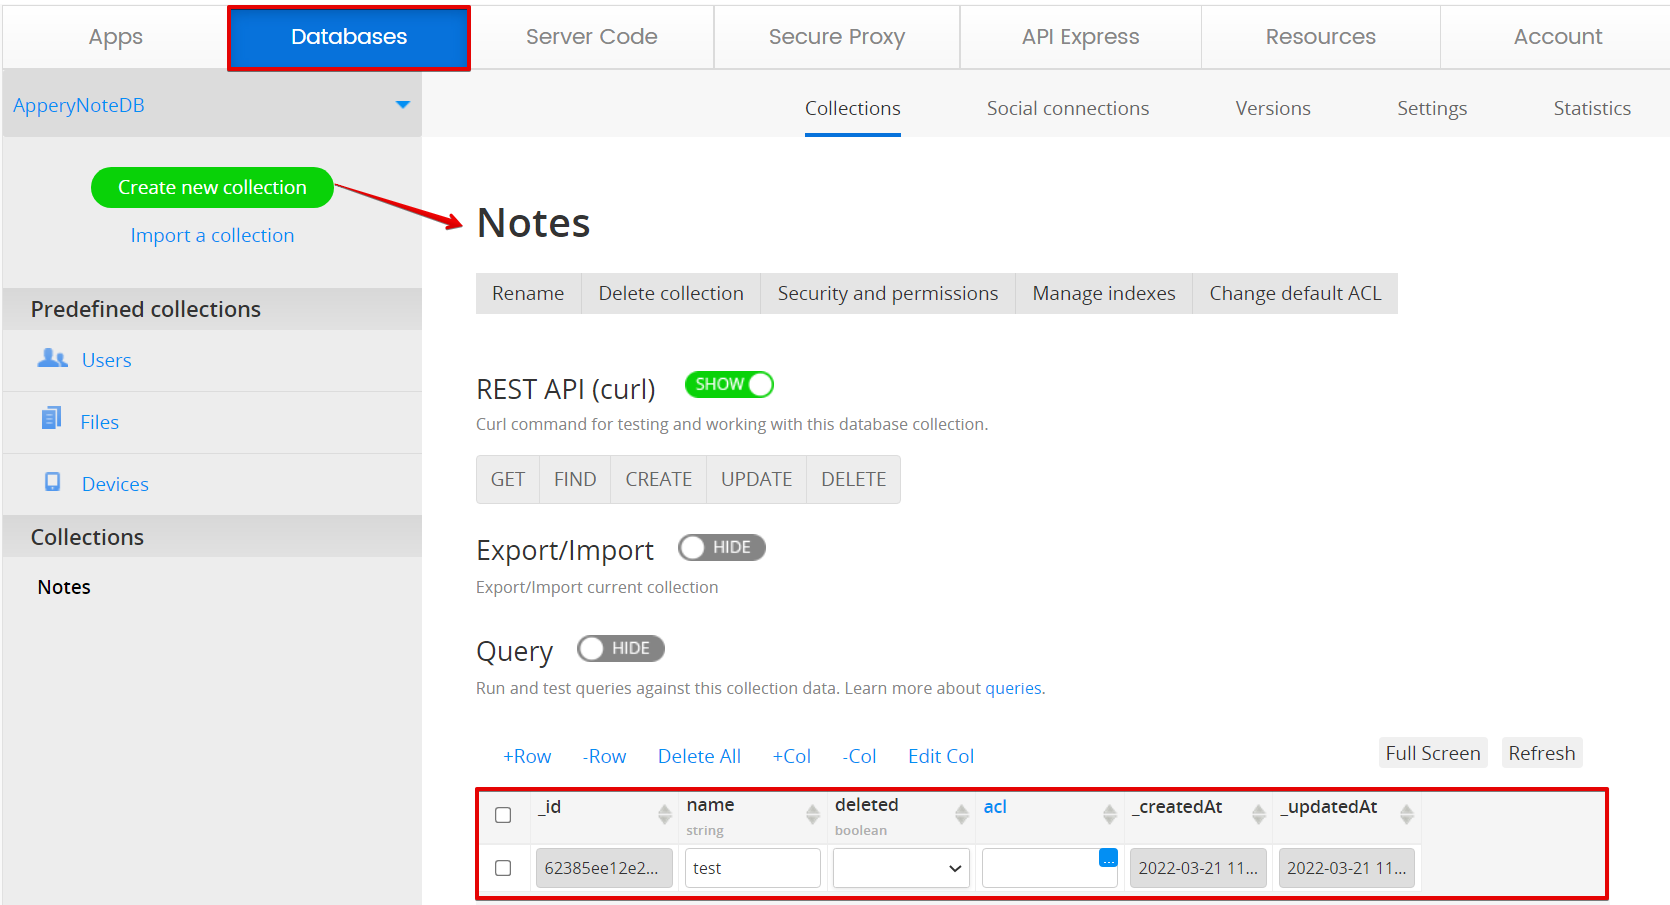
Step 1: Creating Database
The first step is to create the database where the notes will be stored.
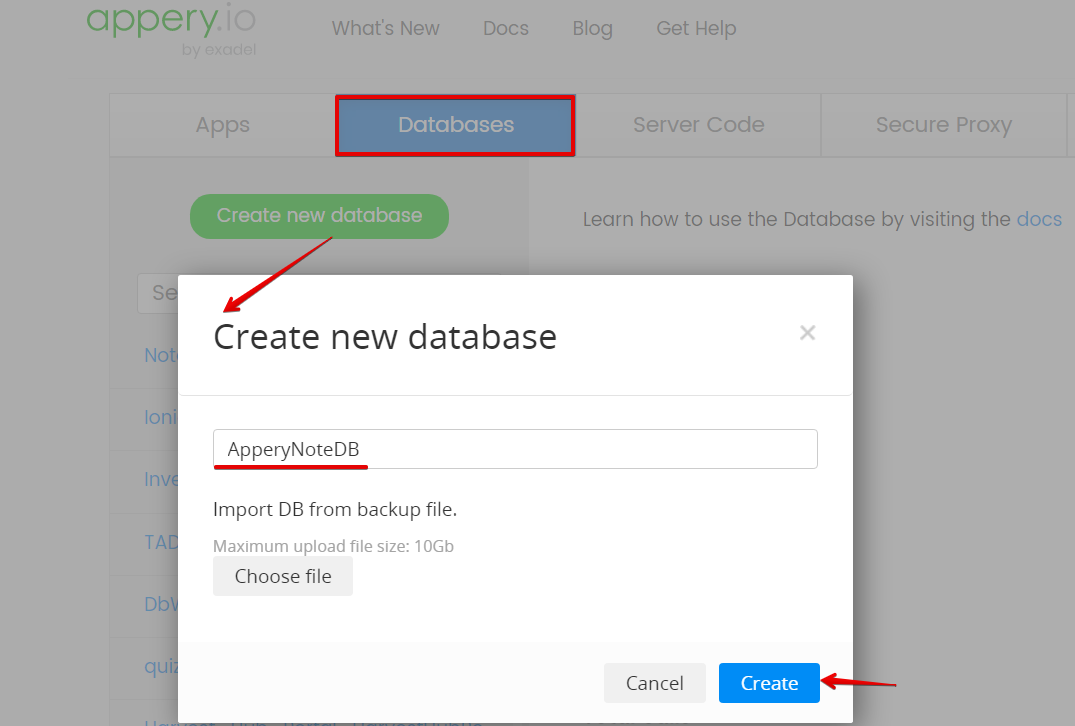
- Create a collection with Name: Notes.
- Add a column with Name: name and type: String.
- Add a column with Name: deleted and type: Boolean.
- Click +Row and fill the first row with name = test:
Step 2: Creating Database Connection
To create a database connection in API Express which will refer to your Appery.io database:
- Go to API Express > Create new DB connection.
- Create a database connection with:
- Name: ApperyNoteDBConnection
- Connection type: Appery.io database
- Database name: ApperyNoteDB
- You don’t need to enter a username or password.
- To make sure that the connection is successful, click Test:
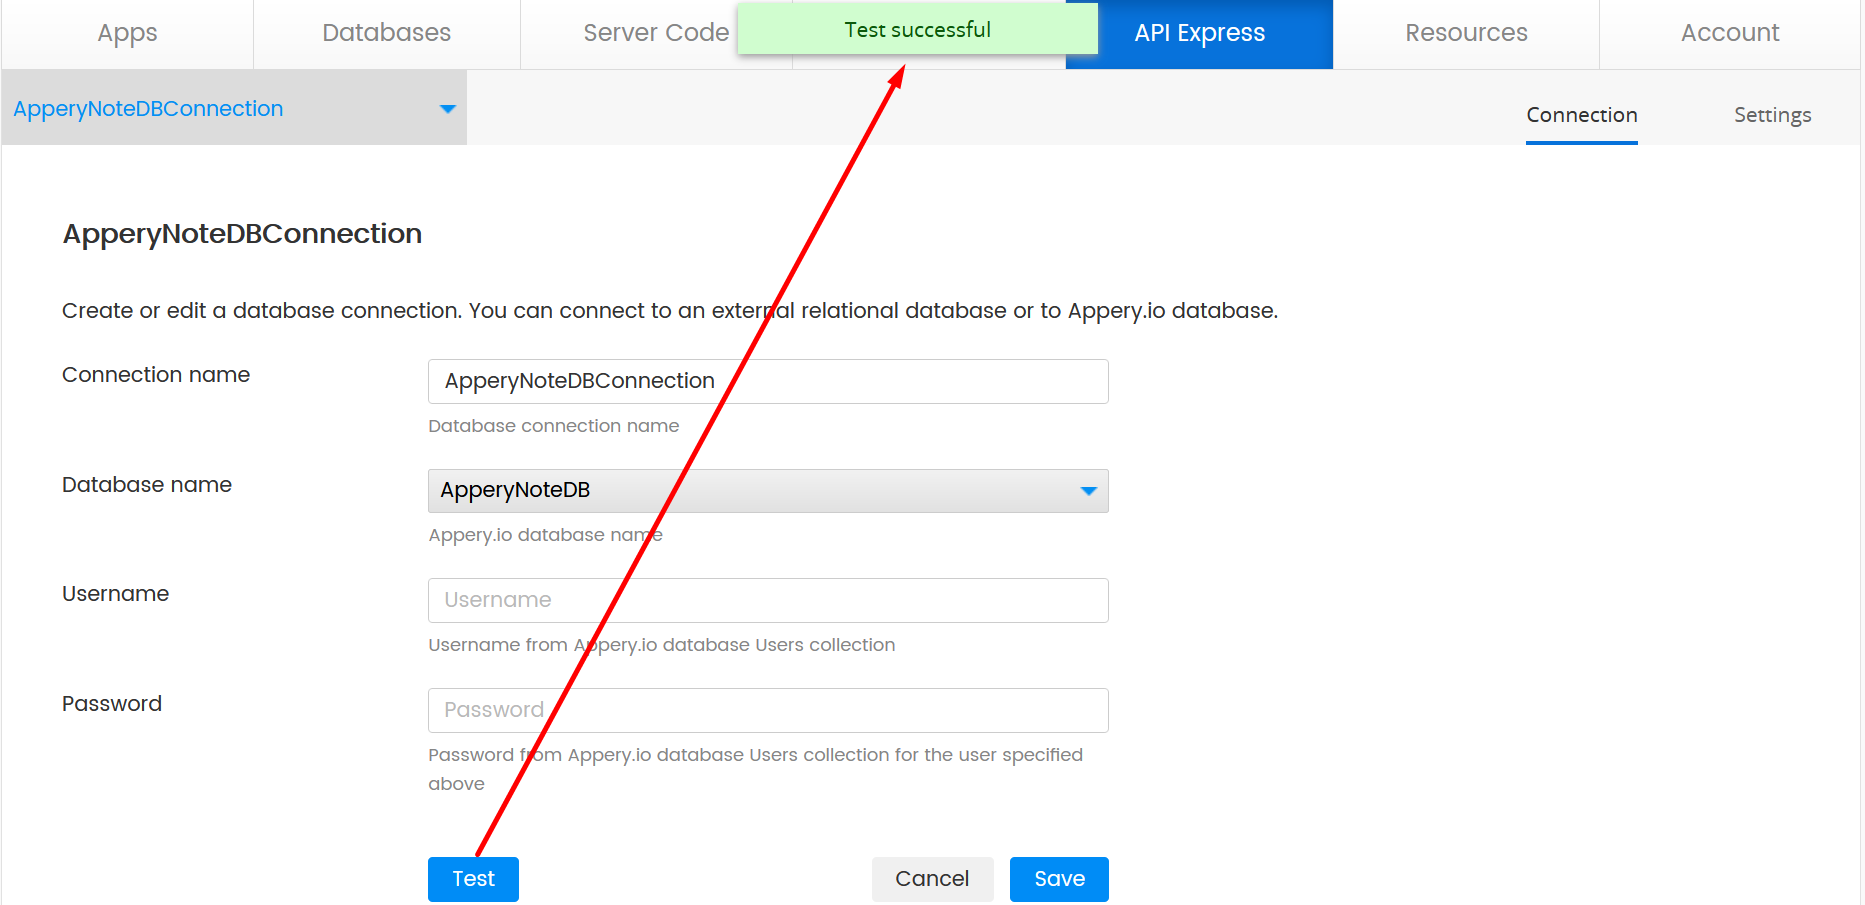
- Save the connection.
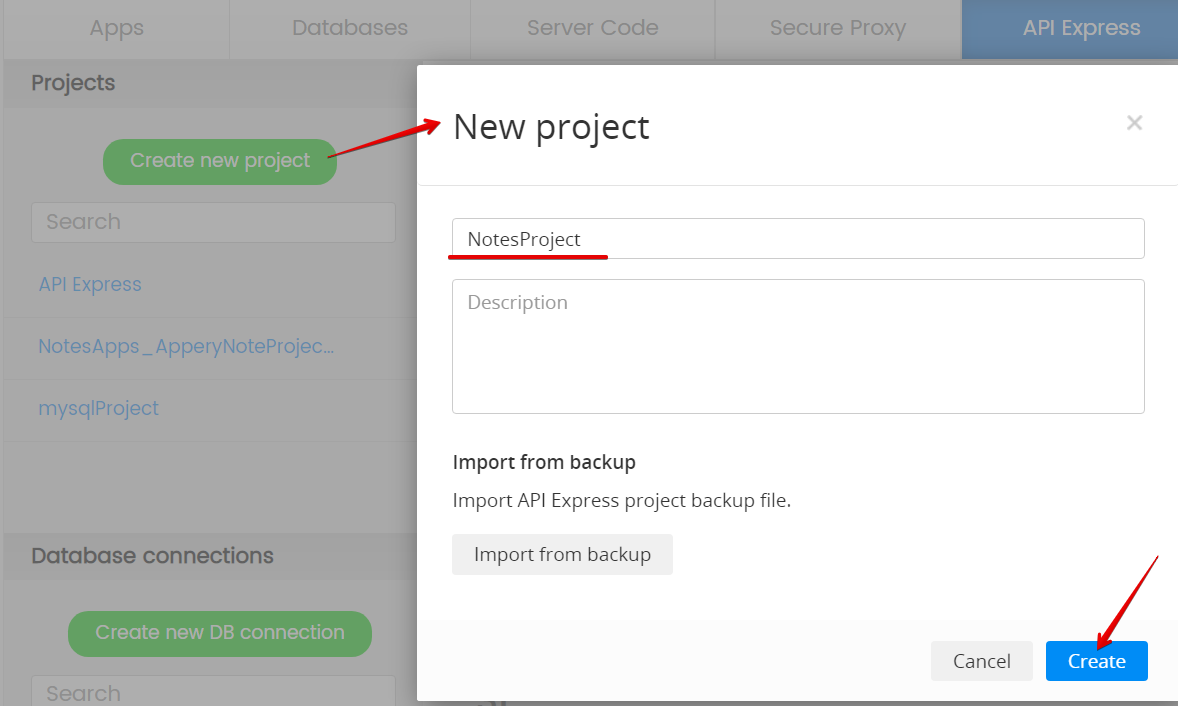
Step 3: Creating API Express Project
To create an API Express project and services for the Notes collection:
- Click Create new project and enter the name, for example NotesProject:
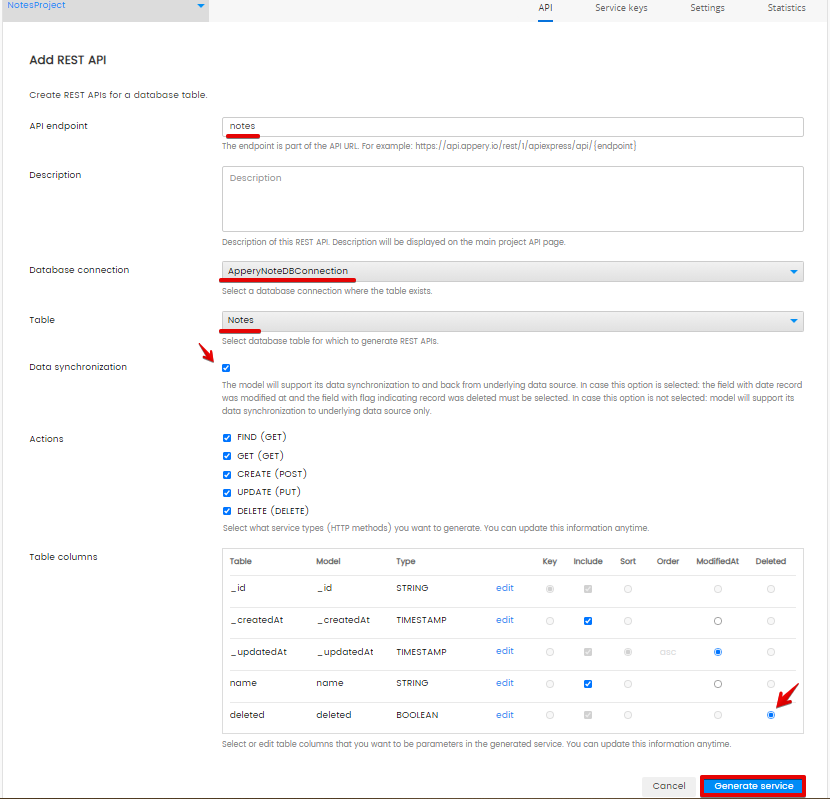
- Create a Service group (click new service). Name it notes:

- Select ApperyNoteDBConnection,
- Select the Notes table,
- Select the Data Synchronization check box,
- Select Deleted for the deleted field,
- Click Generate service:
- You can click the test link to open the test page and invoke the services from the just created Service group:
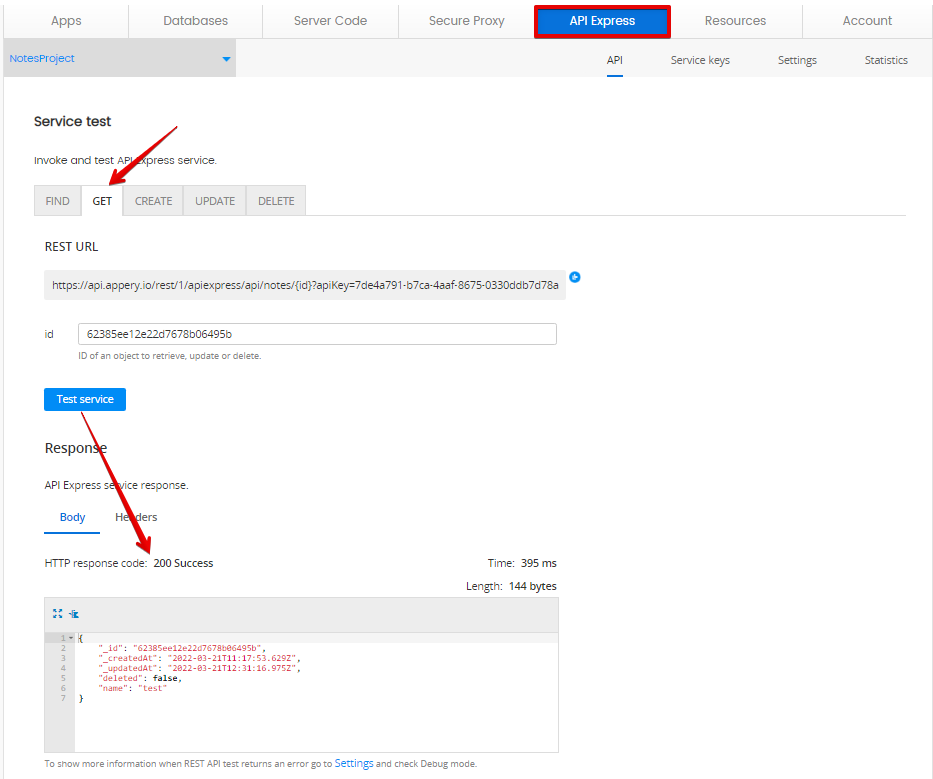
Test dataFor testing, use the id of the test data of your Notes DB collection.
Step 4: Creating Ionic App
To create a new Ionic app:
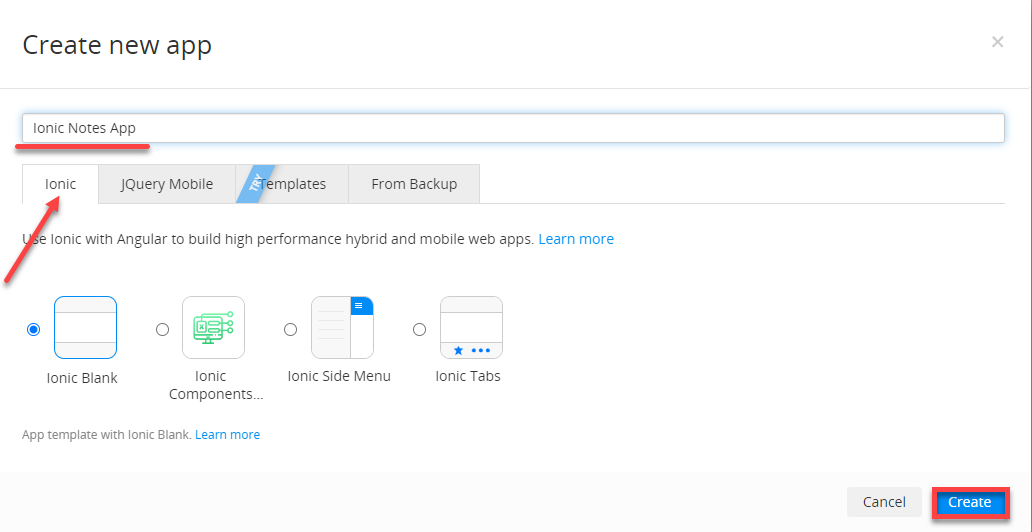
- From the Apps tab, click Create new app.
- Select Ionic as the application type, enter an app name, and click Create:
Step 5: Generating Services to Connect Database
After you have an app created, the next step is to generate services for the database to fetch and save data. To generate services that perform basic operations in the app:
- Click CREATE NEW and select API Express Generator:
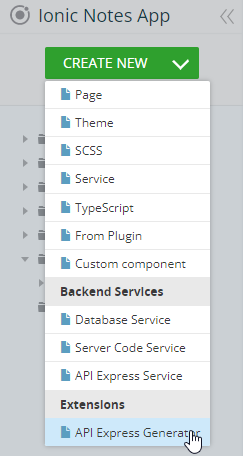
- If you are offered to select the host, click Appery.io. If no host selection is available, just select the NotesProject project.
- Generate generic services for the notes service (press generate): name them notes.
- Press the Refresh button to refresh the App Builder:

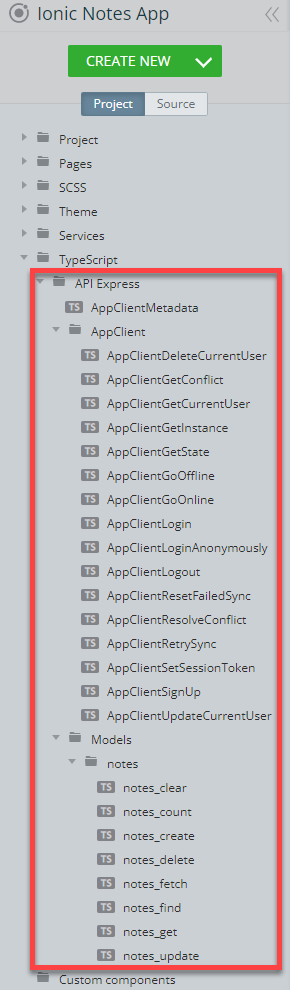
In the Services folder, we can now see the API Express Services that contain two groups. The first group is the generic AppClient Services such as AppClientSettings, AppClientLogin, etc. The second group is the API Express Models Services for generated and custom services:
Step 6: Creating Notes Page
To create the page that will show notes from the Notes collection:
- Select the Pages >Screen1 page and rename it to, for example, Notes.
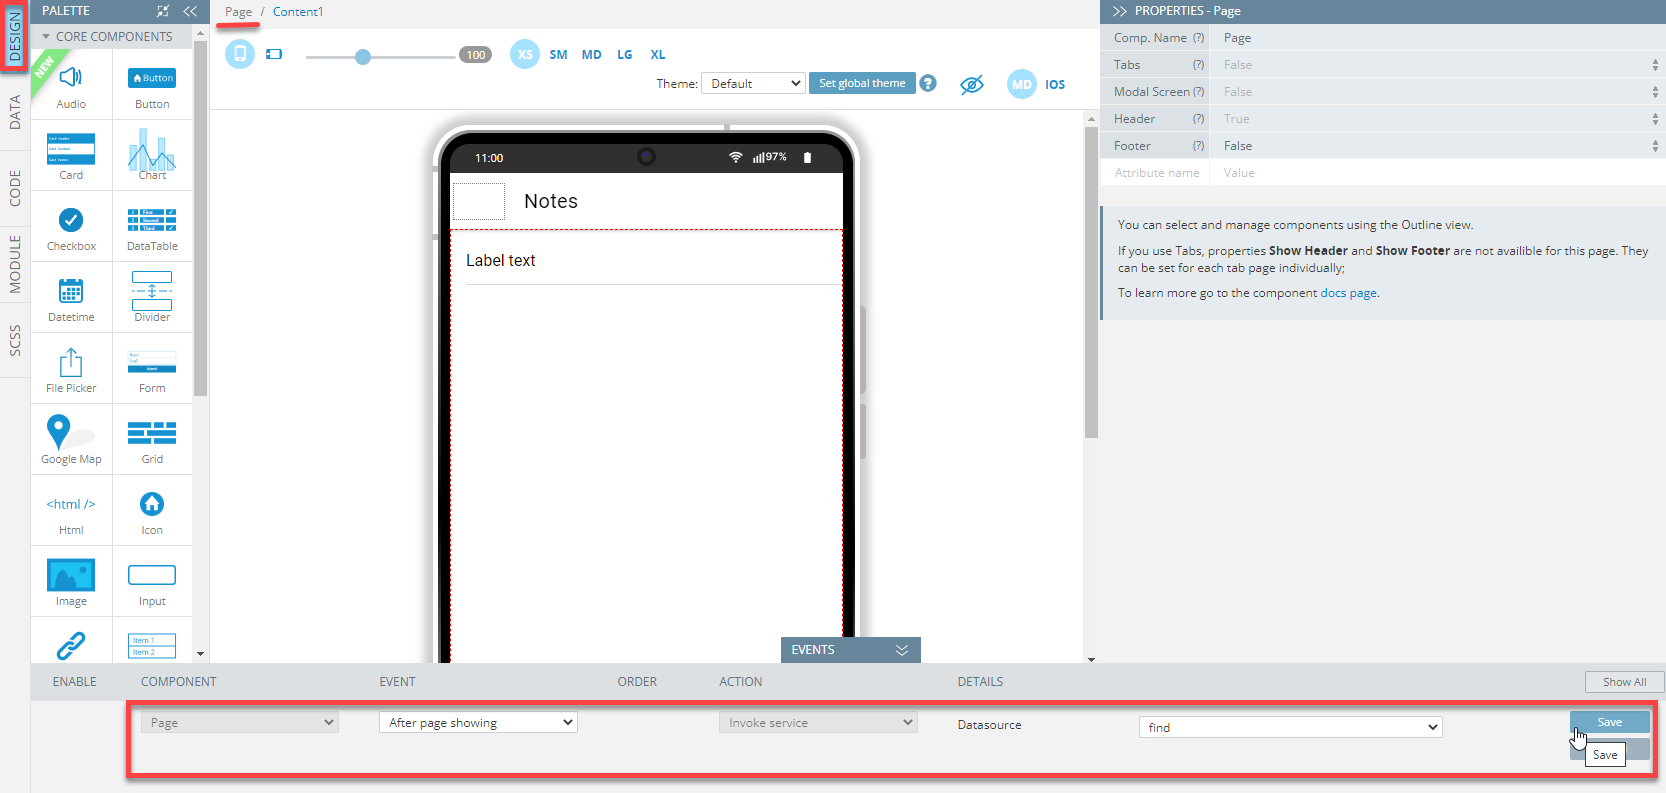
- Then, go to its DESIGN tab and click on the Toolbar title in the app screen and change it to Notes by changing the Text property under the PROPERTIES panel menu. You can also type right in the mobile frame:

- Now, select the Page component from the breadcrumbs (you can also use the OUTLINE view to locate the needed component) and set the page Footer property to False as we will not use it in the app (you will also be asked to confirm changing the property):

On this screen, we will need to get data from the database and show it on the list.
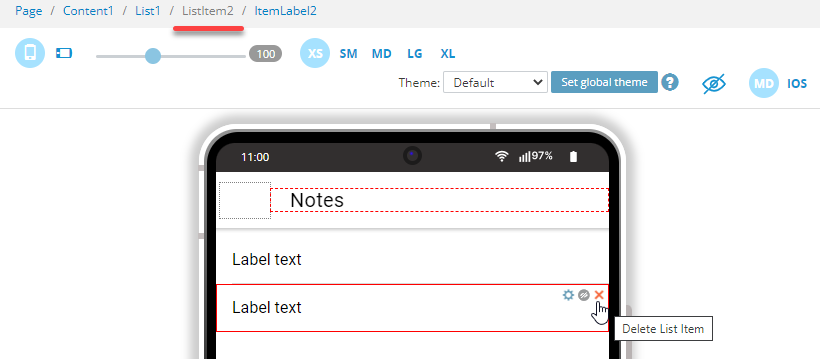
- So, drop the List component to the Content area. A list with two default List items each having a child Item Label component will be created.
- Delete the second List Item:
Now, let's add the first datasource:
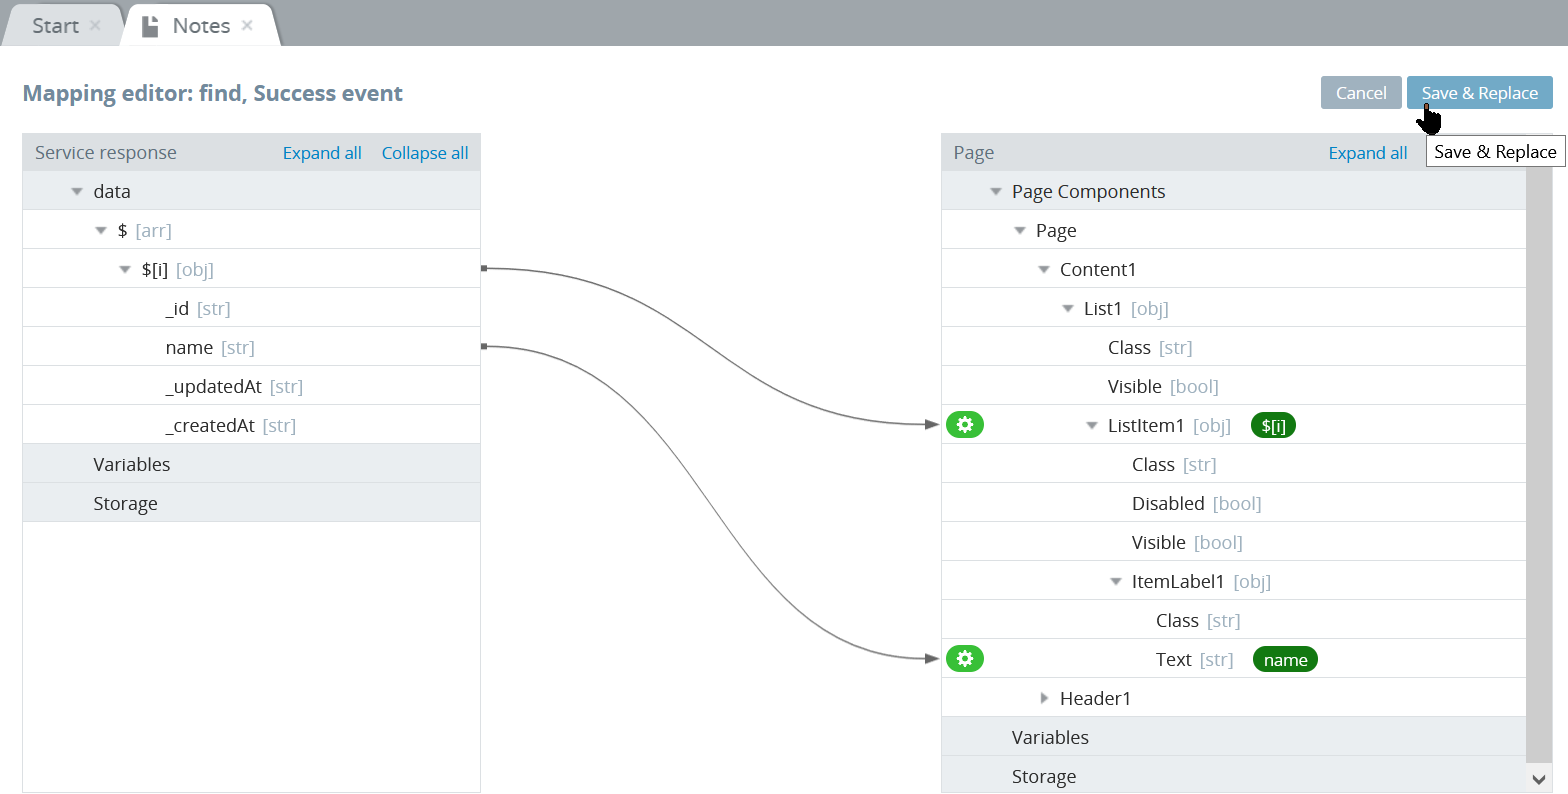
- Open the page DATA panel, select the notes_find service from the datasource drop-down, and click the Add button. Then, change its local name to find:

- Click the service Success > Mapping button, create the following mapping and click Save & Replace:
- Now, go to the page DESIGN panel and unfold the EVENTS tab.
- For the After page showing event of the Page component, select the Invoke service action, select find from the drop-down list and save:
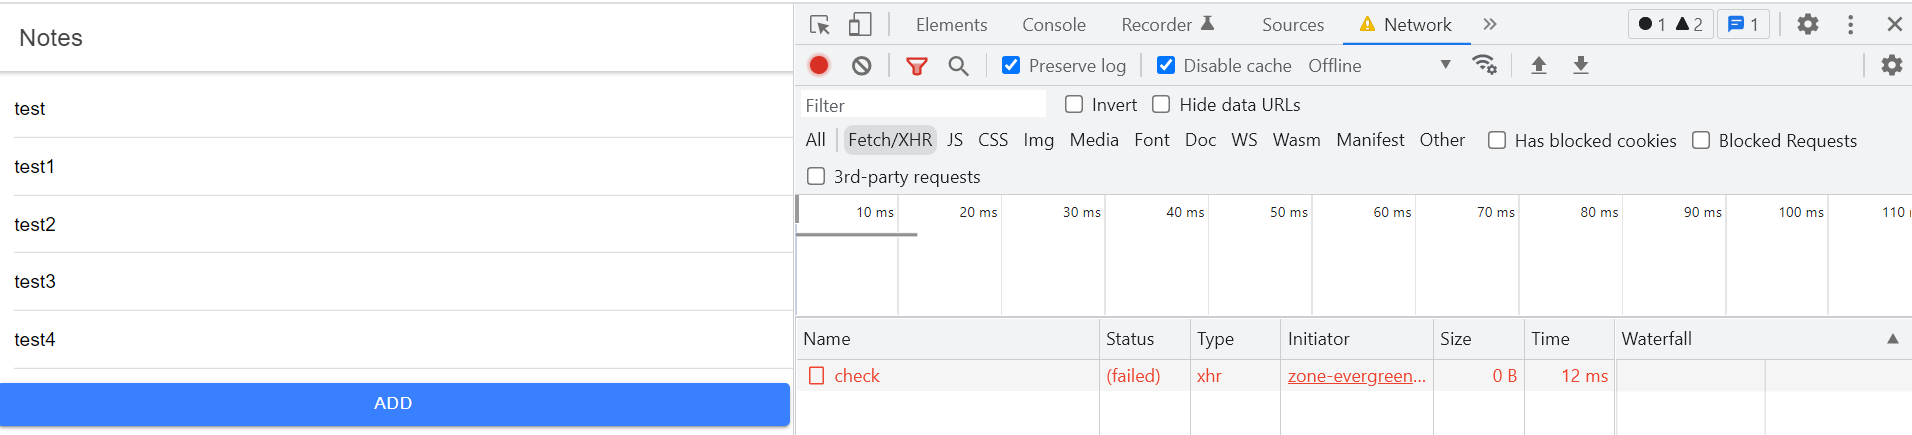
- Click the TEST button in the App Builder Toolbar to launch the app in the browser and see the list of notes: the test value.
Let's press the Remove frame button to better understand the inside behavior of the application.
Also, activate the browser Inspect mode and go to the Network tab:
Your app can now display records from the database.
Step 7: Creating AddNote Page
To be able to add a new note, we will need to go back to the editor and in the page DESIGN panel, add the Button component to the Notes page. Replace its default Text property with Add:

After clicking the Add button on this page, the user will be navigated to the screen where he will be able to create a new note. So, let's create such page and then make the Add button redirect to it.
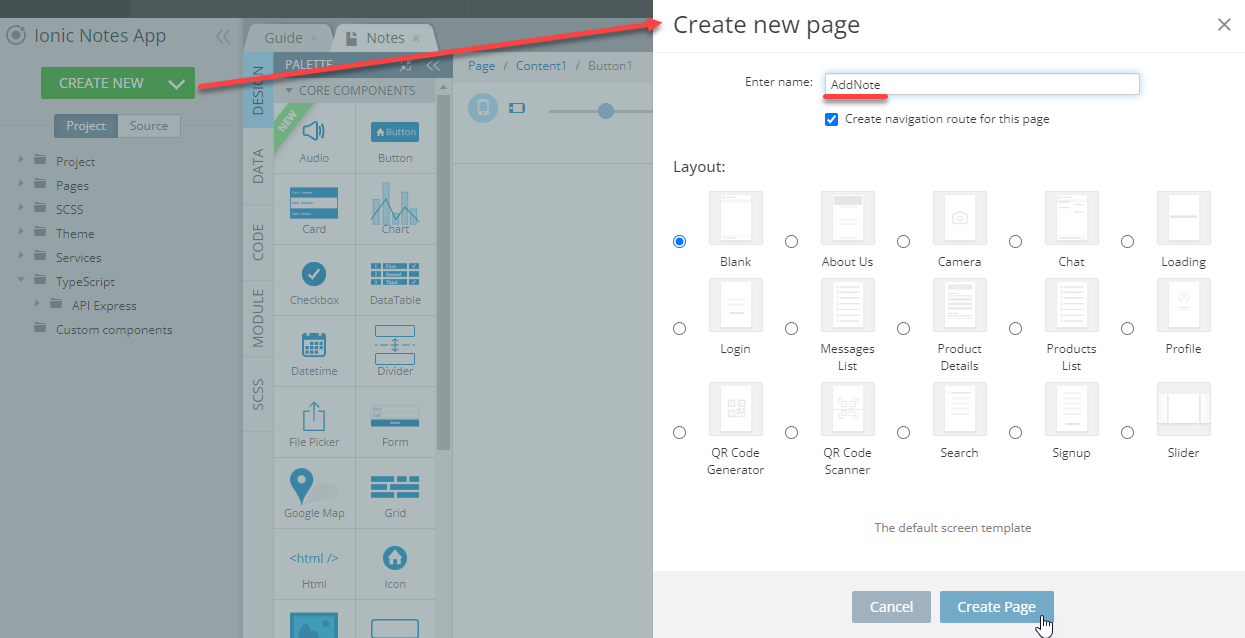
- Create a new page (CREATE NEW > Page) with the name AddNote:
- Open the page DESIGN panel. Then click on the Toolbar title in the app screen and change it to Add Note by changing the Text property under the PROPERTIES panel menu.
- Remove the Footer of the Page component: set it to False under the PROPERTIES panel and confirm the change.
- Add the Input component on the screen and change its Label Text field to Name.
- Add the Button component to the Toolbar buttons area and set its Component Type to Ionic Back Button under the PROPERTIES panel:

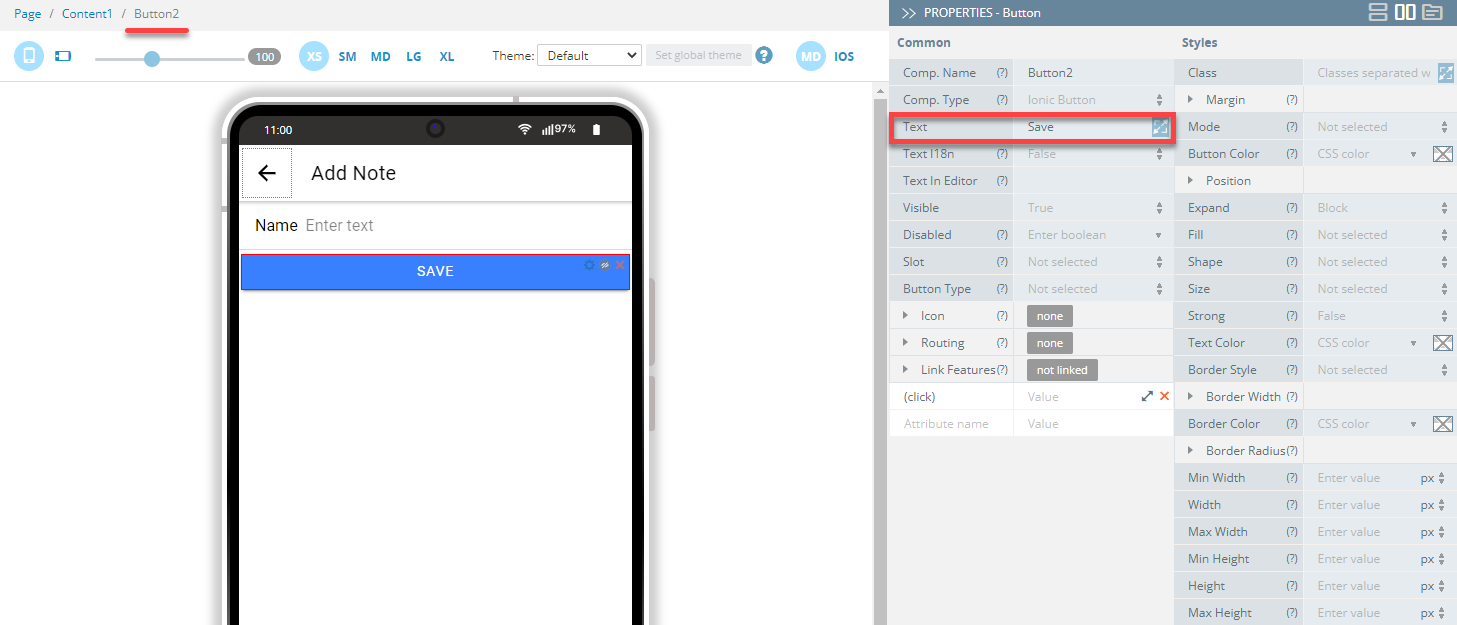
- Also, add the Button component and change its Text field to Save:
- Open the page DATA panel, select the notes_create service from the datasource drop-down, and click the Add button. Then, change its local name to create:

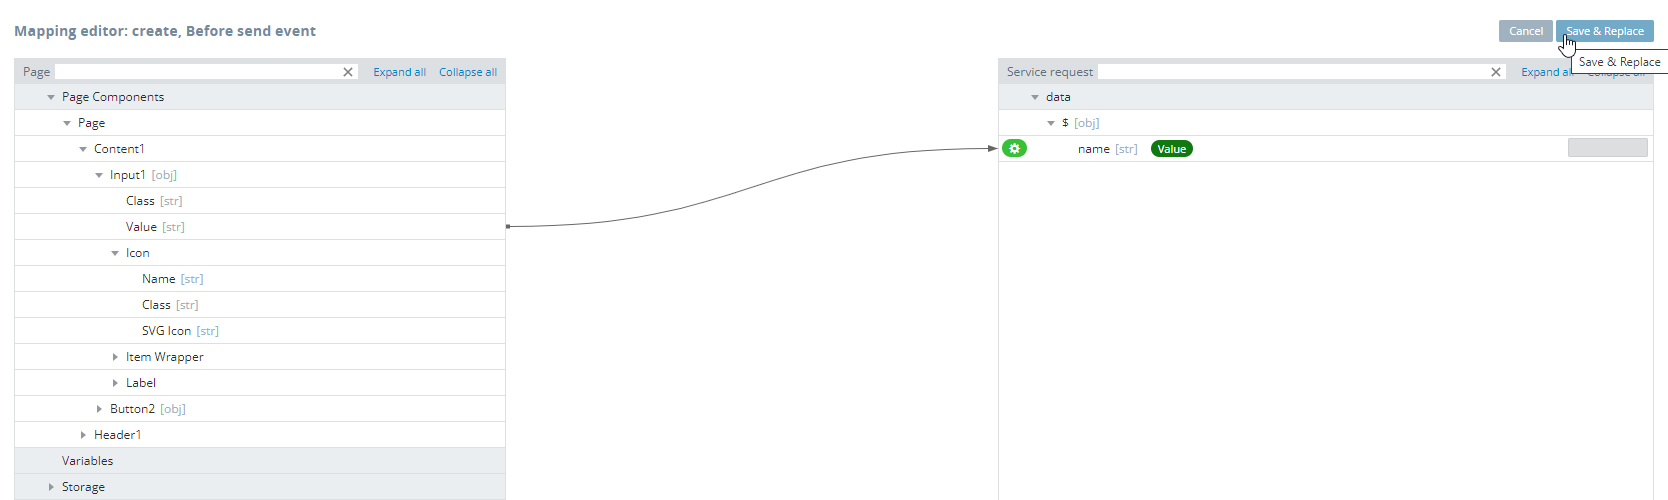
- In the open mapping editor window, click the Mapping button next to the Before send service, create the following mapping and click Save & Replace:
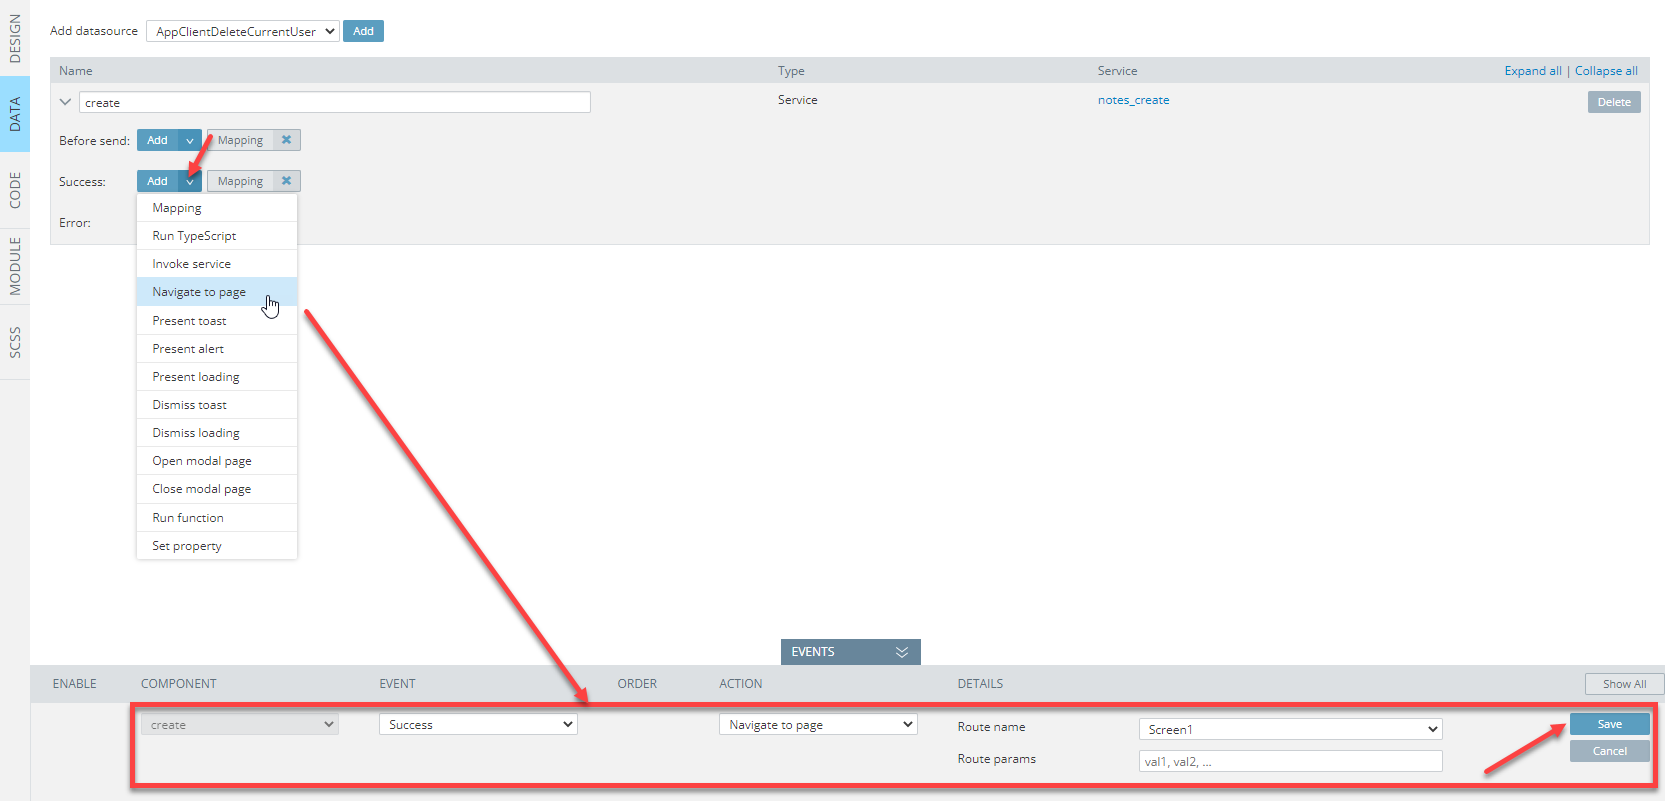
- Now, click the Add arrow button next to the Success service, select the Navigate to page action, then select Screen1 for its Route name:
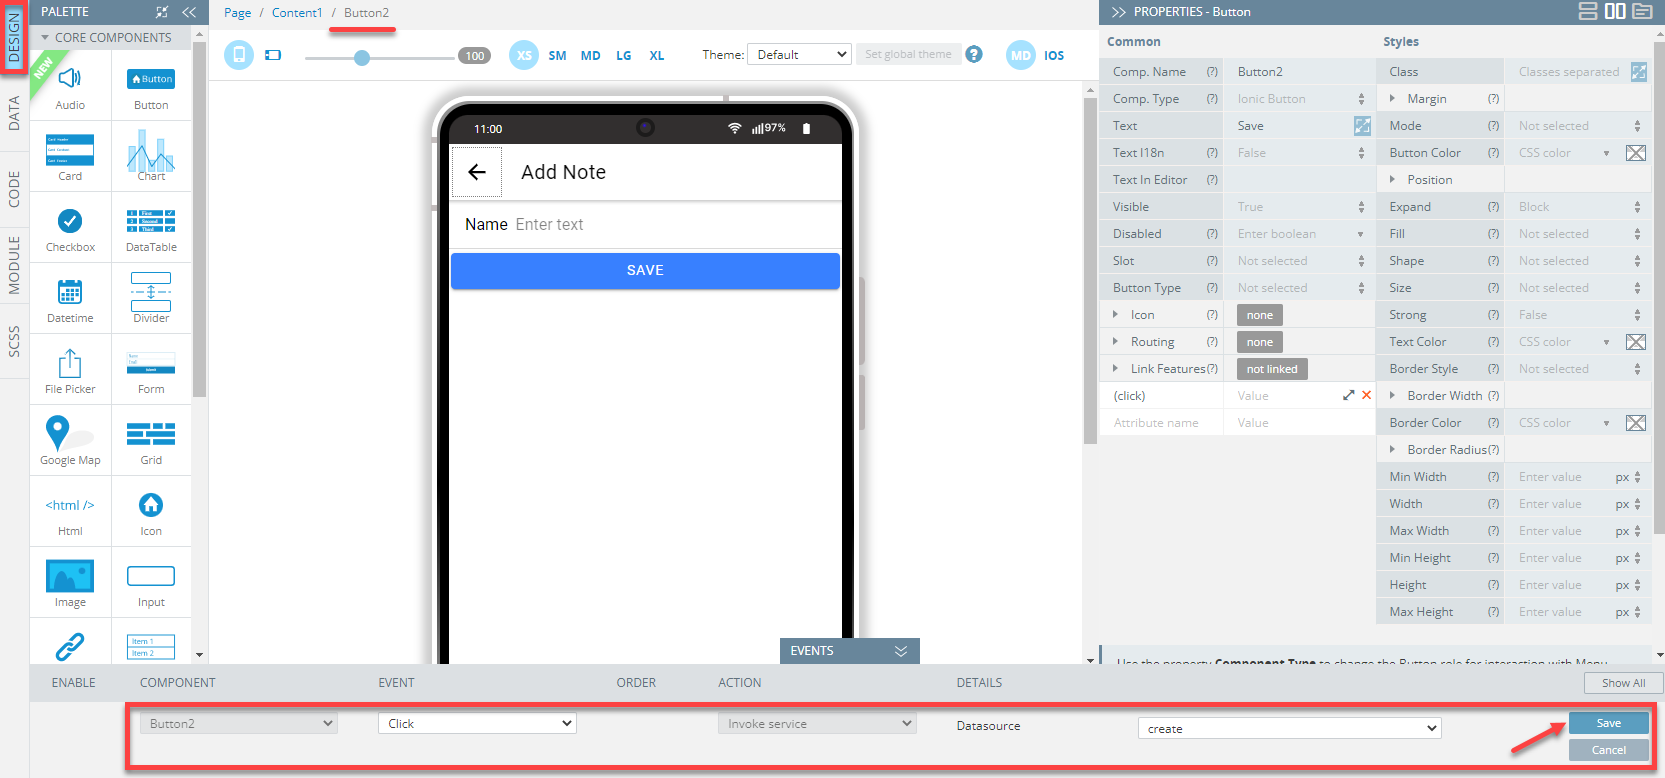
- Go back to the page DESIGN panel and select the SAVE button. For its Click event, set the Invoke service action, then select create from the drop-down and save:
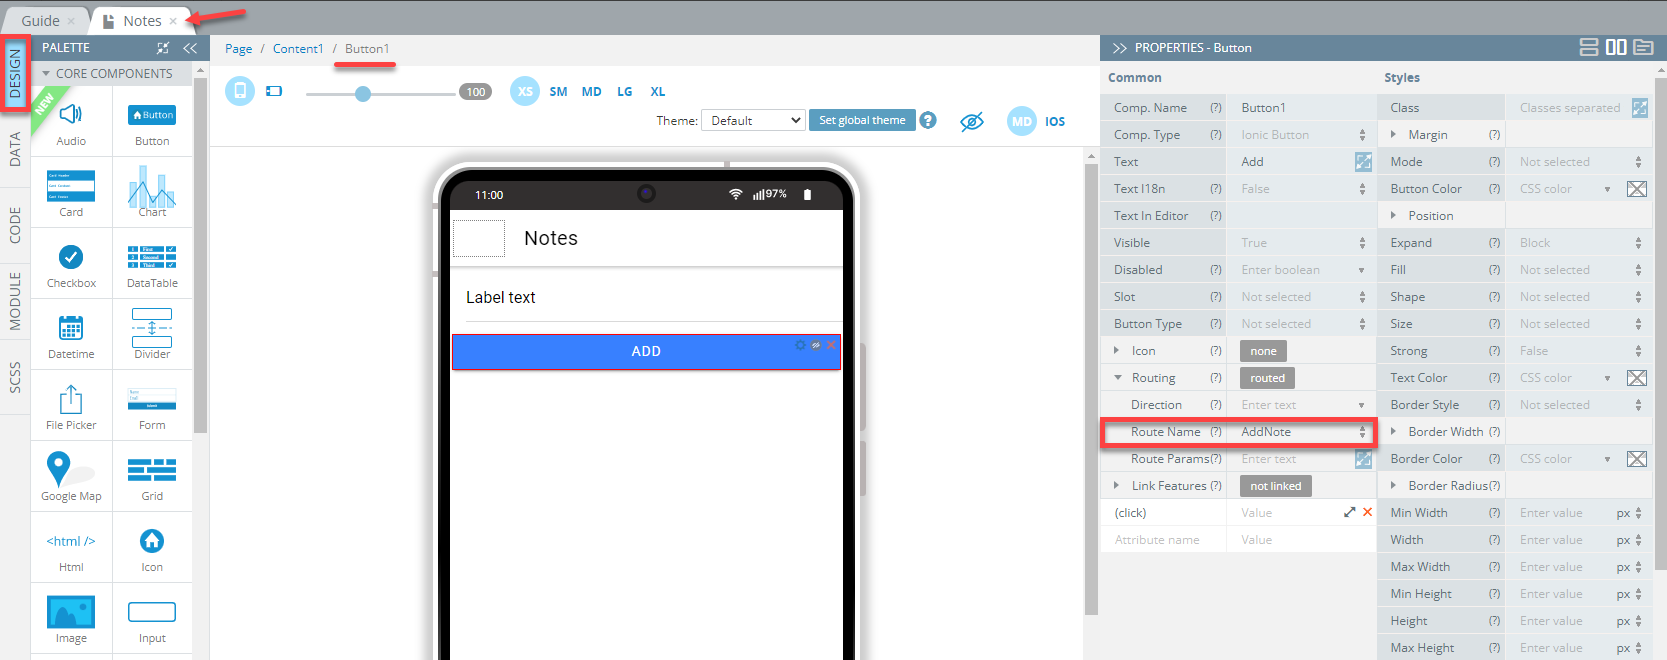
- To be able to test the app behavior, we will also need to set the Routing > Route Name parameter of the Add button (created for the Notes page in Step 6) to the AddNote page:
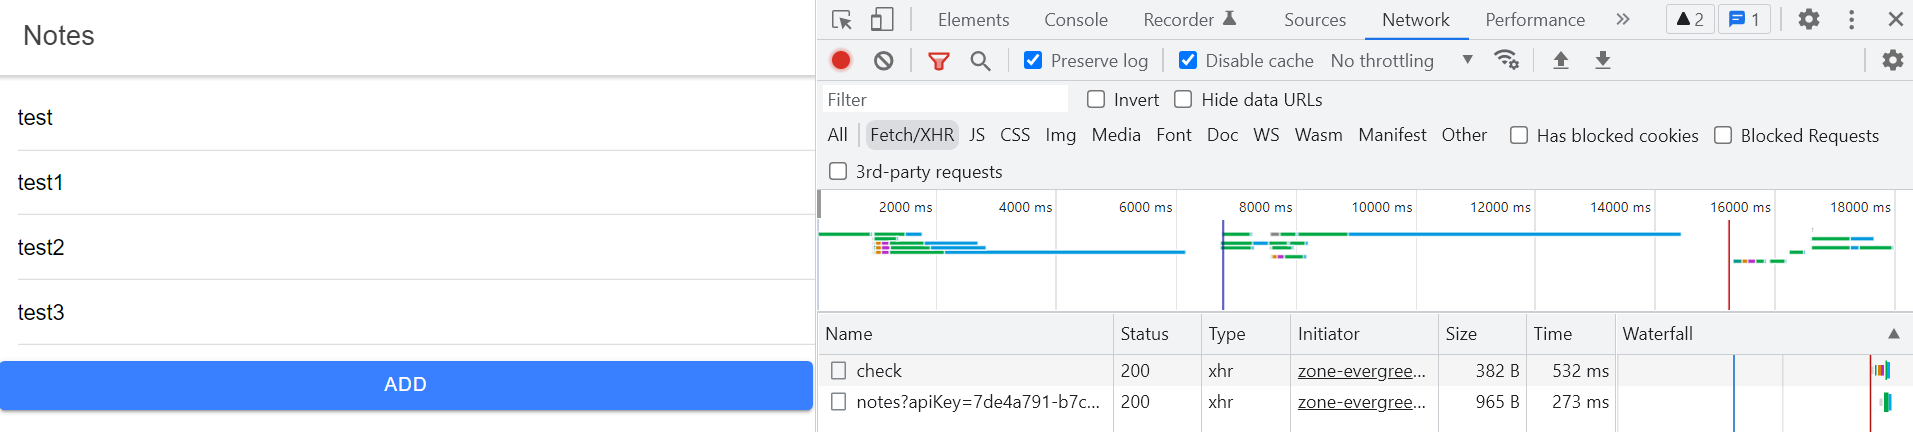
Now, let's test: click the SAVE button in the App BuilderToolbar to refresh the page in preview. The Notes page will open with the existing test value. Click the ADD button to redirect to the Add Note page where you can try adding more values, for example test1. After you click SAVE, the new value will be added to the notes list:
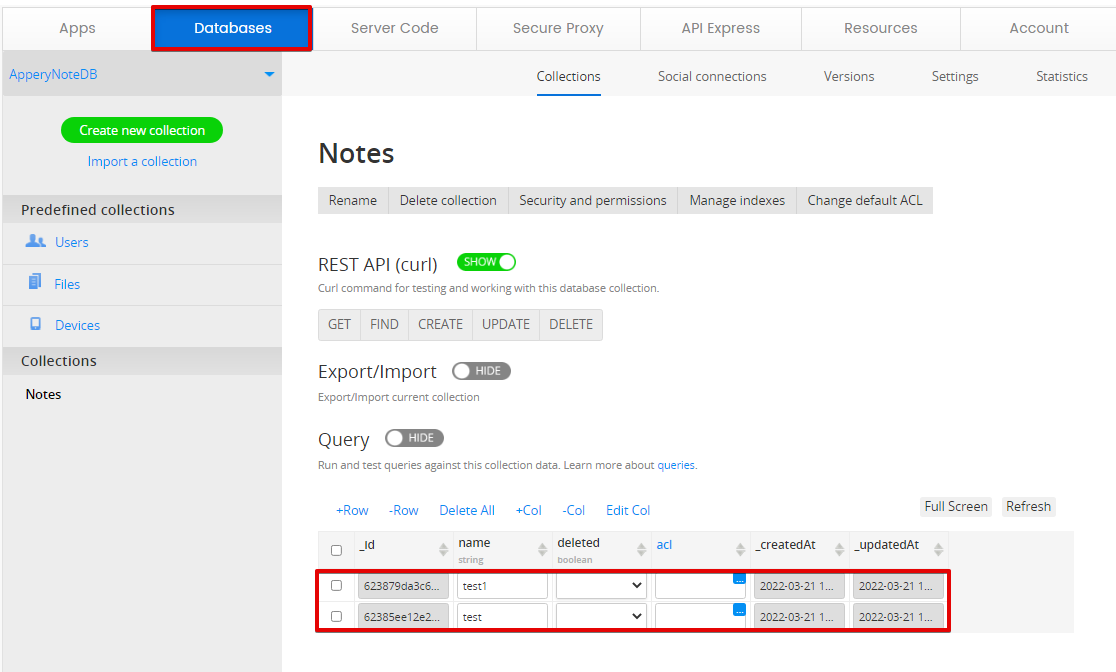
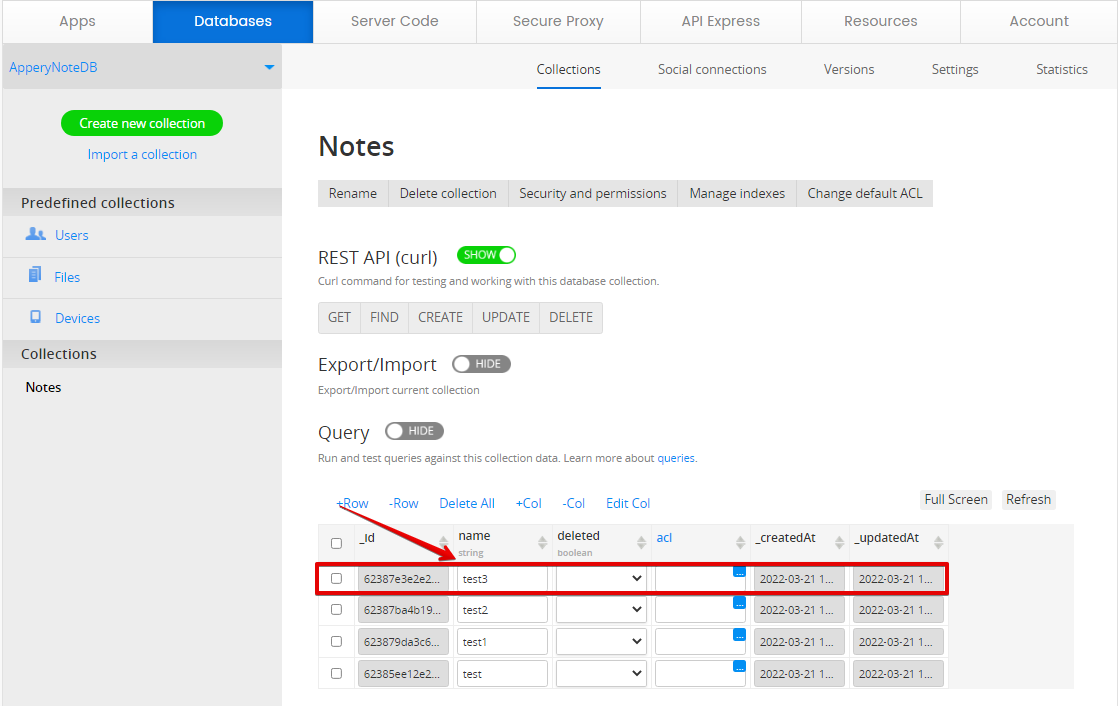
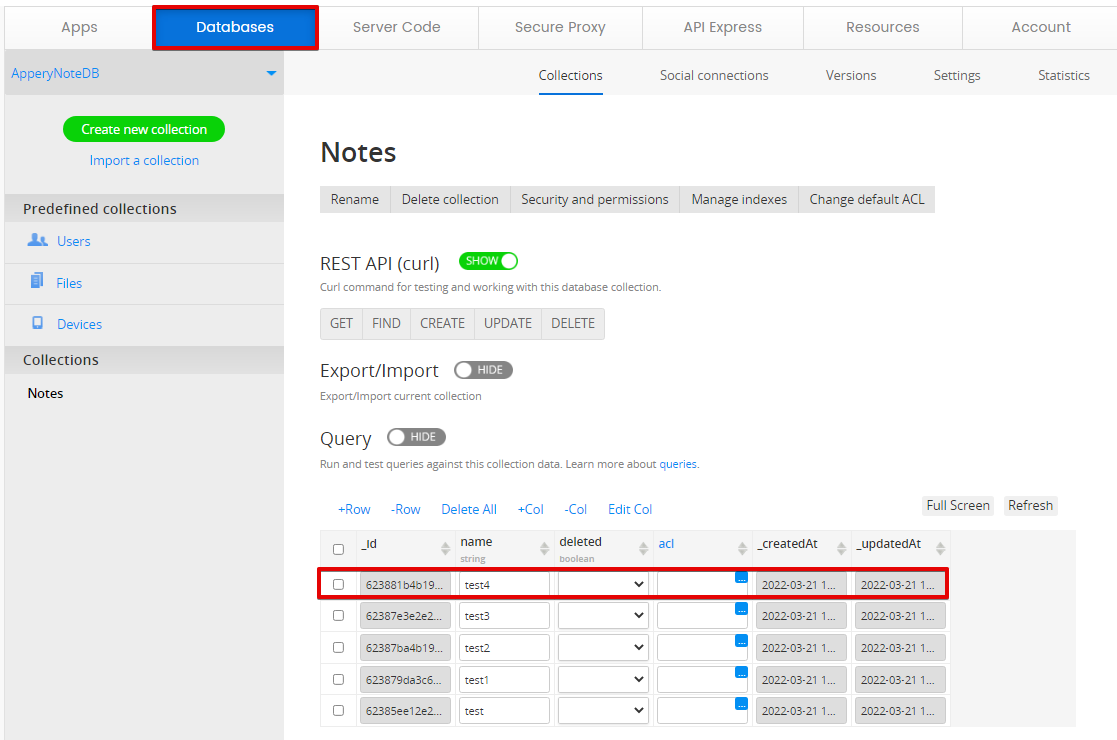
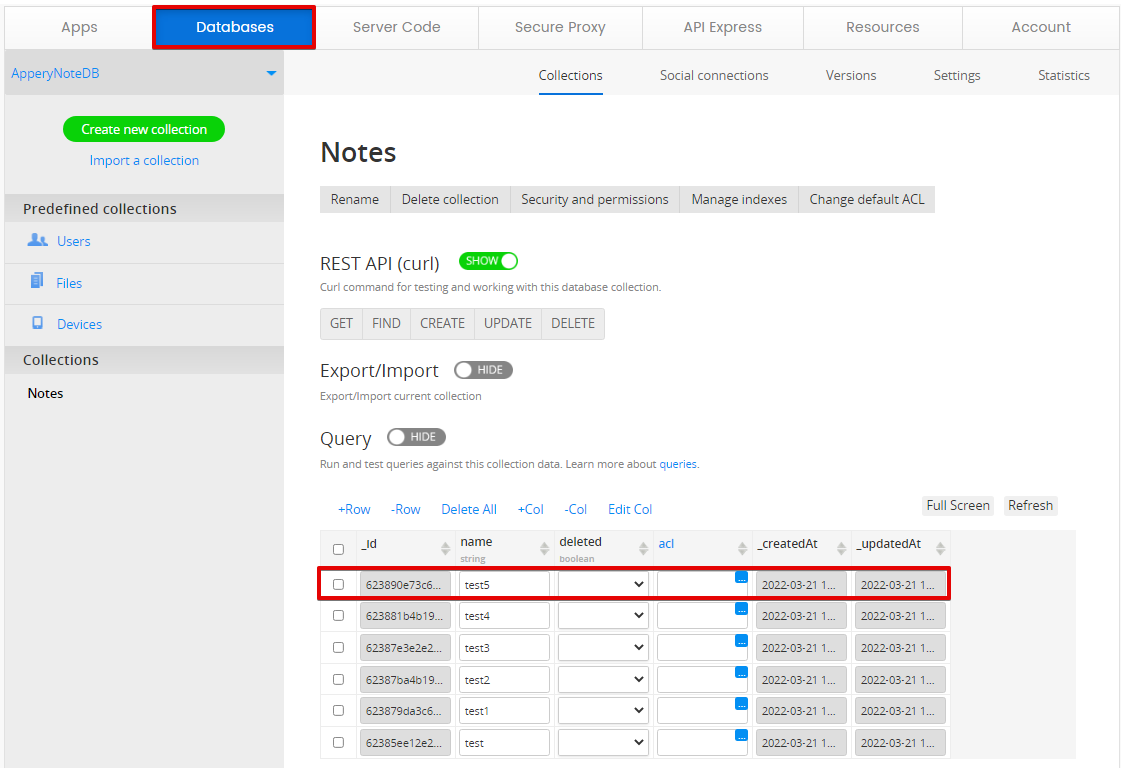
Also, if you now go to the database Notes collection and click the Refresh button, the new test1 record will be displayed:
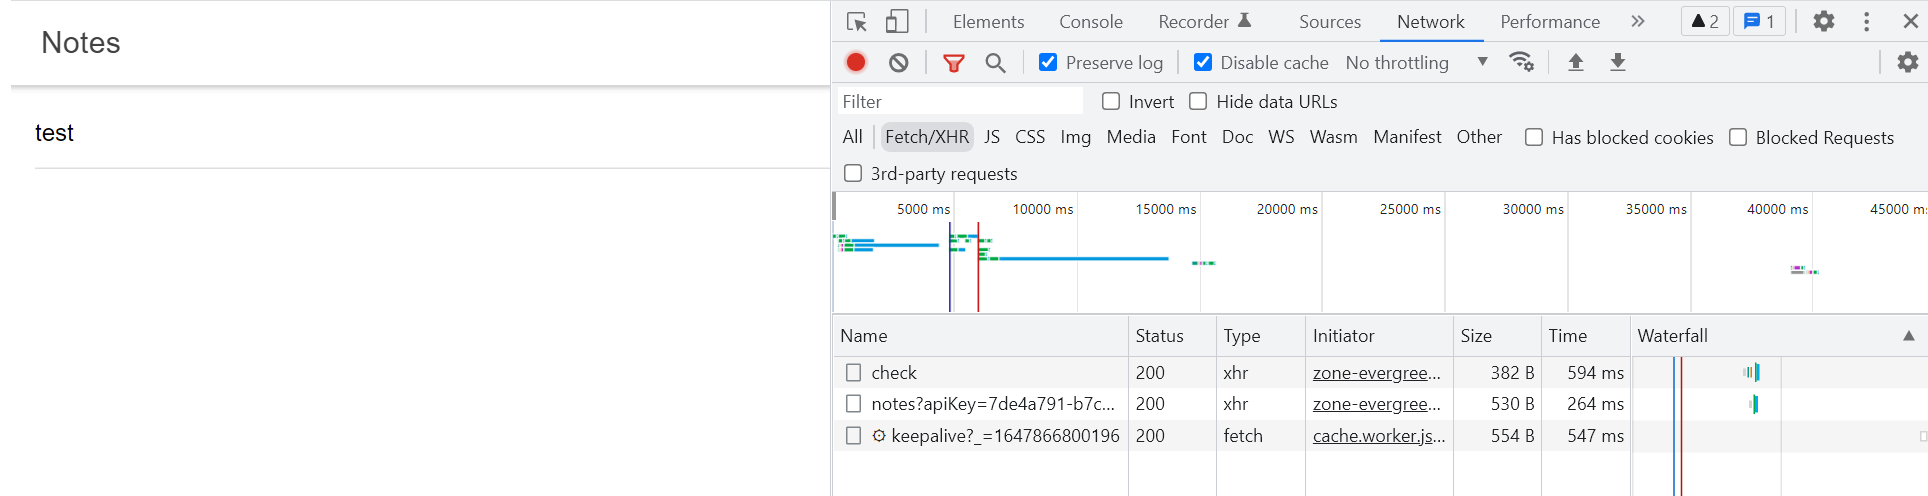
Let's inspect what is actually going on inside the application by reviewing the browser Network tab:
- Click the TEST button in the App BuilderToolbar and then click Remove frame.
- Press the ADD button again.
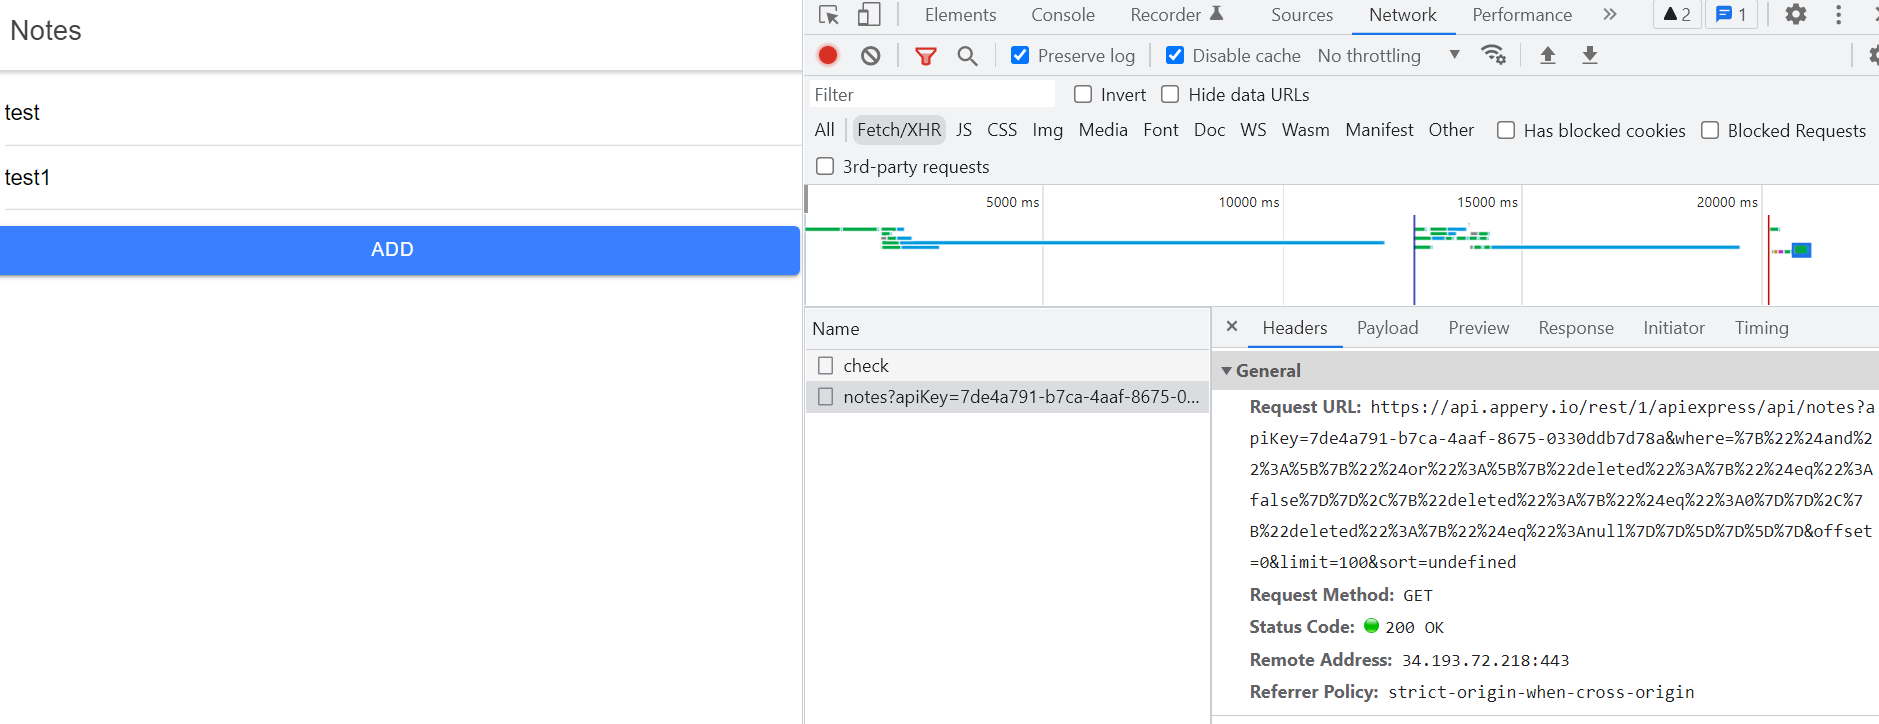
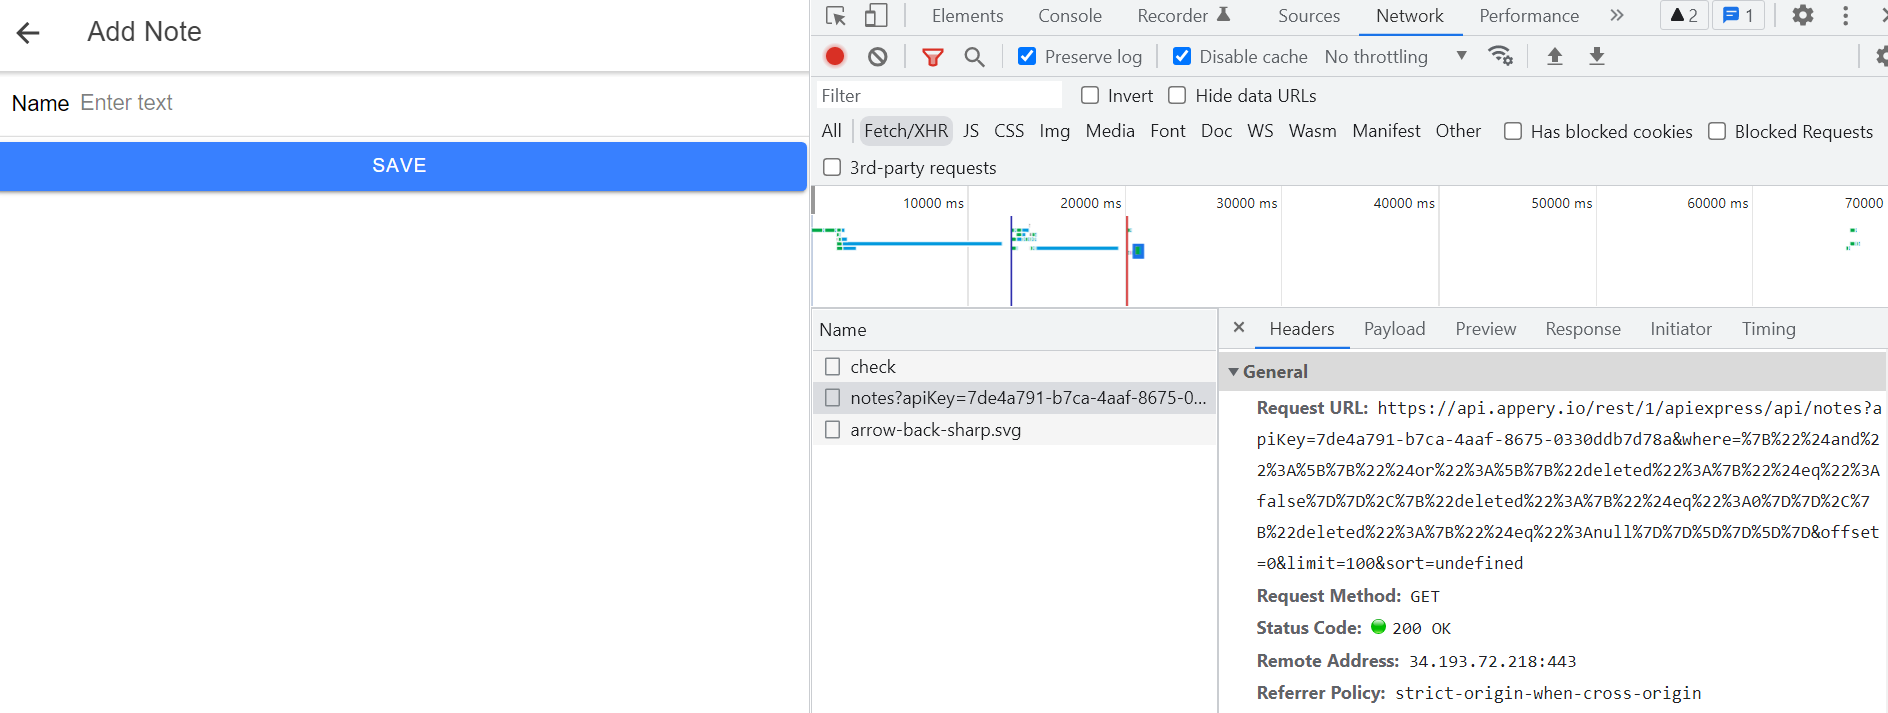
- The Add Note page with the Name field, back- and SAVE buttons appears - the GET request is displayed:
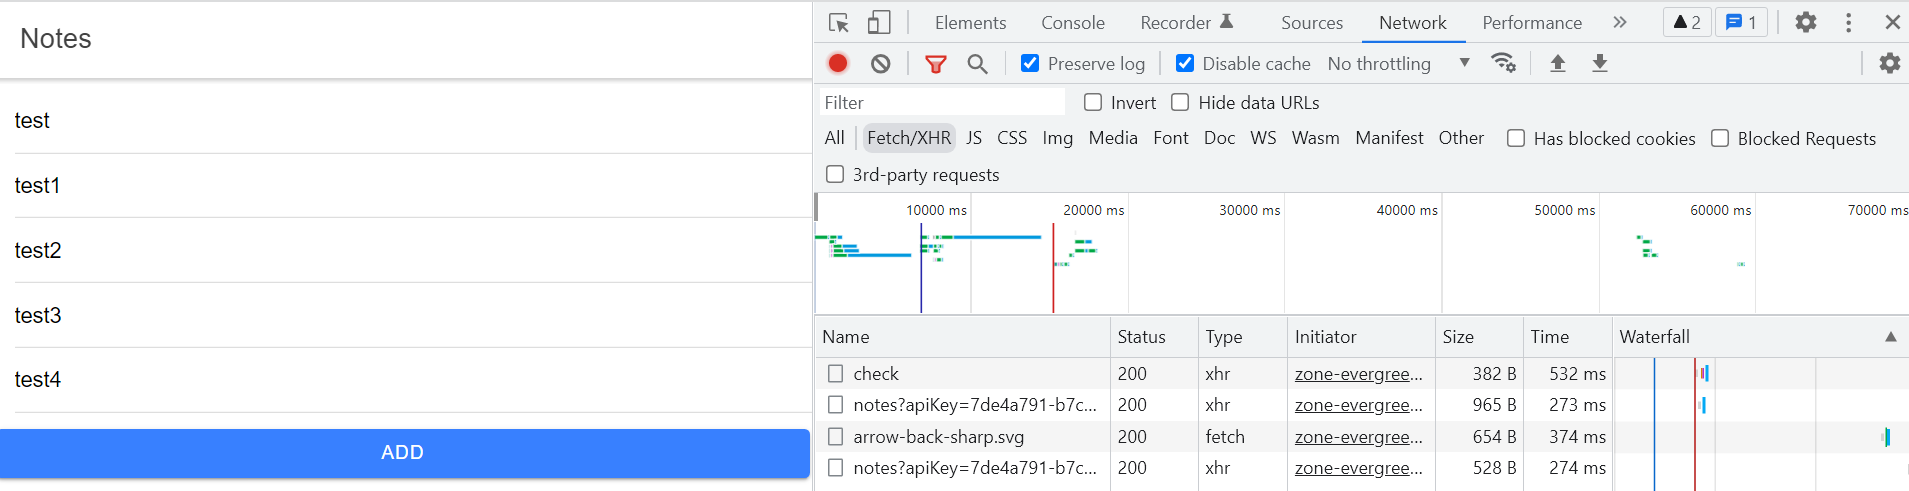
- Fill the Name field with some value: for example, test2. Press the SAVE button.
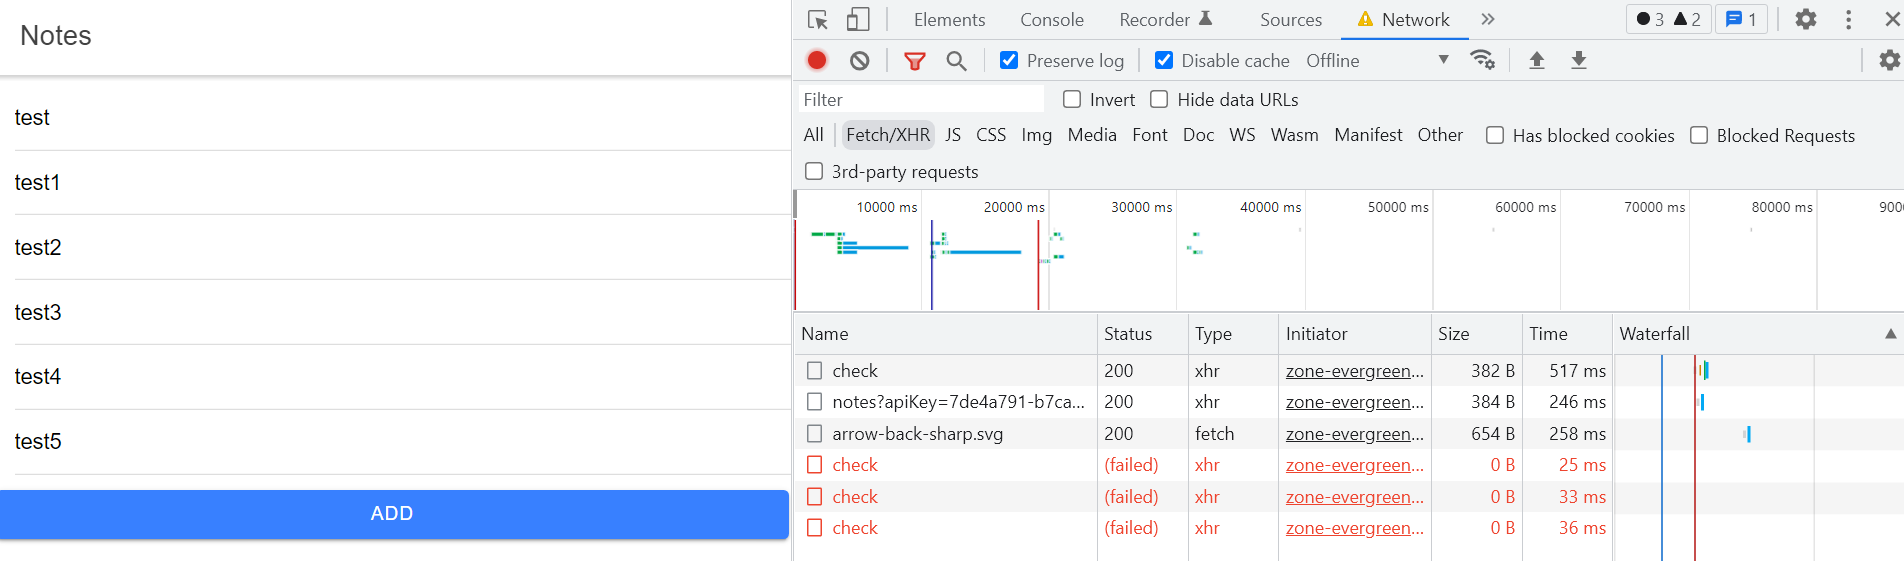
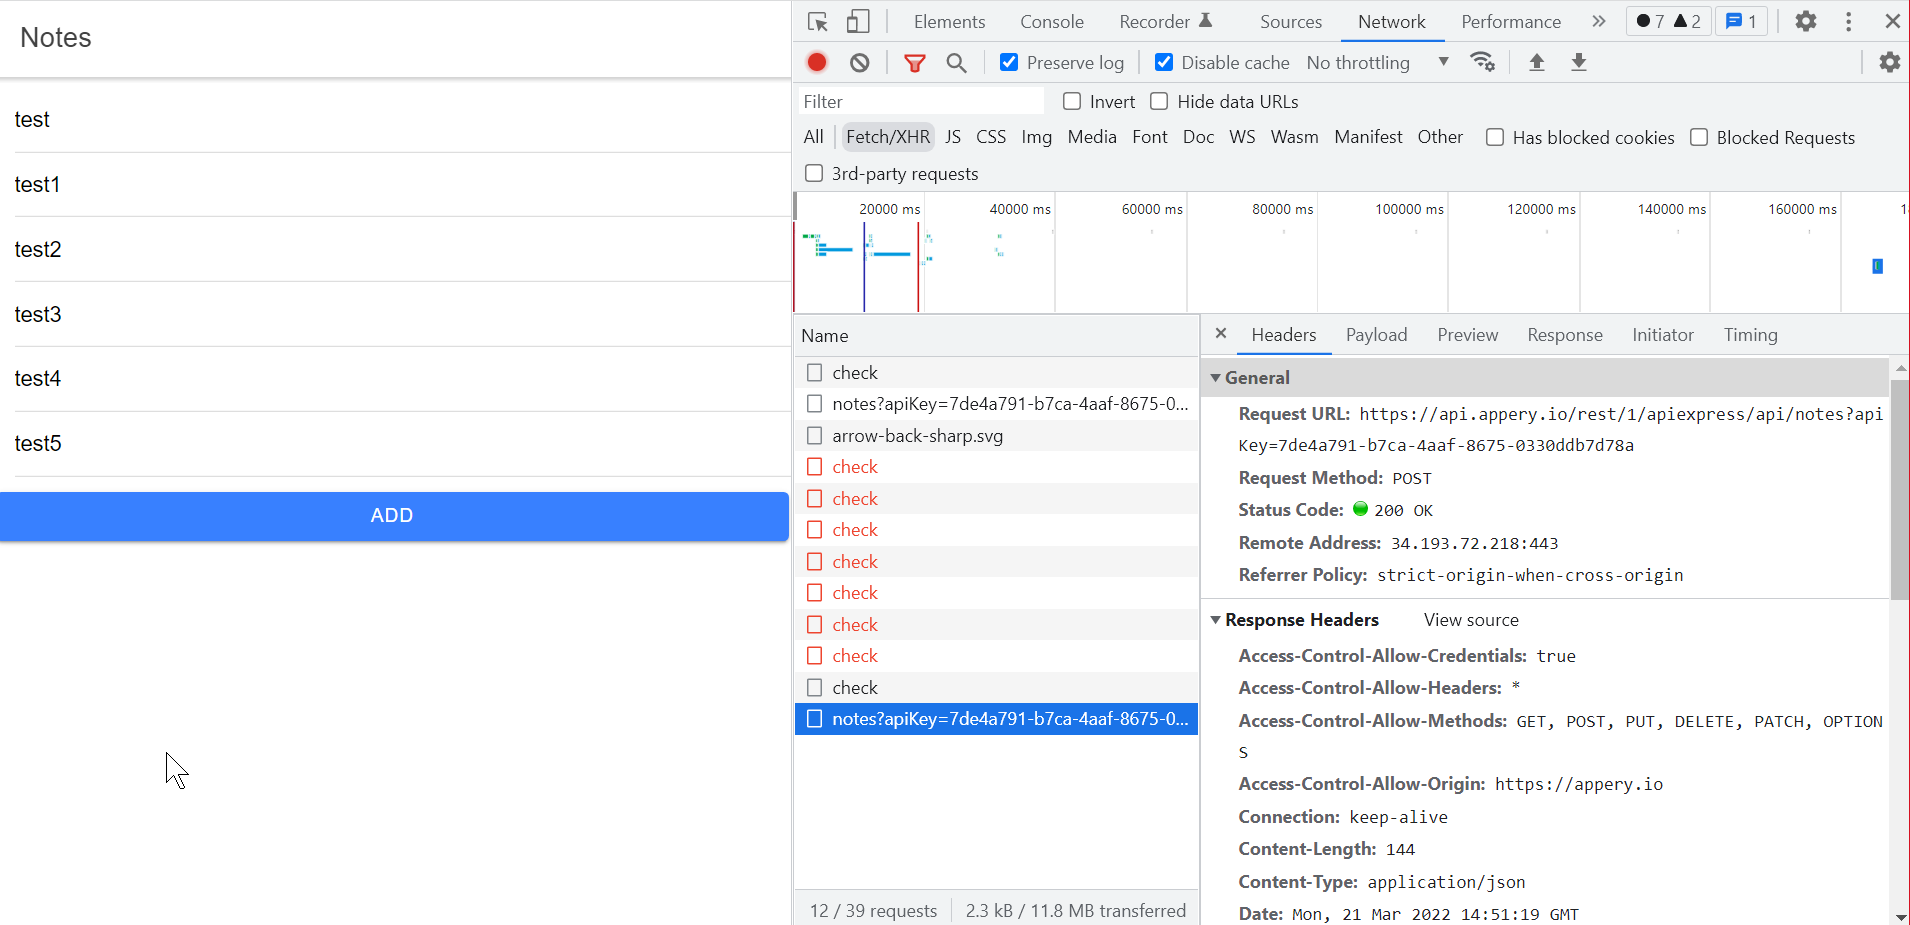
- The Notes page appears again with the newly added note - the POST request is invoked:
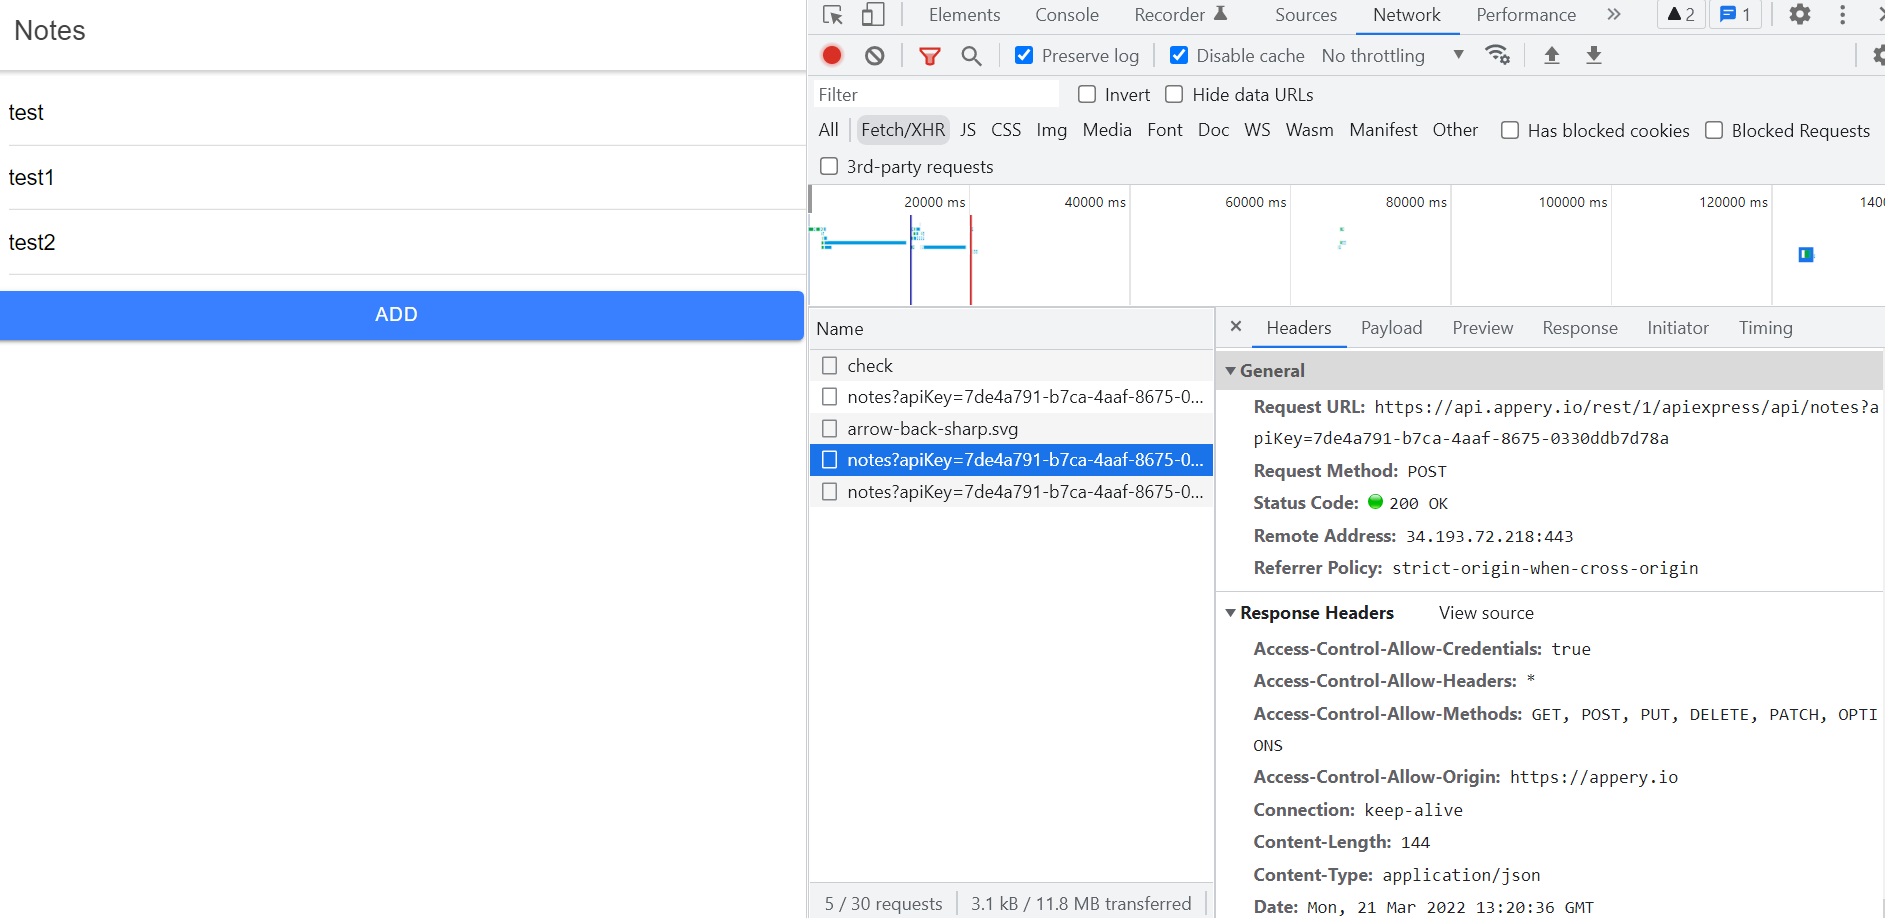
Also, you can review the request Preview tab for full information about the created note:
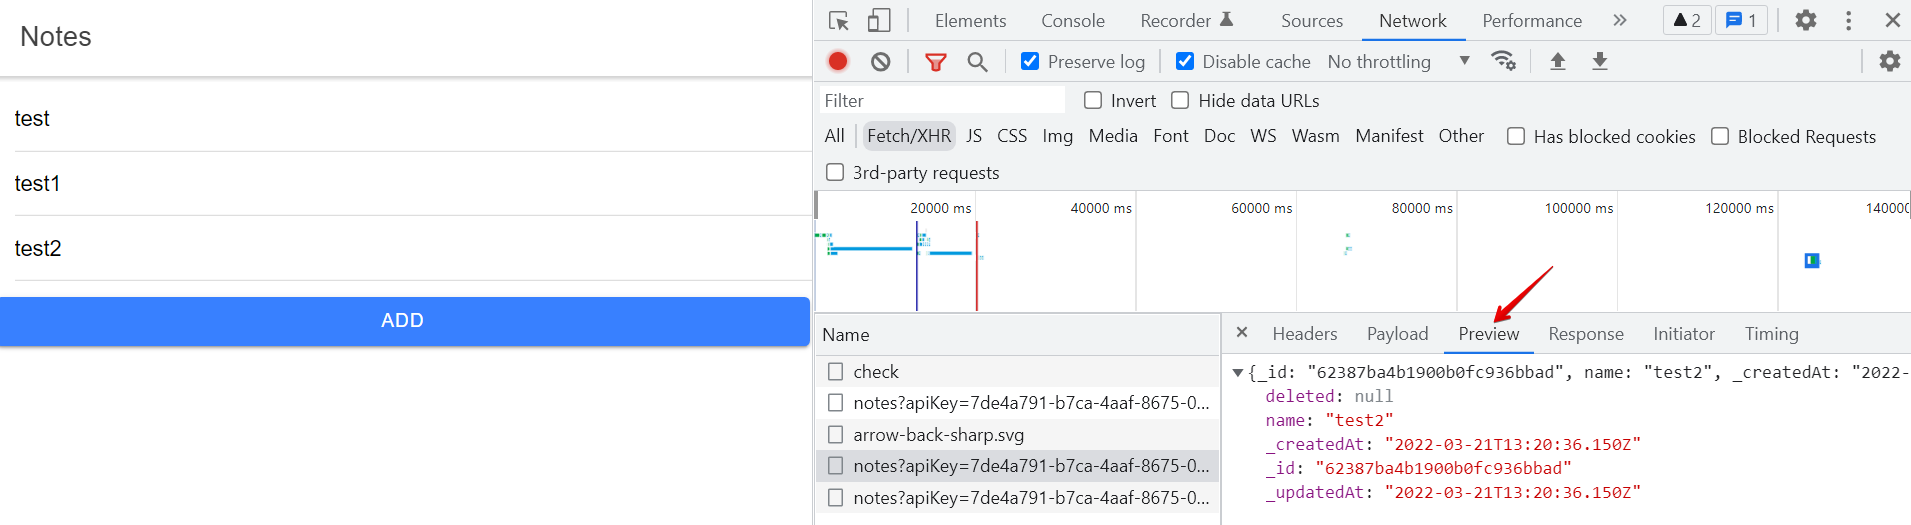
- Finally, the GET service is invoked to get the updated list of notes:
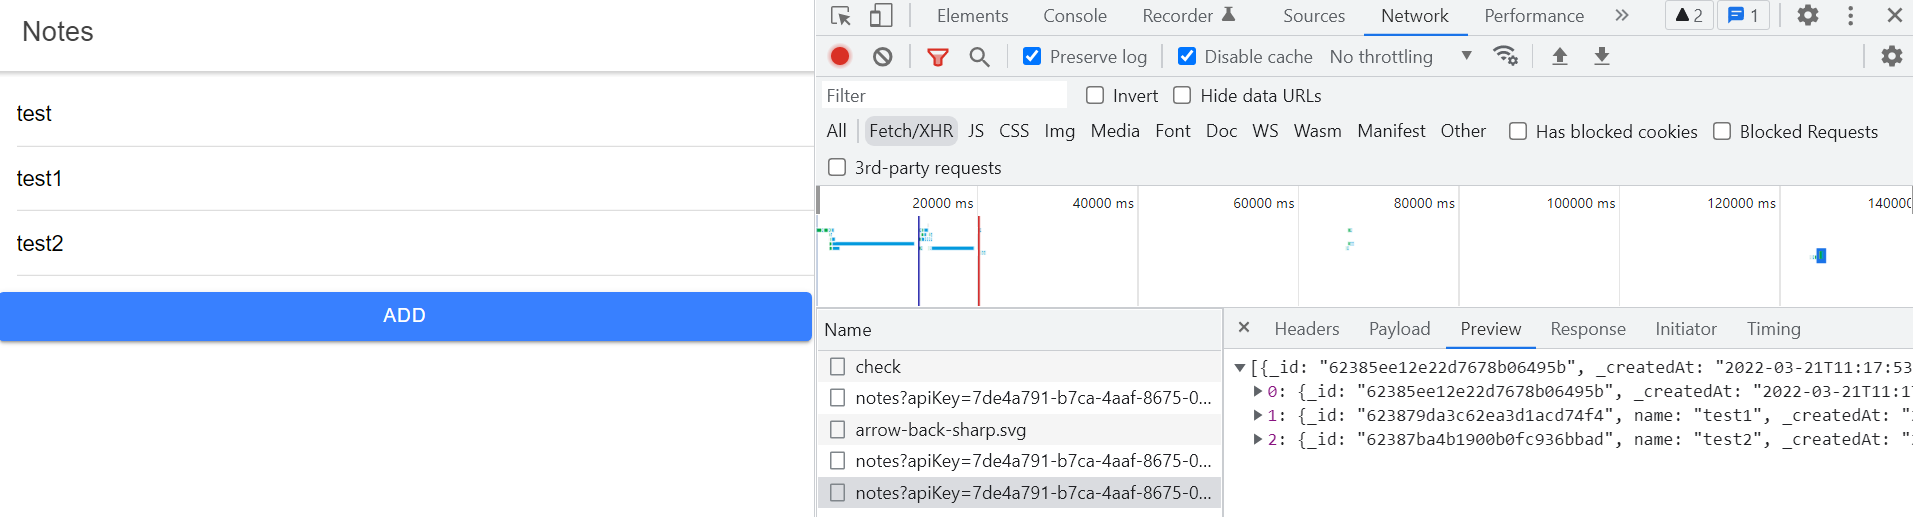
You can try pressing the Refresh button several times to notice that the response of fetch operation is empty. Also, pay attention that the response of fetch operation contains only one record with content: note2. Application loads only the modified data.
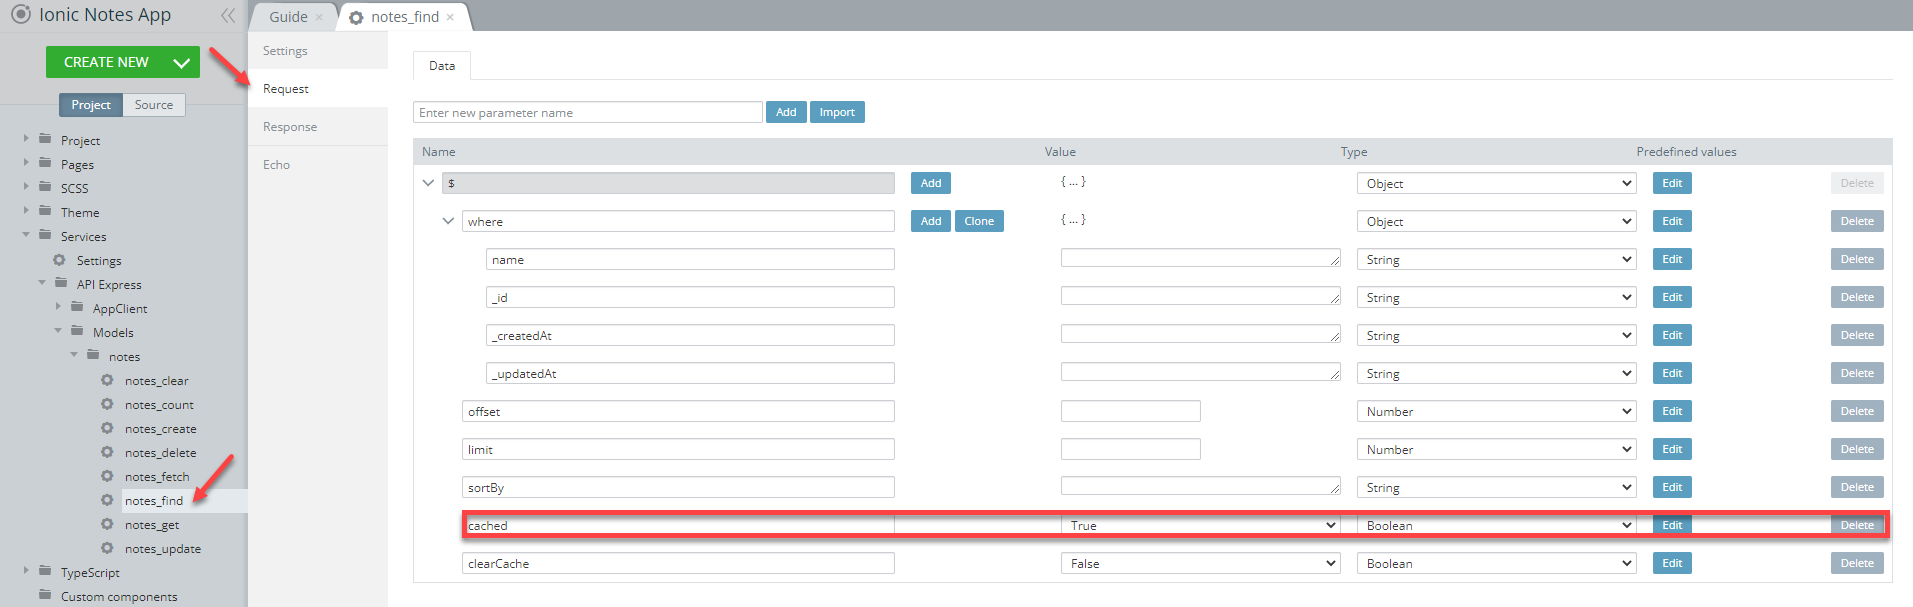
To reduce the number of requests, let's return to the app and go to its Services > API Express > Models > notes folders and open the notes_find model.
Under the Request tab, set the cached parameter to True: this will mean, that when we invoke the find operation, we’ll not make a real REST call request and data will be taken from the local database:
Return to the app preview and refresh the page. Clear cache, then refresh to see that the application didn’t make any REST API calls, however, we can see notes.
Now, let's see what happens if a new record is added into the database outside our application.
Open the database and add a new row with another test value:
Come back to preview and refresh it to see that the just created note is not on the list:
To resolve this issue, first of all, we have to synchronize the local database with a third-party database and only then we will be able to manage this note.
The app now can display and add records.
Step 8: Creating Loading Page
- In the app, add a new screen and name it to Loading.
- Specify this screen as the Default route under the Project >Routing tab:

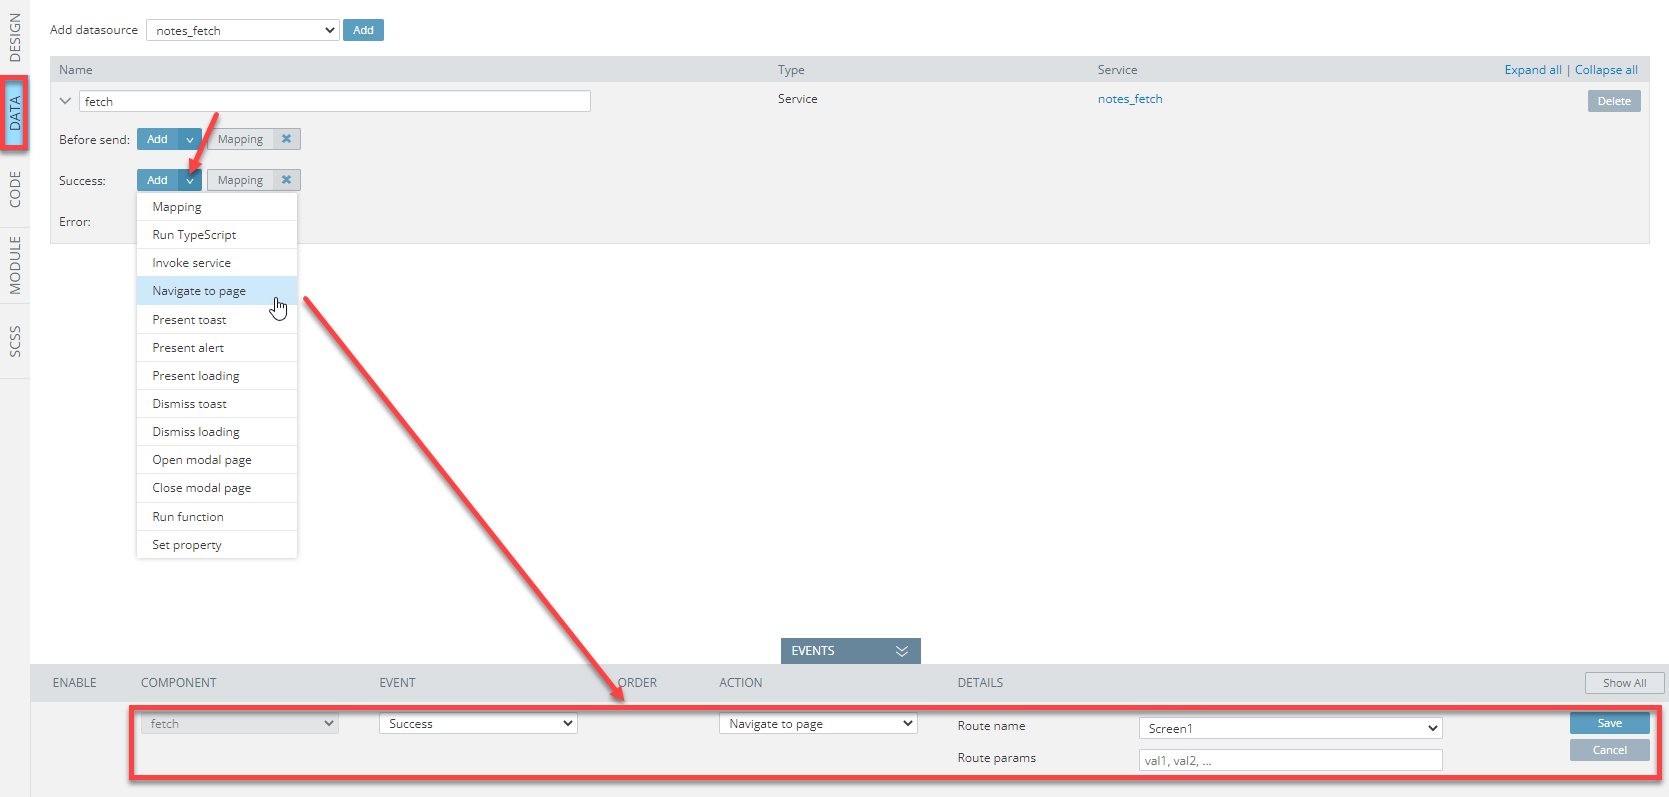
- Now, open the Loading page DATA panel and select the notes_fetch datasource from the drop-down list. Rename it to fetch. It will be responsible for data synchronization:

- To invoke the Navigate to page action, click the Add arrow button of the Success service.
- Select Screen1 in the Route name field and press the Save button:
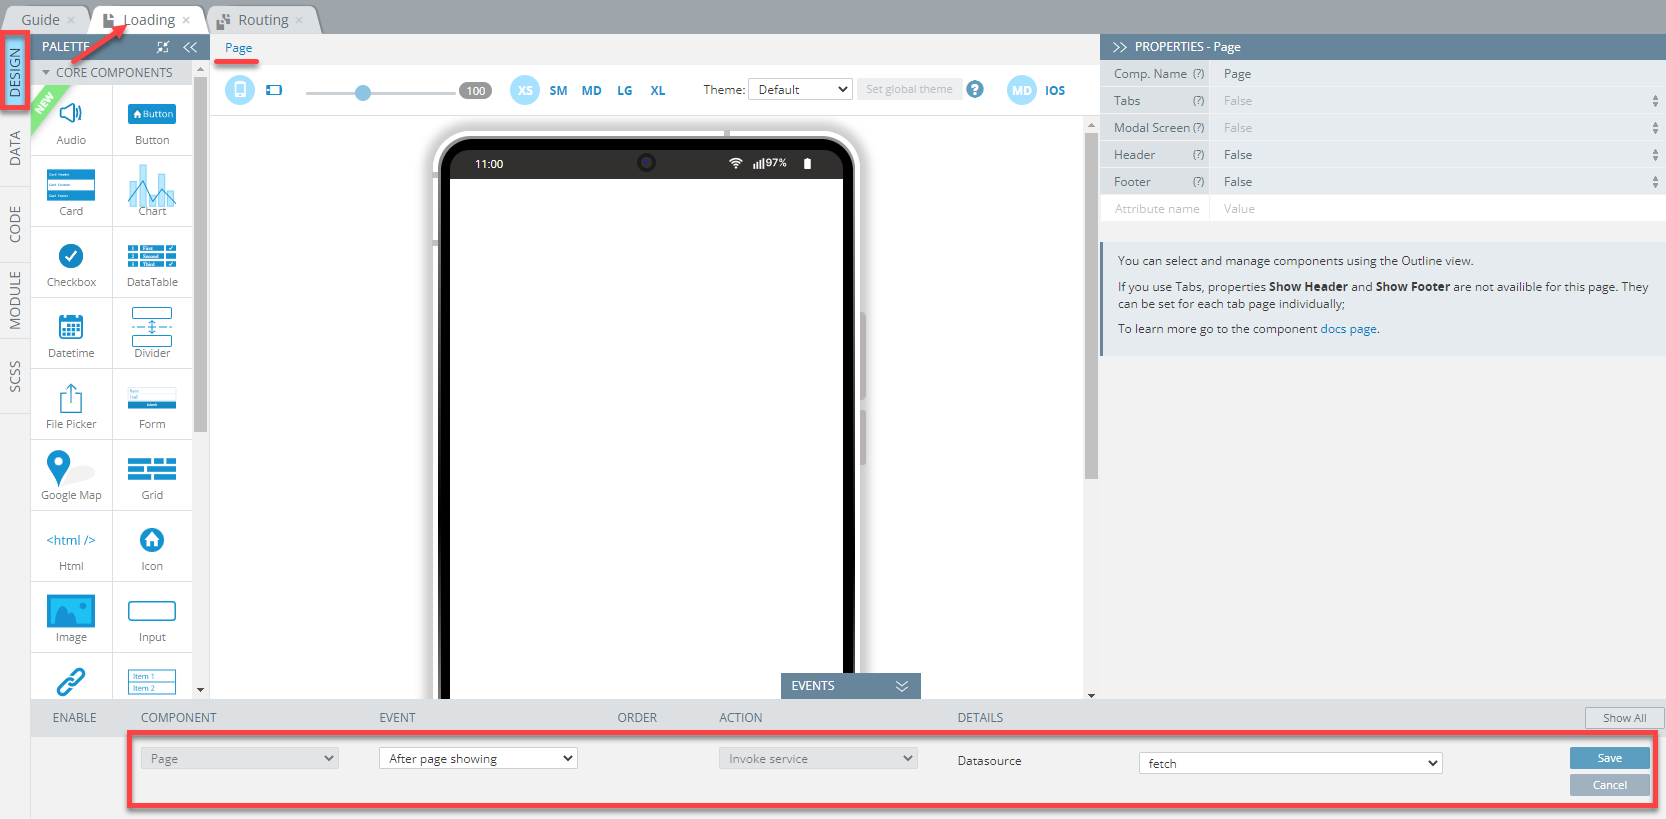
- Go to the page DESIGN panel and remove the page Footer and Header by setting the corresponding properties to False:

- Now, for the After page showing event of the Page component, select the Invoke service action, select the fetch component from the drop-down and save:
- Click the SAVE and then TEST buttons in the App BuilderToolbar. The application gives only one REST API call in the preview to synchronize local and server databases:
- Let's add another note, note4 to the list. It will be added but no dedicated GET REST API call is not made:
However, the note was successfully added to the database (click Refresh to see it):
Step 9: Emulate Offline Mode
To review how the application can support offline mode, we will need to clear the requests history and emulate the browser offline mode.
Emulating Offline Mode for Different BrowsersPlease be aware that the process of emulating the Offline mode differs in different browsers.
In Chrome, for example, you will need to choose Offline in the drop-down list of the No throttling settings:
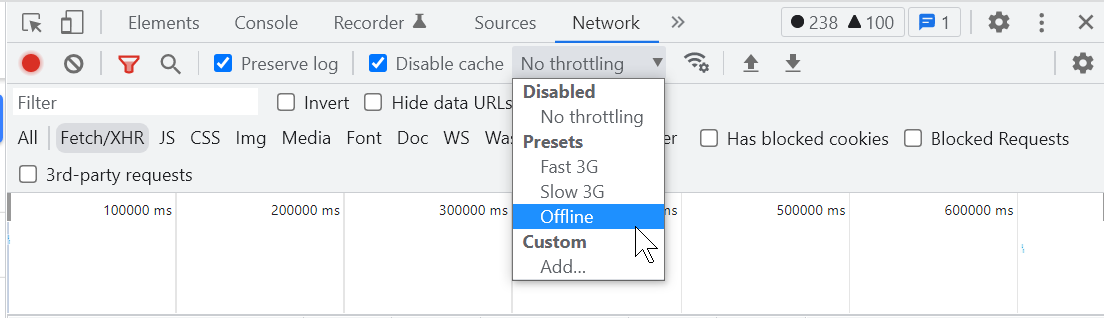
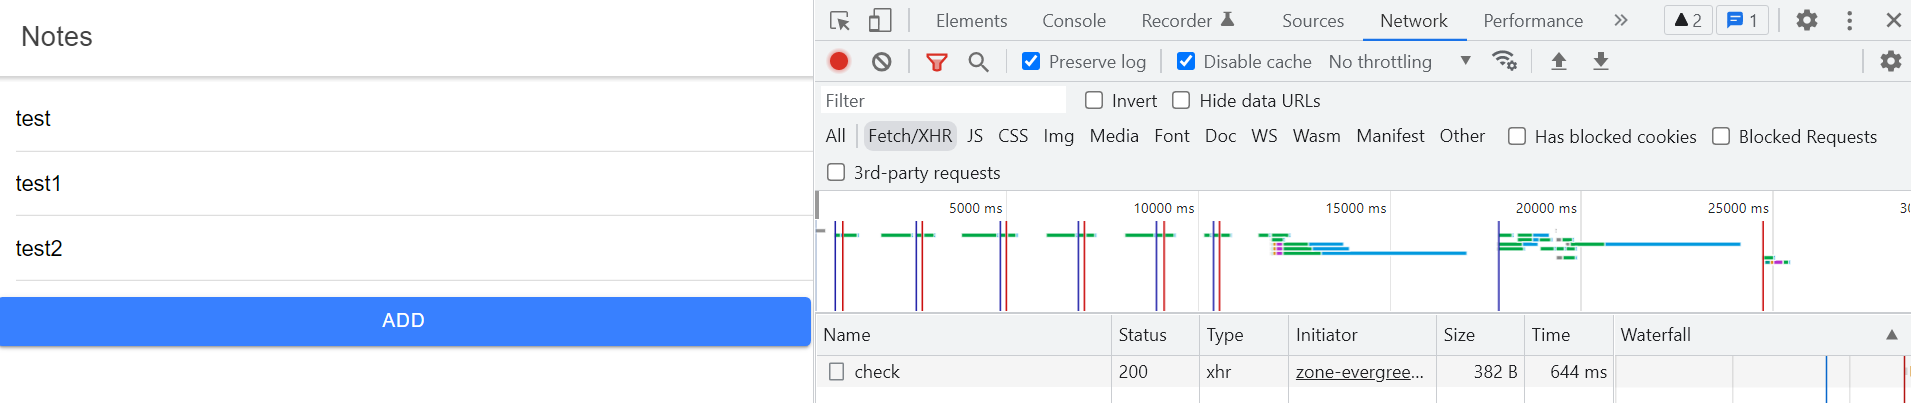
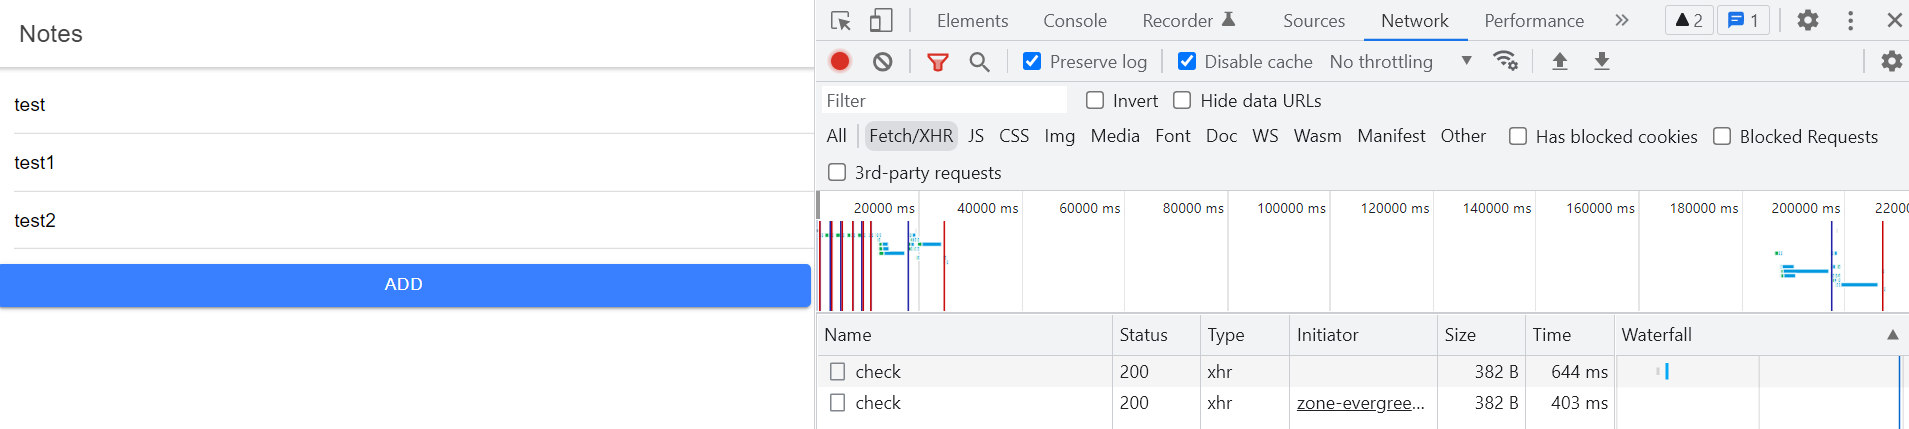
- Clear all requests to display the check request only:
- Then, add a new note: test5. The new note will be added to the Notes list.
Note, that the application did not make any REST API call because it is offline:
As a result, the test5 note is absent from the database.
- Revert to the No throttling value in the drop-down list of the browser Internet settings.
As soon as the application gets the Internet connection, we can see that the application has done the POST request:
Also, a new record is created in the linked database:
Step 10: Adding Logic for Updating Notes
Now, let's extend the app to allow editing the existing notes.
- Open the DESIGN panel of the Notes page and add the button to the List item component, set its Text property to Edit:
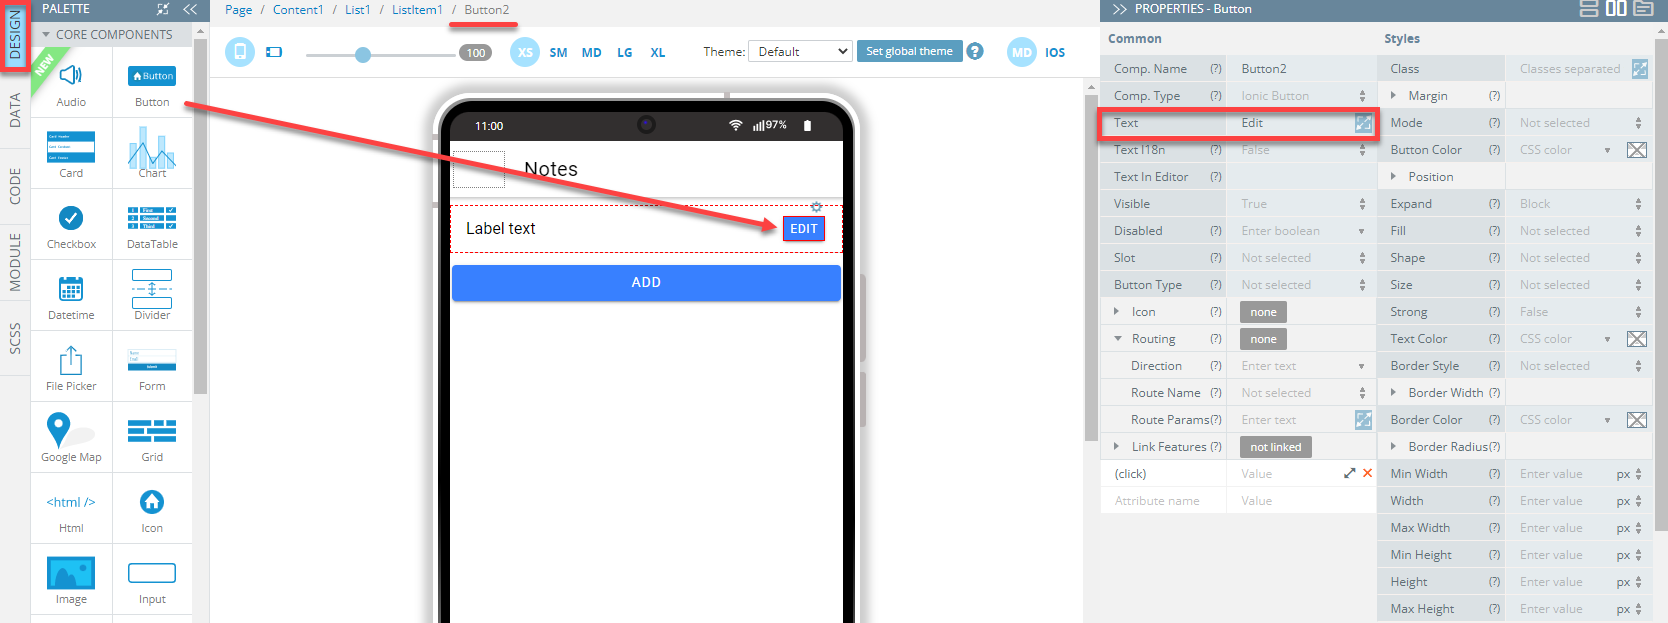
After click on the EDIT button, a user will be navigated to the new screen where editing existing notes is possible.
- So, first of all let's create the EditNote page:
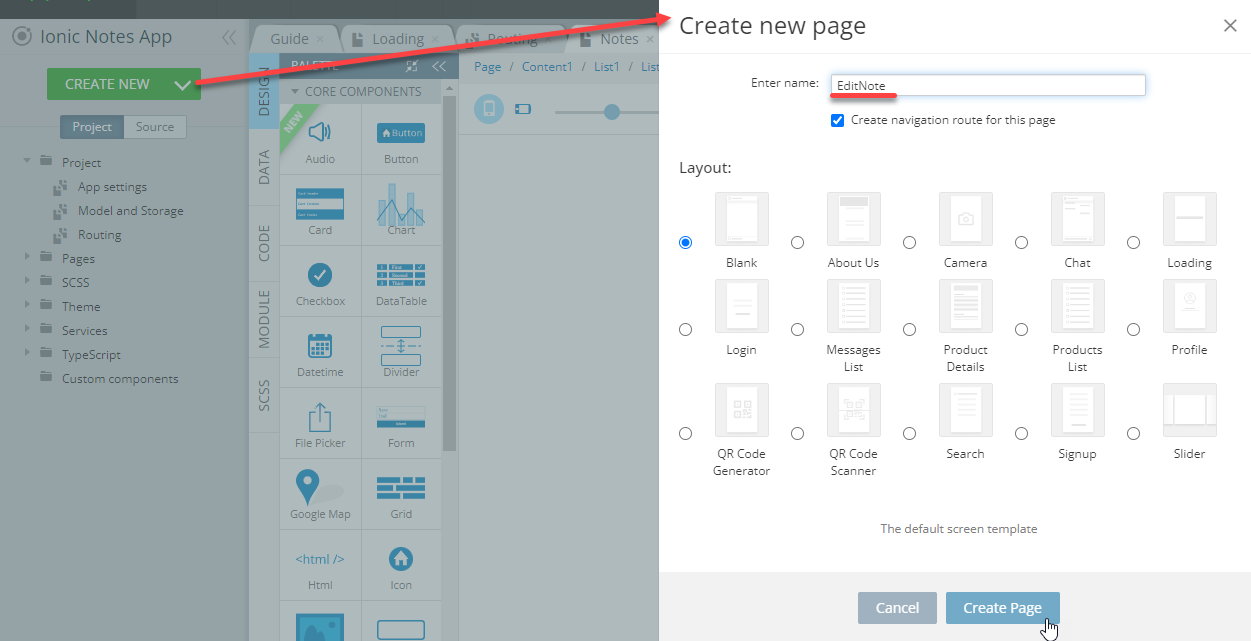
- Replace the default Toolbar title Text property with Edit Note.
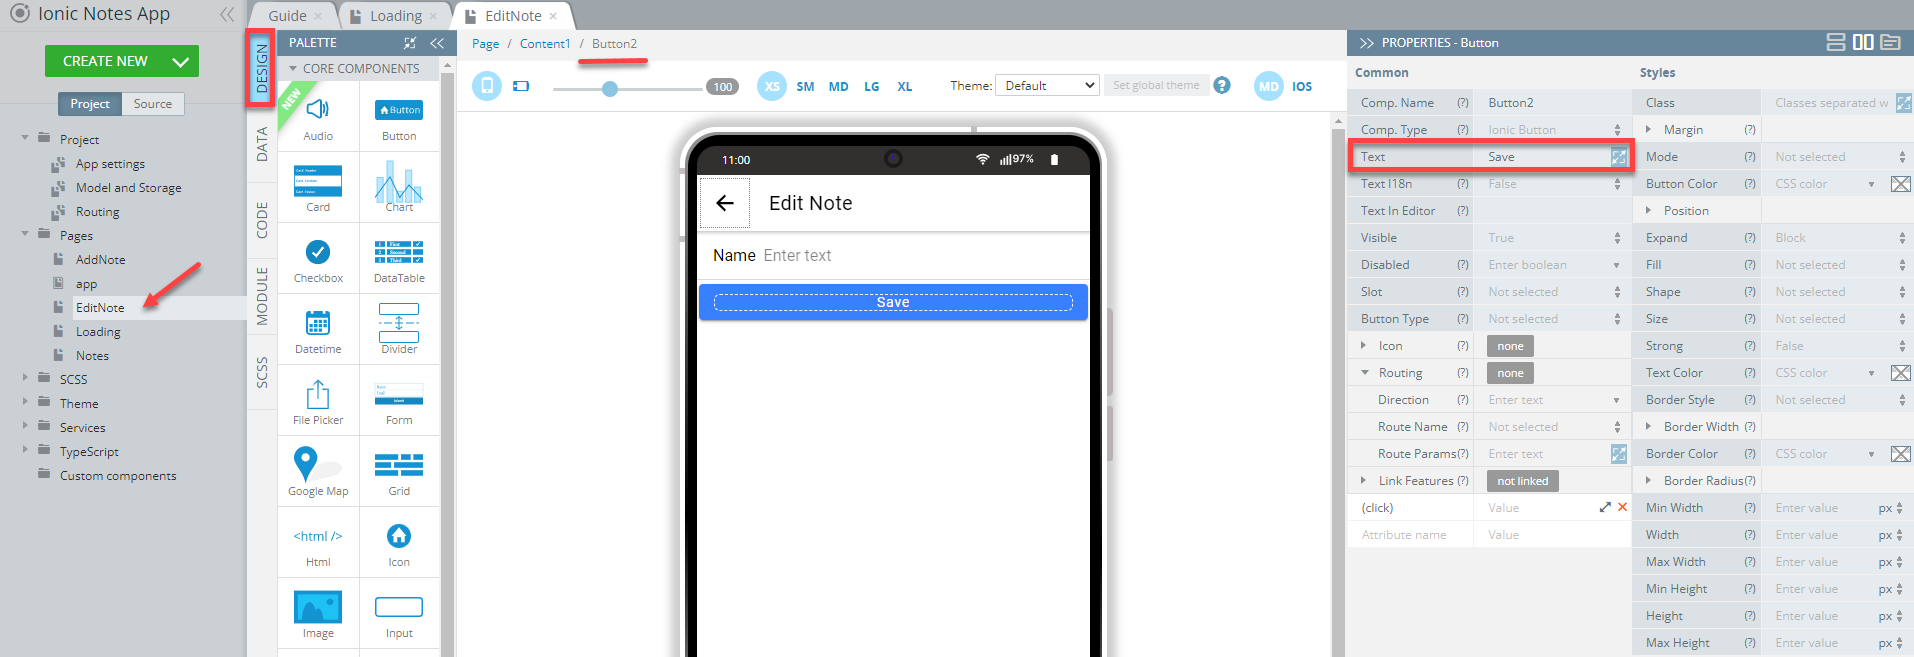
- On the page, add:
- the Button component to Toolbar and set its Comp. Type property to Ionic Back Button.
- the Input component for updating a note name. Set its Label > Text property to Name.
- the Button component to be able to make changes with its Text property set to Save. You are free to type in the mobile frame as well:
We will also need a variable to open notes from the Notes screen in the EditNote screen.
- Also, create a new object model in Project > Model and Storage:
NoteModeland add two properties to it:_idandnameboth of String type:

- Now, switch to the Project > Storage tab and create a new storage variable,
note, define it as Storage and set its Type to NoteModel:

We will use this variable to pass a note from the Notes screen to the EditNote screen.
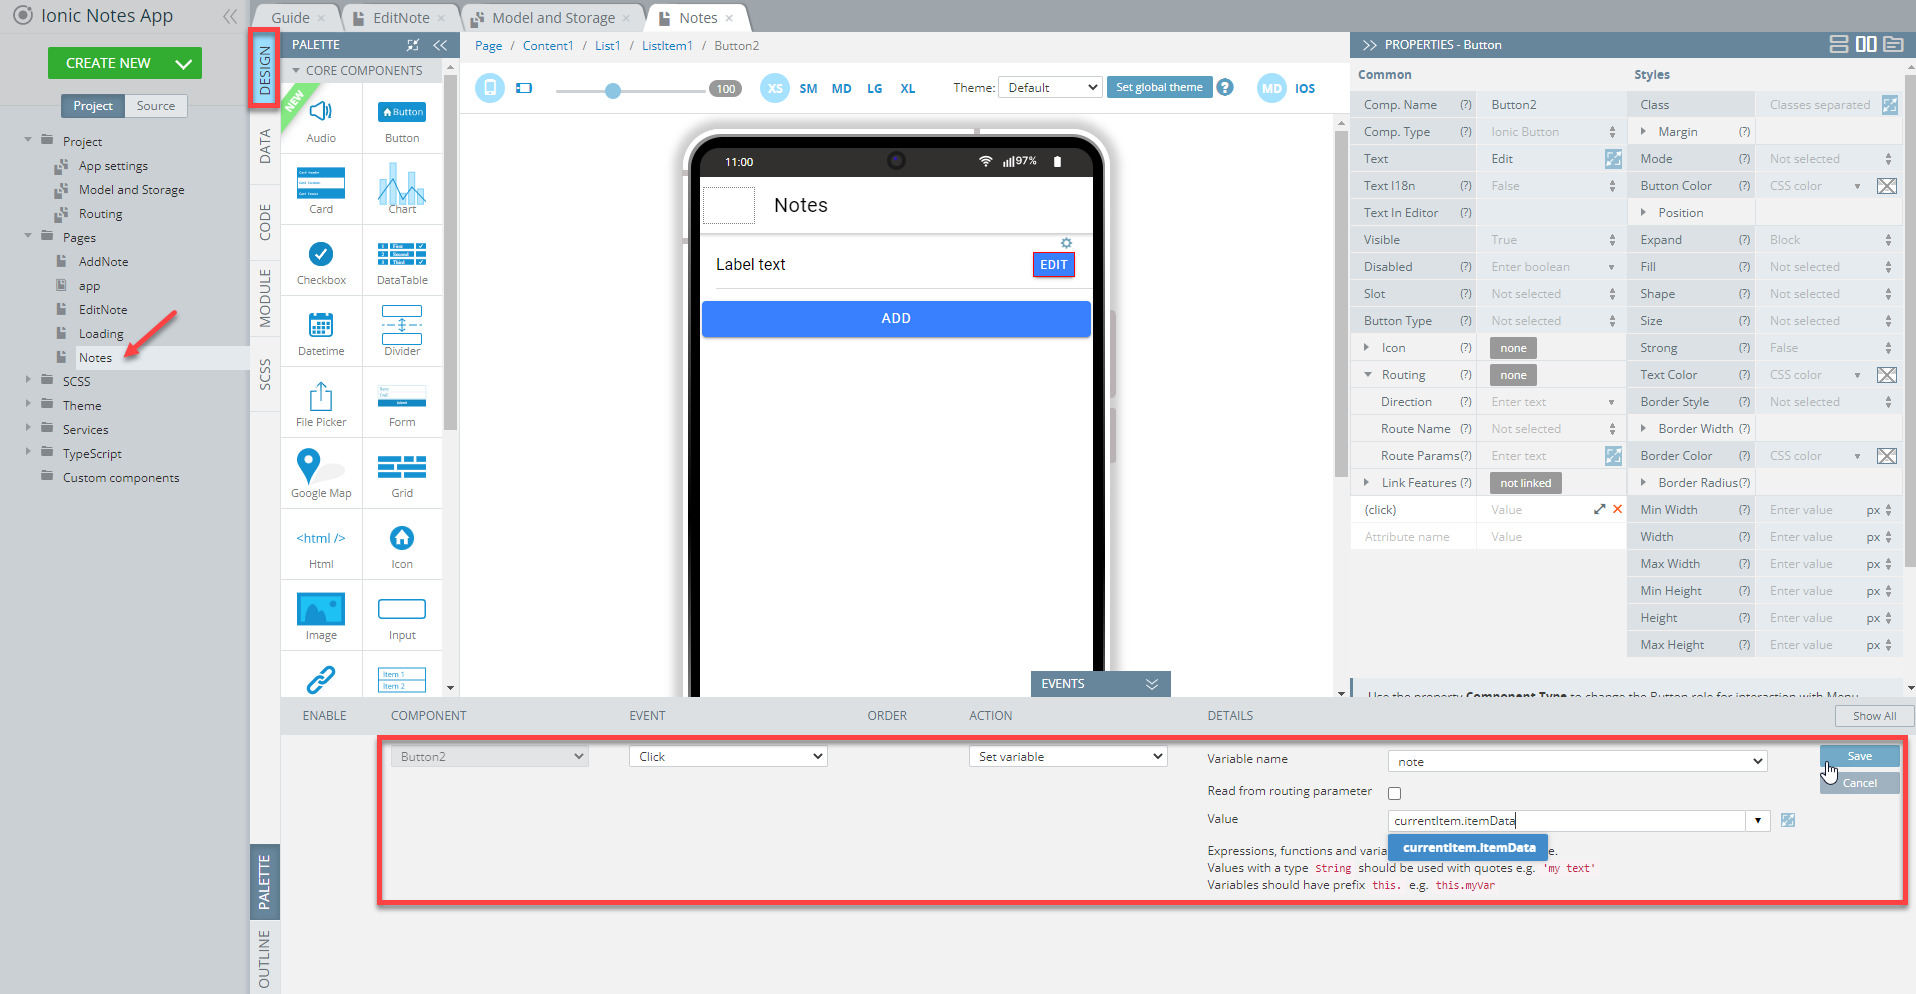
- Open the Notes page DESIGN panel. For the EDIT button, set the Click event, then select the Set variable action, with the note variable and the currentItem.itemData value; finally, press the Save button.
- On the button click, we also have to set navigating the user to the EditNote screen:
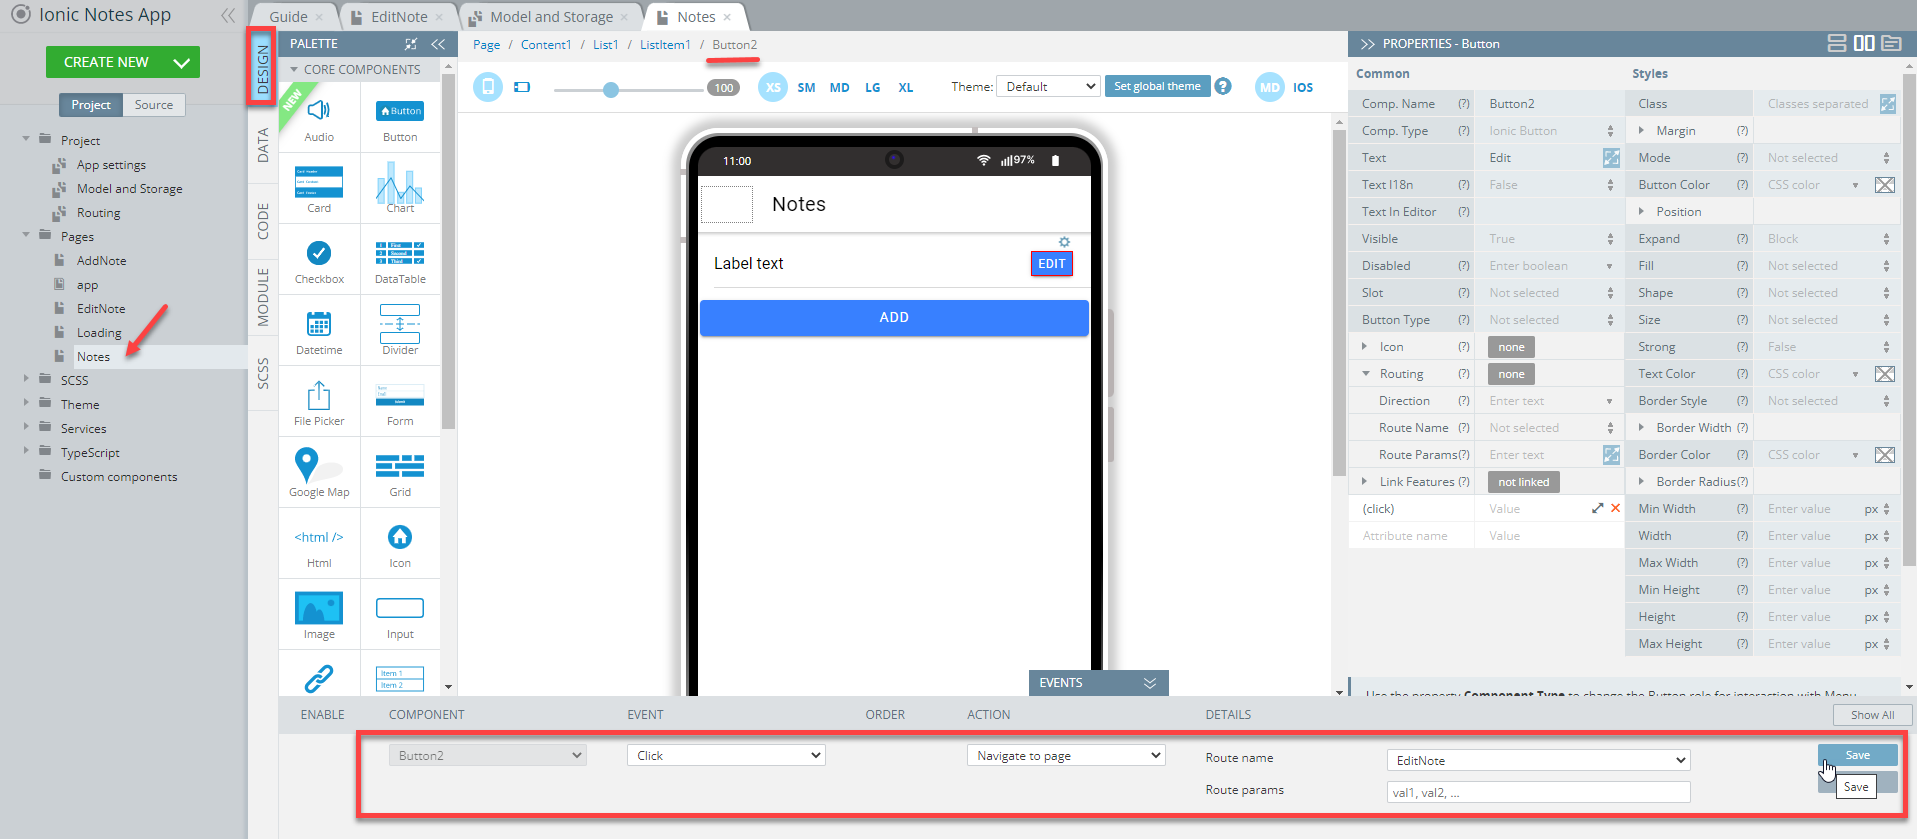
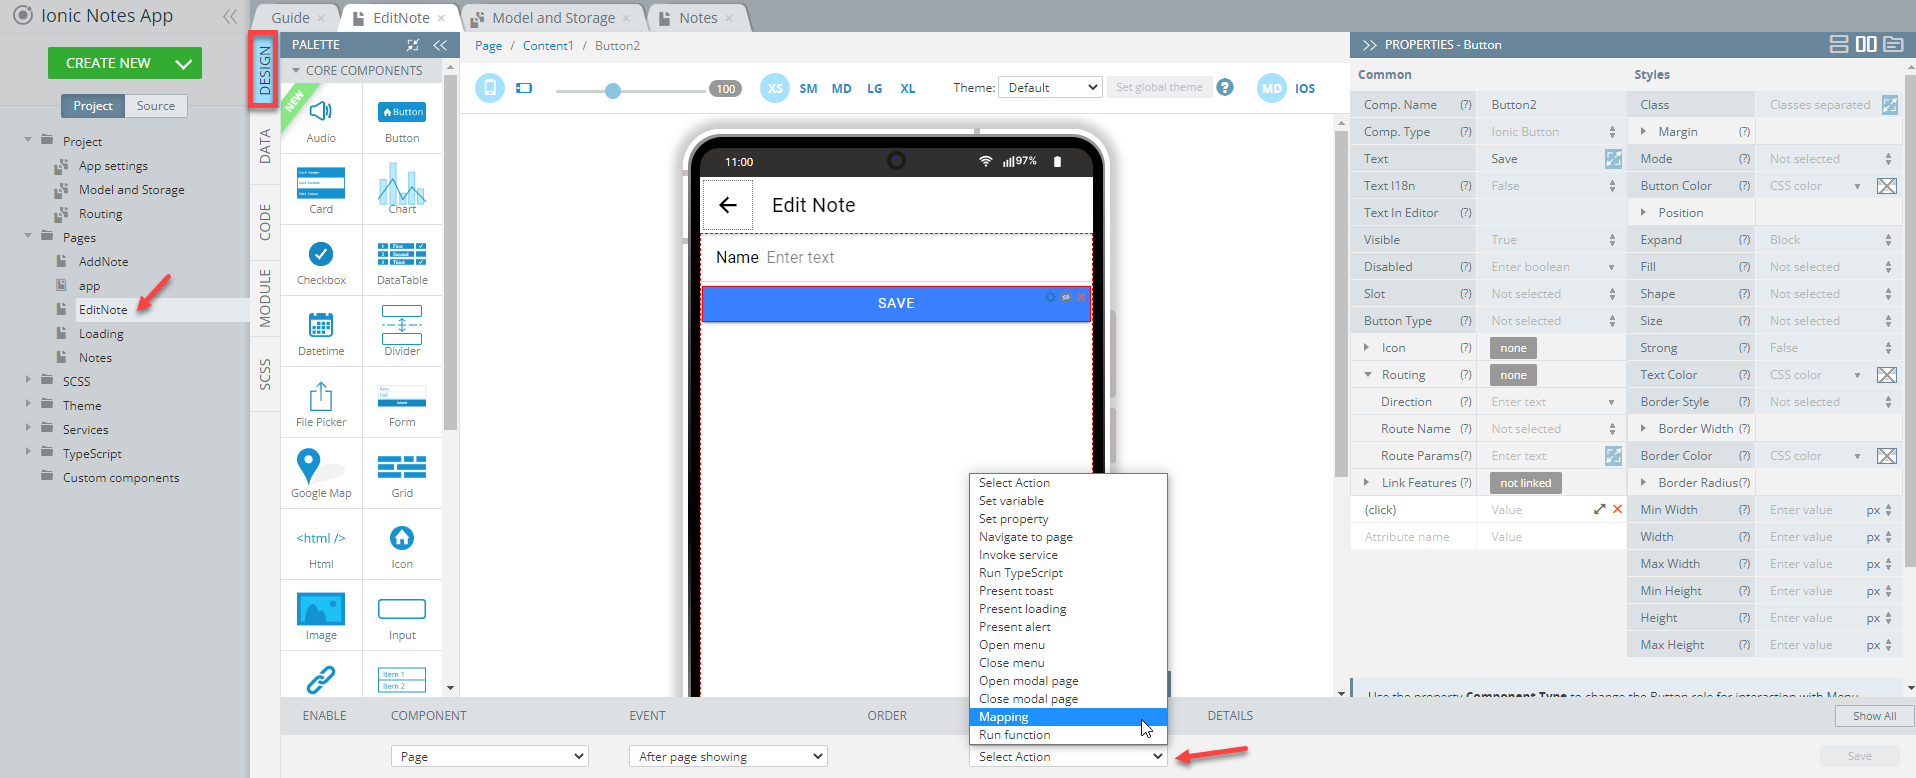
- Unfold the EditNote screen EVENTS tab, where we have to perform mapping on the After page showing event.
- Select the Mapping action for the Page component:
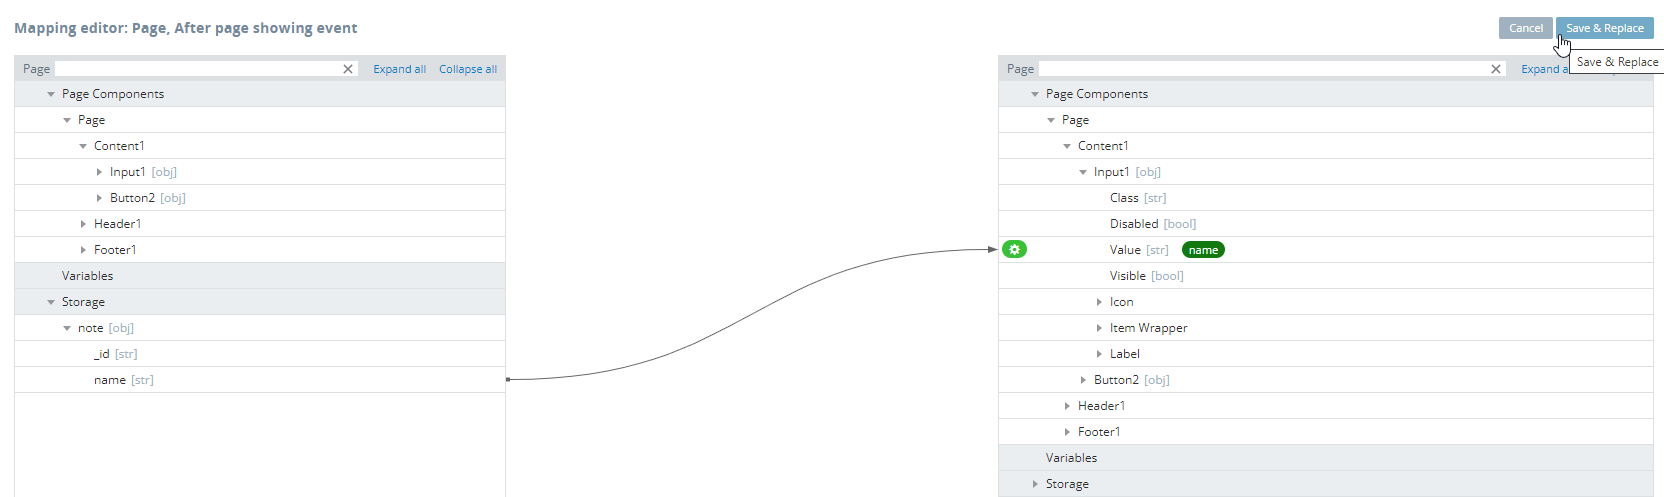
- In the opened mapping editor, map the note value of the
Storagevariable to the Input component. Press the Save & Replace button:
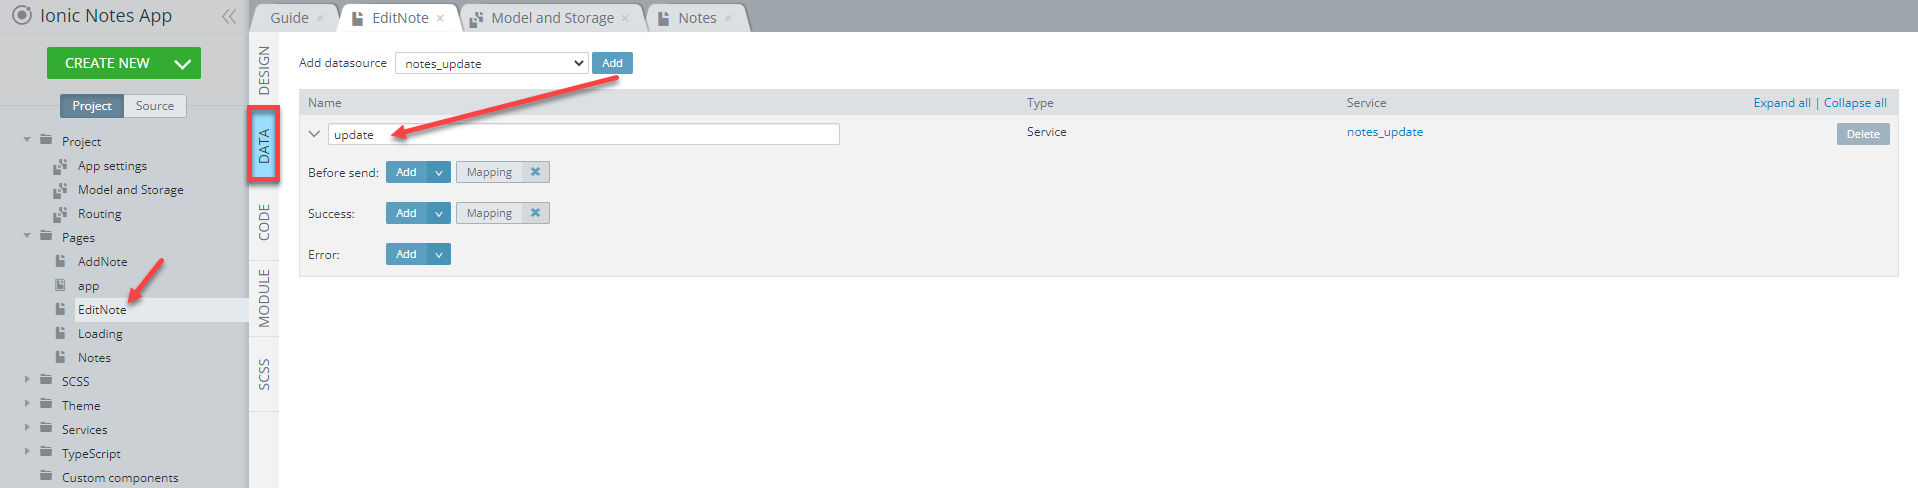
After pressing the SAVE button, the update service is to be invoked.
- So, let's switch to the page DATA panel and add the notes_update datasource. Rename it to update:
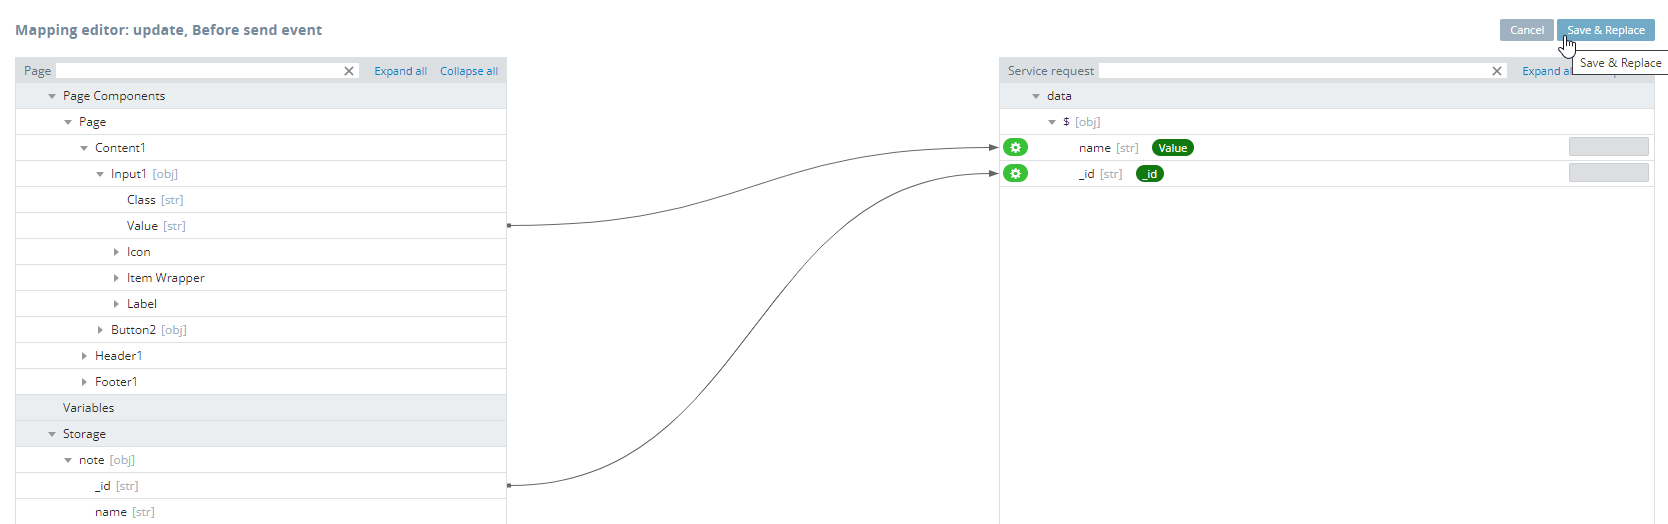
- In the open mapping editor window for the Before send event, create the following mapping and click Save & Replace:
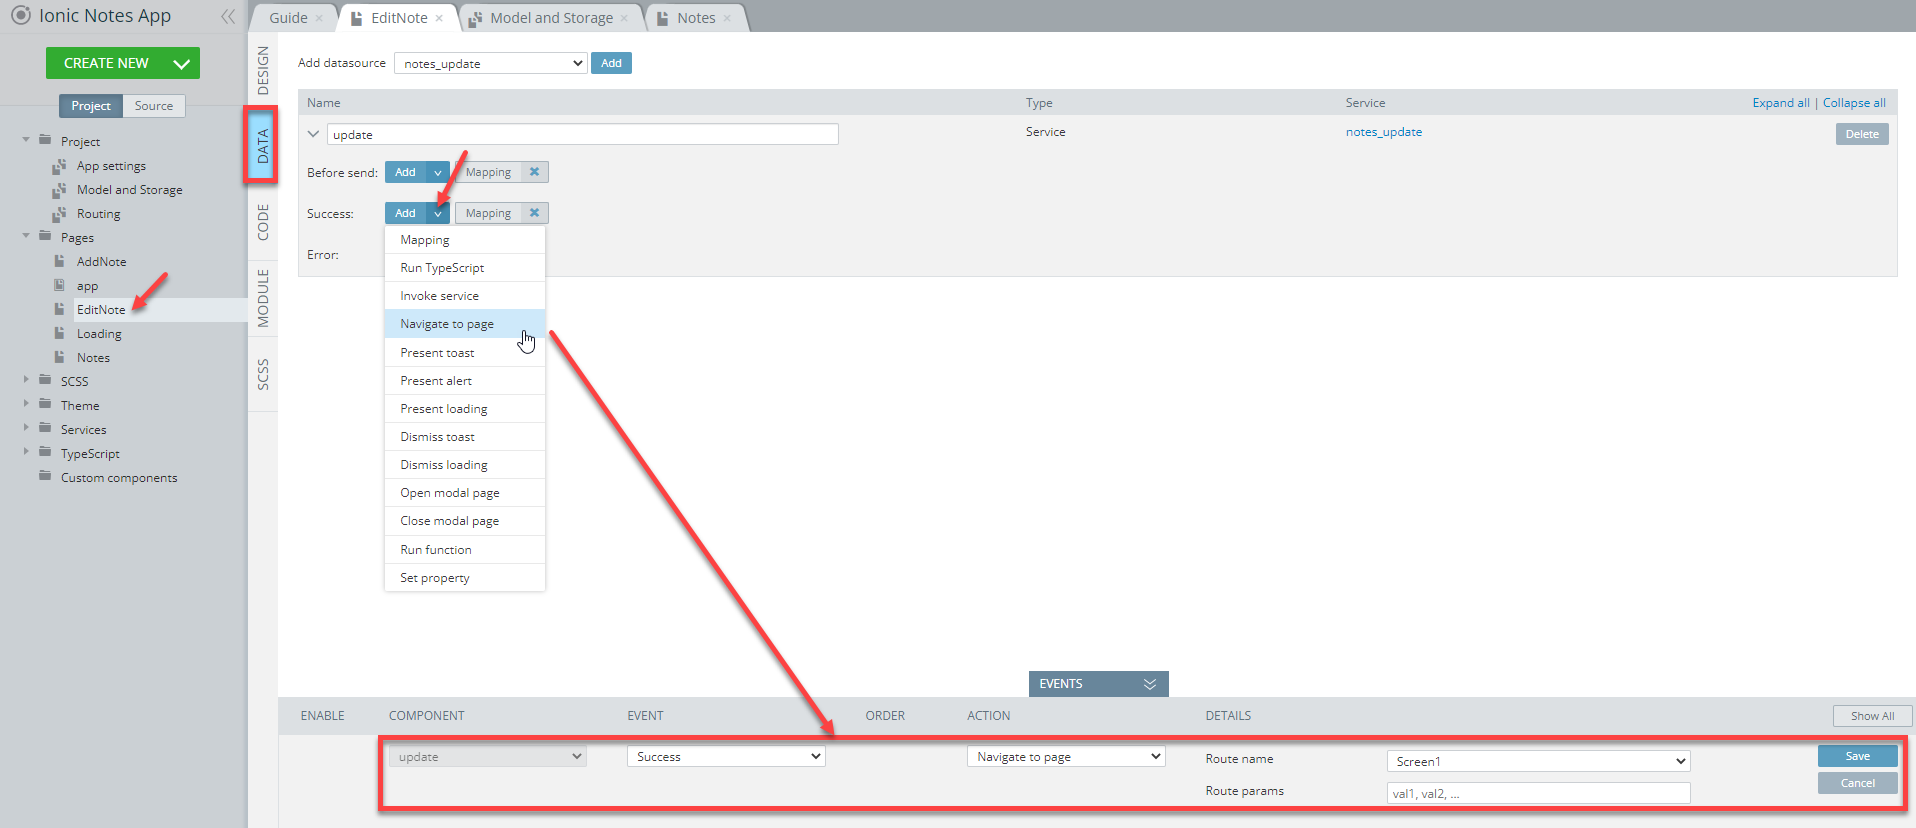
- To invoke the Navigate to page action, click the Add arrow button next to the service's Success event. Then select Screen1 from the Route name drop-down menu, and press the Save button:
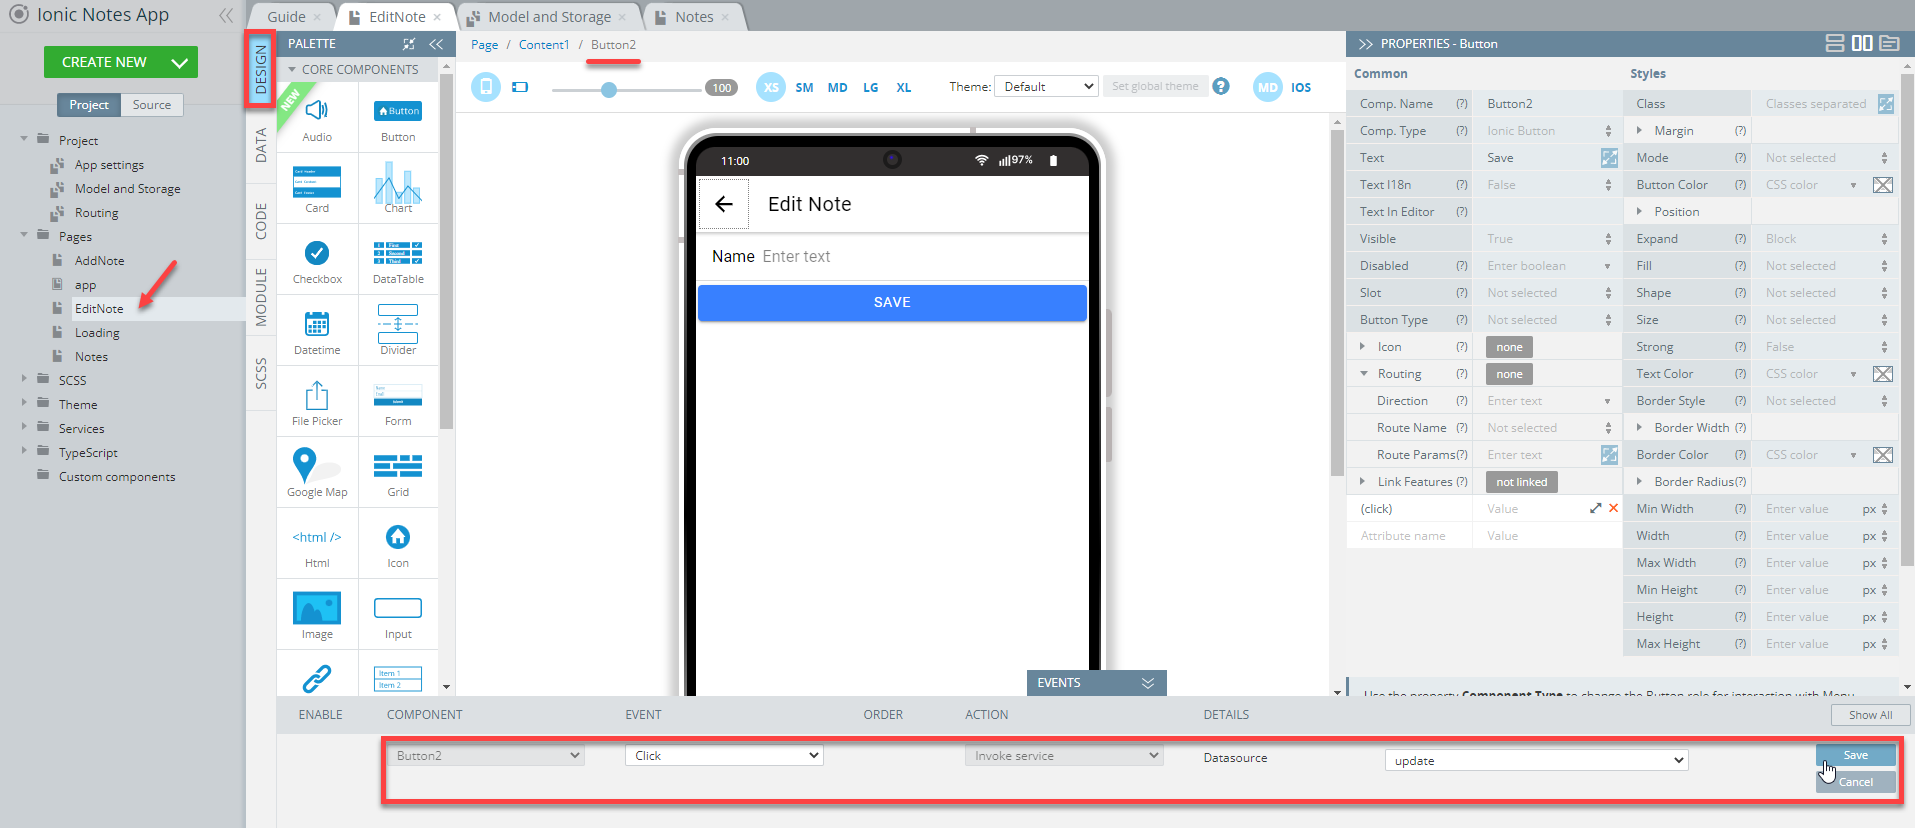
- Go back to the page DESIGN panel and specify that the update service should be invoked after clicking the SAVE button:
- Click the SAVE and then TEST buttons in the App BuilderToolbar.
- Press the EDIT button for the test5 note. Update it (for example, rename it to note5) and press the SAVE button: the updated value is displayed on the list of notes on the Notes page:
Also, the corresponding database record is updated after refreshing the collection list:

Emulating Offline ModeYou can also perform editing operations in the offline mode, just like it was described in the section Step 9: Emulate Offline Mode.
The flow is exactly the same:
- Clear cache and set the Offline settings on the browser Network tab.
- Edit the note, then press the SAVE button on the EditNote screen.
- The updated value will be displayed on the Notes page with the application making no REST API calls.
- However, the changes are not applied to the database.
- Return to the No throttling settings on the Network tab so that the application can synchronize data.
- Refresh the database collection to see that the corresponding database record was updated.
Step 11: Adding Logic for Deleting Notes
Let's also extend the app logic to allow deleting the existing notes.
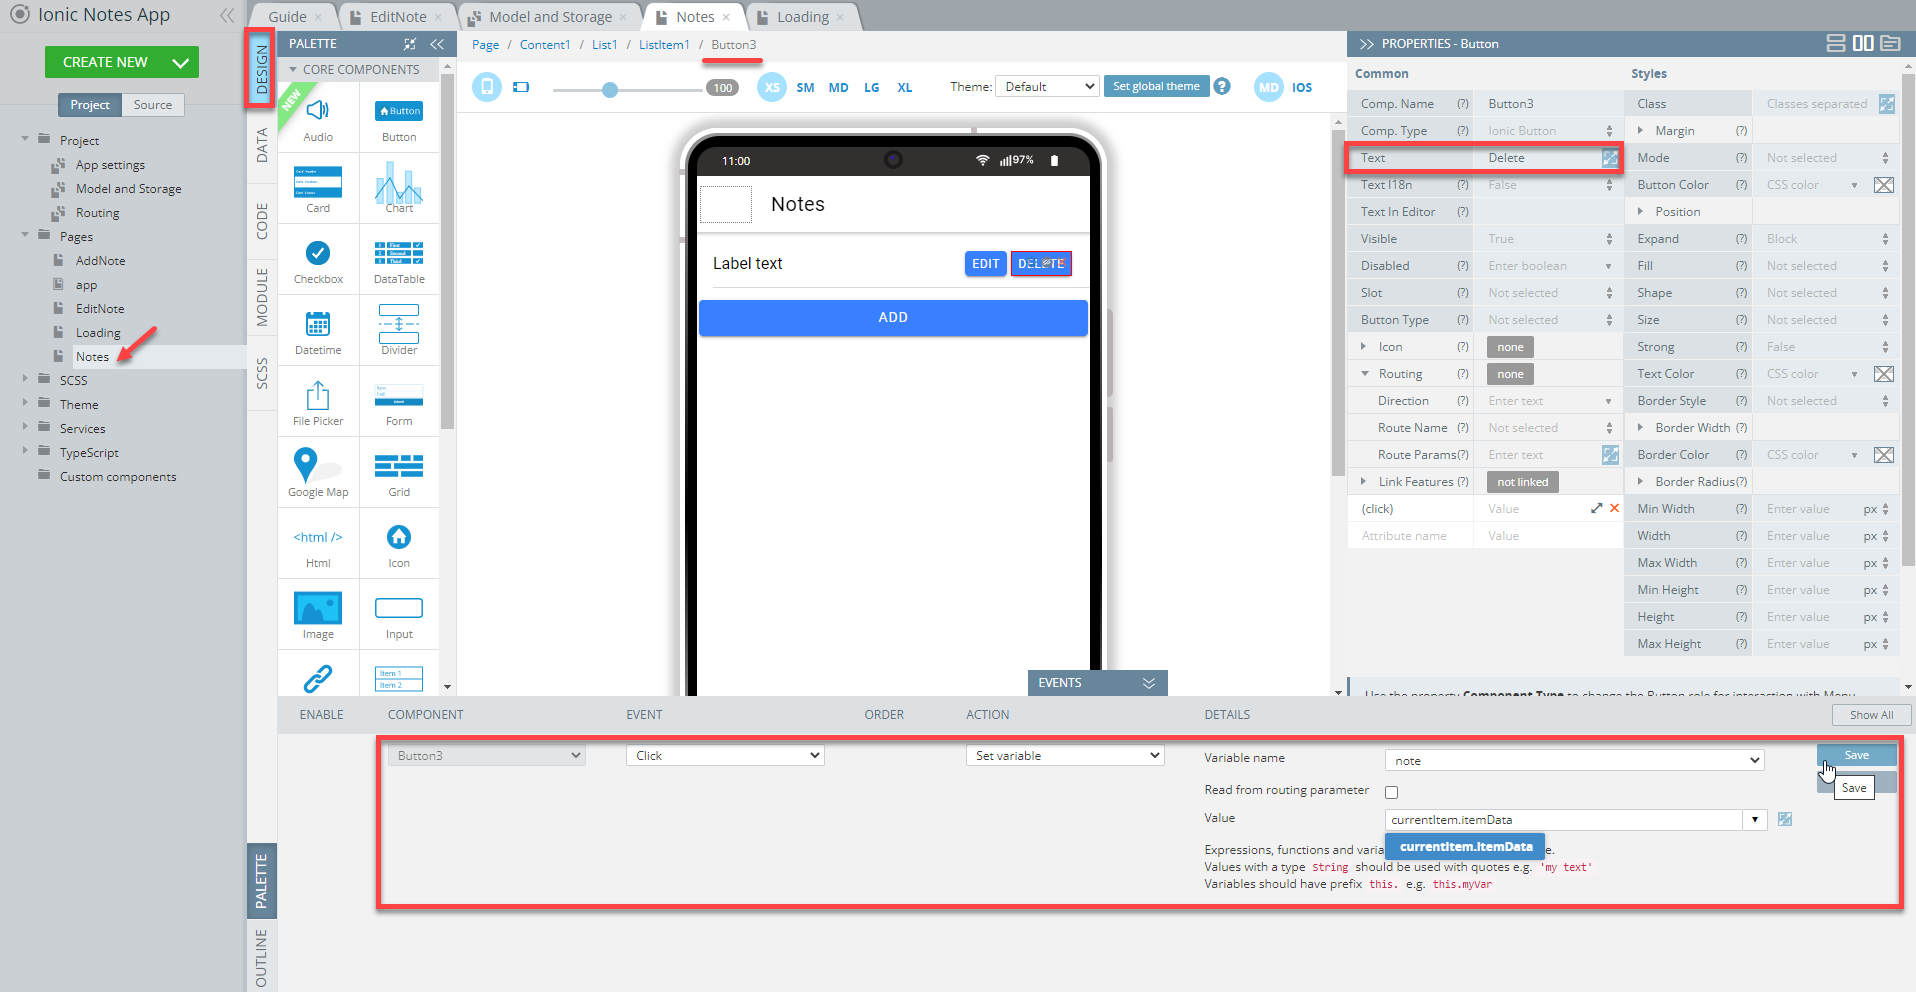
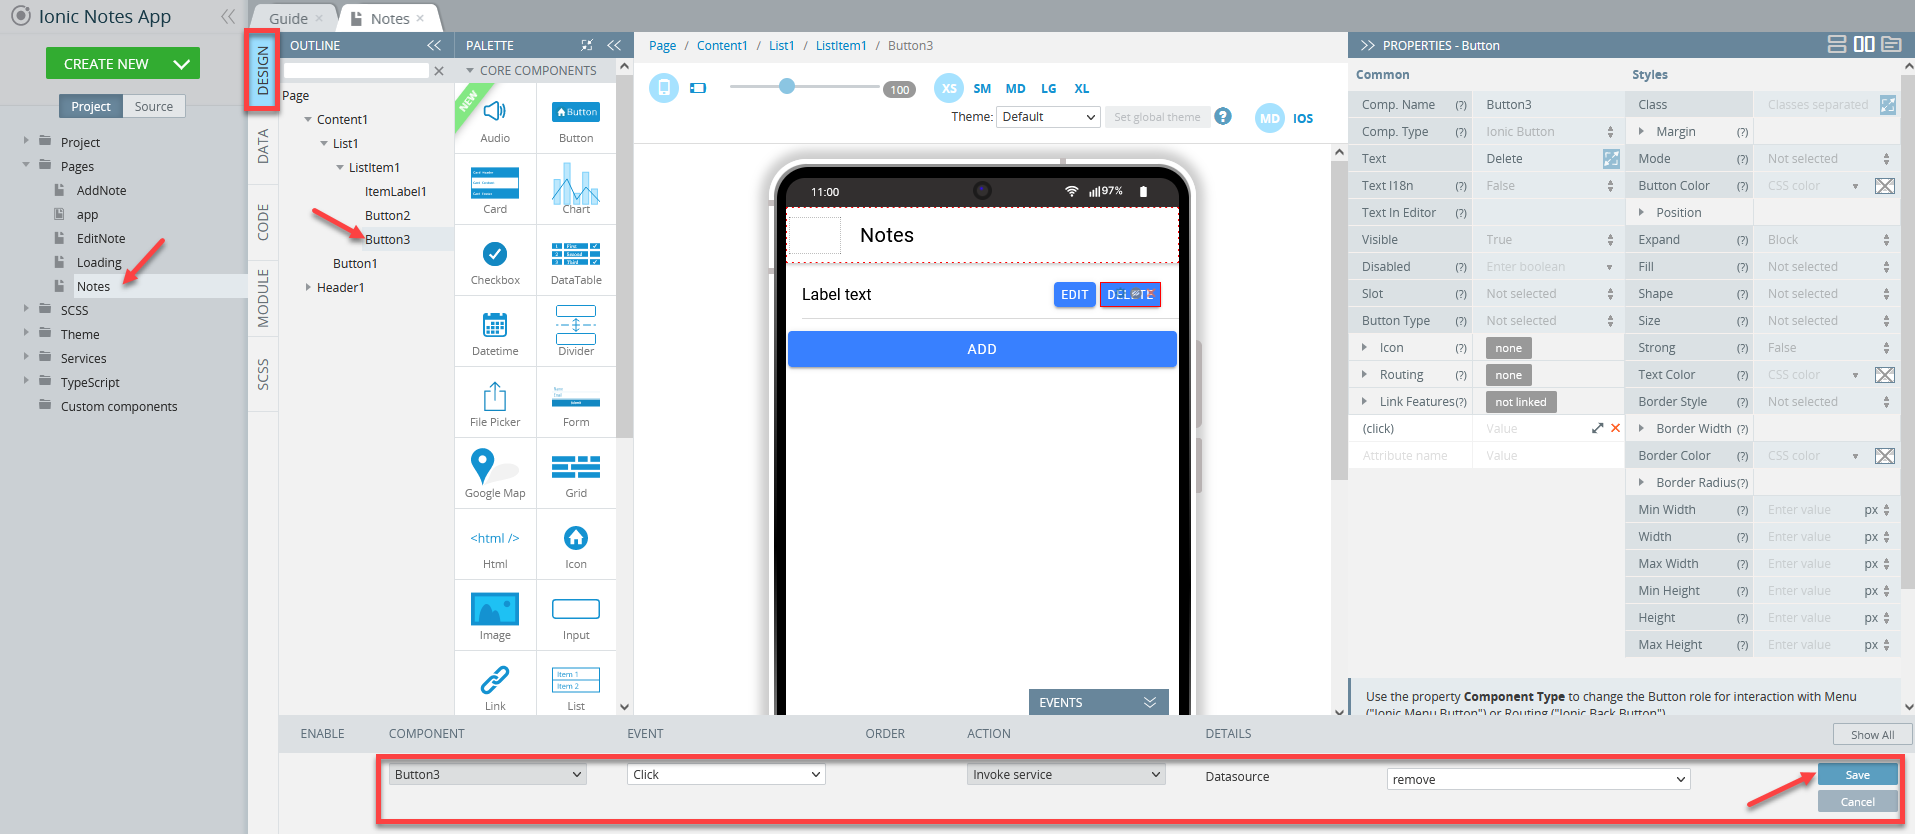
- Open the DESIGN panel of the Notes page and add the button to the List item component, set its Text property to Delete:
- For the DELETE button, set the Click event, then select the Set variable action, with the note variable and the currentItem.itemData values specified; finally, press the Save button:
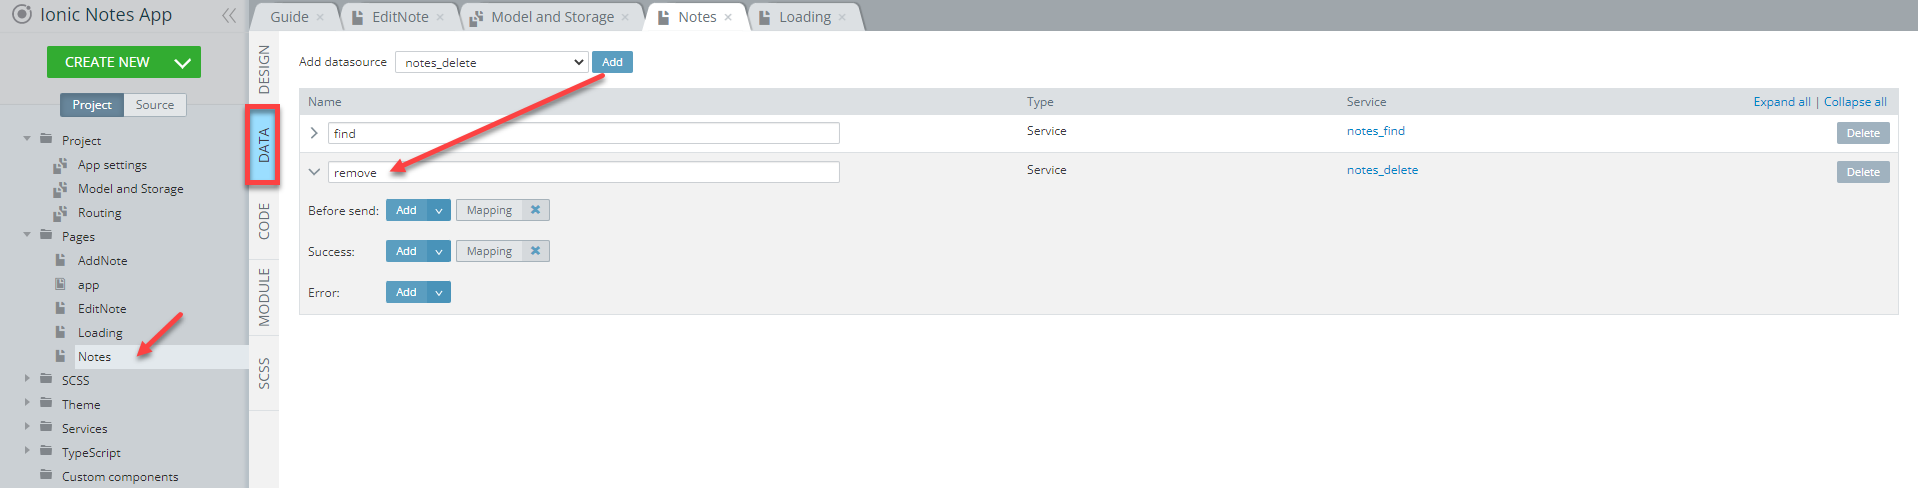
- Now, open the page DATA panel, add the notes_delete datasource, and rename it to remove:
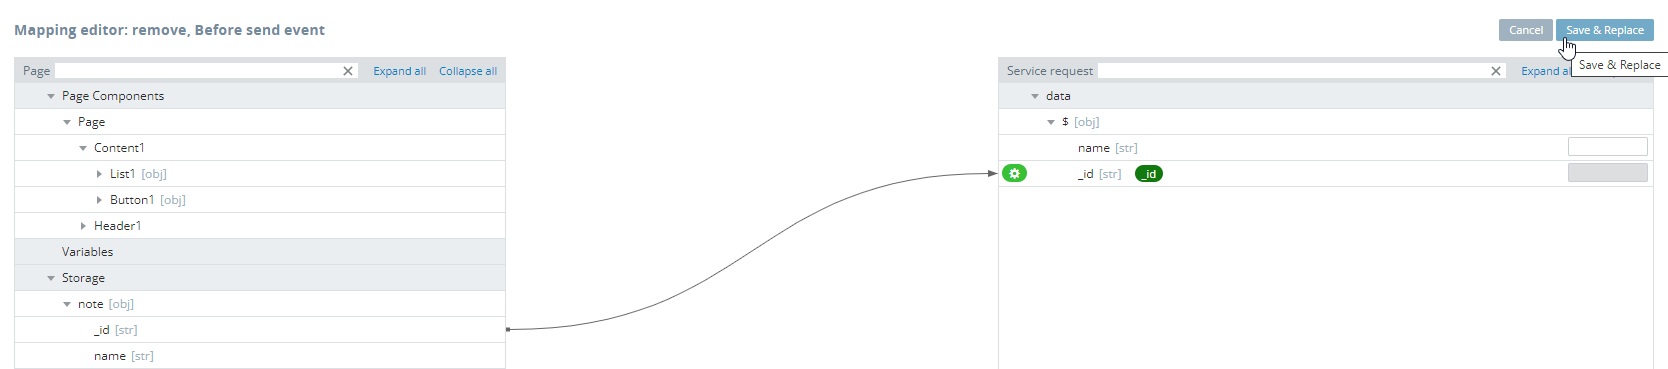
- Click the Mapping button next to the service's Before send event and create the following mapping, then press the Save & Replace button:
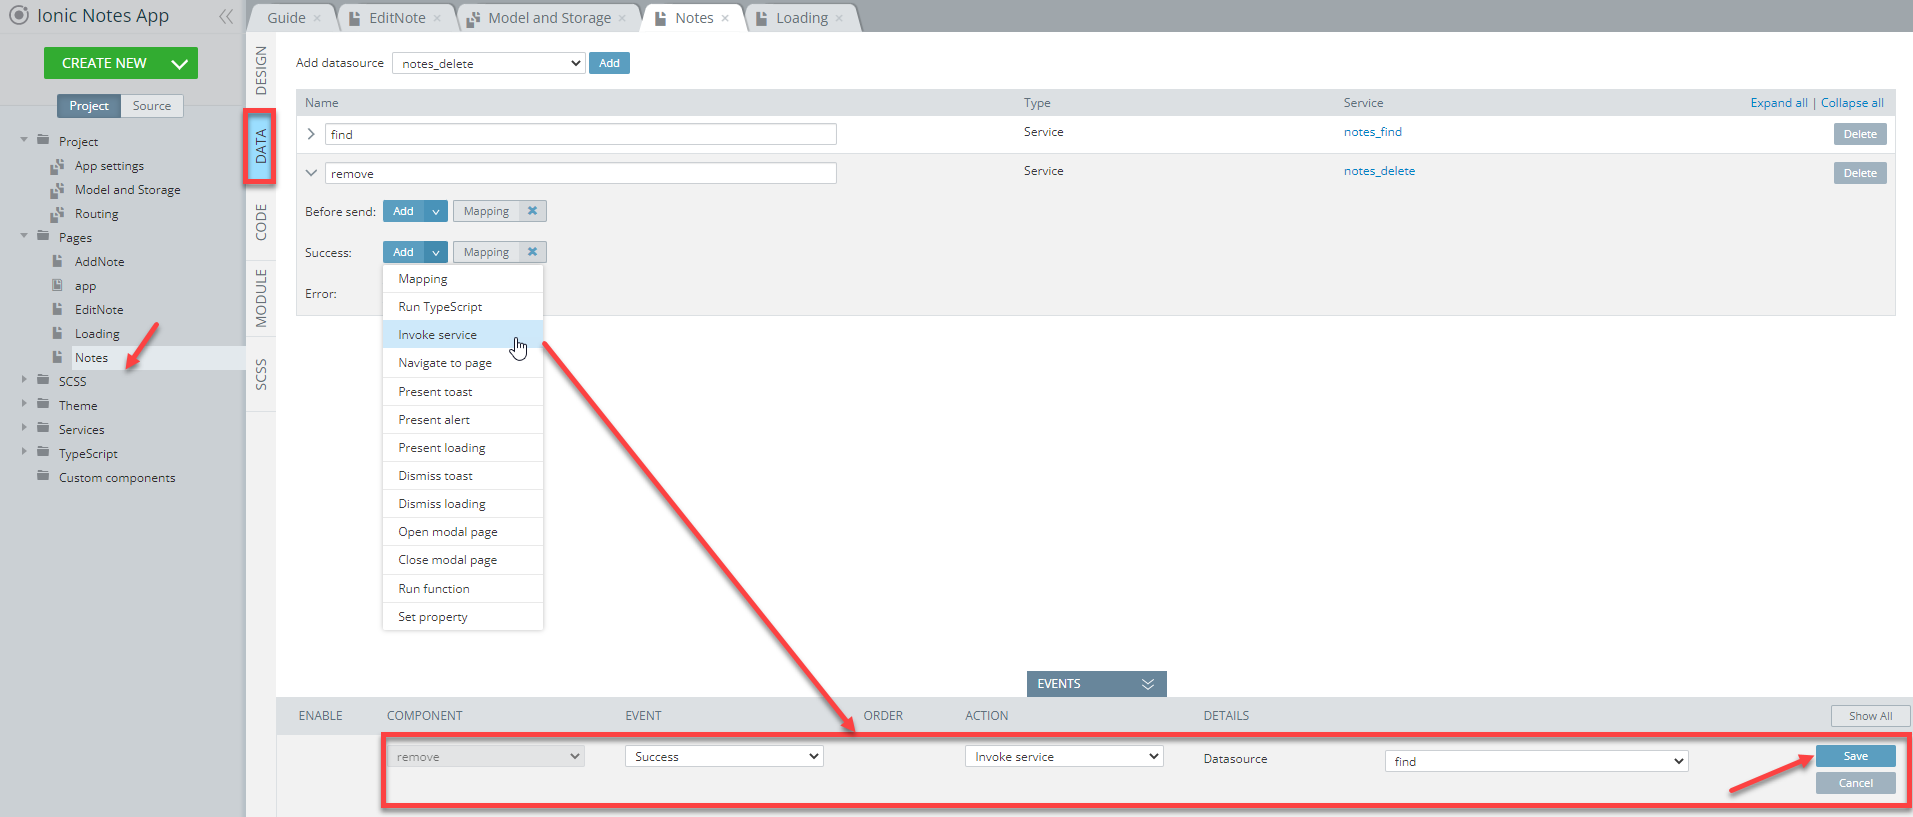
- Click the Add button of the Success service, select the Invoke service action with the find value for the datasource. Press the Save button:
- Go back to the page DESIGN panel and specify the remove service with the Invoke service action for the DELETE button:
- Click the SAVE and then TEST buttons in the App BuilderToolbar.
- Press the DELETE button for the note5 record: it will be cleared from the list of notes on the Notes page:
- This record has the true value in the deleted column of the database, so it is marked as deleted which means the record is deleted:

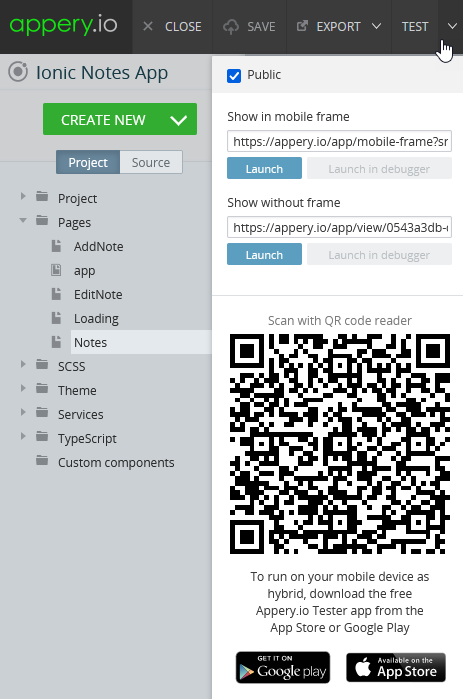
Appery.io Tester AppA great option to quickly test the app on the device is to use our Appery.io Tester app.
The app is free and available for both iOS and Android.
You can check out this page to learn more about using the Appery.io Tester app.
Want to know more?Please check this document to learn how you can add security to your database (Appery.io Database or external relational database).
Updated about 1 year ago