jQM Contacts App
Using the Contacts component in a jQuery Mobile app
Important Note!The option of creating new apps with thejQuery Mobile framework was removed but we still support the projects that were created with it earlier.
What are we going to build?
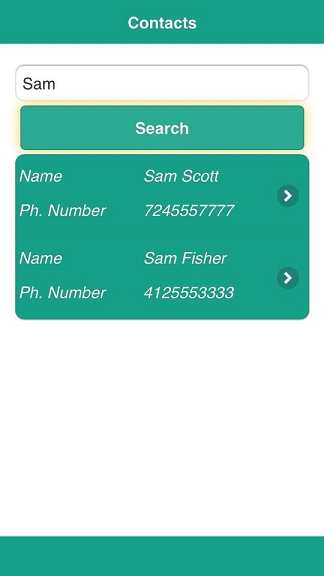
In this tutorial, you’ll learn how to build an app that lists device contacts via button press.
The app will look like this:

Apache Cordova (PhoneGap)
Apache Cordova (PhoneGap) is automatically included when you create a new project in Appery.io. The Contacts component used in Appery.io is the contacts component from Apache Cordova.
Creating a new app
Create a new app in the Appery.io app builder; from the Apps page, enter an app name and click Create. You’ll see a start page.
Creating the UI
First, place an Input component on the page, and rename to query_input. Also, type enter query here in the Placeholder field.
Place the Button component on the page, and rename it to search_button. Place the List component on the page and rename it to contacts_list. Reduce number of list items to 1, rename list item to contacts_item. Place the Grid component over the List component. Place four Label components into each cell:

The top and bottom-left labels are used for titles. Give them any names you want, or leave the default values.
The top- and bottom-right labels don’t contain any text, and have names contact_name and
phone_number, respectively.
Adding the contacts service
To add the contacts service:
- From Projects view: Create New > Service > Contacts, enter name ContactsService and click Create Service. The service will be listed under the Services folder.
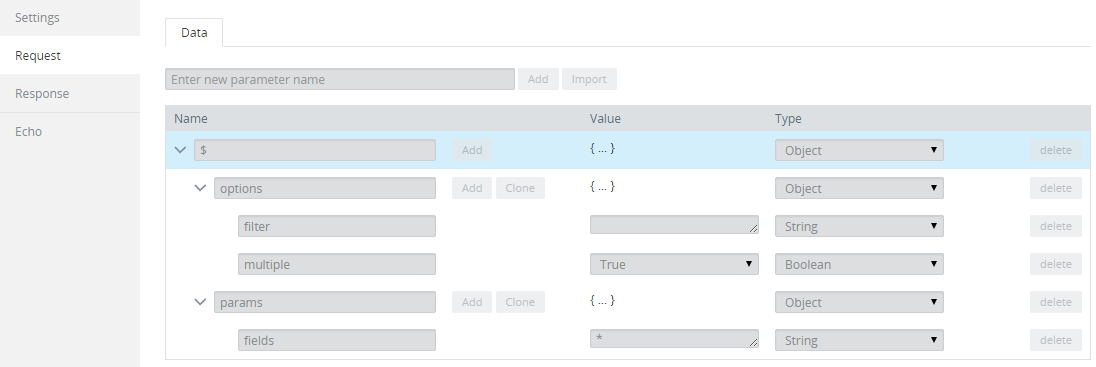
- If you open the service, you’ll see that everything has been preconfigured:

Binding the contacts service
- Open the DATA tab.
- For datasource, select Device > ContactsService > Add. The contacts service will be added to the page. Name it contacts_service.
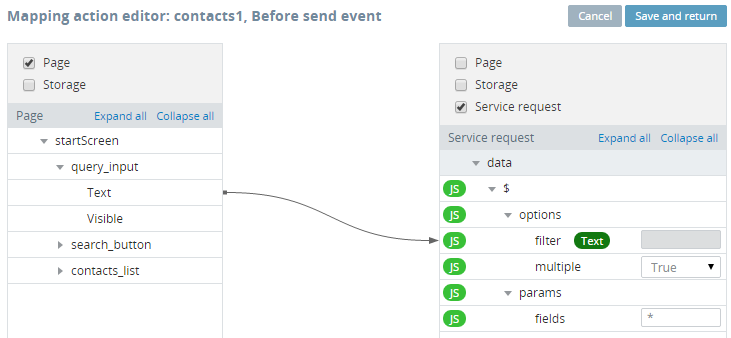
- Click Mapping in front of Before send.
- There are several request options you can see in the Mapping editor.
Take a look at the meaning of these parameters:
- filter – string parameter, determines which records must be shown. It can retrieve as input any text data as the contact name, phone number, or even the email. For example, the Dan value will show only contacts with this occurrence.
- multiple – Boolean parameter, determines if the find operation returns multiple contacts.
- fields – string parameter, determines in which fields the search operation must be performed. Fields must be separated by a space (not a comma). Only specified fields will be returned as a result. This string means that the search will be performed only in these fields and only these fields will be returned: phoneNumbers, name, email. The fields parameter must contain at least one field or symbol. List of possible fields:
- name
- phoneNumbers
- emails
- addresses
- IMs
- organizations
- categories
- URLs
To take the value for filter from the page, create the following mapping:

- Open the Success event Mapping editor.
- To display the contact name and phone number, create the following mapping, and save.
Launching the contacts
- Open the DESIGN tab.
- Select the button, open the EVENTS tab, and add the following event:
search_button > Click > Invoke service > contacts_service, and click Add Event. - Save.
Since we’re invoking a native component, this app has to be tested as a hybrid app, or installed on the device. Testing in the browser won’t work. Remember to search for a contact you already have.
Android
Testing on Android is relatively simple, since you can quickly install any app on your device.
To do it, build the Android binary and install it on your device. When the build is completed, you’ll see a QR code. Scanning the QR code will download the app to your phone. You can also email the app to your device.
iOS
Build the app and install it on your device.
Important NotePlease, note that to export the app for iOS, you will need to upload your distribution certificate and provisioning profile obtained from Apple under the App settings > iOS binary tab.
You can check this document in case you need help with exporting your application for iOS. Here, you will find the document that explains how to manage certificates in Appery.io.
Updated 7 months ago
