Client Services
Setting up advanced client services in an Ionic app and connecting to 3rd party APIs.
Introduction
It is very likely that your app will need to connect to an external API as well. That's very easy to do and you can allow invoking the API from the server by adding client services to your app.
You can use REST services to integrate backend cloud services that support RESTful APIs. Like any other service, REST services usually have inputs and outputs and must be set up within Appery.io.
Using Appery Backend APIsTo learn more about connecting and using the following Appery Backend APIs in an app go to the Using Appery Backend APIs in an App page:
The rest of this section will cover using and editing an imported service in an app.
Creating New Service
Creating a service consists of:
- Entering the service URL.
- Defining the request parameters (the input).
- Defining the response parameters (the output).
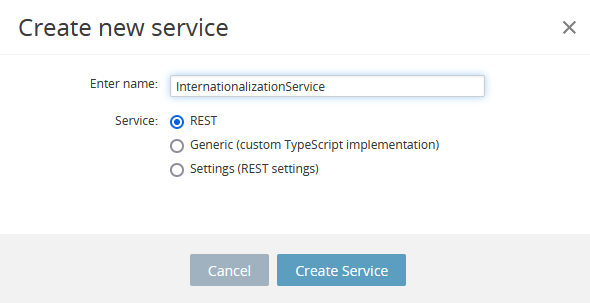
To create a new service, from Project view, click CREATE NEW > Service:
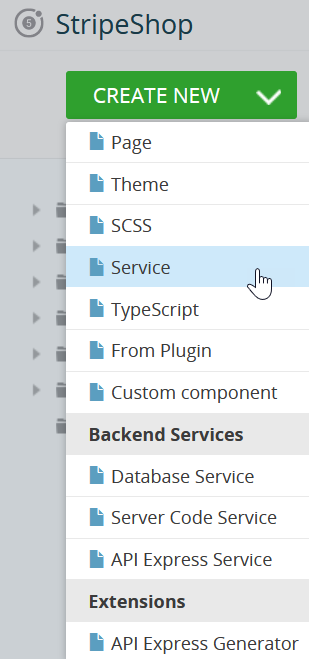
You can select to create three types of client services:
- REST;
- Generic (custom TypeScript implementation);
- Settings (REST settings):

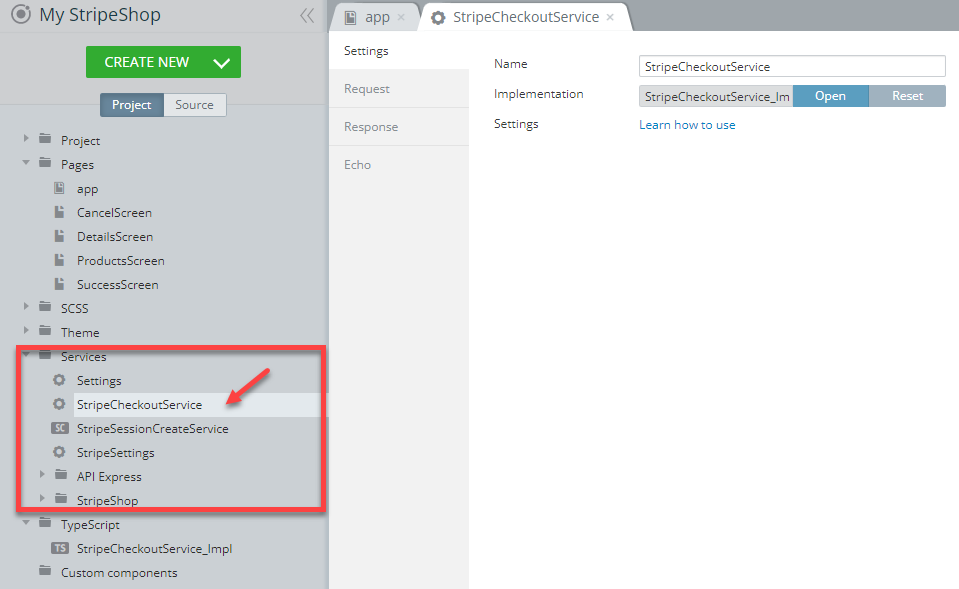
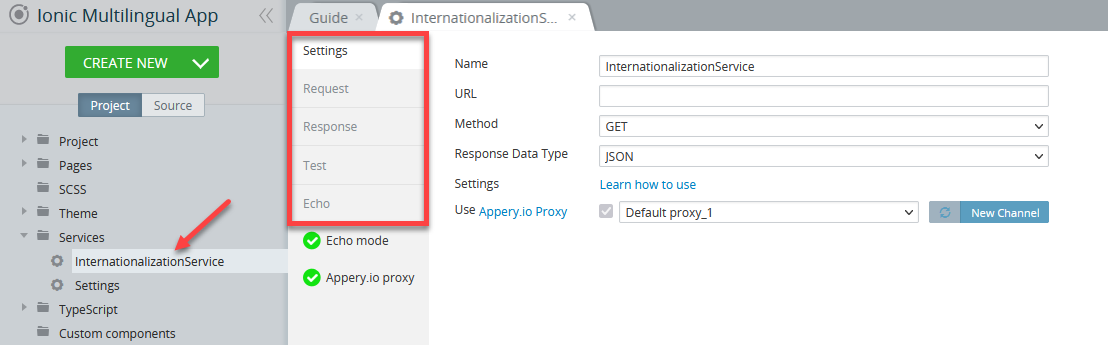
When created, all the client services can be found under the Services folder in the Project View tree on the left:
Adding New Service to Page
Once a service has been defined, it can be added and mapped to one or more pages. To add a service to a page:
- Go to the page where you need to use this service.
- Switch to its DATA panel.
- Add a datasource by selecting the service you've created from the drop-down and clicking the Add button.
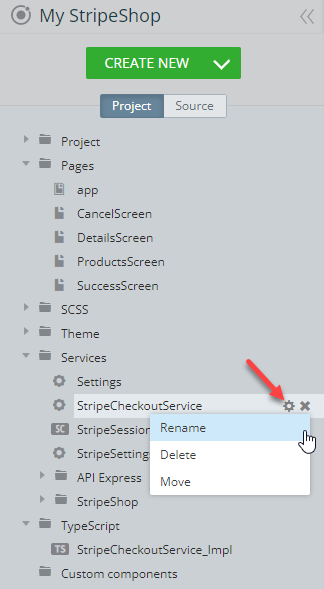
- A service instance is added to the page:

Tip!If the service name is not set initially, the instance receives the default name; however, you can rename it any moment later:
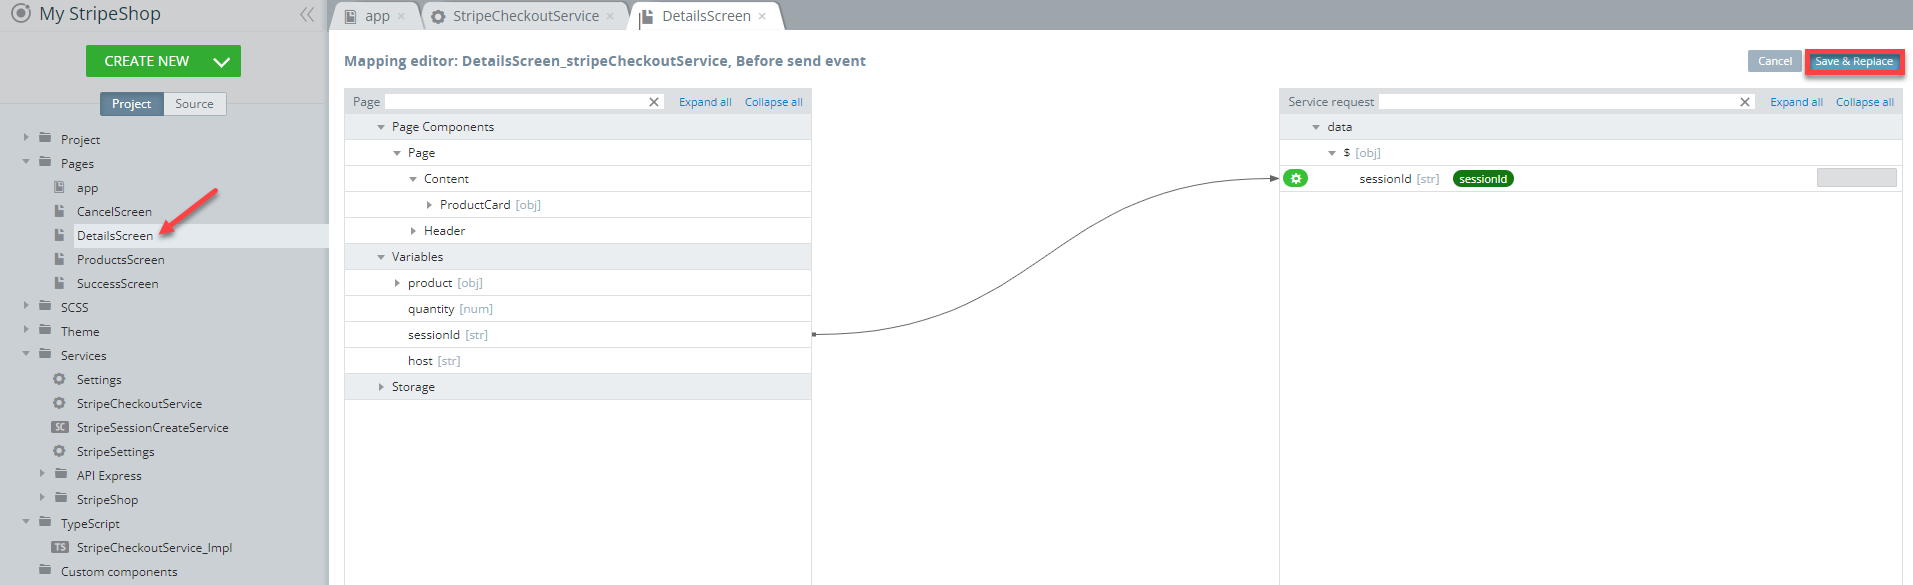
Once the service has been added, you can click the corresponding Mapping button to map the service to the page and save it:
Using REST Service
You can use REST services to integrate backend cloud services that support RESTful APIs. Like any other service, REST services usually have inputs and outputs and must be set up within Appery.io.
Creating a service consists of:
- Entering the service URL;
- Defining the request parameters (the input);
- Defining the response parameters (the output).
Creating New REST Service
To create a new REST service, from the Project view, select CREATE NEW > Service. Enter a service name and click Create Service:
The service will open in a new tab with the following views:
- Settings – define the main options for the service;
- Request – add request headers (Headers tab), input parameters (Query String tab), and set default values, if needed;
- Response – define output headers (Headers tab) and parameters (Body tab);
- Test – test the service, and create a service response based on the test results;
- Echo – get data from the service without invoking it:
Tip!By default, the service instance is named RESTService but you can change it to a more meaningful name by setting its Name property.
Settings View
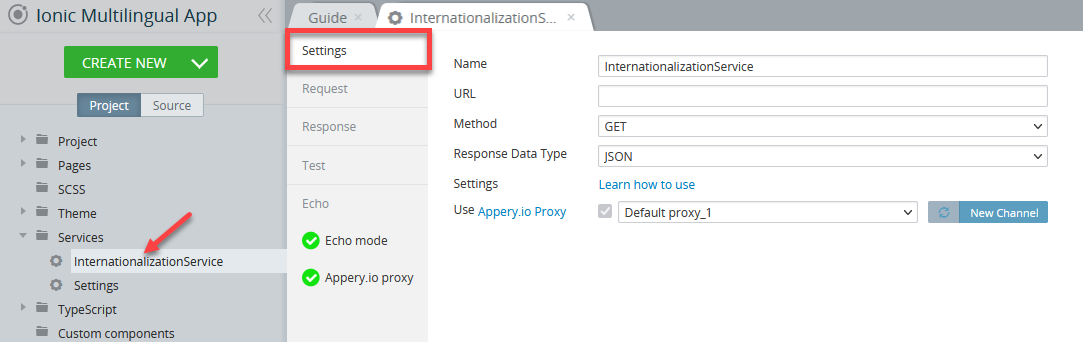
REST Service: Settings view
The Settings view allows setting the:
- Name – service name;
- URL – service URL, which allows access to public (without authorization) or private (requires authorization) data. Read about using dynamic URLs;
- Method – a type of request:
- GET– requests data from a specified resource;
- POST – submits data to be processed to a specified resource;
- PUT – uploads the specified data (a complete replacement of data);
- PATCH – updates data (applies partial modifications to a resource);
- DELETE – deletes data from the specified resource.
- Response Data Type – format of the data returned by the service:
- JSON – JavaScript Object Notation: text-based open standard, designed for human-readable data exchange between the browser and server;
- JSONP – JSON with padding: provides a method to request data from a server in a different domain;
- XML – Extensible Markup Language: a set of rules for encoding documents in a format that is both human-readable and machine-readable;
- Data : application/octet-stream;
- Settings – it is possible to store the parameters into the Settings service and then use them in the REST service URL. Read more here;
- Request Content Type – when using the POST, PATCH, or PUT methods, you can specify how the data should be encoded when submitting it to the server. A list of name/value pairs depends on the value you set to this parameter;
- JSON: application/json application/javascript text/javascript;
- XML: application/xml text/xml application/xhtml+xml application/atom+xml;
- x-www-form-urlencoded: application/x-www-form-urlencoded;
- Data: application/octet-stream;
- Appery.io Proxy – if your service doesn’t support cross-domain calls, you can check this box to provide a proxy service that works for testing.
Request view
To add request headers (Headers tab), input parameters (Query String tab), and, if needed, set default values.

REST Service GET method Request tab
Response View
To define output headers (Headers tab) and parameters (Body tab).

REST Service GET method Response tab
Test View
Once you’ve defined the service properties and one or more request parameters, you can quickly test the service to make sure it works and returns a valid response.
To test the service:
- Switch to the Test view.
- Enter some value(s) for request parameters. If you set default values, you can see them.
- Click Test. The service is invoked and the result should appear in the Response area.
Also, in this view, you can create a service response based on the test results (click Import as Response).
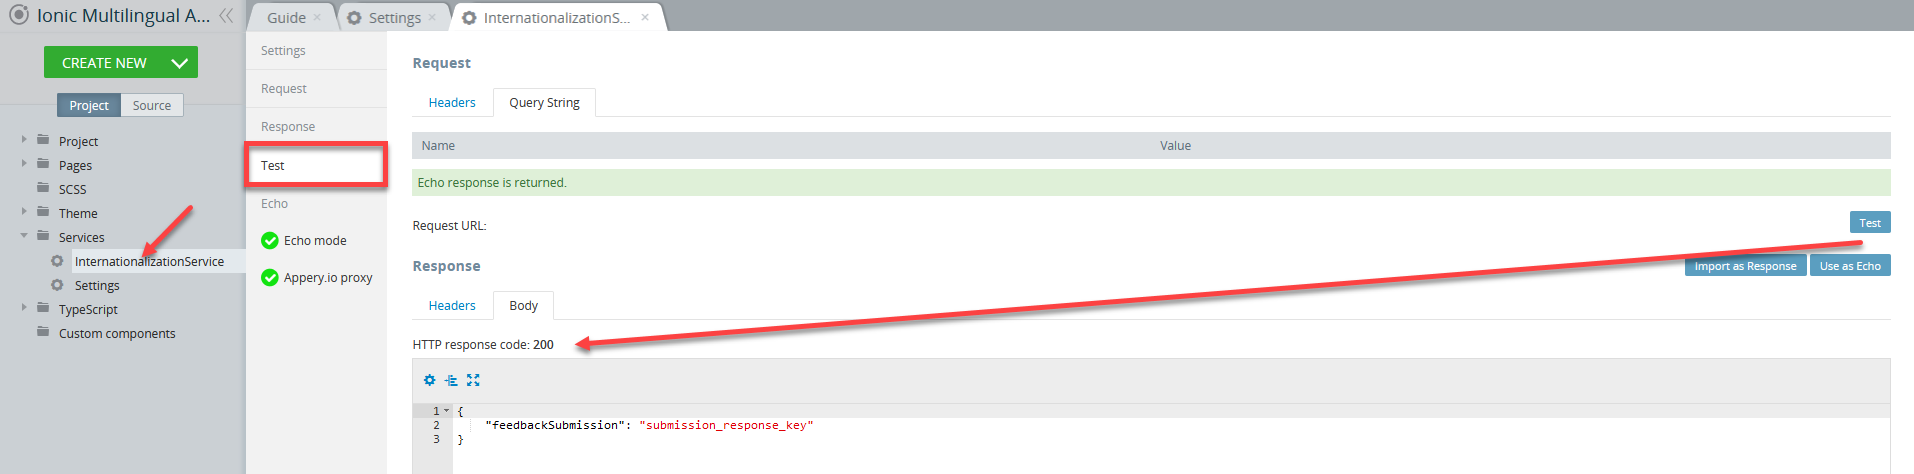
REST Service Test tab
Echo View
In the Echo view you can enable an Echo service, which allows you to get data from a service without invoking it. It’s like a mock service.
It works by you giving a sample response from a service to Appery.io. When it invokes the service, Appery.io uses this (static) sample, instead of actually invoking the service.
To enable the Echo service:
- Switch to the Echo view, and enable the Enable Echo checkbox.
- Paste a sample service response:
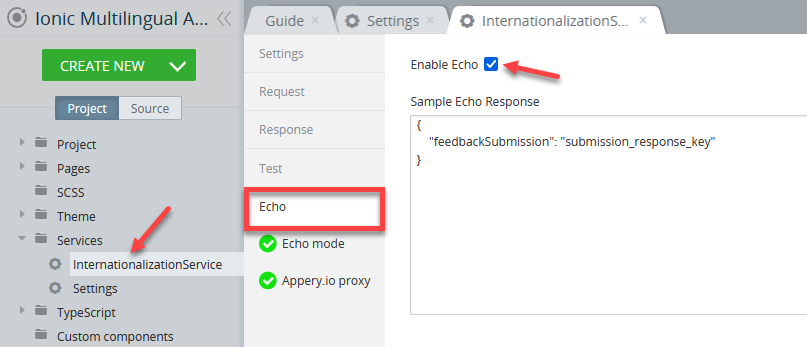
REST Service Echo tab
Adding Service to Page
Once a service has been defined, it can be added and mapped to one or more app pages. To add a service to a page:
- Go to the page where you need to use this service.
- Switch to the DATA panel.
- Add a data source by selecting the service you've created from the drop-down and clicking the Add button.
- A service instance should be added to the page:
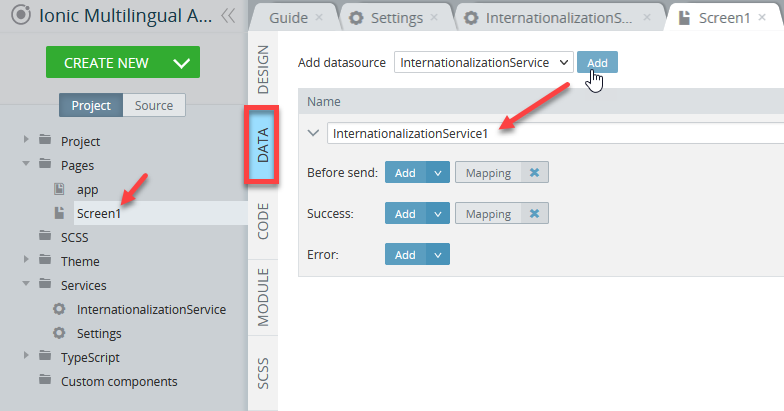
Tip!If the service name is not set initially, the instance receives the default name; however, you can rename it any moment later.
Request Parameters
The Request view allows defining the request parameters and headers required by the service to be invoked. Every service can define a different number of request parameters. Some parameters are required; others may be optional. Some services don’t require any request parameters at all.
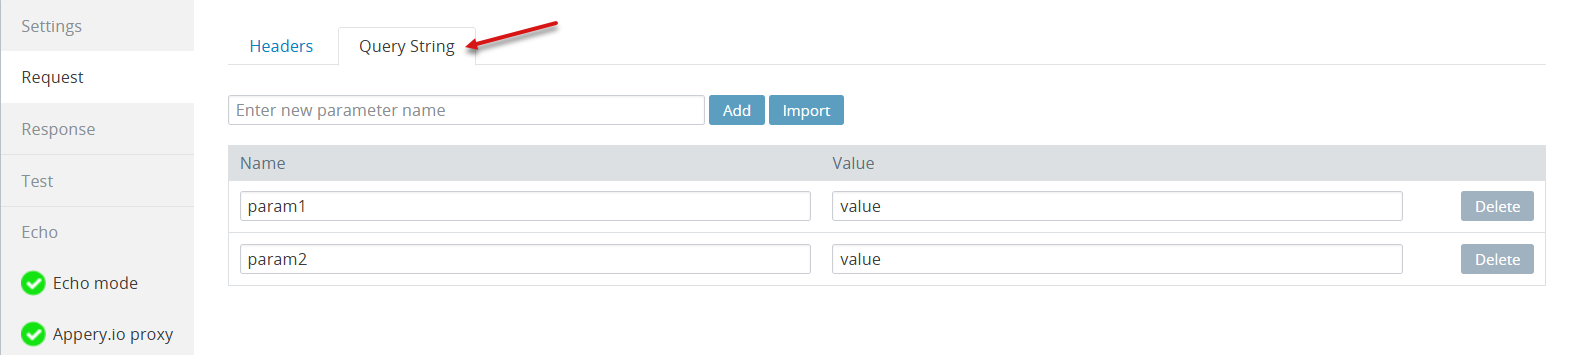
To create, edit, or delete request parameters, go to the Request view and switch to the Query String tab.
Query Parameters
To create a new parameter, enter its name and click Add. To create a new parameter, enter its name and click Add. When you use the service on a page, you can use the default values, or you can map page component properties to the parameters instead.
Import Query String
You can add a set of request parameters by importing a query string. To do this, click Import and enter a query string in the newly-appeared window. Click Import to add request parameters based on the provided data:
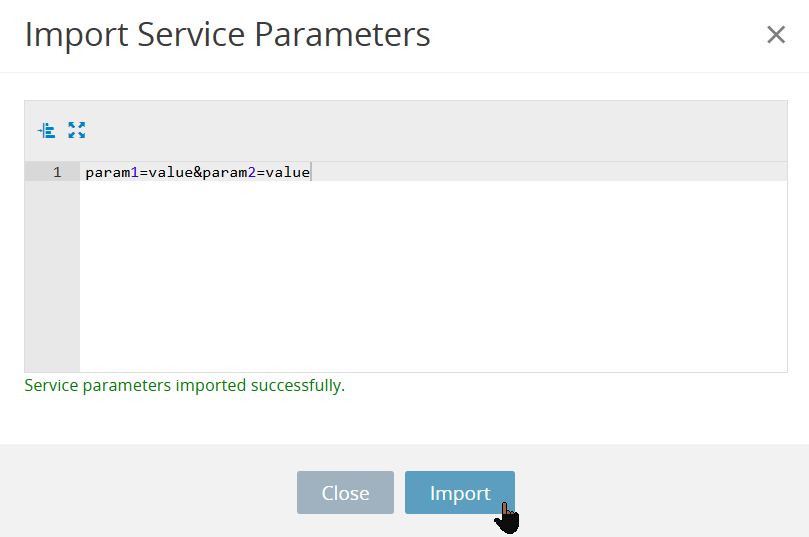
The imported parameters should appear under the Query String tab:
Note!The imported query string should be composed as a series of field-value pairs as in the following:
param1=value¶m2=valueRequest Headers
Some services require one or more request parameters to be sent as a header. Header parameters should be added on the Request > Headers tab.
Import Header Requests
Similarly, you can add a set of request headers at once by using the Import feature:
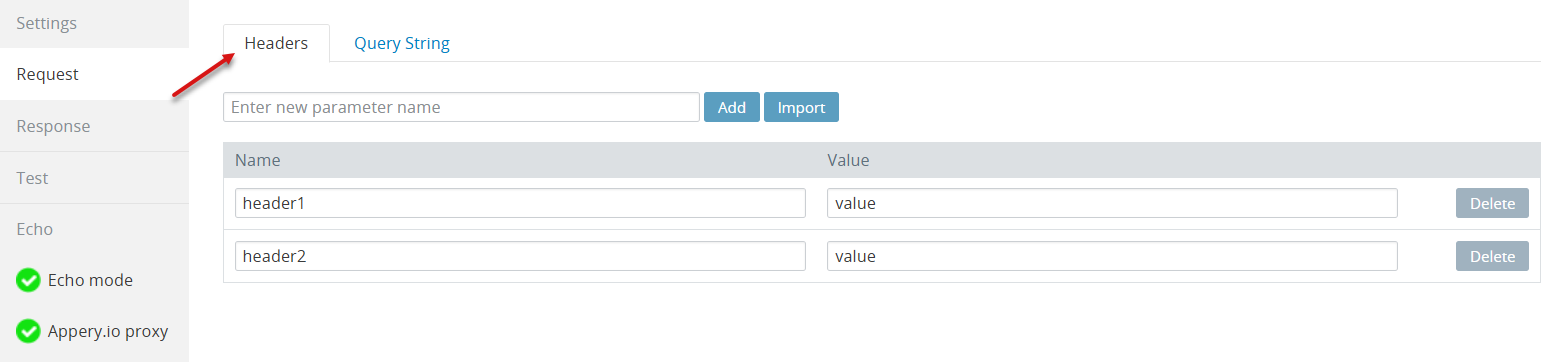
Headers should be specified as field-value pairs. Use line break as a separator between pairs as follows:
header1: value
header2: value
Request Body
When you use POST, PUT, or PATCH methods, the new Body tab appears in the Request view. Its type is based on the Response Data Type chosen in the REST Service settings. If Response Data Type is set to Data, the Request Body contains a single parameter that can’t be modified. When adding the service to a page, you can map binary data (e.g. files) to this parameter.
Default Request Parameter Value
You are not required to map every service input parameter to an element on the page. It’s possible to set a default value for an input parameter. You can also use JavaScript to provide a default value. Click “JS” and provide a default value or expression that will calculate the value.
return "12345";let currentDate = new Date();
return currentDate.getDate();return Apperyio('input_field').val();you set default values during service creation, then those values are automatically copied to the service instance mapping.
Using Settings Service
The Settings service allows you to save app information such as API keys and URLs into a settings file, and then reference the data from anywhere in the app. Thus, it allows you to make changes in one place rather than having to replace the same value everywhere in the app.
It can be used for making values in a REST service and URLs dynamic. For example, you can have the following URL, where the same part should be dynamic (should be substituted from the Settings service): http://mywebsite.com/name/{SettingsName.parameterName}/edit.
Every Ionic app is created with a default Settings service but you can create more if needed.
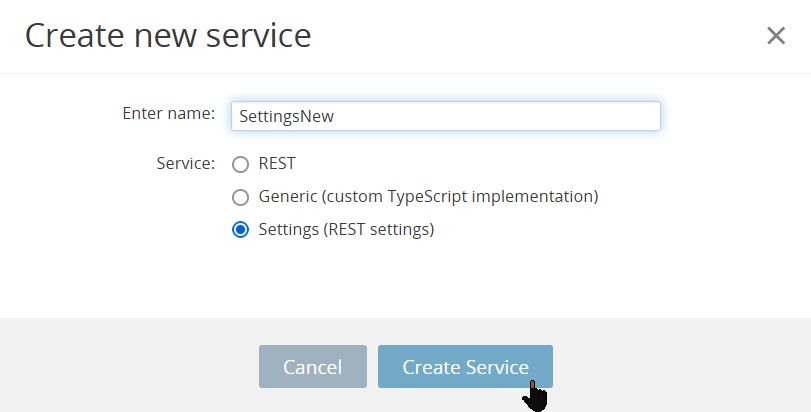
Creating New Settings Service
- To create a new Settings service, open Project view > CREATE NEW > Service, check Settings (REST Settings), enter the name for it, and click Create Service:
- Then create a new parameter in the newly-created Settings service, and provide a value for it. To create a parameter, enter its name and click Add.
It’s basically a properties file with key/value entries. You can also specify some optional descriptions if needed. - Now go to your REST service, and change the dynamic part of your URL to
{SettingsName.parameterName}whereSettingsNameis the settings service name, andparameterNameis the name of the parameter. Your URL should look like this: http://mywebsite.com/name/{SettingsName.parameterName}/edit
Using Settings Values
Using Values in REST Service
You can use the values from the Settings service in defining the REST service as well as TypeScript.
When defining a REST service set the Settings property to the Setting service’s name.
To refer to a value in the settings file use {name}, for example: {url}.

Using the values in the Request tab
Using Values In TypeScript
The Settings service also supports TypeScript API which can be used to read from or write to in the Settings service.
The methods that can be used for managing the Settings service: add, get, remove, and all.
For example, use the following code to get the needed settings:
this.Apperyio.config.get("Settings.aaa", 123)where Settings - is the name of your service and aaa - is the name of the particular setting you need to set up.
API methods for managing the Settings service are listed below.
this.Apperyio.config.get( expression [, default_value] )
To retrieve data from settings:
- expression – setting name or expression like SettingsName.database_url.
- default_value – (optional) if the settings name or expression can’t be found, then default_value will be returned.
Returns the value of setting or default_value (if specified).
Example:
this.Apperyio.config.get('MySettings.database_url');console.log(this.Apperyio.config.get('MySettings.undefined_property', 'default value') );
> default valuethis.Apperyio.config.add( expression, value )
To add a new key value to settings:
- expression – setting name or expression such as SettingsName.database_url.
- value – value for a setting.
Note!It can be added for current runtime only, and doesn’t store anything to the app/constants.js file.
Example:
this.Apperyio.config.add('MySettings.database_url', 'https://api.appery.io/rest/1/db');this.Apperyio.config.all()
No arguments are needed.
Retrieves all of the available settings as an object.
Example:
this.Apperyio.config.all();this.Apperyio.config.init( settings )
- Settings – replace or initialize the Config service in the app.
In general, this function shouldn’t be called since it runs at the start of application bootstrapping with all of the settings.
this.Apperyio.config.init( {
    MySettings: {
        database_url: 'https://api.appery.io/rest/1/db'
    }
} );
this.Apperyio.config.remove( expression )
- Expression – setting name or expression like SettingsName.database_url.
Removes the setting from the App settings.
Note!It removes the setting for current runtime only, not from the
app/constants.jsfile.
console.log( this.Apperyio.config.get('MySettings.database_url') );
> https://api.appery.io/rest/1/db

this.Apperyio.config.remove('MySettings.database_url');

console.log(this.Apperyio.config.get('MySettings.database_url') );
> undefined
The Settings service is a hash that can be set in runtime. For example, if the service is called AppSettings and has the airport_code key then you can set it like this via JavaScript:
AppSettings.airport_code = "SFO";You can read the values similarly:
let airport_code = AppSettings['airport_code'];Or:
let airport_code = AppSettings.airport_code;Plug-ins
Most plug-ins use a Settings service to keep data, (such as API keys) in one centralized place. When creating a new plug-in you can keep this data in a Settings service as well.
Using Generic Service
The Generic service is used to extend the standard REST service by using custom code. It still has inputs and outputs (as standard service) and can be mapped, but the actual service implementation, or what it does is up to you. For example, the service can access local browser databases such as IndexedDB, and SQLite, or do calculations.
You can use the Generic service to provide custom access to data. You can add some custom logic to the automatically generated TypeScript file. If you create a new TypeScript file there’s a default implementation code that can be edited to make your app more flexible and customized.
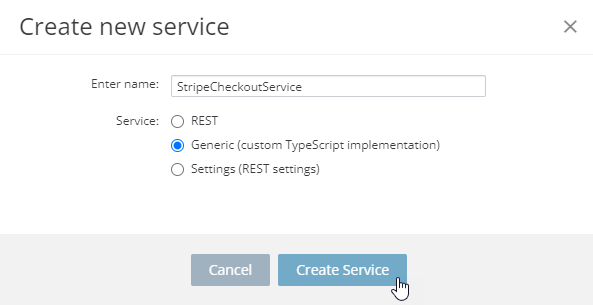
Creating Generic Service
A new generic service can be created via CREATE NEW > Service > Generic (custom TypeScript implementation) dialog:
As soon as the new default service is created you can open this default implementation by clicking Open:
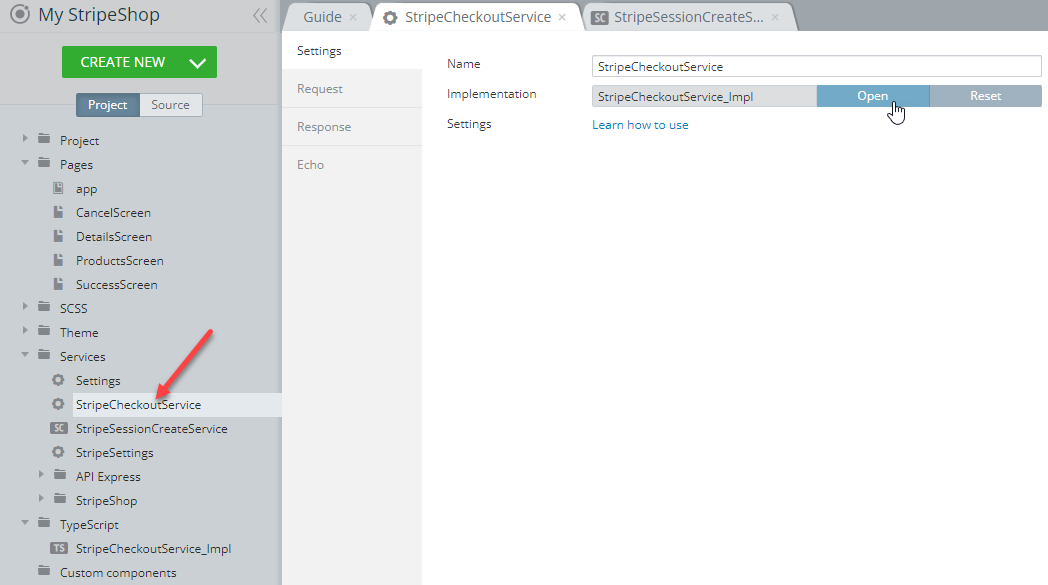
All ._impl files (default and custom) can be found under the TypeScript folder:
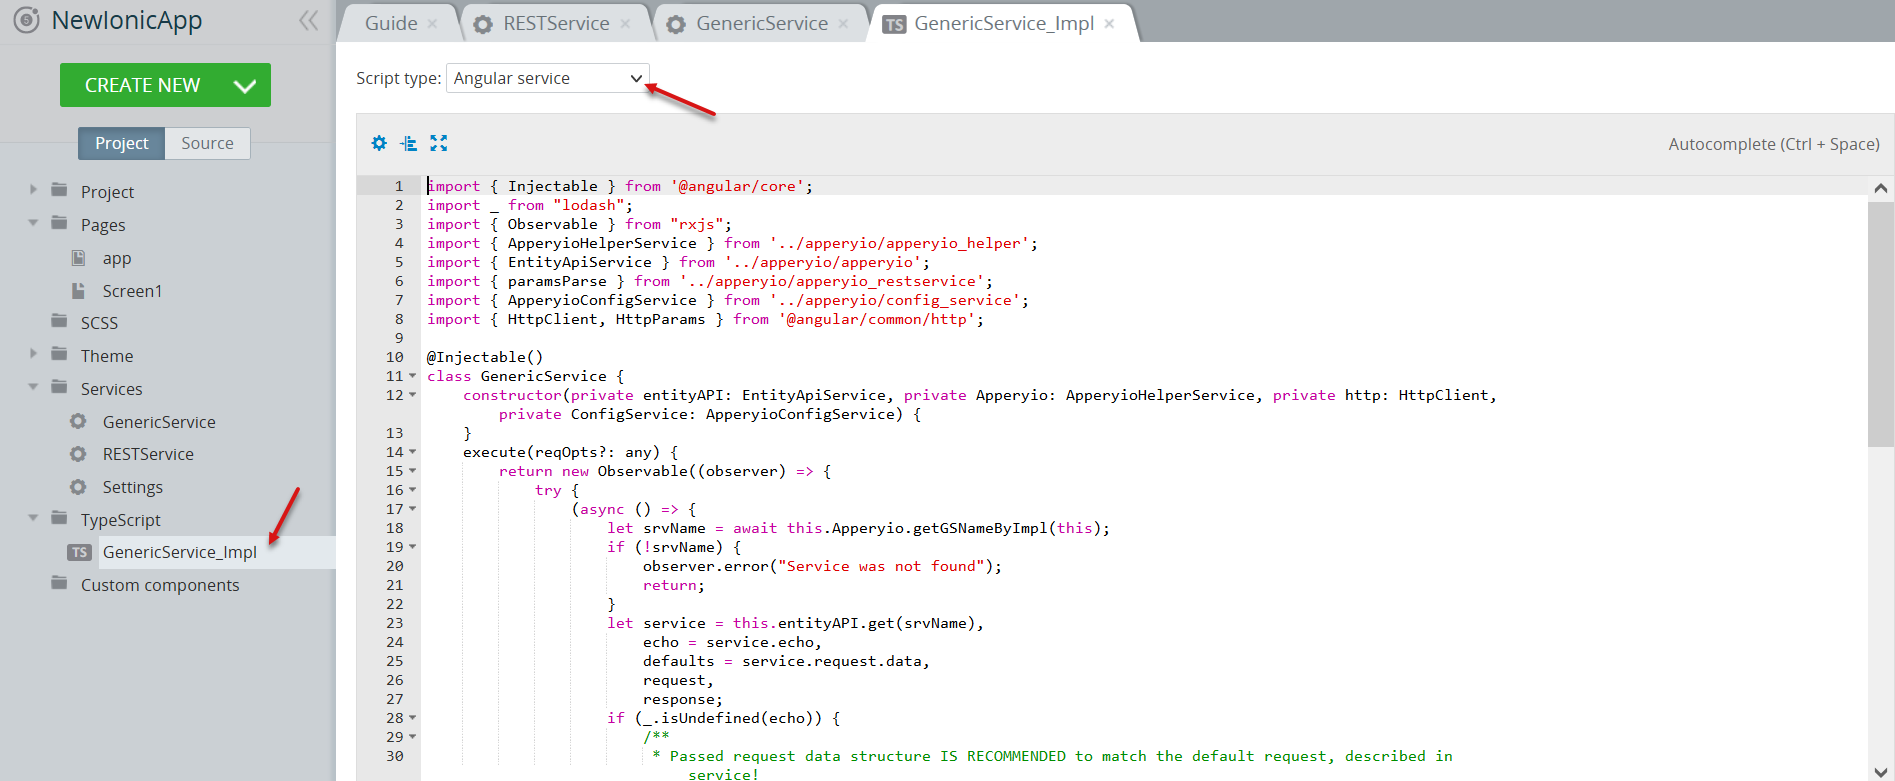
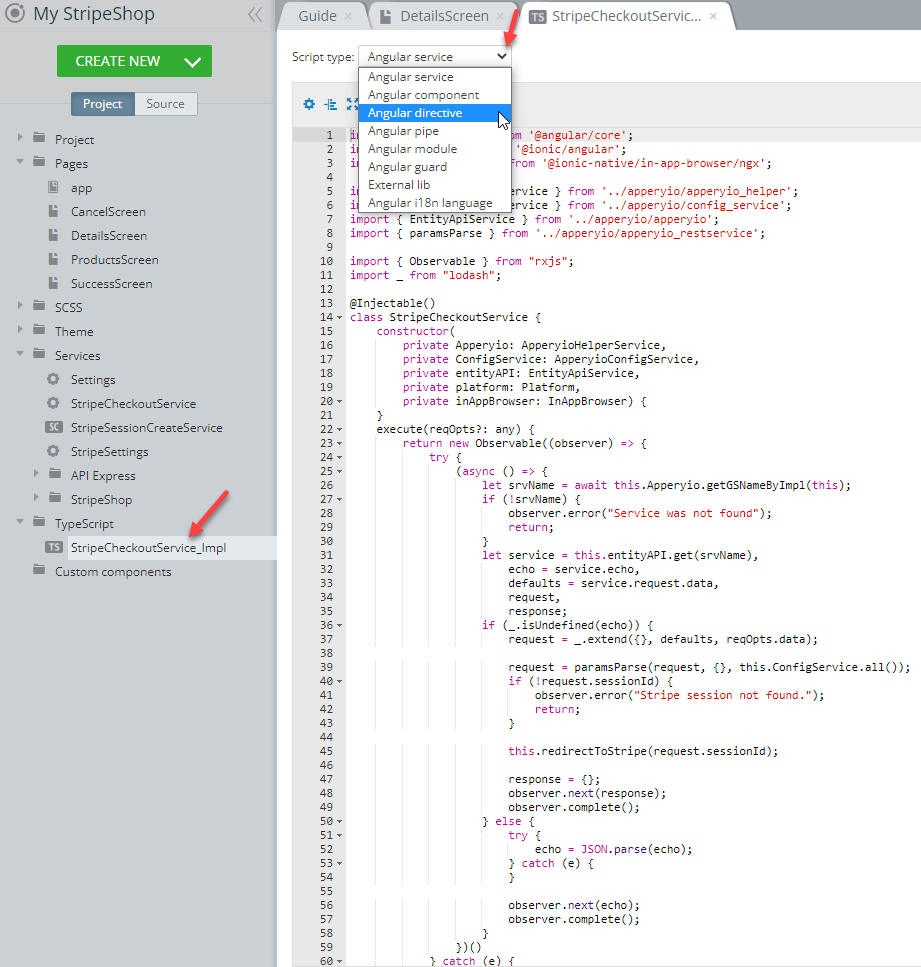
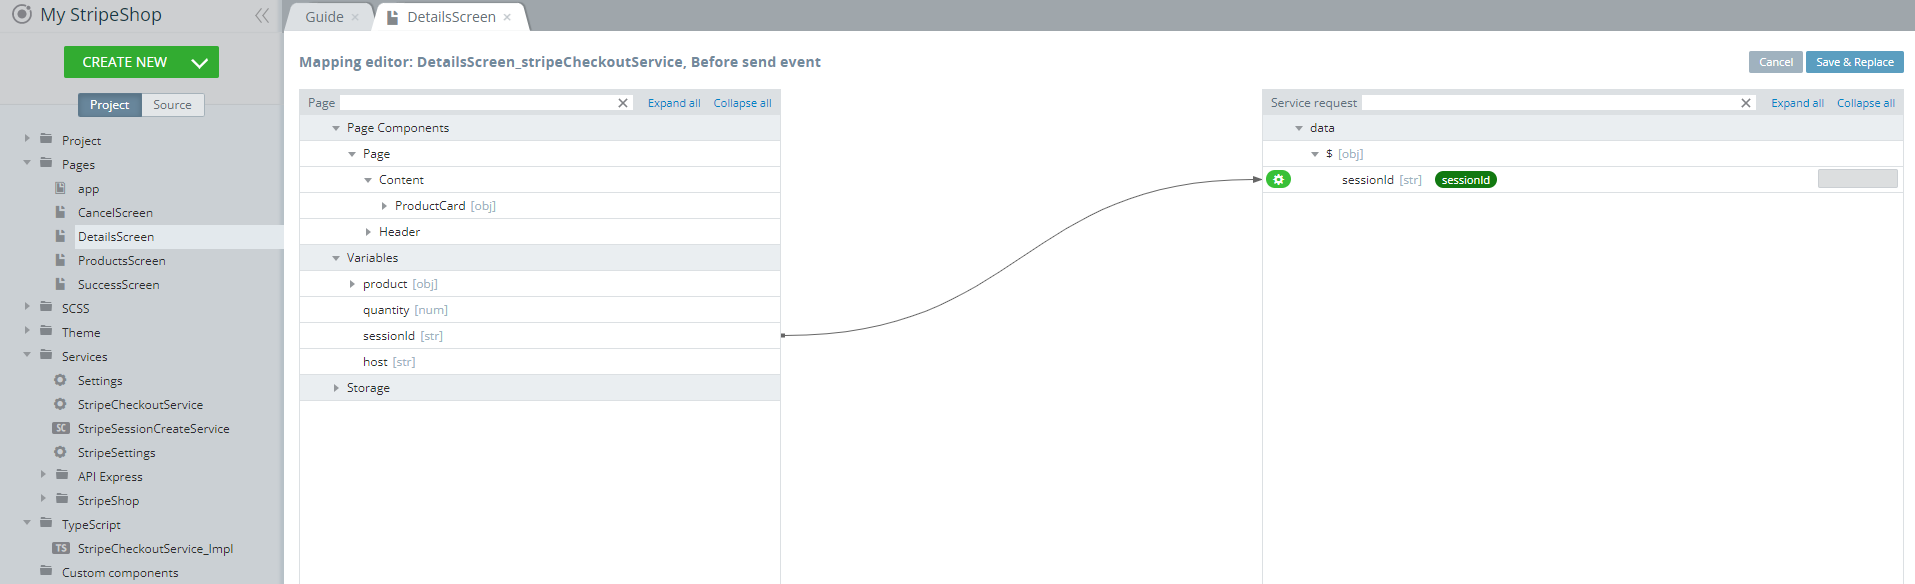
Below, you can find the example with the Generic service created for the StripeShop App template:
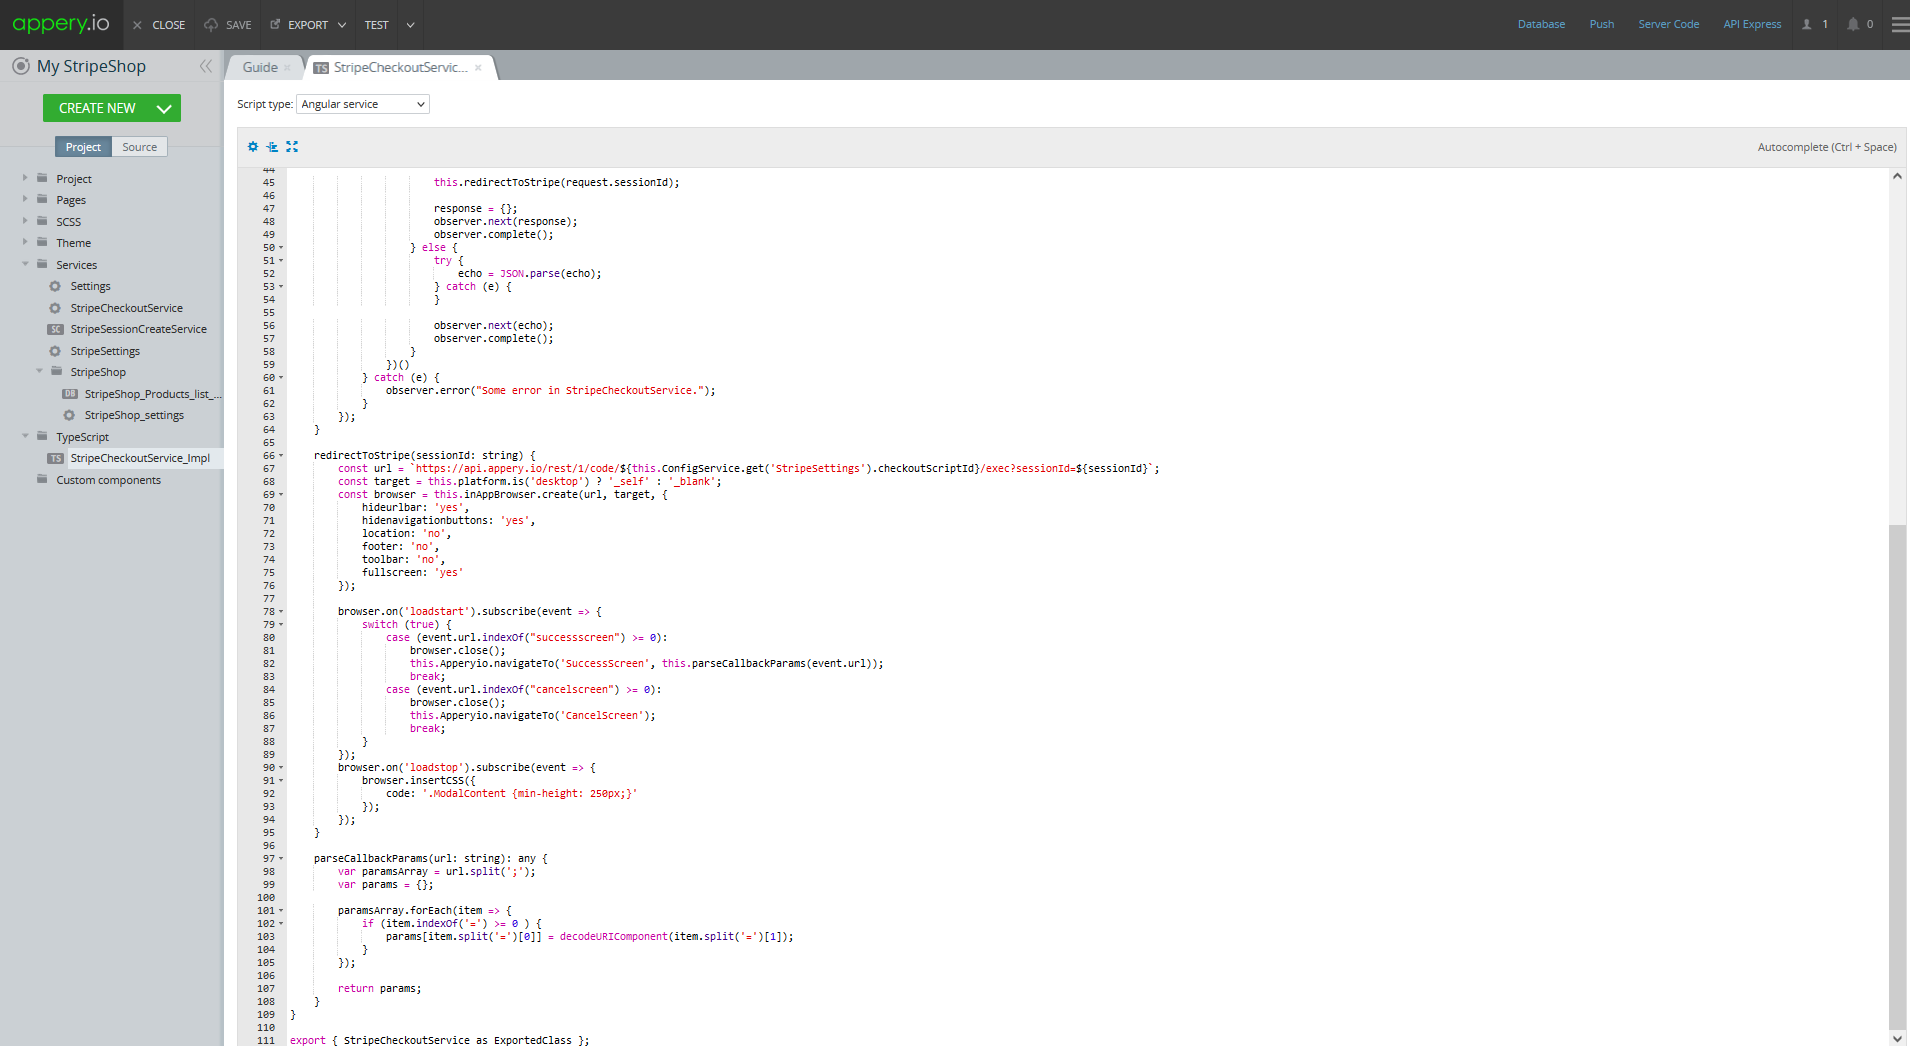
You are free to choose between using the existing TypeScript file or creating a new one.
If you create a new TypeScript file (CREATE NEW > TypeScript), there’s a default implementation code that can be edited by the user.
Select the script type and confirm creating:

Also, you can select the script type to be used for the service when editing it:
To add the service, go to the page DATA panel select it from the drop-down, and click Add:
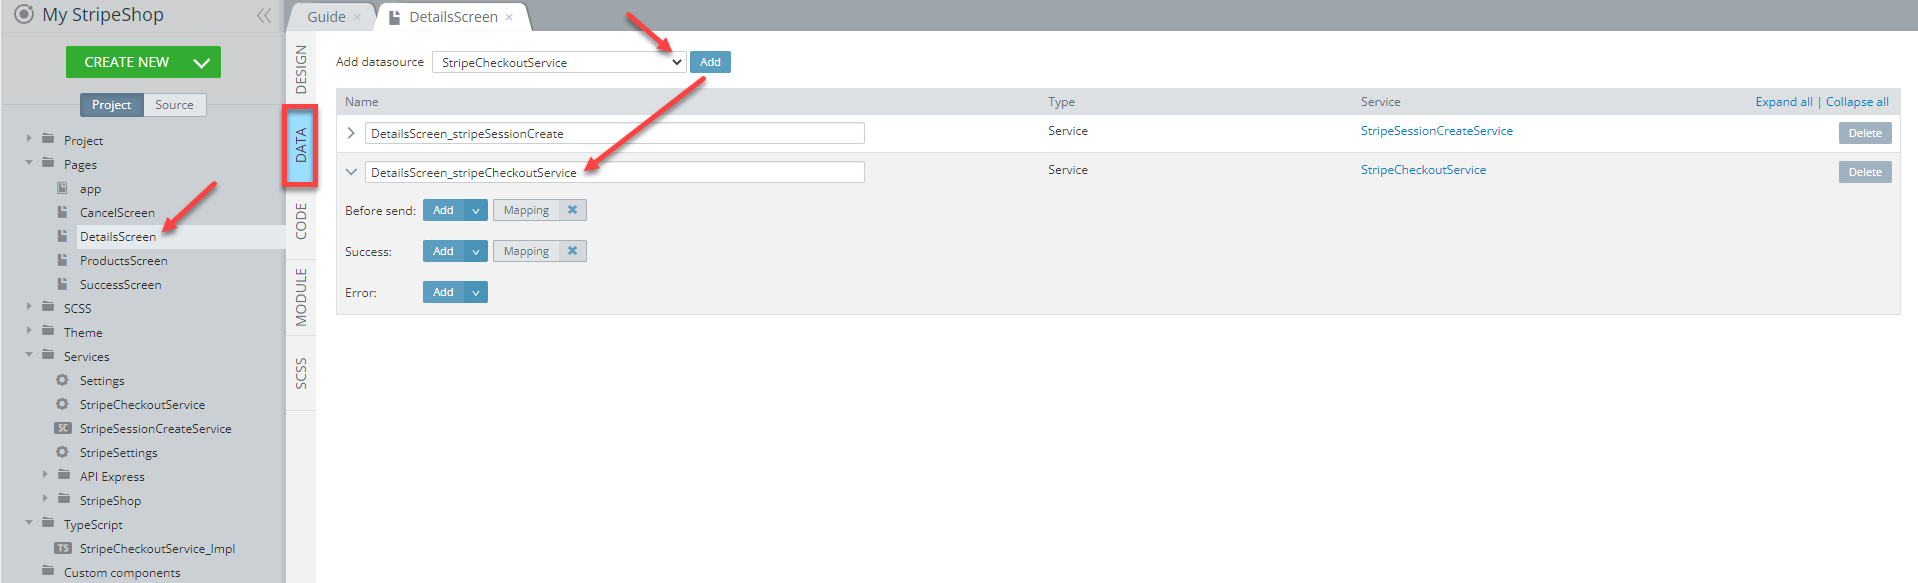
Once the service has been added, click Mapping to map the service to the page and save it:
Request and Response Parameters
Request Parameters
As with the standard REST service, the Generic service also has a Request and Response tabs.
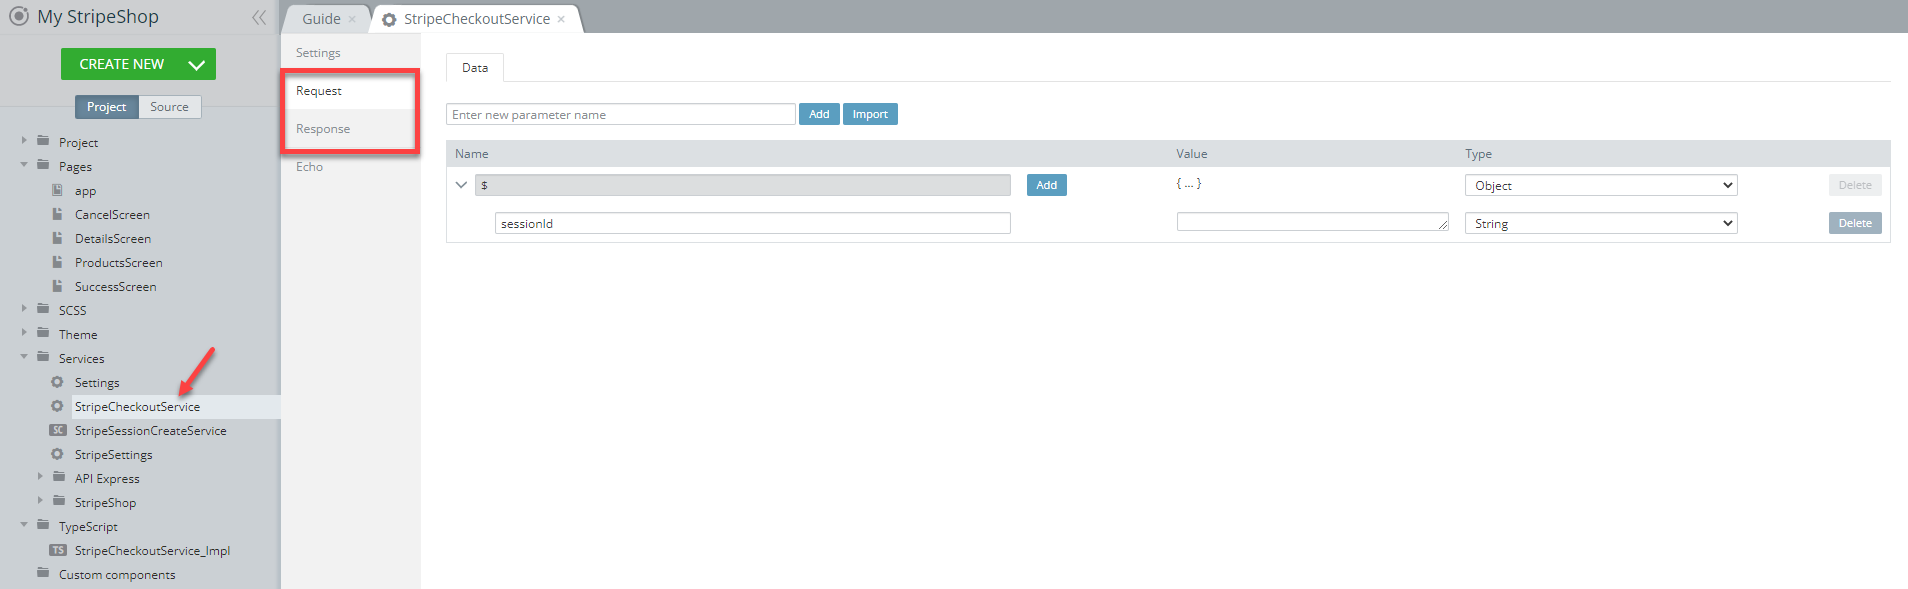
Any input/output parameters needed for custom implementation can be specified there. Input parameters can be accessed by settings.data.<parameterName>.
For example, a specified parameter with someParameter name and some_value value.
This parameter can be accessed from the custom implementation JavaScript file with the following code:
settings.data.someParameterThe following custom implementation will simply log the input parameter:
Appery.CacheData = Appery.createClass(null, {

    init: function(requestOptions) {
        this.__requestOptions = $.extend({}, requestOptions);
    },

    process: function(settings) {
        if (this.__requestOptions.echo) {
            settings.success(this.__requestOptions.echo);
        } else {
            console.log(settings.data.someParameter);
        }
        settings.complete('success');
    }

});
In the example above, the someParameter value was specified in the Request tab. It is also possible to pass this value from the page via components mapping.
For example; there’s a Textarea component on the page where the user must input something. The following mapping will pass the someParameter with the value typed in the Textarea to the custom implementation code:

It doesn’t matter where the parameter value comes from; it can be accessed by settings.data.
Response Parameters
To create the mapping with the results data, the Response tab must contain at least one parameter. Let's say your custom implementation must return the username:

It’s possible to map the response to the component:
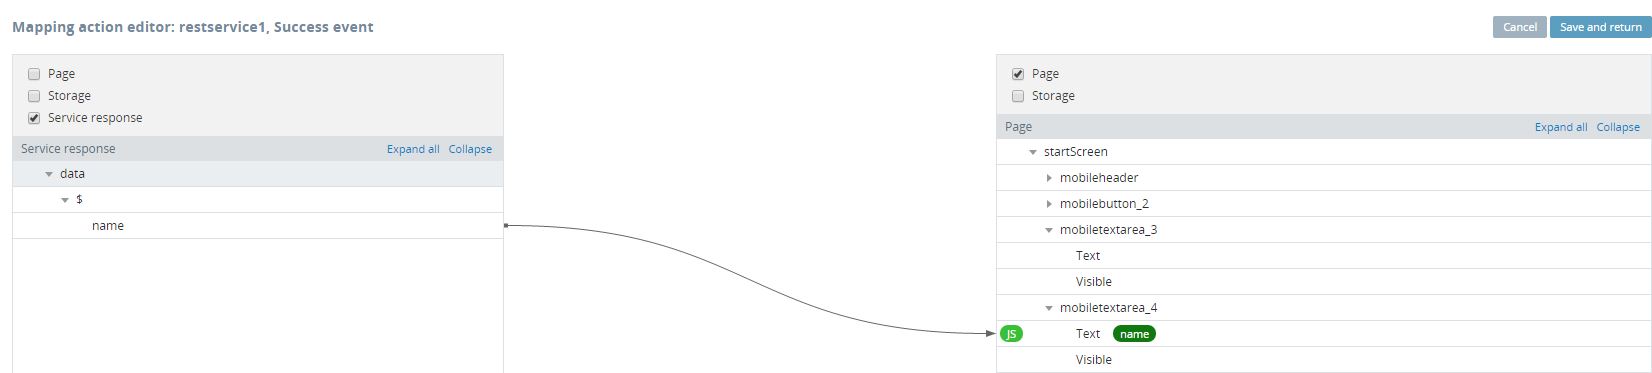
The result can be specified in the implementation using the settings.success method. The parameter mapped to the page, the response parameter, and the parameter specified in the custom implementation must have the same name. In this case, its name:
settings.success({"name":"Dan"});
NoteThe response value must be always specified in
JSONformat.
Custom implementation for the example above:
Appery.CacheData = Appery.createClass(null, {

    init : function(requestOptions) {
        this.__requestOptions = $.extend({}, requestOptions);
    },

    process : function(settings) {
        settings.beforeSend(settings);
        if (this.__requestOptions.echo) {
            settings.success(this.__requestOptions.echo);
        } else {
            console.log('Default implementation is used. Please define your own.');
            settings.success({"name":"Dan"});
        }
        settings.complete('success');
    }

});
Any number of parameters can be returned and mapped. The following screenshots show the implementation with name and age parameters in the response.
The Response tab with two parameters:

Mapping two response values to different components:
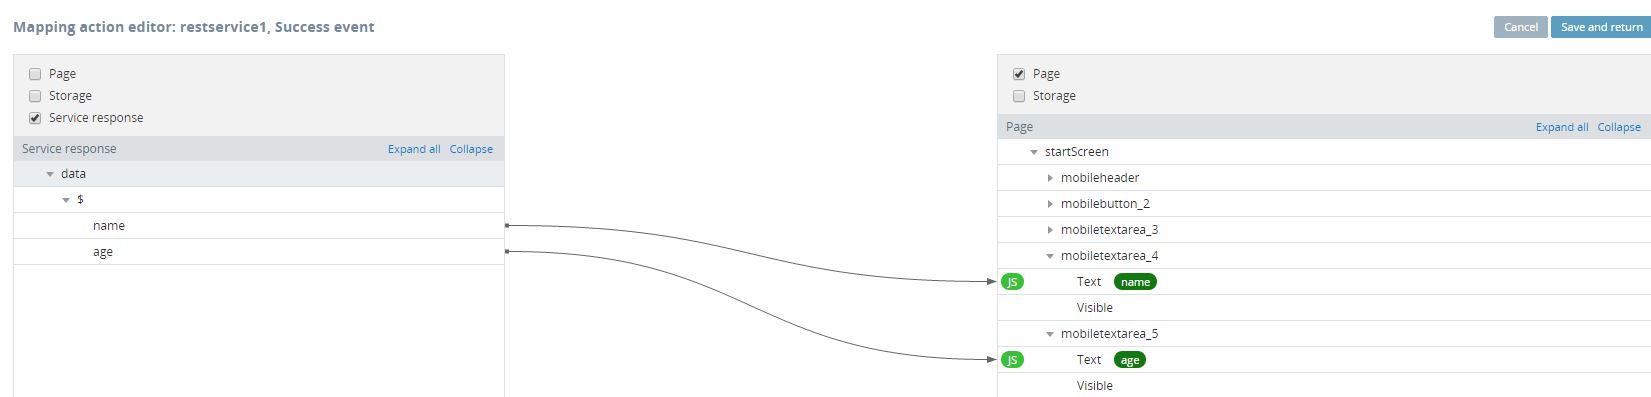
The implementation code in the case of two response values:
Appery.CacheData = Appery.createClass(null, {

    init: function(requestOptions) {
        this.__requestOptions = $.extend({}, requestOptions);
    },

    process: function(settings) {
        if (this.__requestOptions.echo) {
            settings.success(this.__requestOptions.echo);
        } else {
            settings.success({"name":"Dmitry","Age":"22"});
        }
        settings.complete('success');
    }

});
Response parameters will automatically be parsed and associated by names with the mapped parameters.
Settings
Class settings contain a few methods that work the same as that of a common REST Service. In the example above, there are Before send method called first and the Complete method called last. These events are exactly the same as you can see from the visual builder.
If you need, you can implement a GenericService implementation that will return Error in some cases.
Appery.CacheData = Appery.createClass(null, {

    init: function(requestOptions) {
        this.__requestOptions = $.extend({}, requestOptions);
    },

    process: function(settings) {
        if (this.__requestOptions.echo) {
            settings.success(this.__requestOptions.echo);
        } else {
            settings.error(null, null, "Error occured");
        }
        settings.complete('error');
    }

});
In this case, service will call Error event and then Complete the event. When you are mapping to an Error event there are 3 parameters available – jqXHR, textStatus and errorThrown.
You can list this parameter separated by a comma as follows:
settings.error(null, 'textStatus here', "Error occured");Connecting to 3rd party API
Connecting to an external API is possible by:
- Using Rest Service in App Editor with Secure Proxy.
- Using the REST component in API Express.
- Using Server Code script (XHR API).
All the above approaches allow invoking the API from the server.
Updated about 1 year ago