Custom Security
Working with custom security.
Introduction
API Express offers a flexible and powerful way to customize the authentication process. This allows you to write any logic for getting a user session token. This page will explain how to set up custom authentication and how it works.
Enabling Custom Security
To enable custom security, go to the Settings page in your API Express project. For Security type, select Custom service.

Setting project security
How it Works
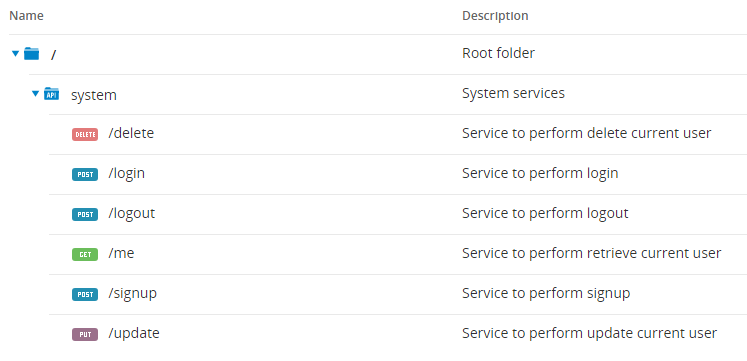
Every API Express project contains a predefined system folder. Here is how the folder works:
- system folder can't be deleted or edited.
- system folder contains five services with names signup, login, logout, delete, and update.
- signup, login and logout services can be deleted but they can't be updated
- signup creates a new user. After successful signup, it becomes possible to login under a new user.
- login service creates a session object on the server which is available when a user session is live.
- login service returns a sessionToken which works as a usual API Express session token and should be passed with every API call as the value of X-Appery-Session-Token header.
- On the server, session object is found based on sessionToken value???.
- me* service returns information about the current user.
- logout service destroys the sessionToken and its link with the session object.
- update service updates logged user.
- delete service removes logged user.
- session object is available in generated and custom services.

system folder
signup Service Default Implementation
The signup service has a built-in implementation that looks like this:

All properties of the component Start are disabled with the exception of Service request message body.
The Start component has the following request structure which also is the request structure for the service itself:
{"username" : "", "password": "", "options" : {}}In most cases, the signup service accepts only two parameters: username and password which are mandatory but additional parameters like domain name can be passed in the options variable:
{"username" : "", "password": "", "options" : {"domain": ""}}The second component is the Script component. Its default implementation is shown below:
result = {
    "status" : "success"
};
Based on Script component code, the component will return a response in the following format:
{
    "status": "success"
}
Successful Signup
In case of a successful signup the value of the status field should be success.
Optionally, the signup service can return additional information (for example some information message)
Unsuccessful Signup
In case of an unsuccessful signup, the value of status field should be different from success (for example failed)
Optionally, the failedDetailsMessage field can be used to return user-friendly response.
The default response of an unsuccessful signup looks like:
{
  "code": "AE100",
  "message": "User with such name already exists",
  "status": "BAD_REQUEST"
}
login Service Default Implementation
The login service has a built-in implementation that looks like this:

login service
All properties of the component Start are disabled with the exception of Service request message body.
The Start component has the following request structure which also is the request structure for the service itself:
{"username" : "", "password": "", "options" : {}}In most cases, the login service accepts only two parameters: username and password which are mandatory but additional parameters like domain name can be passed in the options variable:
{"username" : "", "password": "", "options" : {"domain": ""}}The second component is the Script component. Its default implementation is show below:
result = {
    "status" : "success",
    "session" :  { "userId" : BODY.username, "userName" : BODY.username }
};
Based on the Script component code, the component will return a response in the following format:
{
    "status": "success",
    "session": {
        "userId": "",
        "userName": ""
    }
}
Successful Login
In case of a successful login, the value of the status field should be success.
Optionally, the login service can return the session object. session object has two predefined fields:
| Object name | Description |
|---|---|
| userId | Unique user ID |
| userName | Username for this user |
{
    "status": "success",
    "session": {
        "userId": "ez94580",
        "userName": "amy"
    }
}
Additional fields can be placed into the session object.
A response of a successful login looks like this:
{
  "sessionToken": "f82c611d-80b9-4734-a4ca-532f675dae9b"
}
Unsuccessful Login
In case of an unsuccessful login, the value of status field should be different from success (for example failed)
Optionally, the failedDetailsMessage field can be used to return user-friendly response.
Default response of an unsuccessful login looks like:
{
  "code": "AE010",
  "message": "Wrong username or password",
  "status": "FORBIDDEN"
}
Example Using Static Users
The easiest way to test custom security is to define username in password directly in the code, in the Script component.
The following code defines two users:
- max/pass1
- alex/pass2
var users = [{
    "userId": "1",
    "username": "max",
    "password": "pass1"
}, {
    "userId": "2",
    "username": "alex",
    "password": "pass2"
}];

result = {
    "status": "failed",
    "failedDetailsMessage": "Incorrect username or password"
};

for (var i = 0; i < users.length; i++) {
    if (users[i].username == BODY.username && users[i].password == BODY.password) {
        result = {
            "status": "success",
            "session": {
                "userId": users[i].userId,
                "userName": users[i].username
            }
        };
        break;
    }
}
me Service Default Implementation
The me service has the built-in implementation that looks like this:

me service doesn't accept any parameters.
The second component is the Script component. Its default implementation is show below:
result = {
    "status" : "success",
    "session" :  { "userId" : SESSION.USER_ID, "userName" : SESSION.USER_NAME }
};
Based on Script component code, the component will return a response in the following format:
{
    "status": "success",
    "session": {
        "userId": "",
        "userName": ""
    }
}
update Service Default Implementation
The update service has a built-in implementation that looks like this:

All properties of the component Start are disabled with the exception of Service request message body.
The Start component has the following request structure which also is the request structure for the service itself:
{"username" : "", "password": "", "options" : {}}In most cases, the update service accepts only two parameters: username and password which are mandatory but additional parameters like domain name can be passed in the options variable:
The second component is the Script component. Its default implementation is shown below:
result = {
    "status" : "success"
};
Based on the Script component code, the component will return a response in the following format:
{
    "status": "success"
}
Successful Update
In case of a successful update, the value of status field should be success.
Optionally, the update service can return additional information (for example some information message).
Unsuccessful Update
In case of an unsuccessful update, the value of status field should be different from success (for example failed).
Optionally, the failedDetailsMessage field can be used to return user-friendly response.
The default response of an unsuccessful update looks like:
{
  "code": "AE100",
  "message": "User with such name already exists",
  "status": "BAD_REQUEST"
}
delete Service Default Implementation
The delete service has a built-in implementation that looks like this:

All properties of the component Start are disabled.
The second component is the Script component. Its default implementation is shown below:
result = {
    "status" : "success"
};
Based on the Script component code, the component will return a response in the following format:
{
    "status": "success"
}
Successful Delete
In case of a successful delete, the value of the status field should be success.
Optionally, the delete service can return additional information (for example some information message)
Unsuccessful Delete
In case of an unsuccessful delete, the value of the status field should be different from success (for example failed)
Optionally, the failedDetailsMessage field can be used to return user-friendly response.
The default response of an unsuccessful delete looks like:
{
  "code": "AE100",
  "message": "User wasn't found",
  "status": "BAD_REQUEST"
}
Login Anonymously
Sometimes users consider signup process as tedious and prefer to get familiar with the app before filling user's registration information but on the other hand, the application should be able to identify the user.
For such cases, API Express provides the opportunity to login anonymously.
AppClient has AppClientLoginAnonymously generic service which
- Generates unique credentials (username/password pair)
- Creates a user with such credentials (Sign Up method)
- Logins user under this credentials
Example Using Relational Database
This example uses a relational database to perform signup and login.
The relational database has two tables:
- Users for storing user's credentials
- Labels for storing some user's data

Users and Labels tables
All SQL code was designed for MySQL database but can be easily updated for any other relational database.
The table Users has the following columns:
- user_id - unique user identifier.
- user_name - user name.
- user_password - user password.
- user_activated - additional user's parameter .
This is the DDL script for the Users table:
CREATE TABLE Users
(
    user_id INT PRIMARY KEY NOT NULL AUTO_INCREMENT,
    user_name VARCHAR(100) NOT NULL,
    user_password VARCHAR(100) NOT NULL,
    user_activated BOOLEAN DEFAULT FALSE NOT NULL;
);
CREATE UNIQUE INDEX musers_user_id_uindex ON musers (user_id);
CREATE UNIQUE INDEX musers_user_name_uindex ON musers (user_name);
The Users table has two users (max/pass1 and alex/pass2) that can be used for login.
DML script to insert two predefined users:
INSERT INTO Users (user_name, user_password) VALUES ('max', 'pass1');
INSERT INTO Users (user_name, user_password) VALUES ('alex', 'pass2');
The table Labels has following columns:
- label_id - unique label identifier.
- label_name - label name.
- user_id - foreign key on column user_id from Users table.
DDL scipt of the Labels table:
CREATE TABLE Labels
(
    label_id INT PRIMARY KEY NOT NULL AUTO_INCREMENT,
    user_id INT,
    label_name VARCHAR(100),
    CONSTRAINT Labels_Users__fk FOREIGN KEY (user_id) REFERENCES Users (user_id)
);
CREATE UNIQUE INDEX Labels_label_id_uindex ON Labels (label_id);
The API Express signup service consists of two components:
- SQL - to create new user
- Script - to return a response based on response from SQL component.

The SQL component performs a simple create operation with two parameters username and password:
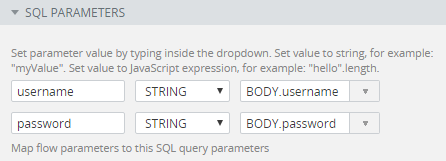
insert into Users (username, password ) values (:username, :password)SQL component parameters should be mapped to corresponding parameters from request body of the Start component as shown below:

The SQL component response for username alex2 and password pass2 is:
[
    {
        "GENERATED_KEY": 1434234627
    }
]
The subsequent Script component checks the size of response (from SQL component) and if it is different from zero then returns success response or returns failed response otherwise.
if (BODY.length == 0) {
    result = {
        "status": "failed",
        "failedDetailsMessage": "Invalid username or password"
    };
} else {
    result = {
        "status": "success"
    }
}
The API Express Login service consists of two components:
- SQL - to perform select operation for passed username/password.
- Script - to return a response based on response from SQL component.

Service flow in API Express
The SQL component performs a simple select operation with two parameters username and password:
select * from Users
where user_name = :username and
      user_password = :password
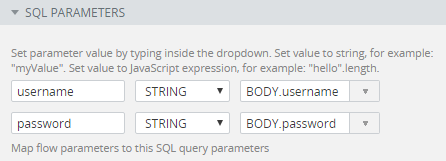
SQL component parameters should be mapped to corresponding parameters from request body of Start component as shown below:

Start component mapping
The SQL component response for username alex and password pass is:
[
    {
        "user_id": 2,
        "user_name": "alex",
        "user_password": "pass2",
        "user_activated": false
    }
]
For invalid credentials response will be an empty array [].
The subsequent Script component checks the size of the response (from the SQL component) and if it is different from zero then returns success response or returns failed response otherwise.
if (BODY.length == 0) {
    result = {
        "status": "failed",
        "failedDetailsMessage": "Incorrect username or password"
    };
} else {
    result = {
        "status": "success",
        "session": {
            "userId": BODY[0].user_id,
            "userName": BODY[0].user_name,
            "activated": BODY[0].user_activated
        }
    }
}
In addition to the required userId and userName field, the session object contains the optional activated field.
The value of the session object is stored on the server side and can be used during subsequent REST API calls.
To test that session object works properly, it can be used in the following simple custom service:

A service with just Start and End
The session is available by name SESSION and has two predefined fields
- SESSION.USER_NAME.
- SESSION.USER_ID.
All another session fields are available as SESSION.fieldName.
Setting the Use as response field to the SESSION object:

Setting service response
An example of the response for a custom service in case of a successful login looks like this:
{
  "activated": false,
  "USER_NAME": "max",
  "USER_ID": 1
}
The variable SESSION.activated can be used to allow running the flow only for activated users.
The API Express me service consists of two components:
- SQL - to retrieve current user from db
- Script - to return a response based on response from SQL component

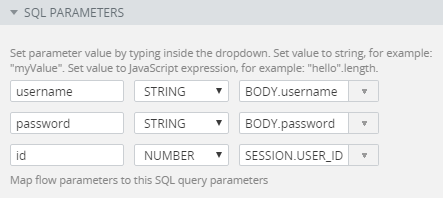
The SQL component performs a simple select operation with one parameter id:
select * from users where id = :idSQL component parameters should be mapped to corresponding parameters as shown below:

The SQL component response is:
[
    {
        "id": 3,
        "username": "alex",
        "password": "pass"
    }
]
For invalid me response will be an empty array [].
The subsequent Script component checks the size of response (from SQL component) and if it is different from zero then returns success response or returns failed response otherwise.
if (BODY.length == 0) {
    result = {
        "status": "failed",
        "failedDetailsMessage": "Current user already doesn't exist"
    };
} else {
    result = {
        "status": "success",
        "session": {
            "userId": BODY[0].user_id,
            "userName": BODY[0].user_name
        }
    }
}
The API Express update service consists of two components:
- SQL - to create new user
- Script - to return a response based on response from the SQL component.

The first SQL component performs a simple update operation with three parameters username , password and id:
update users set username = :username, password = :password where id = :idSQL component parameters should be mapped to the corresponding parameters from request body of _the _Start** component as shown below:

The second SQL component performs a simple select operation with one parameter id to make sure that user was updated:
select * from users where id = :idThe SQL component response for id 1 is:
[
    {
        "user_id": 1,
        "user_name": "alex",
        "user_password": "pass",
        "user_activated": false
    }
]
The last scripts component performs verification and if all conditions are true then returns success response or returns failed response otherwise:
if (BODY.length === 0 || BODY[0].username !== PARAMS.BODY.username || BODY[0].password !== PARAMS.BODY.password) {
    result = {
        "status": "failed"
    };
} else {
    result = {
        "status": "success"
    };
}
The API Express delete service consists of three components:
- SQL - to delete existing user
- SQL - to verify that user was deleted
- Script - to return a response based on response from SQL component

The first SQL component performs a simple delete operation with one parameter id:
delete from users where id = :idSQL component parameters should be mapped to corresponding parameters from request body of the Start component as shown below:

The second SQL component performs a simple select operation with one parameter id to make sure that user was deleted:
select * from users where id = :idThe last scripts component performs verification and if the response is empty then returns success response or returns failed response otherwise:
if (BODY.length !== 0) {
    result = {
        "status": "failed"
    };
} else {
    result = {
        "status": "success"
    };
}You can also implement identification through LDAP by using the LDAP component for the needed service(s), for example, login or logout.
Using in Generated Service
It is also possible to use theuserId variable in a generated service.
A table from which a service is generated has the UserId field which can be mapped to the SESSION.USER_ID variable.
Example of a generated service for table Labels:

Table metadata for a generated service
A create (POST) operation to add a new label:
{
  "label_name": "test label"
}
returns a response like this:
{
  "label_id": 1,
  "label_name": "test label"
}
and in the table Labels the following record should be created:

New record created
The user_id field is filled on the server automatically. The value of this field is taken from the SESSION.userId variable.
Updated 7 months ago
