CONDITION Component
Using the CONDITION component.
The CONDITION component allows you to add if-else like logic to service flow. When you add the CONDITION component to service flow it has two branches (cases):
- if
- else
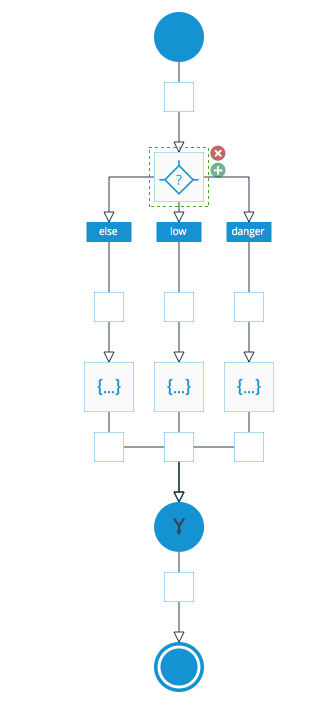
You can add additional branches (cases) by clicking the green (+) icon. Every case besides the default else case can be renamed. Here is an example with three branches:

Condition component.
Each branch (case) is checked based on the logic you specify. To specify a logic to execute for each branch, select the branch. In Properties under the Condition section, you can specify the condition logic. The simplest way is to use the visual condition builder by clicking the Use condition builder button.
Let's run through a quick example.
- Create an API Express service with one query parameter called inventory (number).
- Build a flow as shown in the image above. Don't forget to add the SCRIPT component for each branch.
- Rename the two right branches to low and danger.
- Now select the second branch (low) and in Properties, click the Use condition builder button.
- Click the Add rule button.
- From the lists, select PARAMS.QUERY.inventory > less and enter the number 1000 in the last input. This means this branch will be executed if the inventory number is below 1000.
- Click Save. You will see the condition logic code in Properties.
- Select the third branch (danger) and in Properties, click the Use condition builder button.
- Click Add rule button.
- From the lists, select PARAMS.QUERY.inventory > less and enter the number 100 in the last input. This means this branch will be executed if the inventory number is below 100.
Next, you are going to use the SCRIPT component to output a message for each branch. When you run the service only one branch will match and in turn, its SCRIPT component will be invoked and you will get one output message.
- For the first SCRIPT component, enter the following code:
result = {"message": "No action needed"};- Click Run script to set the component response.
- For the second SCRIPT component, enter the following code.
result = {"message": "Notify supplier"};result = {"message": "Inventory is dangerously low"};- Click Run script to set the component response.
Now select the Merge sub-component in the CONDITION component. This is where you are going to define the response. Remember that only one of the branches will run which means only one of the messages should be displayed.
- First, you need to define the component output. Under Mapping, enter:
{"supplierMessage":""}- Next, click on the Generate mapping button.
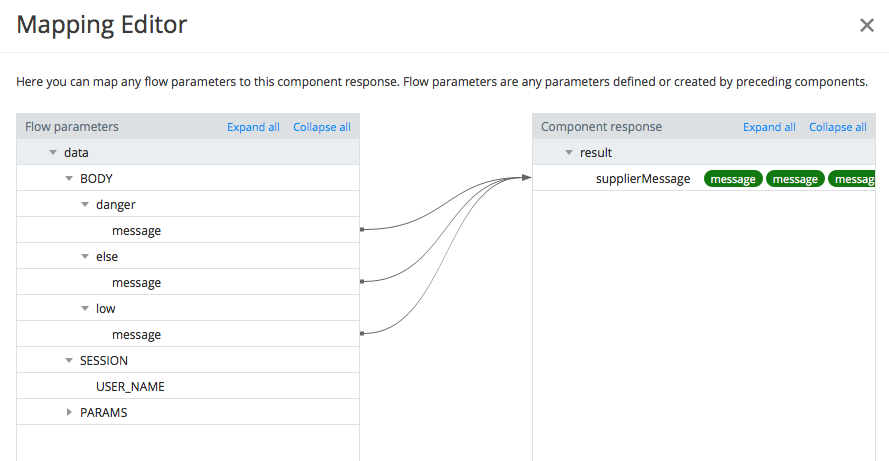
- Map all three branches to supplierMessage as shown below:

Condition mapping.
- Click Save & Replace to save the mapping. You will see the generated code.
- You can now test the API Express service.
Depending on your inventory input you will see one of the following messages:
{
  "supplierMessage": "No action needed"
}
// or
{
  "supplierMessage": "Notify supplier"
}
// or
{
  "supplierMessage": "Inventory is dangerously low"
}
Condition component limits
- The CONDITION component is restricted to 10 branches in total (including else branch).
- JavaScript code length is restricted to 1000 characters and script execution time is restricted to 3 seconds.
To see another example watch the video below.
Sample
Updated 7 months ago
