App Starter Offline Template
Build your own mobile app using our ready-to-go App Starter Offline template.
Introduction
This document describes our customizable App Starter Offline template that is designed to serve as the foundation of any modern mobile application that supports offline mode and can be used on any device.
What is more: you can not only read the app data when offline but also modify it and use synchronization. This allows keeping the data consistent in situations when several users access data to modify it under different online/offline scenarios:
Important!Note that to make sending confirmation emails or messages possible you need to personalize your profile. For testing purposes, use the code 12345.
As a bonus, we provide detailed explanations for those who are interested in customizing the offered app template.
Using App Starter Offline Template
No special knowledge or experience is required to use our App Starter Offline template — just follow the simple steps below to install the app and enjoy low-code development with Appery.io!
Important!Please rest assured that you are the creator and the only owner of this application (actually, like any other app created with Appery.io).
For more details, you can check our Copyright, Trademark, and Content Ownership section here.
Customizing OptionsBesides, many customization options are available like renaming the app, changing the template color themes, launch icons and screens, customizing app pages, etc.
If interested, check out the instructions in the Customizing App Template section below or watch this video to learn how to use our Starter App template:
Creating App from Template
- From the Apps tab, click Create new app.
- Select App Starter Offline, enter the name for your project (for example, Offline Starter App, and click the Create button.
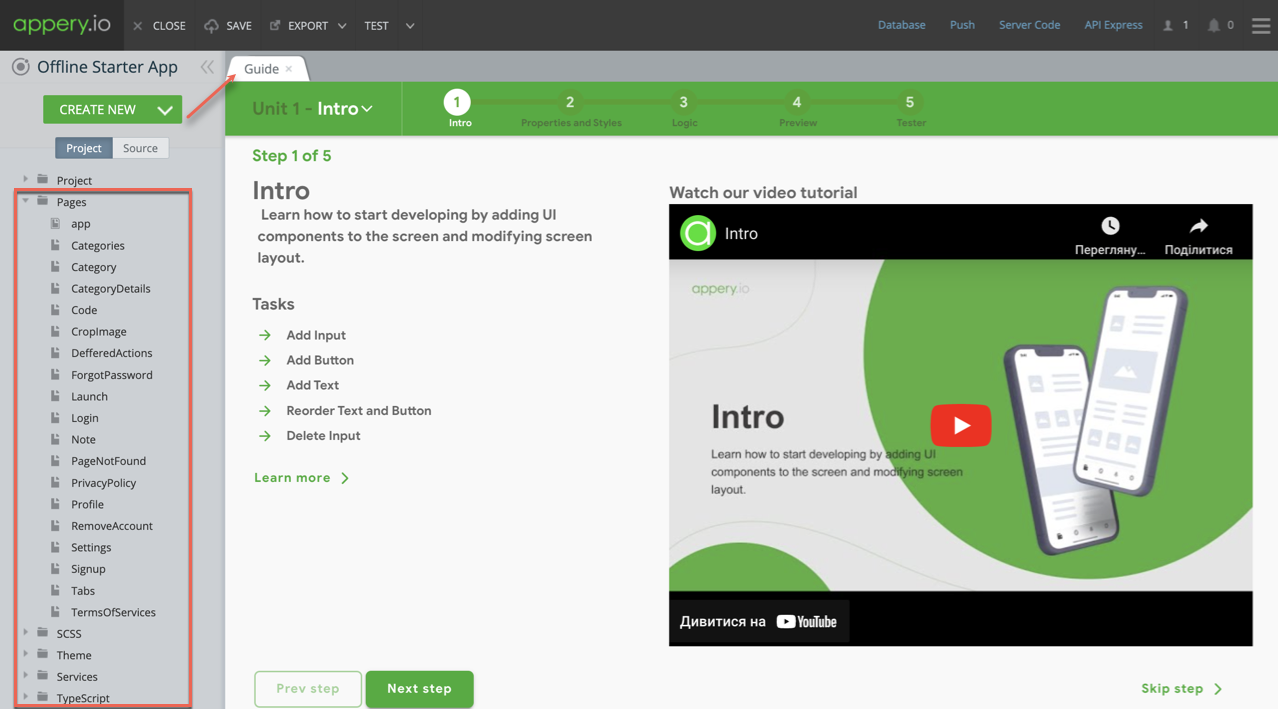
In a moment, refresh your browser to see that the app is created and the first thing you can see is our App Builder Educational Video Guide page with the Project View section on the left where all the predefined project data can be found.
The application is ready to be used so let's test the app at work and see what it's all about.
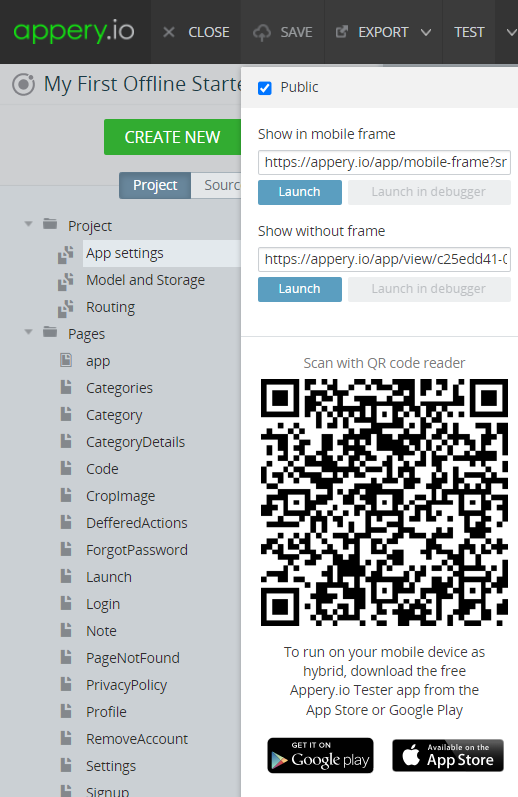
Click the TEST button in the app Toolbar; you are redirected to the tab with the app preview.
Note!If you are launching your project for the first time, please allow some time for the app preview to load.
Registering Account
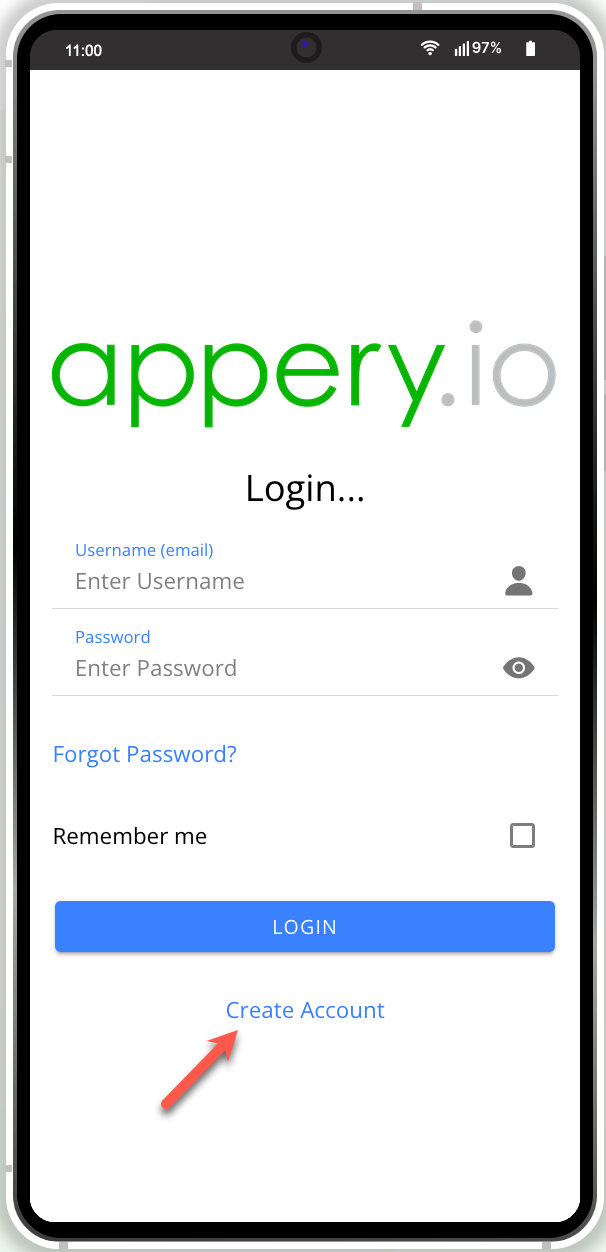
- As a new app user, you must register an account before you can start using the template. So, once redirected to the Login... page, click the Create Account link:
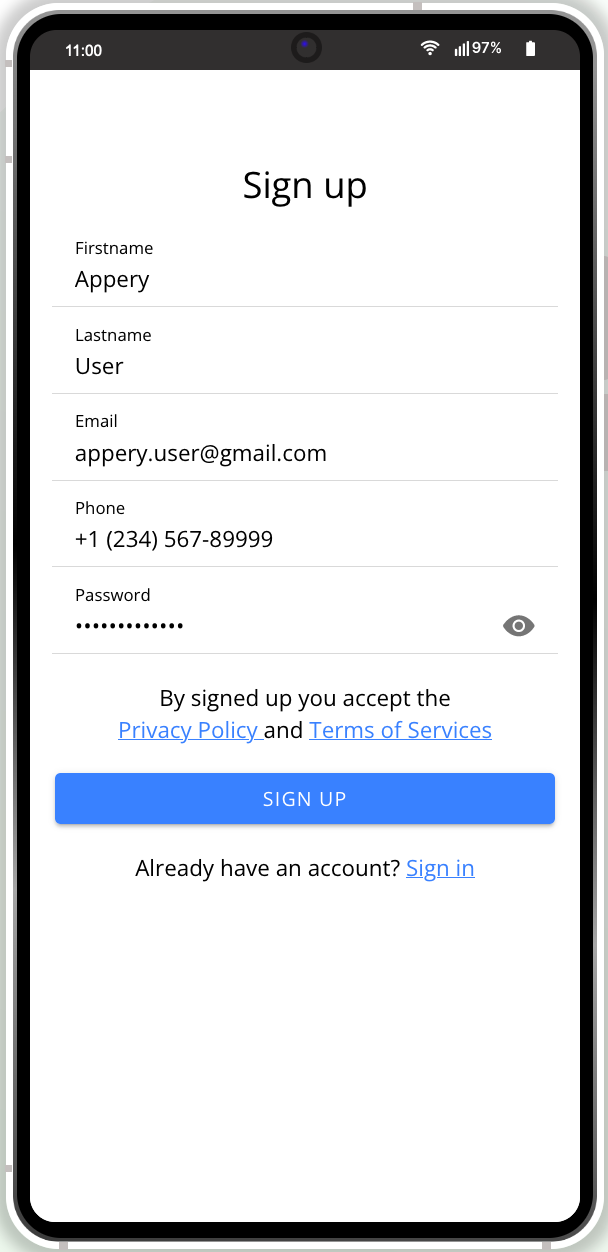
- The Sign up page opens where you will be asked to provide your registration data: first and last names, email address, phone number, and password:
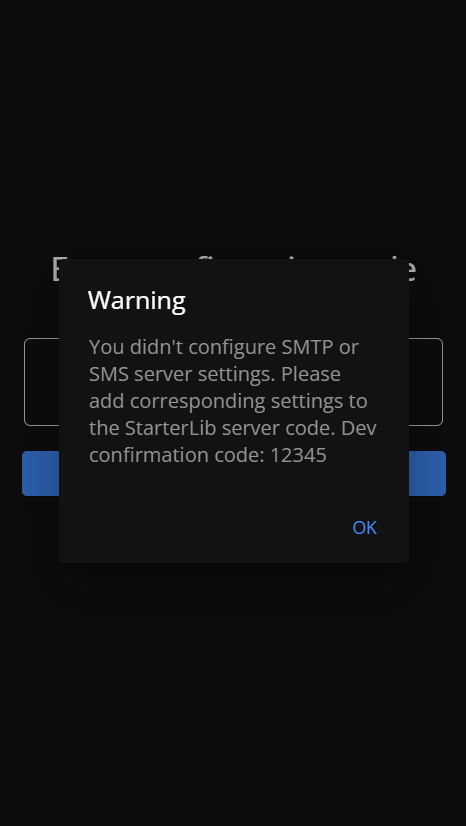
- Once registered, you will get a warning informing you that since this app is operating with a native API, sending emails and messages cannot be tested in the browser. To test the app in full, you will need to configure the StarterLib server code script.

- For now, let's continue in the Test mode. For this, enter 12345 as the confirmation code to finish registration.
- Now, as a registered user, you can enter your details on the Login... page and click LOGIN:
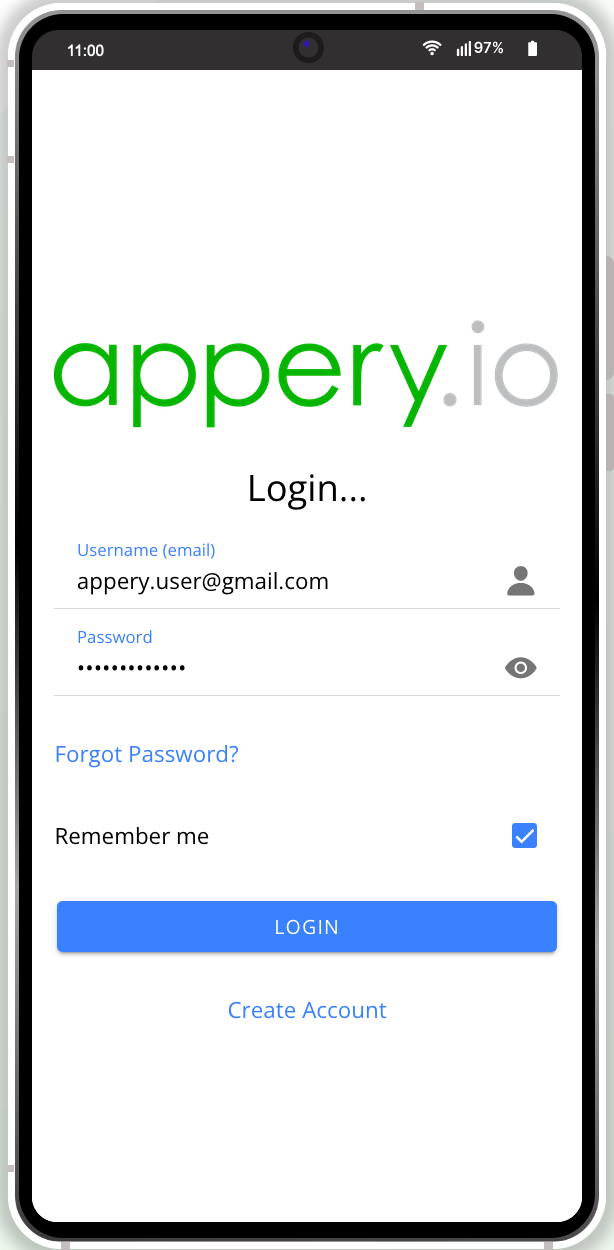
Note!The page also has the Remember me and Forgot Password? options.
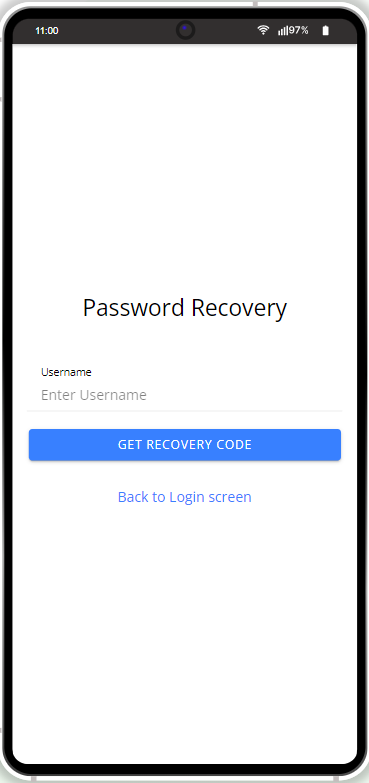
Forgot Password? FeatureNote that the Forgot Password? feature and does not work out-of-the-box unless the app Server Code script is properly defined.
App Description
Once you log into the app, it starts with showing the three Tabs buttons in the footer (left to right): Categories (current), Settings, and Profile.
The app offers two-level records organization: on the first level, categories are saved. Inside categories, you can save notes. Both categories and pages records are fully manageable and can be easily created, edited, or deleted.
By default, the Categories page launches first in the preview:
Clicking on the My first Category record opens the Category page that has the default note, My first note.
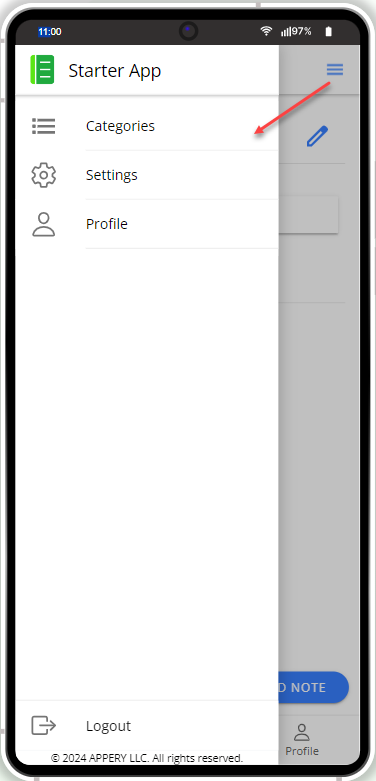
App Menu Page
To access the app menu, click the three-line button in the upper left corner of the screen: the sidebar on the left will open with three menu list items that duplicate the tabbed pages in the footer (Categories, Settings, and Profile). Also, the Logout option becomes available.
What is good - as an app user, you require no special training to use the app: simply choose the corresponding list item you are interested in and proceed with defining the app:
- manage your Categories
- open the app Settings page
- go to the user Profile page
or - Log out.
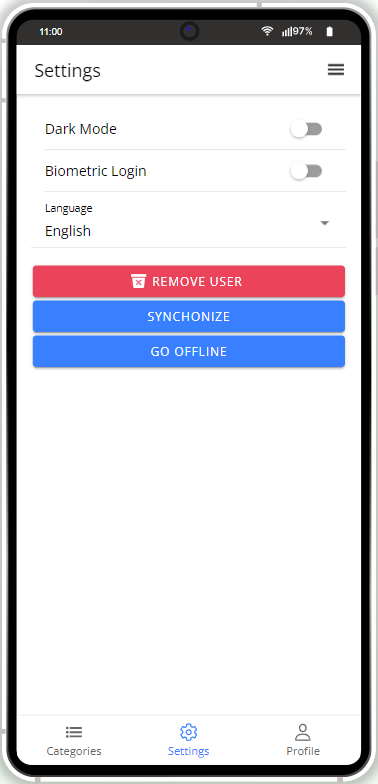
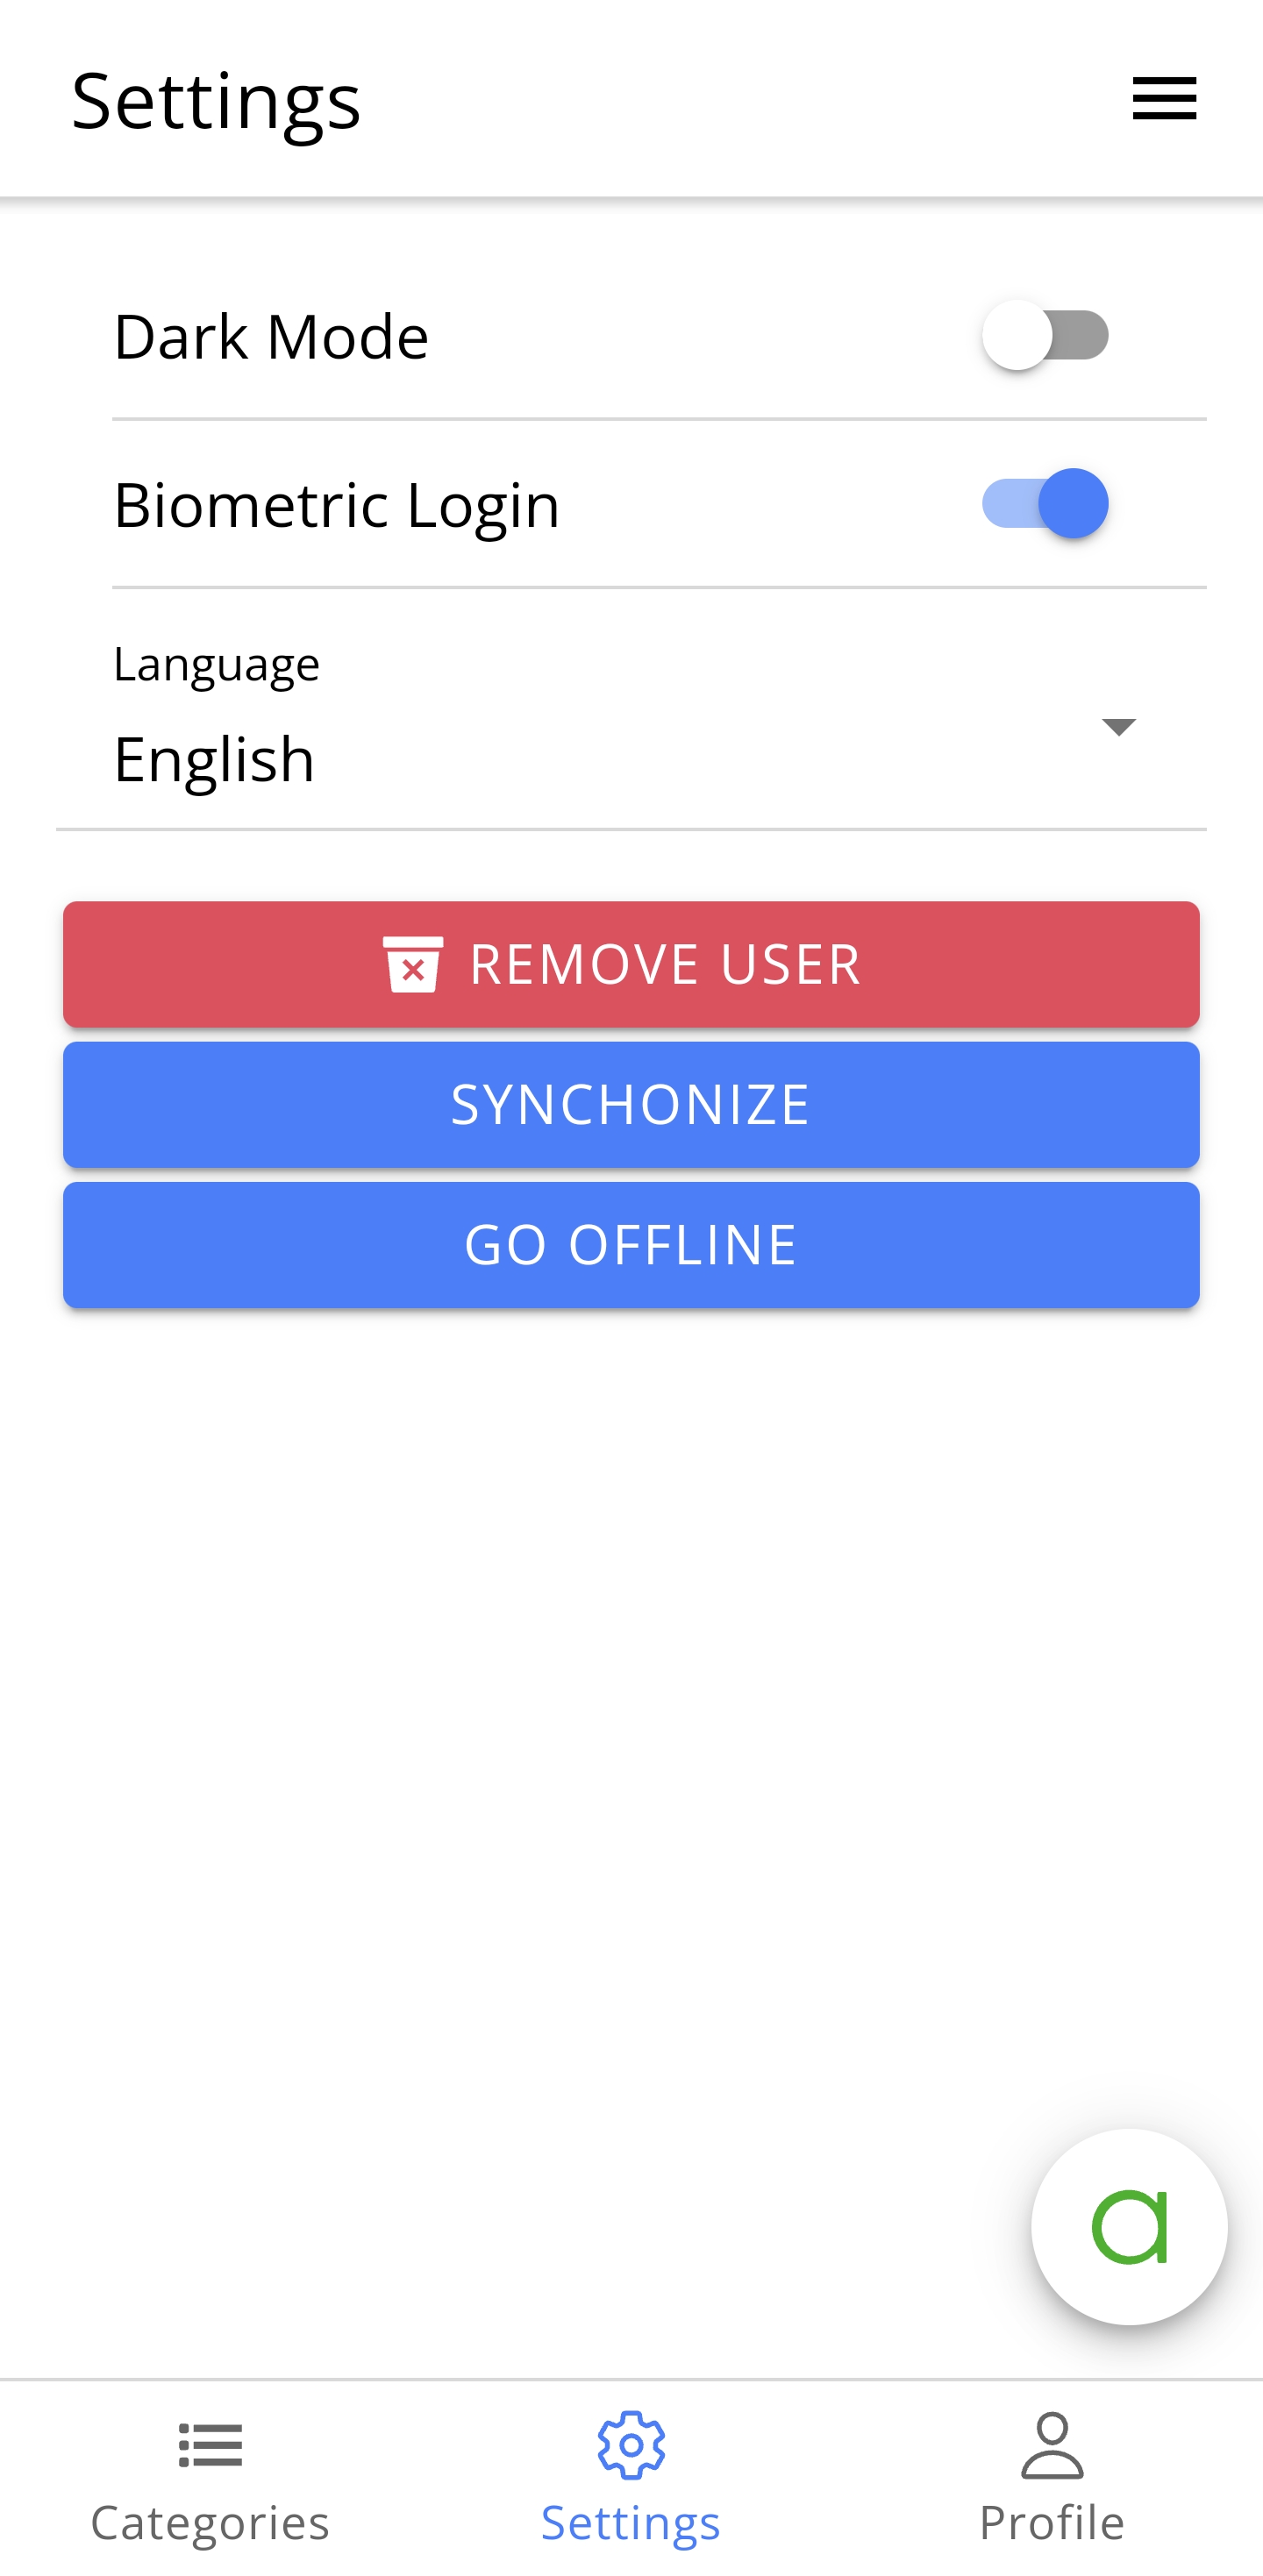
Settings Page
From the Menu page, click Settings; here, you can switch between light and dark modes, enable biometric login, and use the language selector.
Also, the page offers the following options for working in the offline mode:
- Synchronize
- Go offline

On this page, you can also delete the current user.
Categories Page
Managing categories is very simple. You can create, edit, or delete the categories.
Creating Categories
- To start, select Categories on the menu list or click the Categories tab in the footer.
- From the Categories page, click the + ADD button to open the modal window; there, enter the category name and add its description. You can create as many categories as you need:
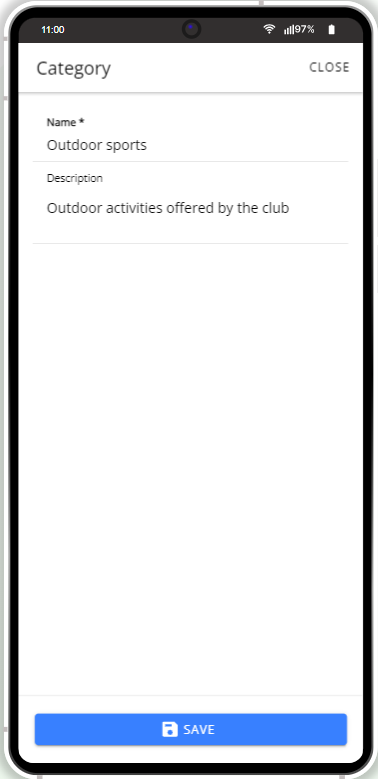
- After you hit SAVE, the created note appears on the Categories page list.
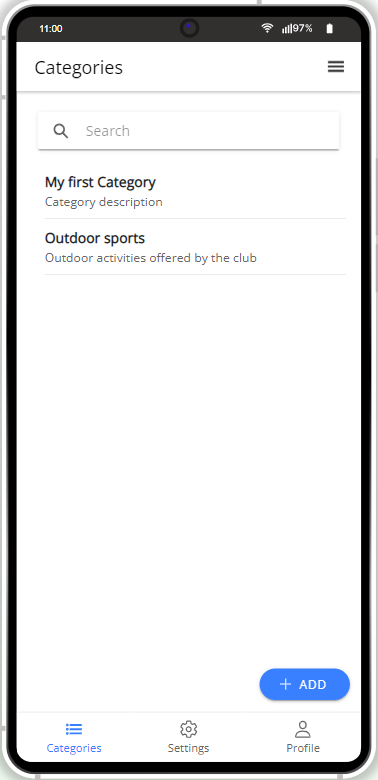
- If needed, you can search for a specific category by using the search option.
- To delete the category, swipe left and confirm the action:
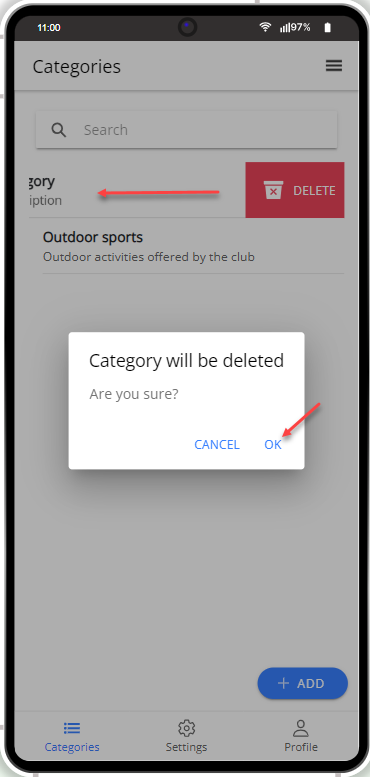
Important!Since the app supports working in the offline mode, for the synchronization purposes, deleting the category/note locally does not delete it from the server. The data deleted by the user is removed from the device but is kept on the server.
If the app record has been modified in the offline mode, after restarting the app in the online mode, the process of synchronization with the data saved on the server starts. So, the app user operating with this data, is notified of any unsynchronized data modifications and can take the corresponding action: reject or accept them. For more details, see the Resolving conflicts section.
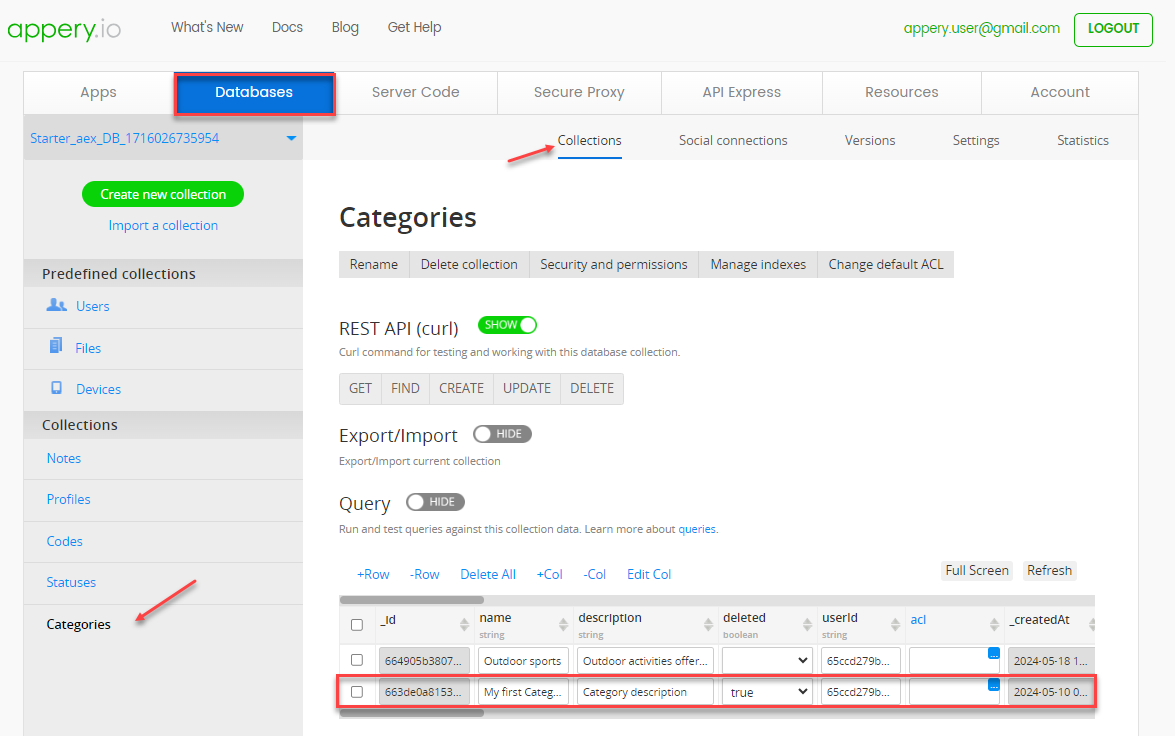
The record deleted locally (on the device) is not completely deleted from the server but is marked as deleted in the linked app database:
Managing Categories
- Click the category record to open the Category page with details. On this page, you can add notes or search for them.
- To create a new note, click the +ADD NOTE button.
- The Note page opens. Here, create the needed note and provide the description (optional).
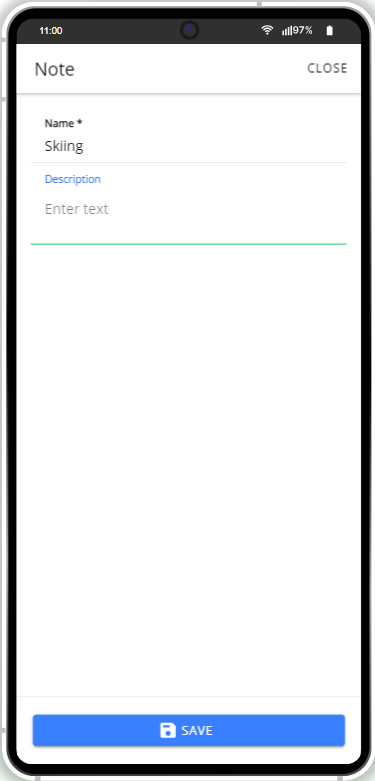
- Click SAVE to save the record or CLOSE to discard the changes and go back to the Category page.
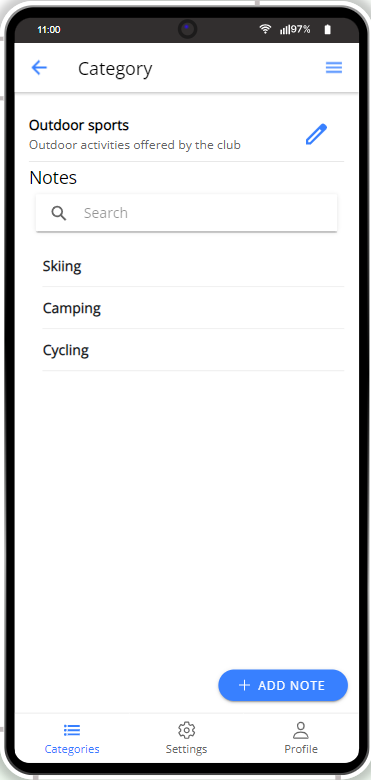
- You can add as many notes as needed, edit, or delete them.
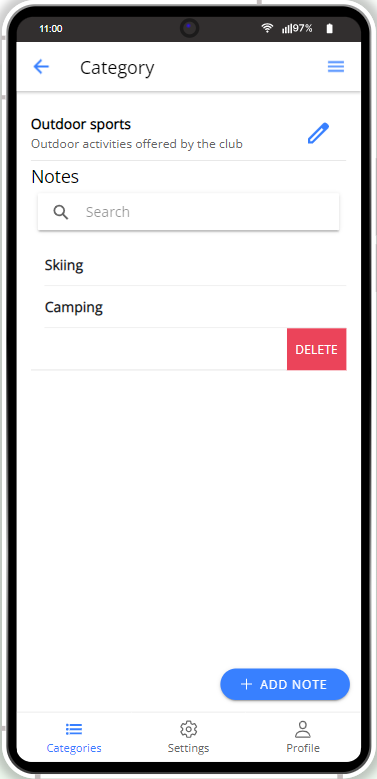
- Also, on the Category page, you can edit the saved category: select it on the list, click the pencil Edit button to open the modal page, make the needed changes, and click SAVE:
- Click CLOSE to close the page without saving the changes.
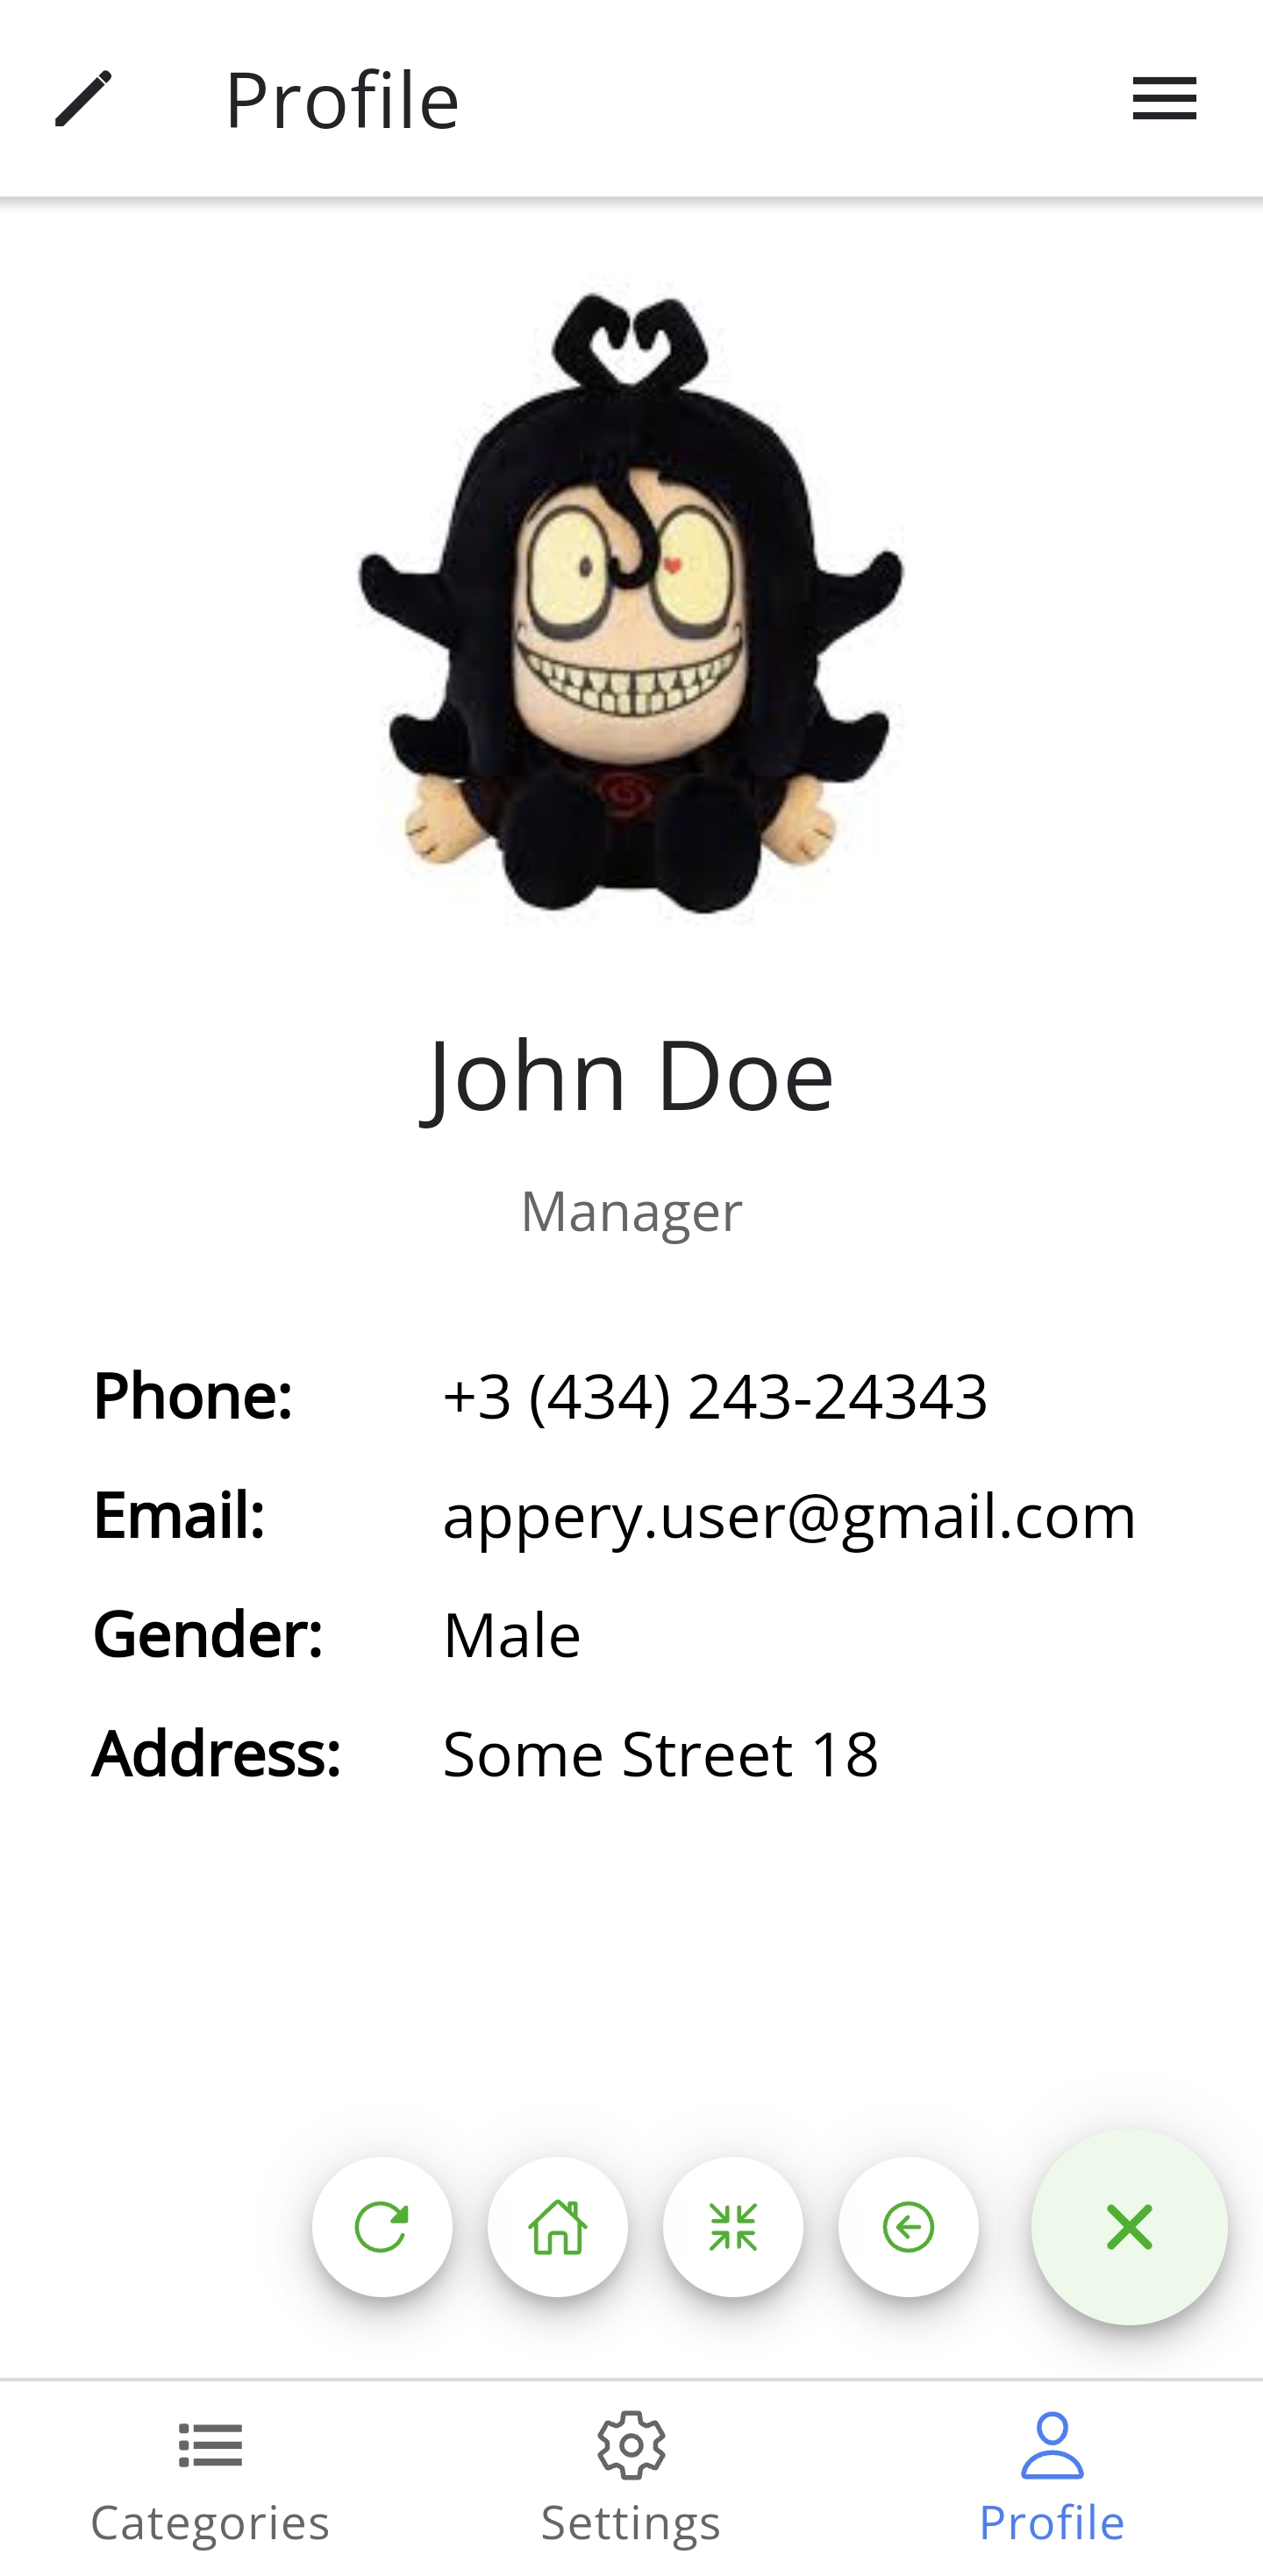
Profile Page
- To open the user profile, select Profile on the menu list or click the Profile tab in the footer.
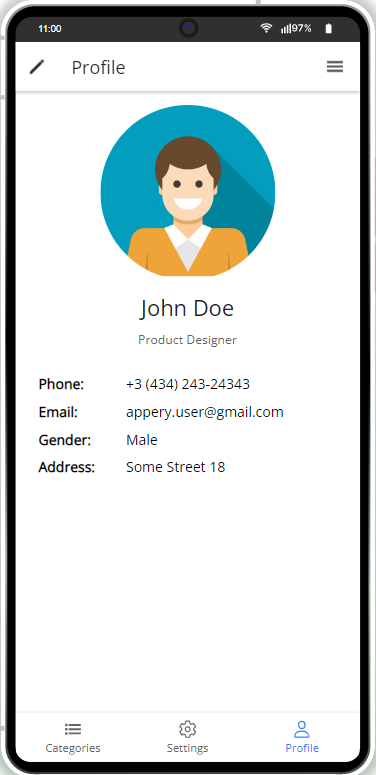
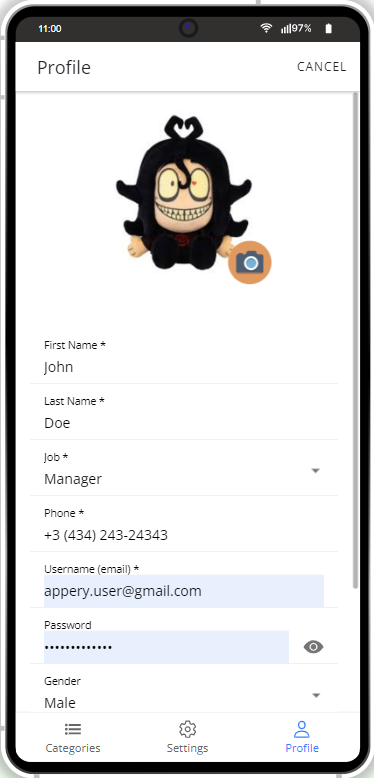
- Click the pencil Edit button in the upper left corner of the page to open the modal where you can edit the user details such as the profile photo (cropping is available), gender, address, etc.
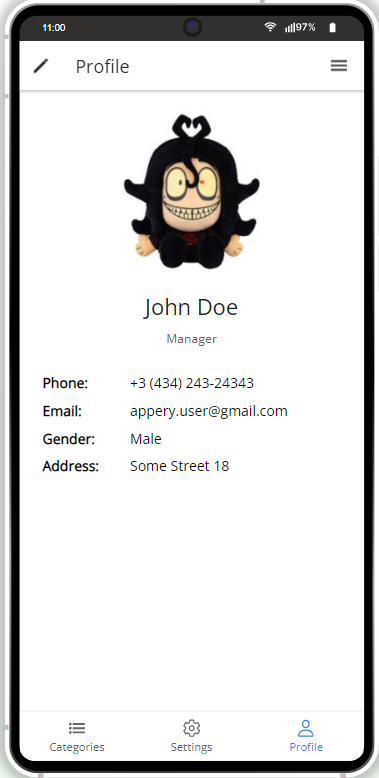
- Click SAVE to keep the changes made and go back to the Profile page:
Customizing OptionsFor this template, many customization options are also available like changing the app color themes, launch icons and screens , customizing app pages, etc.
If interested, check out the instructions in the Customizing App Template section below or watch this video to learn how to use or Starter App.
Working with Online/Offline Mode
The distinctive feature of the App Starter Offline template is that using it you can not only read the data when being offline, but also modify it and use synchronization when several users access data under different online/offline scenarios.
This works as follows:
Initially, your app is in the online mode no matter whether the internet on the device is enabled or not.
When the client goes offline (clicks GO OFFLINE or is disconnected from the network due to any other reason), all change-requests (POST, PUT, DELETE) to the server are going to be queued and stored locally in the cache.
When the client goes back online (clicks GO ONLINE or reconnects to the network), the queue of deferred change-requests will be handled, and one after one, all the requests will be executed.
Synchronization ConflictsWhen different users perform operations on the same data and then move from offline to online , synchronization conflicts can take place. In such cases, the error will be fired to inform them of the changes that have been made to the current data. This allows the users to select whether to accept or reject the changes made to the particular record in the offline mode.
Check below to learn how the app resolves such conflicts.
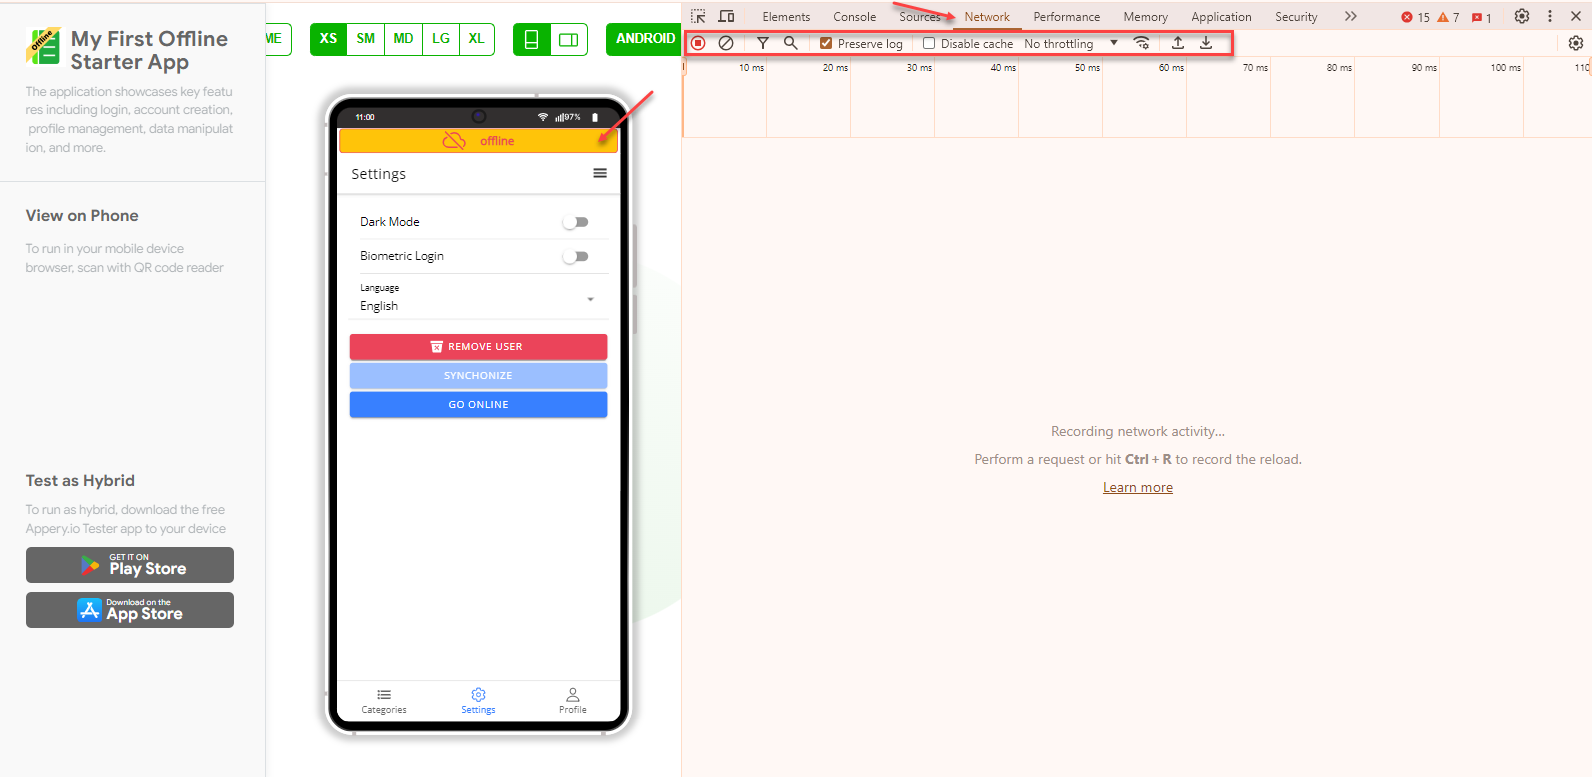
Let's emulate the app behavior to see what happens to the app backend when switching from the offline to the online mode.
- Start the app in your browser. In the browser Network tab, clear the network log, and click to start recording the network activity.
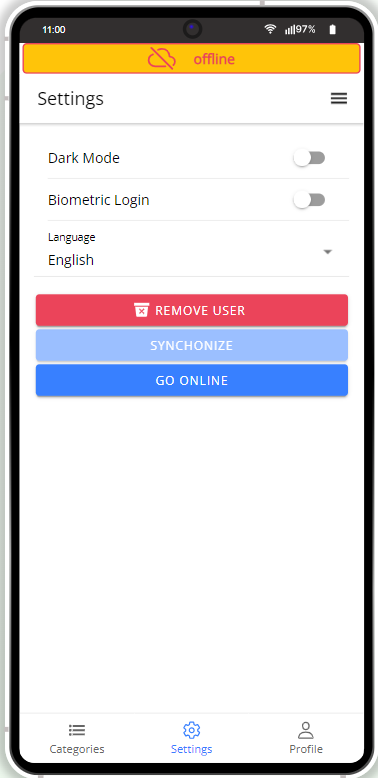
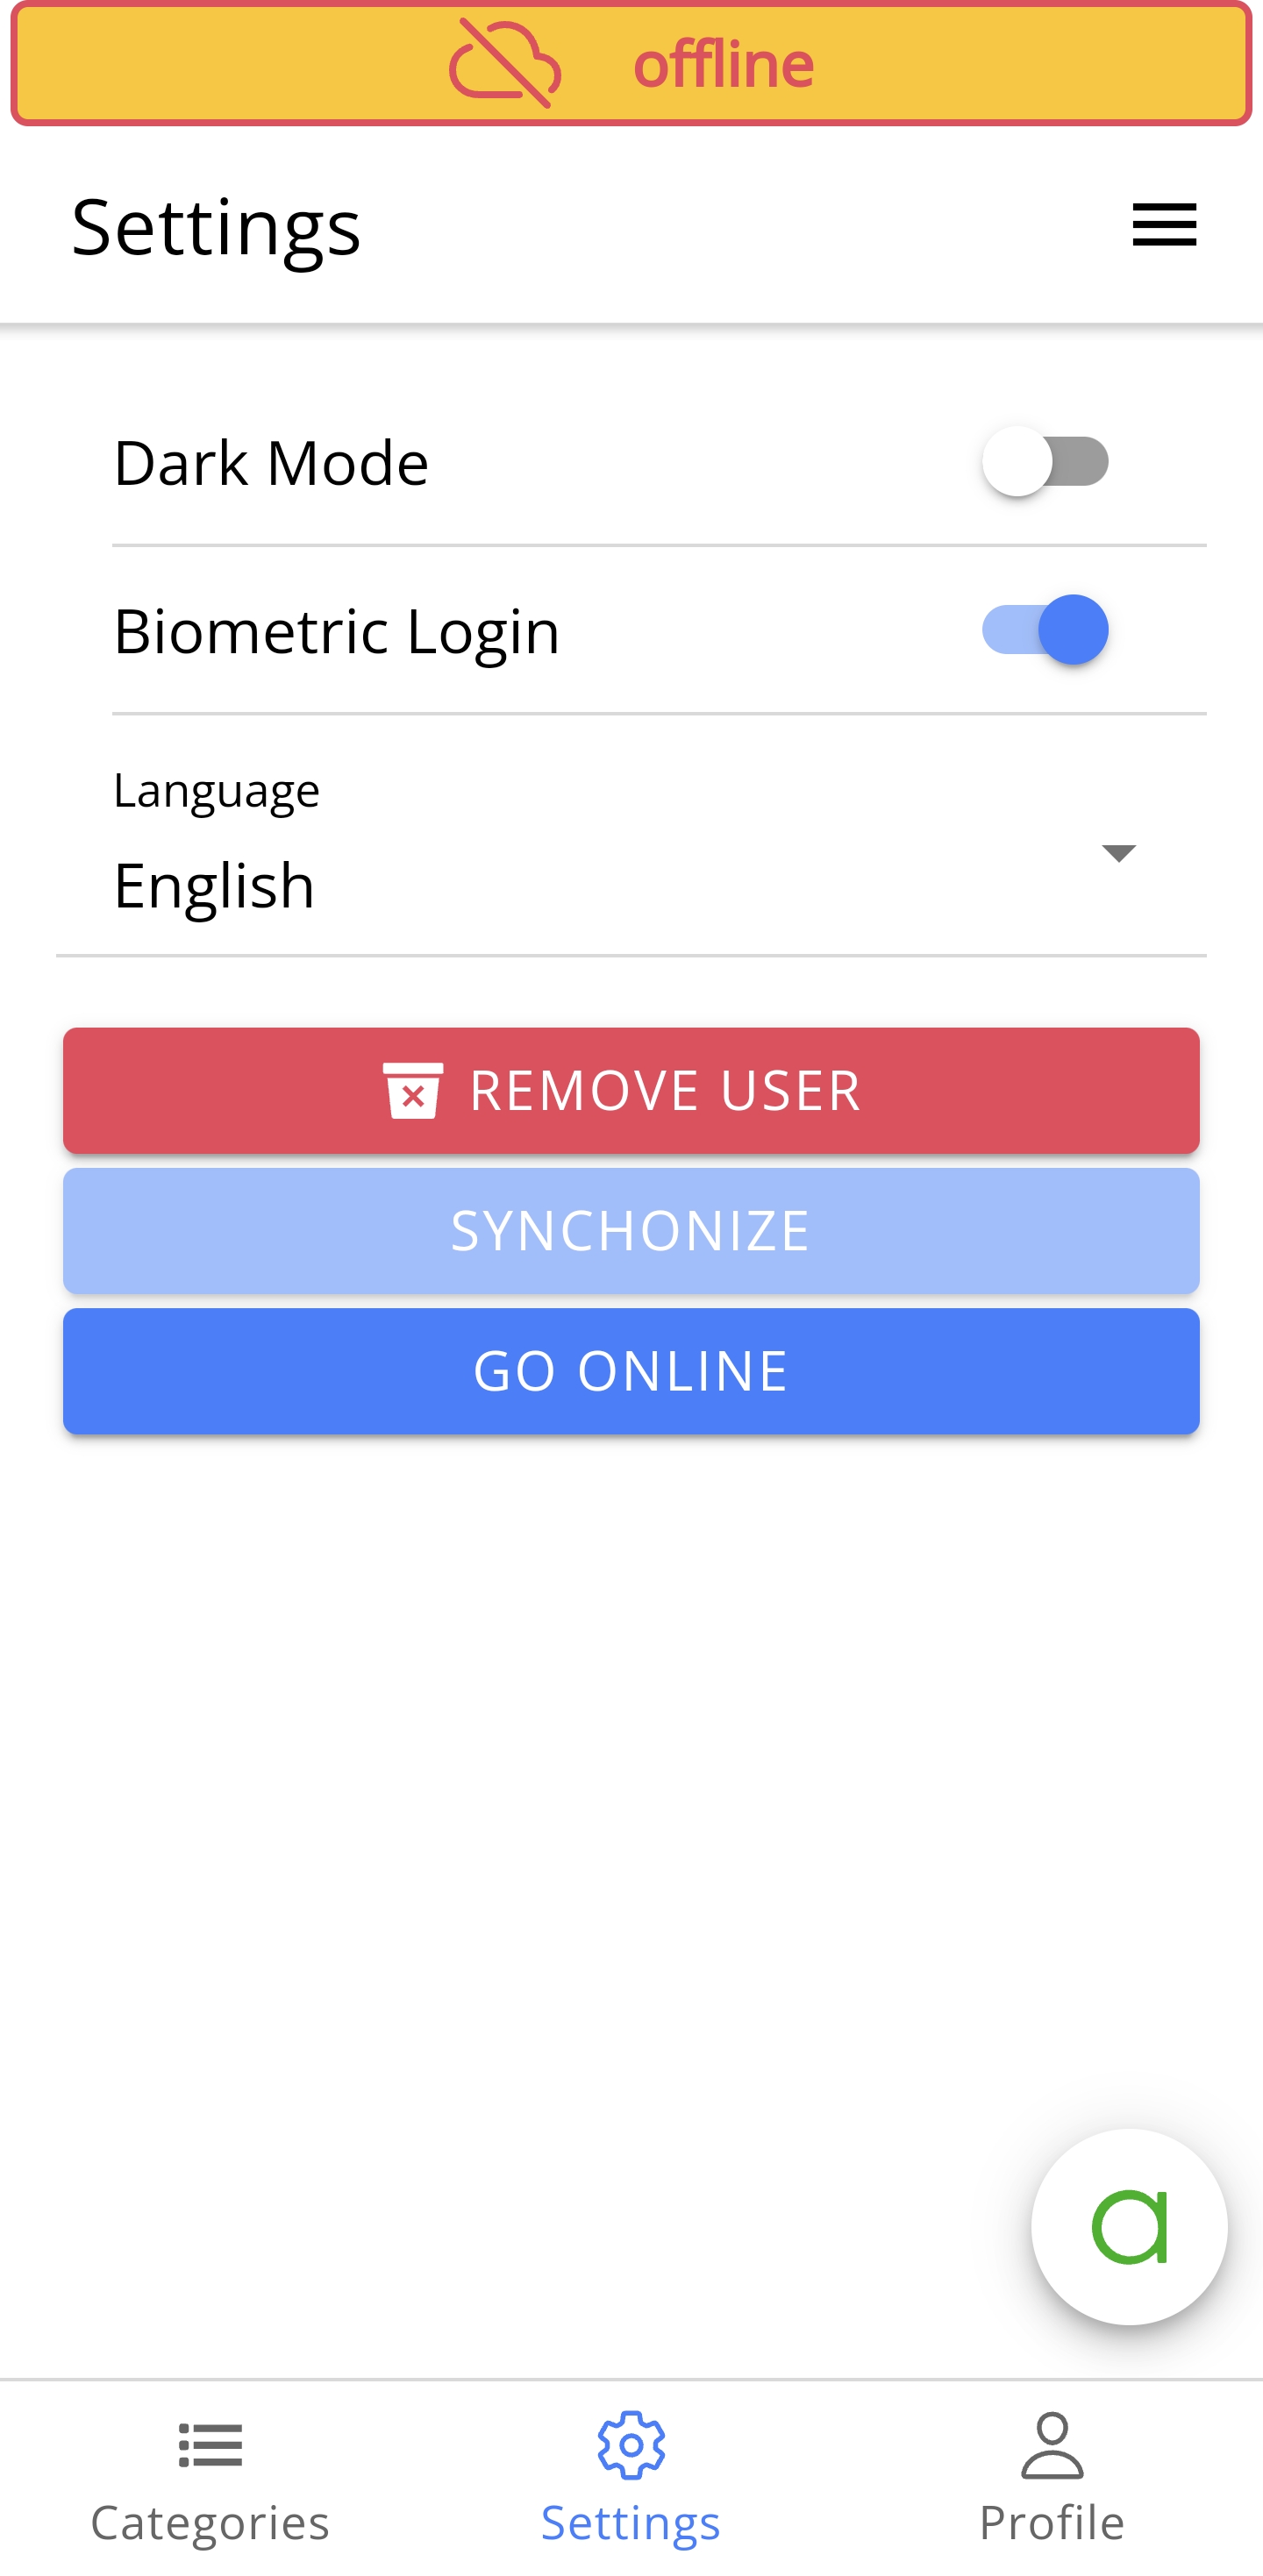
- In the app, click GO OFFLINE: the corresponding label is shown on top of the screen:
- Now, go to the Categories page and add some new records (or make changes to the existing ones): no activity is recorded:
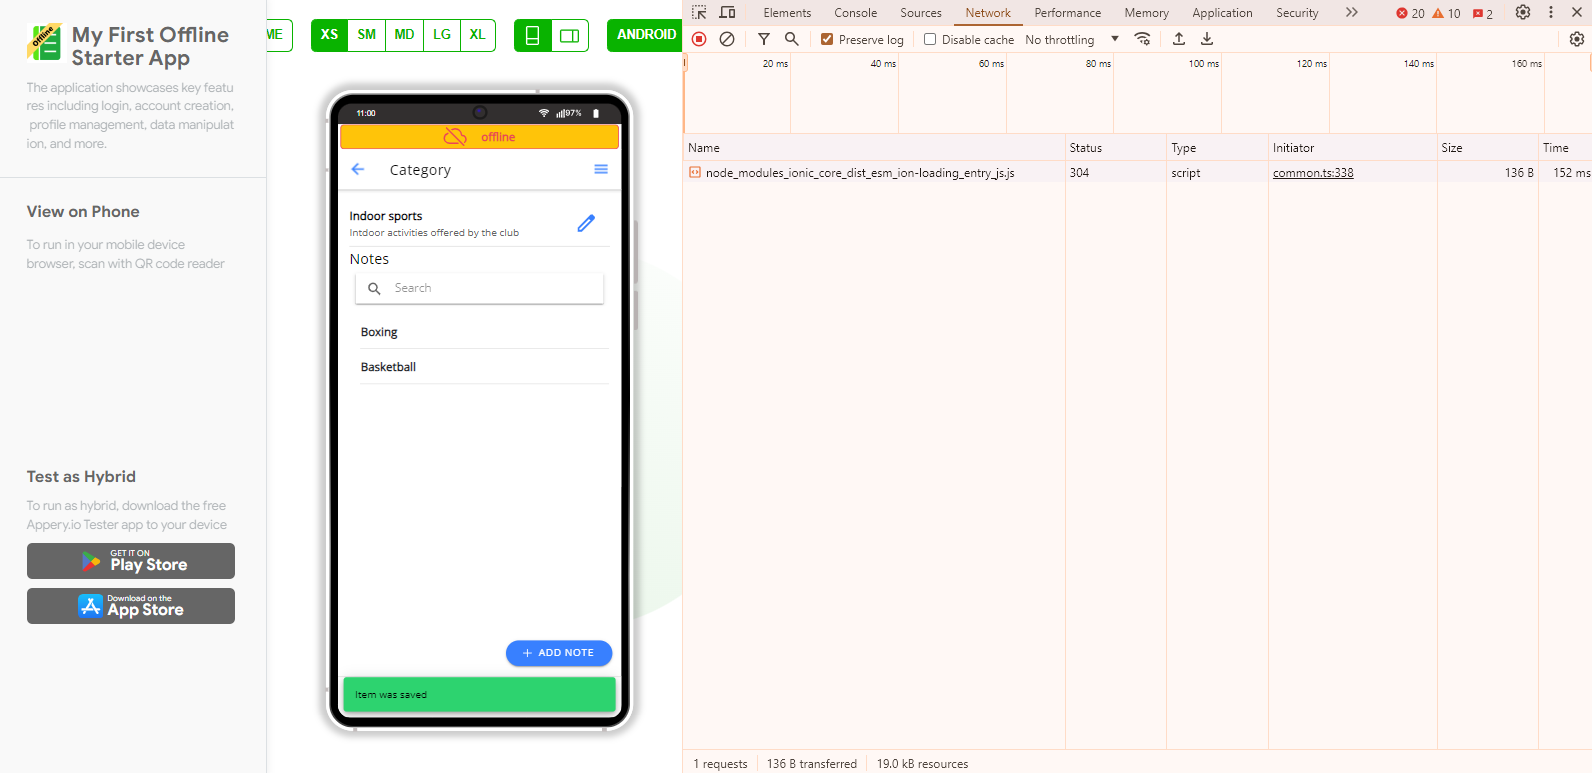
- Then, switch to the Settings tab and click GO ONLINE. All the records added when being offline appear under the Network tab of the browser:
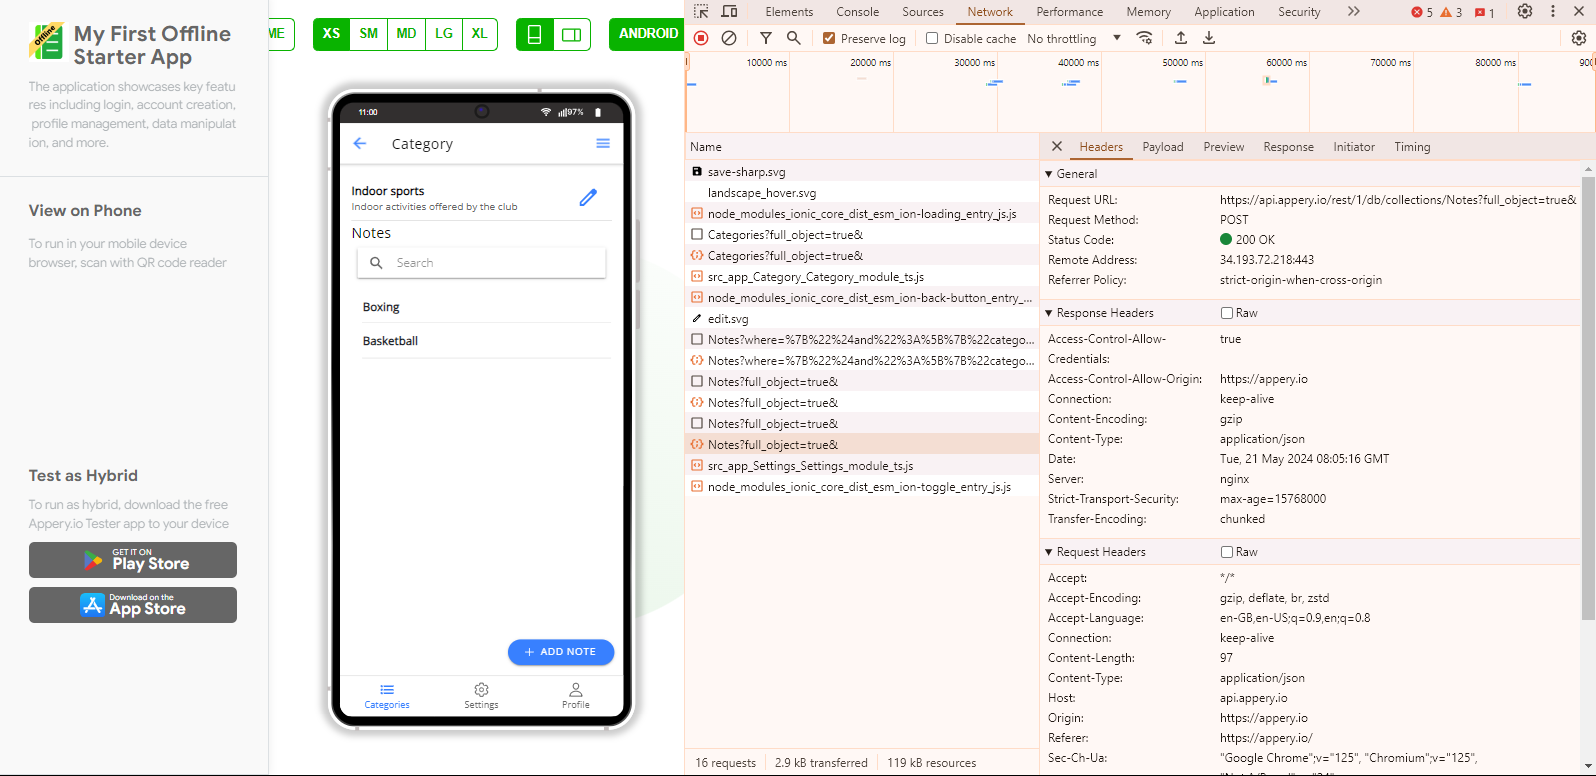
- Also, the created records (both category and notes) are added to the app database and are ready to be synchronized. Now, when the other app offline users restart the app (or go online), the new records will be shown to them:
Resolving Conflicts
Conflicts can take place when different users work on the same data and make incompatible modifications to this data. Let's review how such conflicts are resolved by the app.
Suppose that two users (one offline and one online) want to make changes to the Basketball note: the online user renames it to Men's basketball while the offline user changes the name to Women's basketball.
Let's emulate such a conflict situation:
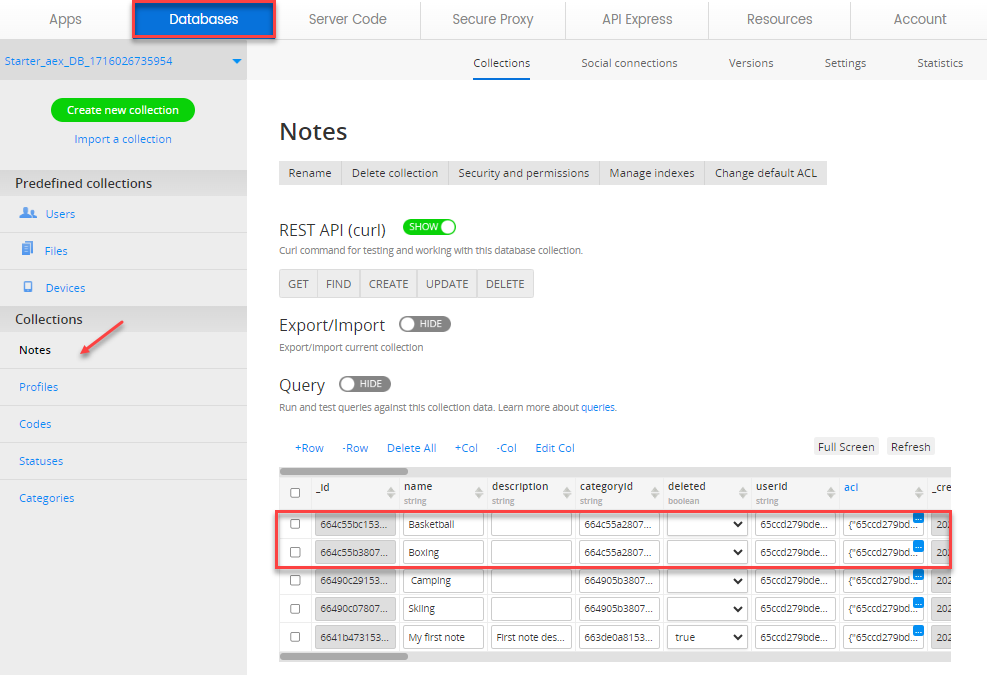
- In the browser tab, go back offline (in the Settings tab, click GO OFFLINE) and, in the Indoor sports Category page, rename the Basketball note to Women's basketball.
- As an online user, go to the Databases tab, refresh the records table (click Refresh) to make sure no new records are added, and rename the Basketball note to Men's basketball :
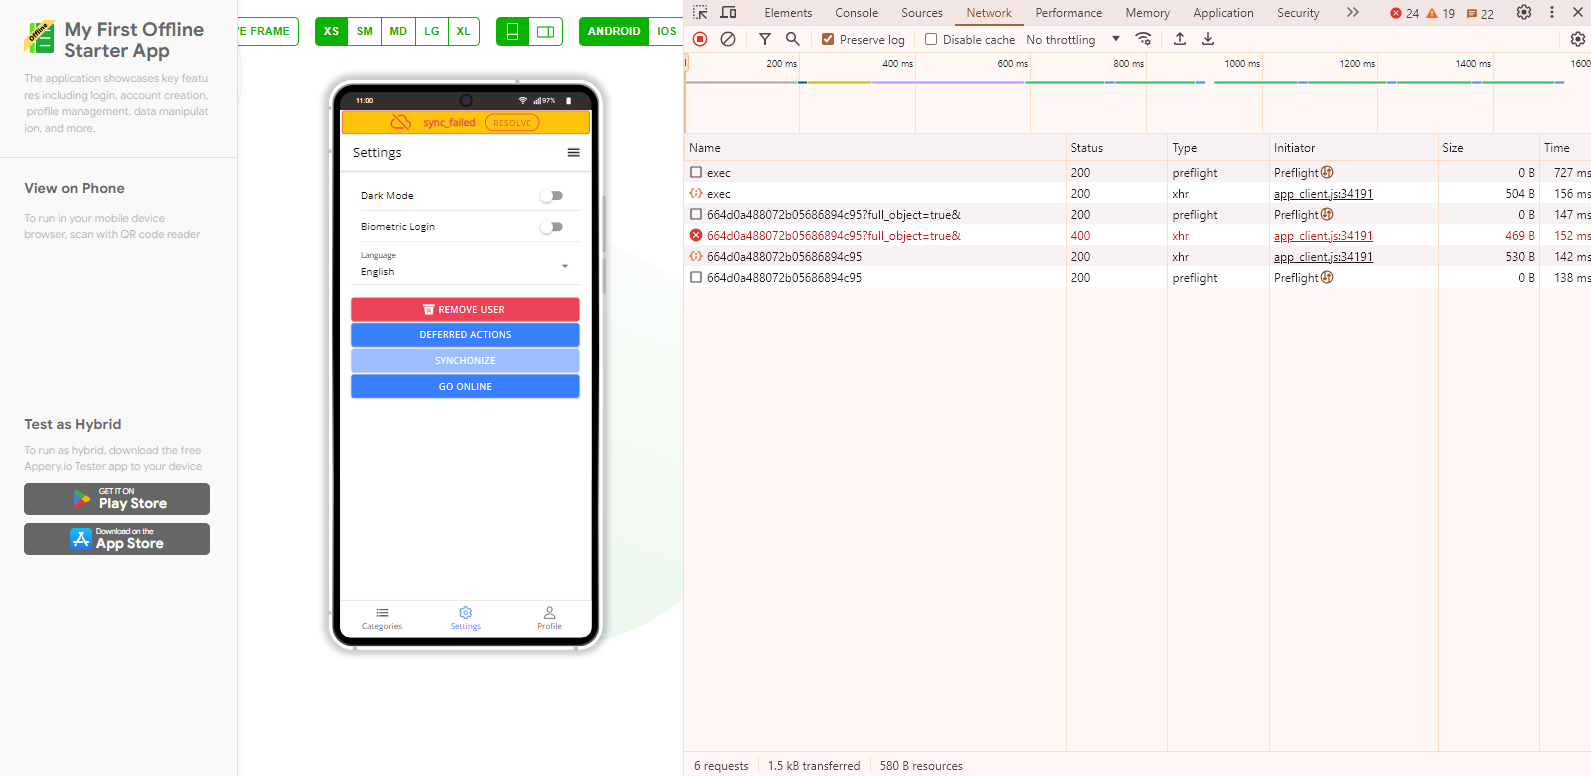
- As an offline user, in the Mobile Preview tab, open the Settings tab and click GO ONLINE. The following error appears notifying about the conflict situation:

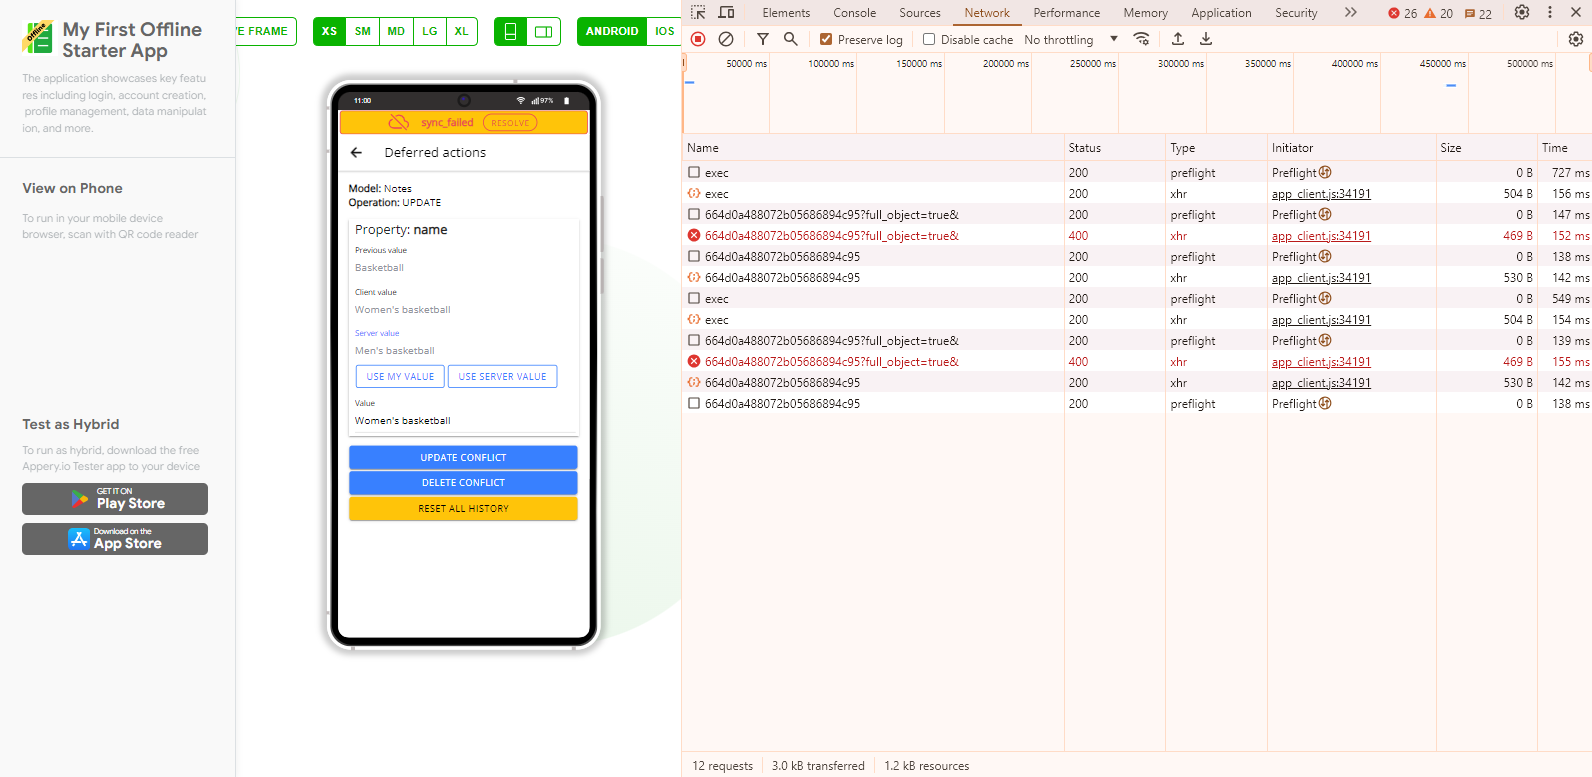
- Click OK to open the following screen with the following suggested actions:
- Click the Resolve button in the screen header. The new window opens where all the note value modifications can be viewed: the original note name (Previous value = Basketball), the value the offline user entered (Client value = Women's basketball), and the value entered by the online user (Server value = Men's basketball):
- You can select one of the options:
- Discard the current modification made in the client and restart synchronization (click DELETE CONFLICT). In this case, all the server data modifications will be accepted.
- Clear all the modifications made on the client when being offline (click RESET ALL HISTORY). In this case, all the server data records will be accepted.
- Use the client value ( click USE MY VALUE). In this case, the server data will be updated with the new data record made by the offline user.
- Accept the value from the server (click USE SERVER VALUE). In this case, the server data record will be accepted.
- Merge the conflict by entering a new value into the Value field and clicking UPDATE CONFLICT. In this case, both the server and local data will be updated with the record entered in the corresponding field.
- Let's select the last option:
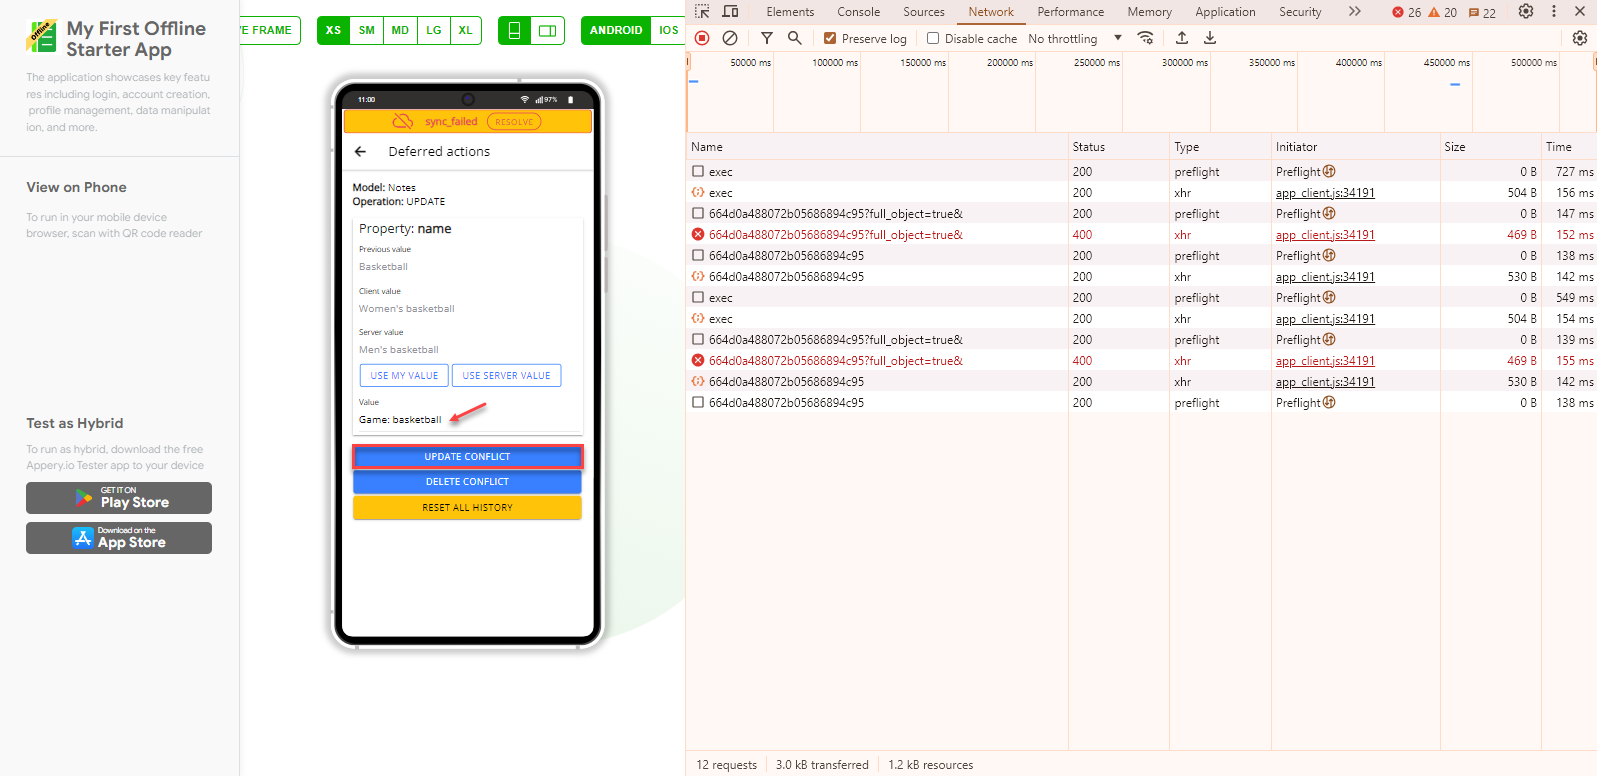
- The record is updated both
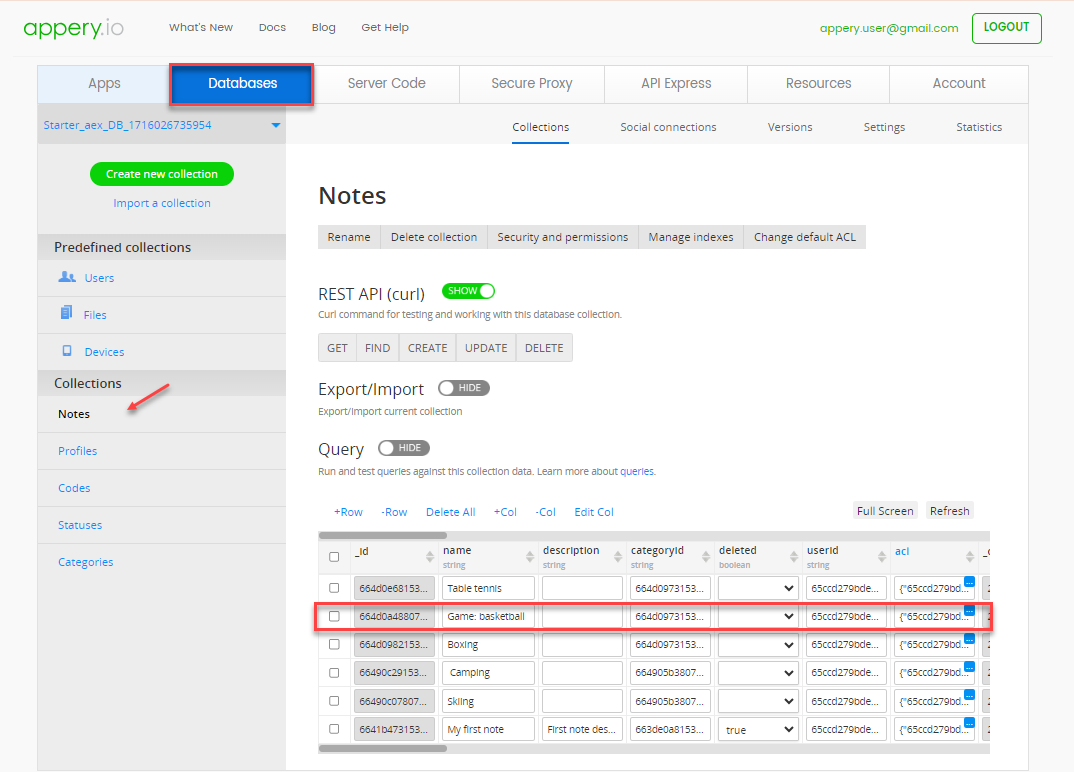
- on the server:
- and in the client:

Personalizing Profile
Note that before the app can be used efficiently, some personalization changes need to be made to the server code library; this will make sending confirmation emails or messages possible.
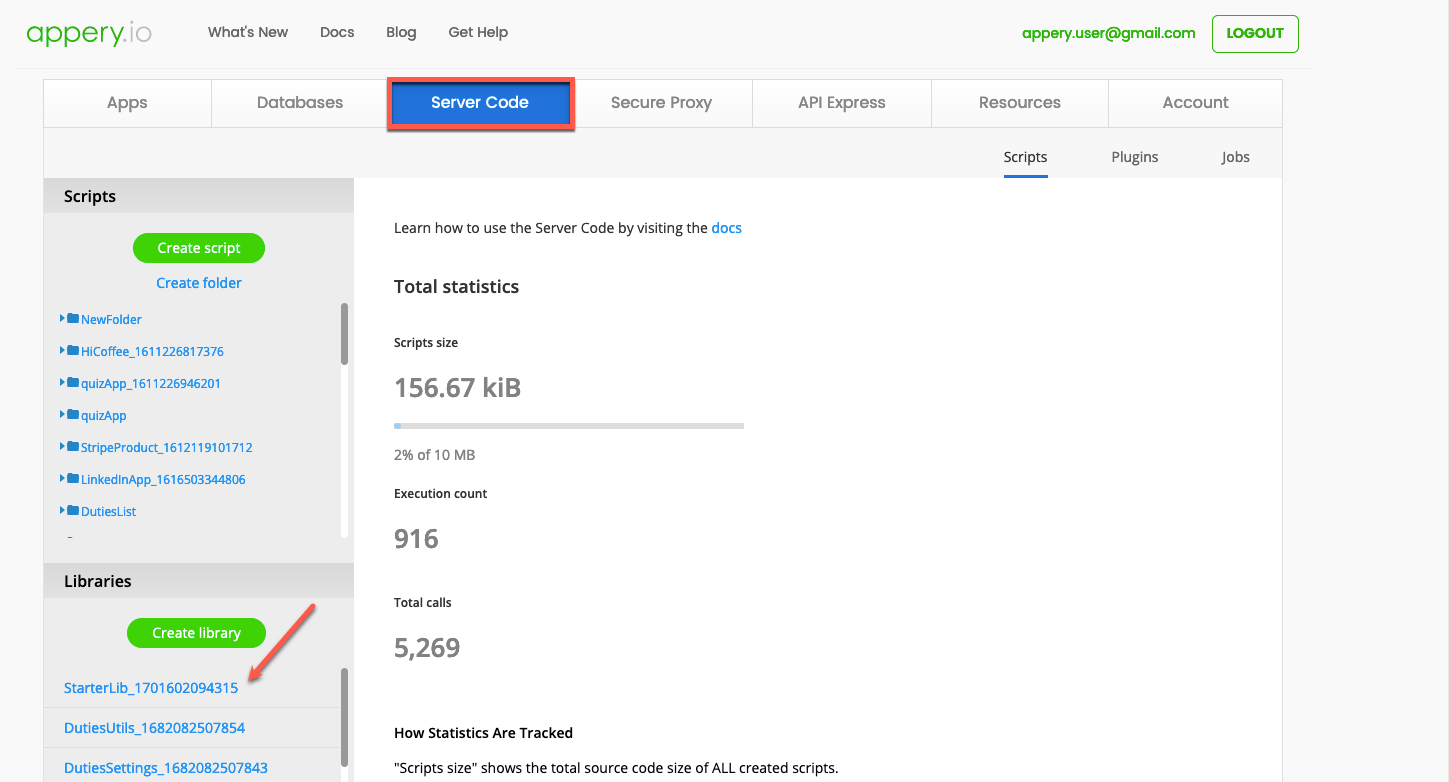
- Click the Server Code link located to the right of the top app Toolbar to open the Server Code dashboard in a new window so that you can now work with it without even closing the project.
- On the Server Code page, select StarterLib to open the library:
- Now, proceed with selecting what
confirmationTypewill be used for sending notifications: SMS or email messaging. - When done, proceed with personalizing the needed fields by replacing the default values with your custom ones, for example, provide your valid email settings or enter your Twilio details:
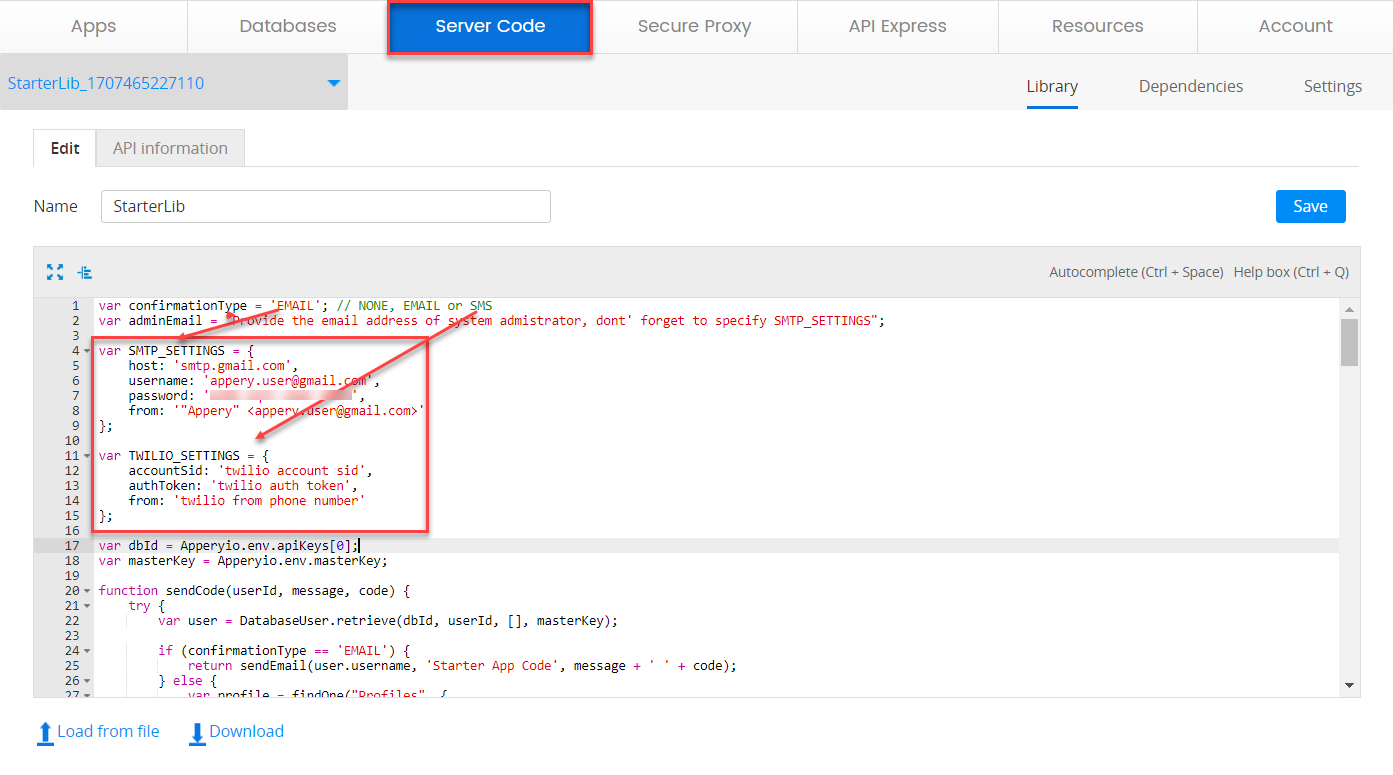
Defining OptionsTo learn how to set up your Twilio account, open this page.
For more details on how to define
SMPTfor your Gmail account you can check this video:
Reviewing App Backend
The suggested template goes with the integrated backend services like Server Code (discussed earlier) and Appery.io Database.
While the Appery.io Server Code services provide correct serverside interactions, Appery.io Database services are responsible for keeping all app data.
Let's take a quick look at what the app database looks like from the inside.
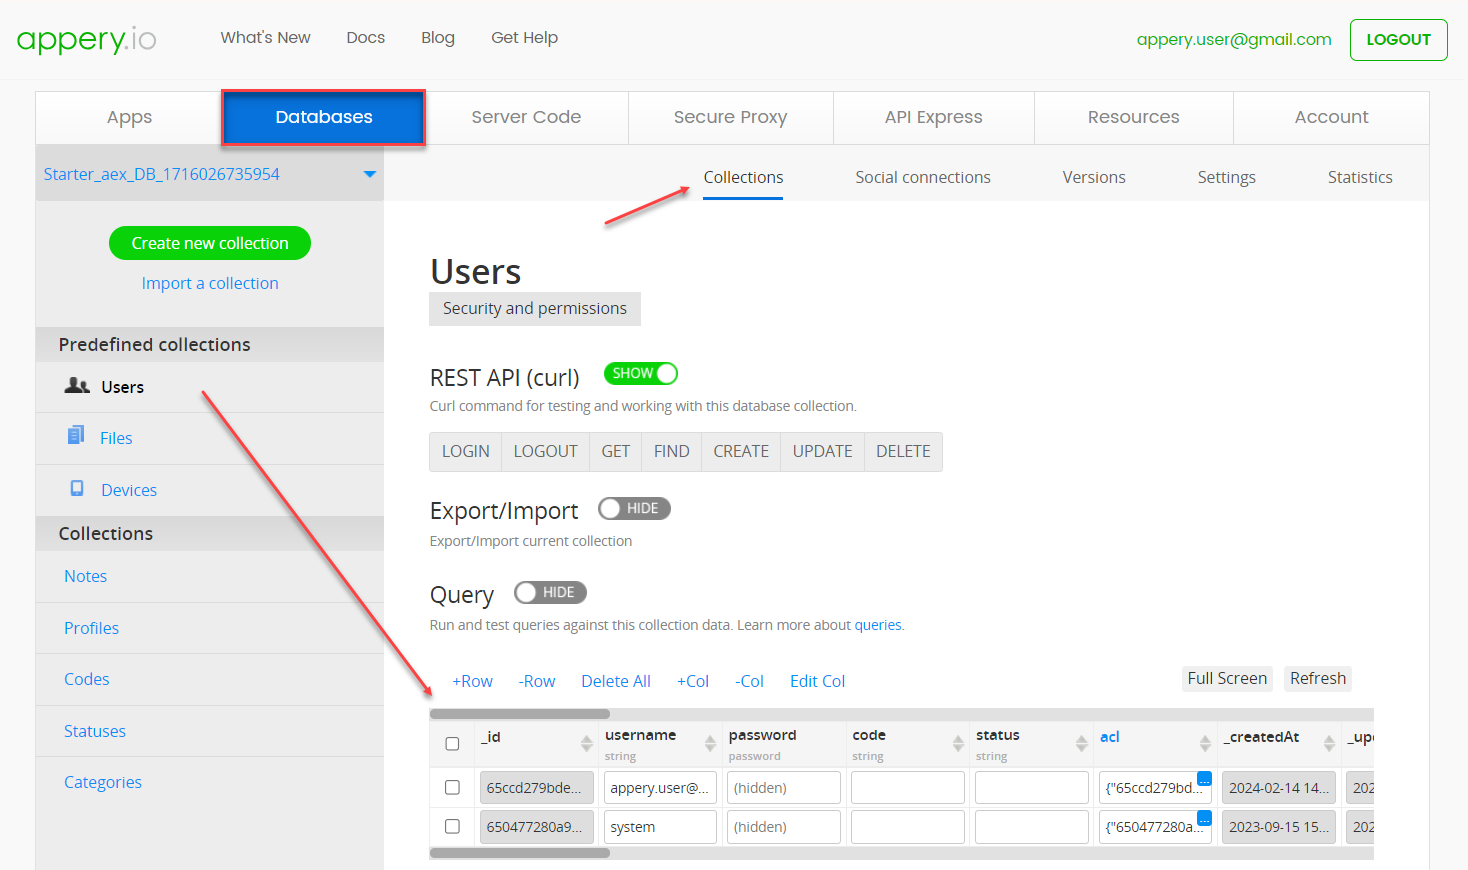
- Click the Database link located to the right of the top app Toolbar to open the Databases dashboard in a new window so that you can review it without even closing the project:aex

- On the Databases page, click Starter_aex_DB to open the database.
- When in the database, click on the Collections tab to access the default user records organized in the Users predefined collection and check that there are records of the users registered for your app:
- Any other database collection can be reviewed (and modified if needed) in a similar way.
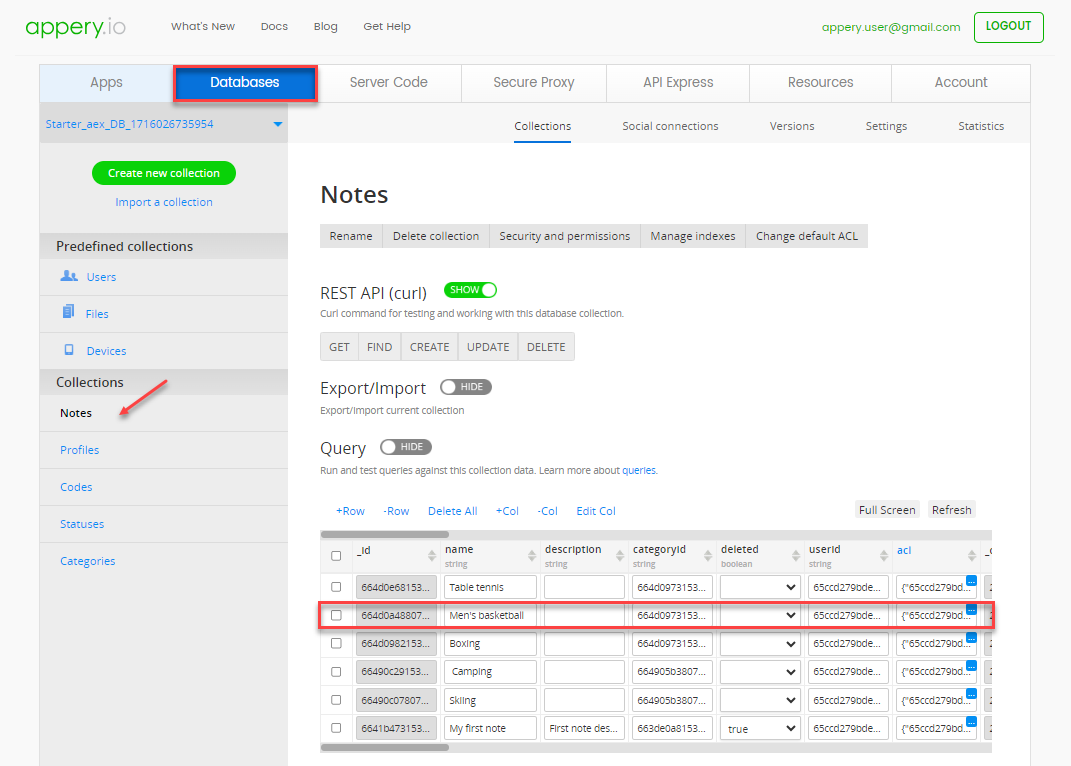
For example, to review the list of notes that have already been added to the app, select the Notes custom collection:
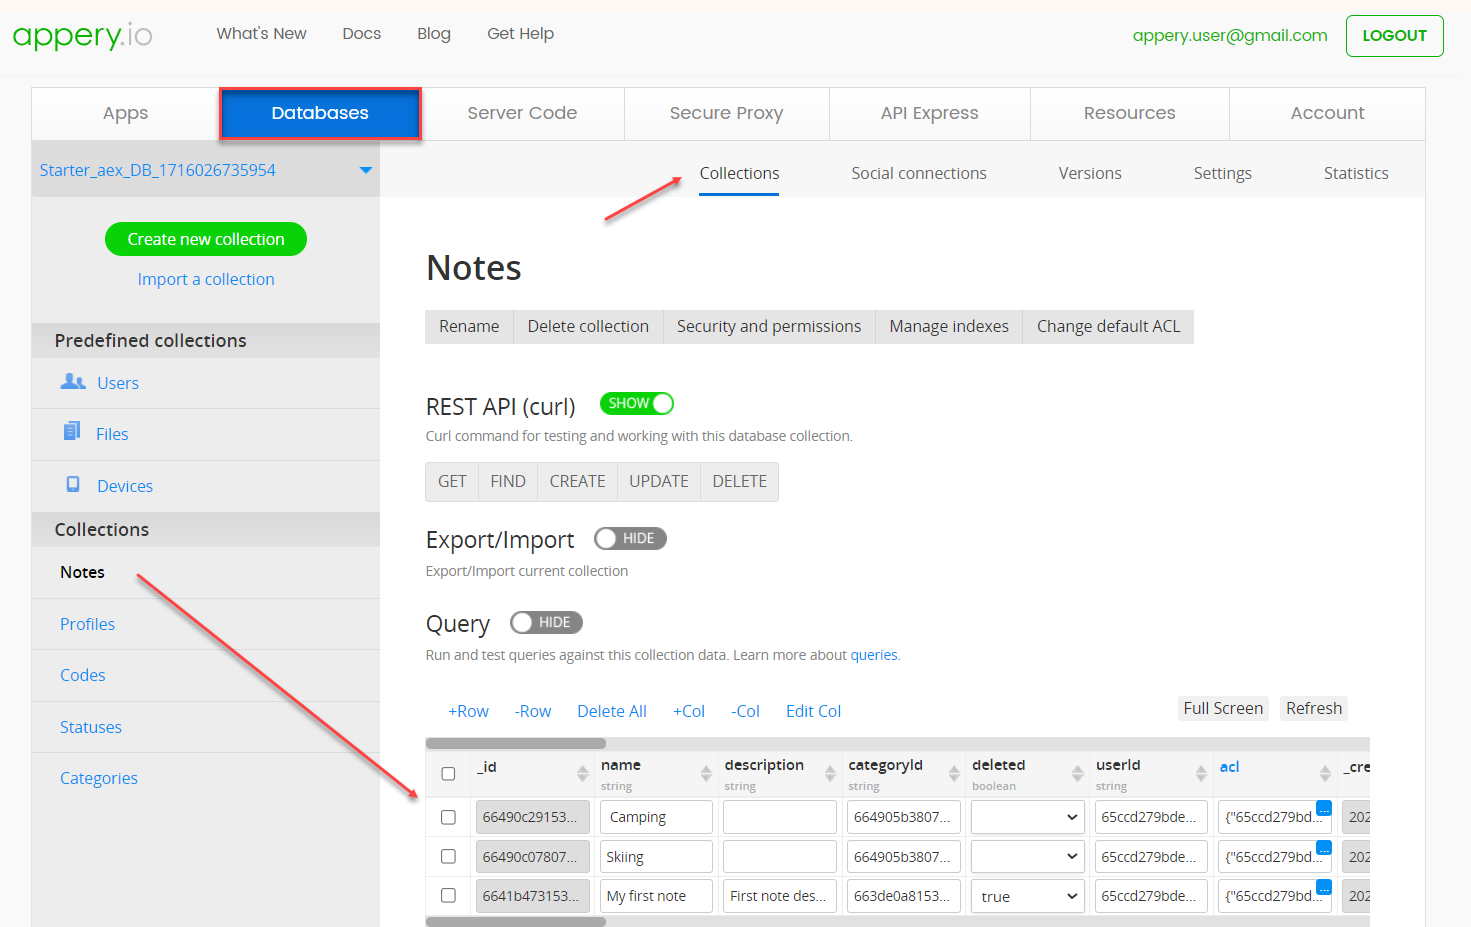
NoteSince the app supports working in the offline mode, for the synchronization purposes, deleting the category/note locally does not delete it from the server. The record deleted by the user is removed from the device but is kept on the server and marked as deleted in the linked app database.
This way, the other app users operating with this data, can be notified of this change and take the corresponding action: reject or accept it.
Video: Integrating a New Database Collection with Your Starter Template AppYou can also check this YouTube video tutorial that shows how to how to create and customize a database collection for integrating it into the project connected to an API backend (cloud database) and created from the App Starter template:
Customizing App Template
Being a template, our Offline Starter App offers many customization options. So, if you are interested in customizing this template, we highly recommend that you check out the instructions in this section.
Note that our Services Team will be happy to assist you in building the application you need. So, if you require professional help with additional customizing or debugging your app code and/or logic, you can consider purchasing one of our Support Packs to get the highest priority support.
Renaming App
The first thing you might like to do to make your app unique is to rename your project.
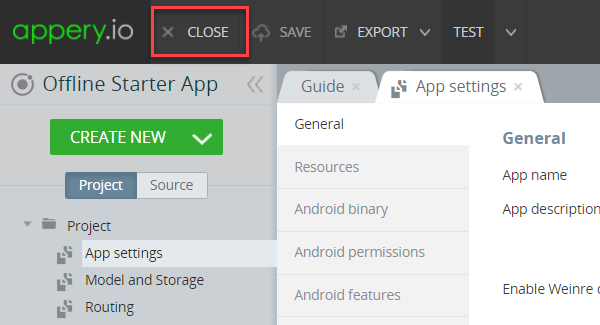
- To do it, you will need to exit the App Builder so click the CLOSE button in the top app Toolbar:
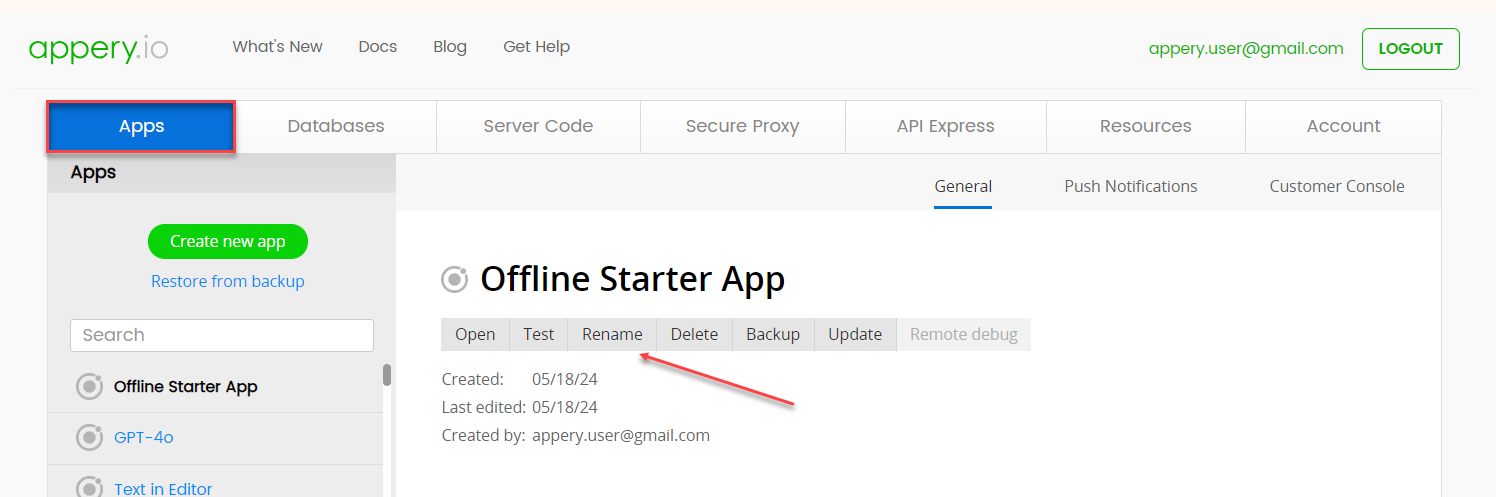
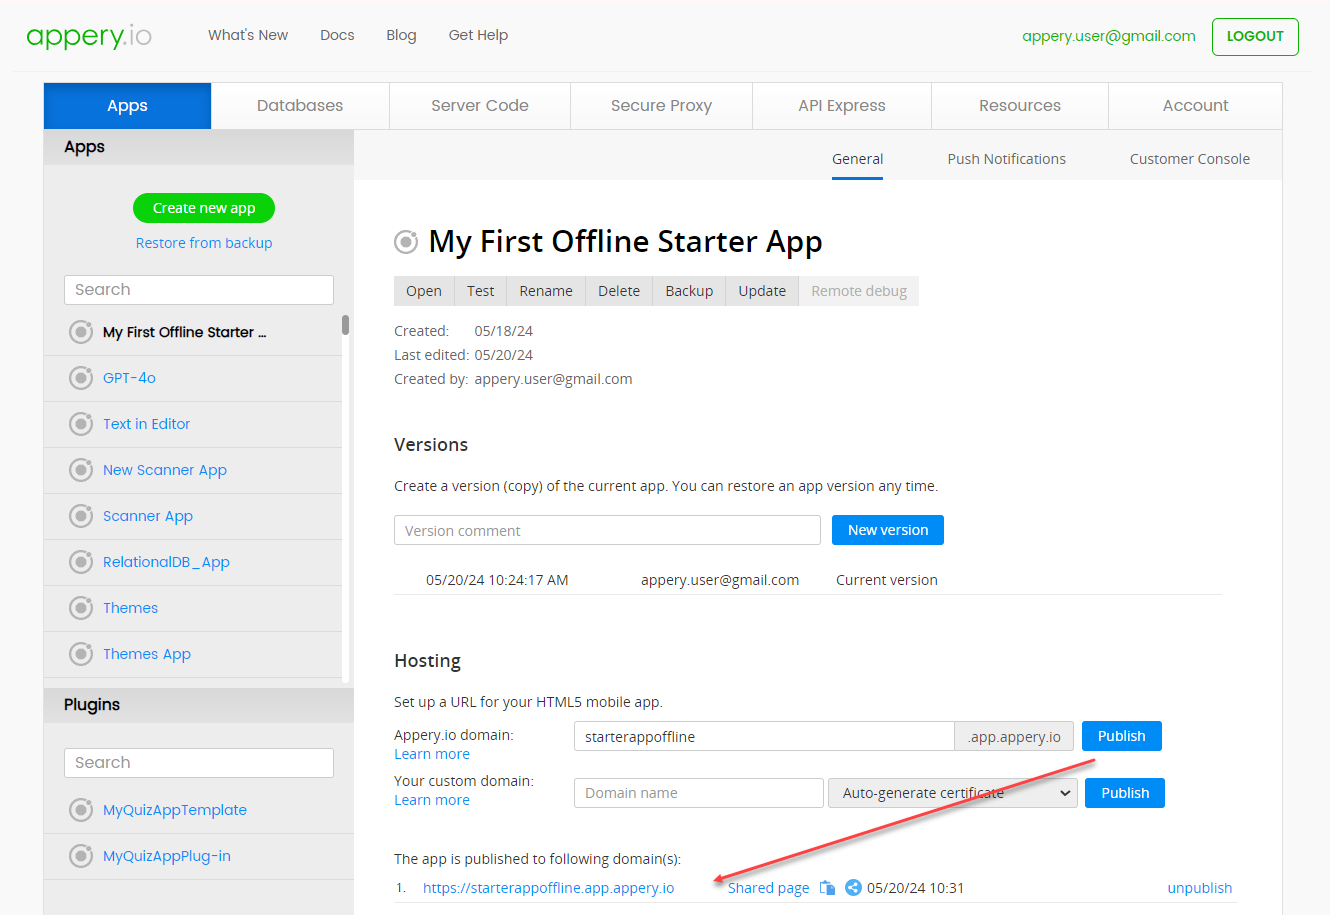
- After that, you will be redirected to the Apps tab with the information about your Appery.io projects, their saved versions, people with whom you share the project, and about hosting on Appery.io. Here, click the app Rename button:
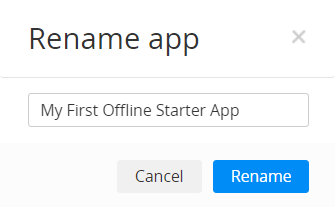
- Now, in a new window, provide a new app name, for example, Genius App, and confirm this change:
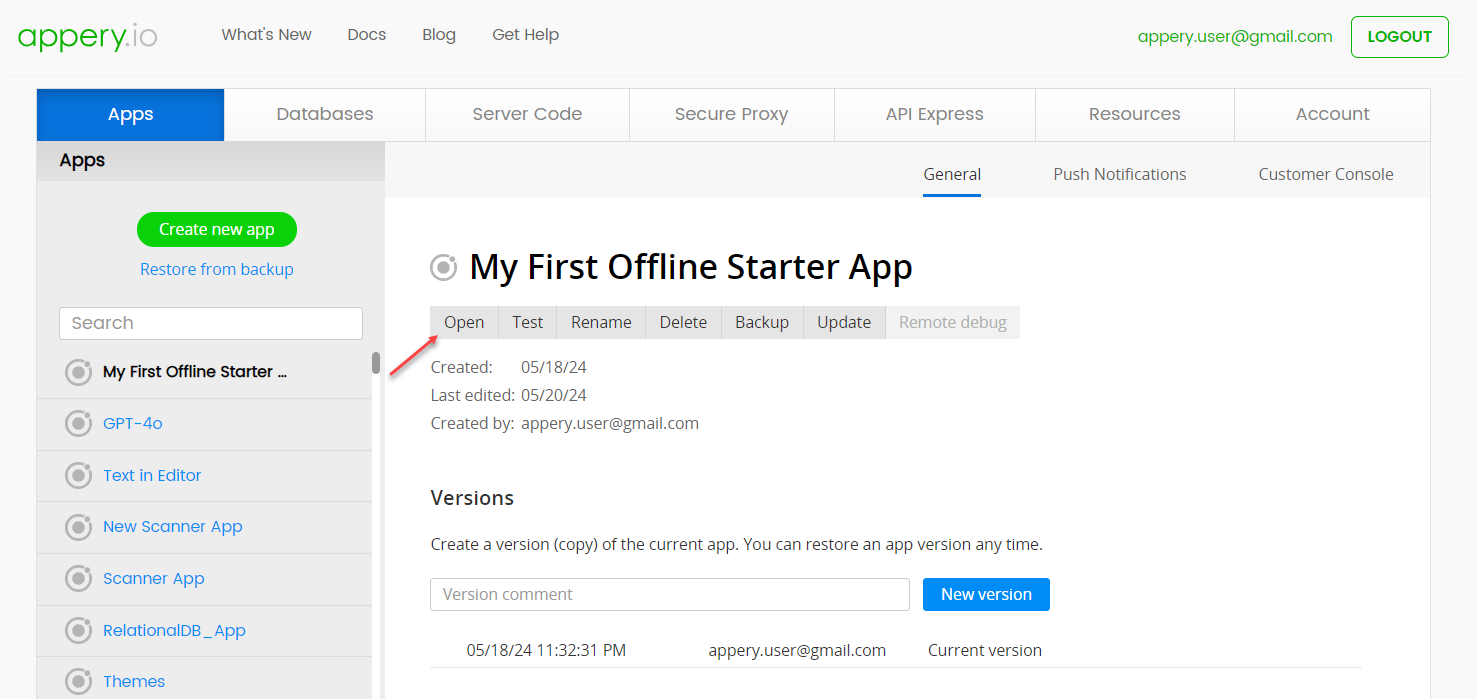
In a moment, the Apps tab will be updated with a new app name.
- Now, you can click Open to proceed with customizing your own application:
Reviewing General App Structure
When the app opens in the App Builder, you will see that this app template was created with Ionic and has multiple folders comprising a set of organized pages, predefined color Themes, integrated backend services, and TypeScripts all of which can be customized as per your needs and app requirements. You can unfold any of them to see what resources are available:
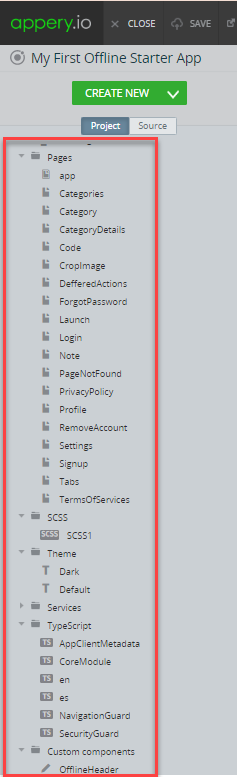
Every file or folder in the Project tree was created using our App Builder and we will now give you a little background on how you can customize the template resources.
Customizing App Pages
Opening the Pages folder, for example, will allow you to customize the individual app pages' UI and behavior. The easiest is changing the text so let's have a closer look at how this can be done.
Changing Text Property
With Appery.io, not only can you easily change the name of your application, but also modify any text in the suggested template.
Let's review the example of changing the text of one of the Login page UI components.
- First, select the Login page on the Project tab list located to the left of the mobile phone frame. The page will open in the DESIGN panel.
Adjusting Screen SizeNote that you might need to switch to the comfortable screen size (depending on your monitor) XS, SM, MD, LG, XL to see the whole page.
- Select the text instance you would like to modify.
Using BreadcrumbsYou might have noted that there are the breadcrumbs above the phone frame: they are often used for easy navigation between the parent/child components.
- The PROPERTIES panel for that component will be shown on the right where you can locate its Text property.
- Now, you can simply modify the text value, for example, replace the default Login... with Sign in... and this change will be automatically reflected in the UI:

- Now, when you click TEST once again, you will see that the preview has also been updated according to the recent change made.
Changing App Logo
Our template has a default logo on its Login page, but you can replace it with any other image you like.
-
To change the default image, in the app Project tab, open the Login page - the page where this image is added to, click the image on the screen which will automatically select the LogoImage component, and then click the Change button for its Image property on the PROPERTIES panel:
-
The Media Manager window opens where you can either select one of the available images or upload a needed file from your drive.
- Click Upload file, select the needed image on your drive, and confirm uploading it.
- When uploaded, the image file should appear on the images list and can be selected and then applied as a new app logo.
Customizing App Color Themes
Another great way to make your application stand out from a plethora of other apps is by changing the app color theme. You will be surprised to see how easy it is to completely change the looks of your app using our Theme Generator option.
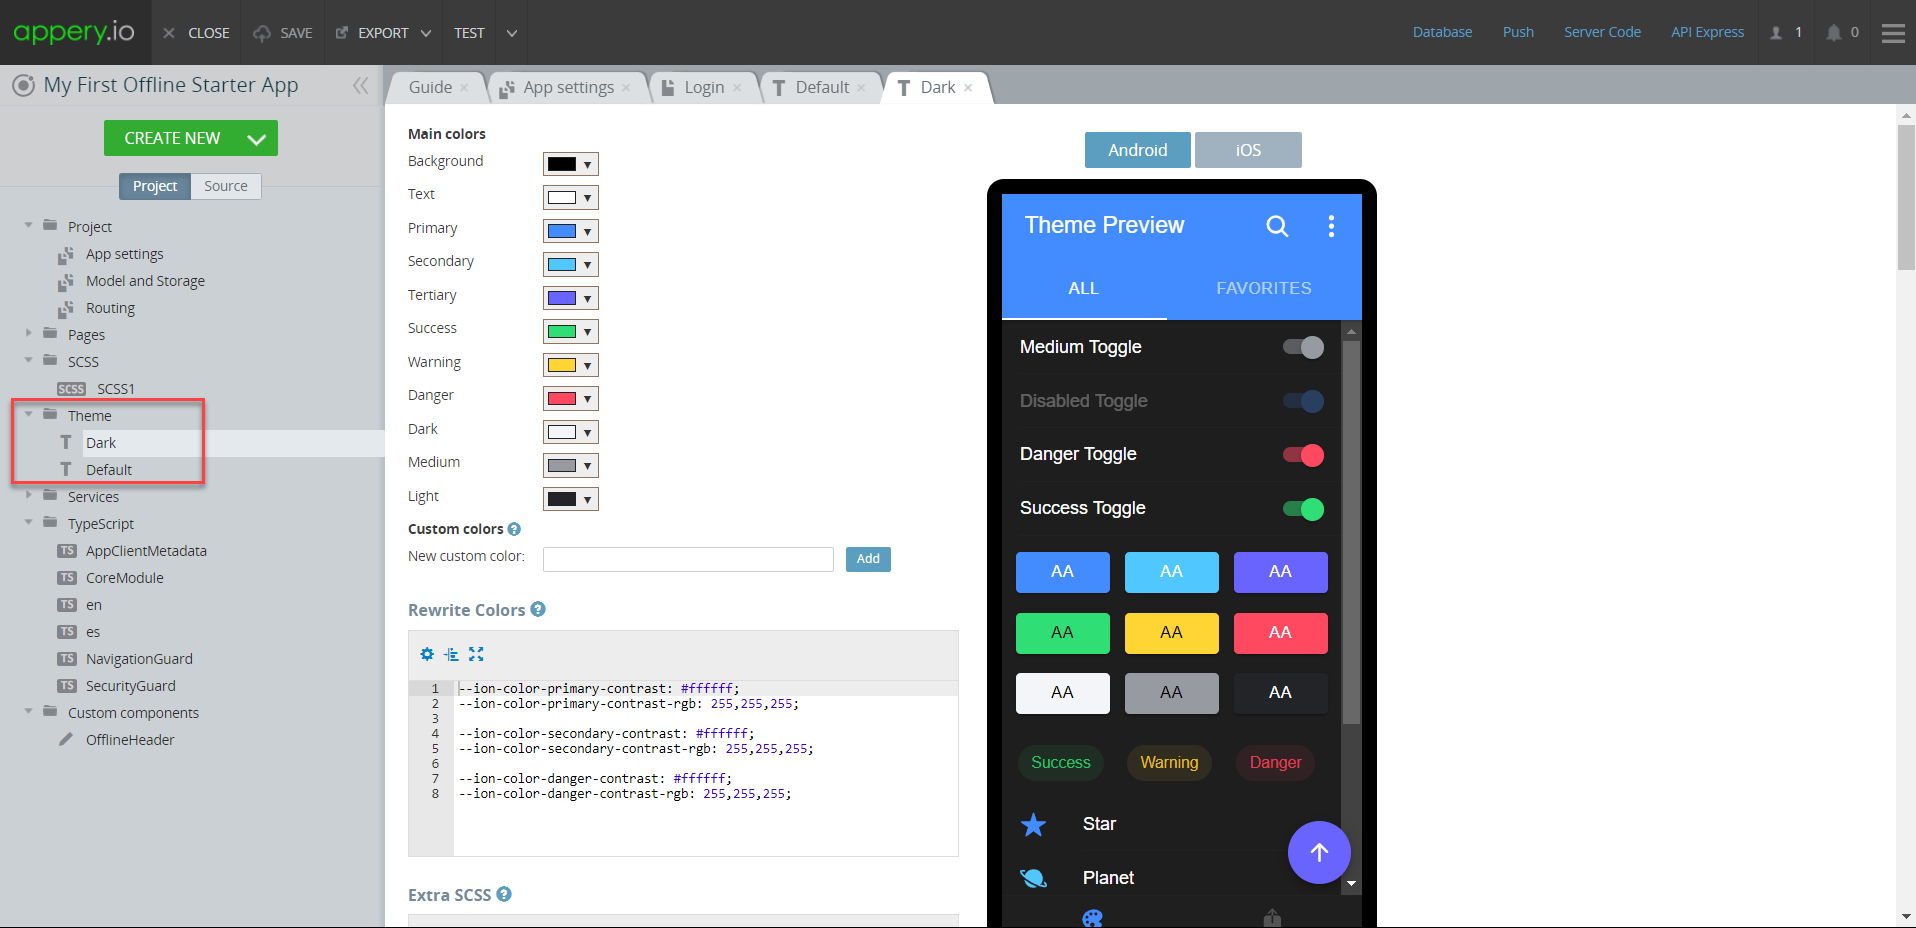
Each of our templates has its unique design. What it also has is called Themes that are created under the Theme folder.
Our Offline Starter App template offers two different color themes to select from: Dark and the default one:
Creating Custom ThemesIf you would like to create your custom theme, you can do it using the CREATE NEW > Theme drop-down and following the instructions in this document.
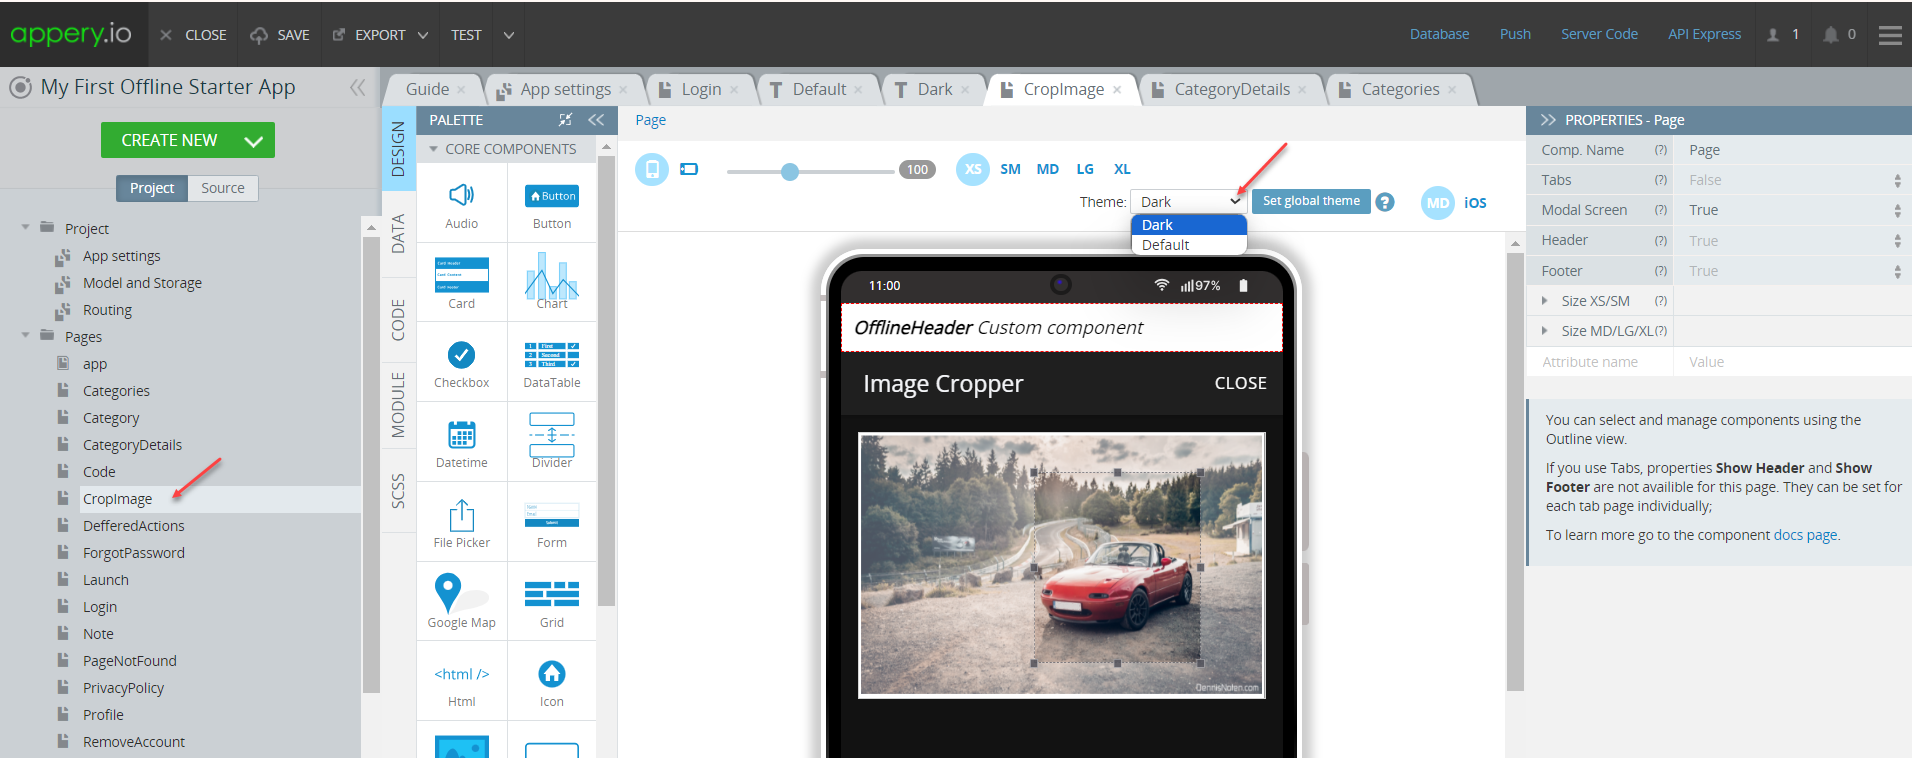
Every app page has a Theme dropdown. The default app theme is applied here but you can try selecting other theme options from the dropdown to see what this specific page will look like under a different theme:
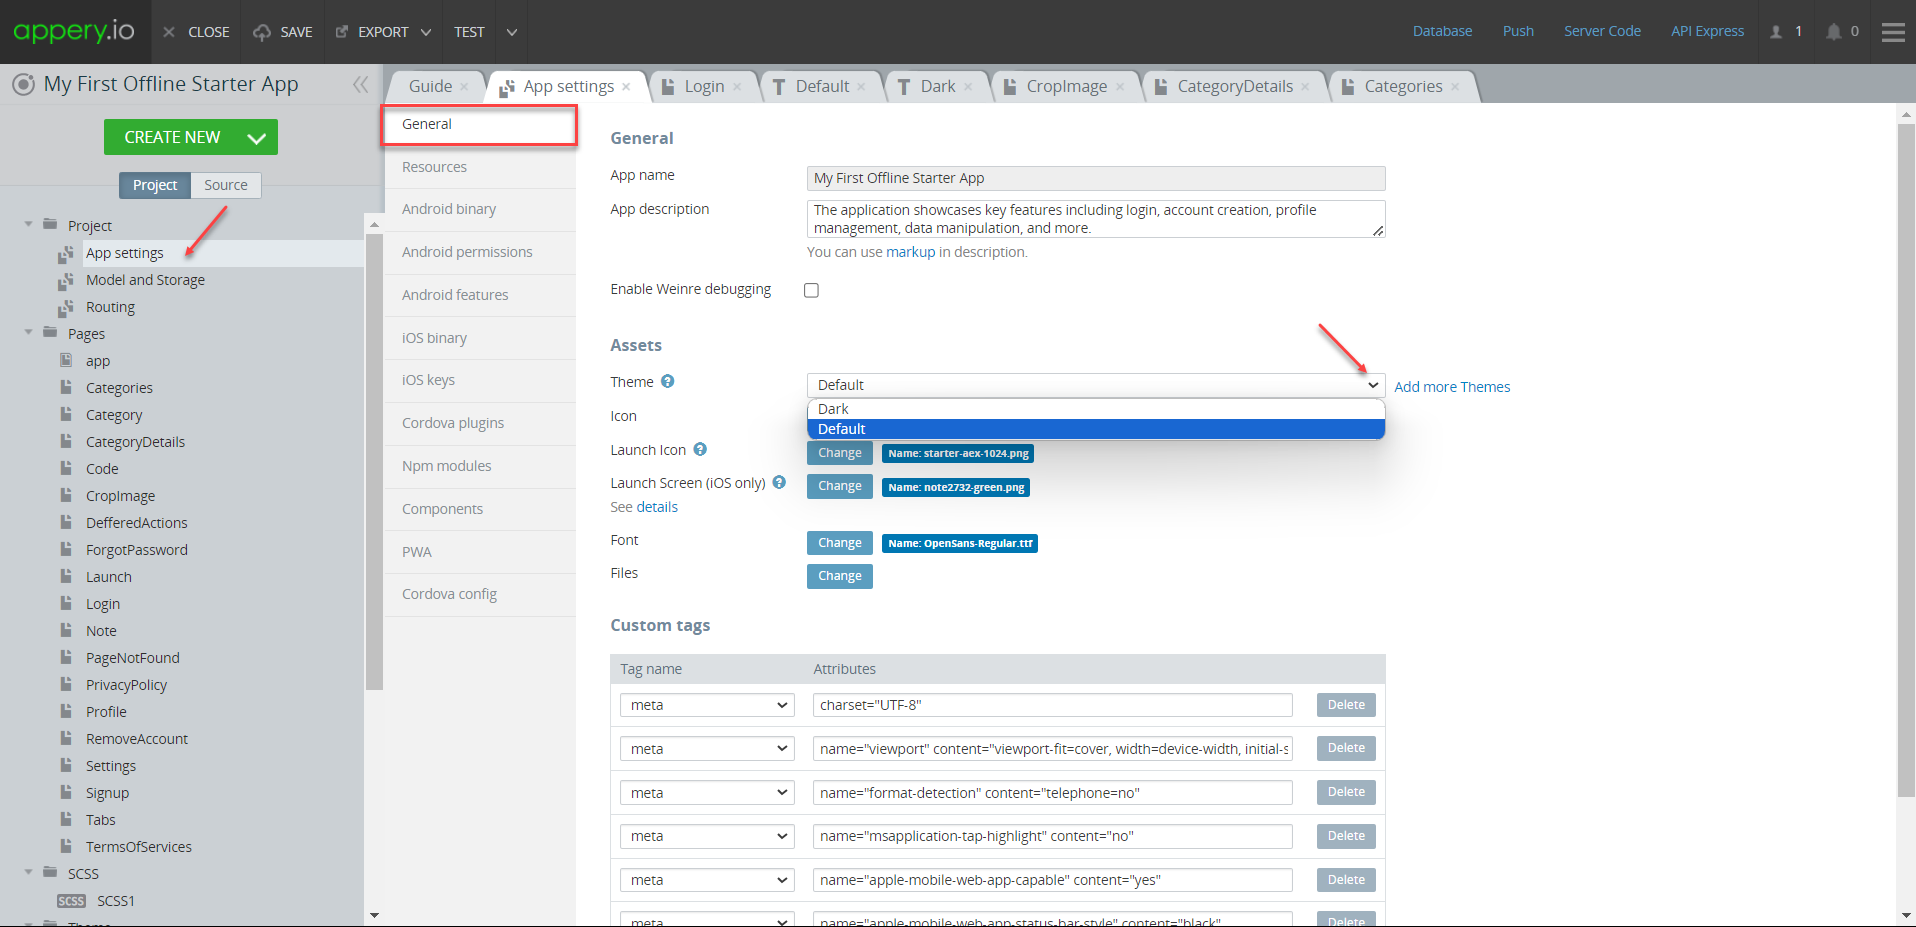
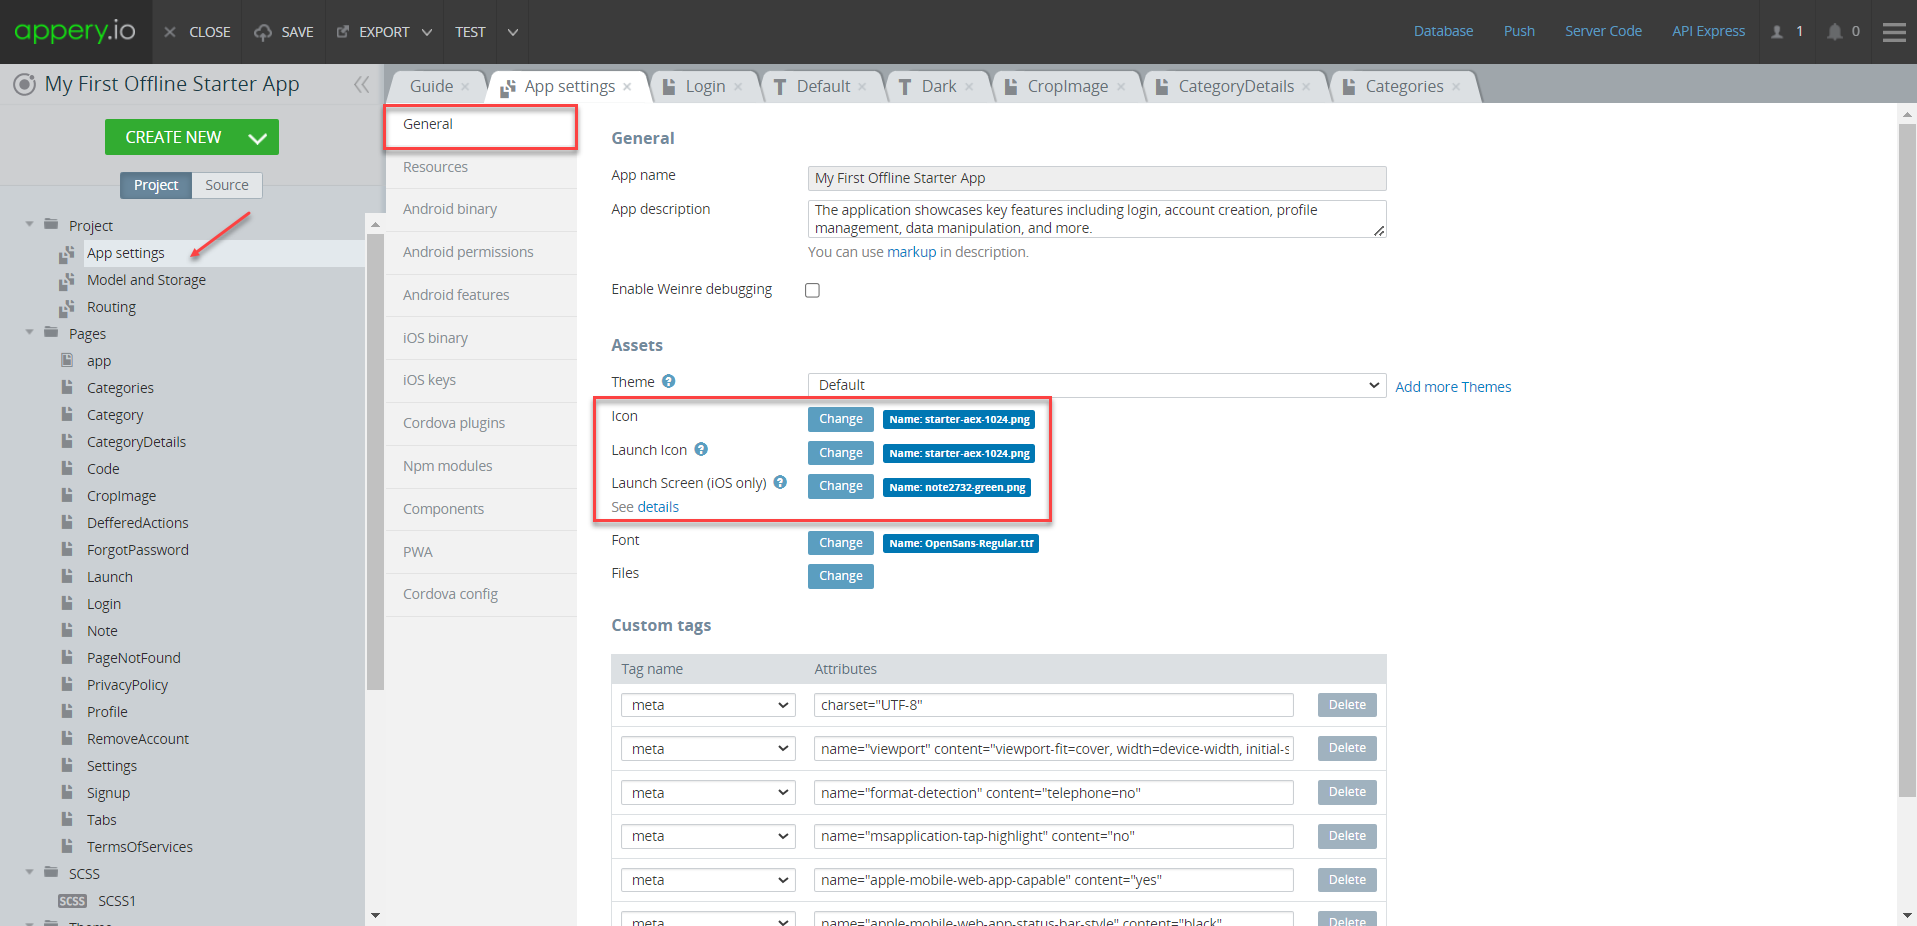
Important!This drop-down works for preview purposes only and if you decide to apply the selected theme to the entire application, go to Project > App Settings > General and select the needed theme from the drop-down:
Customizing App Launch Icons and Screens
In addition to modifying the appearance of the app pages, you are also free to replace the default launch icons and screens (iOS only) by using our Launch Icons and Screens generator (or upload your custom fonts by using the Files Manager).
It works similar to what was demonstrated in the Changing App Logo section: by clicking the Change button and using the Media Manager:
Testing Customized App
Testing any Appery.io app is fast and simple. Simply click the TEST button in the top App BuilderToolbar.
The browser will launch with the app that you have just built.
Testing on Device
When your app version is ready, you might also like to test it on the device.
Appery.io Tester AppA great option to quickly test the app on the device is to use our Appery.io Tester app.
The app is free and available for both iOS and Android.
You can check out this page to learn more about using the Appery.io Tester app.
Hiding Controls menuWhen testing using the Appery.io Tester app, you can also hide the Controls menu by first clicking the main control a button and then selecting the third icon (Four arrows pointing inwards) on the menu. In the modal screen, click OK to confirm:
And here is how our customized Offline Starter App behaves on the device when tested with our Appery.io Tester app:
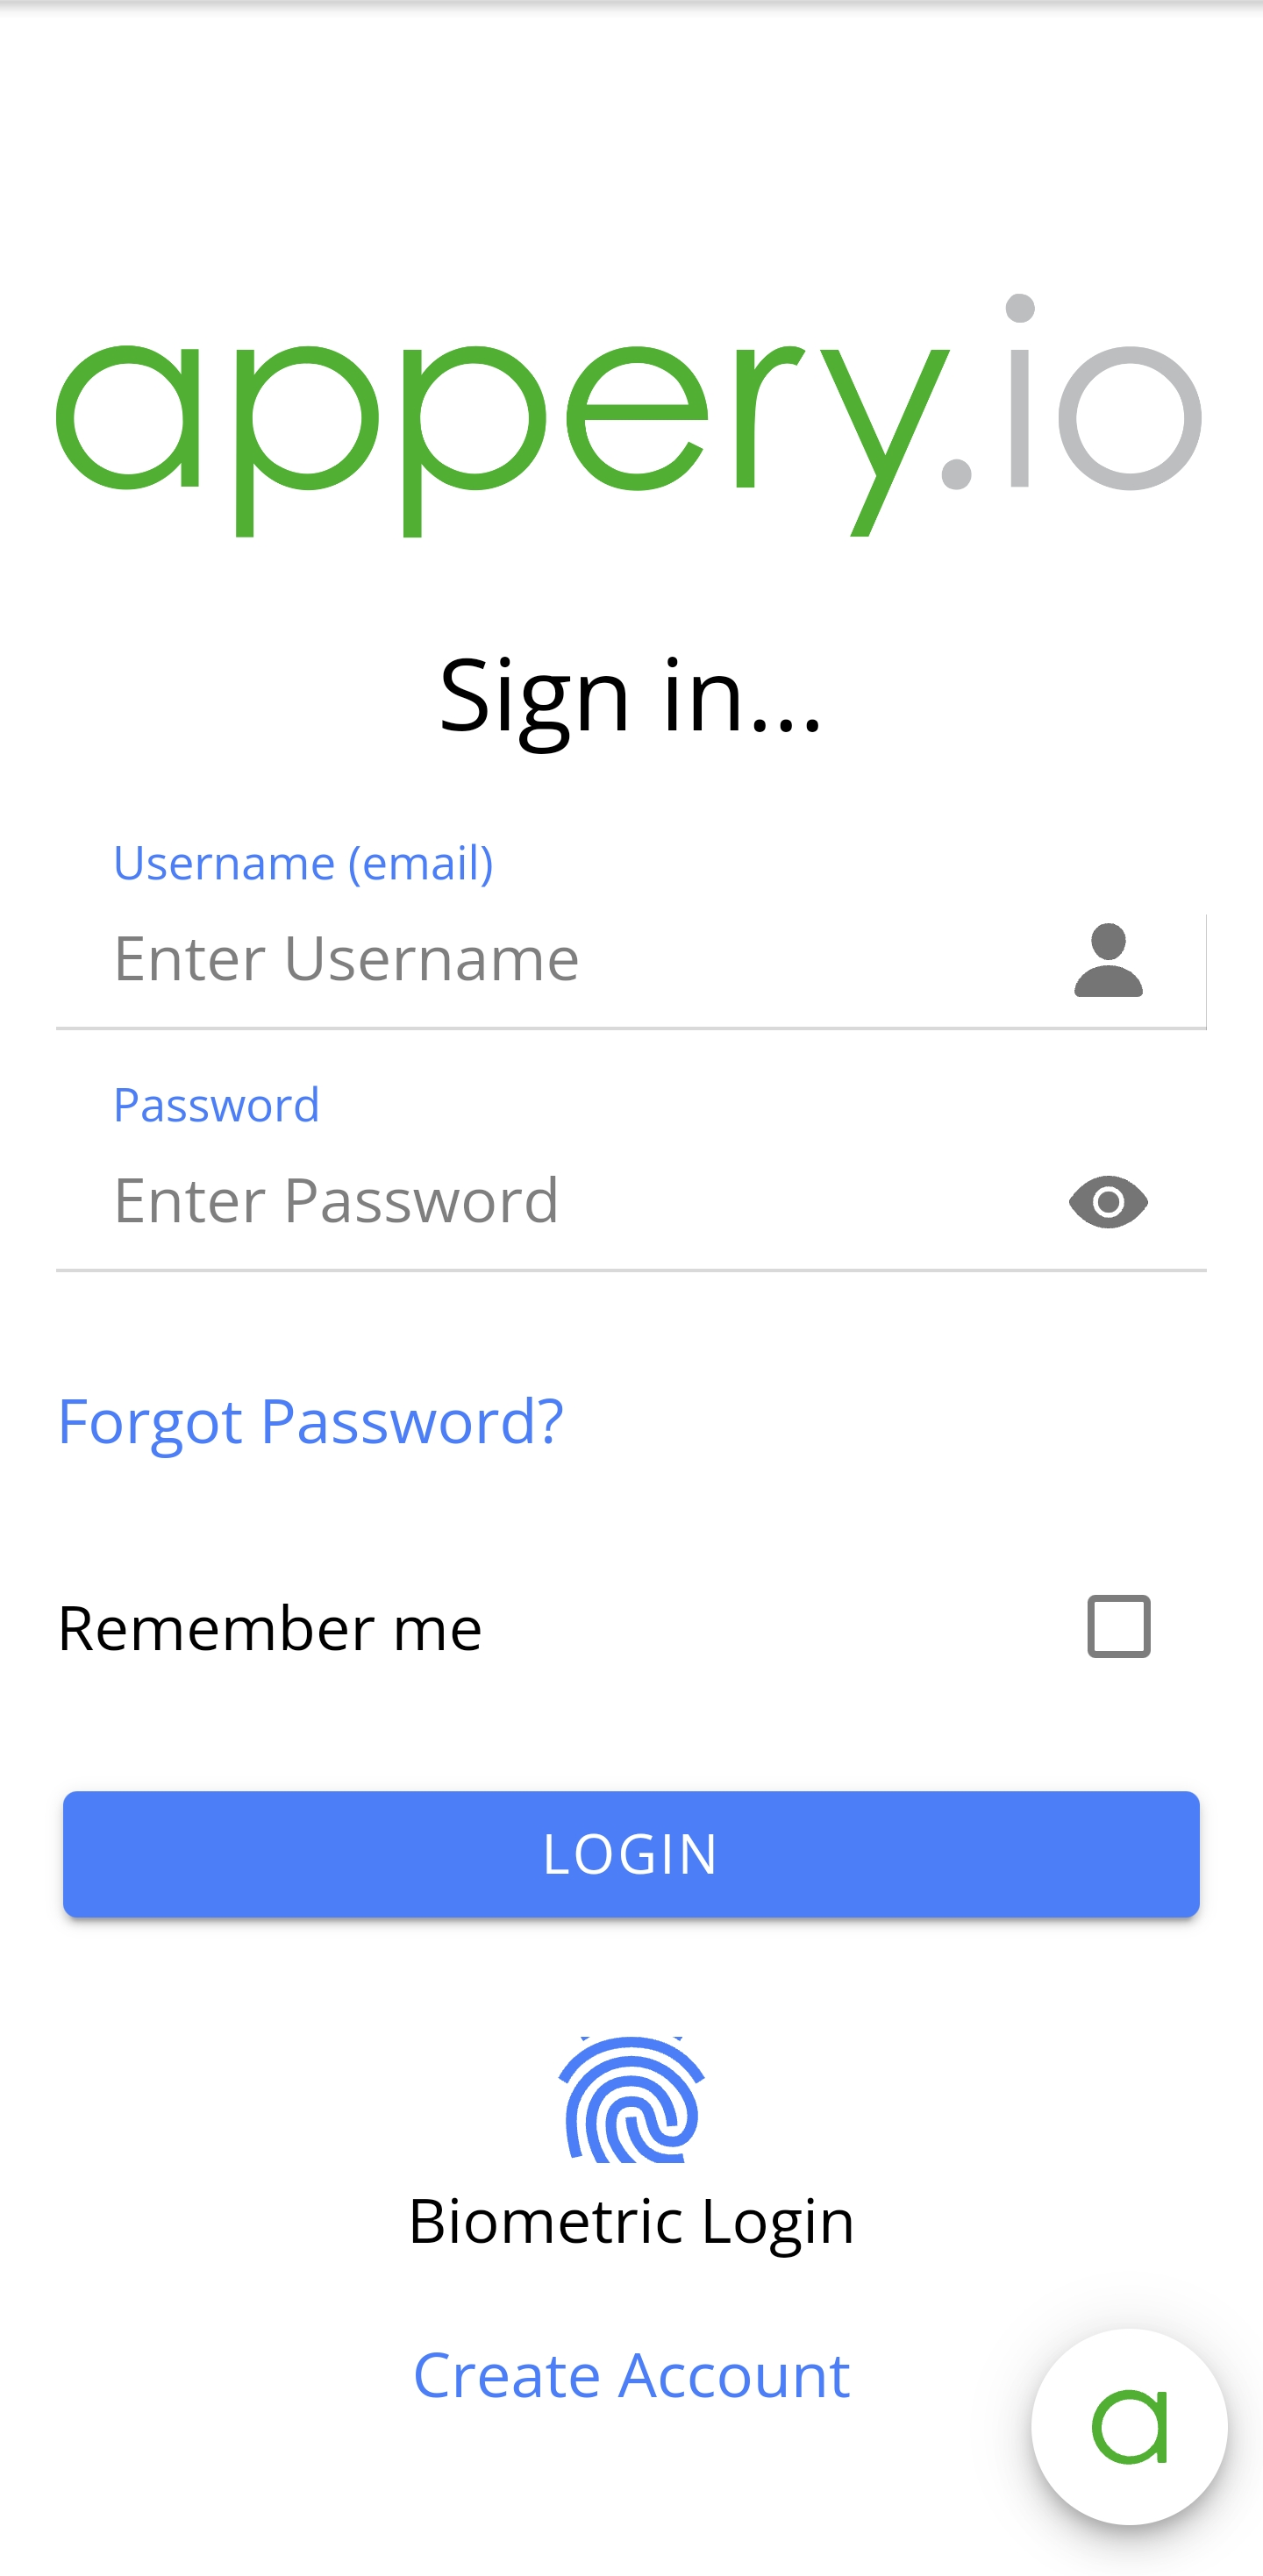
Note that the login page also has the Biometric Login option integrated. Enabling/disabling this option is available on the Settings page and accessible when tested on the device only:
To enable working with the Offline/Online mode, click GO OFFLINE/GO ONLINE:
Exporting App
When your final app version is ready, you might like to proceed with exporting your app for
Android or iOS with further installing it on a device.
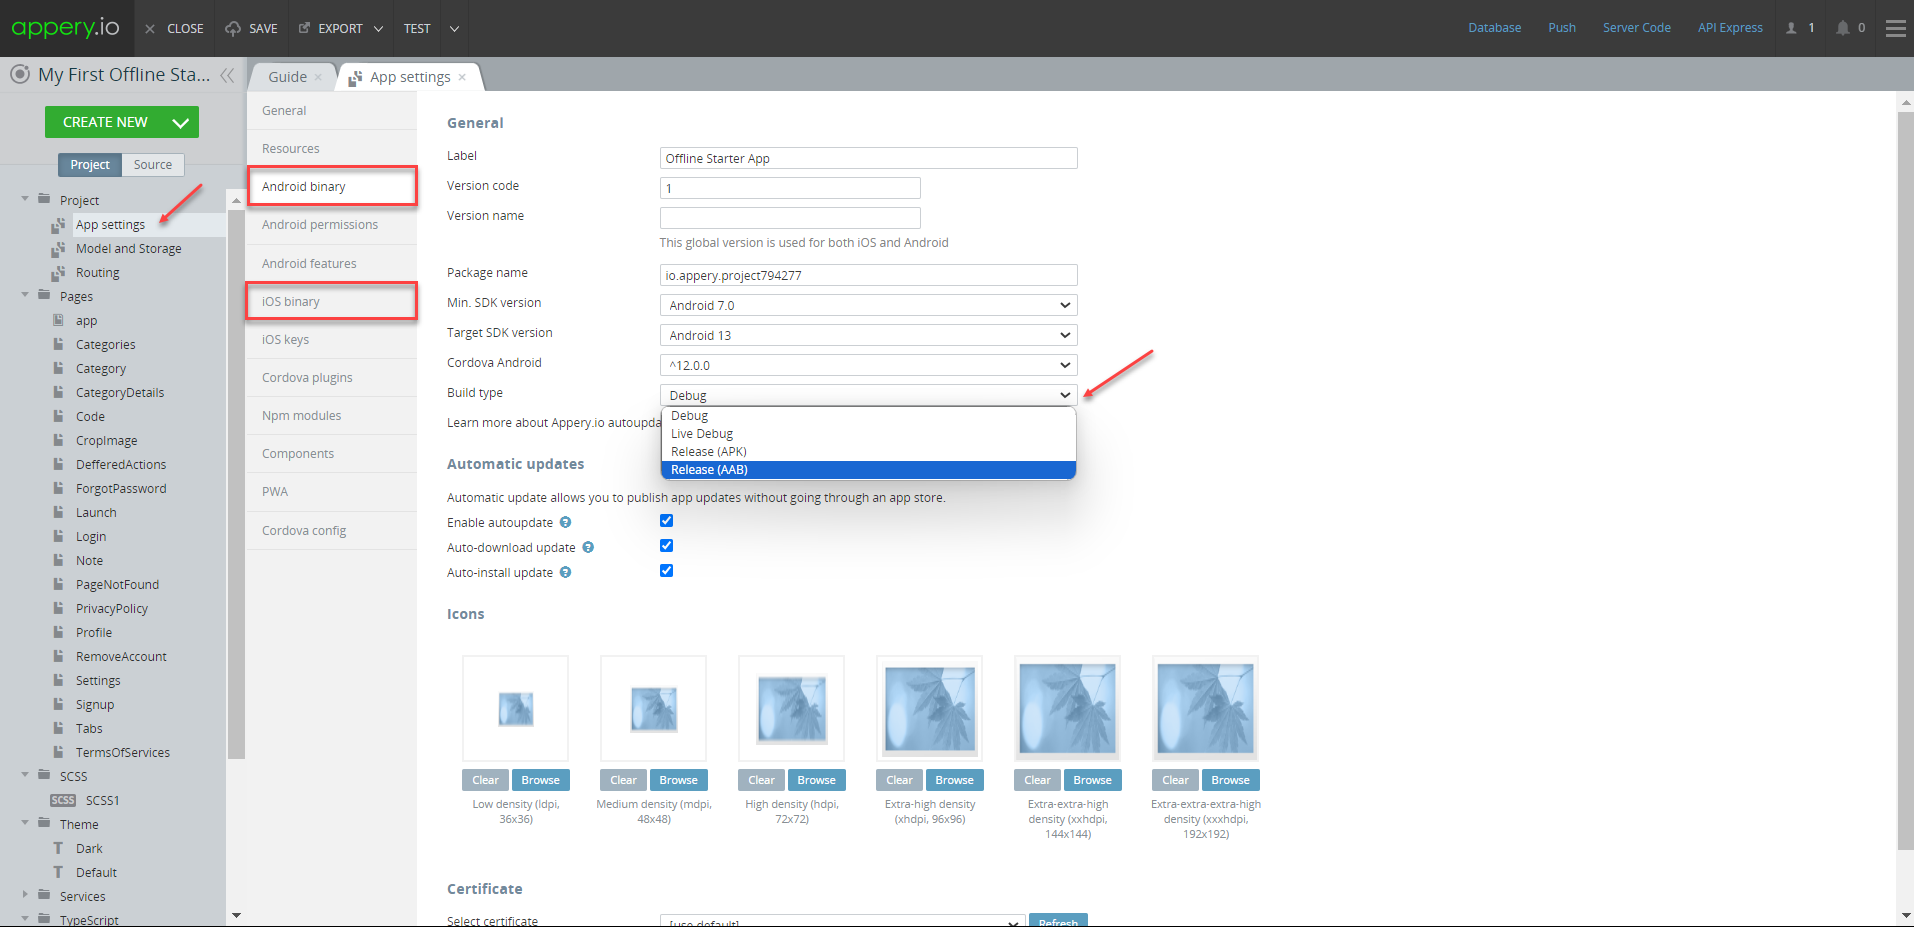
Selecting Build TypeBefore you can proceed with exporting your app, go to Project view > Project > App settings >Android binary/iOS binary to select the Release build type (Debug is the default type for both and can be used for testing purposes only):
If the Release and Publish type is selected under the iOS binary tab, building the release app version will be performed together with publishing it to the App Store.
Important Note!Please, note that before you can export the app, the app certificates must be imported or automatically generated (in the case of Android).
You can check this document in case you need help with exporting your application for iOS.
Here, you will find information on generating certificates for Android.
Note as well that starting from August 2021, new apps are required to publish with the Android App Bundle (.aab) on Google Play.
Please read more here.
You can also check this Appery.io Community video that shows how to create Android and iOS certificates:
-
After the needed certificates have been added to your app all you need to do is to wait for the bundle to be created.
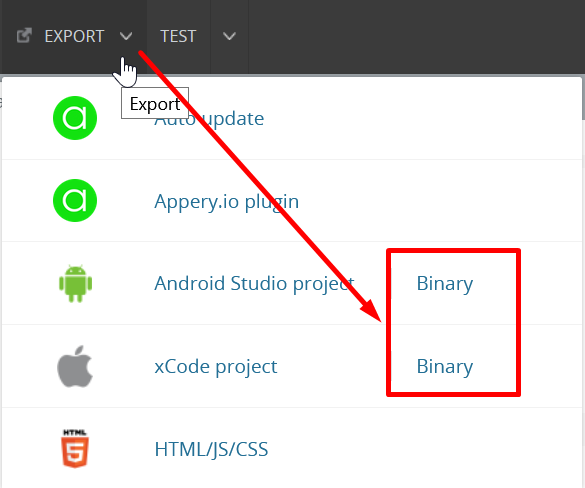
-
Now, you need to select the format you prefer (you are also free to build both if you need):
.aabor.ipato start building your project:
Managing Build Error The certificate file is not setIf this is your first app created with Appery.io you will most likely get the error signifying about missing certificates that will prevent you from successfully finishing the build process.
The error reads similarly for both binary types and indicates that you should set the corresponding certificate before starting a new build.
If this notification is what you see after starting your build, please check out this document about certificate management that explains how to add the needed certificate to your project:
- Once your project bundle is generated, you will see the message:
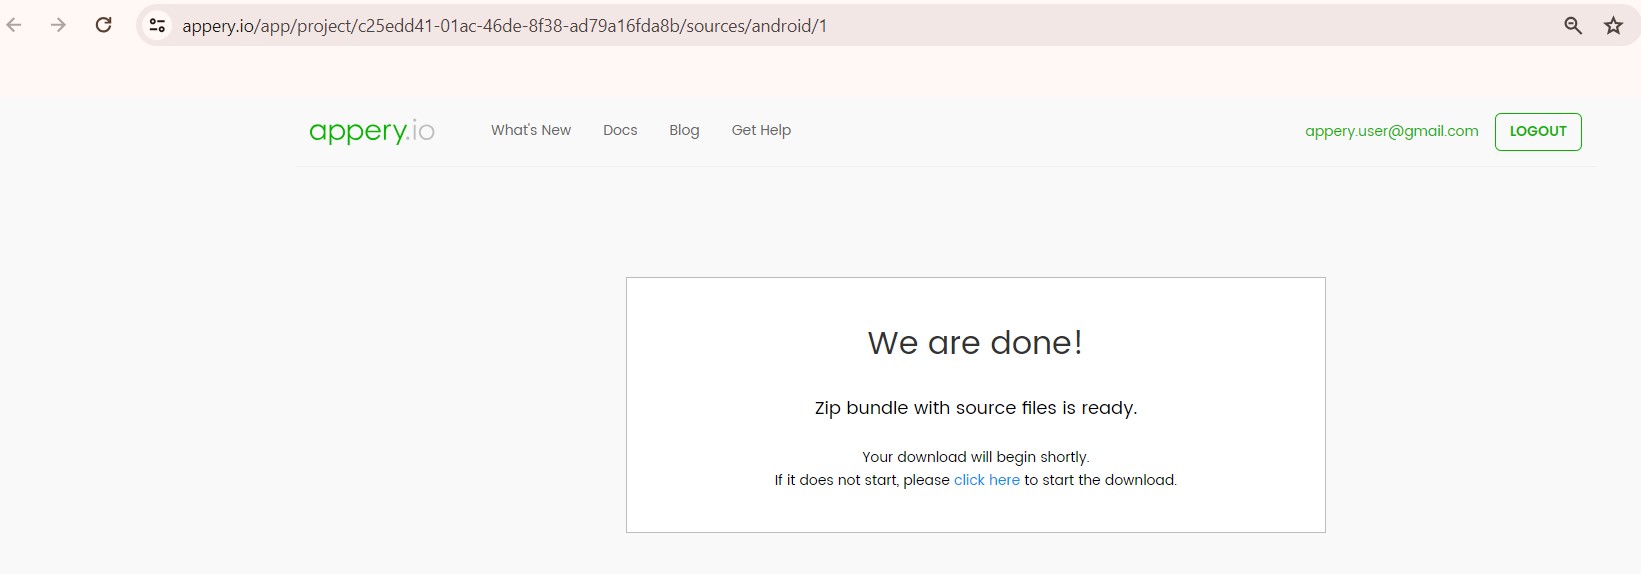
- Then, install the app on your device and enjoy the result of your customization efforts:
Publishing App
Any app that you build in Appery.io can be published as a mobile web app. This means the app will be hosted on a server and can be accessed from any browser on a mobile device:
Updated about 1 year ago