jQM Samples
jQuery Mobile sample code.
Important Note!The option of creating new apps with thejQuery Mobile framework was removed but we still support the projects that were created with it earlier.
Creating A Master-Detail Page
Master-detail is a very common UI design where a list of items is displayed on the first page. When an item is clicked the item details are shown on the next page. When building a mobile app in Appery.io, you can use one of the following approaches: both approaches use the browser’s local storage. Understand that this is not specific to Appery.io; a similar approach is used in every other tool. There is also a step-by-step tutorial, which shows how to use one of the approaches in this section. The key is knowing which item was clicked, and making the item’s ID available on the next page to display the item’s details. The first step is to display the list of items, the following example uses a List, but you can use any other component, such as Grid.
Adding Listener to List Item
This approach uses the built-in Model and Storage feature. This example uses a Food list.
- Create a Food object, and FoodList in the Model. Make sure you use the correct types.
- Create two local storage variables, one that will hold the list (Food), and the other one that will hold the selected item. Again make sure you use the correct types. On the page, when you load the list data, you first load it into the local storage variable:
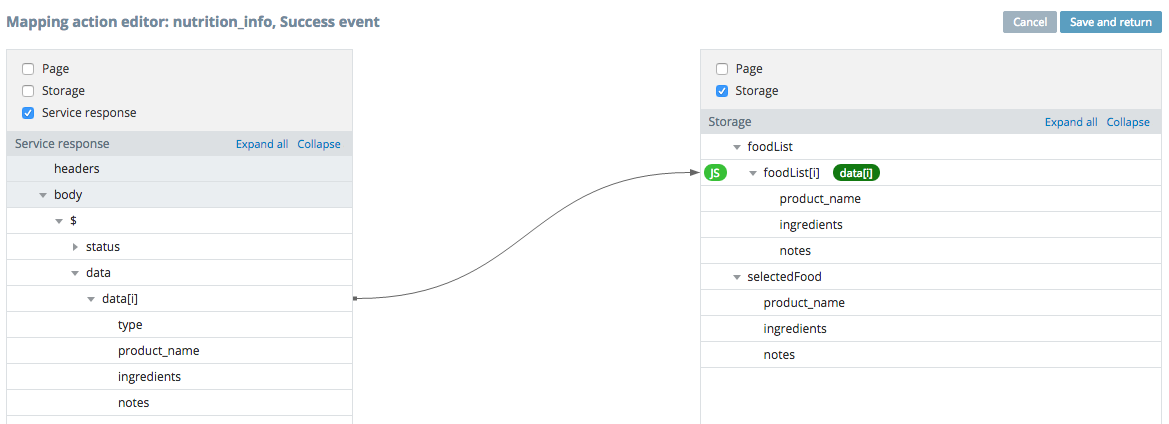
You can use just one connection as long as the name on the service side matches the names in model.
When the above mapping executes, all of the data from the service will be available in your model or the local storage. What’s important is that you are working with actual data types (Food), and not plain strings.
- Next you need to show this data on a page. Add a second mapping action to the services Success event.
The mapping looks like this:
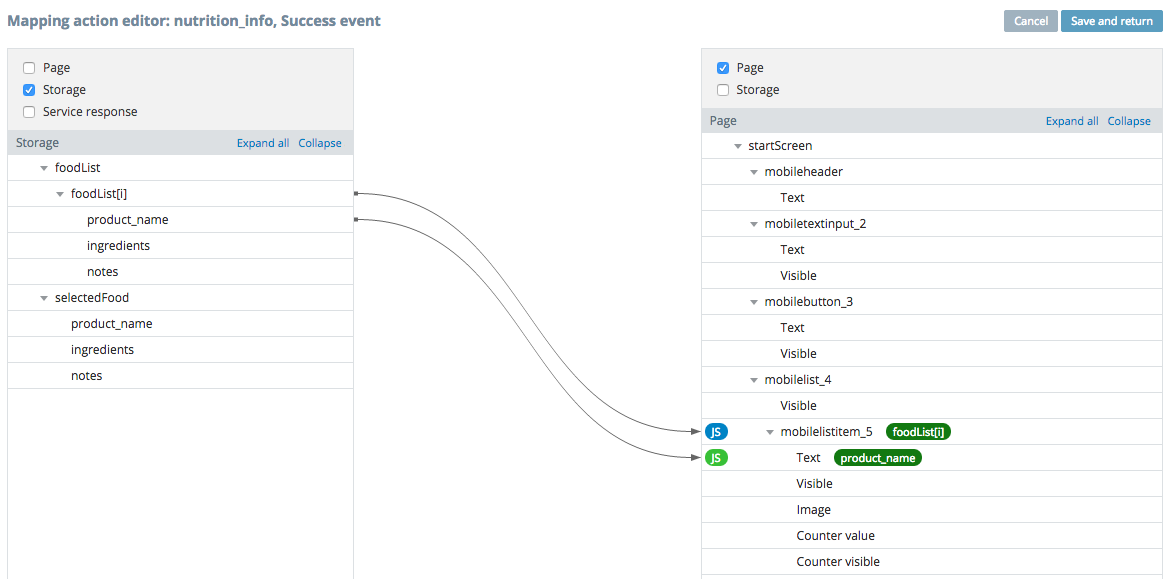
Notice that one of the connections has JS in blue that means it has some custom code:
element.on("click", function () {
   Apperyio.storage.selectedFood.set(value);
});
A listener is added to each list item and when invoked, you take the value (the current Food item) and set it into local storage (into selectedFood variable, of type Food). This means that the currently selected item is now available to the app via the local storage.
On the next page, you can display the selected item also via mapping (on page load or page show event):
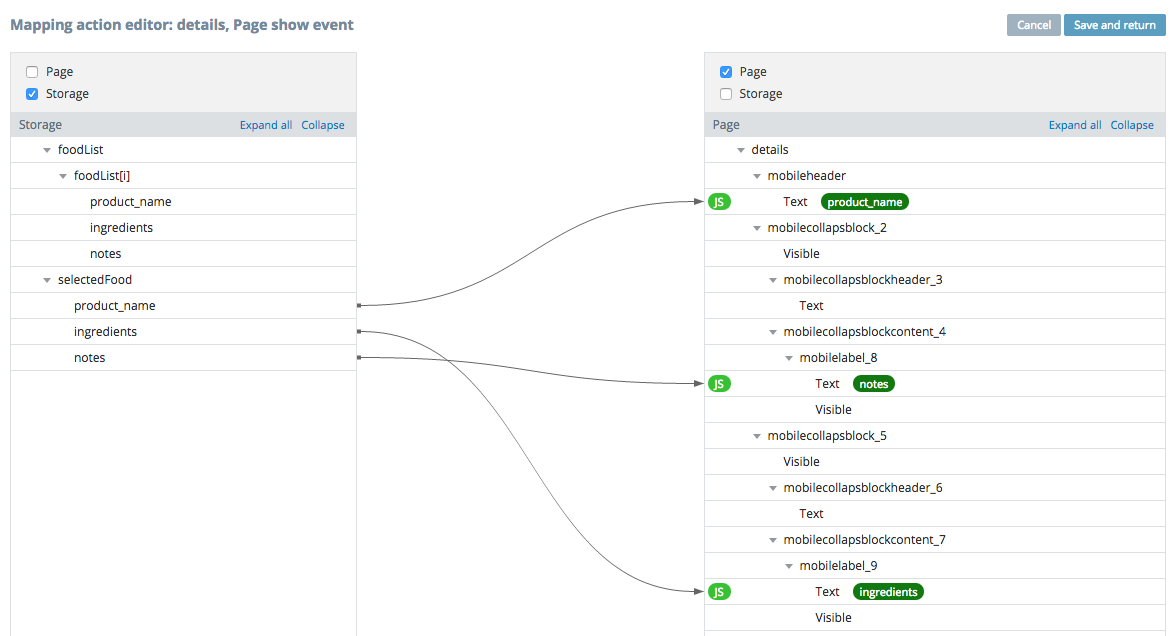
Learn more about Model and Storage.
This approach is recommended to use when possible. Other approaches are available and you can read about them below.
Adding Custom Attribute to List Item
When you are mapping the service to the List, you will need to add very basic JavaScript to the mapping:
The JavaScript code looks like:
element.attr("data-item-id", value.Id);This code adds a new list HTML attribute to the list element called data-item-id (you can call it anything else), and sets it to the current item’s ID value (from the JSON response). This will happen every item in the list. When the list is displayed, every list item will have a new attribute that is set to the needed ID to know which item was selected. The next step is to read the value stored when the item is clicked in the list. To do this, add a click event on the list (item):
localStorage.setItem("itemId", $(this).attr("data-item-id"));When an item is clicked in the list, read the value of the data-item-id attribute and save it into the local storage under the itemId name. Once you have the value in local storage, you can use it to invoke a service on the next page (or any other page of the app). You will also need to add an action to navigate to the next page, for example, invoking the service using the saved value:
Note that because you saved the value into local storage using the local storage API, itemId will not automatically be listed under the Local storage variables on the page side. To create the variable, enter its name in Create variable and select Create > Local storage variable. When you navigate to the next page, you can invoke the service on the page show event.
Using A Hidden Label
Another approach also uses the local storage, but has a slightly different setup. Instead of adding a new attribute to the element, it uses a hidden value in the list. The list contains two labels; the first label will display the item name. The second label is a hidden label, and its name has been changed to itemId.
The mapping will look like:
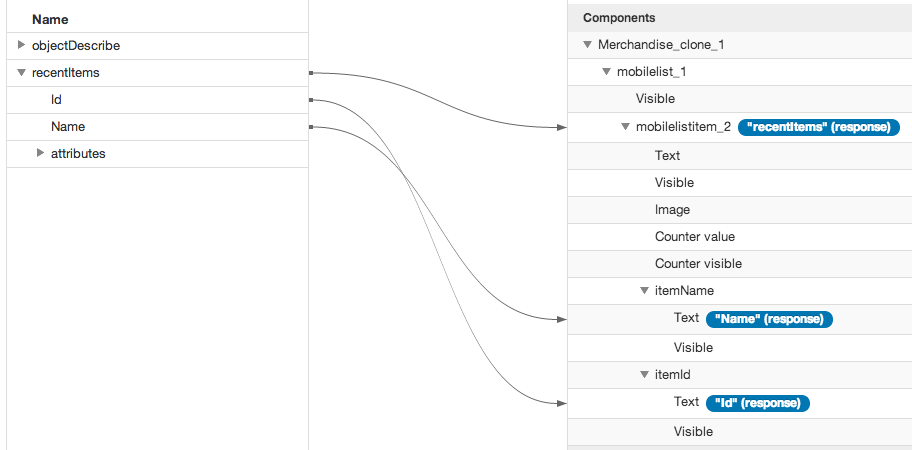
Notice that both Name and Id are mapped to the Labels inside the List. When the List is displayed, every list item will have a hidden ID with the value you need to use on the next page. When a list item is clicked, you need to read the hidden value and save it into local storage. In the EVENTS tab, add the Set local storage variable action.
The local variable is called itemId, and its value is going to be set to the value of the itemId hidden label in the list. You will also need to add an action to navigate to the next page (after the local storage variable is set). Once the value is stored in local storage you can use it on any page of the app because the local storage variable was created via an action, you don’t need to create it by hand for the mapping. Mapping the ID for service invocation:
When you navigate to the next page, you can invoke the service on the page show event.
Centering a Component
To center the component on the page add the following JS onscreen load event:
Apperyio('mobileimage_1').css('margin', 'auto');
Apperyio('mobileimage_1').css('display', 'block');
Where mobileimage_1 – your component name.
Click Test to see the results.
Custom Background
You can set a custom background color or picture via the following CSS code, clicking Create new -> CSS. This example uses a remote image as a background:
[dsid="mobilecontainer"]
{
	background-image:url("http://www.publicdomainpictures.net/pictures/70000/velka/balloons-1389273935QOv.jpg")
}
When you test the above you will see this background.
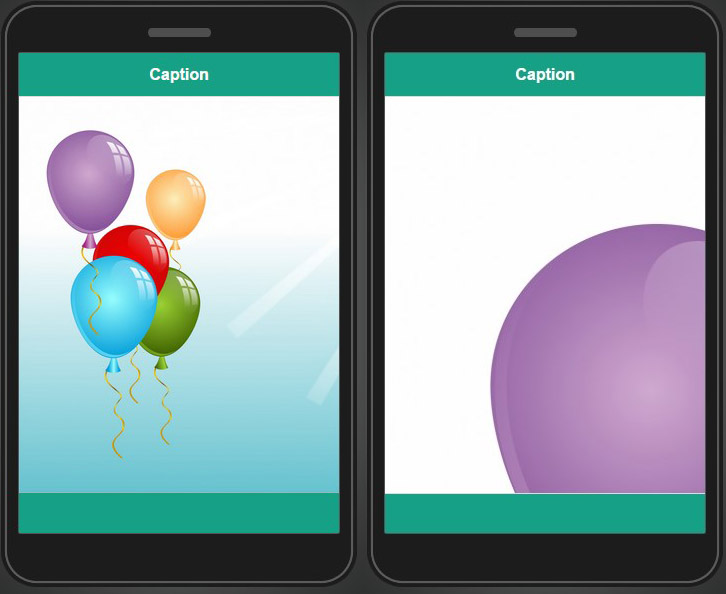
To resize a custom background image to fit different screen sizes use the following CSS code:
[dsid="mobilecontainer"]
{
	background-image:url("http://www.publicdomainpictures.net/pictures/70000/velka/balloons-1389273935QOv.jpg");
	background-repeat:no-repeat;
	background-size:cover;
}
The image below illustrates the difference between a scaled background (the left one) and not scaled (the right one):
If you need to set the background to a particular color:
[dsid="mobilecontainer1"]
{
	background:red;
}
You can also use a CSS class. For example:
.image-class {
	background: red;
}
Then set the class for the mobilecontainer1.
You could use the same approach for setting the background to an image.
You can set background image or color for custom theme too. Open your custom theme and upload the image you want to use by clicking Add image, in the bottom right corner of the screen.
Go to your custom theme and add the following code to the very beginning:
body .ui-content
{
	background-image: url("../images/balloons.jpg");
}
You can set the background color the same way.
Changing Background Dynamically
Here is how you can change the background dynamically running Java Script code on a Load, Page show, or any other event. Upload the image to your app and use it as a background. The uploaded image is then referenced using the Appery.io JavaScript API:
$('div[dsid="mobilecontainer1"]').css('background-image',
'url('+Appery.getImagePath('balloons.jpg')+')');
Making The Component’s Background Transparent
You can change the component’s background to transparent by using the methods listed below.
Button
Set component Class Name to buttonClass in the PROPERTIES panel and add a CSS asset with following code:
.buttonClass{
	background-color: transparent !important;
}
You can also use component a Name property:
[dsid=mobilebutton]{
	background-color: transparent !important;
}
You can do the same via a JavaScript code. Add this code onto the action or event you need:
Apperyio("mobilebutton").css("background-color","transparent");
NotebuttonClass – is the Class Name property mobilebutton – is the component Name property.
Group Buttons
Using the Class Name property and CSS asset:
.groupbuttonClass {
	background-color:transparent!important;
}
Using the component Name property and CSS asset:
[dsid = mobilegroupedbuttons] a {
	background-color:transparent!important;
}
Using the component Name property and JavaScript code:
$("[dsid = mobilegroupedbuttons] a").css("background-color","transparent");Input
Changing all the Input component backgrounds to transparent via the CSS asset:
.ui-input-text {
	background-color: transparent!important;
}
Using the Class Name property and CSS asset:
.inputClass {
	background-color: transparent!important;
}
Using the component Name property and CSS asset:
.ui-input-text input[name="mobileinput"] {
	background-color: red!important;
}
Using the component Name property and JavaScript code:
Apperyio("mobileinput").parent().css("background-color","transparent");Textarea
Using the Class Name property and CSS asset:
.textareaClass {
	background-color: transparent !important;
}
Using the component Name property and CSS asset:
div textarea[dsid = "mobiletextarea"] {
	background-color: transparent !important;
}
Using the component Name property and JavaScript code:
Apperyio("mobiletextarea").css("background-color","transparent");Radio
Using the Class Name property and CSS asset:
.radioClass label {
	background-color : transparent !important;
}
Using the component Name property and CSS asset:
[dsid = mobileradiogroup] label {
	background-color: transparent!important;
}
Using the component Name property and JavaScript code:
$("[dsid = mobileradiogroup] label").css("background-color","transparent");Checkbox
Using the Class Name property and CSS asset:
.checkboxClass label{
	background-color:transparent!important;
}
Using the component Name property and CSS asset:
[dsid = mobilecheckboxgroup] label{
	background-color:transparent!important;
}
Using the component Name property and JavaScript code:
$("[dsid = mobilecheckboxgroup] label").css("background-color","transparent");Slider
Changing all Slider component backgrounds to transparent by using the CSS asset:
.transbnt, .ui-slider, .ui-slider-handle, .ui-slider-track {
	background-color: transparent !important;
}
Changing all Slider component backgrounds to transparent by using the JavaScript code:
$(".transbnt, .ui-slider, .ui-slider-handle, .ui-slider-track").css("background-color","transparent");Toggle
Changing all Toggle component backgrounds to transparent by using the CSS asset:
.ui-flipswitch, .ui-btn{
	background-color: rgba(0,0,0,0) !important;
}
Changing all Toggle component backgrounds to transparent by using the JavaScript code:
$(".ui-flipswitch, .ui-btn").css("background-color","transparent");Select
Changing all Select component backgrounds to transparent by using the CSS asset:
.ui-select a, .ui-selectmenu-list li a, .ui-selectmenu {
	background-color: rgba(0,0,0,0)!important;
}
Changing all Select component backgrounds to transparent by using the JavaScript code:
$(".ui-select a, .ui-selectmenu-list li a, .ui-selectmenu").css("background-color","transparent");List
Using the Class Name property and CSS asset:
.listClass li a{
  background-color:transparent!important;
}
Using the component Name property and CSS asset:
[dsid = mobilelist] li a{
	background-color:transparent!important;
}
Using the component Name property and JavaScript code:
Apperyio("mobilelistitem").css("background-color","transparent");Navbar
Using the Class Name property and CSS asset:
.navbarClass li a{
	background: rgba(0,0,0,0) !important;
}
Using the component Name property and CSS asset:
[name = mobilenavbar] li a{
	background: rgba(0,0,0,0) !important;
}
Using the component Name property and JavaScript code:
$("[name = mobilenavbar] li a").css("background-color","rgba(0,0,0,0)");CollapsibleSet / Collapsible
- Collapsblockheader:
Using the Class Name property and CSS asset:
.collapseheaderClass .ui-collapsible-heading-toggle {
	background-color:transparent!important;
}
Using the component Name property and CSS asset:
[name = mobilecollapsblockheader] .ui-collapsible-heading-toggle {
	background-color:transparent!important;
}
Using the component Name property and JavaScript code:
$("[name = mobilecollapsblockheader] .ui-collapsible-heading-toggle").css("background-color","transparent");- Collapsblock:
Using the Class Name property and CSS asset:
.collapseblockClass .ui-collapsible-content {
	background-color:transparent!important;
}
Using the component Name property and CSS asset:
div[name = mobilecollapsblock].ui-collapsible-content {
	background-color:transparent!important;
}
Using the component Name property and JavaScript code:
$("[name = mobilecollapsblock] .ui-collapsible-content").css("background-color","transparent");Panel
Changing all Panel component backgrounds to transparent by using the CSS asset:
.ui-panel-animate, .ui-panel-open, .ui-panel-position-left, .ui-panel-display-overlay {
	background-color: transparent
}
Changing all Panel component backgrounds to transparent by using the JavaScript code:
$(".ui-panel-animate, .ui-panel-open, .ui-panel-position-left, .ui-panel-display-overlay").css("background-color",
"transparent");
Header
Changing all Header component backgrounds to transparent by using the CSS asset:
.ui-header {
	background-color: rgba(0,0,0,0) !important;
}
Using the Class Name property and CSS asset:
.headerClass {
	background-color: rgba(0,0,0,0) !important;
}
Using the component Name property and JavaScript code:
Apperyio("mobileheader").parent().css("background-color","transparent");Footer
Changing all Footer component backgrounds to transparent by using the CSS asset:
.ui-footer{
	background-color: rgba(0,0,0,0) !important;
}
Using the Class Name property and CSS asset:
.footerClass{
	background-image: rgba(0,0,0,0) !important;
}
Using the component Name property and JavaScript code:
Apperyio("mobilefooter").css("background-color","transparent");Adding Image Background To Header Or Footer
You can also use your own images as a header/footer, or both:
Create new > Theme, name it and copy the code of the theme you want to make changes to into the space provided.
- Upload the images you’d like to insert using the Add image button on the custom theme page.
- Position the code for header/footer and add CSS rules for .ui-bar-swatch letter.
NoteYou can use classes .ui-bar<swatch-letter> to apply different images for each swatch.
Be careful with the position and size of the background to make sure it’s good for all devices.
Now you can test the application to see the changes in your app.
Embedding A YouTube Video
Appery.io now has built-in Youtube and Vimeo components. YouTube doesn’t give you a URL that can be played via an HTML5 video element. Therefore, the only option is to embed the video, for example: Run the following code on page load:
$('<iframe />', {
  name: 'myFrame',
  id: 'myFrame',
  class: 'youtube-player" type="text/html',
  width: '300',
  height: '250',
  src: 'https://www.youtube.com/embed/TIA6KNfpRqs'
}).appendTo('body');
Working with YouTube Player API for iframe
The following code examples shows how to work with YouTube Player API for iframe.
//Where "youtube_" is your youtube component name.
var youtubeComponent = Apperyio("youtube_component");
var player = youtubeComponent.data("youtube-player-object");
//player.playVideo();
player.cueVideoById("BwmXjr5bmjw");
Learn more about this API.
Navigating After X-Seconds
This is useful if you want to create a splash-like first page and then navigate to another page. Create a page and place an image on it. Add a page load event and run this JavaScript:
setTimeout("Appery.navigateTo('page_name',{})" , 1000);page_name would be the page name to which you navigate. 1000 means that the navigation will happen after 1 second.
Custom AJAX Status
To change the default loader that appears when AJAX calls perform, create a CSS file with the following code:
.ui-loader .ui-icon-loading {
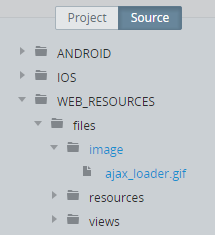
    background-image: url("../../../../files/image/ajax_loader.gif") !important;
    background-position: 0 0;
    background-color: transparent;
}
Change the image URL according to your uploaded loader. In the example above, the image is placed via the following path:
Manipulating Appery.io Components With JQuery
You can use the Appery.io JavaScript API to easily access any Appery.io component, and manipulate it with the jQuery Mobile API.
Let’s build the example that dynamically adds items to a list using JavaScript.
- Select the header and change the Caption label at the top to Using Selectors.
- Drag and drop a Label component, and change its text to Colors.
- Add a List component (in Properties, change its name to colorsList).
- Drag and drop an Input component (rename it to newColorField, remove the Text, and enter New Color Name… to the Placeholder).
- Drag and drop a Button component below the label, and change its text to Add.
Select the button first, go to the Events tab (right panel), and add a click event with the action Run Custom JavaScript.
Paste the following code:
var list = Apperyio("colorsList");
var newColor = Apperyio("newColorField").val();
list.append("<li><a>" + newColor + "</a></li>").listview("refresh");
Apperyio("newColorField").val("");
Notice the way you address Appery.io components using the Appery.io API. To receive the reference to the component with a particular name (for use in JavaScript), use the following API call:
Apperyio("<component name>")In the code above you put a reference for a list component into a list variable, and put the value of the text input into a newColor variable using the jQuery val function. Then, use the append method to add a new item with the text you’ve entered in the field, and refresh the view using the list view method. Finally, clear the value of the input field.
Form Validation
This blog post explains how to do validation with JavaScript in the app.
Launching the Native Dialer Or SMS App
It’s possible to open the dialer window with a pre-populated phone number. This method works for both native apps and mobile web. To do this, use the following code:
Android
To launch the dialer on an Android device:
window.open('tel:+37529XXXXXXX', '_system');iOS
To launch the dialer on an iOS device:
window.open('tel:+37529XXXXXXX', '_system')It is also possible to open an SMS typing window with pre-populated text messages and a phone number:
window.open('sms:+14155551212?body=Hello from Appery.io!', '_system');
Helpful InformationTo learn more about how to use mobile telephone links in mobile web and hybrid apps click here.
Dialer and SMS Native AppsThe code examples above use standard JavaScript to launch native apps. Keep in mind that different platform may support these protocols differently and in some cases might not work at all.
Hiding And Showing A Spinner
Use the following code to hide a spinner:
hideSpinner();Use the following to display a spinner:
showSpinner();Validating an Email Field with Regular Expression
Read: How to Validate an Email Field in a jQuery Mobile App Using a Regular Expression
Updated 7 months ago
