Ionic Chatbot App using Dialogflow
How to build the sample Ionic Chatbot app using Appery.io and Dialogflow.
Introduction
This sample app provides step by step instructions that will walk you through the process of creating the Chatbot application with the help of Dialogflow.
Important Note!Our Chatbot sample app contains ready to use services and the UI that makes it easy to use.
Note that you will need to set up your Dialogflow account and build a simple Agent to make it work.
The tutorial is divided into two parts: setting up the Dialogflow service (part 1) and creating the Ionic app with defining its logic (part 2). You should complete the first part first and then move to the second part.
Target Audience
This sample app tutorial is intended for advanced developers who have prior experience building apps with Appery.io.
But as an alternative, you can also try this app by creating it from the backup:
- Download the app backup file.
- Click Create new app.
- Type in the app name.
- Click From backup and select the project backup file on your drive.
- Click Create:

Dialogflow Setup
Dialogflow is a natural language processing (NLP) platform that provides services for chatbots and makes it easy to create and integrate a conversational user interface into your mobile app, web app, chatbot, etc.
Dialogflow can analyze different types of input from your customers (including text and audio input) and respond to them.
Dialogflow compares the user's phrase in a natural language with some "non-linguistic" value (called intent) and then provides an answer. In addition, it can hold the context of the dialog, so that the following phrase can take into account the conversation context.
For more information about the platform, visit the Dialogflow docs page.
Creating Agent
Let's start with setting up a Dialogflow account and building a simple Agent. You can think of an Agent as a call center operator that can react to user phrases and fulfill user intentions.
- First, go to the Dialogflow website and sign up using your Google account.
- After logging in, in the left menu, click Create Agent:

Creating new Dialogflow Agent
-
Enter your agent name, for example, ApperyAgent.
-
In the GOOGLE PROJECT section, select Create new Google project or choose any other existing Google project for import. Make sure that billing is enabled for the project.

Creating new Google project
- Click the Create button in the top-right corner.
That's it, now our agent is created and ready for further adjustments:

Setting up Agent
Default Intents
Intents are used to handle specific requests from a user. In simple terms, if a user says A, we want our Chatbot to respond with B.
Under the Intents tab, you should see two default intents:
- The Default Welcome Intent, that is called in case a user begins a conversation with your agent. It should welcome a user and return a response that helps him understand what the agent does or what to say to start a conversation.
- The Default Fallback Intent, that is called when the agent cannot recognize user input.

Intents tab
Let's modify the Default Welcome Intent responses to provide more information about the Chatbot. Change default responses text as shown in the screenshot below and click the SAVE button on the top panel:

Modifying Default Welcome Intent responses
Creating Custom Intent
Our app should be able to correctly respond to "What is the weather in ..." requests for any city.
So, we need a way to get the city name from a user's message, get the weather forecast, and then send a reply to this user. To do it, let's use a custom intent.
-
To create an intent, in the left menu, click the + button located next to the Intents button.
Let's name our new intent Detect location. -
Also, to provide some sample user phrases, click the ADD TRAINING PHRASES button under the Training phrases tab:

Creating custom intent
- Type some training phrases here as shown in the screenshot and save:

Adding training phrases
As you can see, the city names are highlighted in yellow.
To do this manually, highlight the city names with the cursor and mark it as @sys.geo-city — the predefined entity for cities.
- Then, scroll down to the Action and parameters tab and make geo-city a required parameter:

Action and parameters tab
- Add the default response under the Responses tab. The Chatbot will use it in case, for some reason, the weather for the city cannot be received:

Default response
- And, finally, we need to enable fulfillment for this intent. It is needed for the integration of our custom backend script that receives a city from the intent and returns weather information. Scroll down to the Fulfillment tab, click the ENABLE FULFILLMENT button and enable the toggle next to Enable webhook call for this intent, as shown below:
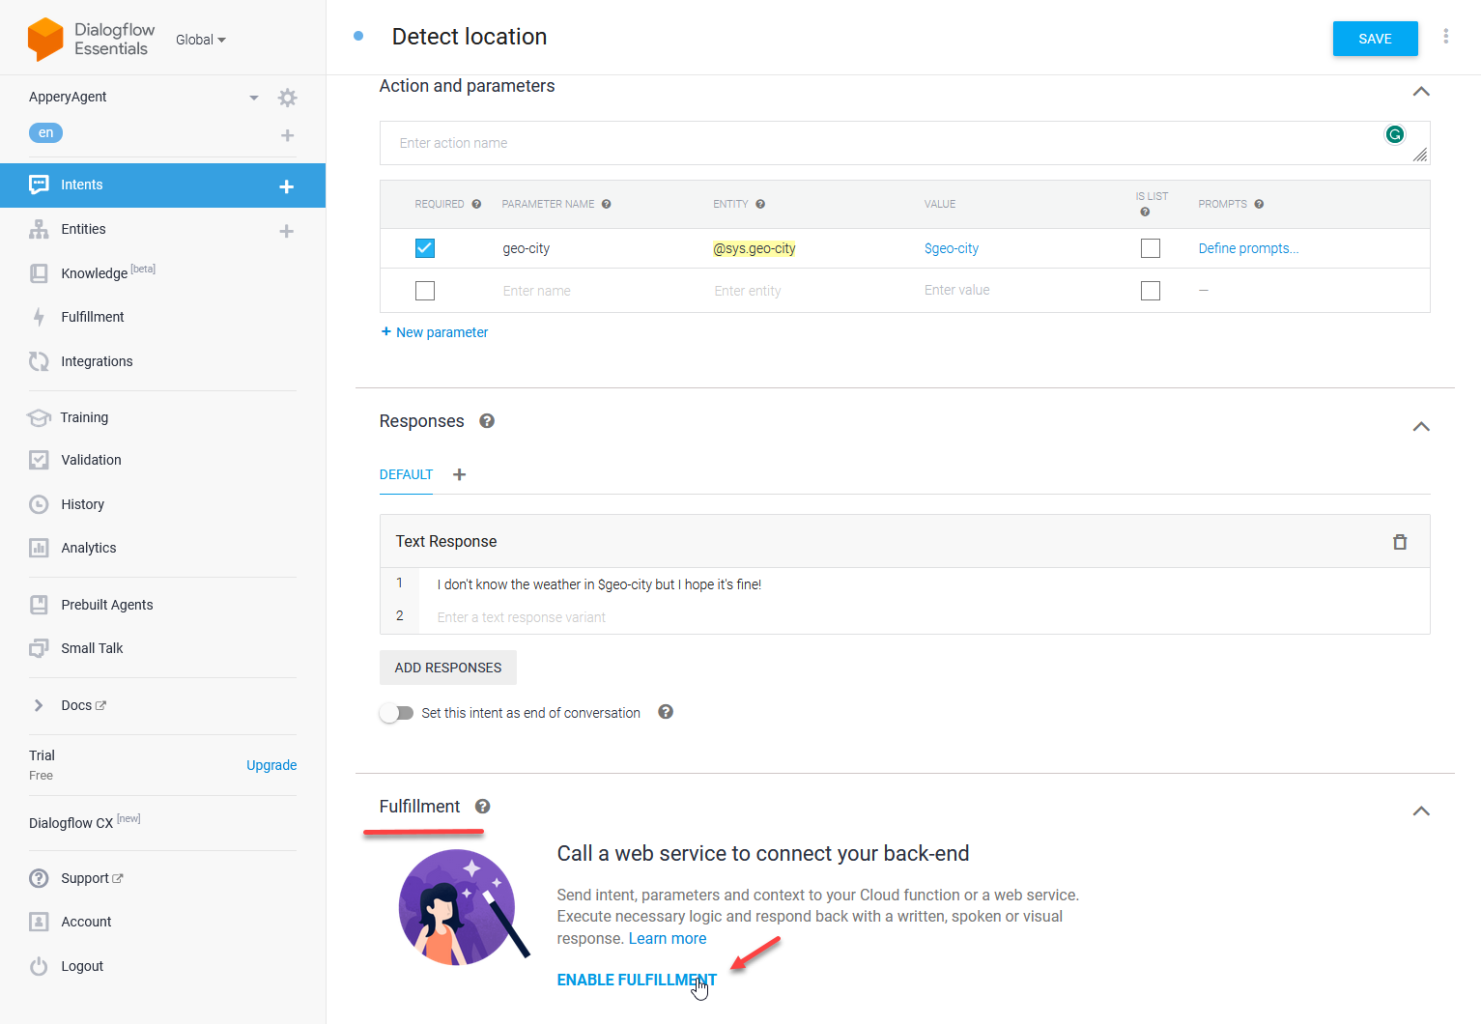
Enabling fulfillment
Don't forget to save all the changes by clicking the SAVE button at the page top.
Getting Google Service Account Key
To use a chatbot created outside the Google Cloud Console, we need to get a service key. It will give us the possibility to make authorized API calls.
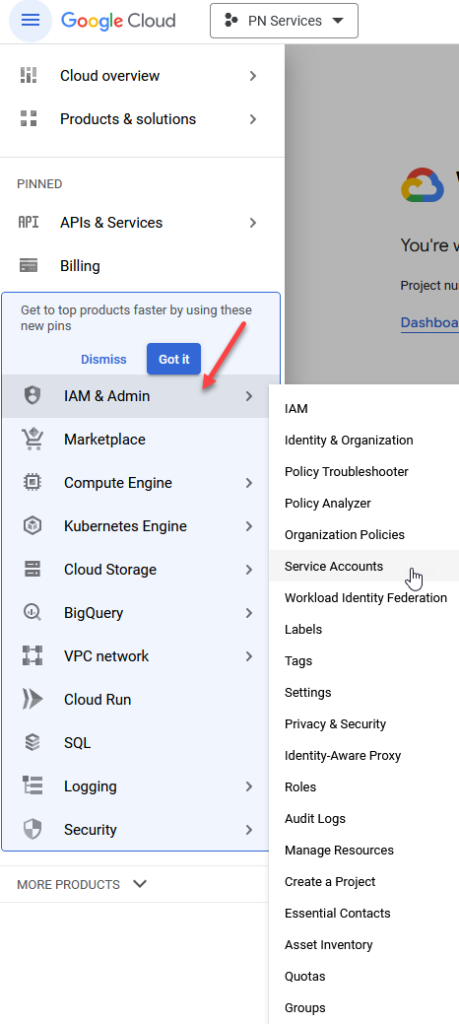
- Go to the Google Console.
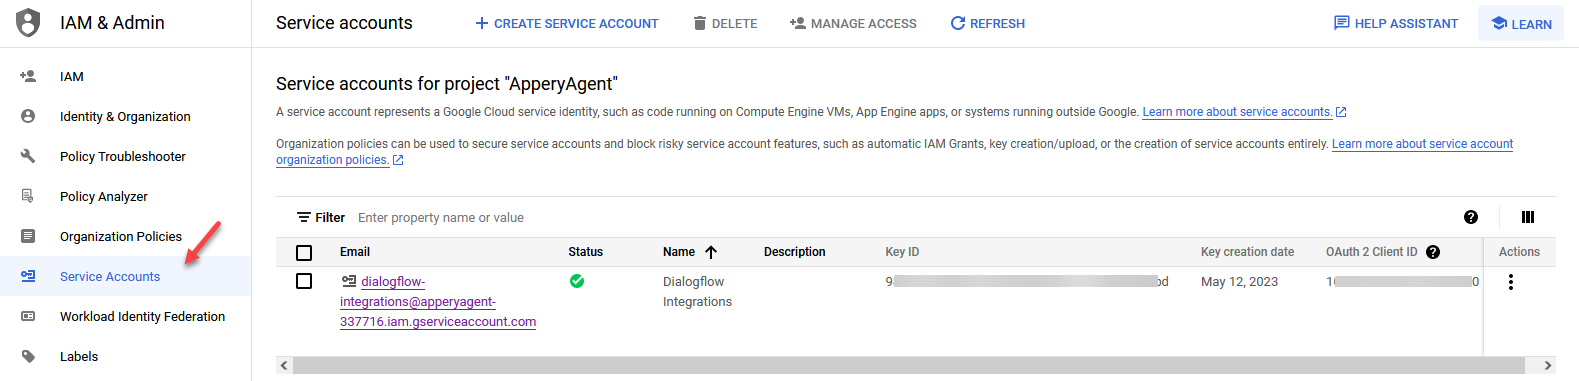
- From the left menu, select IAM & admin > Service accounts:
Service accounts
- In the header, select ApperyAgent, the project created by Dialogflow:
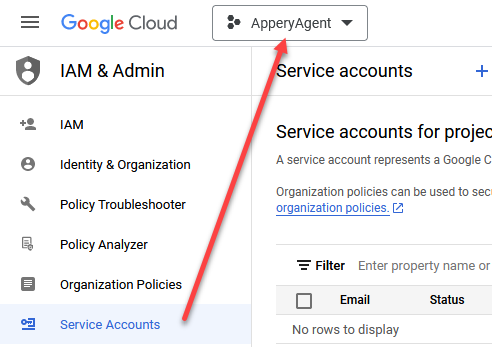
Selecting ApperyAgent project
- Click +CREATE NEW SERVICE ACCOUNT to generate the Dialogflow Integrations account for ApperyAgent project; click "CREATE AND CONTINUE":

- In the generated account, open the Service account details section, open the KEYS tab, and click the ADD KEY button to create a new service account key:
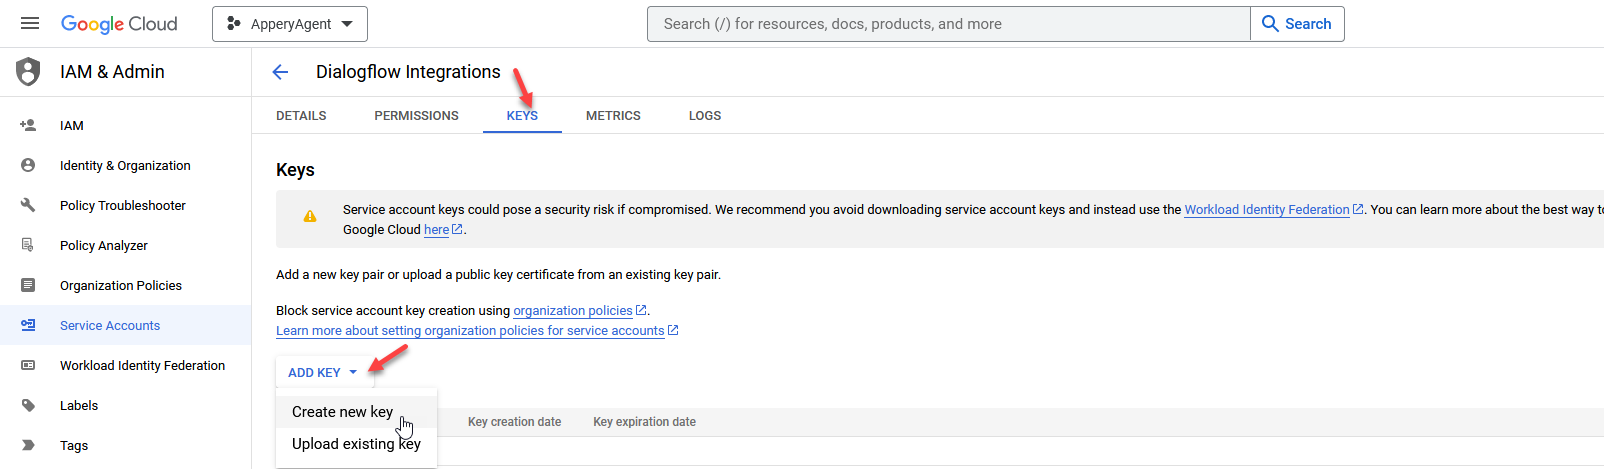
- In the pop-up window, choose JSON key type and click CREATE:

Creating a key
- Save the generated JSON file on your local machine.
If you go to the Service accounts tab now, you should see all service account details:
- Next, we have to provide permission to our service account which we’ve created in the steps above. Go to the IAM tab and click the GRANT ACCESS button at the top section:
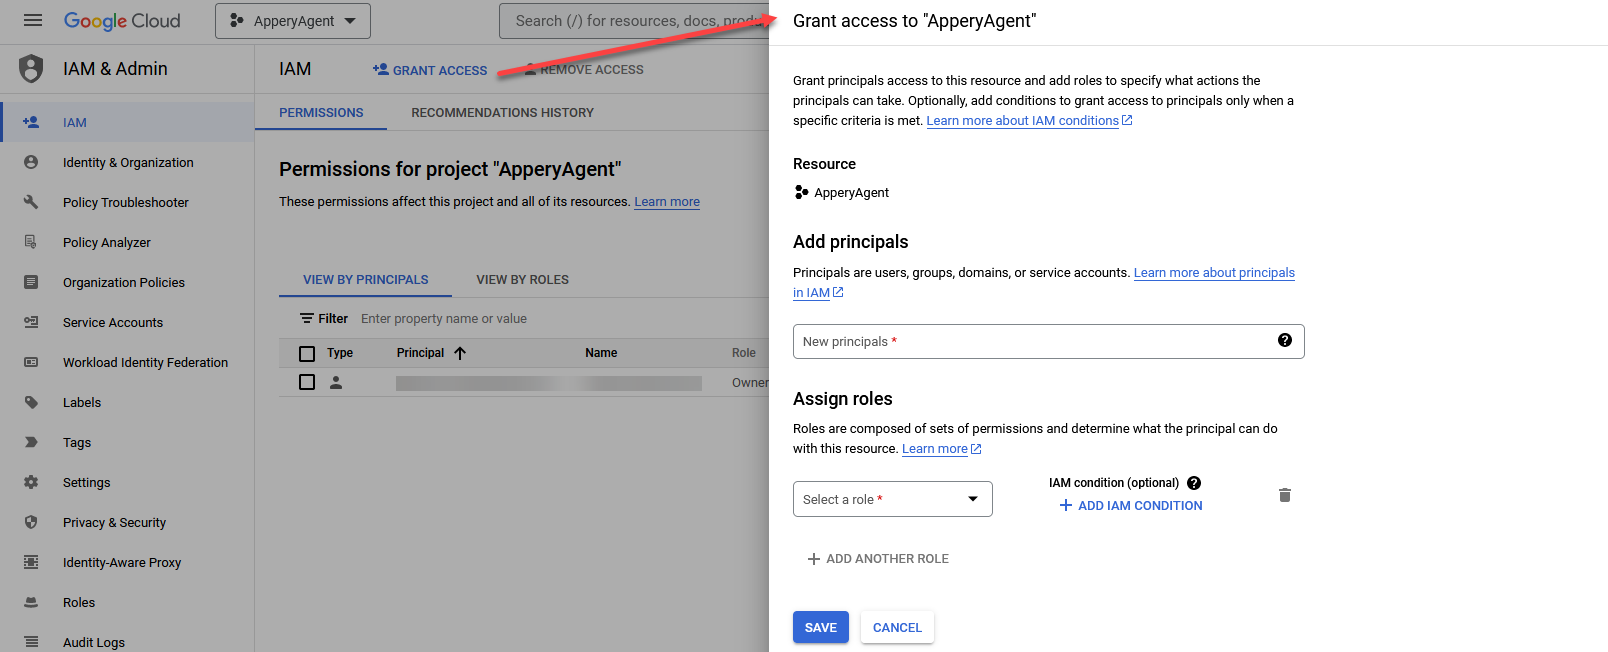
- In the opened window, click the New principals field and search for the email of the service account e.g. (in our tutorial according to the screenshots, the email looks like
dialogflow-integration@wa******.com). Add this email address to the field. - Search for Dialogflow API Admin using filters in the Role section. Select the role from the list:
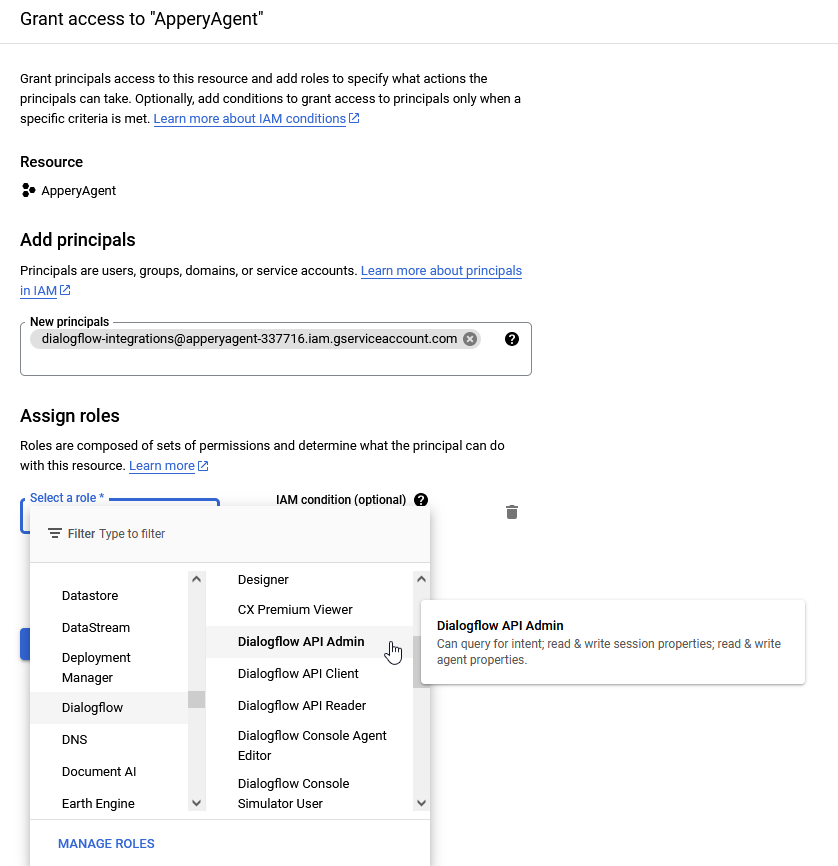
- Click the Save button.
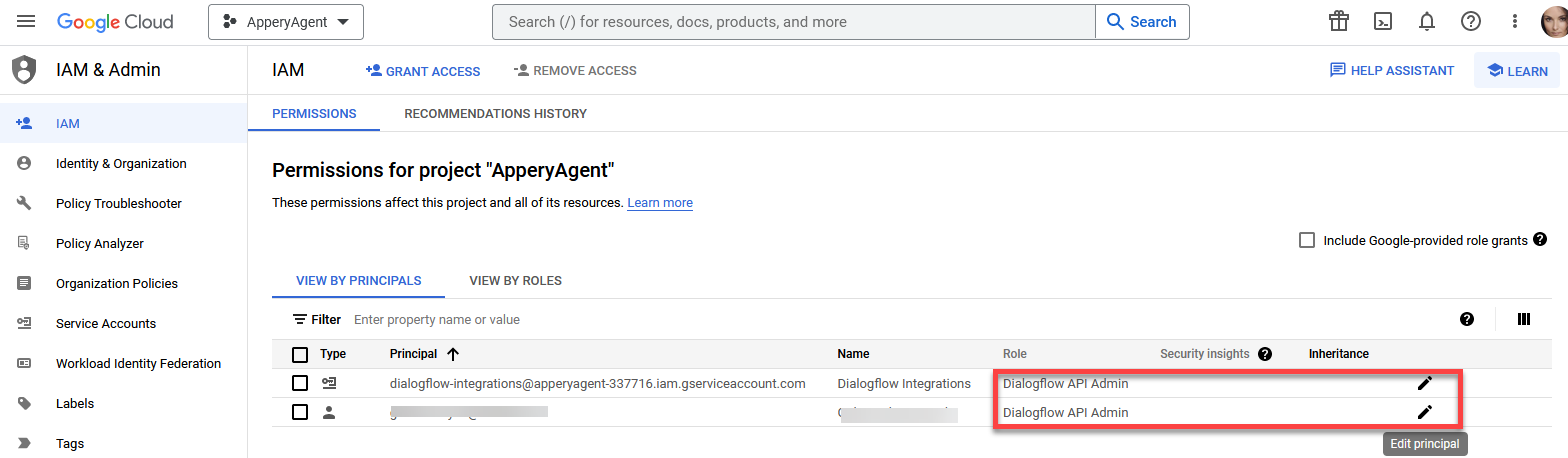
Important Note!All the project principals should be assigned the Dialogflow API Admin role. So. if you find that under the project PERMISSIONS tab the project owner principal has only the owner permissions, please edit this record and add the Dialogflow API Admin role in the same way it was done for
dialogflow-integration@wa******.comin step 11.
Loading Required Dependency
Interacting with the Dialogflow API V2 requires authentication by service account.
To authenticate using generated keys of our service account, we will use the JSON Web Token approach to generate an access token. For more details, please see this Wiki article.
Creating Appery.io Server Code Libraries
Creating Dialogflow Settings Library
- Login to Appery.io and go to the Server Code section.
- Click the Create library button in the Libraries section.
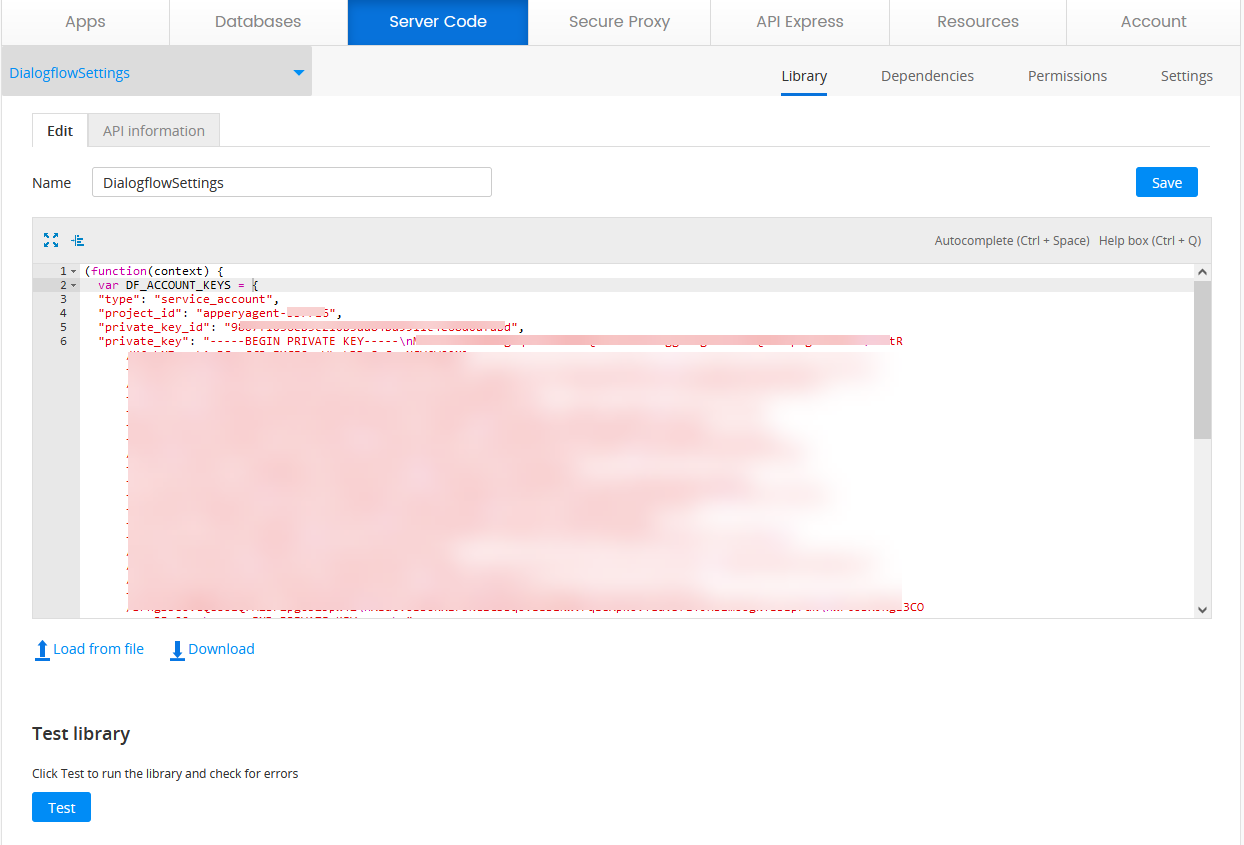
- Enter DialogflowSettings for the name of a new script.
- In the code editor, paste the following JavaScript code:
(function(context) {
  var DF_ACCOUNT_KEYS = {
    // Data from the JSON file generated from your Google Service Account
    // https://dialogflow.com/docs/reference/v2-auth-setup#getting_the_service_account_key
  };

  // Base url of Dialogflow V2 API
  var DF_API_BASE_URL = "https://dialogflow.googleapis.com/v2";

  // Session alias
  var DF_SESSION_ALIAS = "/projects/" + DF_ACCOUNT_KEYS.project_id + "/agent/sessions/"+ new Date().getTime();

  context.DF_API_BASE_URL = DF_API_BASE_URL;
  context.DF_ACCOUNT_KEYS = DF_ACCOUNT_KEYS;
  context.DF_SESSION_ALIAS = DF_SESSION_ALIAS;

  return context;
})(this);- Note that the DF_ACCOUNT_KEYS constant value should be replaced by the JSON which was downloaded to your drive in steps 7-8 of the Getting Google service account keys part of this tutorial (any text editor can be used to view this data):

Dialogflow Settings
- Click Save and then test for syntax errors in your code by clicking the Test button at the bottom of the script editor:
Creating Dialogflow Auth Manager Library
- From the Appery.io dashboard Server Code section, click Back to list and then create another library by clicking the Create library button in the Libraries section:

- Enter DialogflowAuthManager for its name.
- In the code editor, paste the following JavaScript code:
(function(context) {
  var manager = {
    getAccessToken: generateToken
  };

  var b64map = "ABCDEFGHIJKLMNOPQRSTUVWXYZabcdefghijklmnopqrstuvwxyz0123456789+/";
  var b64pad = "=";

  function generateToken() {
    // Header
    const header = {
      alg: 'RS256',
      typ: 'JWT',
      kid: DF_ACCOUNT_KEYS.private_key_id
    };

    // Payload
    const payload = {
      iss: DF_ACCOUNT_KEYS.client_email,
      sub: DF_ACCOUNT_KEYS.client_email,
      iat: getTime('now'),
      exp: getTime('now + 1hour'),
      aud: 'https://dialogflow.googleapis.com/google.cloud.dialogflow.v2.Sessions'
    };

    const stringHeader = JSON.stringify(header);
    const stringPayload = JSON.stringify(payload);
    const uHeader = utf8tob64u(stringHeader);
    const uPayload = utf8tob64u(stringPayload);
    const uSignatureInput = uHeader + "." + uPayload;
    const token = Apperyio.Crypto.sign(uSignatureInput, DF_ACCOUNT_KEYS.private_key, 'SHA256withRSA');

    return uSignatureInput + '.' + token;
  }

  function utf8tob64u(s) {
    return hextob64u(uricmptohex(encodeURIComponentAll(s)));
  }

  function hextob64u(s) {
    if (s.length % 2 == 1) s = "0" + s;
    return b64tob64u(hex2b64(s));
  }

  function uricmptohex(s) {
    return s.replace(/%/g, "");
  }

  function encodeURIComponentAll(u8) {
    var s = encodeURIComponent(u8);
    var s2 = "";
    for (var i = 0; i < s.length; i++) {
      if (s[i] == "%") {
        s2 = s2 + s.substr(i, 3);
        i = i + 2;
      } else {
        s2 = s2 + "%" + stohex(s[i]);
      }
    }
    return s2;
  }

  function stohex(s) {
    return BAtohex(stoBA(s));
  }

  function BAtohex(a) {
    var s = "";
    for (var i = 0; i < a.length; i++) {
      var hex1 = a[i].toString(16);
      if (hex1.length == 1) hex1 = "0" + hex1;
      s = s + hex1;
    }
    return s;
  }

  function stoBA(s) {
    var a = new Array();
    for (var i = 0; i < s.length; i++) {
      a[i] = s.charCodeAt(i);
    }
    return a;
  }

  function b64tob64u(s) {
    s = s.replace(/\=/g, "");
    s = s.replace(/\+/g, "-");
    s = s.replace(/\//g, "_");
    return s;
  }

  function hex2b64(h) {
    var i;
    var c;
    var ret = "";
    for (i = 0; i + 3 <= h.length; i += 3) {
      c = parseInt(h.substring(i, i + 3), 16);
      ret += b64map.charAt(c >> 6) + b64map.charAt(c & 63);
    }
    if (i + 1 == h.length) {
      c = parseInt(h.substring(i, i + 1), 16);
      ret += b64map.charAt(c << 2);
    } else if (i + 2 == h.length) {
      c = parseInt(h.substring(i, i + 2), 16);
      ret += b64map.charAt(c >> 2) + b64map.charAt((c & 3) << 4);
    }
    if (b64pad)
      while ((ret.length & 3) > 0) ret += b64pad;
    return ret;
  }

  function getTime(s) {
    if (s == "now") {
      return getNow();
    } else if (s == "now + 1hour") {
      return getNow() + 60 * 60;
    } else if (s == "now + 1day") {
      return getNow() + 60 * 60 * 24;
    } else if (s == "now + 1month") {
      return getNow() + 60 * 60 * 24 * 30;
    } else if (s == "now + 1year") {
      return getNow() + 60 * 60 * 24 * 365;
    } else if (s.match(/^[0-9]+$/)) {
      return parseInt(s);
    }
    throw "unsupported format: " + s;
  }

  function getNow() {
    var d = ~~(new Date() / 1000);
    return d;
  }

  context.dfManager = manager;
})(this);- Switch to the Dependencies tab and select the DialogflowSettings script:

Dependencies tab
- Then, go back to the Library tab and click Save.
- Finally, test your code for syntax errors by clicking the Test button at the bottom of the script editor:

Testing library
Creating Appery.io Server Code for Integration with Dialogflow API V2
- From the Appery.io dashboard Server Code section, click Back to list and then create another library by clicking the Create script button in the Scripts section.
- Enter getChatBotResponse for its name. Then, click Save.
- Open the Dependencies tab and select the following scripts:

Selecting scripts
- Go back to the Script tab. Paste the following JavaScript code in the code editor:
try {
  var requestBody = JSON.parse(request.body());
  var message = requestBody.message || '';
  var language = 'en-US';
  var token = dfManager.getAccessToken();

  if (token) {
    var apiResult = getDetectIntentResult(token, message, language);
    response.success(apiResult, 'application/json');
  } else {
    throw new Error('Failed to retrieve access token.');
  }
} catch (err) {
  response.error({
    'error': err.message,
    'message': 'serverCode getChatBotResponse execution failed.'
  }, 400);
}

function getDetectIntentResult(token, message, language) {
  var apiResponse = detectIntent(token, message, language);

  if (apiResponse.status === 200) {
    return JSON.parse(apiResponse.body);
  } else {
    throw new Error('Failed to request Dialogflow API.');
  }
}

function detectIntent(token, message, language) {
  var url = DF_API_BASE_URL + DF_SESSION_ALIAS + ':detectIntent';

  var XHRResponse = XHR2.send('POST', url, {
    'headers': {
      'Authorization': 'Bearer ' + token,
      'Content-type': 'application/json'
    },
    'body': {
      'queryInput': {
        'text': {
          'text': message,
          'languageCode': language
        }
      }
    }
  });

  return XHRResponse;
}- Click the Save button to save all the changes.
Testing Integration
Let’s test integration with Dialogflow API V2.
- Go to the Script parameters tab.
- Select POST as the request method and JSON for MIME type.
- Type the following request body:
{
  "message": "Hello"
}
Request body
- Go to the Run tab and click Save and run. You will see the response from Dialogflow:

Test response
Getting Weather Information
We will use OpenWeatherMap API to get the current weather forecast based on a user query.
You can go through our Ionic Weather App tutorial to get familiar with the API usage.
In fact, all you need for our Chatbot app is just to get the OpenWeatherMap API key and paste it into a sample script.
Obtaining OpenWeatherMap API Key
- Sign up for a free account to get an API key for using the service.
- Get your OpenWeatherMap API key:

Creating Appery.io Server Code for Integration with OpenWeatherMap
- From the Appery.io dashboard go to the Server Code section.
- Click the Create script button.
- Enter getWeather for the name of a new script.
- From your OpenWeatherMap dashboard, copy the API key you have just created.
- In the code editor, enter the following JavaScript code. Don't forget to replace the value of the OPENWEATHER_API_KEY constant with the just copied OpenWeatherMap API key:
try {
  const requestBody = JSON.parse(request.body());
  const city = requestBody.queryResult.parameters['geo-city'];

  const apiResult = getWeatherInfo(city);
  const weather = generateMessage(apiResult);

  response.success({ 'fulfillmentText': weather }, "application/json");
} catch (err) {
  response.error({
    'error': err.message,
    'message': 'serverCode getWeather execution failed.'
  }, 400);
}

function getWeatherInfo(city) {
  const OPENWEATHER_API_KEY = 'YOUR_OPENWEATHERMAP_API_KEY';
  const url = 'https://api.openweathermap.org/data/2.5/weather?q=' + city + '&units=metric&appid=' + OPENWEATHER_API_KEY;

  const XHRResponse = XHR2.send('GET', url);
  return XHRResponse;
}

function generateMessage(res) {
  const text = JSON.parse(res.body);
  return `It is ${text.main.temp}° and ${text.weather[0].description} in ${text.name}!`;
}- Click the Save button:

- Finally, open the API information tab and copy the script service URL to the clipboard by clicking the button next to it. We'll need this URL in the next step:

Script service URL
Enabling Dialogflow Fulfillment
Now, the final touch. We need to add the getWeather script URL to the Dialogflow settings. Then Dialogflow will be able to send a request to our service with information about the matched intent.
- Go to the Dialogflow console. In the left menu, click the Fulfillment button:

Enabling Dialogflow fulfillment
- Enable Webhook and insert the getWeather script service URL into the URL field:

Enabling Webhook
- Save all the changes by clicking the SAVE button at the bottom of the page.
Now, we can test our Chatbot — right here, on the right side of the Dialogflow console. Let's ask it about the weather in some city:

Testing Chatbot
Congratulations, now we are ready to build the app UI!
App UI
Creating New App
- From the Apps tab, click Create new app.
- Select Ionic >Ionic Blank for the application type, enter Ionic Chatbot App for the app name, and click Create:

Creating new app
Creating App UI
- Every new app comes with a default Screen1 page. Let's open it: Pages > Screen1.
- Go to the CODE panel of the Screen1 page. Here, create two variables:
messagesof Any type with[]default value;myMessageof String type with no default value:

Defining variables
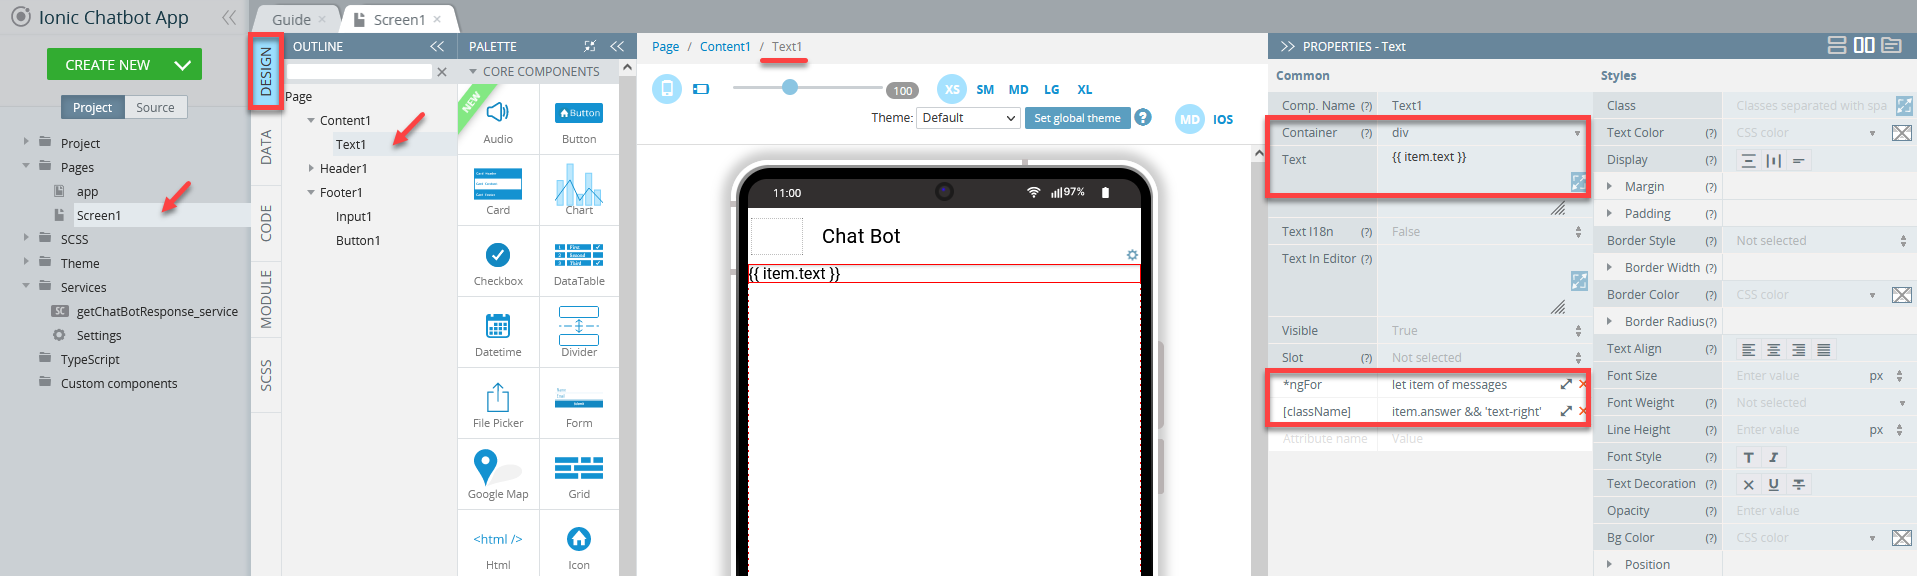
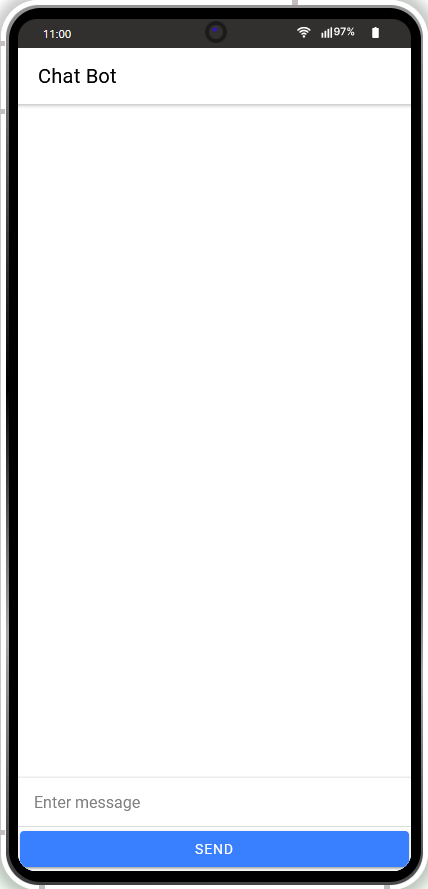
- Now, navigate to the page DESIGN panel. Select the Toolbar title element and set its Text property value to Chat Bot.
- Drop the Text component to the Content area. Change its Container property to div and replace the default Text property with {{ item.text }}.
- Also, add a couple of other properties:
- *ngFor with let item of messages value;
- [className] with item.answer && 'text-right' value:
- Drop the Input component from the PALETTE to the page footer.
- In the PROPERTIES panel of the created input, remove the label text. Update its Placeholder value to Enter message. Also, add a new property [(ngModel)] with myMessage value:
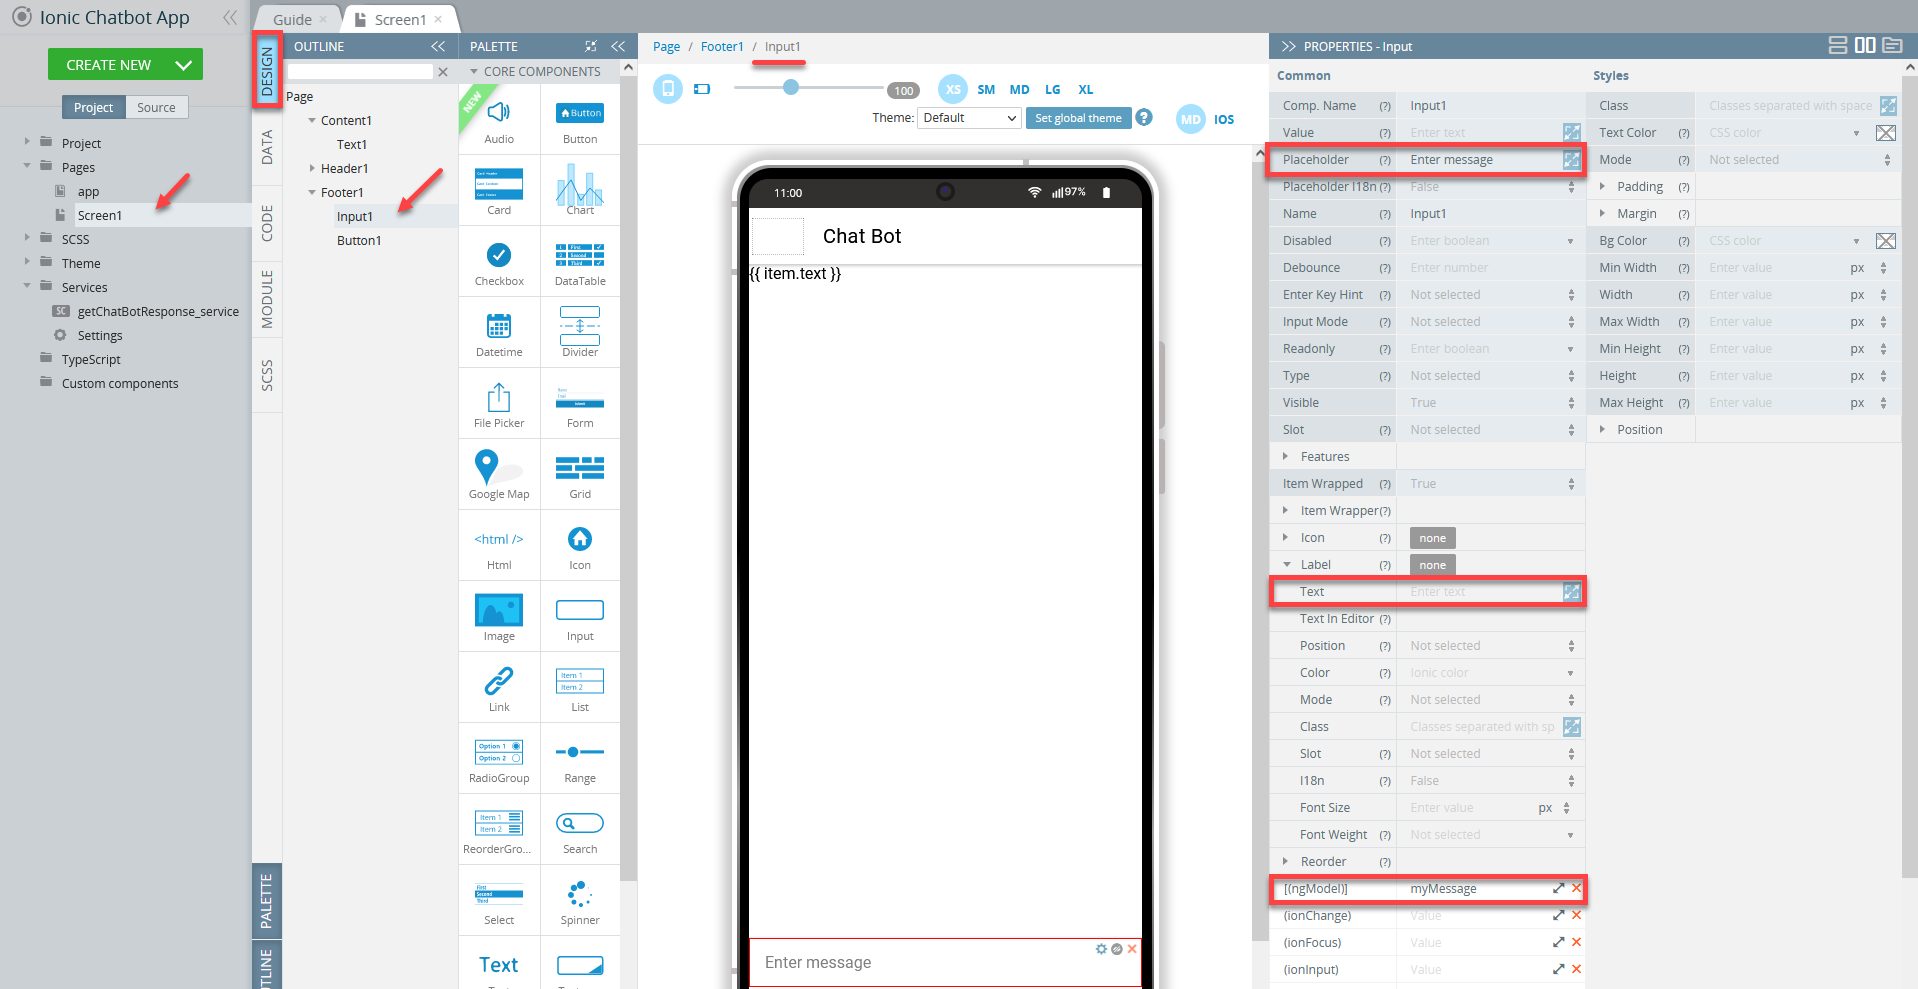
Defining Input element
- Now, drop the Button component to the page footer. Change the button's Text property to Send and then switch to the Styles tab to set the Expand property of the button to block:
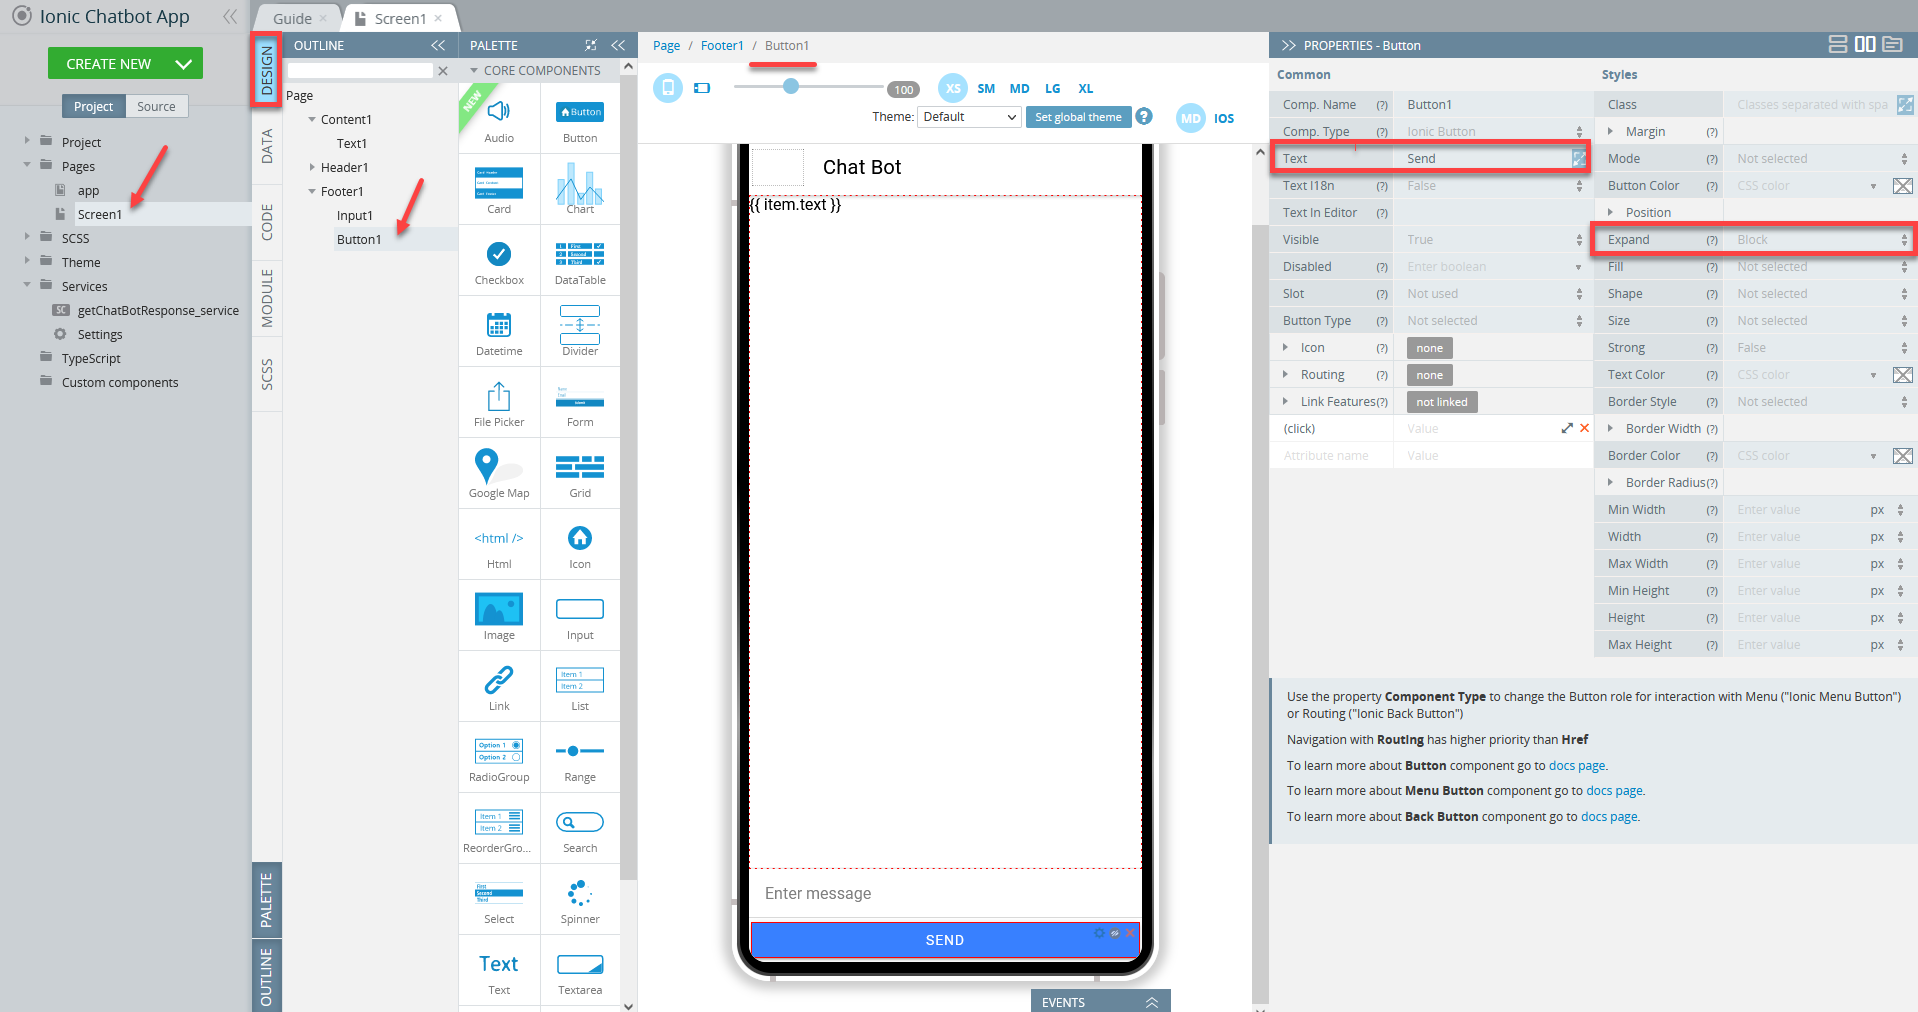
Defining Button element
- We can also apply some styling to the app. Open the SCSS panel panel and enter the following styles:
.text-right {
  text-align: right;
  margin: 8px 0;
}
The resulting app UI is very simple:
Resulting app UI
App Logic
Now, let’s import the service that we created in the first part of our tutorial.
- Click the CREATE NEW button.
- Select Server Code Service from the drop-down menu.
- In the drop-down, choose the previously created getChatBotResponse server code script. Click the Import selected service button:

Importing Server code service
- On the left side, expand the Services folder and select getChatBotResponse_service.
- Go to the Test service tab and click Test on the right.
- After testing is finished, you should get a response in the body section. Click the Import as response button to generate a mapping response model (you should see the "Service response created successfully." message):

Importing response
- Go to the service Response tab. You will see that a response model for the mapping has been generated. Make sure the fulfillmentMessages property exists in the response model:

- Let’s update the request model of the service. Open its Settings tab and, in the Request Content Type field, select JSON:

Request Content Type
- Go to the Request tab of the service. Add a new parameter and name it message:

Adding Request parameter
- Now, we should define the newly created service on the Screen1 page. Open the DATA panel of the Screen1 page. For Add datasource, select Service and choose getChatBotResponse_service that we have just created. Click the Add button and change the name of the created instance to getChatBotResponse:

Adding datasource
- Now, let’s update the execution flow. Click the Add button of the Before send event and select Run TypeScript. As you can see, the EVENTS tab has been expanded from the bottom. Type the following script there:
this.messages.push({text: this.myMessage});- Click the Save button. Also, let’s change the script execution order so that the script starts before the mapping. Drag the Run TypeScript block to the left, before the mapping block, as shown below:

Setting up script execution order
- Then, we should create a mapping for the request. Click the Mapping block in the Before send section. The visual mapping window will appear.
- Create the relation as shown in the screenshot below and click the Save & Replace button to save the Before send mapping:

Before send mapping
- Let’s proceed with mapping. Click the Mapping block in the Success section. Then. you'll need to create a relation between the response and the Screen1 page. Create it as shown n the screenshot:

Success mapping
- Click the green TS button next to the messages variable. In the transformation editor that opens select Custom TS for Choose transformation:

- In the editor, add the following code:
let oldMessages = this.messages;
const answer = {
  text: value[0].text.text[0],
  answer: true
};

oldMessages.push(answer);
this.myMessage = '';

return oldMessages;- Click the Save button (the TS button should turn blue) and then the Save & Replace button.
- To finish, we should execute the getChatBotResponse service. Go to the DESIGN panel of the Screen1 page, select the Button1 component, and expand the EVENTS tab from the bottom.
- Both the Button1 component and the Click event are selected by default. Choose Invoke service in the ACTION drop-down. In the Datasource drop-down, choose getChatBotResponse. Then click the Save button in the EVENTS tab:

Send button click event
- Finally, click the SAVE button in the top menu to save all the app changes.
App Testing
Now we are ready to test our app. In the top menu, select the TEST button and choose the testing option you prefer.
When the app starts in the web browser, just say Hi bot and ask the Chatbot about the weather in some city:

Testing the app
Testing on Device
Now, when your app version is ready, you might also like to test it on the device.
Appery.io Tester AppA great option to quickly test the app on the device is to use our Appery.io Tester app.
The app is free and available for both iOS and Android.
You can check out this page to learn more about using the Appery.io Tester app.
Updated about 1 year ago