jQM Barcode Scanner App
Using the Barcode scanner component in a jQuery Mobile app
Important Note!The option of creating new apps with thejQuery Mobile framework was removed but we still support the projects that were created with it earlier.
What are we going to build?
In this tutorial, we’ll build an app that starts the barcode scanner on a button click. After the scan is complete, we’ll display the scan information.
Ionic Barcode Scanner Plug-in and Ionic QR Code Generator TutorialsPlease check out our Ionic Barcode Scanner Plug-in Sample App page where we demonstrate how you can build an app that uses Appery.io BarcodeScanner plug-in in your Ionic app.
You can also check our step-by-step Ionic QR Code Generator App that explains how to create an Ionic app that can generate a QR Code on a button click.
Apache Cordova (PhoneGap)
Apache Cordova (PhoneGap) is automatically included when you create a new project in Appery.io. The barcode scanner component used in Appery.io is based on this plugin.
Creating a new app
Create a new app in the Appery.io app builder. From the Apps page, enter an app name (use any name) and click Create. You’ll see a start page.
Creating the UI
The UI will be simple:

Barcode scanner page.
There is a Button, and three Labels below the button.
The Theme/Swatch used is: Pastel/B.
Note: To change your theme and swatch settings, you need to import the available default themes via plug-ins first: CREATE NEW > From Plugin (or click “Add more Themes” from App settings > General), which will open a window with the list of available themes for importing. Select the theme(s) to import and click Import selected plugins.
Then, in the builder, go to Project > App Settings. You’ll be able to change your theme and swatch via the drop-down menus.
Adding Barcode Scanner Service
To add the barcode scanner service:
- From Projects view; CREATE NEW > Service > Barcode, and click Create Service. The service will be listed under the Services folder.
- If you open the service, you’ll see that everything has been preconfigured.
Now we need to bind the service to the page.
Binding Barcode Service
- Open the DATA tab.
- For datasource, select Device > BarcodeService > Add. The mobilebarcode1 service will be added to the page.
- The service has no Before send parameters defined, so, click Mapping for Success event.
- Since we want to display the picture we just took, create the following mapping, and save:
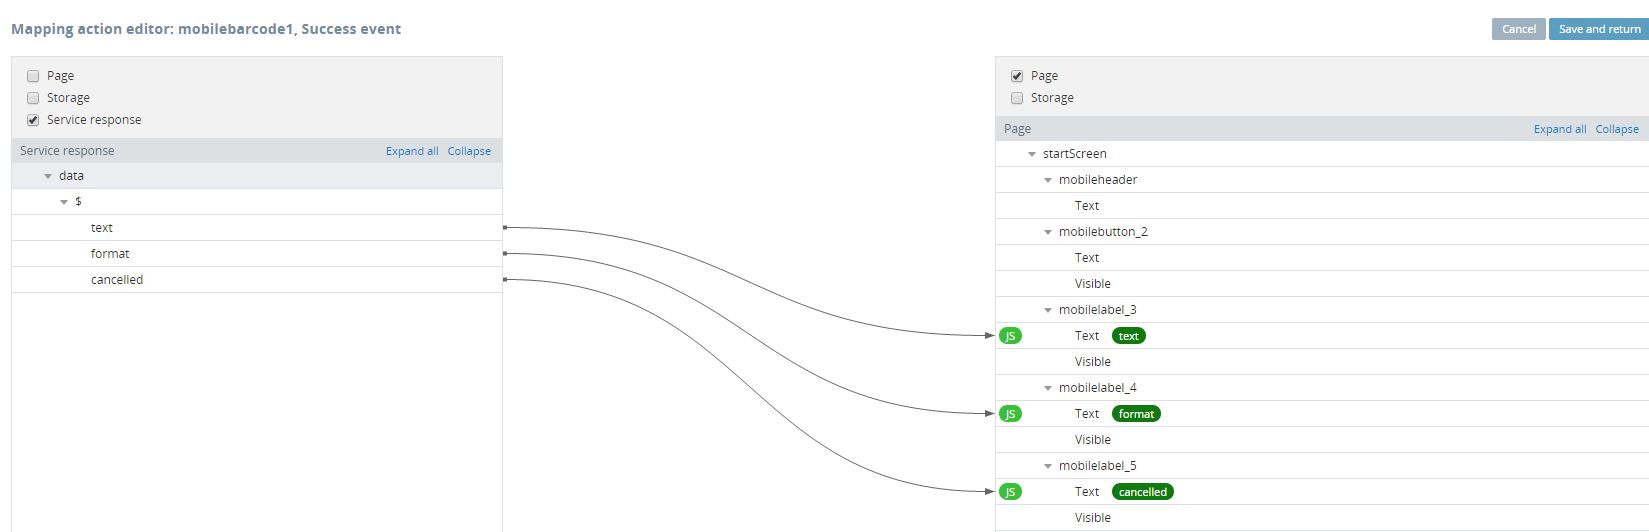
Where:
- text – is the text representation of the barcode data.
- format – is the type of barcode detected.
- cancelled – is whether or not the user cancelled the scan.
Launching Barcode Scanner
- Open the DESIGN tab.
- Select the button, open the EVENTS tab, and add the following event:
mobilebuttonX > Click > Invoke service > mobilebarcode1, and click Save.
Error Handling
To handle scan errors, go to the DATA tab, select mobilebarcode1 for the component, and then select a fail event. Don’t forget to save.
Testing App
Since we’re invoking a native component (barcode scanner), the app has to be tested as a hybrid app, or installed on the device. Testing won’t work in the browser.
The final app will look like:

The example above shows the scanning of a QR code that returned a URL.
Once you get the value from the scan, you can save it in local storage and use it as an input to another API to get more information about the scan. For example, if you scanned a product barcode number, you could then invoke a service to get information about the product.
Android
Testing on Android is relatively simple since you can install any app rather quickly on your device. Build the Android binary and install it on your device. When the build is completed, you will see a QR code. Scanning the QR code will download the app to your phone. You can also email the app to your device.
iOS
Build the app and install it on your device.
Important NotePlease, note that to export the app for iOS, you will need to upload your distribution certificate and provisioning profile obtained from Apple under the App settings > iOS binary tab.
You can check this document in case you need help with exporting your application for iOS. Here, you will find the document that explains how to manage certificates in Appery.io.
More Help Resources
More help resources are in our blog, our YouTube channel, and other web sites.
Updated 9 months ago