Ionic 5 Calendar Plug-in App
Ionic 5 sample app using Cordova Calendar plug-in
Introduction
In this sample app tutorial, we will show how to build an Ionic 5 app, where you can use Cordova Calendar plug-in. This plug-in allows viewing and adding events to the mobile device calendar.
Important noticeBe informed that when creating an app with Cordova plugins it is important that the needed plug-in be imported before you proceed with the app UI or create it from a backup.
Part 1. Importing Plug-in
Before the plug-in can be used in your app, you need to import it to Appery.io. You can find the plug-in sources by following this GitHub link: Cordova Calendar plugin GitHub page.
Information on how the plug-in can be imported to Appery.io can be found here:
Custom Cordova Plugins: Importing Cordova plugins from GitHub.

As soon as the plug-in is imported, we can proceed with creating the app.
Part 2. Creating App
Downloads and Resources
You can try the app yourself by creating from the backup. In this case, follow the steps:
- Download the app backup file.
- Click Create new app.
- Click the From backup tab and select the project backup file on your drive.
- Type in the app name.
- Click Create.

Creating App from Template
NEW: One-Click Template Installation!You can now enjoy the one-click-away option of installing the template app: simply click the button below and in a moment, your app is ready to start! There’s no need to go to the Create new app dialog or download the template backup with further installing it!
You can also create this app by using our Create new app dialog:
Creating New App
- From the Apps tab, click Create new app:
- Select Ionic 5 > Ionic 5 Blank as the application type, enter Calendar App for the app name, and click Create:

Creating a new app
Adding Dependencies
- Inside the app, navigate to Project > App Settings > Cordova plugins. Here, go to the Imported Cordova Plugins tab, enable the Calendar plug-in and click the SAVE button at the top:

- Now, switch to Project > App settings > Npm modules and add a new Dependency: @ionic-native/calendar of version ^5.32.1:

- Unfold the Pages folder and choose the app page.
- Click the MODULE tab of the app page. In the Imports section, type in import { Calendar } from '@ionic-native/calendar/ngx';

- Then, scroll down to the NgModule Settings > Providers section and type Calendar into the text field:

- Save the app changes by clicking the SAVE button.
Creating App UI
- Navigate to Pages >Screen1 and select the DESIGN panel.
- Now, under the PROPERTIES panel, set the Page Footer property to False.
- Then, select the ToolbarTitle1 component and change it's Text property to Yoga Class Schedule:

- Now, go to Screen1 CODE panel. Under the Custom includes section, add a dependency with { Calendar } for Name and @ionic-native/calendar/ngx for its Path:

- Then, scroll down and define some necessary variables:
- variable calendar of Calendar type. The Add DI checkbox should be checked.
- variable eventList of any type with [] default value.
With all the needed variables added, the CODE panel should look like this:

Initializing App with Default Data
As we are creating the list of sample events, let's create an auxiliary function to generate event dates.
- In the CODE > Functions section, create a new generateDate method. It should take 3 arguments: currentDate, days and hours, and should return the date that is calculated as current date + specified number of days + specified number of hours. In the code editor, type in the following code:
const MILLISECONDS_IN_HOUR = 3600000, HOURS_IN_DAY = 24;
const date = new Date();
const dateShift = (days * HOURS_IN_DAY + hours) * MILLISECONDS_IN_HOUR;

date.setTime(currentDate.getTime() + dateShift);
return date;
Creating generateDate method

Defining the method logic
Then, let's add some sample data. In our app, we'll show a list of events that can be added to the user calendar.
- To do it, create one more method with constructor name and type in the following code to initialize the eventList variable with some data. For generating dates, we'll get the current date and apply the previously created generateDate method:
const currDate = new Date();
this.eventList = [
{
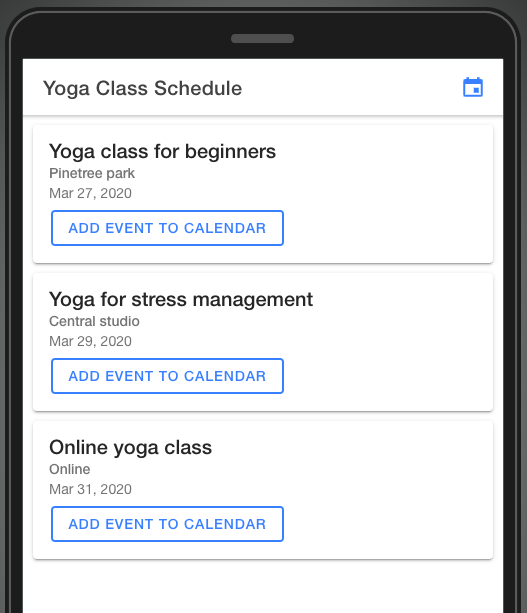
title: 'Yoga class for beginners',
location: 'Pinetree park',
message: 'Suitable for everyone',
startDate: this.generateDate(currDate, 1, 2),
endDate: this.generateDate(currDate, 1, 3),
}, {
title: 'Yoga for stress management',
location: 'Central studio',
message: 'For stress relief and overall health',
startDate: this.generateDate(currDate, 3, 0),
endDate: this.generateDate(currDate, 3, 1),
}, {
title: 'Online yoga class',
location: 'Online',
message: 'Bringing the studio to your own home',
startDate: this.generateDate(currDate, 5, 3),
endDate: this.generateDate(currDate, 5, 4),
}
];Then, let's switch to the DESIGN panel and proceed with creating the app UI.
- First, we need to create a button that will open the calendar app installed on your device. Drag & drop a Button component to the app Toolbar from the PALETTE on the left.
- Select the created Button component, then, under the PROPERTIES panel tab, set the Button Type property to Bar Button, the Slot property to End and empty the value of the Text property. Expand the Icon property, from the drop down, select primary for Color and set its Slot to Icon Only; then click the No icon button and select the calendar icon for Style:

- Expand the EVENTS tab from the bottom. For the Button1 component, select Click for event, for the action, select Run TypeScript , then enter the code below and save:
const currentDate = new Date();
this.calendar.openCalendar(currentDate);- Here is how it should look like:

It's time to set permissions now.
- Go to the App settings > Android permissions tab and set the following calendar permissions for the Android platform: READ_CALENDAR & WRITE_CALENDAR:

- Now, witch to the iOS keys tab and set calendar permission for the IOS platform. In the Additional keys section, add the NSCalendarsUsageDescription:

Creating Calendar Events
Now, we need to create a card for each event in the created list of yoga classes.
- Under the DESIGN panel, drag & drop a Card component to the screen. Under the PROPERTIES panel, add a new property with *ngFor name and let item of eventList value. This will create a card for each event in our events list.
- Inside the card, select the CardItemTitle1 component and set its Title Text property to {{item.title}}:

- Drag & drop a Button component to Card1 and set the following properties for it:
- Expand: Not selected
- Fill: Outline
- Text: Add event to calendar
- (click): addEvent(item):

- Then, drag & drop two Text components into Card1, placing them before the button.
- For the first text component, Text1, set the following properties:
- Container: ion-card-subtitle
- Text: {{item.location}}

- And for the second text component, Text2, set the same properties with the following values:
- Container: p
- Text: {{item.startDate | date}}

Save all the changes. Now the UI is ready and should look like this:
Let's go back to the CODE panel and finish defining the app logic.
- Here, we need to create one more function with addEvent for its name and ev for its argument. It will be executed when a user clicks the Add event to calendar button and will open the native calendar's event creation screen. So, in its code editor, type the following code:
let options = [ev.title, ev.location, ev.message, ev.startDate, ev.endDate];

this.calendar.createEventInteractively(...options).catch((error) => {
    console.log(error);
});
App Testing
Now, you're ready to test the app. Note that you need to test it on a device as the plug-in won’t work inside the browser. When the app starts, the plug-in will automatically ask for permissions.
Here's how the app should work. You can click the calendar icon in the toolbar to open the calendar app, or to click the Add event to calendar button for a specific event, as shown in the screenshots below:

App work on Android, Google calendar

App work on iOS, default Calendar app
Updated about 1 year ago