Sending
Sending Push Notifications to Android and iOS devices.
The Appery.io Push Notifications feature allows sending push messages to users who have installed your app.
Quickstart
Important Note!The option of creating new apps with the jQuery Mobile framework was removed but we still support the projects that were created with it earlier.
If you are new to sending Push Notifications, you may want to see our step-by-step tutorials:
- To learn how to use push notifications in Ionic apps, go to Ionic Quickstart Push Notifications Tutorial.
- JQM Quickstart Push Notifications Tutorial for jQuery Mobile projects.
- To learn more about sending Push Notifications to Android and iOS devices, take a look at Sending.
Note!Also, you can read more on Cordova PushPlugin here.
Enabling Push Notifications
Go to the Configuration page to learn how to enable and configure Push Notifications.
Want to know more?Please check out this document to learn how to add the predefined Push Notification services your Ionic mobile app.
Video: Configure Sending Push Notifications to Android mobile devicesYou can check this YouTube video tutorial that shows how to configure sending pushes to mobile devices running on Android:
Video: Configure Sending Push Notifications to iOS mobile devicesAlso, you can check this YouTube video tutorial that shows how to configure sending pushes to mobile devices running on iOS:
Video: Configure Sending Push Notifications from Server CodeYou can check this YouTube video tutorial that shows how to configure sending pushes to mobile devices from Server Code:
Sending Options
There are many options available to configure when it comes to sending push notifications. Initially, only the basic options are displayed; in order to view more, click the Advanced settings drop-down (to locate it, scroll the Send push notification tab down):

Expiration Date
Time stamp in UTC TZ, when the provider should stop resending a notification to an offline device.
Please, be aware that the Apple provider will not be trying to re-send a message if this parameter is not set.
Targeting (filtering) Devices
There are two options in terms of filtering: device filtering using a query builder and device filtering using a query string. The most convenient way to filter devices is to use the query builder: it supports all data types available in the database.
However, if the builder does not have sufficient flexibility for your queries, use the second option. It accepts all possible queries and can be used with any other collection.
When using the device filtering using a query builder, they are predefined sets of operations for each data type.
To send a notification using Channels, choose from the fields list. The includes option can specify the array of channels where the push notification must be sent.
The not includes operator ensures that push notifications are sent to all of the channels except those specified.
It is also possible to use the elemMatch operator to match more than one component within an array element. In this case, the array structure must be a little more complex.
To send the push notification to a certain device, use the deviceID field and the equals operator:
NoteSee how to retrieve the deviceID below.
The not equal operation ensures push notifications are sent to all of the devices except the one(s) specified.
You can also define the timeZone for your pushes; this is useful in combination with other filters.
Click the Add filter to add more specific filters.
After the filter parameters are set, the query string and the number of recipients are updated.
At the bottom of the page, you can find the number of recipients filtered by the query.
Custom Sound
Adding custom sounds in Ionic projects:
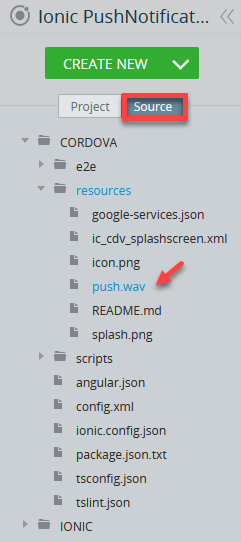
- In the Source tab, unfold the CORDOVA > resources folder and upload your custom sound, for example, the
push.wavfile (should be prepared beforehand):
- Enable the needed device type (here, iOS) and then select the parameter Custom sound file (with providing the file name) on the Send Push Notification tab:

- Scroll down, expand the Advanced settings section, and click the Add button for the Custom data parameter; provide ios_channel_id with a channel name, for example testchannel1:

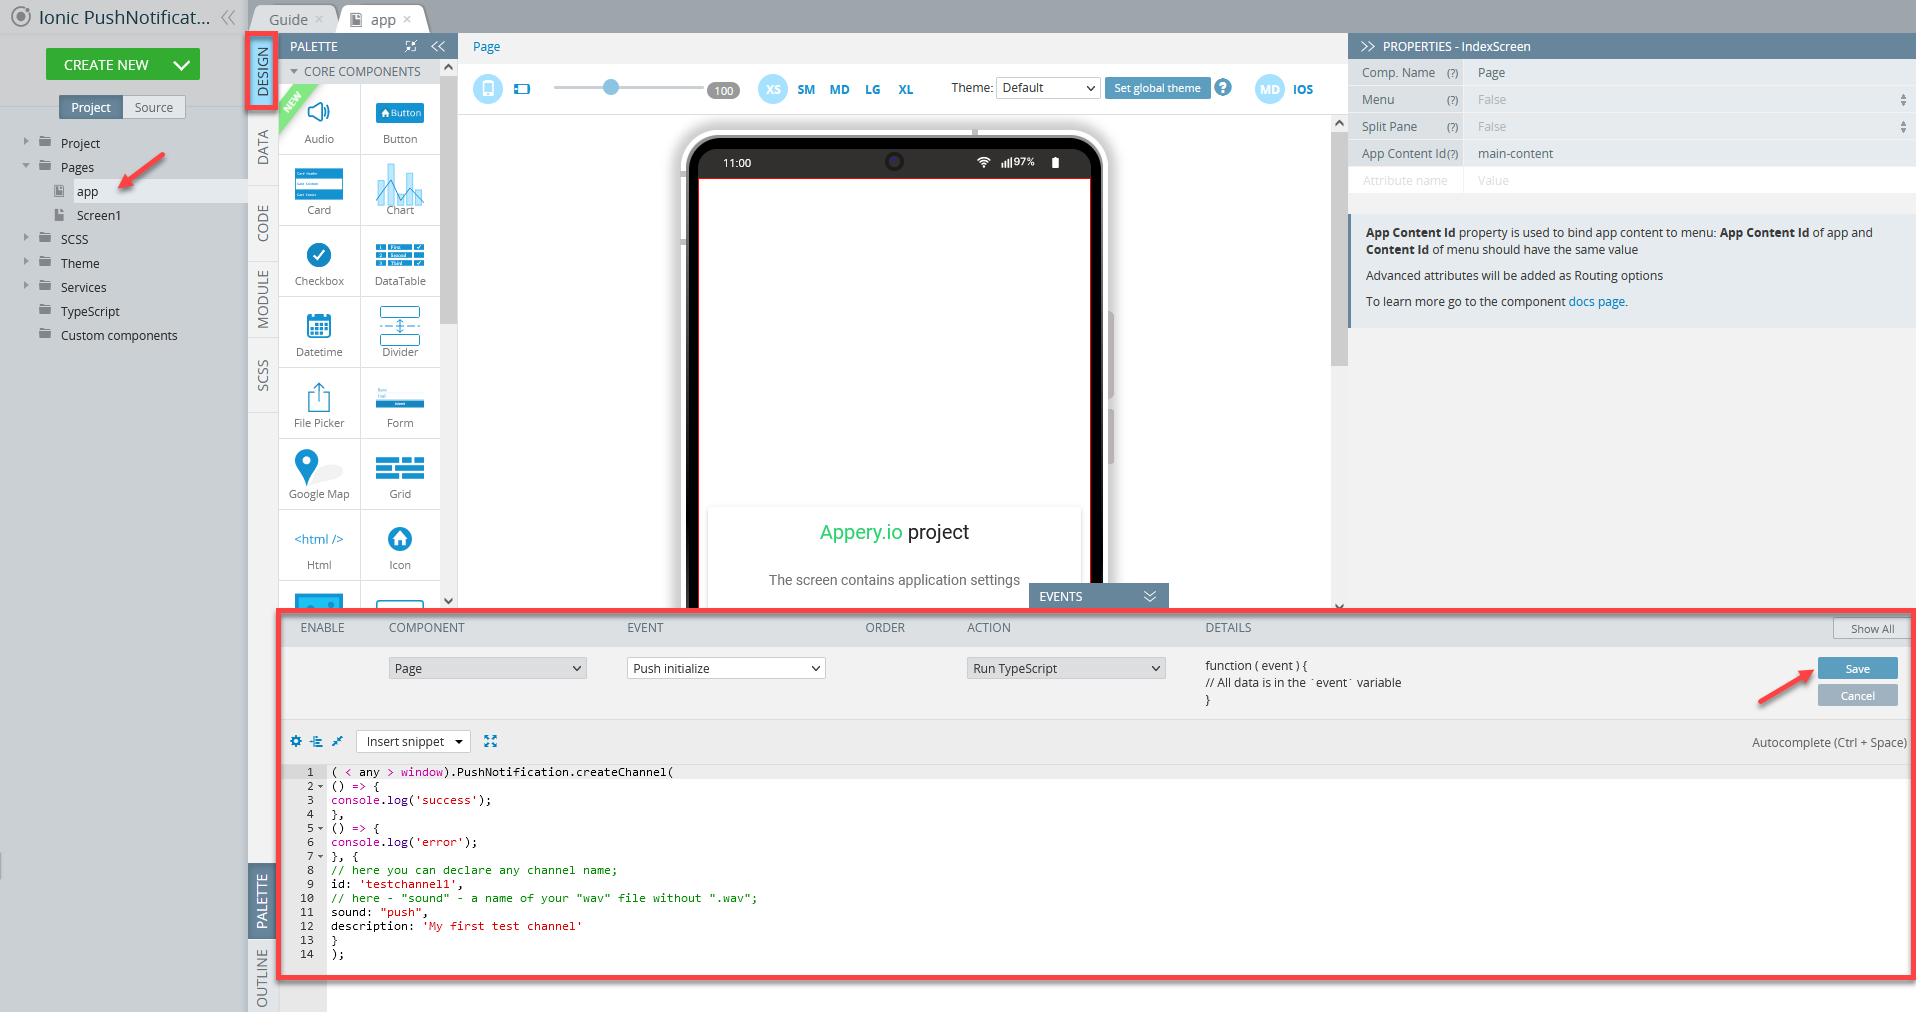
- Go to the app page and declare the Push initialize event with the following code (note the correct ios_channel_id name (here, testchannel1) and the file name without its extension:
mac):
( < any > window).PushNotification.createChannel(
() => {
console.log('success');
},
() => {
console.log('error');
}, {
// here you can declare any channel name;
id: 'testchannel1',
// here - "sound" - a name of your "wav" file without ".wav";
sound: "push",
description: 'My first test channel'
}
);
- Go back to the Project tab and add the link to your custom file to the
config.xmlfile into the Custom config section under the App Settings > Cordova config tab.
Select the needed tab under the Project > App settings tab (here, we use iOS) and paste the below line of code:
<resource-file src="resources/push.wav" target="app/src/main/res/raw/push.wav"/>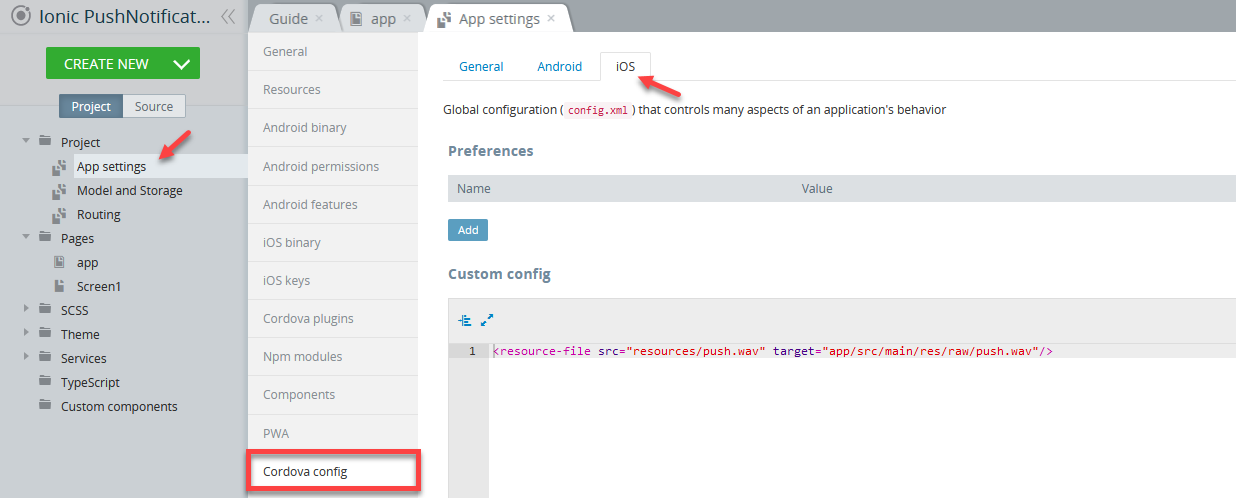
Note!Make sure you selected the needed tab under the Project > App settings tab: Android, and/or iOS.
Also, to make sure your receive custom sounds, check that your device is not put on Silent mode.
For example, you can check this link to learn how to enable the Ring mode for iOS devices.
Important Note!iOS only accepts
.wav,.aiff, and.cafextensions, whereas Android accepts.wav,.mp3and.oggextensions. Also, iOS has an additional length restriction of the audio clip: it should not exceed 30 seconds.
Adding Both Custom Sound and Custom Icon (Image) to ProjectIf you need to add to your project both custom sound and custom icon (image), make sure that in the
config.xml filethe information about the custom sound file is added before the information about custom icon (image).
Adding custom sounds for the Cordova version 5.1 (JQM) and 2.1 (Ionic1)
Important: Adding custom sounds for the latest Cordova version (5.3) (JQM)Note that the file path for the for the Android platform in a JQM app with latest Cordova version (5.3) should look like this:
<resource-file src="resources/mac.wav" target="app/src/main/res/raw/mac.wav"/>
For the iOS platform:
- the sound files are to be uploaded to the resources/ folder;
- to be included to the build, they have to be declared as
resource-fileinconfig.xml:
<resource-file src="resources/bird.wav" />within the section<platform name="ios"> - when sending the push message declare the custom sound file on the Push Settings tab this way:
bird.wav
For the Android platform:
- the sound files are to be uploaded to the resources/android/res folder;
- to be included in the build, they have to be declared as
resource-fileinconfig.xml:
<resource-file src="resources/android/res/sound.wav" target="app/src/main/res/raw/sound.wav" />within the section<platform name="android"> - in the app, the Push initialize event should be declared with the Channel as the following code:
PushNotification.createChannel(
        function(){
            alert('channel success');
        },
        function(){
            alert('channel error');
        },
        {
            // here you can declare any channel name;
            id: 'testchannel1',
            // here - "sound" - a name of your "wav" file without ".wav";
            sound: "sound",
            description: 'My first test channel'
        }
);document.addEventListener("pushinit", function() {
PushNotification.createChannel(
() => {
console.log('success');
},
() => {
console.log('error');
}, {
// here you can declare any channel name;
id: 'testchannel1',
// here - "sound" - a name of your "wav" file without ".wav";
sound: "sound1",
description: 'My first test channel'
}
);
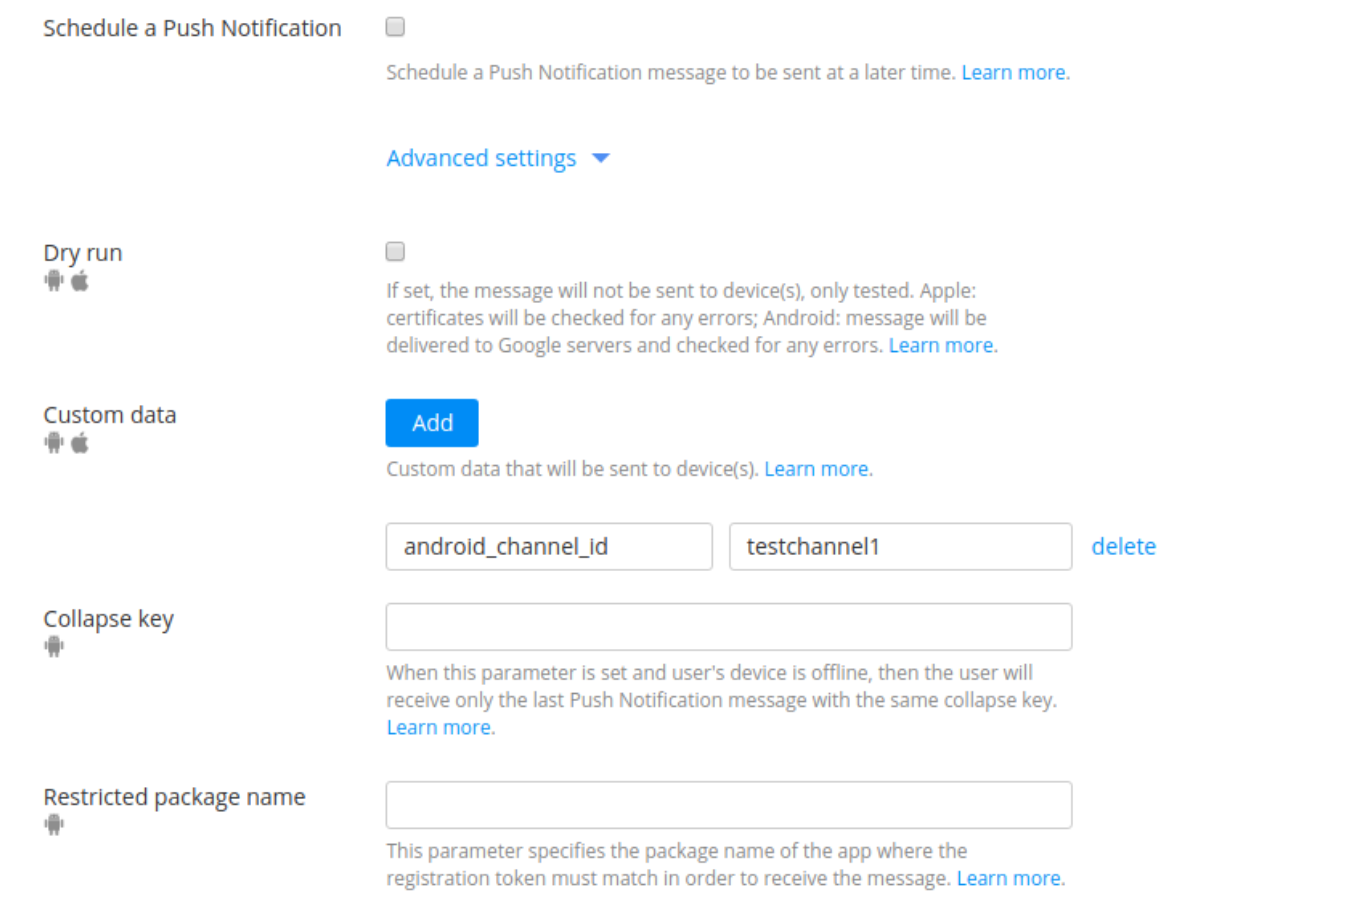
});- when sending the push message on the Push sending tab add
android_channel_idwith a channel name:
Adding custom sounds for Cordova versions older than 5.1 (JQM)
In the Sound file section, you can set your own sound file to play when a push arrives, if the value is not specified or is invalid, the default sound settings will be applied.
- To use a custom sound, you'll need to first open the app and make sure that you have the Push sound enabled in the global Settings under the Push Notifications tab.
- Next, you will need to upload the sound to the
source/CORDOVA/platforms/ios/platform_www/soundfilename.wav (for iOS)or
source/CORDOVA/platforms/android/res/raw/soundfilename.wav (for Android):
Note!There is no default raw folder in
source/CORDOVA/platforms/android/res/, so you will need to create it first.
- Now, go to the Push Notifications console and select Custom for the Sound file and enter the uploaded sound file name into the field provided.
- For iOS, you need to specify the path:
www/soundfilename.wav.
Note!Google updated the rules for Push custom sound for Android 8.0+ devices.
Sound configuration per Notification has been deprecated since Android 8.0 (API 26). The custom sound can be now set per Channel only.
More information can be found here.
Check Silent to disable the sound playback. Click here to read more about custom alerts.
Note!The silent mode works for iOS 8 and higher only.
Scheduling Push Notifications
You can also defer sending a push notification. To do this, check the Schedule a push box under the Message text area.
There are two ways to schedule push notifications:
- A push will be sent on the date and time defined according to the time zone of the device.
- A push will be sent to all devices in different time zones accordingly, all at the same time.
To schedule a push, follow these steps:
- Check the Schedule a push box.
- Select how you want the push to be sent. If you are sending the notification based on the device time zone, check the first option.
- This allows you to set a time when a push should be sent; UTC date is truncated to minutes.
If a push should be sent to all devices at once, check the second option. - Define the date and time when a push should be sent. Select the time zone for the second option and the time will be calculated automatically on the server.
- Click Schedule to apply.
Scheduled and history
All push notifications appear in the list in the Scheduled and history view.
Here, you can see the date and time information for pushes (depending on the time zone of the device), their badges, and statuses. The Status field may have one of the following values:
- Wait – the specified time has not arrived, no push has been sent.
- Process – some devices have received the push, but not all.
- Sent – a push has been sent to all devices.
- Error – a push hasn't been sent (with the information on the error).
Immediate push notifications (sent without scheduling) also appear in the list with the status sent.
You can delete any record on the list.
Click Filter scheduled to filter list items by status (sent, wait, error, process) and/or by date.
Changing Scheduled Notifications
Scheduled notifications with the status wait can be changed. To do that, click edit.
The Edit push dialog opens. There, you can change all the editable settings of a scheduled notification.
Dry Run
Check the box to run a quick test of your push notification setup. For Android devices, testing for errors is provided by GCM (Google Cloud Messaging) as a native support option. For iOS devices, it is run to check certificates for any errors.
No messages will be sent to a device.
Custom Data
User data that will be sent to a device. Click Add and enter the parameters and values you would like to send with your push.
NoteThere are no restrictions on the custom data to be sent in a push notification, but there is the 4kB restriction for the entire push notification set by Google and Apple. To check the approximate amount of data being sent with your push, go to the Push message data section below.
Click Delete to remove excess data.
Collapse Key
Android only.
In situations where there is a newer message that renders an older one, a related message is irrelevant to the client app, or GCM (Google Cloud Messaging) replaces the older message e.g. Send-to-Sync, or outdated notifications, set the Collapse key parameter to true, and if a user's device is offline, only the last push notification with the same collapse key will be displayed.
Restricted Package Name
Android only.
This parameter specifies a string containing the package name of the app. When it is set, messages are only sent to the registration IDs that match the package name, and the registration token must match in order to receive the message.
An application with any package ID can receive your messages as long as it knows your GCM Sender ID and as long as you use its GCM registration Id as a message recipient ID.
Icon
Android only.
The default push notification icon is your app icon but any custom icon can be set to be displayed in the push.
NoteBe informed that different icon's behavior may be observed on different devices depending on the Android mobile operating system in use.
Also, be aware that the app icon is a small two-dimensional representation of your app's identity and it appears in monochrome in the status bar. If your app sends a wide variety of notifications, you may replace this icon with a symbol that reflects the content type.
More details about Android notifications can be found here.
Setting custom icons in Ionic projects with libraries version 1.1
To set a custom push notification image:
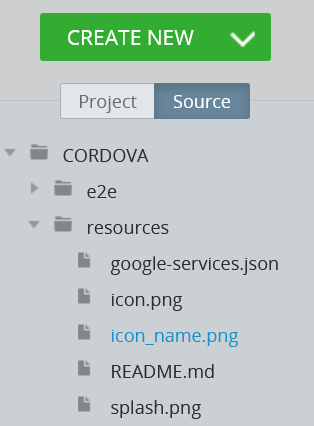
- In the Source tab, upload your custom image, for example,
icon_name.pnginto the resources folder:
- Set it as a push image under Push Notifications tab > Advanced setting > Icon at the bottom of the Send push notification tab.
You will need to unfold the Advanced settings folder first:

Note that the icon file name must contain only lower-case letters and digits [a-z 0-9 _ ].
- Open
scripts/config.xml. - Under the line
<platform name="android">, insert<resource-file src="resources/icon_name.png" target="app/src/main/drawable/icon_name.png"/>(When editing, you receive a warning about editing a file in the Source tab):

Adding both custom sound and custom icon (image) to projectIf you need to add to your project both custom sound and custom icon (image), make sure that in the
config.xml filethe information about the custom sound file is added before the information about custom icon (image).
Important note!Be informed that configuring the
config.xmlfile is the final step and is not to be followed by any other configuration modifications! If this condition is not observed, sending push notifications with custom images will fail!
Setting custom icons in Ionic projects with libraries version 1.0
- In the Source tab, upload your custom image, for example,
icon_name.pnginto the CORDOVA/resources/android/ folder and set it as a push image under Advanced settings > Icon at the bottom of the Send push notification tab. Note that the icon file name must contain only lower-case letters and digits [a-z 0-9 _ ]. - Open
CORDOVA/scripts/config.xml. - Under the line
<platform name="android">, insert<resource-file src="resources/android/icon_name.png" target="app/src/main/res/drawable/icon_name.png"/>(When editing, you receive a warning about editing a file in the Source tab):

Important note!An icon file name must contain only lower-case letters and digits [a-z 0-9 _ ].
Setting custom icons in JQM projects with libraries version 5.1
- Upload your custom image, for example,
icon_name.pngicon into the corresponding folder in the Source tab: CORDOVA/resources/android/ and set it as a push image. - An icon file name must contain only lower-case letters and digits [a-z 0-9 _ ].
- Open
CORDOVA/config.xml. - Under the line
<platform name="android">, insert<resource-file src="resources/android/icon_name.png" target="app/src/main/res/drawable/icon_name.png"/>(When editing, you receive a warning about editing a file in the Source tab):

- Open Push Notifications tab > Advanced setting > Icon and insert in the field
icon_name.
NoteRead more about icon sizes and supporting multiple screens here.
Use Cases to be Aware of:
- For Android 6.0 or above, a white square sign appears in the status – this is a material design requirement from Google. To avoid this, the icon needs to use transparent pixels.
- Choose to display Icons or Images in the apps using Android 5.0 or lower – they cannot be used in combination.
Setting custom icons in JQM projects with libraries version 5.0
- Upload your custom image, for example,
icon_name.pngicon into the corresponding Source/CORDOVA/platforms/android/res/drawable/ folder to set it as a push image. If there is no drawable folder, simply create one. - An icon file name must contain only lowercase letters and digits [a-z 0-9_ ].
- In the Source tab, open the
WEB_RESOURCES > app > startScreen.jsfile. (When editing, you receive a warning about editing a file in the Source tab). - Find the PushNotification.init function and add the icon property with the 'icon' value.
Icon Color
Android only.
The background color of a push notification Icon is supported on devices with Android 5.0 and higher. Click on the square in the corresponding field to get to the color palette.
NoteColor is set in #rrggbb format.
Image
Android only.
An image can be shown as a large icon for Android notifications (appearing in the upper right corner).
Adding Custom Images
A custom image can be set to be displayed in the push.
To set a custom push notification image, follow the steps similar to what needs to be taken for adding custom icons.
You can check this section for instructions on how to add custom icons for different project types (and different libraries).
Important note!The only difference is that the image_name will need to be inserted for the Push Notifications tab > Advanced setting > Image field (instead of Icon):
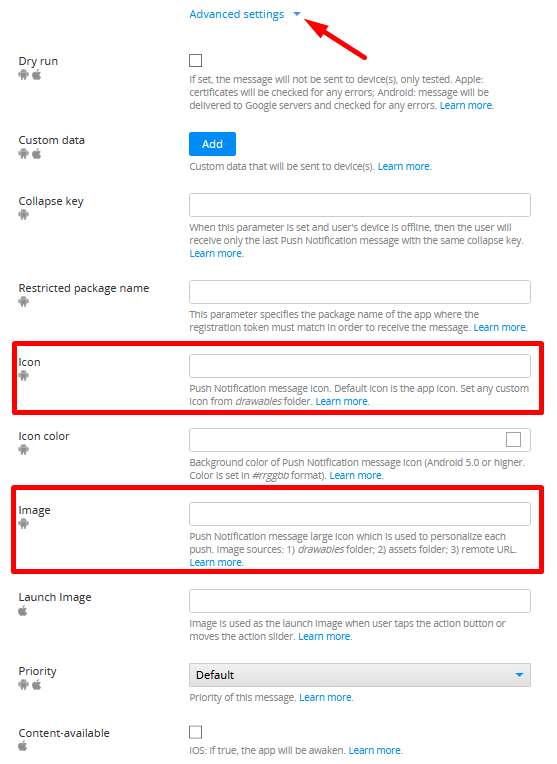
Note that the image file name must contain only lower-case letters and digits [a-z 0-9 _ ].
Launch Image
iOS only.
The image is launched on a device when a user taps an action button or moves the action slider.
Priority
Selecting the message priority when sending pushes: Default, Normal, or High.
- Normal (interpreted as 5 for iOS and normal for Android) will attempt to deliver the notification at a time that conserves device battery power.
- High (interpreted as 10 for iOS and high for Android) will attempt to deliver the notification immediately (or immediately after it was scheduled).
Setting this parameter to Default (or null in the REST request) will stipulate the default server behavior according to the service policy (for iOS – 10, for Android – normal).
NoteMore information on setting the message priority for Android OS can be found here.
Go here to learn more about Apple Push Notification service (APNs).
Content-available
iOS only.
Tick the check box to enable the message content, then set the value to 1 to awaken the app.
Action buttons
Android only.
To specify titles for your push action buttons and icons, click Add, then enter the corresponding names.
The list of objects to represent buttons that will be shown below the notification.
- title – the specified button title;
- icon – the image to be displayed on the left side of the text. You can read here or here about how to upload custom images;
- callback – the global function of the app. Push object will be sent as an argument.
Push Message Data
In this section, you can see the approximate amount of data being sent with your push. Appery.io doesn't set any limits for sending pushes, however, there is the 4kB restriction set by Google and Apple. So, monitoring push message data is needed to make sure that you do not exceed the allowed amount.
Push Notifications Settings
In the Settings view, you can:
- Find and reset the Push API Key;
- Switch the database to link your project to another database;
- Turn the push notification sound on or off;
- Specify to show or not show the alert;
- Specify the Badge (iOS only);
- Specify Android OS and iOS settings, including the iOS push certificate uploading:

Push Notifications Statistics
On the push notifications Statistics tab, you can see your sending statistics:

Working With Channels
In the predefined Devices collection, there is a Channels column. It has an Array type and can contain any amount of values.
Channels – useful concept that can help classify devices.
For example, there is an application with two versions – free and paid. Using the code of your app you can easily set needed values in the Channels column via the update REST service.
You can specify the first channel for free and the second channel for a fee, enabling sending different push notifications for each application type. You can also add one generic channel for both application types to send information to both.
The Channels column for devices running the free version:
- [1, 3] //1 - means free and 3 means common
The Channels column for devices running the paid version:
- [2, 3] //2 - means paid app and 3 means common
In this way, sending push notifications to the first ([1]) channel will guarantee that this notification will be delivered to the free version of the app only. Sending push notifications to the second ([2]) channel guarantees that only devices with the paid version of the application will receive the message. And sending push notifications to the third channel ([3]) means that both types of the app will receive the notification.
Obtaining DeviceID and Token
The deviceID variable makes it possible to send push notifications directly to specific devices.
AngularJS
Obtaining deviceID and token in AngularJS projects has been automated by using the following code:
pushSettings = Apperyio.config('PushNotification');
pushSettings.deviceId
pushSettings.token
jQuery Mobile
Once the push notifications are enabled in App settings (with Use push notification checked), the application is automatically registered in the Devices collection of the database.
When the application is first launched from the device after the Device ready event, the deviceID can be retrieved by the pushNotificationDeviceID local storage variable.
Use the Device ready event and delay of 1ms to retrieve the deviceID variable:
setTimeout(function() {
    alert(localStorage.getItem('pushNotificationDeviceID'));
}, 1);
NoteThe device.uuid parameter or other
deviceIDvariables that can be retrieved by 3rd party applications are not the variables that Appery.io push notifications need to work properly. Use onlypushNotificationDeviceID.
To use this variable in mapping, define the local storage variable with the same name.
When first launched from the device, a new record with the deviceID of the phone that the application was launched from is added to the Devices collection.
To get the token parameter, use the pushNotificationToken local storage variable the same way you used deviceID:
setTimeout(function() {
    alert(localStorage.getItem('pushNotificationToken'));
}, 1);
To target a specific ID, use deviceID instead of a token because a token is issued by Apple/Google services and can be changed.
Push Notification Events
- Push initialize – fires when the app initializes a connection with the server;
- Push notification – fires when the device receives a notification. You can access message data in the handler of this event.
For example, the code below will display the push notification message: alert(event.message); (in Ionic5 projects) or alert(data.message); (in jQuery Mobile projects); - Push registration fail – fires when a device registration fails;
- Push registration success – fires when a device registration is successful.
Note!All custom data sent with a push notification can be accessed from the
event.additionalDataobject.
For more details on how to handle push notification events in Ionic projects read here.
Read here on how to add and use events in jQuery Mobile.
Reading Data from Push Notification MessagesThis blog post shows how to read data from a Push Notifications message.
Push Notification Send Errors
Sometimes sending push notifications can fail. It happens for multiple reasons. Errors are returned by Firebase Cloud Messaging, Google Cloud Messaging, or Apple Push Notification providers and shown in the Scheduled and history tab:

Some push notification errors summary:
| Error | Description | Provider |
|---|---|---|
| Invalid device token | Device token wasn't registered in FCM or was invalidated. | Firebase Cloud Messaging |
| Can't authenticate to Google. Please check Firebase Admin SDK JSON File | User has specified invalid Firebase Admin SDK JSON File. | Firebase Cloud Messaging |
| Device token has a length of [9] and not the required 64 bytes | User has specified invalid device token (token has incorrect length). | Apple Push Notification |
| Sending push notification fail: argument cannot be null | One of required parameters for sending push is missing (token, payload, api key). | |
| Invalid registration | User has not specified device token, or it is invalid. | Google Cloud Messaging |
"Error occurred while loading the keystore: keystore password was incorrect" NotificationSometimes, the error status can fire with the message "Error occurred while loading the keystore: keystore password was incorrect" while sending pushes to an iOS device:

To resolve this issue, please go back to your app Push Notifications > Settings tab and double-check that the entered password is correct and corresponds to the Push Notification Client SSL certificate you got from Apple:

Note!FCM (Firebase Cloud Messaging) error codes can be found here.
APNs (Apple Push Notification Service) error codes can be found here (Table 5-1).
GCM (Google Cloud Messaging) error codes can be found here.See also Push Notification REST API.
More Help Resources
More help resources are linked to the blog, our YouTube channel , and other websites.
Updated 8 months ago