Amazon AWS RDS
Connecting to Amazon RDS service.
Introduction
In this tutorial, you’ll learn how to create an account with the Amazon web service (AWS), set up your external relational database and connect it for using with Appery.io API Express.
Creating Amazon AWS Account
- Open the link – https://aws.amazon.com.
- Click Create a Free Account and complete the registration.
Appery.io API Express: How to Set Up and Connect a Relational DB into Your Project
You can also check this video for instructions on how to:
- Set up a relational database using Amazon Web Services
- Create a db table and populate it with data using pgAdmin software.
- Create and define the database connection and generate and test an API express service to expose the DB data.
Creating Database
- After your registration has been completed, you can login with your account on the main page.
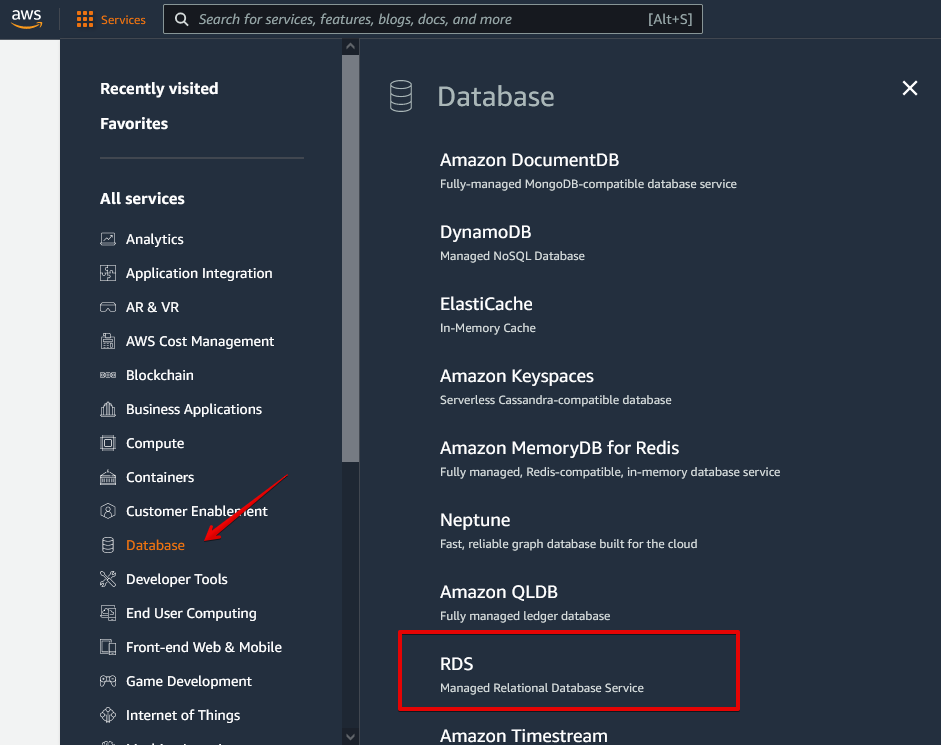
After successful login, you’ll get access to the Amazon Web Services console. - Select Database > RDS:
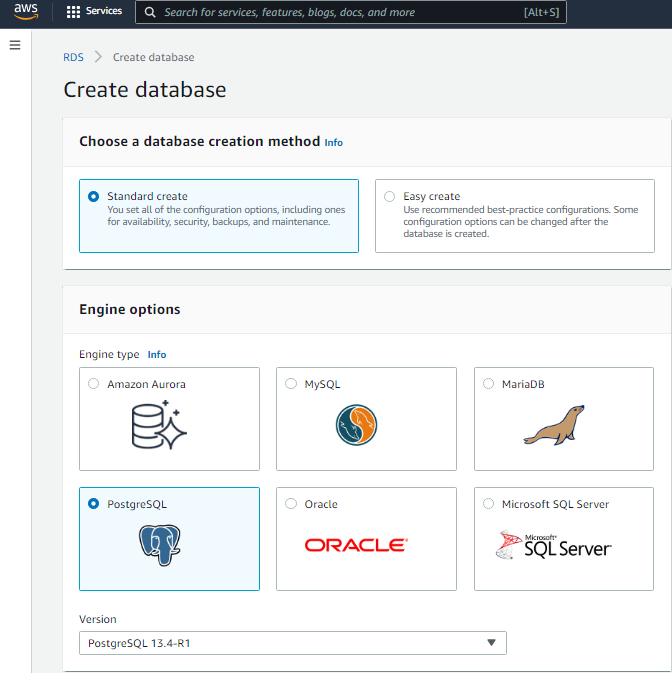
- On the next page, click Create database:

- Choose the Standard create database creation method.
- For Engine options, select PostgreSQL and the PostgreSQL 13.4-R1 version:
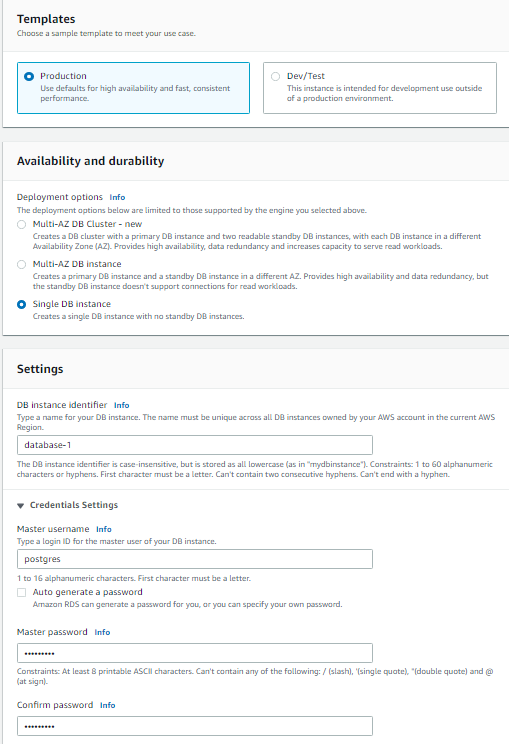
- Keep the Production template selected.
- In the Availability and durability section, choose Single DB instance.
- Then, type a name for your DB cluster.
- Under Credentials Settings, enter the master password and confirm it:
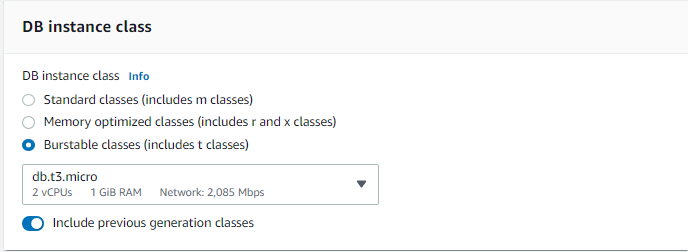
- In the DB instance class section, choose Burstable classes. In this example, we will use
db.t3.micro. Also, enable the Include previous generation classes toggle:
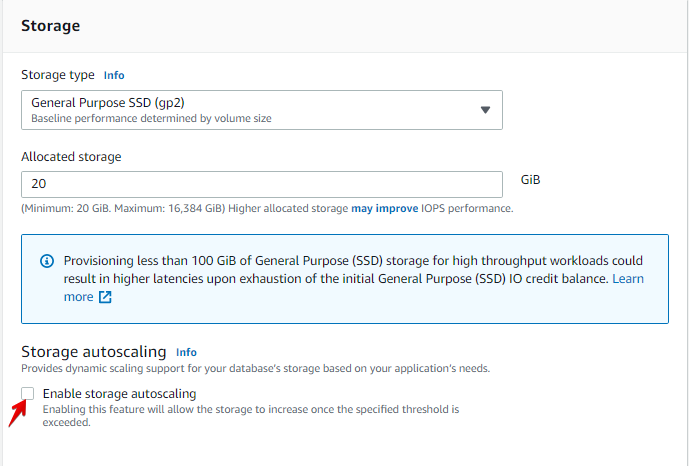
- In the Storage section, select the General Purpose SSD (gp2) option and disable the Enable storage autoscaling check box:
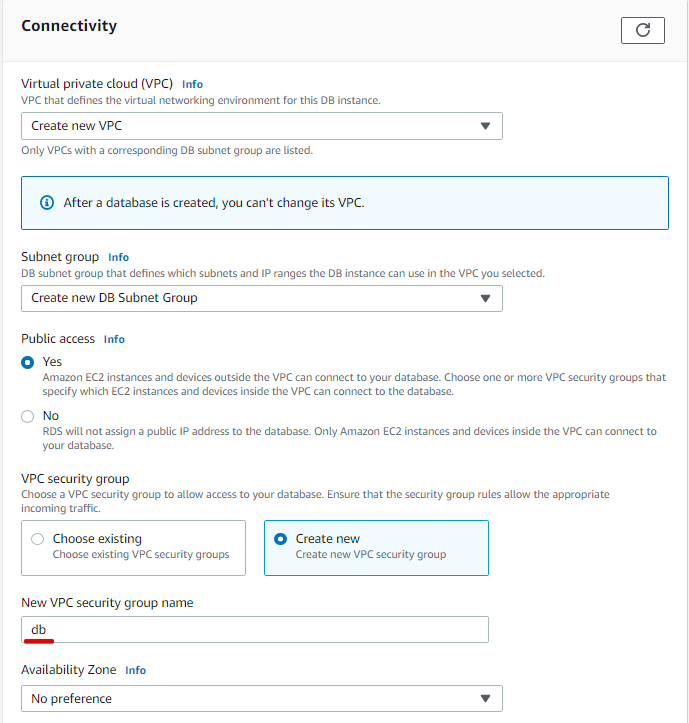
- In the Connectivity section, select Create new VPC, set the Public access option to Yes; for the VPC security group, enable Create new and enter the New VPC security group name = db:
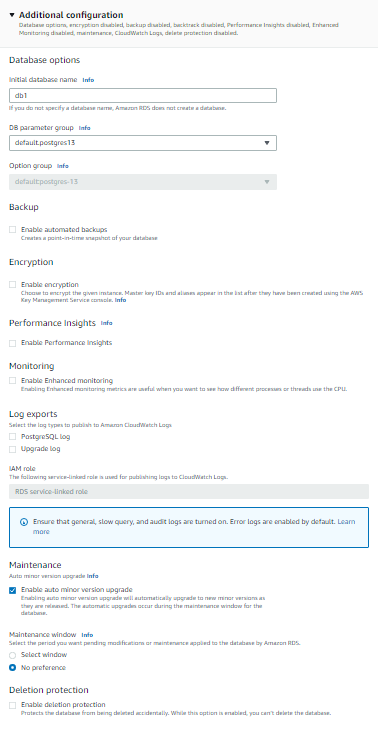
- Unfold the Additional configuration section, for Initial database name, enter db1 and then disable the following options:
- Enable automated backups
- Enable encryption
- Enable Performance Insights
- Enable Enhanced monitoring
- Enable deletion protection:
Note!
Additional configuration settings depend on your development and budgeting needs and may vary.
- Click Create database:

- Now, you can review your AWS database:

- Select the database, scroll down to the Security group rules section, and then choose Inbound for the first security group:

- Now, let’s click it to review the security group:

- Select the db security group in the Inbound rules tab and then click the Edit inbound rules button:
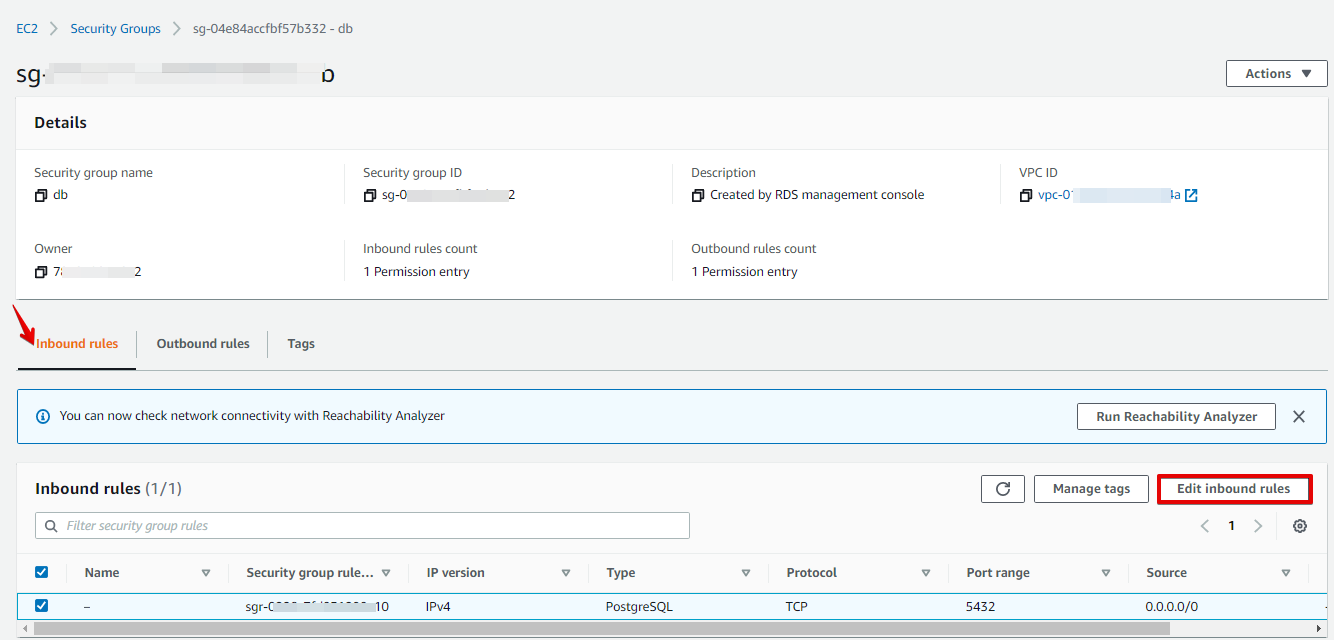
- Choose the Anywhere-IPv4 option for its source and then click Save rules:

You should receive the confirmation message stating that your inbound security group rules have been successfully modified.
Important!
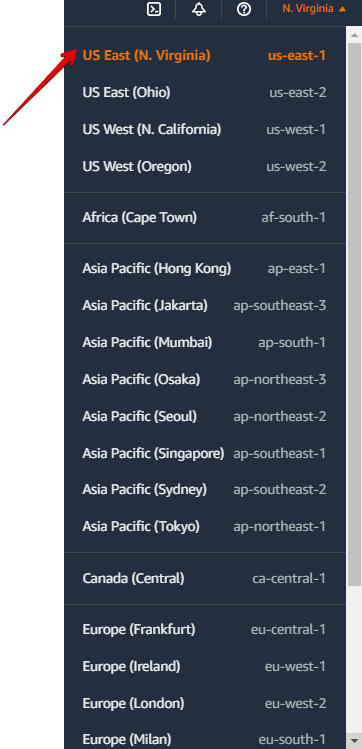
Note that account settings are region-dependent.
In our example, we were using the us-east=1 region but you might need to modify them according to your region:
Creating Database Table
Now, to start working with API Express, we need to create a table(s) by using special database tools.
- Let’s take, as an example, pgAdmin: https://www.pgadmin.org/download/ and save it to the drive.
- Install it and run on your machine.
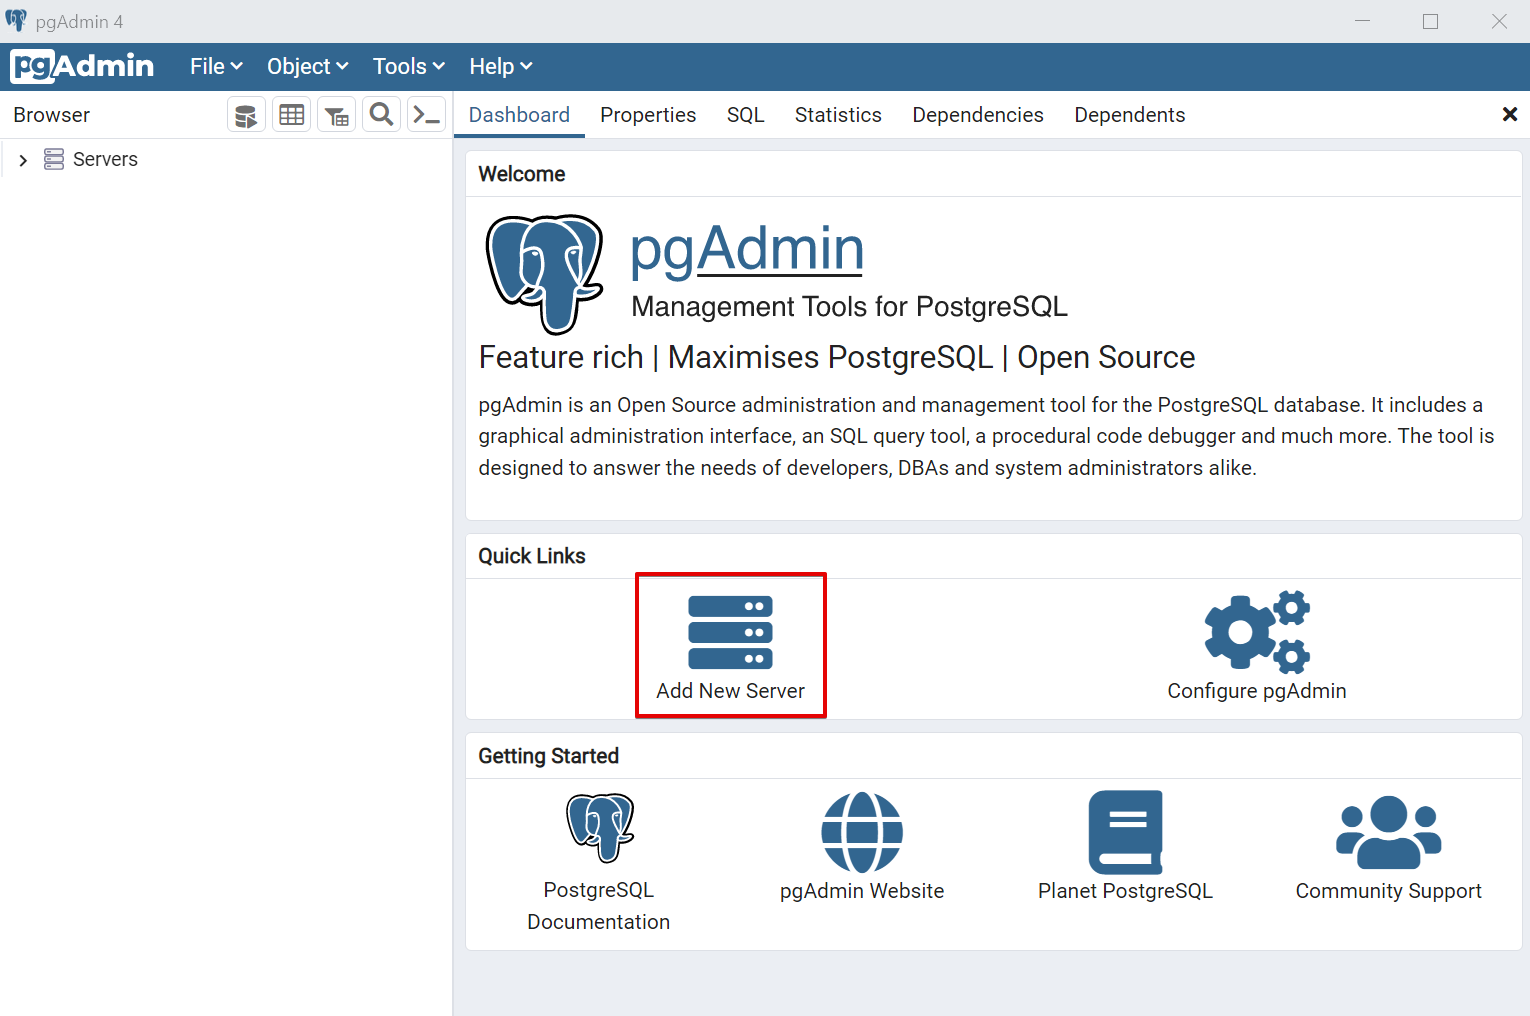
- On the main app page, click Add New Server:
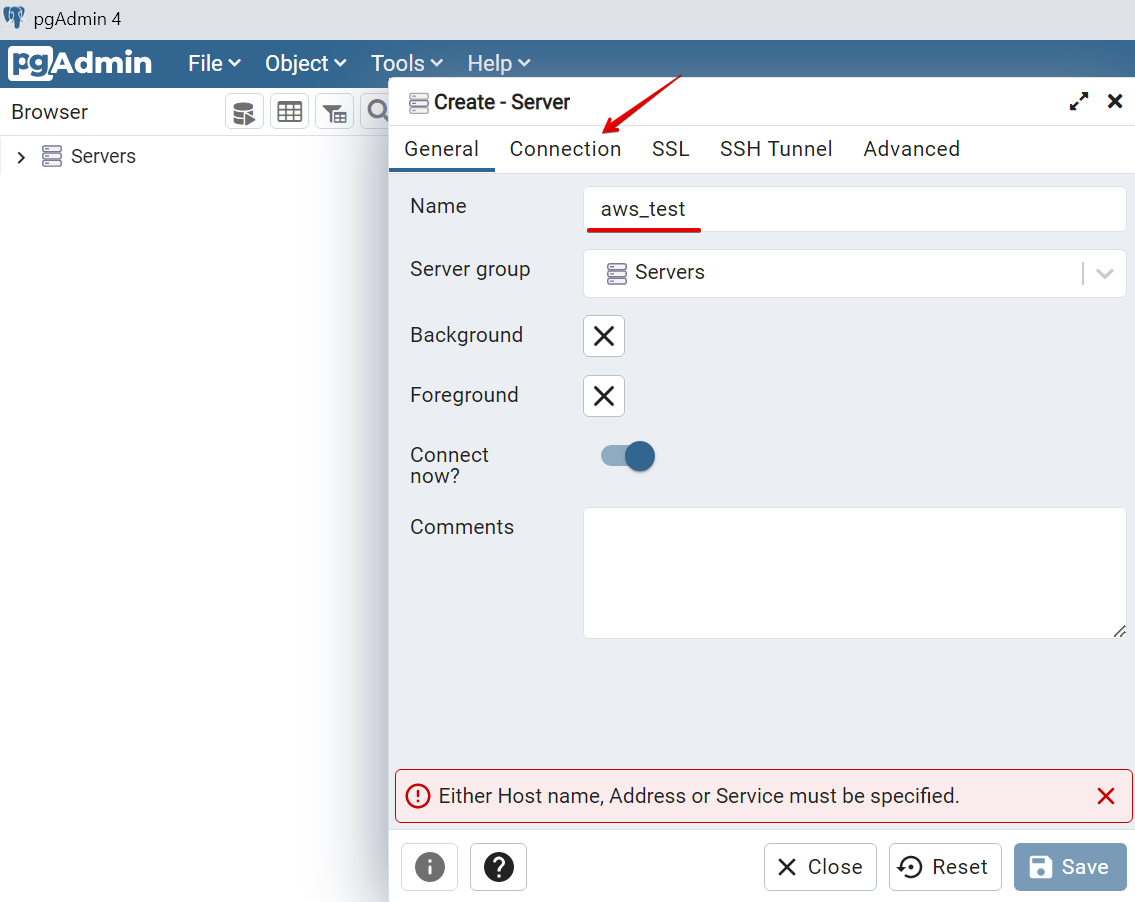
- Under the Connection tab, enter the server name: aws_test:
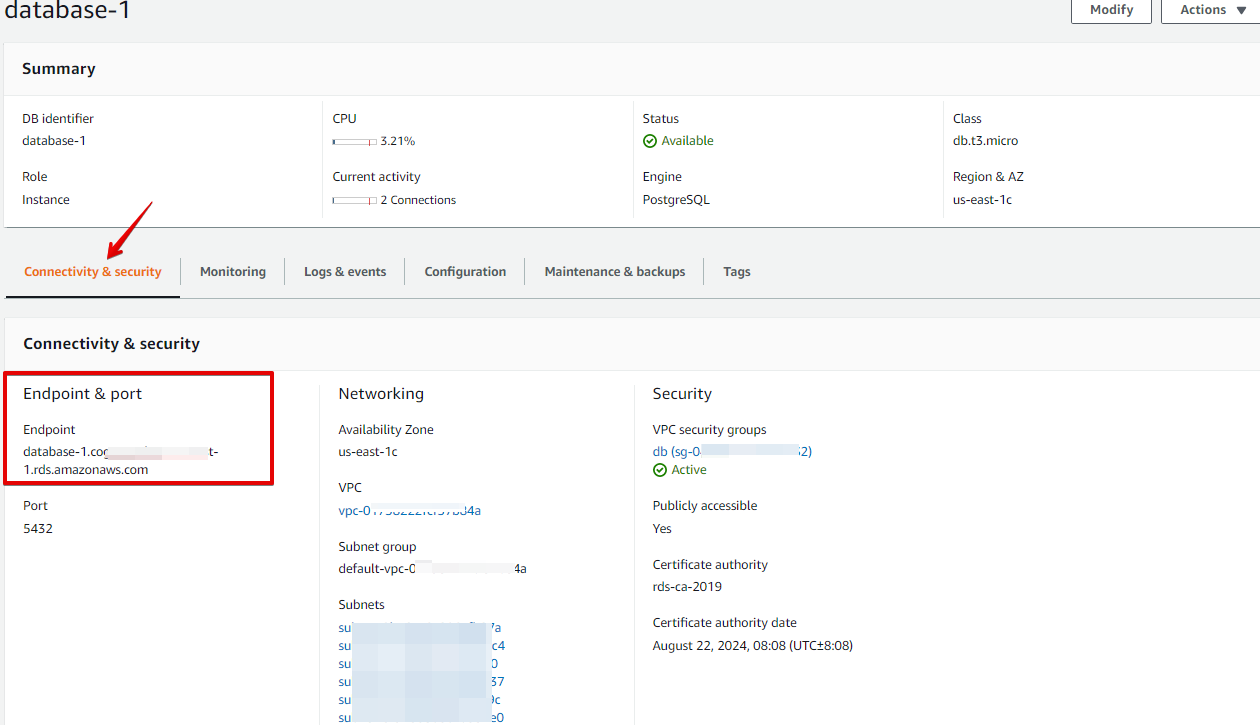
- After that, click the Connection tab and enter the host name/address obtained from the Amazon database Endpoint, Maintenance database = db1, Username = postgres, Password, then enable the Save password? toggle and then click the Save button:
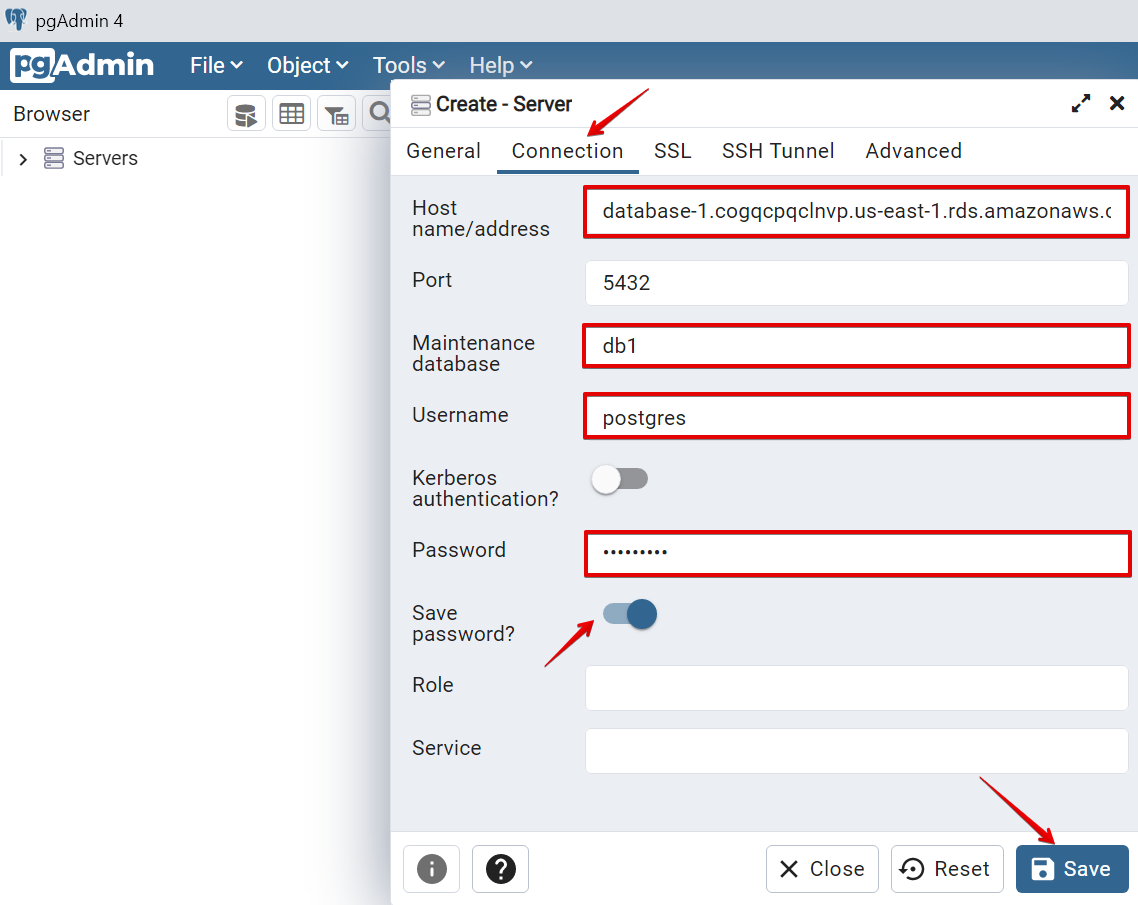
Host name/address can be found in the AWS database Connectivity & security section as the Amazon database Endpoint:
- In the aws_test tree, click Databases > db1> Schemas > Tables, then right click Create > Table:
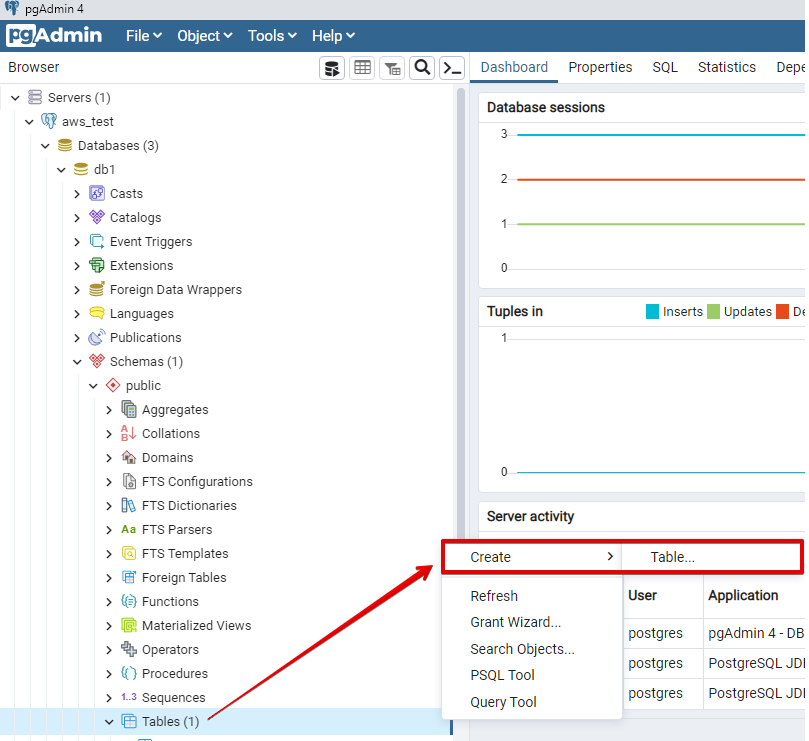
- Right-click on Tables, then select New Table.
- In the new window, enter the table name, for example, *test and switch to the Columns tab:
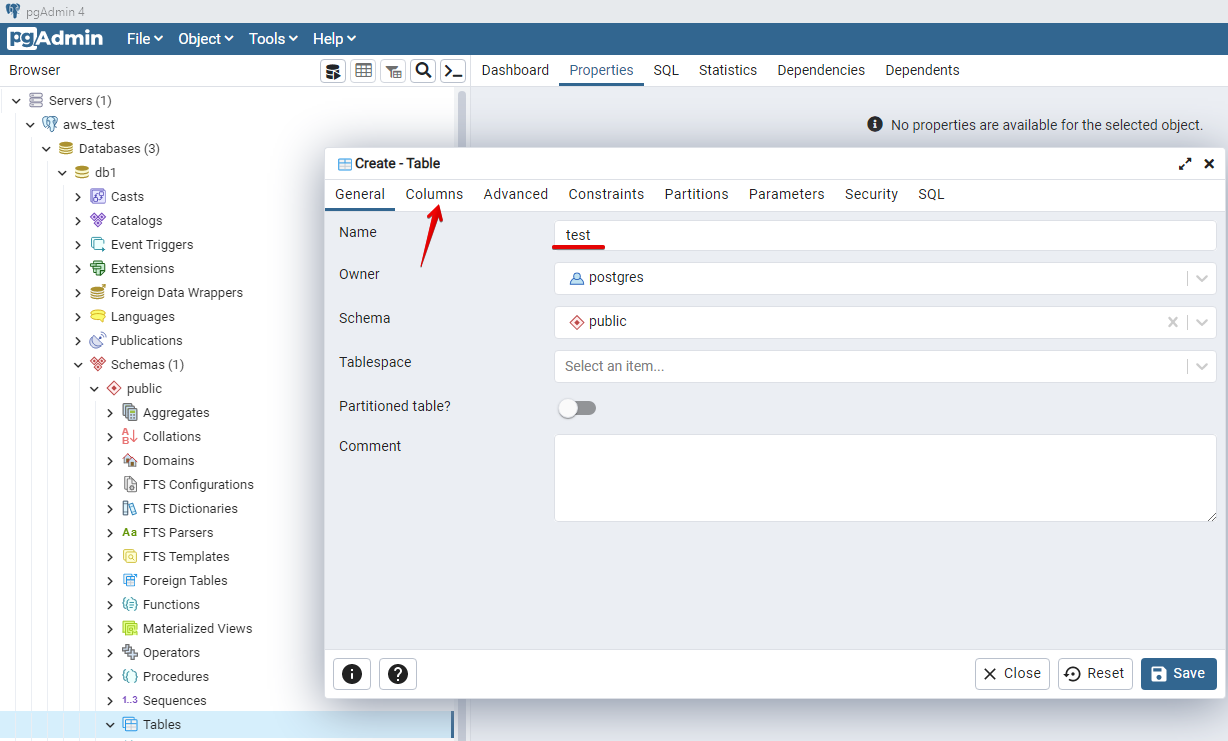
- Add the columns to your table by clicking the + button and defining their names and types.
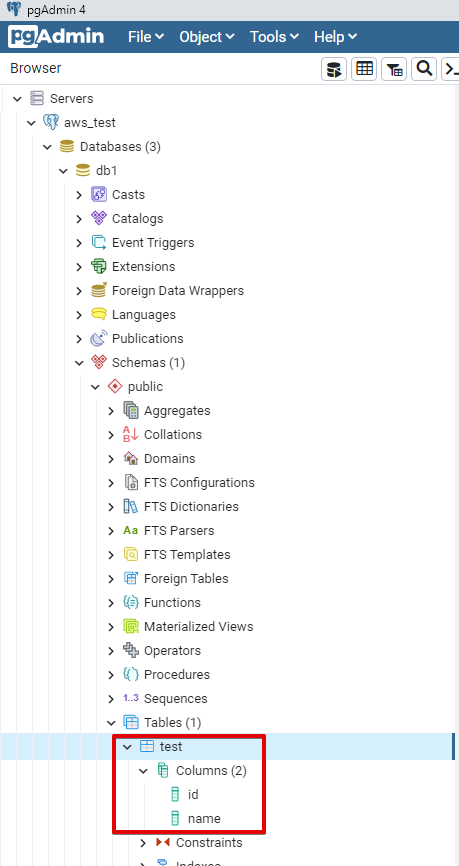
In our example, we add two columns: (id of the serial data type (will automatically be modified to integer) and name of the character varying data type with Length/Precision value set to 100). Also, enable the Not Null? and Primary key? toggles for the id column:
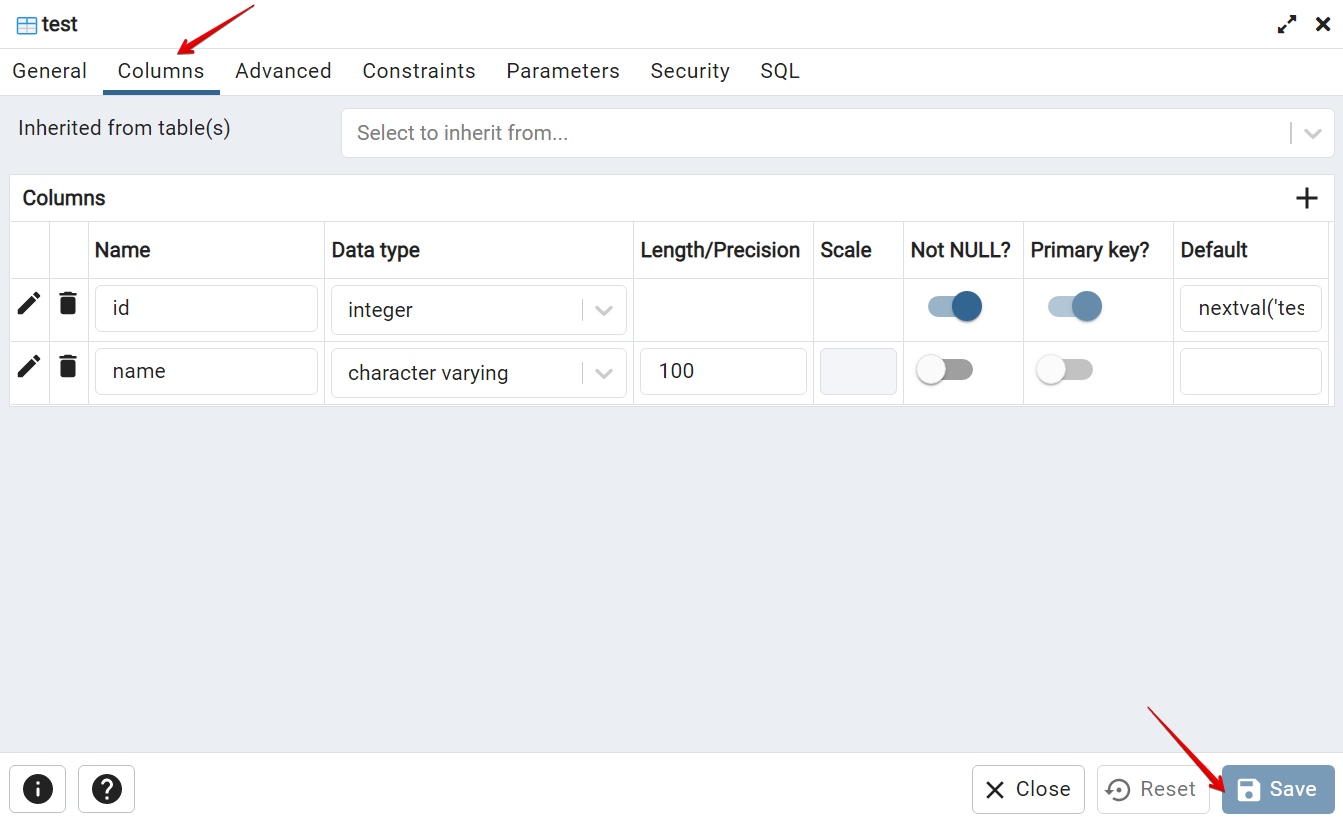
- Click Save: a new table appears on the list:
Filling Table with Data
Let’s add some data to the table.
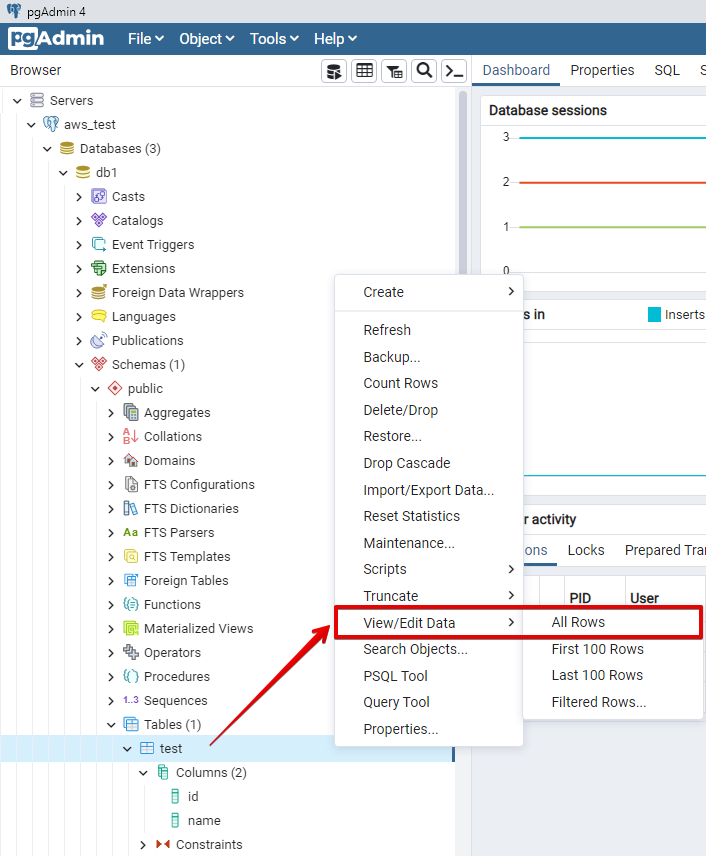
- In the pgAdmin application, right-click on the table (here it’s the test table), then select View/Edit Data, and then All Rows:
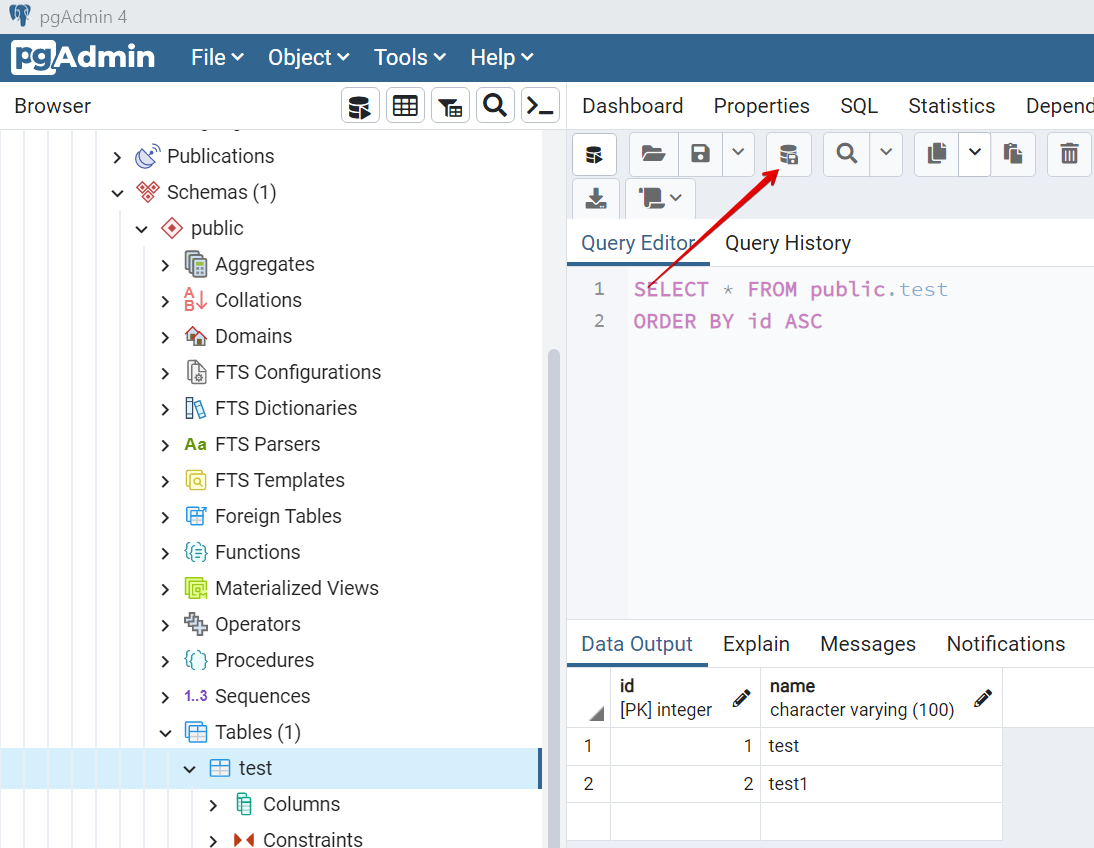
- In the new page, enter some data into the fields provided and click the Save Data Changes button:
Primary Key
Make sure that the table has a primary key defined.
Now, when we have a table filled in, let’s create an API Express project to check how our model works.
Configuring Firewall Rules
Please note, that you might need to follow the steps in Exposing Your Database to API Express to configure firewall rules.
Adding Database Connection to API Express
- In the Appery.io Visual Builder, go to the API Express tab.
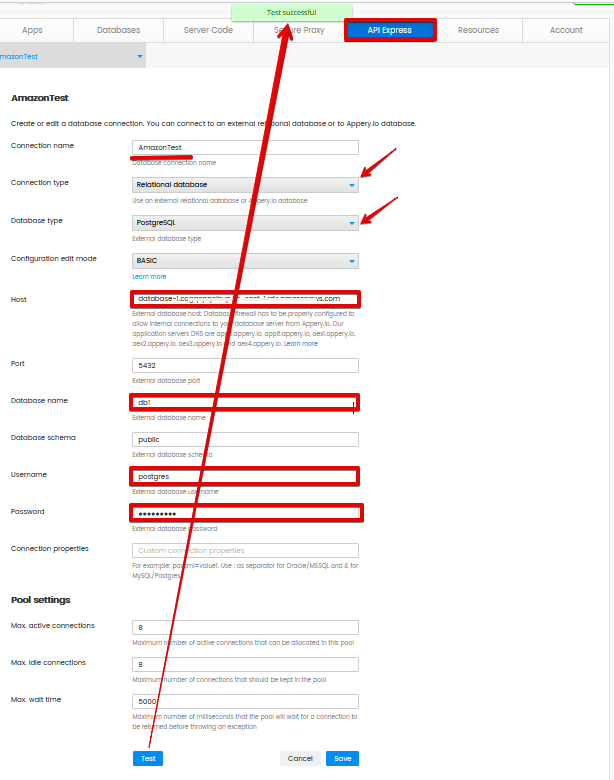
- There, click Create new DB connection, fill in all the required information: enter the connection name, select Relational database for Connection type, and, for Database type, select PostgreSQL. For Host, enter the Amazon database Endpoint that can be found in the AWS database Connectivity & security section (see Step 5 in the Creating Database Table.
- Also, enter the database name (db1), Username (postgres), and the password.
- To ensure it works correctly, click Test:
- Then click Save.
- Now, let’s create a new project: under the same API Express tab, click Create new project, enter its name, for example AmazonTestProject, and click Create:
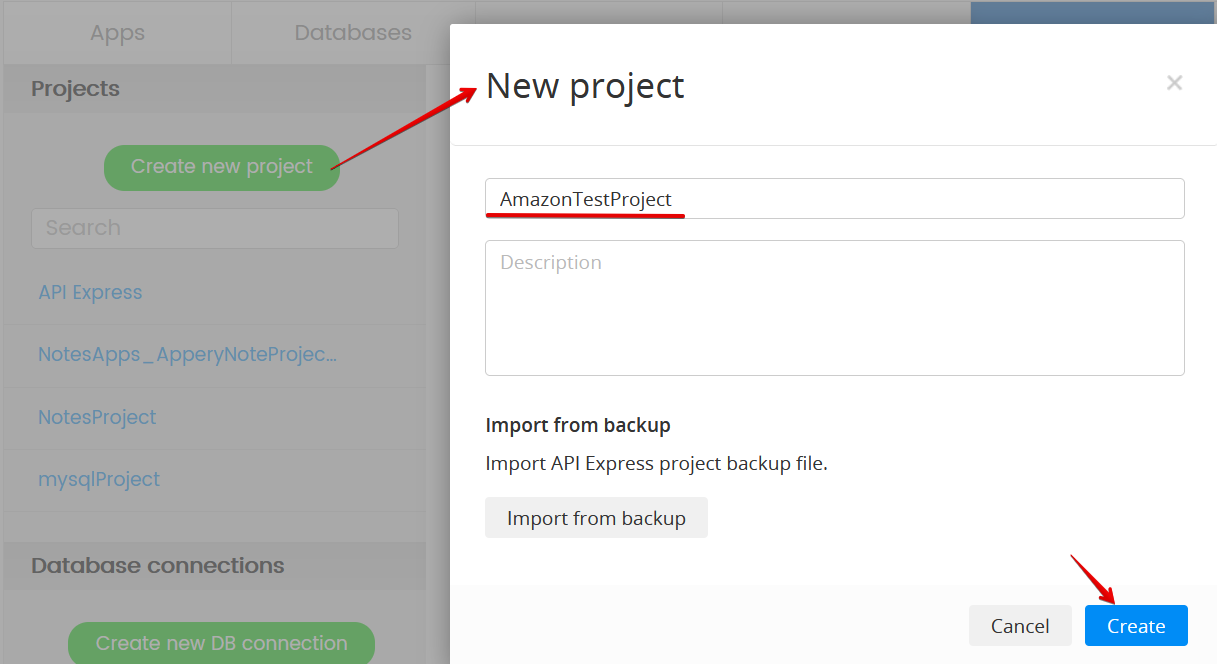
- Open the project and click the new service link:

- In the new window, enter the service name, select the connection and table, then click the Generate service link:
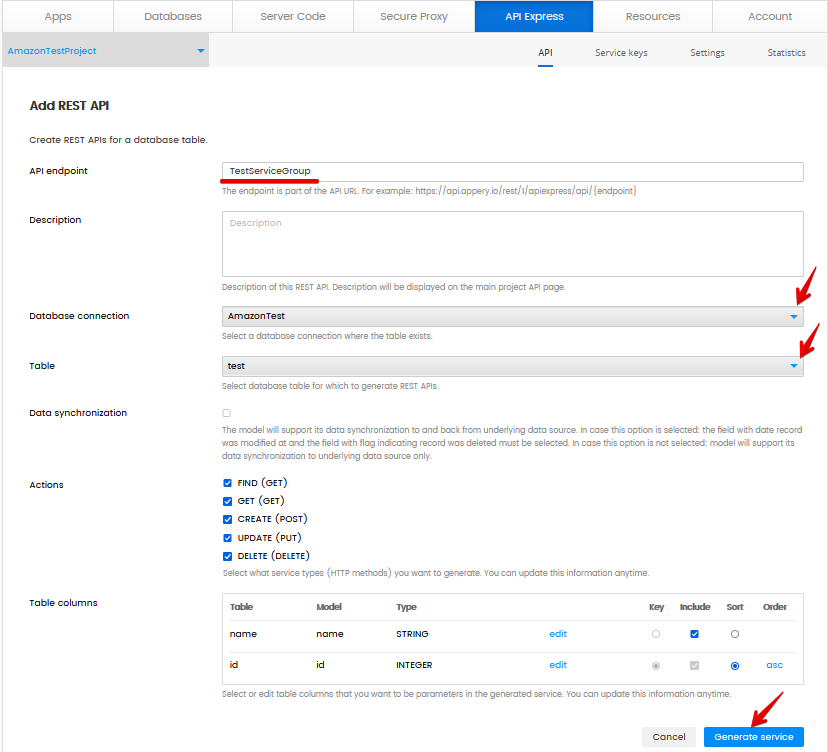
- The model is saved and can now be tested under the API Express menu:
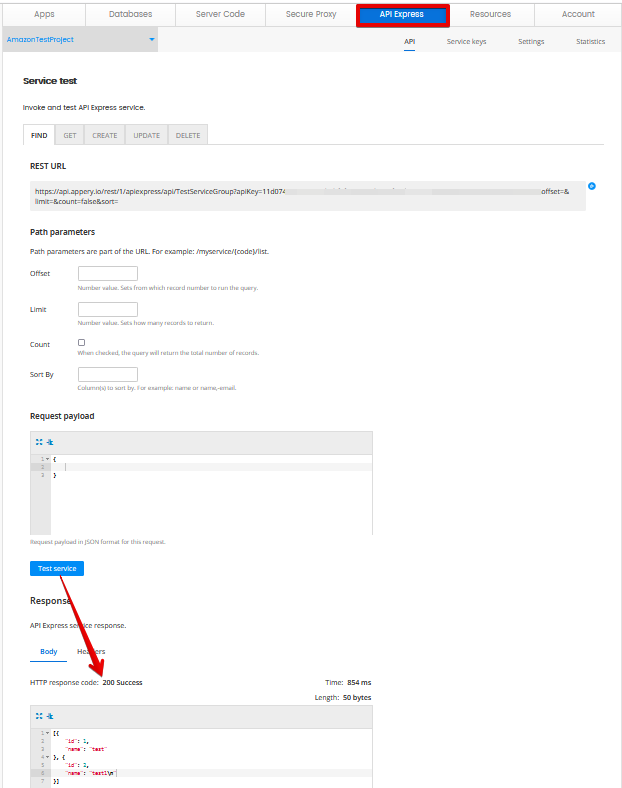
Updated 6 months ago
